Make your holiday gatherings unforgettable with these 34 festive Christmas party food recipes! Whether you’re hosting an intimate family dinner or a grand holiday celebration, we’ve gathered crowd-pleasing appetizers, stunning mains, and decadent desserts that will have everyone asking for seconds. From classic favorites to creative twists, these dishes are sure to spread joy and deliciousness throughout your seasonal festivities. Let’s dive into the ultimate holiday menu!
Gingerbread Spiced Glazed Ham
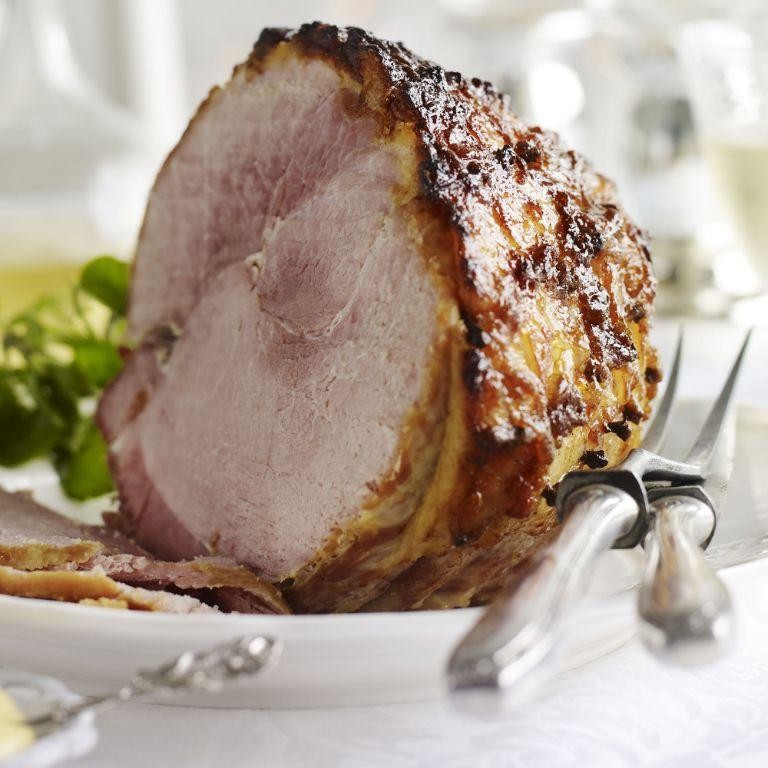
Finally, here’s a holiday ham that actually tastes as good as it smells. You’re going to love how the warm spices cling to every slice, and that sticky-sweet glaze makes it the star of any dinner table. It’s the kind of centerpiece that’ll have everyone asking for your secret.
1
ham15
minutes105
minutesIngredients
– 1 (8-10 lb) fully cooked spiral-cut ham (I find the spiral cuts hold the glaze beautifully)
– 1 cup dark brown sugar, packed (the deep molasses flavor works best here)
– 1/2 cup pure maple syrup (skip the pancake syrup—real maple makes all the difference)
– 1/4 cup Dijon mustard (this adds a nice tangy balance to the sweetness)
– 2 tsp ground ginger (freshly ground if you have it, but the jarred stuff works fine)
– 1 tsp ground cinnamon (I always use Ceylon cinnamon for its subtle warmth)
– 1/2 tsp ground cloves (just enough to give that classic gingerbread depth)
– 1/4 tsp ground nutmeg (freshly grated nutmeg really elevates the whole spice blend)
Instructions
1. Preheat your oven to 325°F and position a rack in the lower third of the oven.
2. Place the spiral-cut ham cut-side down in a roasting pan. Tip: Lining the pan with foil makes cleanup much easier.
3. In a medium bowl, whisk together the dark brown sugar, maple syrup, Dijon mustard, ground ginger, cinnamon, cloves, and nutmeg until completely smooth.
4. Brush half of the gingerbread spice glaze evenly over the entire surface of the ham, making sure to get between the spiral cuts.
5. Cover the ham tightly with foil and bake at 325°F for 1 hour and 15 minutes. Tip: The foil trap keeps the ham moist while it heats through.
6. Remove the ham from the oven and carefully take off the foil—watch for steam!
7. Brush the remaining glaze over the ham, again working it into all the spiral cuts.
8. Return the ham to the oven, uncovered, and bake for another 25-30 minutes until the glaze is bubbly and caramelized. Tip: The internal temperature should reach 140°F when checked with a meat thermometer.
9. Let the ham rest on a cutting board for 15 minutes before slicing to allow the juices to redistribute.
You’ll notice the glaze forms this gorgeous crackly crust that gives way to incredibly moist, spiced meat underneath. That sweet-spicy balance makes it perfect sliced thin for sandwiches the next day, or serve it warm with roasted sweet potatoes to really lean into those cozy gingerbread flavors.
Cranberry Brie Bites
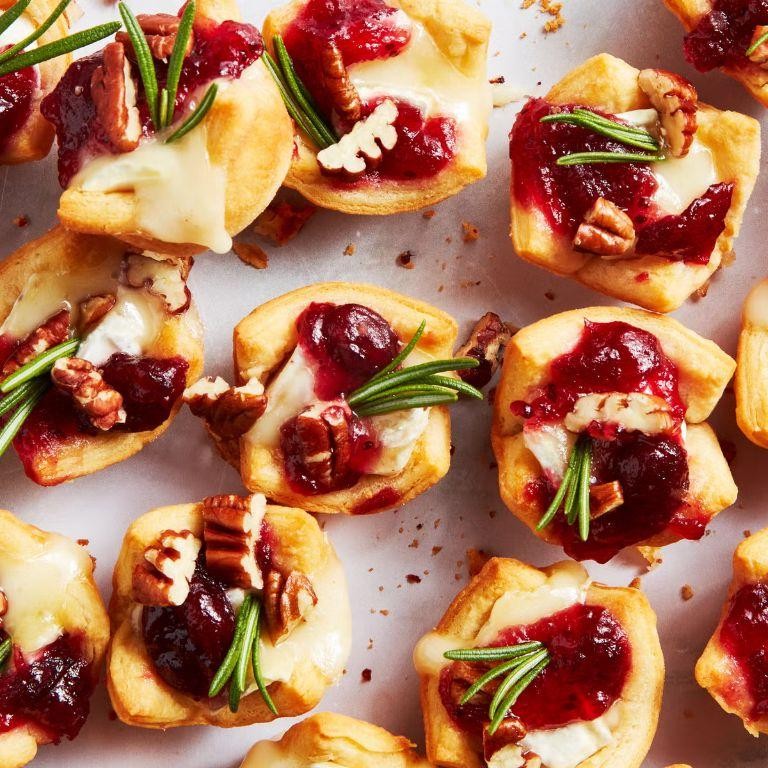
Wondering what to bring to your next holiday party? These cranberry brie bites are always the first to disappear from any platter. They’re buttery, cheesy, and just sweet enough to make everyone ask for the recipe.
24
bites15
minutes15
minutesIngredients
– 1 sheet frozen puff pastry, thawed (I like to let it sit on the counter for about 40 minutes—it’s easier to work with)
– 1 wheel (8 oz) brie cheese, rind removed and cut into ½-inch cubes (the rind is edible, but I find it melts better without it)
– ½ cup whole berry cranberry sauce (homemade or the good canned kind—both work!)
– 1 tbsp fresh thyme leaves, plus extra for garnish (fresh makes all the difference here)
– 1 large egg, lightly beaten (room temp helps it brush on smoothly)
– 2 tbsp honey for drizzling (warm it slightly so it flows nicely)
Instructions
1. Preheat your oven to 400°F and line a baking sheet with parchment paper.
2. Unfold the thawed puff pastry sheet on a lightly floured surface and roll it out to a 10×12-inch rectangle.
3. Cut the pastry into 24 equal squares using a sharp knife or pizza cutter.
4. Press each square into the cups of a mini muffin tin—this keeps them from spreading too much.
5. Place one cube of brie into each pastry cup.
6. Top each with 1 teaspoon of cranberry sauce.
7. Sprinkle fresh thyme leaves evenly over all the bites.
8. Brush the exposed edges of the pastry with the beaten egg—this gives them that golden shine.
9. Bake for 12-15 minutes until the pastry is puffed and golden brown.
10. Remove from oven and let cool in the pan for 2 minutes before transferring to a wire rack.
11. Drizzle warm honey over the bites just before serving.
Let these cool just enough so you don’t burn your tongue—that melted brie is dangerously hot! The flaky pastry gives way to gooey cheese and tart cranberry, with the honey adding a lovely sweetness. I love serving these on a wooden board with extra thyme sprigs scattered around for a festive touch.
Holiday Stuffed Mushrooms
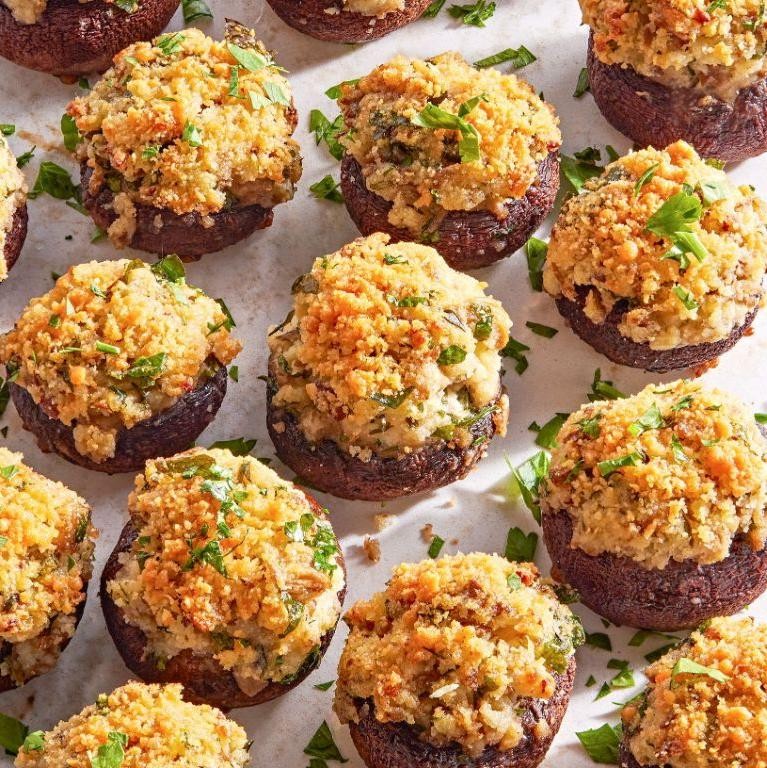
Zesty holiday gatherings just wouldn’t be complete without these crowd-pleasing stuffed mushrooms. You’re going to love how these savory bites disappear from the platter in minutes. They’re the perfect make-ahead appetizer that always impresses.
24
portions20
minutes26
minutesIngredients
– 24 large white mushrooms (look for ones with deep caps that will hold lots of filling)
– 1/2 cup panko breadcrumbs (I prefer panko over regular for that extra crunch)
– 8 oz cream cheese, softened to room temperature (this makes mixing so much easier)
– 1/2 cup grated Parmesan cheese (the good stuff from the refrigerated section)
– 1/4 cup finely chopped fresh parsley
– 3 cloves garlic, minced (fresh is best here for that punchy flavor)
– 2 tbsp extra virgin olive oil (my go-to for roasting)
– 1/2 tsp smoked paprika
– 1/4 tsp black pepper
– 1/4 tsp salt
Instructions
1. Preheat your oven to 375°F and line a baking sheet with parchment paper.
2. Gently twist the stems from all 24 mushrooms and set the caps aside.
3. Finely chop the mushroom stems until they resemble coarse crumbs.
4. Heat 1 tablespoon of olive oil in a skillet over medium heat for 30 seconds.
5. Add the chopped mushroom stems and cook for 5 minutes until they release their moisture and turn golden brown.
6. Add the minced garlic and cook for 1 minute until fragrant.
7. Transfer the mushroom stem mixture to a medium bowl and let it cool for 5 minutes.
8. Add the softened cream cheese, Parmesan cheese, panko breadcrumbs, parsley, smoked paprika, black pepper, and salt to the bowl.
9. Mix all ingredients thoroughly until well combined.
10. Spoon the filling mixture evenly into the 24 mushroom caps, mounding it slightly.
11. Arrange the stuffed mushrooms on the prepared baking sheet about 1 inch apart.
12. Drizzle the remaining 1 tablespoon of olive oil over the stuffed mushrooms.
13. Bake at 375°F for 18-20 minutes until the mushrooms are tender and the tops are golden brown.
14. Let the mushrooms rest for 5 minutes before serving.
Now these beauties are ready to shine! Notice how the mushroom caps become tender while the cheesy filling develops a lovely golden crust. Nothing beats serving them warm from the oven when the Parmesan forms that irresistible crispy edge that everyone fights over.
Roasted Chestnut and Sage Dip

Ever find yourself craving something cozy and unique for your next gathering? This roasted chestnut and sage dip is that unexpected star that’ll have everyone asking for the recipe. It’s perfect for autumn evenings when you want something warm and comforting.
3
servings15
minutes11
minutesIngredients
– 2 cups roasted chestnuts (I like buying them pre-roasted to save time)
– 1/4 cup fresh sage leaves (fresh makes all the difference here)
– 3 cloves garlic (go for the plump ones)
– 1/2 cup sour cream (full-fat gives the creamiest texture)
– 1/4 cup olive oil (extra virgin is my go-to for better flavor)
– 1 tsp lemon juice (freshly squeezed, not bottled)
– 1/2 tsp salt (I prefer sea salt for this recipe)
– 1/4 tsp black pepper (freshly ground if you have it)
Instructions
1. Preheat your oven to 400°F and line a baking sheet with parchment paper.
2. Roughly chop the roasted chestnuts into smaller pieces for easier blending.
3. Spread the chestnuts and whole garlic cloves evenly on the prepared baking sheet.
4. Bake for 8 minutes at 400°F until the garlic becomes fragrant and slightly golden.
5. While those bake, heat olive oil in a small skillet over medium heat for 2 minutes.
6. Add fresh sage leaves to the hot oil and fry for exactly 45 seconds until crisp.
7. Remove the sage leaves with a slotted spoon and place them on a paper towel.
8. Transfer the baked chestnuts and garlic to a food processor.
9. Add the fried sage leaves, reserving the sage-infused oil.
10. Pulse the mixture 5 times until coarsely chopped.
11. Add sour cream, lemon juice, salt, and black pepper to the food processor.
12. Blend for 1 full minute until the mixture becomes completely smooth.
13. While the processor runs, slowly drizzle in the reserved sage oil through the feed tube.
14. Scrape down the sides of the bowl with a spatula to incorporate everything evenly.
15. Blend for another 30 seconds until the dip reaches a creamy, spreadable consistency.
16. Transfer the dip to a serving bowl and let it rest for 10 minutes before serving.
Creamy with subtle earthy notes, this dip has that perfect balance between the nutty chestnuts and aromatic sage. The texture is wonderfully smooth yet substantial enough to hold up on crackers or apple slices. Try serving it warm with crostini or as an unexpected spread for your favorite sandwiches—it transforms ordinary bread into something truly special.
Pomegranate and Goat Cheese Crostini

Aren’t you always looking for that perfect appetizer that looks fancy but comes together in minutes? Pomegranate and goat cheese crostini is your answer—it’s the ideal blend of creamy, crunchy, and sweet that’ll have everyone asking for the recipe. You’ll love how these little toasts brighten up any gathering with minimal effort.
1
baguette15
minutes10
minutesIngredients
- 1 baguette, sliced into ½-inch thick pieces (I like using day-old bread for extra crunch)
- 8 oz goat cheese, at room temperature (this makes spreading so much easier)
- 1 cup pomegranate arils (the jewel-like seeds add such beautiful color)
- 2 tbsp honey (local raw honey gives the best flavor)
- 2 tbsp extra virgin olive oil (my go-to for brushing the bread)
- ¼ cup fresh mint leaves, chopped (fresh makes all the difference here)
- ½ tsp flaky sea salt (Maldon salt creates the perfect salty crunch)
Instructions
- Preheat your oven to 375°F and line a baking sheet with parchment paper.
- Arrange the baguette slices in a single layer on the prepared baking sheet.
- Brush both sides of each bread slice lightly with olive oil using a pastry brush.
- Bake the bread slices for 8-10 minutes until golden brown and crisp around the edges.
- Remove the toasted bread from the oven and let cool completely on a wire rack.
- Spread about 1 tablespoon of room temperature goat cheese evenly on each cooled crostini.
- Sprinkle pomegranate arils generously over the goat cheese layer.
- Drizzle honey in a zigzag pattern across the assembled crostini.
- Top each crostini with chopped mint leaves and a pinch of flaky sea salt.
- Arrange the finished crostini on a serving platter and serve immediately.
Now you’ve got these gorgeous little bites with the perfect contrast of creamy goat cheese against the crisp bread. The sweet-tart pomegranate seeds pop in your mouth while the mint adds that fresh finish. Nothing beats serving these on a wooden board with a glass of crisp white wine for the ultimate appetizer experience.
Maple-Glazed Bacon-Wrapped Dates
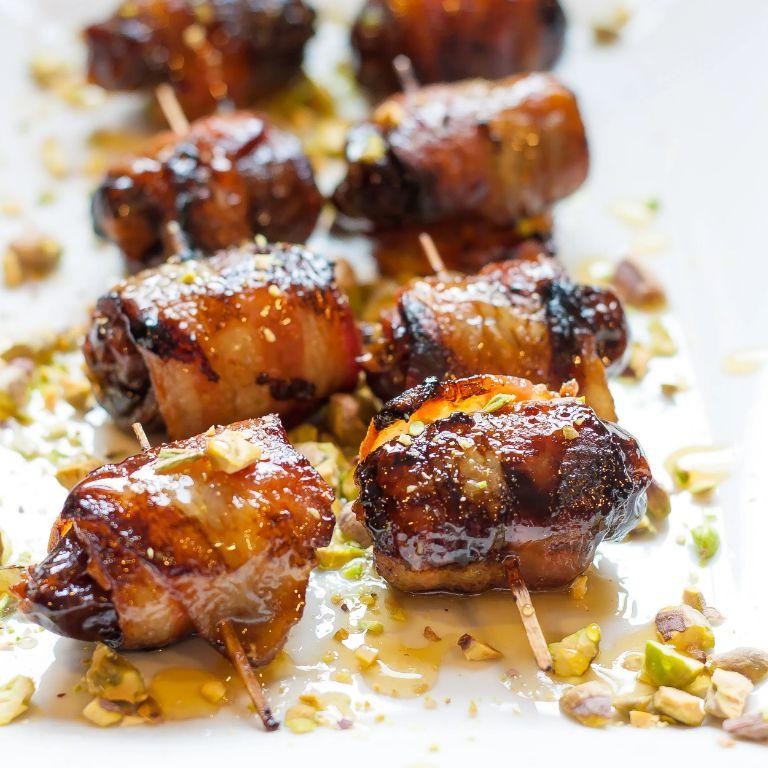
Unbelievably simple yet impressively delicious, these maple-glazed bacon-wrapped dates are the perfect party appetizer that always gets rave reviews. You’ll love how the sweet, sticky maple syrup caramelizes with the salty bacon, creating little flavor bombs that disappear within minutes.
24
dates15
minutes22
minutesIngredients
- 24 Medjool dates – I prefer the plump, juicy ones that are naturally sweet
- 12 slices thick-cut bacon – cut in half crosswise, because thin bacon tends to overcook before the dates soften
- 1/4 cup pure maple syrup – the real stuff makes all the difference here
- 1/4 teaspoon smoked paprika – my secret ingredient for that extra smoky depth
- 1/4 teaspoon black pepper – freshly ground if you have it
Instructions
- Preheat your oven to 375°F and line a baking sheet with parchment paper to prevent sticking and make cleanup easier.
- Using a small knife, make a lengthwise slit in each date and remove the pits if they aren’t already pitted.
- Wrap each date with one half-slice of bacon, securing it with a toothpick through the center where the bacon ends overlap.
- Arrange the wrapped dates in a single layer on your prepared baking sheet, making sure they aren’t touching so they cook evenly.
- In a small bowl, whisk together the maple syrup, smoked paprika, and black pepper until well combined.
- Brush each bacon-wrapped date generously with the maple syrup mixture, getting all sides coated for maximum flavor.
- Bake for 18-22 minutes until the bacon is crispy and the maple glaze is bubbling and caramelized around the edges.
- Flip each date halfway through baking using tongs to ensure even cooking and browning on both sides.
- Let the dates rest on the baking sheet for 5 minutes before serving – this allows the glaze to set and prevents burning your mouth.
Let these little gems cool just enough to handle, and you’ll be rewarded with the perfect contrast of crispy, salty bacon against the soft, sweet date interior. The caramelized maple glaze adds that irresistible sticky-sweet crunch that makes these impossible to eat just one. Try serving them alongside a creamy blue cheese dip or scattered over a bed of arugula for an unexpected salad topping that’ll wow your guests.
Christmas Tree Cheese Ball

Eager to bring some festive cheer to your holiday table? This Christmas Tree Cheese Ball is the perfect centerpiece for any gathering. You’ll love how simple it is to create something so impressive-looking.
1
cheese ball25
minutesIngredients
– 2 (8 oz) packages cream cheese, softened (I always let mine sit out for 30 minutes first)
– 1 cup shredded sharp cheddar cheese (the extra sharp gives it that nice bite)
– 1/2 cup chopped green onions, white and green parts separated
– 1/4 cup real bacon bits (I prefer the kind you find near the salad dressings)
– 1 tsp Worcestershire sauce
– 1/2 tsp garlic powder
– 1/4 tsp black pepper
– 1/4 cup finely chopped fresh parsley
– 2 tbsp sliced almonds
– 1 small red bell pepper, cut into tiny squares
Instructions
1. Place softened cream cheese in a large mixing bowl.
2. Add shredded cheddar cheese, white parts of green onions, bacon bits, Worcestershire sauce, garlic powder, and black pepper to the bowl.
3. Mix all ingredients together using a hand mixer on medium speed for 1-2 minutes until completely combined and smooth.
4. Tip: Scrape down the sides of the bowl halfway through mixing to ensure everything incorporates evenly.
5. Transfer the cheese mixture onto a large piece of plastic wrap.
6. Shape the mixture into a cone form, about 8 inches tall, using your hands to mold it.
7. Wrap the shaped cheese ball tightly in plastic wrap.
8. Refrigerate the wrapped cheese ball for at least 2 hours, or until firm enough to handle.
9. Tip: Don’t skip the chilling time – this makes decorating much easier and prevents the cheese ball from losing its shape.
10. Remove the cheese ball from refrigerator and unwrap it.
11. Press the sliced almonds into the cheese ball in overlapping rows to create “tree branches.”
12. Sprinkle the chopped parsley evenly over the entire surface to create the “pine needles.”
13. Arrange the green onion tops in a straight line down the center to form the “tree trunk.”
14. Place the red bell pepper squares randomly on the tree to look like “ornaments.”
15. Tip: Use a small offset spatula to help press decorations into place without messing up the tree shape.
16. Transfer the finished Christmas tree cheese ball to your serving platter.
Funny how something so simple can become the star of the party! The creamy texture pairs perfectly with the salty bacon and sharp cheddar, while the fresh parsley adds a bright contrast. Try serving it with an assortment of crackers and vegetable sticks around the base to complete the festive presentation.
Spiced Pumpkin Soup Shots
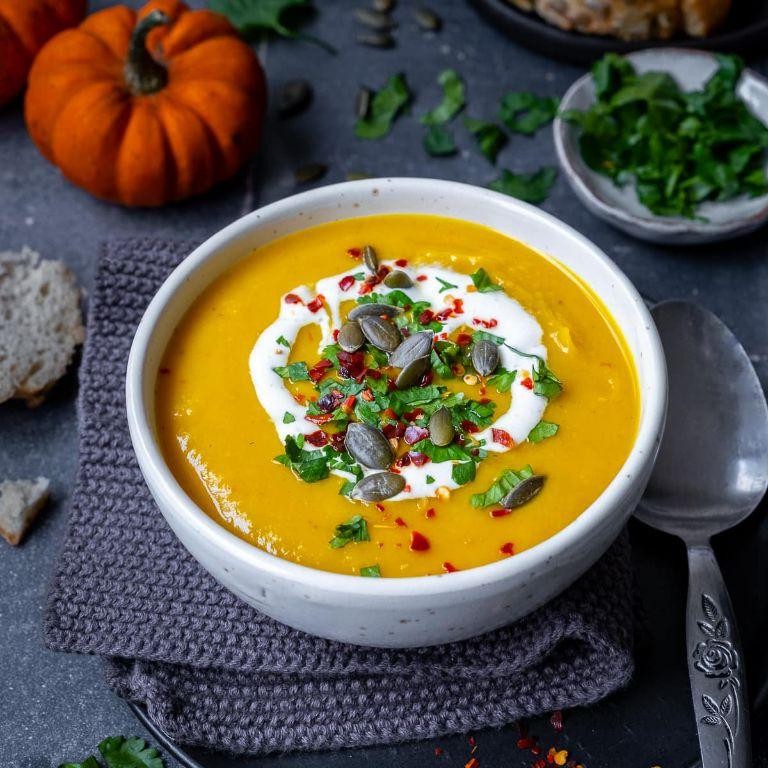
Cozy up, friends—these spiced pumpkin soup shots are the perfect little warm-up for crisp fall days. They’re creamy, just spicy enough, and so easy to whip up when you’re craving something comforting but don’t want a big production. I love making a batch to share (or not—no judgment here!).
12
shots15
minutes24
minutesIngredients
– 2 tablespoons unsalted butter (I always use unsalted so I can control the salt level)
– 1 small yellow onion, finely chopped (go for a sweet variety if you can—it balances the spices nicely)
– 2 cloves garlic, minced (fresh is best here for that punchy flavor)
– 1 (15-ounce) can pumpkin puree (not pumpkin pie filling—I’ve made that mistake before!)
– 3 cups vegetable broth (low-sodium lets the spices shine)
– 1/2 cup heavy cream (room temp blends in smoother)
– 1 teaspoon ground cinnamon
– 1/2 teaspoon ground nutmeg (freshly grated if you’re feeling fancy)
– 1/4 teaspoon cayenne pepper (adjust if you like more heat)
– 1/2 teaspoon salt
– 1/4 teaspoon black pepper
Instructions
1. Melt the unsalted butter in a large pot over medium heat.
2. Add the finely chopped yellow onion and cook for 5–7 minutes, stirring occasionally, until the onion is soft and translucent.
3. Stir in the minced garlic and cook for 1 minute until fragrant—don’t let it brown!
4. Pour in the pumpkin puree and vegetable broth, stirring to combine everything smoothly.
5. Whisk in the ground cinnamon, ground nutmeg, cayenne pepper, salt, and black pepper until no clumps remain.
6. Bring the soup to a gentle boil, then reduce the heat to low and let it simmer for 15 minutes to let the flavors meld.
7. Carefully transfer the soup in batches to a blender and blend until completely smooth (tip: hold the lid down with a towel to avoid hot splatters).
8. Return the blended soup to the pot and stir in the heavy cream over low heat until just warmed through—don’t boil it or the cream might curdle.
9. Ladle the soup into small shot glasses or cups for serving.
A velvety texture and warm spice blend make these shots irresistible—the cayenne gives a subtle kick that lingers nicely. Serve them as a starter at your next gathering, or keep them all to yourself with a sprinkle of extra cinnamon on top.
Cranberry Orange Meatballs
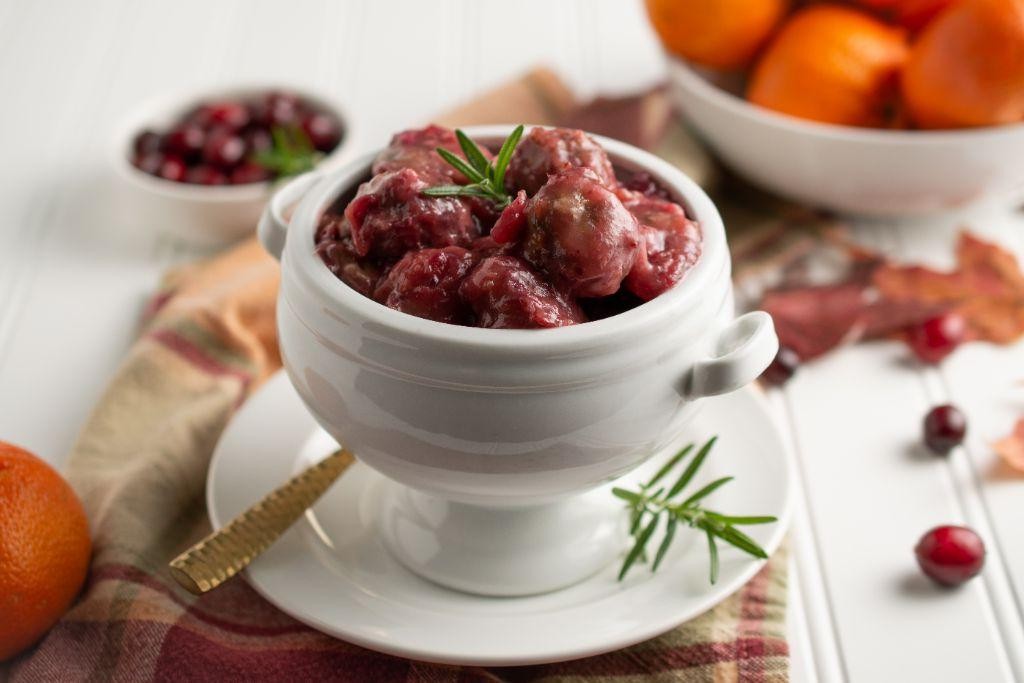
Let’s be real—sometimes you need a dish that feels fancy but comes together with minimal effort. These cranberry orange meatballs are exactly that, with a sweet-tangy sauce that’ll have everyone asking for the recipe.
2
servings15
minutes30
minutesIngredients
- 1 lb ground beef (I like 85/15 for juicier meatballs)
- 1/2 cup breadcrumbs (panko gives a nice light crunch)
- 1 large egg, lightly beaten (room temp helps it bind better)
- 1/4 cup grated onion (trust me, it keeps the meatballs moist)
- 1 tsp garlic powder
- 1/2 tsp salt
- 1/4 tsp black pepper
- 14 oz canned whole berry cranberry sauce (the jellied kind works too)
- 1/2 cup orange juice (freshly squeezed if you’re feeling extra)
- 2 tbsp soy sauce (I use low-sodium to control saltiness)
- 1 tbsp brown sugar
- 1 tsp orange zest (don’t skip this—it adds a bright pop)
Instructions
- Preheat your oven to 400°F and line a baking sheet with parchment paper.
- In a large bowl, combine the ground beef, breadcrumbs, egg, grated onion, garlic powder, salt, and pepper.
- Mix gently with your hands until just combined—overmixing can make the meatballs tough.
- Shape the mixture into 1-inch meatballs and place them on the prepared baking sheet.
- Bake for 18–20 minutes, or until the internal temperature reaches 165°F and they’re lightly browned.
- While the meatballs bake, combine the cranberry sauce, orange juice, soy sauce, brown sugar, and orange zest in a saucepan.
- Simmer the sauce over medium heat for 5–7 minutes, stirring occasionally, until it thickens slightly.
- Transfer the baked meatballs to the saucepan and toss gently to coat them in the sauce.
- Let them simmer together for 2–3 minutes so the flavors meld.
Unbelievably tender and packed with zesty-sweet flavor, these meatballs are a total crowd-pleaser. Serve them over rice for a cozy dinner, or stick toothpicks in them for an easy party appetizer—either way, they disappear fast.
Eggnog Cheesecake Bars
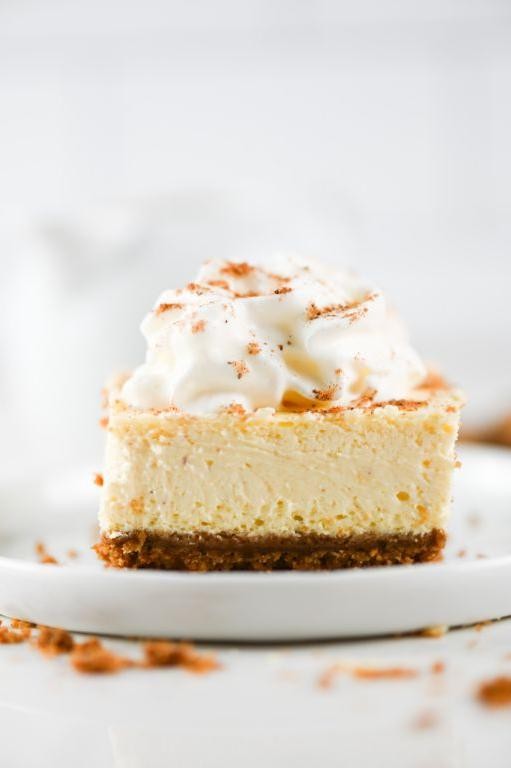
Kicking off the holiday baking season just got easier with these eggnog cheesecake bars. You get all the cozy, spiced flavor of classic eggnog in a no-fuss bar form that’s perfect for potlucks or casual gatherings. They’re creamy, festive, and way simpler than making a whole cheesecake.
16
bars20
minutes50
minutesIngredients
– 2 cups graham cracker crumbs (I like the honey kind for extra sweetness)
– 1/2 cup unsalted butter, melted (salted works too if that’s what you have)
– 16 oz cream cheese, at room temperature (this is key for smooth blending)
– 1/2 cup granulated sugar
– 2 large eggs, at room temperature (they incorporate better when not cold)
– 1 cup prepared eggnog (the richer, the better—I use store-bought to save time)
– 1 tsp vanilla extract
– 1/2 tsp ground nutmeg (freshly grated if you’re feeling fancy)
– 1/4 tsp ground cinnamon
Instructions
1. Preheat your oven to 325°F and line an 8×8 inch baking pan with parchment paper, leaving some overhang for easy removal.
2. In a medium bowl, combine the graham cracker crumbs and melted butter until the mixture resembles wet sand.
3. Press the crumb mixture firmly into the bottom of the prepared pan using the bottom of a measuring cup to create an even layer.
4. Bake the crust for 10 minutes at 325°F until lightly golden, then remove from the oven and let it cool slightly.
5. In a large mixing bowl, beat the room temperature cream cheese and sugar on medium speed for 2 minutes until smooth and no lumps remain.
6. Add the room temperature eggs one at a time, mixing just until each is incorporated to avoid overbeating.
7. Pour in the eggnog, vanilla extract, nutmeg, and cinnamon, then mix on low speed until everything is fully combined and the batter is uniform.
8. Tip: Scrape down the sides of the bowl with a spatula halfway through mixing to ensure no pockets of unmixed ingredients.
9. Pour the cheesecake filling over the pre-baked crust and spread it evenly with a spatula.
10. Bake at 325°F for 35–40 minutes, until the edges are set but the center still has a slight jiggle when you gently shake the pan.
11. Tip: Avoid opening the oven door during the first 30 minutes of baking to prevent cracks from forming.
12. Turn off the oven, crack the door open about 1 inch, and let the bars cool inside for 1 hour to prevent sudden temperature changes.
13. Remove the pan from the oven and let it cool completely on a wire rack, about 1–2 hours.
14. Tip: For clean slices, chill the bars in the refrigerator for at least 4 hours or overnight before cutting.
15. Use the parchment paper overhang to lift the bars out of the pan, then slice into squares with a sharp knife wiped clean between cuts.
For the perfect finish, these bars have a velvety, rich texture with a hint of warmth from the nutmeg and cinnamon. Serve them chilled with a dusting of extra nutmeg or a dollop of whipped cream for an extra festive touch—they’re even better the next day as the flavors meld together.
Candy Cane Caprese Skewers

Gosh, these festive skewers are the easiest holiday appetizer you’ll make this season! They combine classic Caprese flavors with a candy cane twist that’s perfect for Christmas parties. You’ll love how quickly they come together while still looking impressive on any platter.
12
skewers15
minutesIngredients
– 12 small fresh mozzarella balls (I like the pearl-sized ones for perfect bites)
– 24 cherry tomatoes (go for the sweetest ones you can find)
– 24 fresh basil leaves (pick the medium-sized ones, not too big)
– 2 tbsp extra virgin olive oil (this is where quality really matters)
– 1 tbsp balsamic glaze (the thick, syrupy kind works best)
– 1/4 tsp sea salt (I prefer flaky salt for texture)
– 1/4 tsp freshly ground black pepper
Instructions
1. Drain the fresh mozzarella balls thoroughly and pat them dry with paper towels.
2. Rinse the cherry tomatoes under cool water and pat them completely dry.
3. Pick 24 medium-sized basil leaves, making sure they’re clean and free of bruises.
4. Thread one cherry tomato onto a 6-inch skewer, pushing it about halfway down.
5. Add one fresh basil leaf by folding it gently and sliding it onto the skewer.
6. Thread one mozzarella ball next, positioning it snugly against the basil.
7. Add another folded basil leaf right after the mozzarella.
8. Finish with a second cherry tomato at the end of the skewer.
9. Repeat steps 4-8 until all 12 skewers are assembled in the candy cane pattern.
10. Arrange the completed skewers on a serving platter in a single layer.
11. Drizzle the 2 tablespoons of extra virgin olive oil evenly over all the skewers.
12. Drizzle the 1 tablespoon of balsamic glaze in zigzag patterns across the skewers.
13. Sprinkle the 1/4 teaspoon of sea salt evenly over the entire arrangement.
14. Finish by grinding the 1/4 teaspoon of black pepper over the skewers.
The cool, creamy mozzarella pairs beautifully with the juicy tomatoes and peppery basil. I love serving these on a red and white platter to really emphasize the candy cane theme—they disappear fast at holiday gatherings!
Butternut Squash and Apple Bruschetta
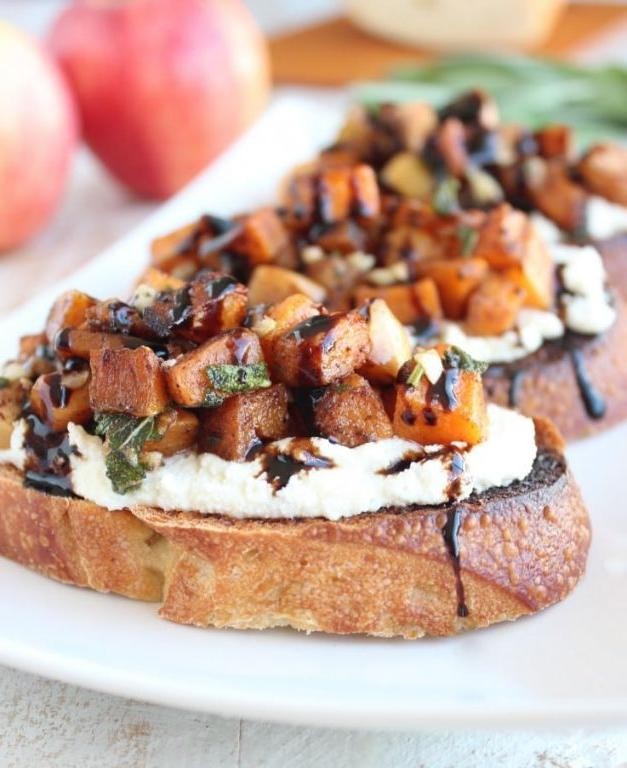
Looking for that perfect fall appetizer that screams cozy season? You’ve found it. This butternut squash and apple bruschetta combines sweet, savory, and crunchy in the most delicious way possible.
1
baguette15
minutes33
minutesIngredients
– 1 small butternut squash, peeled and cubed (about 2 cups) – I like cutting mine into ½-inch pieces for even roasting
– 2 medium apples, cored and diced – Honeycrisp are my favorite for their sweet-tart balance
– 1 baguette, sliced into ½-inch thick pieces – day-old bread works great for extra crunch
– 2 tbsp extra virgin olive oil – my go-to for roasting
– 1 tbsp maple syrup – the real stuff makes all the difference
– ¼ cup crumbled goat cheese – room temp spreads so much easier
– 1 tbsp fresh thyme leaves – fresh really elevates the flavor
– Salt and black pepper
Instructions
1. Preheat your oven to 400°F.
2. Toss the cubed butternut squash and diced apples with 1 tablespoon olive oil, maple syrup, and a pinch of salt on a baking sheet.
3. Roast for 20-25 minutes until the squash is tender when pierced with a fork and the apples are slightly caramelized.
4. While the squash mixture roasts, brush the baguette slices with the remaining 1 tablespoon olive oil.
5. Arrange the bread slices in a single layer on another baking sheet.
6. Toast the bread in the oven for 8-10 minutes until golden brown and crisp around the edges.
7. Remove both baking sheets from the oven and let the squash mixture cool for 5 minutes.
8. Gently mash about half of the roasted squash and apple mixture with a fork, leaving some chunks for texture.
9. Spread the mashed mixture evenly onto each toasted baguette slice.
10. Top each bruschetta with crumbled goat cheese and fresh thyme leaves.
11. Finish with a sprinkle of black pepper over all the bruschetta.
What makes this appetizer special is how the creamy goat cheese melts slightly against the warm squash, while the crisp baguette provides the perfect crunch. The sweet roasted apples balance the savory notes beautifully. Try serving these on a wooden board with extra thyme sprigs for a rustic fall presentation that’ll have everyone reaching for seconds.
Festive Mini Quiches

Oh my gosh, these festive mini quiches are the perfect bite-sized party food that always disappears first at my holiday gatherings. You can whip them up in under an hour, and they’re so versatile—perfect for brunch, appetizers, or even a quick breakfast on the go. Seriously, once you try these, you’ll be making them for every occasion!
12
portions20
minutes25
minutesIngredients
– 1 package (2 sheets) frozen puff pastry, thawed (I always keep an extra box in the freezer for last-minute guests)
– 6 large eggs, at room temperature for better mixing
– 1/2 cup heavy cream (this makes them extra rich and creamy)
– 1 cup shredded Gruyère cheese (my favorite for its nutty flavor)
– 1/2 cup diced ham
– 1/4 cup chopped fresh chives
– 1/4 tsp salt
– 1/8 tsp black pepper
– Cooking spray for the muffin tin
Instructions
1. Preheat your oven to 375°F and spray a 12-cup muffin tin with cooking spray.
2. Unfold the thawed puff pastry sheets on a lightly floured surface.
3. Use a 3-inch round cutter to cut 12 circles from the pastry sheets.
4. Press each pastry circle into the prepared muffin cups, forming mini crusts.
5. In a medium bowl, whisk the room temperature eggs until fully combined.
6. Add the heavy cream to the eggs and whisk until smooth.
7. Stir in the shredded Gruyère cheese, diced ham, chopped chives, salt, and black pepper.
8. Divide the egg mixture evenly among the 12 pastry-lined muffin cups, filling each about 3/4 full.
9. Bake at 375°F for 20-25 minutes until the quiches are puffed and golden brown.
10. Let the quiches cool in the pan for 5 minutes before removing.
11. Use a small offset spatula to gently lift each quiche from the muffin tin.
12. Transfer the mini quiches to a wire rack to cool slightly before serving.
Buttery, flaky pastry gives way to the most delightful creamy filling with pockets of savory ham and melty cheese. These mini quiches have that perfect balance of richness from the Gruyère and freshness from the chives. I love serving them warm on a decorative platter with extra chives sprinkled over the top—they look so fancy but are secretly so easy!
Mulled Wine Poached Pears
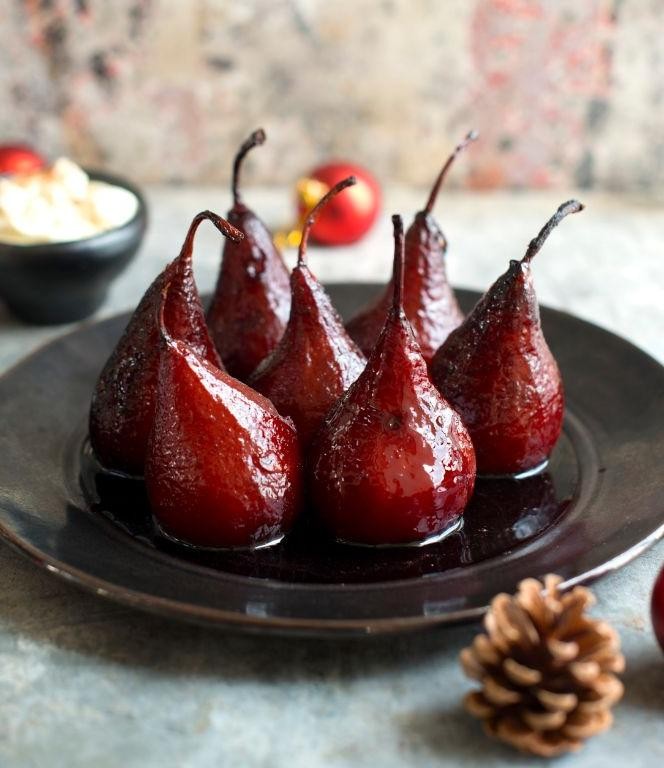
Kind of magical how a simple pear transforms into something so elegant, isn’t it? Picture this: you’re cozying up on a crisp autumn evening, and the aroma of spiced wine fills your kitchen. These mulled wine poached pears are your new secret weapon for effortless entertaining—or just treating yourself right.
3
portions10
minutes35
minutesIngredients
– 4 firm Bosc pears (they hold their shape beautifully when poached)
– 2 cups dry red wine (I love using a Cabernet for its bold flavor)
– 1 cup granulated sugar
– 1 orange, sliced into rounds (don’t skip the peel—it adds wonderful citrus oils)
– 3 whole cinnamon sticks
– 5 whole cloves (these little guys pack a punch, so no need for extra)
– 1 tsp vanilla extract (the real stuff makes all the difference)
Instructions
1. Peel the pears carefully, leaving the stems intact for a pretty presentation.
2. Use a melon baller or small spoon to core each pear from the bottom, removing the seeds.
3. Combine red wine, sugar, orange slices, cinnamon sticks, and cloves in a medium saucepan.
4. Heat the mixture over medium heat, stirring occasionally until the sugar fully dissolves—this usually takes about 3-4 minutes.
5. Gently place the peeled pears into the simmering liquid, making sure they’re fully submerged.
6. Reduce heat to maintain a gentle simmer (small bubbles should appear but not a rolling boil).
7. Poach the pears for 25-30 minutes, turning them halfway through with a spoon for even color.
8. Test for doneness by inserting a paring knife into the thickest part of a pear—it should slide in with little resistance.
9. Remove the saucepan from heat and stir in vanilla extract.
10. Let the pears cool in the poaching liquid for at least 30 minutes to absorb more flavor.
Aren’t they stunning? The pears turn this gorgeous ruby hue while staying tender but not mushy. Serve them warm with a drizzle of the reduced poaching liquid over vanilla ice cream, or chill them overnight for an elegant dessert that actually gets better with time.
Chocolate Peppermint Bark

Mmm, is there anything more festive than that perfect combo of rich chocolate and cool peppermint? You’re going to love how easy this chocolate peppermint bark is to make, and it always feels like such a fancy homemade gift or treat for yourself.
1
bark20
minutes2
minutesIngredients
– 16 oz semi-sweet chocolate chips (I like Ghirardelli for their smooth melt)
– 16 oz white chocolate chips (make sure they’re good quality—cheaper ones can seize up)
– 1 tsp peppermint extract (pure extract gives the best flavor, not imitation)
– 8 candy canes, crushed (I put them in a zip-top bag and whack with a rolling pin—very therapeutic!)
– 1 tbsp coconut oil (this little secret helps the chocolate set with a beautiful snap)
Instructions
1. Line a 9×13 inch baking sheet with parchment paper, making sure it overhangs the edges for easy removal later.
2. Place the semi-sweet chocolate chips and ½ tbsp coconut oil in a microwave-safe bowl.
3. Microwave on high for 30 seconds, then stir vigorously—the chips will still look mostly solid but will start melting as you stir.
4. Continue microwaving in 15-second intervals, stirring after each, until the chocolate is completely smooth and glossy (this usually takes about 60-90 seconds total).
5. Immediately pour the melted dark chocolate onto the prepared baking sheet.
6. Use an offset spatula to spread the chocolate into a thin, even layer about ¼ inch thick.
7. Place the baking sheet in the refrigerator for exactly 15 minutes to set the chocolate layer firm.
8. While the dark chocolate sets, place white chocolate chips and remaining ½ tbsp coconut oil in a clean microwave-safe bowl.
9. Microwave on high for 30 seconds, stir, then continue in 15-second intervals until completely melted and smooth.
10. Stir 1 tsp peppermint extract into the melted white chocolate until fully incorporated.
11. Remove the baking sheet from refrigerator and pour the peppermint-white chocolate over the set dark chocolate layer.
12. Quickly spread the white chocolate into an even layer using your offset spatula.
13. Immediately sprinkle the crushed candy canes evenly over the entire surface, gently pressing them in so they adhere.
14. Return the baking sheet to the refrigerator and chill for at least 30 minutes, or until completely firm and snap-when-broken hard.
15. Remove the chilled bark from the refrigerator and use the parchment paper edges to lift it out of the pan.
16. Break the bark into irregular pieces by hand or cut with a sharp knife for cleaner edges.
Zesty peppermint and rich chocolate create the most satisfying crackle when you break into pieces. The white layer stays creamy against the snap of the dark chocolate underneath. I love piling these shards in a holiday tin or scattering them over vanilla ice cream for an instant festive upgrade.
Holiday Fruit and Nut Truffles
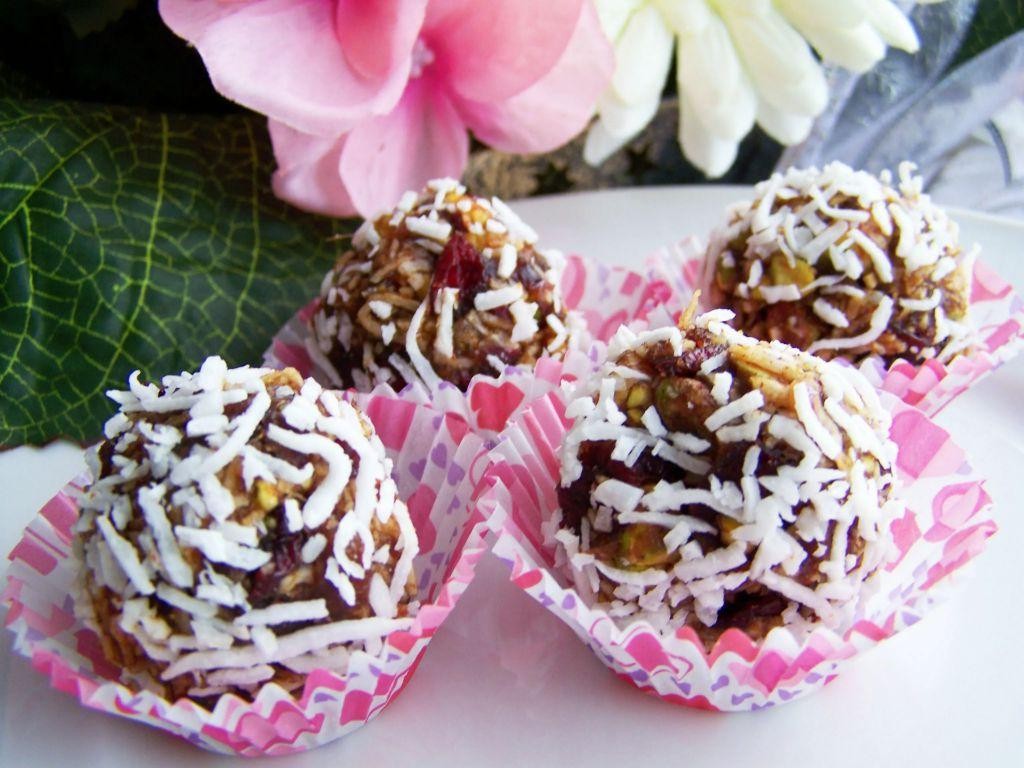
Now, let’s whip up these delightful holiday truffles that are perfect for gifting or just treating yourself. Nothing beats the combination of sweet dates, crunchy nuts, and rich chocolate during the festive season. You’ll love how simple they are to make while still feeling totally special.
12
truffles20
minutesIngredients
– 1 cup pitted Medjool dates (I find they’re naturally sweeter and softer than other varieties)
– 1/2 cup raw walnuts (pecans work great too if that’s what you have on hand)
– 1/4 cup unsweetened cocoa powder (the good stuff makes all the difference)
– 1 tablespoon pure maple syrup (this adds the perfect touch of sweetness)
– 1/2 teaspoon vanilla extract (real vanilla, not imitation, trust me)
– Pinch of sea salt (it really makes the chocolate flavor pop)
Instructions
1. Place the pitted dates in a medium bowl and cover them with warm water for exactly 10 minutes to soften.
2. Drain the dates thoroughly and pat them dry with paper towels to remove excess moisture.
3. Add the walnuts to a food processor and pulse for 15-20 seconds until they’re finely chopped but not powdery.
4. Transfer the chopped walnuts to a separate small bowl and set aside for coating later.
5. Combine the softened dates, cocoa powder, maple syrup, vanilla extract, and sea salt in the food processor.
6. Process the mixture for 45-60 seconds until it forms a sticky, uniform dough that pulls away from the sides.
7. Scoop out tablespoon-sized portions of the dough and roll them into smooth balls between your palms.
8. Roll each ball in the reserved chopped walnuts until fully coated on all sides.
9. Arrange the coated truffles in a single layer on a parchment-lined baking sheet.
10. Refrigerate the truffles for at least 30 minutes to firm up before serving.
Every bite delivers that perfect chewy texture from the dates with a satisfying crunch from the walnuts. The rich chocolate flavor really shines through, making these feel decadent without being overly sweet. I love serving them on a pretty platter with coffee after holiday dinners, or packing them in cute boxes as homemade gifts for neighbors.
Conclusion
Now you have everything needed to create a memorable holiday spread! These 34 festive recipes offer delicious options for every taste and skill level. We’d love to hear which dishes become your favorites—leave a comment below and don’t forget to share this roundup on Pinterest to spread the holiday cheer!


