
Overwhelmed by lunchtime decisions during your Whole30 journey? You’re not alone! Finding satisfying, compliant midday meals can be challenging, but we’ve done the heavy lifting for you. Get ready to discover 35 delicious Whole30 recipes that will make lunch the highlight of your day—from vibrant salads to hearty bowls that keep you energized and on track.
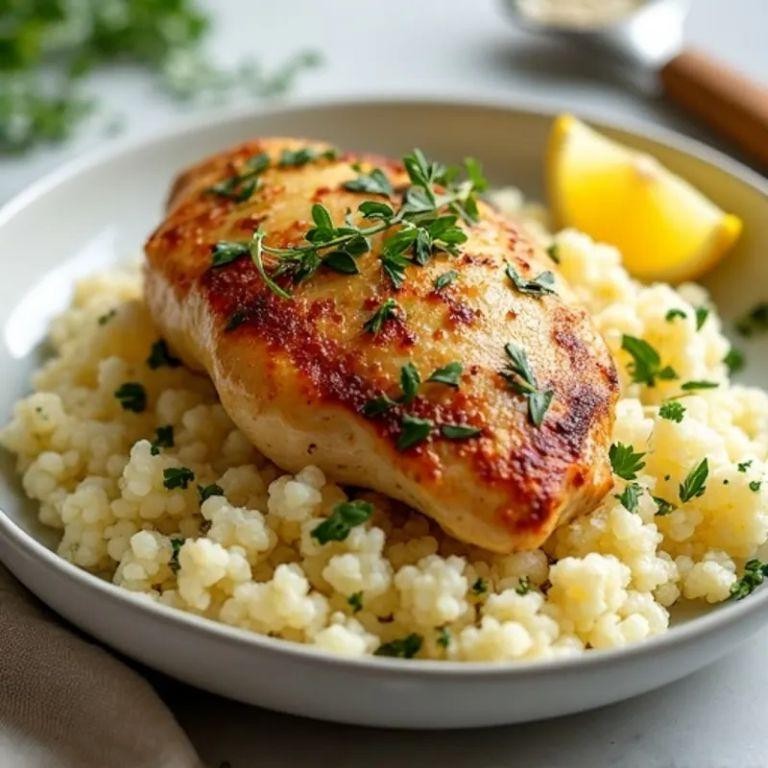
Zesty Lemon Herb Chicken Salad
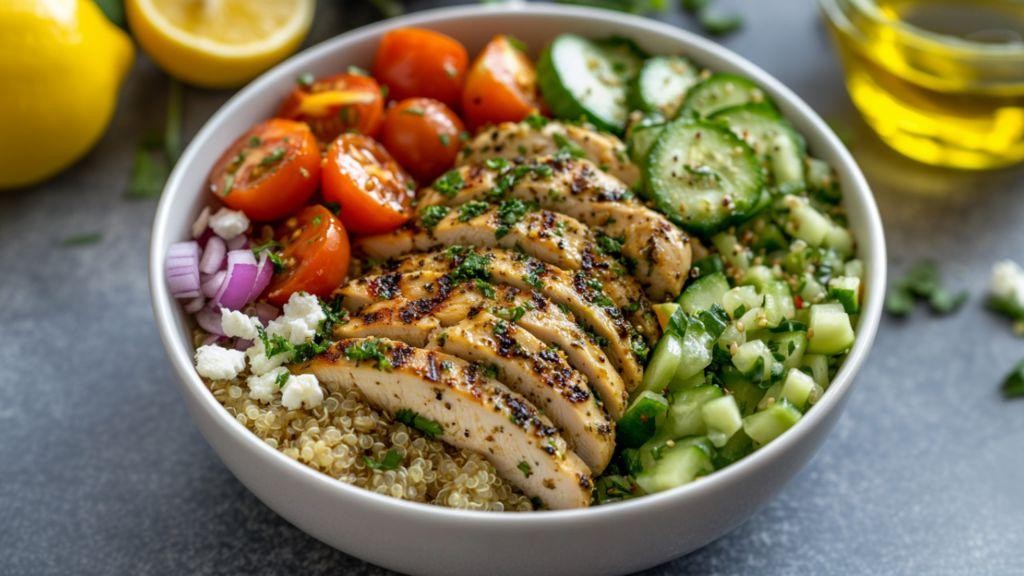
Whip up this vibrant chicken salad when you need a fresh, satisfying meal that comes together fast. The bright lemon and herbs cut through the richness perfectly, making it ideal for lunch or a light dinner. You’ll love how the flavors meld together after a quick chill in the fridge.
2
servings15
minutes30
minutesIngredients
– 1 pound of boneless, skinless chicken breasts
– A couple of tablespoons of olive oil
– A good squeeze of fresh lemon juice (about 2 tablespoons)
– A handful of chopped fresh parsley
– A sprinkle of dried oregano (about 1 teaspoon)
– A pinch of salt and black pepper
– A couple of cups of chopped romaine lettuce
– A handful of cherry tomatoes, halved
– A quarter of a red onion, thinly sliced
Instructions
1. Preheat your oven to 375°F.
2. Pat the chicken breasts completely dry with paper towels to ensure a good sear.
3. Brush both sides of the chicken with 1 tablespoon of olive oil.
4. Season the chicken evenly on both sides with salt, black pepper, and dried oregano.
5. Place the chicken on a baking sheet lined with parchment paper.
6. Bake for 25 minutes, or until the internal temperature reaches 165°F on a meat thermometer.
7. Remove the chicken from the oven and let it rest on a cutting board for 5 minutes to retain its juices.
8. While the chicken rests, whisk together the remaining 1 tablespoon of olive oil and fresh lemon juice in a large bowl.
9. Chop the rested chicken into bite-sized pieces.
10. Add the chopped chicken, fresh parsley, romaine lettuce, halved cherry tomatoes, and sliced red onion to the bowl with the dressing.
11. Toss everything together until evenly coated. Don’t overdress—add the dressing gradually to avoid a soggy salad.
12. Serve immediately or chill for 15 minutes to let the flavors intensify. During this time, the acid from the lemon will slightly tenderize the chicken, enhancing the overall texture.
Did you notice how the juicy chicken contrasts with the crisp lettuce and burst-in-your-mouth tomatoes? The lemon-herb dressing soaks in beautifully if you let it sit, making every bite zesty and fresh. Try stuffing it into pita pockets or serving over quinoa for a heartier meal.
Savory Beef and Vegetable Stir-fry
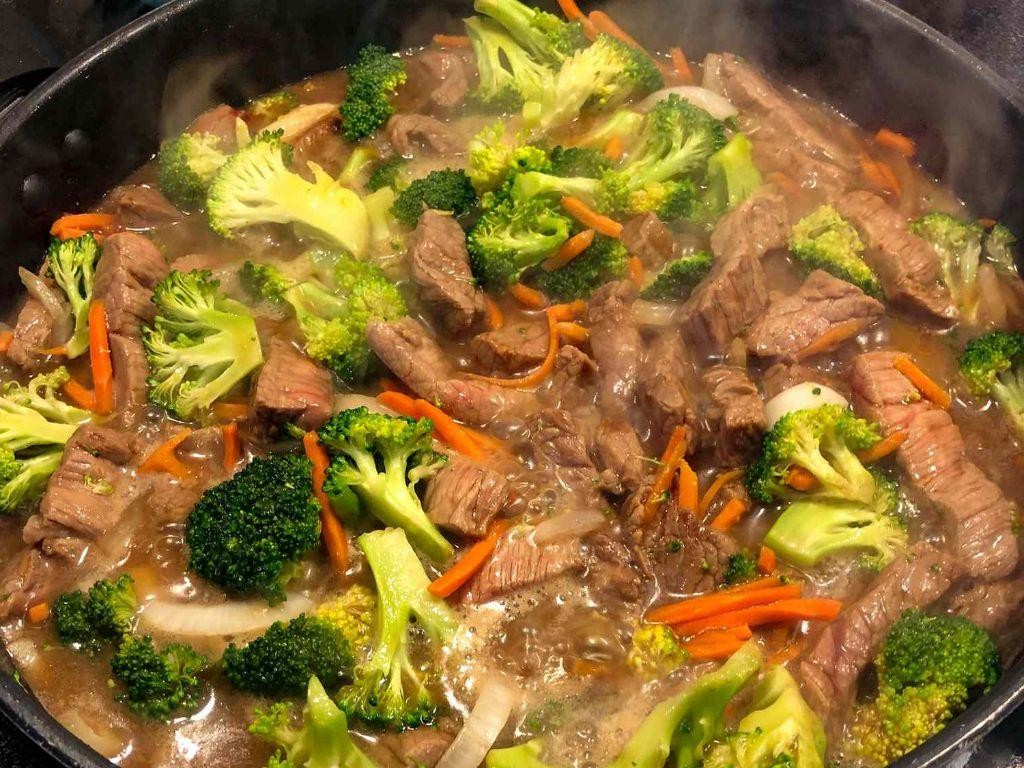
Nailing a quick weeknight dinner just got easier with this savory beef and vegetable stir-fry. Nothing beats coming home to a meal that’s ready in minutes but tastes like you spent hours. Perfect for busy evenings when you want something satisfying without the fuss.
2
servings15
minutes10
minutesIngredients
– 1 pound of thinly sliced beef strips
– A couple of cups of broccoli florets
– 1 sliced bell pepper
– A handful of sliced carrots
– 2 minced garlic cloves
– A thumb of grated ginger
– A splash of soy sauce
– A splash of vegetable oil
– A pinch of salt
Instructions
1. Heat a large skillet or wok over high heat with a splash of vegetable oil until it shimmers.
2. Add the beef strips in a single layer and cook for 2 minutes without stirring to get a good sear.
3. Flip the beef and cook for another 2 minutes until browned but still slightly pink inside.
4. Remove the beef from the skillet and set it aside on a plate.
5. Add the broccoli, bell pepper, and carrots to the same skillet and stir-fry for 3 minutes until they start to soften.
6. Toss in the minced garlic and grated ginger, cooking for 30 seconds until fragrant to avoid burning.
7. Return the beef to the skillet and pour in the soy sauce, stirring everything together for 1 minute to coat evenly.
8. Season with a pinch of salt and cook for another minute until the beef is fully cooked and the vegetables are tender-crisp.
Generously spoon this stir-fry over steamed rice or noodles for a complete meal. The beef stays juicy while the veggies add a satisfying crunch, and the savory sauce ties it all together. Try topping it with sesame seeds or a squeeze of lime for an extra zing.
Spicy Cauliflower and Avocado Wrap
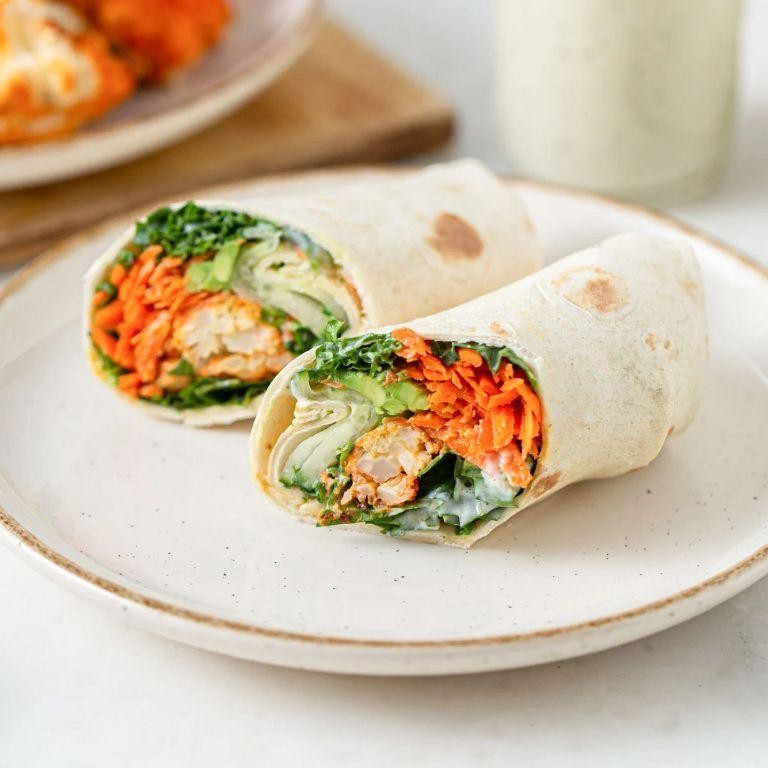
Sometimes you need a lunch that punches above its weight. Spicy roasted cauliflower meets cool avocado in this satisfying wrap that comes together in under 30 minutes. Seriously, this might become your new go-to.
2
wraps10
minutes25
minutesIngredients
– 1 medium head of cauliflower, cut into bite-sized florets
– 2 tablespoons of olive oil
– 1 teaspoon of smoked paprika
– A good pinch of cayenne pepper (more if you like heat)
– A couple of large flour tortillas
– 1 ripe avocado, pitted and sliced
– A big handful of fresh spinach
– A generous squeeze of lime juice
– A dollop of Greek yogurt or sour cream
Instructions
1. Preheat your oven to 425°F and line a baking sheet with parchment paper.
2. Toss the cauliflower florets with olive oil, smoked paprika, and cayenne pepper until evenly coated.
3. Spread the cauliflower in a single layer on the baking sheet.
4. Roast for 20-25 minutes, flipping halfway through, until the edges are crispy and browned.
5. While the cauliflower roasts, warm the tortillas in a dry skillet over medium heat for about 30 seconds per side. (Tip: Warming makes them more pliable and less likely to tear.)
6. Place the warmed tortillas on your work surface.
7. Layer spinach evenly across the center of each tortilla.
8. Arrange the roasted cauliflower over the spinach.
9. Top with sliced avocado.
10. Drizzle with lime juice to prevent browning and add brightness.
11. Add a dollop of Greek yogurt or sour cream down the center.
12. Fold the bottom edge of the tortilla up over the filling, then fold in the sides and roll tightly away from you. (Tip: Don’t overfill—it makes rolling easier.)
13. Slice each wrap in half diagonally for easier handling.
Get ready for a fantastic contrast of textures and temperatures. The crispy, spicy cauliflower plays perfectly against the cool, creamy avocado and tangy yogurt. Try serving these with a side of pickled onions or extra hot sauce for dipping.
Grilled Salmon with Fresh Mango Salsa
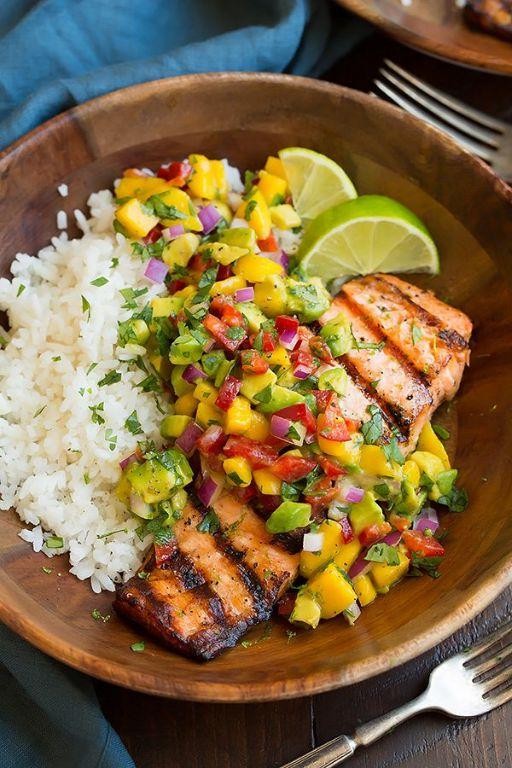
Every summer evening deserves a meal that feels both special and effortless. Grilled salmon with fresh mango salsa delivers exactly that—bright, satisfying, and ready in minutes. Elevate your weeknight dinner without the fuss.
5
servings15
minutes10
minutesIngredients
– 4 salmon fillets, about 6 ounces each
– A couple of ripe mangoes, diced
– 1 red bell pepper, finely chopped
– 1/2 red onion, minced
– A handful of fresh cilantro, chopped
– Juice of 2 limes
– A splash of olive oil
– 1 teaspoon of chili powder
– Salt to coat the salmon
Instructions
1. Preheat your grill to medium-high heat, around 400°F.
2. Pat the salmon fillets dry with paper towels to ensure a crisp skin.
3. Brush both sides of the salmon with a splash of olive oil.
4. Sprinkle the salmon evenly with 1 teaspoon of chili powder and a light coat of salt.
5. Place the salmon skin-side up on the grill and cook for 4–5 minutes until grill marks appear.
6. Flip the salmon carefully using a spatula and grill for another 4–5 minutes until the internal temperature reaches 145°F.
7. While the salmon cooks, dice the mangoes into 1/2-inch pieces for the salsa.
8. Finely chop the red bell pepper and mince the red onion.
9. Chop a handful of fresh cilantro leaves, avoiding the stems for better flavor.
10. Combine the diced mango, chopped bell pepper, minced red onion, and chopped cilantro in a medium bowl.
11. Squeeze the juice of 2 limes over the salsa mixture and stir gently to combine.
12. Let the salsa sit for 5 minutes to allow the flavors to meld while the salmon finishes cooking.
13. Remove the salmon from the grill and let it rest for 2 minutes before serving.
14. Top each salmon fillet generously with the fresh mango salsa.
Delight in the contrast between the flaky, smoky salmon and the juicy, tangy salsa. The mango adds a natural sweetness that balances the chili spice perfectly. Serve it over a bed of cilantro-lime rice or with crispy tortilla chips for a fun twist.
Garlic Mushroom and Spinach Quiche

Whip up this savory quiche when you need an impressive yet simple brunch centerpiece. Garlicky mushrooms and fresh spinach create a rich, earthy filling that bakes into a golden, flaky crust. It’s a make-ahead marvel that tastes even better the next day.
6
servings60
minutesIngredients
– 1 store-bought pie crust, thawed
– 8 large eggs
– 1 cup of heavy cream
– a couple of big handfuls of fresh spinach
– 8 oz sliced cremini mushrooms
– 3 cloves of garlic, minced
– a splash of olive oil
– a generous pinch of salt and black pepper
– 1 cup of shredded Gruyère cheese
Instructions
1. Preheat your oven to 375°F.
2. Press the thawed pie crust firmly into a 9-inch pie dish.
3. Prick the bottom of the crust all over with a fork to prevent puffing.
4. Blind bake the crust for 10 minutes until lightly set.
5. Heat a splash of olive oil in a large skillet over medium heat.
6. Add the sliced mushrooms and cook for 8-10 minutes, stirring occasionally, until they’ve released their liquid and turned golden brown.
7. Stir in the minced garlic and cook for 1 more minute until fragrant.
8. Add the fresh spinach and cook just until wilted, about 2 minutes.
9. Remove the skillet from heat and let the mixture cool slightly.
10. In a large bowl, whisk together the 8 eggs and 1 cup of heavy cream until fully combined.
11. Season the egg mixture with a generous pinch of salt and black pepper.
12. Stir in the shredded Gruyère cheese.
13. Fold the cooled mushroom and spinach mixture into the egg base.
14. Pour the filling into the pre-baked crust, spreading it evenly.
15. Bake at 375°F for 35-40 minutes, until the center is set and the top is golden brown.
16. Let the quiche rest for 10 minutes before slicing to allow the filling to set properly.
17. Serve warm or at room temperature. A golden, flaky crust gives way to a creamy, savory filling packed with earthy mushrooms and garlic. For a fresh twist, top slices with a simple arugula salad dressed with lemon vinaigrette.
Chicken Lettuce Wraps with Cashew Sauce

Out of all the quick dinner solutions I’ve tested, these chicken lettuce wraps consistently hit the spot. They’re fresh, fast, and perfect for busy weeknights when you want something satisfying without the fuss.
2
servings20
minutes10
minutesIngredients
- 1 lb ground chicken
- 1 head of butter lettuce
- 1/2 cup raw cashews
- 1/4 cup water
- 2 tbsp soy sauce
- 1 tbsp lime juice
- 1 tsp minced garlic
- 1 tsp grated ginger
- A splash of sesame oil
- A couple of green onions, chopped
Instructions
- Soak cashews in hot water for 15 minutes to soften them for blending.
- While cashews soak, brown ground chicken in a skillet over medium-high heat for 6-8 minutes, breaking it into small crumbles.
- Drain any excess fat from the chicken—this keeps the wraps from getting greasy.
- Add minced garlic and grated ginger to the skillet, cooking for 1 minute until fragrant.
- Pour in soy sauce and stir to coat the chicken evenly.
- Drain soaked cashews and add them to a blender with 1/4 cup water, lime juice, and sesame oil.
- Blend on high for 1-2 minutes until the sauce is completely smooth and creamy.
- Separate butter lettuce leaves carefully, choosing the most cup-like ones for holding filling.
- Spoon chicken mixture into lettuce cups, drizzle generously with cashew sauce, and top with chopped green onions.
Here’s what makes these wraps special: the cool, crisp lettuce contrasts beautifully with the warm, savory chicken, while the creamy cashew sauce adds a rich, nutty finish. Try stacking them on a platter for a DIY dinner setup that lets everyone build their own.
Butternut Squash and Apple Soup

Keeping cozy just got easier with this seasonal favorite. Butternut squash and sweet apples create a velvety soup that’s perfect for crisp fall days. It’s simple to make and packed with comforting flavor.
5
servings15
minutes45
minutesIngredients
– 1 medium butternut squash, peeled and cubed
– 2 apples, cored and chopped
– 1 onion, diced
– 3 cups vegetable broth
– 1 cup heavy cream
– 2 tablespoons olive oil
– A pinch of cinnamon
– A splash of maple syrup
– Salt and pepper to season
Instructions
1. Preheat your oven to 400°F.
2. Toss the cubed butternut squash with 1 tablespoon of olive oil on a baking sheet.
3. Roast the squash for 25 minutes until tender and lightly browned. Tip: Roasting deepens the squash’s sweetness.
4. Heat the remaining olive oil in a large pot over medium heat.
5. Sauté the diced onion for 5 minutes until translucent.
6. Add the chopped apples and cook for another 3 minutes.
7. Pour in the vegetable broth and bring to a boil.
8. Reduce heat and simmer for 10 minutes.
9. Stir in the roasted squash and simmer for 5 more minutes.
10. Carefully blend the soup until smooth using an immersion blender. Tip: For extra creaminess, blend in batches if using a countertop blender.
11. Stir in the heavy cream, cinnamon, and maple syrup.
12. Season with salt and pepper, then simmer for 2 minutes to heat through. Tip: Taste and adjust seasoning before serving for the best flavor.
Golden and velvety, this soup has a smooth texture with subtle sweetness from the apples and maple. The hint of cinnamon adds warmth, making it ideal for chilly evenings. Serve it with a drizzle of cream or crusty bread for dipping.
Crispy Oven-Baked Sweet Potato Fries
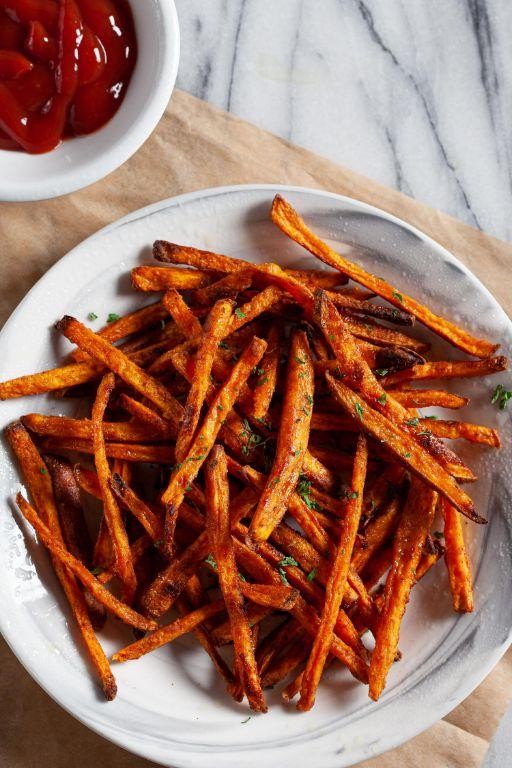
Oven-baked sweet potato fries deliver that crave-worthy crunch without the deep fryer. Our method ensures maximum crispiness every single time. Perfect for weeknight dinners or game day snacking.
5
servings15
minutes30
minutesIngredients
– 2 large sweet potatoes, peeled
– 2 tablespoons olive oil
– 1 tablespoon cornstarch
– 1 teaspoon garlic powder
– ½ teaspoon smoked paprika
– A good pinch of salt
– A couple of grinds of black pepper
Instructions
1. Preheat your oven to 425°F and line a large baking sheet with parchment paper.
2. Cut the peeled sweet potatoes into ¼-inch thick fry-shaped sticks.
3. Place the cut fries in a large bowl and toss them with the cornstarch until evenly coated. Tip: The cornstarch is your secret weapon for extra crispiness.
4. Drizzle the olive oil over the fries and toss again to coat.
5. Sprinkle the garlic powder, smoked paprika, salt, and black pepper over the fries.
6. Toss everything one final time until all fries are evenly seasoned.
7. Arrange the fries in a single layer on the prepared baking sheet, making sure they don’t touch. Tip: Crowding the pan creates steam, which makes fries soggy.
8. Bake for 15 minutes at 425°F.
9. Carefully flip each fry using tongs.
10. Return to the oven and bake for another 10-15 minutes until deeply golden and crispy at the edges. Tip: Don’t pull them out too early—that deep color means maximum flavor and crunch.
11. Let the fries rest on the baking sheet for 5 minutes before serving.
Best served immediately while they’re hot and crispy. These fries have a wonderful sweet-and-savory balance with a satisfying crunch that holds up to dipping. Try them with a spicy aioli or classic ketchup for the ultimate snack.
Hearty Turkey and Zucchini Burgers
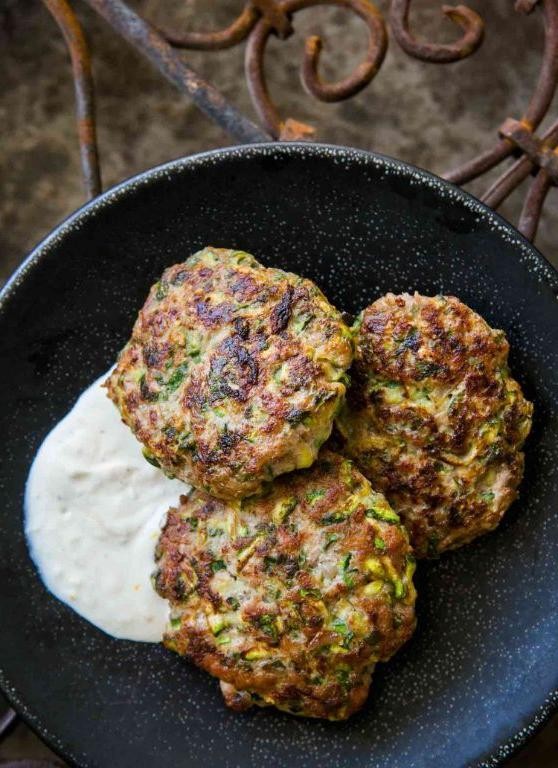
Unbelievably moist and packed with flavor, these turkey zucchini burgers are your new weeknight hero. Using zucchini keeps them juicy while adding extra veggies to your meal. They come together quickly and cook up perfectly every time.
2
portions15
minutes12
minutesIngredients
– 1 pound ground turkey
– 1 medium zucchini, grated and squeezed dry
– 1/2 cup breadcrumbs
– 1 large egg
– 2 cloves garlic, minced
– 1 tablespoon Worcestershire sauce
– A couple of tablespoons olive oil
– A good pinch of salt and black pepper
Instructions
1. Place grated zucchini in a clean kitchen towel and squeeze firmly to remove excess moisture.
2. In a large bowl, combine ground turkey, squeezed zucchini, breadcrumbs, egg, minced garlic, Worcestershire sauce, salt, and pepper.
3. Mix gently with your hands until just combined—overmixing makes tough burgers.
4. Divide mixture into 4 equal portions and shape into 3/4-inch thick patties.
5. Heat 2 tablespoons olive oil in a large skillet over medium-high heat until shimmering.
6. Place patties in the hot skillet and cook for 5-6 minutes until golden brown crust forms.
7. Flip burgers carefully and cook another 5-6 minutes until internal temperature reaches 165°F.
8. Transfer burgers to a plate and let rest for 3 minutes before serving.
Fantastically tender with a subtle garlicky kick, these burgers stay remarkably juicy thanks to the zucchini. The texture holds together beautifully without being dense. Try them on toasted brioche buns with spicy mayo or crumbled over a crisp green salad for a lighter option.
Ranch-Style Tuna Salad with Greens
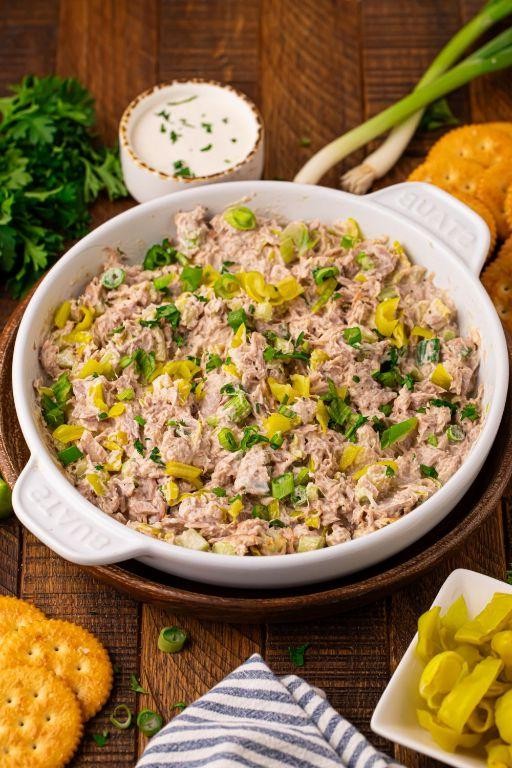
Ditch the boring lunch routine with this protein-packed tuna salad. Ranch seasoning adds zesty flavor while crisp greens keep it fresh. Perfect for quick meals that actually satisfy.
2
servings15
minutesIngredients
– 2 cans of solid white tuna, drained well
– A couple of big handfuls of mixed greens
– A generous 1/4 cup of ranch dressing
– A splash of lemon juice (about 1 tbsp)
– A pinch of salt and a few cracks of black pepper
– 1/4 cup of chopped red onion
– A handful of cherry tomatoes, halved
Instructions
1. Drain both cans of tuna thoroughly, pressing out excess liquid with a fork.
2. In a medium bowl, flake the tuna with a fork until no large chunks remain.
3. Add the ranch dressing and lemon juice to the tuna, mixing until fully combined.
4. Stir in the chopped red onion and season with salt and pepper.
5. Gently fold in the halved cherry tomatoes to avoid crushing them.
6. Arrange the mixed greens on two plates or in meal prep containers.
7. Spoon the tuna mixture over the greens, dividing evenly between servings.
8. Serve immediately or refrigerate for up to 2 days.
Now you’ve got a creamy, crunchy lunch that beats any sad desk salad. The ranch dressing clings perfectly to the flaky tuna while the fresh greens provide crisp texture. Try stuffing it into pita pockets or serving with crackers for different meal options.
Herb-Roasted Chicken with Cauliflower Rice
Hitting that perfect weeknight dinner balance just got easier. Herb-roasted chicken with cauliflower rice delivers big flavor with minimal effort. This one-pan wonder will become your new go-to.
5
servings15
minutes85
minutesIngredients
– One whole chicken (about 4 pounds)
– A couple of tablespoons of olive oil
– A big pinch of kosher salt
– A few grinds of black pepper
– A handful of fresh rosemary sprigs
– A handful of fresh thyme sprigs
– One head of cauliflower
– A splash of chicken broth
– Two minced garlic cloves
– A squeeze of lemon juice
Instructions
1. Preheat your oven to 425°F.
2. Pat the chicken completely dry with paper towels for crispier skin.
3. Rub the chicken all over with olive oil.
4. Season the chicken inside and out with kosher salt and black pepper.
5. Stuff the cavity with rosemary and thyme sprigs.
6. Place the chicken breast-side up in a large roasting pan.
7. Roast for 60-75 minutes until the internal temperature reaches 165°F in the thickest part of the thigh.
8. While the chicken roasts, cut the cauliflower into florets.
9. Pulse the cauliflower in a food processor until it resembles rice grains.
10. Heat a tablespoon of olive oil in a large skillet over medium-high heat.
11. Add the minced garlic and cook for 30 seconds until fragrant.
12. Add the cauliflower rice and cook for 5-7 minutes, stirring frequently.
13. Pour in the chicken broth to keep the rice moist.
14. Cook for another 3-4 minutes until tender but not mushy.
15. Squeeze fresh lemon juice over the cauliflower rice.
16. Season with salt and pepper.
17. Remove the chicken from the oven and let it rest for 10 minutes before carving.
Perfectly roasted chicken yields juicy meat beneath that crackling herb-infused skin. The cauliflower rice soaks up all those delicious pan juices while staying light and fresh. Try serving it with the carved chicken arranged over the rice for a beautiful, complete meal that feels special enough for company.
Mediterranean Chicken and Artichoke Bowls
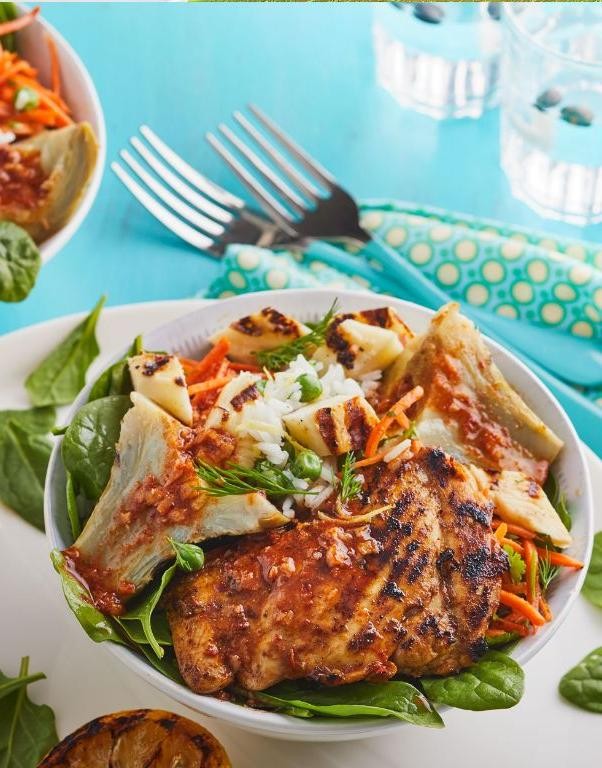
Ready for a meal that feels like vacation? These Mediterranean chicken and artichoke bowls come together fast and deliver big flavor. Rustle up tender chicken, briny artichokes, and fresh veggies for a satisfying lunch or dinner.
2
bowls15
minutes22
minutesIngredients
– A couple of boneless, skinless chicken breasts
– A splash of olive oil
– A couple of cloves of garlic, minced
– A 14-ounce can of artichoke hearts, drained and chopped
– A cup of cherry tomatoes, halved
– A half cup of pitted kalamata olives
– A quarter cup of crumbled feta cheese
– A couple of tablespoons of lemon juice
– A teaspoon of dried oregano
Instructions
1. Preheat your oven to 375°F.
2. Pat the chicken breasts completely dry with paper towels to ensure a good sear.
3. Heat a splash of olive oil in an oven-safe skillet over medium-high heat for 1 minute.
4. Season the chicken breasts on both sides with salt and pepper.
5. Place the chicken in the hot skillet and sear for 3 minutes without moving it to develop a golden-brown crust.
6. Flip the chicken and cook for another 3 minutes.
7. Add the minced garlic to the skillet and cook for 30 seconds until fragrant.
8. Stir in the chopped artichoke hearts, halved cherry tomatoes, and pitted kalamata olives around the chicken.
9. Drizzle everything with lemon juice and sprinkle with dried oregano.
10. Transfer the skillet to the preheated oven and bake for 15 minutes, or until the chicken reaches 165°F internally.
11. Remove the skillet from the oven and let the chicken rest for 5 minutes to redistribute its juices.
12. Slice the chicken against the grain into strips.
13. Divide the artichoke and tomato mixture between two bowls.
14. Top with the sliced chicken and sprinkle with crumbled feta cheese.
Perfectly tender chicken mingles with the bright, briny notes of artichokes and olives. The juicy tomatoes and salty feta create a vibrant, satisfying texture. Try serving it over couscous or stuffing it into warm pita pockets for a handheld twist.
Coconut Curry Shrimp with Zoodles
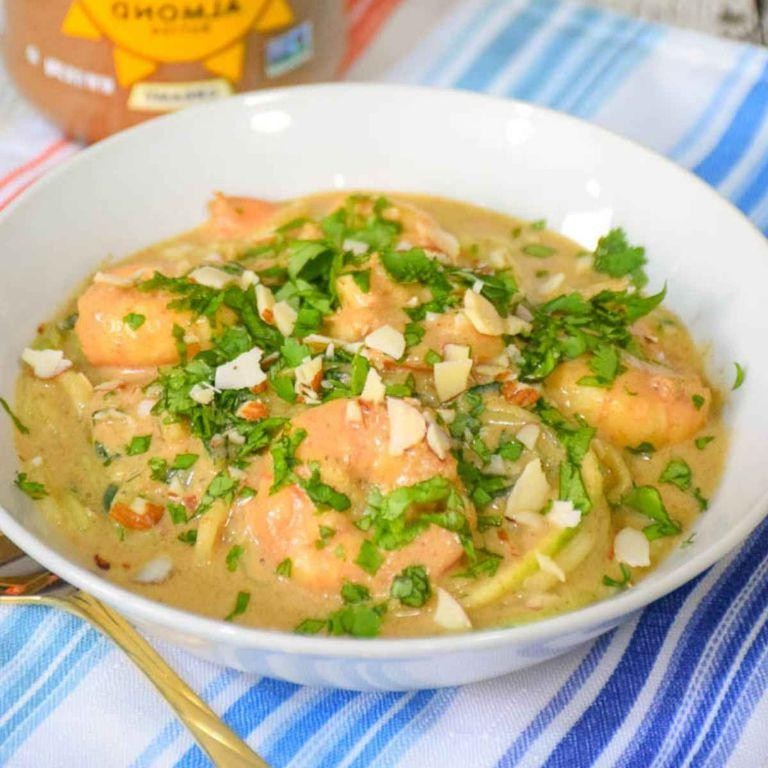
Craving something flavorful but light? Coconut curry shrimp with zoodles delivers restaurant-quality taste in under 30 minutes. This dish combines creamy coconut milk with bold curry spices for a satisfying meal that won’t weigh you down.
4
servings10
minutes15
minutesIngredients
– 1 pound of large raw shrimp, peeled and deveined
– 2 medium zucchinis, spiralized into zoodles
– 1 can (13.5 oz) of full-fat coconut milk
– 2 tablespoons of red curry paste
– 1 tablespoon of coconut oil
– A couple of minced garlic cloves
– A splash of fish sauce
– A squeeze of fresh lime juice
– A handful of chopped fresh cilantro
Instructions
1. Pat shrimp completely dry with paper towels and season with salt.
2. Heat coconut oil in a large skillet over medium-high heat until shimmering.
3. Add shrimp in a single layer and cook for 2 minutes per side until pink and opaque.
4. Transfer shrimp to a clean plate using tongs.
5. Reduce heat to medium and add minced garlic to the same skillet.
6. Sauté garlic for 30 seconds until fragrant but not browned.
7. Whisk in red curry paste and cook for 1 minute to bloom the spices.
8. Pour in coconut milk and fish sauce, stirring to combine completely.
9. Simmer sauce for 5 minutes until slightly thickened.
10. Add zucchini noodles and toss to coat in the curry sauce.
11. Cook zoodles for 2-3 minutes until just tender but still al dente.
12. Return shrimp to the skillet and stir to warm through.
13. Squeeze fresh lime juice over the dish and garnish with chopped cilantro.
14. Serve immediately while hot. Don’t let the zoodles sit too long or they’ll release water and become soggy. Deliciously creamy with a subtle heat from the curry, this dish features tender shrimp and crisp-tender zoodles that hold their texture beautifully. Try serving it over cauliflower rice for extra volume, or top with chopped peanuts for added crunch.
Taco-Spiced Stuffed Bell Peppers

Filled with bold Tex-Mex flavors, these stuffed peppers deliver a satisfying meal in one colorful package. They’re perfect for weeknights when you want something hearty but healthy. Customize the spice level to your preference for a truly personal touch.
3
portions15
minutes40
minutesIngredients
– 4 large bell peppers (any color you like)
– 1 pound of ground beef
– 1 cup of cooked rice
– 1 can (15 oz) of black beans, rinsed
– 1 cup of corn kernels (fresh or frozen)
– 1 small onion, diced
– 2 cloves of garlic, minced
– 1 packet of taco seasoning
– 1 cup of shredded cheddar cheese
– A couple of tablespoons of olive oil
– A splash of water
Instructions
1. Preheat your oven to 375°F.
2. Slice the bell peppers in half lengthwise and remove all seeds and membranes.
3. Place the pepper halves cut-side up in a 9×13 inch baking dish.
4. Heat olive oil in a large skillet over medium-high heat.
5. Add the diced onion and cook for 3-4 minutes until translucent.
6. Add the ground beef and cook for 6-7 minutes, breaking it up with a spoon until browned.
7. Stir in the minced garlic and cook for 1 minute until fragrant.
8. Drain any excess grease from the skillet.
9. Add the taco seasoning packet and a splash of water to the beef mixture.
10. Stir in the cooked rice, black beans, and corn kernels until well combined.
11. Spoon the filling mixture evenly into each pepper half, packing it down lightly.
12. Cover the baking dish tightly with aluminum foil.
13. Bake at 375°F for 25 minutes.
14. Remove the foil and sprinkle shredded cheddar cheese evenly over each pepper.
15. Return to the oven uncovered for 5-7 minutes until cheese is melted and bubbly.
16. Let the peppers rest for 5 minutes before serving.
The tender-crisp peppers provide a satisfying crunch against the savory, spiced filling. The melted cheese creates a creamy contrast to the hearty beef and beans. Serve them with cool sour cream or fresh avocado slices for extra richness.
Garlic-Lime Pork Chops with Mixed Vegetables
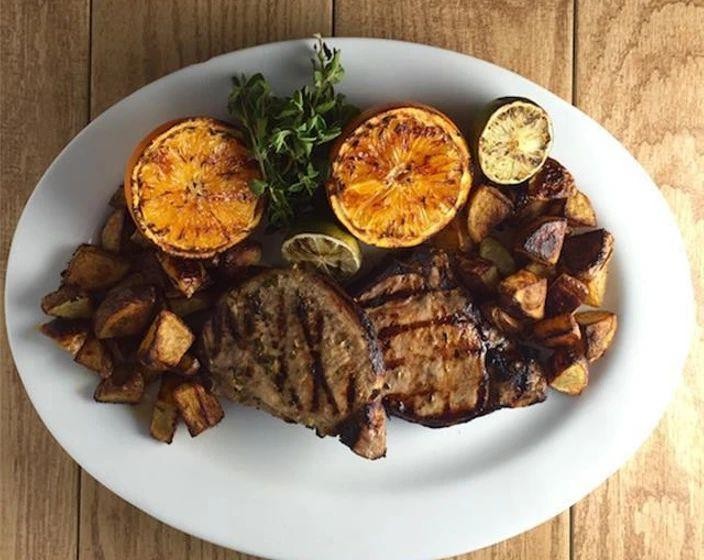
Dinner just got easier with these zesty pork chops. They come together quickly and pair perfectly with colorful roasted vegetables. Perfect for busy weeknights when you want something flavorful without the fuss.
3
servings15
minutes25
minutesIngredients
– 4 bone-in pork chops, about 1-inch thick
– A couple of limes
– 4 cloves of garlic, minced
– A good glug of olive oil
– A big handful of broccoli florets
– A couple of carrots, sliced
– 1 red bell pepper, chopped
– Salt and black pepper
Instructions
1. Preheat your oven to 400°F.
2. Pat the pork chops completely dry with paper towels – this helps them get a nice sear.
3. Season both sides of the pork chops generously with salt and black pepper.
4. Heat 2 tablespoons of olive oil in a large oven-safe skillet over medium-high heat until shimmering.
5. Sear the pork chops for 3 minutes per side until golden brown.
6. While the pork chops sear, juice both limes into a small bowl.
7. Add the minced garlic to the lime juice along with 1 tablespoon of olive oil.
8. Remove the seared pork chops from the skillet and set aside on a plate.
9. Add the broccoli, carrots, and bell pepper to the same skillet.
10. Drizzle the vegetables with the remaining olive oil and season with salt and pepper.
11. Return the pork chops to the skillet, nestling them among the vegetables.
12. Pour the garlic-lime mixture evenly over the pork chops and vegetables.
13. Transfer the skillet to the preheated oven and roast for 12-15 minutes, until the pork reaches 145°F internally.
14. Let the pork chops rest for 5 minutes before serving – this keeps them juicy.
15. Spoon the pan juices over everything before serving.
Vibrant and satisfying, these pork chops boast a perfect balance of zesty lime and savory garlic. The vegetables roast up tender-crisp while soaking up all the flavorful pan juices. Try serving over quinoa or with crusty bread to soak up every last bit of the delicious sauce.
Thai-Inspired Coconut Chicken Soup

Grab your soup pot—this Thai-inspired coconut chicken soup comes together faster than takeout. Get ready for creamy coconut broth with tender chicken and bright lime. Great for chilly evenings when you want something comforting but not heavy.
2
servings15
minutes28
minutesIngredients
– 1 pound of chicken breast, sliced thin
– 1 can (13.5 oz) of coconut milk
– 4 cups of chicken broth
– a couple of garlic cloves, minced
– 1 thumb of ginger, grated
– 1 stalk of lemongrass, smashed
– a big splash of fish sauce
– juice from 1 lime
– a handful of sliced mushrooms
– a sprinkle of chopped cilantro
– 1 sliced red chili (optional)
Instructions
1. Heat a large pot over medium-high heat for 2 minutes.
2. Add the sliced chicken and cook for 5–7 minutes until no pink remains, stirring occasionally.
3. Stir in the minced garlic and grated ginger, cooking for 1 minute until fragrant.
4. Pour in the chicken broth and coconut milk, scraping the bottom of the pot.
5. Add the smashed lemongrass stalk and sliced mushrooms.
6. Bring the soup to a boil, then reduce heat to low and simmer for 15 minutes.
7. Remove the lemongrass stalk and discard it.
8. Stir in the fish sauce and lime juice.
9. Ladle the soup into bowls and top with chopped cilantro and sliced red chili if using.
Tip: Smash the lemongrass with the back of a knife to release more flavor.
Tip: Don’t boil the soup after adding lime juice to keep it bright.
Tip: Slice the chicken against the grain for extra tenderness.
The broth is silky from the coconut milk, with a tangy kick from lime and savory depth from fish sauce. Serve it over steamed jasmine rice or with a side of crunchy lettuce cups for dipping.
Seared Ahi Tuna and Avocado Salad
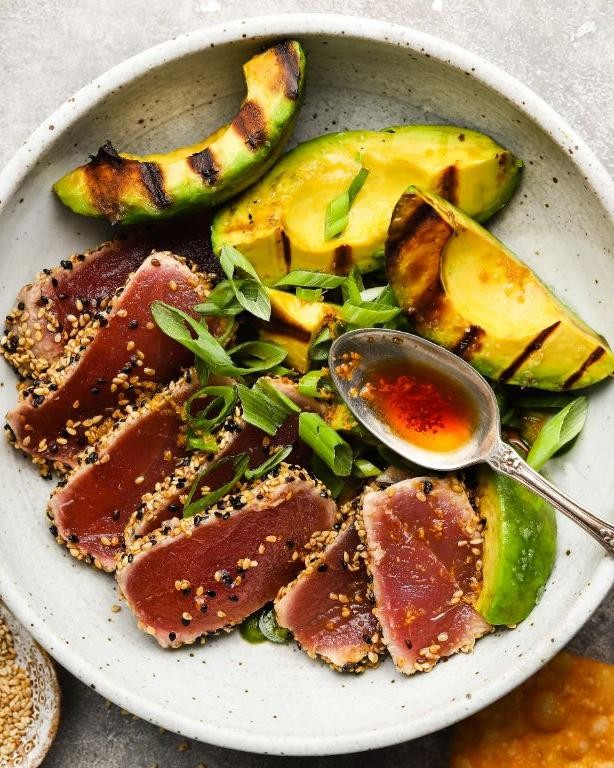
Tired of complicated salads? This seared ahi tuna and avocado salad delivers restaurant-quality results with minimal effort. The contrast between the warm, crusty tuna and cool, creamy avocado makes every bite exciting.
2
servings10
minutes4
minutesIngredients
– 2 ahi tuna steaks, about 1 inch thick
– 1 tablespoon of olive oil
– 1 ripe avocado
– 4 cups of mixed greens
– A couple of tablespoons of soy sauce
– A splash of sesame oil
– 1 teaspoon of sesame seeds
– A pinch of salt and black pepper
Instructions
1. Pat the tuna steaks completely dry with paper towels.
2. Season both sides of the tuna with a generous pinch of salt and black pepper.
3. Heat 1 tablespoon of olive oil in a cast-iron skillet over high heat until it shimmers.
4. Place the tuna steaks in the hot skillet and sear for 60 seconds without moving them.
5. Flip the tuna and sear the other side for another 60 seconds for rare doneness.
6. Remove the tuna from the skillet and let it rest on a cutting board for 2 minutes.
7. While the tuna rests, slice the avocado in half, remove the pit, and scoop the flesh from the skin.
8. Cut the avocado into ½-inch thick slices.
9. Arrange 4 cups of mixed greens on two plates.
10. Top the greens with the sliced avocado.
11. Slice the rested tuna against the grain into ¼-inch thick pieces.
12. Fan the tuna slices over the avocado and greens.
13. Drizzle a couple of tablespoons of soy sauce evenly over both salads.
14. Add a splash of sesame oil over each salad.
15. Sprinkle 1 teaspoon of sesame seeds over the top.
Fantastic texture contrast makes this salad special. The sesame-crusted tuna gives way to buttery flesh, while the avocado adds creaminess against the crisp greens. Serve it with extra soy sauce for dipping or wrap the components in nori sheets for a handheld version.
Lemon Tarragon Grilled Chicken Thighs

Nailing the perfect grilled chicken doesn’t require fancy techniques—just bright lemon and aromatic tarragon. This recipe delivers juicy, flavorful thighs with minimal effort. Fire up the grill and let’s get cooking.
8
portions15
minutes24
minutesIngredients
– 8 bone-in, skin-on chicken thighs
– 1/4 cup of olive oil
– The juice and zest from 2 large lemons
– A couple of tablespoons of fresh tarragon, chopped
– 3 minced garlic cloves
– A good pinch of salt and black pepper
Instructions
1. In a medium bowl, whisk together 1/4 cup olive oil, the juice and zest from 2 lemons, 2 tablespoons chopped tarragon, 3 minced garlic cloves, and a generous pinch of salt and pepper.
2. Place 8 chicken thighs in a large resealable bag and pour the marinade over them, ensuring each piece is coated. Tip: Press out excess air before sealing to help the marinade penetrate deeply.
3. Refrigerate the marinating chicken for at least 1 hour, or up to 4 hours for maximum flavor.
4. Preheat your grill to medium-high heat, aiming for 400°F.
5. Remove the chicken from the bag, letting excess marinade drip off, and place the thighs skin-side down on the hot grill grates.
6. Grill for 6-8 minutes until the skin is golden brown and has distinct grill marks. Tip: Avoid moving the chicken too soon to prevent sticking and ensure good searing.
7. Flip the chicken thighs and grill for another 6-8 minutes on the second side.
8. Move the thighs to a cooler part of the grill or reduce the heat to medium, and continue cooking for 10-12 more minutes. Tip: Use a meat thermometer to check for doneness—the internal temperature should reach 165°F in the thickest part.
9. Transfer the grilled chicken to a clean plate and let it rest for 5 minutes before serving.
Resting the chicken ensures the juices redistribute, giving you incredibly tender, moist meat. The lemon-tarragon combo is zesty and herbaceous, cutting through the richness of the thighs beautifully. Serve it sliced over a crisp salad or alongside grilled vegetables for a complete, satisfying meal.
Conclusion
These thirty-five Whole30 lunch recipes prove that eating well doesn’t mean sacrificing flavor or satisfaction. They’re designed to keep you energized and on track with your health goals. We’d love to hear which recipes become your new favorites—drop a comment below and share this roundup on Pinterest to help other home cooks discover these delicious ideas!


