Buckle up, air fryer fans! Whether you’re craving quick weeknight dinners, seasonal favorites, or ultimate comfort food, your West Bend air fryer is about to become your kitchen’s MVP. We’ve rounded up 27 delicious culinary creations that are sure to inspire your next meal. Get ready to explore these tasty ideas—your taste buds will thank you!
Crispy Air Fryer Chicken Wings
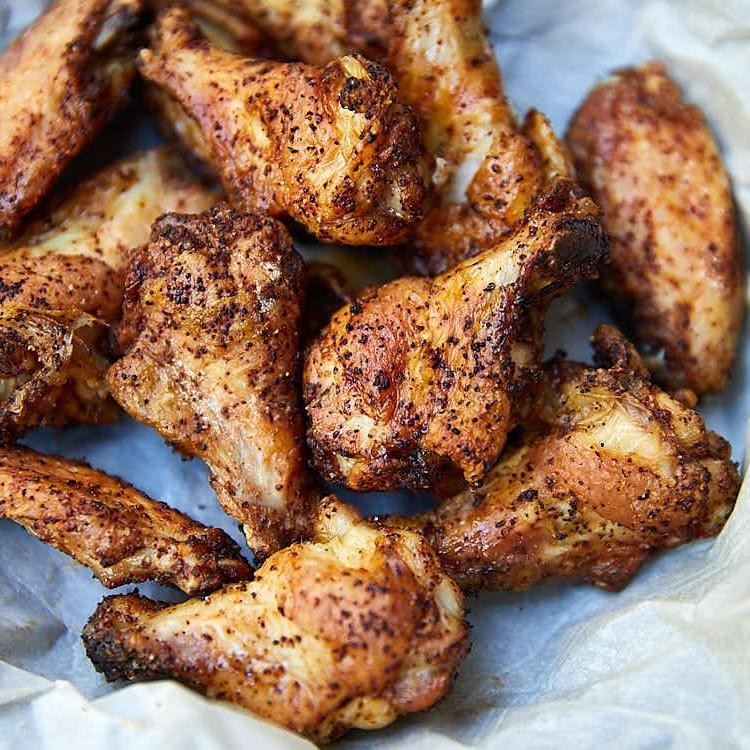
Haven’t we all been there? You’re craving those perfectly crispy, restaurant-style chicken wings but don’t want to deal with the mess and oil of deep frying. That’s exactly why my air fryer has become my wing-making hero—it delivers that satisfying crunch with way less fuss, and I’m sharing my go-to method that never lets me down.
Serving: 4 | Pre Time: 10 minutes | Cooking Time: 25 minutes
Ingredients
– About 2 pounds of chicken wings (I like to get the party wings, already split)
– A good drizzle of olive oil, maybe a tablespoon or two
– A generous sprinkle of garlic powder
– A couple of teaspoons of smoked paprika for that hint of warmth
– A big pinch of salt and a few cracks of black pepper
– A splash of hot sauce (I’m loyal to Frank’s RedHot) for tossing at the end
– A little pat of butter, melted, to mix with the hot sauce
Instructions
1. Pat your chicken wings completely dry with paper towels—this is my secret tip for extra crispiness, as moisture is the enemy of crunch.
2. In a large bowl, toss the dried wings with the olive oil until they’re lightly coated all over.
3. Sprinkle the garlic powder, smoked paprika, salt, and black pepper evenly over the wings, then toss again to ensure every piece is well-seasoned.
4. Preheat your air fryer to 400°F for about 3 minutes, which helps them start cooking immediately for a better sear.
5. Arrange the wings in a single layer in the air fryer basket, making sure they aren’t touching—this allows hot air to circulate properly, so they cook evenly without steaming.
6. Air fry at 400°F for 12 minutes, then flip each wing carefully using tongs.
7. Continue air frying for another 10-12 minutes, until the wings are golden brown and crispy, with an internal temperature of 165°F when checked with a meat thermometer.
8. While the wings cook, melt the butter in a small bowl and stir in the hot sauce until combined.
9. Once the wings are done, immediately toss them in the hot sauce mixture while they’re still hot—this helps the sauce cling beautifully without making them soggy.
10. Serve right away for the best texture.
These wings come out with a shatteringly crisp exterior that gives way to juicy, tender meat inside. The smoky paprika and garlic add a savory depth that pairs perfectly with the tangy kick from the hot sauce. Try serving them with a cool blue cheese dip and celery sticks for a classic game-day spread, or get creative by sprinkling on some fresh herbs like chopped parsley for a bright finish.
Guilt-Free Air Fryer French Fries
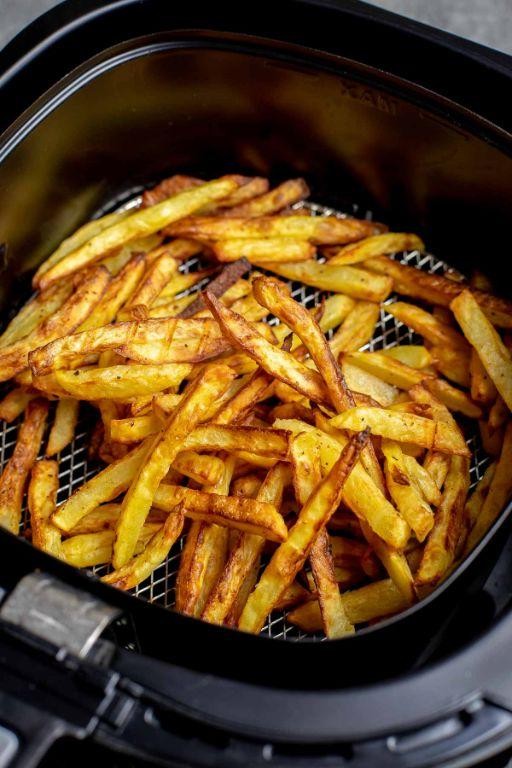
Perfectly crispy, golden fries without the deep-fryer guilt—that’s what I’m sharing today! As someone who loves fries but hates the greasy aftermath, I’ve been experimenting with my air fryer for months, and this recipe is my go-to for a quick, satisfying snack. It’s so simple that even my teenager can make them without turning the kitchen into a disaster zone.
Serving: 4 | Pre Time: 10 minutes | Cooking Time: 20 minutes
Ingredients
- 2 large russet potatoes, scrubbed clean
- 1 tablespoon of olive oil
- 1 teaspoon of garlic powder
- 1/2 teaspoon of paprika
- A generous pinch of salt
- A splash of water for soaking
Instructions
- Cut the potatoes into 1/4-inch thick sticks, aiming for uniform size to ensure even cooking—this is key for that perfect crispiness.
- Soak the potato sticks in a bowl of cold water for 10 minutes to remove excess starch, which helps them get extra crispy in the air fryer.
- Drain the potatoes and pat them completely dry with paper towels; any moisture left can lead to steaming instead of frying.
- In a large bowl, toss the dried potatoes with olive oil, garlic powder, paprika, and salt until evenly coated.
- Preheat your air fryer to 400°F for 3 minutes to give it a head start, which promotes better browning.
- Arrange the potatoes in a single layer in the air fryer basket, avoiding overcrowding to allow hot air circulation.
- Cook at 400°F for 15 minutes, shaking the basket halfway through to flip the fries for even cooking.
- Check for doneness—the fries should be golden brown and crispy on the outside. If needed, cook for an additional 5 minutes at 400°F.
- Remove the fries from the air fryer and let them cool for 2 minutes on a wire rack to maintain their crunch.
These fries come out with a satisfying crunch on the outside and a tender, fluffy inside that’s just irresistible. Try serving them with a side of homemade ketchup or a sprinkle of fresh herbs for a fun twist—they’re so good, you might forget they’re guilt-free!
Zucchini Fries with Garlic Aioli

Let me tell you about my latest kitchen experiment that turned into a family favorite—zucchini fries with garlic aioli. Last summer, my garden overflowed with zucchini, and after one too many loaves of zucchini bread, I needed a savory solution. These crispy, oven-baked fries with a creamy dipping sauce became our go-to snack for movie nights, and I’ve been tweaking the recipe ever since to get that perfect crunch without deep-frying.
Serving: 4 | Pre Time: 15 minutes | Cooking Time: 20 minutes
Ingredients
- A couple of medium zucchinis (about 2 cups when sliced)
- A cup of all-purpose flour
- Two large eggs, beaten
- A cup and a half of panko breadcrumbs
- A half cup of grated Parmesan cheese
- A teaspoon of garlic powder
- A teaspoon of paprika
- A half teaspoon of salt
- A quarter teaspoon of black pepper
- A splash of olive oil for drizzling
- For the aioli: a half cup of mayonnaise, two minced garlic cloves, a tablespoon of lemon juice, and a pinch of salt
Instructions
- Preheat your oven to 425°F and line a baking sheet with parchment paper.
- Slice the zucchinis into fry-shaped sticks, about 1/2-inch thick and 3 inches long.
- Set up three shallow bowls: one with the all-purpose flour, one with the beaten eggs, and one with a mix of panko breadcrumbs, grated Parmesan cheese, garlic powder, paprika, salt, and black pepper.
- Tip: Pat the zucchini sticks dry with a paper towel first—this helps the coating stick better and prevents sogginess.
- Dredge each zucchini stick in the flour, shaking off any excess.
- Dip the floured stick into the beaten eggs, letting the excess drip off.
- Coat the stick in the panko-Parmesan mixture, pressing gently to ensure it’s fully covered.
- Place the coated sticks on the prepared baking sheet in a single layer, not touching.
- Drizzle the zucchini fries lightly with olive oil.
- Bake in the preheated oven for 18-20 minutes, flipping halfway through, until golden brown and crispy.
- Tip: Use a spatula to flip them carefully to avoid losing the coating—they’re fragile when hot!
- While the fries bake, make the garlic aioli by combining the mayonnaise, minced garlic cloves, lemon juice, and a pinch of salt in a small bowl.
- Stir the aioli until smooth and set it aside to let the flavors meld.
- Tip: For a smoother aioli, let it sit for at least 10 minutes before serving to allow the garlic to mellow.
- Remove the zucchini fries from the oven and let them cool for 2-3 minutes on the baking sheet.
Keep these fries warm in a low oven if you’re not serving immediately—they lose their crunch fast! The texture is delightfully crispy on the outside with a tender, almost creamy interior, while the garlic aioli adds a tangy, savory kick that balances the mild zucchini. Try serving them alongside a burger or as an appetizer with extra lemon wedges for a zesty twist.
Tender Air Fried Brussels Sprouts
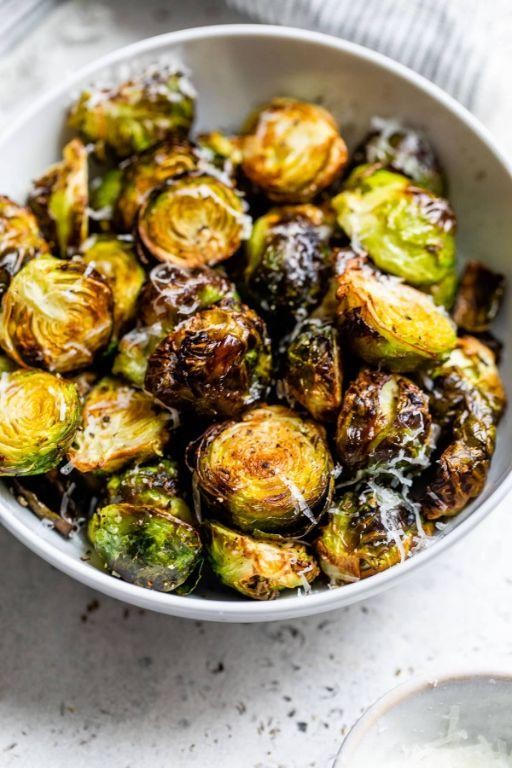
Believe me when I say I’ve tried every method under the sun to make Brussels sprouts that my family will actually eat, and this air fryer version is the absolute winner—it’s become our go-to side dish for everything from weeknight dinners to holiday gatherings. There’s something magical about how the air fryer gives them those crispy, caramelized edges while keeping the insides tender, and I love that I can whip them up with minimal fuss while multitasking in the kitchen.
Serving: 4 | Pre Time: 10 minutes | Cooking Time: 15 minutes
Ingredients
– A pound of fresh Brussels sprouts, trimmed and halved
– A couple of tablespoons of olive oil
– A generous sprinkle of kosher salt
– A few cracks of freshly ground black pepper
– A tablespoon of balsamic vinegar
– A couple of cloves of garlic, minced
– A pinch of red pepper flakes (optional, for a little kick)
Instructions
1. Preheat your air fryer to 375°F for about 3 minutes—this helps them start crisping right away.
2. In a large bowl, toss the halved Brussels sprouts with the olive oil, making sure each piece is lightly coated (tip: I use my hands to massage it in for even coverage).
3. Add the kosher salt, black pepper, minced garlic, and red pepper flakes to the bowl, and toss again until everything is well combined.
4. Arrange the Brussels sprouts in a single layer in the air fryer basket, leaving a little space between them so they crisp up evenly instead of steaming.
5. Air fry at 375°F for 10 minutes, shaking the basket halfway through to ensure all sides get golden brown.
6. Drizzle the balsamic vinegar over the sprouts in the basket, and give it a quick shake to distribute it (tip: the vinegar adds a tangy sweetness that balances the savory flavors).
7. Continue air frying for another 5 minutes at 375°F, or until the edges are deeply caramelized and crispy to your liking.
8. Remove the Brussels sprouts from the air fryer and let them rest for a minute before serving—this helps them stay extra crispy (tip: I always taste one to check the seasoning and adjust if needed).
Looking at these sprouts fresh out of the air fryer, you’ll notice how they’re perfectly charred on the outside with a soft, almost buttery center that melts in your mouth. I love serving them over a bed of creamy polenta or tossing them with cooked pasta and a squeeze of lemon for a quick vegetarian meal—they’re so versatile and always disappear fast!
Perfectly Cooked Air Fryer Salmon
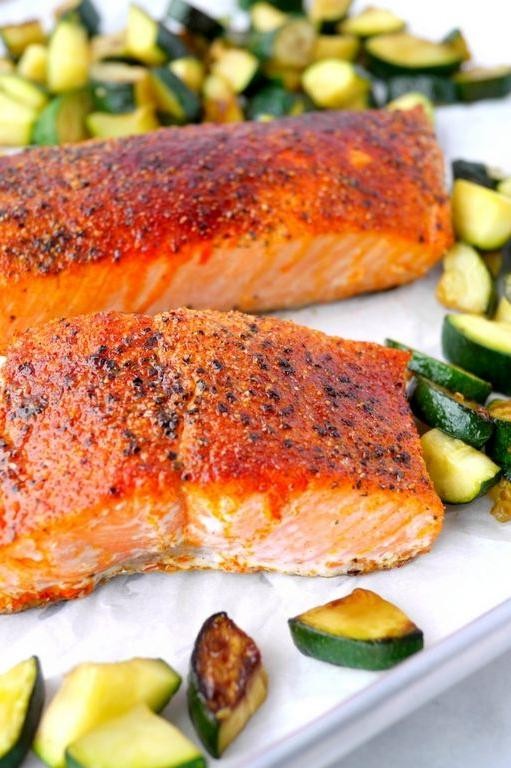
Unbelievably, I used to be intimidated by cooking salmon at home until I discovered my air fryer could deliver restaurant-quality results in minutes. Now this perfectly cooked air fryer salmon is my go-to weeknight dinner—it’s so simple that even my most kitchen-averse friends have mastered it after one try.
Serving: 2 | Pre Time: 5 minutes | Cooking Time: 10 minutes
Ingredients
- Two 6-ounce salmon fillets, skin-on (I prefer wild-caught for that richer flavor)
- A generous drizzle of olive oil, about 1 tablespoon
- A couple of pinches of kosher salt
- A few cracks of freshly ground black pepper
- A squeeze of fresh lemon juice, about 1 tablespoon
- A sprinkle of garlic powder, roughly ½ teaspoon
- A splash of soy sauce, about 1 teaspoon (trust me, it adds a savory depth)
Instructions
- Pat the two 6-ounce salmon fillets completely dry with paper towels—this helps the skin get crispy.
- Drizzle 1 tablespoon of olive oil evenly over both sides of each salmon fillet.
- Sprinkle a couple of pinches of kosher salt and a few cracks of freshly ground black pepper onto the flesh side of the fillets.
- Add a sprinkle of garlic powder (about ½ teaspoon total) evenly over the seasoned side.
- Squeeze about 1 tablespoon of fresh lemon juice over the fillets.
- Finish with a splash of soy sauce (about 1 teaspoon) drizzled over the top.
- Preheat your air fryer to 400°F for 3 minutes.
- Place the salmon fillets skin-side down in the air fryer basket, ensuring they aren’t touching.
- Air fry at 400°F for 8–10 minutes—check at 8 minutes; the salmon is done when it flakes easily with a fork and reaches 145°F internally. Tip: For even cooking, choose fillets that are similar in thickness.
- Carefully remove the basket and let the salmon rest for 2 minutes before serving. Tip: Don’t skip the rest—it allows the juices to redistribute.
Nothing beats the flaky, moist interior and that delightfully crispy skin you get from the air fryer. The lemon and soy sauce create a bright, umami-packed glaze that makes this salmon feel fancy without any fuss. I love serving it over a bed of quinoa with roasted asparagus, or flaking it into tacos with a quick cabbage slaw for a fun twist.
Crispy Air Fryer Coconut Shrimp

Perfect for a quick weeknight treat or a fun appetizer for guests, these crispy coconut shrimp have become my go‑to air fryer obsession. I love how they turn out golden and crunchy without the mess of deep frying—plus, that sweet coconut flavor pairs so well with a simple dipping sauce.
Serving: 4 | Pre Time: 15 minutes | Cooking Time: 10 minutes
Ingredients
- 1 pound of large raw shrimp, peeled and deveined (tails on or off—your call!)
- ½ cup of all‑purpose flour
- 2 large eggs, lightly beaten
- 1 cup of sweetened shredded coconut
- ½ cup of panko breadcrumbs
- 1 teaspoon of garlic powder
- ½ teaspoon of paprika
- A pinch of salt and a few cracks of black pepper
- Cooking spray or a light brush of oil
Instructions
- Pat the shrimp completely dry with paper towels—this helps the coating stick better.
- Set up three shallow bowls: one with the flour, one with the beaten eggs, and one with a mix of shredded coconut, panko, garlic powder, paprika, salt, and pepper.
- Dredge each shrimp first in the flour, shaking off any excess.
- Dip it into the beaten eggs, letting any extra drip off.
- Press it firmly into the coconut‑panko mixture, coating all sides evenly. Tip: Use one hand for dry ingredients and the other for wet to keep your fingers less messy.
- Place the coated shrimp in a single layer in the air fryer basket, leaving a little space between each.
- Lightly spray or brush them with oil—this ensures they crisp up nicely.
- Air fry at 400°F for 8–10 minutes, flipping halfway through, until golden brown and crispy. Tip: Check at 8 minutes; shrimp cook quickly and can overcook if left too long.
- Let them rest for 2–3 minutes before serving—they’ll stay crispier this way.
Here’s the best part: each bite gives you that satisfying crunch followed by tender, juicy shrimp with a hint of sweet coconut. I love serving these with a quick spicy mayo or a tangy mango salsa for a tropical twist that always impresses.
Air Fried Onion Rings with Dipping Sauce
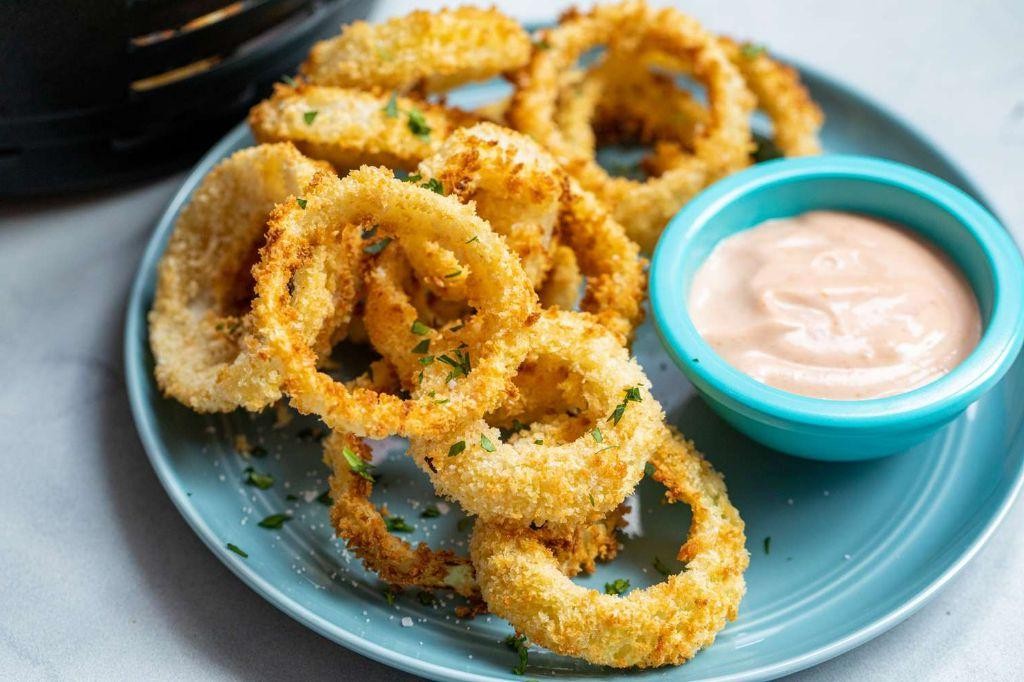
Kicking off my weekend with a craving for something crispy but not too heavy, I remembered these air fried onion rings I perfected last summer. They’re my go‑when I want that satisfying crunch without the deep‑fry mess, and the dipping sauce? Let’s just say it’s the real star here.
Serving: 4 | Pre Time: 15 minutes | Cooking Time: 12 minutes
Ingredients
– 2 large yellow onions, sliced into ½‑inch rings
– 1 cup all‑purpose flour
– 2 large eggs, beaten
– 1½ cups panko breadcrumbs
– 1 tsp garlic powder
– 1 tsp smoked paprika
– A good pinch of salt and black pepper
– Cooking spray (I use avocado oil)
– For the sauce: ½ cup mayonnaise, 2 tbsp ketchup, 1 tbsp pickle relish, a squeeze of lemon juice, and a dash of hot sauce if you’re feeling bold
Instructions
1. Preheat your air fryer to 400°F for about 5 minutes—this helps get them extra crispy from the start.
2. Separate the onion slices into rings, patting them dry with paper towels to help the coating stick better (trust me, this tip saves a lot of mess!).
3. In three shallow bowls, set up your coating station: put the flour in the first, the beaten eggs in the second, and mix the panko, garlic powder, smoked paprika, salt, and pepper in the third.
4. Dip each onion ring first into the flour, shaking off any excess, then into the egg, and finally coat it thoroughly in the panko mixture, pressing gently so the crumbs adhere.
5. Lightly spray the air fryer basket with cooking spray and arrange the coated rings in a single layer without overcrowding—I usually do two batches to avoid steaming.
6. Spray the tops of the rings with a bit more cooking spray, then air fry at 400°F for 6 minutes.
7. Flip the rings carefully using tongs, spray lightly again, and air fry for another 6 minutes until they’re golden brown and crisp (peek at the 5‑minute mark to check for doneness, as air fryers can vary).
8. While the rings cook, whisk together the mayonnaise, ketchup, pickle relish, lemon juice, and hot sauce in a small bowl until smooth.
9. Transfer the hot onion rings to a plate lined with paper towels to catch any excess oil.
10. Serve immediately with the dipping sauce on the side.
Delightfully crunchy on the outside with a tender, sweet onion center, these rings pair perfectly with that tangy sauce. I love stacking them high on a platter for game day or serving them alongside a burger for a fun twist—they always disappear fast!
Fluffy Air Fryer Breakfast Donuts
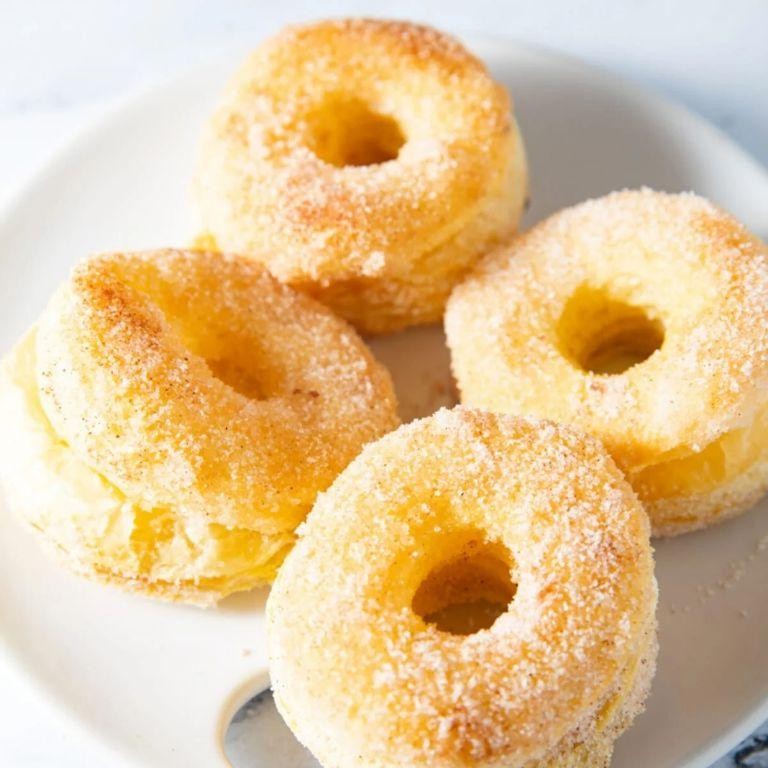
Unexpectedly, my Sunday mornings have been transformed by these air fryer donuts—they’re so light and quick, I’ve almost given up on my usual pancake routine. Honestly, I used to think donuts were a weekend splurge best left to the bakery, but this recipe changed my mind with its simplicity and that irresistible fluffy texture. Now, I whip them up whenever I’m craving something sweet without the fuss.
Serving: 6 | Pre Time: 10 minutes | Cooking Time: 8 minutes
Ingredients
– 1 cup of all-purpose flour (I always scoop and level it for accuracy)
– 1/4 cup of granulated sugar, plus an extra couple of tablespoons for coating
– 1 teaspoon of baking powder
– A pinch of salt (just a tiny sprinkle)
– 1/2 cup of milk (any kind works—I use whole milk for richness)
– 1 large egg, lightly beaten
– 2 tablespoons of melted butter, cooled a bit
– 1 teaspoon of vanilla extract (a good splash for flavor)
– Cooking spray or a brush of oil for the air fryer basket
Instructions
1. In a medium bowl, whisk together 1 cup of all-purpose flour, 1/4 cup of granulated sugar, 1 teaspoon of baking powder, and a pinch of salt until well combined.
2. In a separate small bowl, mix 1/2 cup of milk, 1 large egg, 2 tablespoons of melted butter, and 1 teaspoon of vanilla extract until smooth.
3. Pour the wet ingredients into the dry ingredients and stir gently until just combined—be careful not to overmix, as this keeps the donuts tender (tip: a few lumps are fine!).
4. Lightly grease the air fryer basket with cooking spray or a brush of oil to prevent sticking.
5. Spoon the batter into a piping bag or a zip-top bag with the corner snipped off, then pipe 6 small rings onto the greased basket, spacing them about 1 inch apart.
6. Preheat the air fryer to 350°F, then cook the donuts for 6–8 minutes, or until they’re golden brown and spring back when touched (tip: check at 6 minutes to avoid over-browning).
7. While the donuts cook, place an extra couple of tablespoons of granulated sugar in a shallow bowl for coating.
8. Remove the donuts from the air fryer using tongs or a spatula, let them cool for 2–3 minutes until handleable, then roll each one in the sugar until evenly coated (tip: do this while they’re still warm so the sugar sticks better).
Yes, these donuts turn out incredibly light with a subtle vanilla sweetness and a satisfying crunch from the sugar coating. I love serving them fresh with a drizzle of honey or alongside a hot coffee—they’re perfect for a cozy breakfast or a quick snack any time of day.
Air Fryer BBQ Chicken Skewers

Mondays are my favorite day to meal prep, and these Air Fryer BBQ Chicken Skewers have become my go-to for busy weeknights—they’re juicy, packed with smoky-sweet flavor, and ready in under 30 minutes. I love how the air fryer gives them that perfect char without the fuss of firing up the grill, and my kids always ask for seconds! Trust me, once you try this method, you’ll never go back to soggy oven-baked skewers.
Serving: 4 | Pre Time: 15 minutes | Cooking Time: 12 minutes
Ingredients
– About 1.5 pounds of boneless, skinless chicken breasts, cut into 1-inch cubes
– A generous ½ cup of your favorite BBQ sauce (I use a smoky Kansas City style)
– A couple of tablespoons of olive oil
– A splash of apple cider vinegar (about 1 tablespoon)
– A teaspoon of smoked paprika
– A pinch of salt and a few cracks of black pepper
– Wooden or metal skewers (if using wooden, soak them in water for 30 minutes first to prevent burning)
Instructions
1. In a medium bowl, whisk together ½ cup of BBQ sauce, 2 tablespoons of olive oil, 1 tablespoon of apple cider vinegar, 1 teaspoon of smoked paprika, ½ teaspoon of salt, and ¼ teaspoon of black pepper until smooth.
2. Add the cubed chicken to the bowl and toss thoroughly to coat every piece in the marinade. Tip: Let it sit for at least 10 minutes (or up to 2 hours in the fridge) for deeper flavor—I often prep this in the morning for dinner.
3. While the chicken marinates, soak wooden skewers in water for 30 minutes if using, or have metal skewers ready.
4. Thread the marinated chicken cubes onto the skewers, leaving a small gap between pieces for even cooking.
5. Preheat your air fryer to 400°F for 3 minutes. Tip: A quick preheat ensures a nice sear and prevents sticking.
6. Place the skewers in the air fryer basket in a single layer, making sure they don’t touch. You may need to cook in batches depending on your air fryer size.
7. Cook at 400°F for 10–12 minutes, flipping the skewers halfway through at the 6-minute mark. Tip: Check for doneness by cutting into a piece—the chicken should be opaque with no pink inside and reach an internal temperature of 165°F.
8. Brush the skewers with an extra tablespoon of BBQ sauce during the last 2 minutes of cooking for a glossy finish.
9. Remove the skewers from the air fryer and let them rest for 3 minutes before serving. Finally, these skewers come out with a caramelized, slightly crispy exterior that gives way to tender, juicy chicken inside. For a fun twist, I love serving them over a bed of cilantro-lime rice or with a side of cool, crunchy slaw to balance the smoky sweetness.
Spicy Air Fried Cauliflower Buffalo Bites

Now, if you’re like me, you’ve probably tried to make healthier versions of buffalo wings at home, only to end up with soggy, disappointing results—I’ve been there! But after some kitchen experiments, I’ve nailed down these spicy air fried cauliflower buffalo bites that are crispy, flavorful, and totally guilt-free, perfect for game day or a quick snack. Trust me, they’re so good you won’t miss the chicken!
Serving: 4 | Pre Time: 15 minutes | Cooking Time: 20 minutes
Ingredients
– 1 large head of cauliflower, cut into bite-sized florets (about 4 cups)
– 1 cup of all-purpose flour
– 1 cup of milk
– A couple of teaspoons of garlic powder
– A couple of teaspoons of paprika
– A pinch of salt and black pepper
– 1/2 cup of buffalo sauce
– A tablespoon of melted butter
– A splash of olive oil for spraying
Instructions
1. Preheat your air fryer to 400°F for 5 minutes to ensure it’s hot and ready.
2. In a large bowl, whisk together 1 cup of all-purpose flour, 1 cup of milk, 2 teaspoons of garlic powder, 2 teaspoons of paprika, and a pinch of salt and black pepper until smooth—this batter should coat the back of a spoon nicely.
3. Tip: For extra crispiness, pat the cauliflower florets dry with a paper towel before dipping to remove excess moisture.
4. Dip each cauliflower floret into the batter, letting any excess drip off, and place them in a single layer in the air fryer basket.
5. Lightly spray the coated florets with olive oil using a cooking spray bottle to help them brown evenly.
6. Air fry at 400°F for 15 minutes, shaking the basket halfway through to promote even cooking and prevent sticking.
7. Tip: If your air fryer tends to cook unevenly, rotate the basket 180 degrees at the halfway mark for better results.
8. While the cauliflower cooks, mix 1/2 cup of buffalo sauce with 1 tablespoon of melted butter in a small bowl until well combined.
9. Once the cauliflower is golden and crispy, transfer it to a large bowl and toss it gently with the buffalo sauce mixture until fully coated.
10. Return the sauced cauliflower to the air fryer and cook for an additional 5 minutes at 400°F to set the glaze and enhance the flavor.
11. Tip: Let the bites cool for a minute or two before serving—they’ll be piping hot and the texture firms up slightly for that perfect crunch.
Just out of the air fryer, these bites have a satisfying crunch on the outside with a tender, almost meaty interior that soaks up all that spicy buffalo goodness. I love serving them with a side of cool ranch dressing or celery sticks to balance the heat, and they’re always a hit at parties—even my picky friends can’t get enough!
Savory Air Fryer Stuffed Bell Peppers

Craving a cozy, hands-off dinner that feels homemade without the fuss? I recently whipped up these savory stuffed peppers on a busy weeknight when my oven was occupied with cookies—my trusty air fryer came to the rescue, delivering crispy edges and tender insides in half the time. It’s become my go-to for a satisfying meal that even my picky toddler devours, proving that simple ingredients can shine with a little creativity.
Serving: 4 | Pre Time: 15 minutes | Cooking Time: 20 minutes
Ingredients
- 4 medium bell peppers (any color you like—I used a mix for vibrancy)
- 1 pound of ground beef (or swap for turkey if you prefer)
- 1 cup of cooked rice (I had leftover white rice, but brown works too)
- 1/2 cup of shredded cheddar cheese
- 1/4 cup of diced onion
- 2 cloves of garlic, minced
- 1 tablespoon of olive oil
- 1 teaspoon of Italian seasoning
- A pinch of salt and black pepper
- A splash of tomato sauce (about 1/4 cup from a jar)
Instructions
- Preheat your air fryer to 375°F for 5 minutes—this ensures even cooking from the start.
- Slice the tops off the bell peppers and remove the seeds and membranes, then set them aside.
- In a skillet over medium heat, add the olive oil and sauté the diced onion for 3 minutes until softened.
- Add the ground beef to the skillet and cook for 5 minutes, breaking it up with a spoon until browned.
- Stir in the minced garlic and Italian seasoning, cooking for 1 more minute until fragrant.
- Mix in the cooked rice, tomato sauce, salt, and black pepper, then remove from heat—this filling should be moist but not soggy.
- Stuff each bell pepper with the beef mixture, packing it gently to the top.
- Sprinkle the shredded cheddar cheese evenly over the stuffed peppers.
- Place the peppers upright in the air fryer basket, leaving space between them for air circulation.
- Air fry at 375°F for 15 minutes, checking at 10 minutes—the peppers should be tender and the cheese golden brown.
Serve these peppers hot, and you’ll love how the crispy cheese contrasts with the juicy filling. Sometimes I drizzle a little extra tomato sauce on top or pair them with a simple salad for a complete meal—they reheat beautifully for leftovers, making tomorrow’s lunch a breeze.
Air Fried Apple Cinnamon Fritters

A crisp autumn breeze always makes me crave something warm and spiced, and after one too many failed attempts at deep-frying, I finally perfected these air-fried apple cinnamon fritters—they’re my cozy, guilt-free solution to fall cravings. Trust me, your kitchen will smell incredible.
Serving: 8 fritters | Pre Time: 15 minutes | Cooking Time: 10 minutes
Ingredients
– 1 cup of all-purpose flour, plus a little extra for dusting
– 2 teaspoons of baking powder
– 1 teaspoon of ground cinnamon, plus an extra pinch for sprinkling
– A pinch of salt
– 1 large egg
– 1/3 cup of milk
– 2 tablespoons of melted butter
– 1 medium apple, peeled and diced into small pieces (I like Granny Smith for tartness)
– 1/4 cup of granulated sugar for coating
– Cooking spray or a light brush of oil
Instructions
1. Preheat your air fryer to 375°F for about 5 minutes—this ensures even cooking from the start.
2. In a medium bowl, whisk together 1 cup of all-purpose flour, 2 teaspoons of baking powder, 1 teaspoon of ground cinnamon, and a pinch of salt until well combined.
3. In a separate bowl, beat 1 large egg, then stir in 1/3 cup of milk and 2 tablespoons of melted butter until smooth.
4. Tip: Gently fold the wet ingredients into the dry mixture until just combined; overmixing can make the fritters tough.
5. Fold in the diced apple pieces until evenly distributed throughout the batter.
6. Lightly dust your hands with flour, then scoop about 2 tablespoons of batter and shape it into a small, flat patty, about 1/2-inch thick.
7. Tip: Place the shaped fritters on a parchment-lined tray and let them rest for 5 minutes—this helps them hold their shape better in the air fryer.
8. Lightly spray the air fryer basket with cooking spray or brush with oil to prevent sticking.
9. Arrange the fritters in a single layer in the basket, leaving space between them for air circulation.
10. Air fry at 375°F for 8-10 minutes, flipping halfway through, until golden brown and cooked through.
11. While the fritters cook, mix 1/4 cup of granulated sugar with an extra pinch of cinnamon in a shallow bowl.
12. Tip: As soon as the fritters come out of the air fryer, roll them in the cinnamon-sugar mixture while still warm—it sticks better and adds a delightful crunch.
13. Let the fritters cool on a wire rack for a few minutes before serving.
Dive into these fritters while they’re still warm; the exterior is lightly crisp from the air fryer, giving way to a soft, apple-studded interior with a cozy cinnamon hug. I love serving them with a dollop of whipped cream or a drizzle of caramel for an extra indulgent treat—they disappear fast at my house!
Juicy Air Fryer Pork Chops
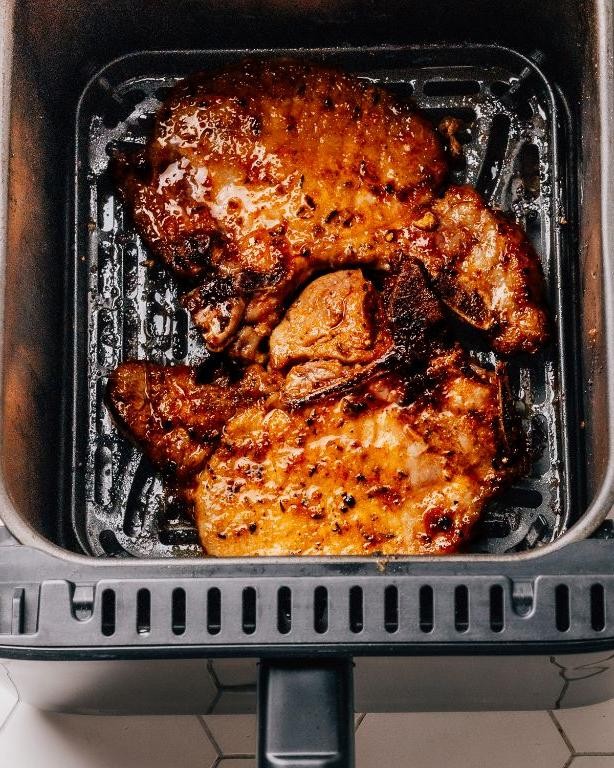
Over the weekend, I was craving something hearty but didn’t want to spend hours in the kitchen—enter these juicy air fryer pork chops! They’re my go‑to when I need a satisfying meal without the fuss, and I love how the air fryer locks in moisture so they never turn out dry. Trust me, once you try this method, you’ll be making them on repeat too.
Serving: 2 | Pre Time: 10 minutes | Cooking Time: 12 minutes
Ingredients
– A couple of boneless pork chops, about 1-inch thick
– A good drizzle of olive oil
– A generous sprinkle of garlic powder
– A pinch of smoked paprika for that cozy, smoky hint
– A splash of soy sauce for umami depth
– A tablespoon of honey for a touch of sweetness
– A dash of black pepper
Instructions
1. Pat the pork chops completely dry with paper towels—this helps the seasoning stick and promotes a better sear.
2. In a small bowl, whisk together the olive oil, garlic powder, smoked paprika, soy sauce, honey, and black pepper until smooth.
3. Rub the mixture all over both sides of the pork chops, coating them evenly. Let them sit at room temperature for 5 minutes to absorb the flavors.
4. Preheat your air fryer to 400°F for 3 minutes so it’s nice and hot when the chops go in.
5. Place the pork chops in the air fryer basket in a single layer, leaving a little space between them for air circulation.
6. Air fry at 400°F for 6 minutes, then carefully flip the chops using tongs.
7. Continue air frying for another 6 minutes, or until the internal temperature reaches 145°F on a meat thermometer—this ensures they’re safe to eat but still juicy.
8. Transfer the pork chops to a plate and let them rest for 5 minutes; this allows the juices to redistribute so every bite is tender.
Keep these chops in mind for busy nights—they come out incredibly juicy with a caramelized, slightly sticky glaze from the honey and soy sauce. I love serving them over a bed of creamy mashed potatoes or with a crisp side salad to balance the richness.
Garlic Parmesan Air Fryer Potato Wedges
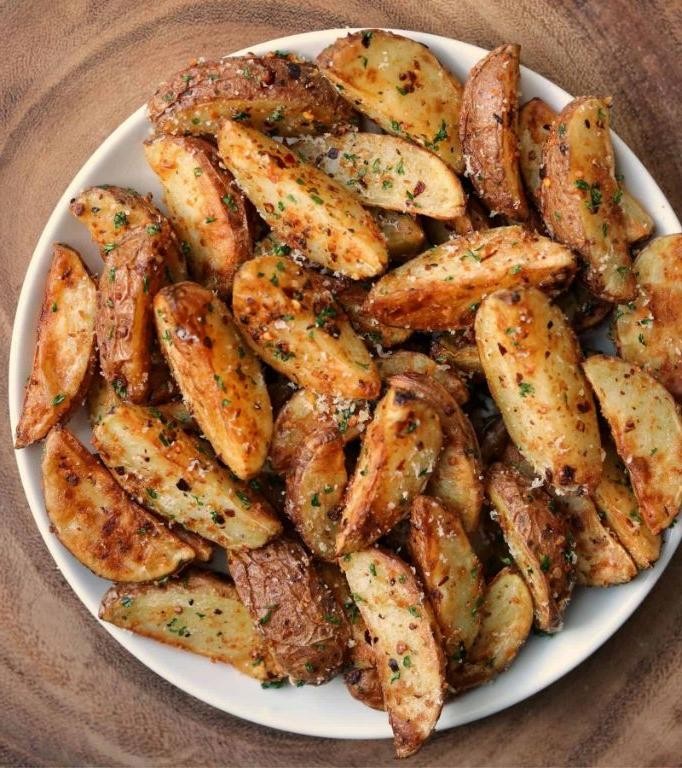
Crispy, garlicky, and utterly addictive—these Garlic Parmesan Air Fryer Potato Wedges are my go‑by when I need a quick side that feels like a treat. I discovered this recipe during a busy weeknight when my oven was on the fritz, and now I make them almost every Friday as a fun start to the weekend. They’re so simple, yet the air fryer gives them that perfect golden crunch without all the oil.
Serving: 4 | Pre Time: 10 minutes | Cooking Time: 20 minutes
Ingredients
– 4 medium russet potatoes, scrubbed clean (no need to peel, I love the skin!)
– A good glug of olive oil, about 2 tablespoons
– 3 cloves of garlic, minced—fresh is best here for that punchy flavor
– A generous ¼ cup of grated Parmesan cheese
– A couple of teaspoons of dried Italian seasoning
– A big pinch of salt and a few cracks of black pepper
Instructions
1. Cut each potato lengthwise into 8 wedges, aiming for even sizes so they cook uniformly.
2. In a large bowl, toss the potato wedges with the olive oil, minced garlic, Italian seasoning, salt, and pepper until evenly coated. Tip: Let them sit for 5 minutes—this helps the flavors meld and the potatoes dry slightly for crispier results.
3. Preheat your air fryer to 400°F for 3 minutes to ensure it’s hot and ready.
4. Arrange the wedges in a single layer in the air fryer basket, leaving a little space between them for air circulation. You may need to cook in batches to avoid overcrowding.
5. Air fry at 400°F for 15 minutes, shaking the basket halfway through to promote even browning. Tip: Check at the 12‑minute mark—if they’re already golden, they might be done early depending on your air fryer model.
6. Sprinkle the grated Parmesan cheese evenly over the wedges and air fry for another 3–5 minutes at 400°F, until the cheese is melted and lightly golden. Tip: Keep an eye here; Parmesan can burn quickly, so stop as soon as it looks toasty.
7. Remove the wedges carefully with tongs and let them cool for a minute or two on a plate—they’ll crisp up a bit more as they sit.
Eat them straight away while they’re hot and crispy! The edges get wonderfully crunchy, while the centers stay tender, and that garlic‑Parmesan combo is downright irresistible. I love serving these with a dollop of cool ranch dip or alongside grilled chicken for a full meal—they disappear fast, so maybe double the batch!
Air Fryer Veggie Nuggets with Ranch Dip

Tired of the same old veggie sides? I was too, until I started whipping up these crispy Air Fryer Veggie Nuggets with Ranch Dip—they’re my go‑for snack when I’m craving something crunchy but don’t want to fuss with deep‑frying. Honestly, they’re so good my kids now ask for them over store‑bought nuggets!
Serving: 4 | Pre Time: 15 minutes | Cooking Time: 12 minutes
Ingredients
– 2 cups of finely grated cauliflower (about half a small head)
– 1 cup of cooked quinoa (I use leftover quinoa from last night’s dinner)
– ½ cup of grated Parmesan cheese
– 1 large egg, lightly beaten
– 2 tablespoons of all‑purpose flour
– 1 teaspoon of garlic powder
– ½ teaspoon of smoked paprika
– A good pinch of salt and black pepper
– Cooking spray (I prefer avocado oil spray)
– For the ranch dip: ½ cup of plain Greek yogurt, 2 tablespoons of mayonnaise, a splash of lemon juice, 1 teaspoon of dried dill, and a couple of minced garlic cloves
Instructions
1. Preheat your air fryer to 400°F for about 3 minutes—this helps the nuggets crisp up evenly.
2. In a large bowl, combine the grated cauliflower, cooked quinoa, Parmesan, egg, flour, garlic powder, smoked paprika, salt, and pepper. Mix with your hands until everything sticks together. (Tip: Squeeze out excess moisture from the cauliflower with a clean towel to prevent soggy nuggets.)
3. Shape the mixture into 16 small nuggets, about 1‑inch thick, and place them on a plate.
4. Lightly spray the air fryer basket with cooking spray, then arrange the nuggets in a single layer without touching. You might need to cook in batches.
5. Air fry at 400°F for 10–12 minutes, flipping halfway through, until golden brown and crispy. (Tip: Check at 10 minutes—if they’re not browned enough, add 1–2 more minutes.)
6. While the nuggets cook, whisk together the Greek yogurt, mayonnaise, lemon juice, dill, and minced garlic in a small bowl for the ranch dip. (Tip: Let the dip sit for 5 minutes so the flavors meld.)
7. Carefully remove the nuggets from the air fryer and let them cool for a minute on a wire rack—this keeps them extra crisp.
Grab a nugget straight from the air fryer and dip it into that cool, herby ranch—the contrast between the crispy exterior and tender, savory inside is downright addictive. I love serving these with extra veggies on the side or stuffing them into pita pockets for a quick lunch.
Air Fried Mozzarella Sticks

Haven’t we all been there—craving that crispy, gooey mozzarella stick magic but dreading the mess and oil of deep frying? I sure have, especially on busy weeknights when my kitchen counter looks like a tornado hit it. That’s why I’m obsessed with these Air Fried Mozzarella Sticks: they deliver all the cheesy satisfaction with way less fuss and guilt, perfect for a quick snack or game-day spread.
Serving: 4 | Pre Time: 15 minutes | Cooking Time: 10 minutes
Ingredients
– 8 mozzarella string cheese sticks
– 1 cup of all-purpose flour
– 2 large eggs, lightly beaten
– 1 cup of Italian-style breadcrumbs (I like the ones with herbs already mixed in)
– A couple of tablespoons of grated Parmesan cheese
– A splash of milk (about 1 tablespoon) to help the eggs coat better
– Cooking spray (the olive oil kind works great)
– Your favorite marinara sauce for dipping (about 1 cup)
Instructions
1. Line a baking sheet with parchment paper and set it aside.
2. Cut each mozzarella string cheese stick in half crosswise to make 16 pieces total.
3. Place the 1 cup of all-purpose flour in a shallow bowl.
4. In another shallow bowl, whisk together the 2 large eggs and a splash of milk until smooth.
5. In a third shallow bowl, combine the 1 cup of Italian-style breadcrumbs and a couple of tablespoons of grated Parmesan cheese.
6. Dredge each mozzarella piece in the flour, shaking off any excess.
7. Dip the floured piece into the egg mixture, letting any drip off.
8. Roll the piece in the breadcrumb mixture, pressing gently to coat evenly. Tip: For extra crispiness, double-coat by repeating the egg and breadcrumb steps once.
9. Place the coated sticks on the prepared baking sheet and freeze for at least 10 minutes. Tip: Freezing helps prevent cheese leakage during cooking—don’t skip this!
10. Preheat your air fryer to 400°F for about 3 minutes.
11. Lightly spray the air fryer basket with cooking spray.
12. Arrange the frozen sticks in a single layer in the basket, leaving space between them.
13. Lightly spray the tops of the sticks with cooking spray.
14. Air fry at 400°F for 8–10 minutes, flipping halfway through, until golden brown and crispy. Tip: Check at 8 minutes—they cook fast, and you want the cheese melted but not oozing out.
15. While cooking, heat the 1 cup of marinara sauce in a small saucepan over medium heat until warm, about 5 minutes.
16. Carefully remove the sticks from the air fryer and let them cool for a minute on a plate.
17. Serve immediately with the warm marinara sauce for dipping.
Unbelievably, these come out with a satisfying crunch that gives way to that stretchy, molten mozzarella center—no sogginess in sight. I love pairing them with a zesty marinara for that classic combo, but they’re also fantastic with a ranch dip or even on top of a salad for a fun twist.
Air Fryer Lemon Herb Chicken Thighs
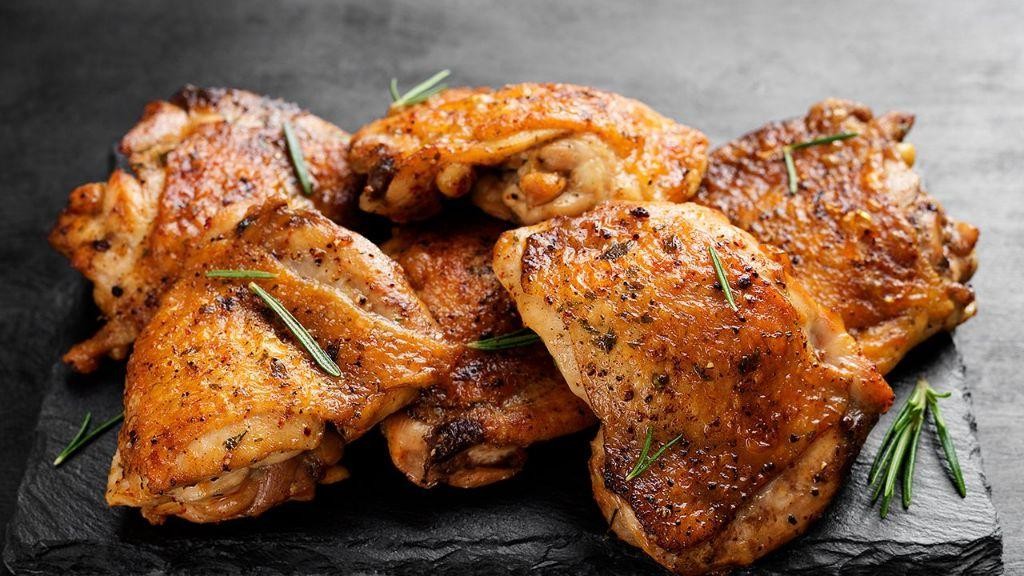
Remember those hectic weeknights when you’d rather order takeout than cook? I’ve been there too, which is why I’m obsessed with this fuss-free, flavor-packed chicken that comes together with minimal effort. My air fryer has become my kitchen hero for dishes like this, delivering crispy skin and juicy meat without heating up the whole house.
Serving: 4 | Pre Time: 10 minutes | Cooking Time: 20 minutes
Ingredients
– A couple of pounds of bone-in, skin-on chicken thighs (about 4–6 pieces)
– A good glug of olive oil, about 2 tablespoons
– The zest and juice from one large lemon
– A couple of minced garlic cloves
– A handful of fresh herbs—I love using rosemary and thyme, roughly chopped
– A generous pinch of kosher salt and freshly ground black pepper
Instructions
1. Pat the chicken thighs completely dry with paper towels—this helps the skin get extra crispy in the air fryer.
2. In a large bowl, combine the olive oil, lemon zest, lemon juice, minced garlic, chopped herbs, salt, and pepper.
3. Add the chicken thighs to the bowl and toss them thoroughly to coat every piece with the marinade. Let them sit for at least 5 minutes to soak up the flavors.
4. Preheat your air fryer to 400°F for about 3 minutes, which ensures even cooking from the start.
5. Arrange the chicken thighs in a single layer in the air fryer basket, skin-side up, making sure they aren’t touching so air can circulate.
6. Air fry at 400°F for 10 minutes, then carefully flip each thigh using tongs.
7. Continue air frying for another 8–10 minutes, or until the internal temperature reaches 165°F when checked with a meat thermometer and the skin is golden brown and crispy.
8. Let the chicken rest for 5 minutes on a plate before serving to allow the juices to redistribute.
Every bite of this chicken is a burst of zesty lemon and aromatic herbs, with skin so crisp it crackles. I love shredding the leftovers into salads or stuffing them into warm tortillas with avocado for a quick lunch the next day.
Air Fried Churros with Chocolate Sauce
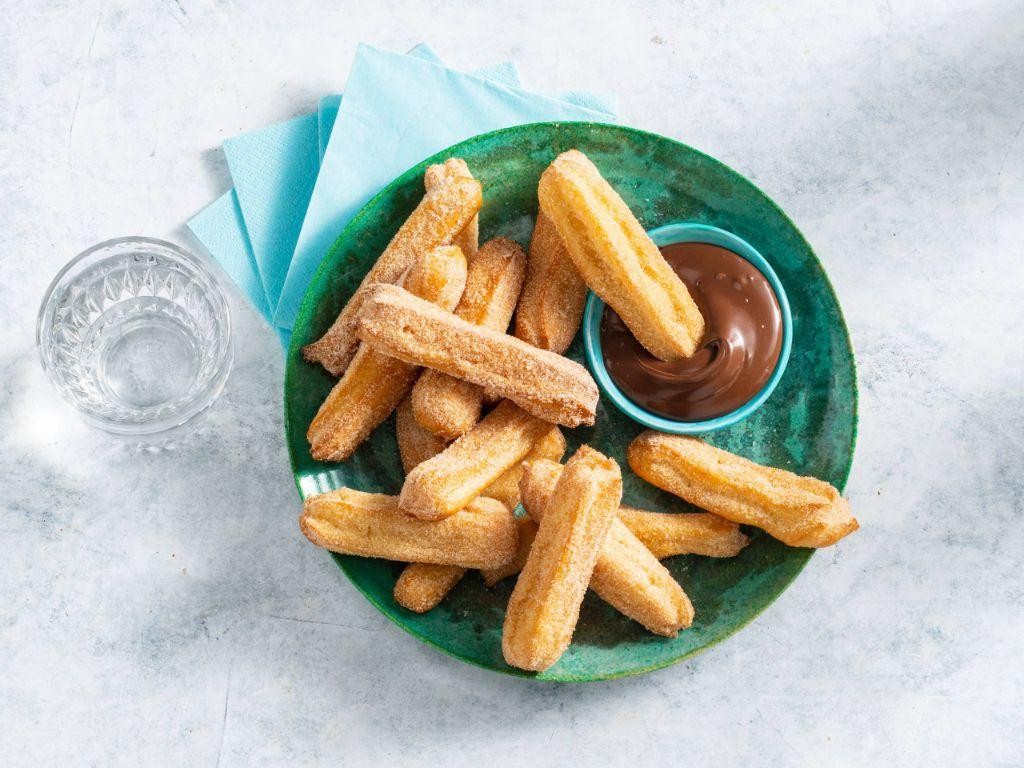
Just when I thought my air fryer couldn’t get any more magical, it whipped up these crispy, cinnamon-sugar churros that taste like a carnival in my kitchen. I’ve been experimenting with healthier twists on my favorite treats lately, and skipping the deep fryer for this one was a total game-changer—my kids didn’t even notice the difference, and that’s saying something!
Serving: 4 | Pre Time: 15 minutes | Cooking Time: 10 minutes
Ingredients
– A cup of water
– A stick of unsalted butter (that’s ½ cup)
– A pinch of salt
– A cup of all-purpose flour
– A couple of large eggs
– A splash of vanilla extract
– A half cup of granulated sugar mixed with a tablespoon of ground cinnamon for coating
– For the chocolate sauce: a half cup of heavy cream and 4 ounces of semi-sweet chocolate chips
Instructions
1. In a medium saucepan, combine 1 cup of water, ½ cup of unsalted butter, and a pinch of salt over medium-high heat until it comes to a boil.
2. Reduce the heat to low and stir in 1 cup of all-purpose flour all at once, mixing vigorously with a wooden spoon until it forms a smooth ball that pulls away from the sides of the pan—this should take about 1 minute.
3. Tip: Let the dough cool for 5 minutes to avoid cooking the eggs, which helps prevent a lumpy texture.
4. Transfer the dough to a mixing bowl and beat in 2 large eggs, one at a time, until fully incorporated, then mix in a splash of vanilla extract until the dough is glossy and thick.
5. Spoon the dough into a piping bag fitted with a large star tip—if you don’t have one, a zip-top bag with a corner snipped off works, though the ridges won’t be as defined.
6. Pipe 4-inch strips of dough onto parchment paper, cutting them with scissors, and freeze for 10 minutes to help them hold their shape during cooking.
7. Preheat your air fryer to 375°F for 3 minutes, then lightly spray the basket with cooking oil.
8. Arrange the churros in a single layer in the air fryer basket, leaving space between them, and air fry at 375°F for 8–10 minutes, flipping halfway through, until golden brown and crisp.
9. Tip: Check at 8 minutes—if they’re not quite crispy, add another minute or two, as air fryers can vary in heat distribution.
10. While the churros cook, make the chocolate sauce by heating ½ cup of heavy cream in a small saucepan over medium heat until it just begins to simmer, then pour it over 4 ounces of semi-sweet chocolate chips in a bowl and let sit for 1 minute before stirring until smooth.
11. Tip: For a thinner sauce, add a teaspoon of warm water; if it’s too thin, let it cool slightly to thicken up.
12. Immediately roll the hot churros in the cinnamon-sugar mixture until evenly coated, working quickly so the sugar sticks well.
13. Serve the churros warm with the chocolate sauce for dipping.
Generously dusted with cinnamon-sugar, these churros have a delightfully crunchy exterior that gives way to a soft, airy center—perfect for dunking into that rich, velvety chocolate sauce. I love serving them with a side of fresh berries for a pop of color, or even crumbling them over vanilla ice cream for an extra-indulgent dessert twist.
Conclusion
So many tasty possibilities await in your West Bend air fryer! From crispy snacks to hearty meals, these 27 recipes prove it’s a kitchen superstar. We’d love to hear which dish becomes your new favorite—drop a comment below and share this roundup on Pinterest to spread the air frying joy!