
Unforgettable celebrations begin with delicious food! Planning a wedding shower brunch? You’re in the right place. We’ve gathered 21 elegant recipes that blend sophistication with approachable flavors, perfect for creating a memorable gathering. From savory bites to sweet finales, these dishes are designed to impress your guests without stressing the host. Let’s dive into a collection that promises to make your celebration truly special.
Smoked Salmon and Dill Quiche

Wandering through the kitchen this morning, I found myself craving something both comforting and elegant—a dish that feels like a quiet celebration of simple ingredients coming together. The gentle aroma of dill and the rich promise of smoked salmon whispered of a quiche that’s perfect for a leisurely brunch or a light supper, its flaky crust cradling a creamy, savory filling that’s as nourishing as it is delightful.
Serving: 6 | Pre Time: 20 minutes | Cooking Time: 45 minutes
Ingredients
– A single 9-inch pie crust, either store-bought or homemade
– 4 large eggs
– A cup of heavy cream
– A splash of whole milk, about ¼ cup
– 4 ounces of smoked salmon, flaked into little pieces
– A handful of fresh dill, finely chopped
– A cup of shredded Gruyère cheese
– A pinch of salt and a couple of cracks of black pepper
– A tablespoon of unsalted butter, for greasing
Instructions
1. Preheat your oven to 375°F (190°C) and lightly grease a 9-inch pie dish with the tablespoon of unsalted butter to prevent sticking.
2. Gently press the 9-inch pie crust into the prepared dish, trimming any excess edges with a knife or your fingers for a neat fit.
3. In a medium mixing bowl, whisk together the 4 large eggs until they’re smooth and slightly frothy, which helps create a light texture in the quiche.
4. Pour in the cup of heavy cream and the ¼ cup of whole milk, continuing to whisk until fully combined and creamy.
5. Stir in the cup of shredded Gruyère cheese, the 4 ounces of flaked smoked salmon, and the handful of finely chopped fresh dill until evenly distributed throughout the mixture.
6. Season the mixture with a pinch of salt and a couple of cracks of black pepper, adjusting lightly as the salmon adds its own savory note.
7. Carefully pour the filling into the pie crust, using a spatula to scrape the bowl clean and spread it evenly without overfilling.
8. Place the quiche in the preheated oven and bake for 45 minutes, or until the top is golden brown and the center is set, with no jiggle when gently shaken.
9. Remove from the oven and let it cool on a wire rack for at least 10 minutes before slicing to allow the filling to firm up nicely.
10. Serve warm or at room temperature, slicing into wedges with a sharp knife for clean edges.
Delight in the way the flaky crust gives way to a velvety, rich interior, where the smoky salmon and fresh dill mingle in every bite. This quiche pairs beautifully with a simple green salad or some roasted asparagus for a complete meal, its flavors deepening as it sits, making any leftovers a treat the next day.
Mini Avocado Toast Bites

Kneading through memories of lazy weekend brunches, I find myself craving something small yet satisfying—a snack that feels both indulgent and effortless. These mini avocado toast bites capture that cozy moment, transforming simple ingredients into little bites of creamy, crunchy delight. They’re perfect for when you want something special without the fuss.
Serving: 12 bites | Pre Time: 10 minutes | Cooking Time: 5 minutes
Ingredients
– A couple of slices of whole-grain bread, cut into 12 small rounds
– One ripe avocado, pitted and scooped
– A splash of fresh lemon juice, about 1 tbsp
– A pinch of sea salt
– A sprinkle of red pepper flakes
– A handful of microgreens or arugula for topping
– A drizzle of extra-virgin olive oil
Instructions
1. Preheat your oven to 375°F and line a baking sheet with parchment paper.
2. Use a small round cookie cutter or glass to cut 12 circles from the bread slices, discarding the crusts.
3. Place the bread rounds on the prepared baking sheet in a single layer.
4. Toast the bread in the oven for 4-5 minutes, until lightly golden and crisp at the edges—keep an eye on them to prevent burning.
5. While the bread toasts, scoop the avocado flesh into a small bowl and mash it with a fork until mostly smooth but with some small chunks for texture.
6. Stir in the lemon juice and sea salt until well combined; the acid helps prevent browning and brightens the flavor.
7. Remove the toasted bread rounds from the oven and let them cool on the baking sheet for 1-2 minutes to firm up.
8. Spoon about 1 tsp of the avocado mixture onto each bread round, spreading it gently to cover the surface.
9. Top each bite with a few microgreens or arugula leaves for a fresh, peppery contrast.
10. Finish with a sprinkle of red pepper flakes and a light drizzle of olive oil over all the bites.
Just as the last drizzle settles, these bites offer a delightful play of textures—the crisp bread gives way to the creamy avocado, while the greens add a tender crunch. Joyfully, they’re versatile too; try them with a sprinkle of everything bagel seasoning or a dollop of crumbled feta for a tangy twist at your next gathering.
Herb-Infused Chicken Salad Croissants
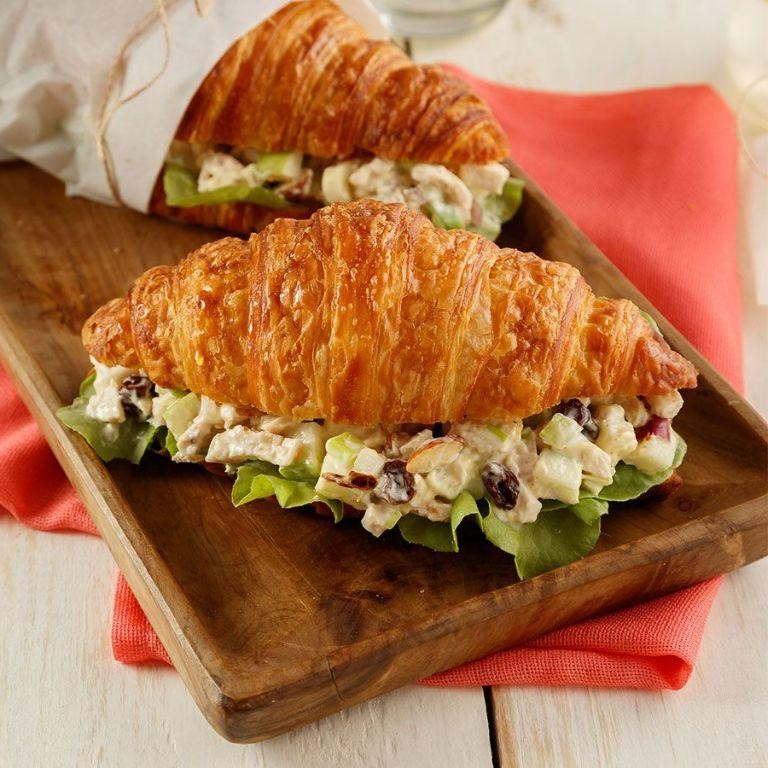
Today, as the afternoon light slants through my kitchen window, I find myself craving something both comforting and elegant—a simple pleasure to savor slowly. These herb-infused chicken salad croissants are just that: tender, fragrant, and perfect for a quiet moment or a shared gathering.
Serving: 4 | Pre Time: 20 minutes | Cooking Time: 15 minutes
Ingredients
– 2 cups of cooked, shredded chicken breast (about 1 pound before cooking)
– 4 large croissants, split open gently
– 1/2 cup of mayonnaise
– 1/4 cup of plain Greek yogurt
– 1/4 cup of finely chopped celery
– 2 tablespoons of fresh lemon juice
– 1 tablespoon of Dijon mustard
– 2 tablespoons of chopped fresh dill
– 1 tablespoon of chopped fresh parsley
– 1/4 teaspoon of garlic powder
– A pinch of salt and black pepper
Instructions
1. In a medium mixing bowl, combine the shredded chicken, mayonnaise, Greek yogurt, chopped celery, lemon juice, Dijon mustard, fresh dill, fresh parsley, garlic powder, salt, and black pepper.
2. Gently fold all ingredients together until evenly coated, being careful not to overmix to keep the chicken tender.
3. Taste the mixture and adjust seasoning if needed, but avoid adding more salt until after chilling to let flavors meld.
4. Cover the bowl with plastic wrap and refrigerate the chicken salad for at least 30 minutes to allow the herbs to infuse and the flavors to deepen.
5. While the salad chills, preheat your oven to 350°F and place the split croissants on a baking sheet.
6. Toast the croissants in the oven for 5-7 minutes, or until they are lightly golden and crisp on the edges but still soft inside.
7. Remove the croissants from the oven and let them cool for 2-3 minutes to prevent the salad from wilting when assembled.
8. Spoon about 1/2 cup of the chilled chicken salad onto the bottom half of each croissant, spreading it evenly with a spoon.
9. Place the top half of each croissant gently over the salad, pressing down lightly to secure it without crushing the filling.
10. Serve immediately, or wrap individually in parchment paper for a portable meal that stays fresh for a few hours.
Most delightful is the way the creamy, herb-kissed chicken contrasts with the flaky, buttery croissant—each bite offers a subtle crunch from the celery and a bright zing from the lemon. For a creative twist, try adding a handful of toasted almonds or serving it alongside a simple arugula salad drizzled with olive oil.
Rosemary and Goat Cheese Stuffed Mushrooms
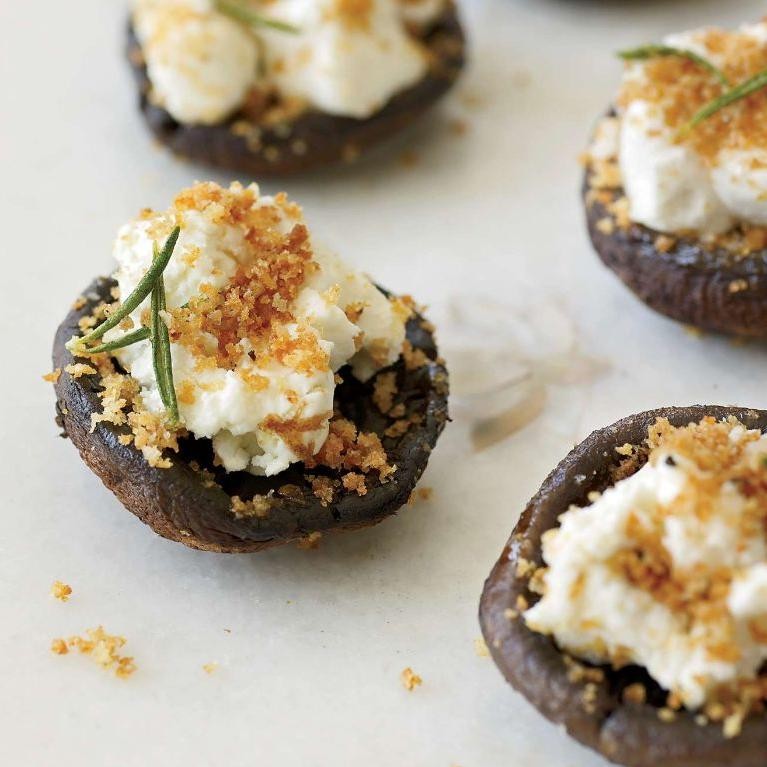
Just now, as the afternoon light slants through my kitchen window, I find myself reaching for the familiar comfort of these stuffed mushrooms—a recipe that feels like a quiet conversation with the seasons. They’re simple, earthy, and carry the gentle warmth of rosemary, perfect for those moments when you crave something both elegant and uncomplicated.
Serving: 4 | Pre Time: 15 minutes | Cooking Time: 20 minutes
Ingredients
– About 16 large cremini mushrooms, stems removed and saved
– A couple of tablespoons of olive oil
– A splash of balsamic vinegar
– A small handful of fresh rosemary, finely chopped
– A 4-ounce log of creamy goat cheese
– Half a cup of panko breadcrumbs
– A pinch of salt and a few cracks of black pepper
Instructions
1. Preheat your oven to 400°F and line a baking sheet with parchment paper.
2. Gently clean the mushroom caps with a damp paper towel—avoid rinsing them, as they can absorb too much water and become soggy.
3. Finely chop the reserved mushroom stems and sauté them in a skillet with 1 tablespoon of olive oil over medium heat for about 5 minutes, until softened.
4. In a mixing bowl, combine the sautéed stems, goat cheese, chopped rosemary, balsamic vinegar, salt, and pepper, stirring until smooth.
5. Spoon the filling evenly into each mushroom cap, mounding it slightly.
6. In a small bowl, toss the panko breadcrumbs with the remaining tablespoon of olive oil to coat lightly.
7. Sprinkle the oiled panko over the stuffed mushrooms, pressing gently so it adheres—this will give them a lovely golden crunch.
8. Bake on the prepared sheet for 18–20 minutes, until the mushrooms are tender and the tops are crisp and lightly browned.
9. Let them cool for 5 minutes before serving; this allows the flavors to settle and prevents burning your mouth.
Gooey and fragrant, these mushrooms emerge from the oven with a tender bite and a creamy, herb-infused center that melts into the earthy caps. Serve them warm on a rustic platter, perhaps drizzled with a touch of honey for a sweet contrast, or alongside a crisp salad for a light, satisfying meal.
Lavender-Scented Scones with Honey Butter

A quiet morning calls for something special, something that feels like a gentle pause in the rush of the day. These lavender-scented scones, with their tender crumb and floral whisper, are just that—a simple, fragrant treat to enjoy with a dollop of honey butter.
Serving: 8 | Pre Time: 15 minutes | Cooking Time: 15 minutes
Ingredients
– A couple of cups of all-purpose flour
– A good pinch of salt
– A tablespoon of baking powder
– A third of a cup of granulated sugar
– A half cup of cold unsalted butter, cut into small cubes
– A splash of heavy cream
– A couple of large eggs
– A teaspoon of dried culinary lavender buds
– For the honey butter: a half cup of softened unsalted butter and a quarter cup of honey
Instructions
1. Preheat your oven to 400°F and line a baking sheet with parchment paper.
2. In a large bowl, whisk together the flour, salt, baking powder, and sugar until well combined.
3. Add the cold butter cubes to the dry ingredients and use your fingertips or a pastry cutter to work them in until the mixture resembles coarse crumbs with some pea-sized pieces remaining.
4. In a separate small bowl, lightly beat the eggs and heavy cream together, then stir in the lavender buds.
5. Pour the wet ingredients into the dry mixture and gently fold with a spatula just until a shaggy dough forms—be careful not to overmix, as this keeps the scones tender.
6. Turn the dough out onto a lightly floured surface and pat it into a 1-inch thick circle.
7. Use a sharp knife or a biscuit cutter to cut the dough into 8 wedges or rounds, placing them about 2 inches apart on the prepared baking sheet.
8. Brush the tops of the scones lightly with a bit of extra cream for a golden finish, then bake for 12-15 minutes, or until they are puffed and just starting to turn golden brown around the edges.
9. While the scones bake, make the honey butter by mixing the softened butter and honey in a small bowl until smooth and creamy.
10. Let the scones cool on the baking sheet for 5 minutes before transferring to a wire rack.
11. Serve the warm scones with a generous smear of the honey butter on the side.
Melt-in-your-mouth tender with a subtle floral aroma, these scones pair beautifully with a hot cup of tea or coffee. For a creative twist, try crumbling a warm scone over vanilla ice cream or serving it alongside fresh berries for a delightful breakfast or afternoon treat.
Prosciutto Wrapped Asparagus Spears

Wandering through the market today, I found myself drawn to the slender green stalks of asparagus, their tips still tightly furled, and knew they’d be perfect wrapped in salty, paper-thin prosciutto—a simple pleasure that feels both elegant and comforting.
Serving: 4 | Pre Time: 10 minutes | Cooking Time: 15 minutes
Ingredients
– a bunch of fresh asparagus spears (about 20 spears)
– 8 thin slices of prosciutto
– a couple of tablespoons of olive oil
– a generous pinch of kosher salt
– a few cracks of freshly ground black pepper
Instructions
1. Preheat your oven to 400°F and line a baking sheet with parchment paper.
2. Rinse the asparagus spears under cold water and pat them completely dry with a clean kitchen towel—this helps the prosciutto stick better.
3. Trim off the tough, woody ends of the asparagus by snapping each spear where it naturally breaks, about 1-2 inches from the bottom.
4. Drizzle the asparagus with olive oil, then sprinkle evenly with kosher salt and black pepper, tossing gently to coat.
5. Cut each prosciutto slice in half lengthwise to create 16 long, thin strips.
6. Wrap one prosciutto strip around each asparagus spear, starting just below the tip and spiraling down to the base, overlapping slightly; the prosciutto should adhere to itself.
7. Arrange the wrapped spears in a single layer on the prepared baking sheet, leaving a little space between them for even cooking.
8. Roast in the preheated oven for 12-15 minutes, until the prosciutto is crisp and the asparagus is tender when pierced with a fork.
9. Remove from the oven and let cool for 2-3 minutes on the baking sheet—this allows the prosciutto to crisp up further as it rests.
10. Transfer to a serving platter immediately to prevent sogginess.
Buttery-tender asparagus meets the savory crunch of prosciutto in every bite, with the olive oil adding a subtle richness. Serve these warm, perhaps with a dollop of lemon aioli for dipping, or scatter them over a fresh salad for a textural contrast that’s utterly delightful.
Garden Vegetable Frittata

Holding this warm ceramic dish in my hands, I’m reminded how the simplest ingredients from the garden can become a quiet, nourishing meal. It’s a gentle way to use up those last bits of summer produce, turning them into something soft and satisfying for a slow morning or a simple supper.
Serving: 4 | Pre Time: 15 minutes | Cooking Time: 25 minutes
Ingredients
– 8 large eggs
– A splash of whole milk, about 2 tablespoons
– A good pinch of kosher salt and a few cracks of black pepper
– A glug of olive oil, roughly 1 tablespoon
– A small yellow onion, thinly sliced
– A couple of cloves of garlic, minced
– A handful of baby spinach, roughly chopped
– A cup of cherry tomatoes, halved
– Half a red bell pepper, diced
– A generous half-cup of shredded sharp cheddar cheese
Instructions
1. Crack the 8 large eggs into a medium bowl.
2. Add the splash of whole milk, the good pinch of kosher salt, and the few cracks of black pepper to the bowl.
3. Whisk the egg mixture vigorously with a fork until it’s completely smooth and slightly frothy, about 1 minute. (Tip: Thorough whisking incorporates air for a fluffier frittata.)
4. Place a 10-inch oven-safe skillet over medium heat on the stovetop.
5. Pour the glug of olive oil into the preheating skillet and swirl it to coat the bottom.
6. Add the thinly sliced small yellow onion to the hot oil.
7. Cook the onion, stirring occasionally, until it becomes soft and translucent, about 5 minutes.
8. Add the minced couple of cloves of garlic to the skillet and cook for 1 more minute, just until fragrant.
9. Add the handful of roughly chopped baby spinach, the cup of halved cherry tomatoes, and the diced half red bell pepper to the skillet.
10. Cook the vegetables, stirring gently, until the spinach wilts and the tomatoes just begin to soften, about 3-4 minutes. (Tip: Sautéing the vegetables first removes excess moisture for a better texture.)
11. Preheat your oven’s broiler to a high setting, roughly 500°F.
12. Pour the whisked egg mixture evenly over the cooked vegetables in the skillet.
13. Let the eggs cook undisturbed over medium-low heat until the edges are just set, about 5-7 minutes.
14. Sprinkle the generous half-cup of shredded sharp cheddar cheese evenly over the top of the setting eggs.
15. Carefully transfer the skillet from the stovetop to the preheated oven, placing it on a rack about 6 inches from the broiler element.
16. Broil the frittata until the top is golden brown, the center is fully set, and a knife inserted comes out clean, about 3-5 minutes. (Tip: Watch it closely under the broiler, as it can go from golden to burnt quickly.)
17. Remove the skillet from the oven using an oven mitt.
18. Let the frittata rest in the skillet for 5 full minutes before slicing.
This frittata emerges with a custardy, tender center and a beautifully bronzed, cheesy top. The sweet tomatoes and peppers soften into the eggs, creating pockets of gentle flavor. Try serving a wedge alongside a simple green salad dressed with lemon, or tuck a slice into a warm tortilla for a hearty breakfast wrap.
Zucchini and Corn Pancakes with Lemon Ricotta

Zucchini and corn pancakes with lemon ricotta—this is the kind of quiet, comforting meal I find myself making on a slow afternoon, when the light slants through the kitchen window and the world feels a little softer.
Serving: 4 | Pre Time: 15 minutes | Cooking Time: 20 minutes
Ingredients
– A couple of medium zucchinis, grated
– A cup of fresh or frozen corn kernels
– A cup of all-purpose flour
– Two large eggs
– A quarter cup of milk
– A couple of tablespoons of melted butter, plus a little extra for the pan
– A teaspoon of baking powder
– A good pinch of salt and a few cracks of black pepper
– For the topping: a cup of whole milk ricotta, the zest and juice from one lemon, and a drizzle of honey
Instructions
1. Place the grated zucchini in a clean kitchen towel and squeeze it firmly over the sink to remove as much liquid as possible—this keeps your pancakes from getting soggy.
2. In a large bowl, combine the squeezed zucchini, corn, flour, eggs, milk, the two tablespoons of melted butter, baking powder, salt, and pepper. Stir gently until just combined; a few lumps are fine.
3. Heat a large non-stick skillet or griddle over medium heat and add a small pat of the extra butter, swirling to coat the surface.
4. For each pancake, scoop about a quarter cup of batter onto the hot skillet. Cook for 3 to 4 minutes, until you see bubbles forming on the surface and the edges look set.
5. Carefully flip each pancake with a spatula and cook for another 2 to 3 minutes on the second side, until golden brown and cooked through. Keep finished pancakes warm on a plate in a low oven (around 200°F) while you cook the rest, adding more butter to the pan as needed.
6. While the pancakes cook, make the lemon ricotta: in a small bowl, stir together the ricotta, lemon zest, lemon juice, and a drizzle of honey until smooth and creamy.
Using a light hand when mixing the batter ensures tender pancakes, and letting the skillet get properly hot before adding the batter gives you that perfect golden crust. Ultimately, these pancakes are wonderfully crisp on the outside yet tender within, with the sweet corn and mild zucchini playing against the bright, creamy ricotta—try stacking them high for a casual brunch or serving them alongside a simple green salad for a light supper.
Berry and Mint Fruit Salad
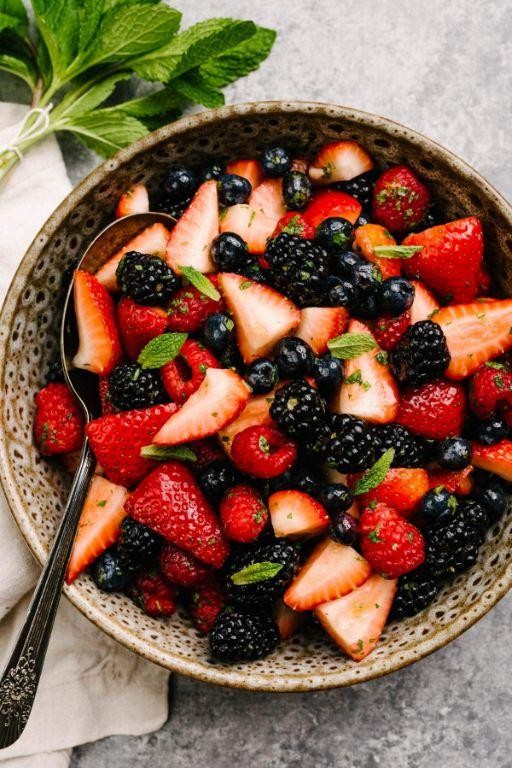
Often, the simplest moments in the kitchen are the ones that feel most like a quiet conversation with myself. On a day like today, when the light is soft and the pace is gentle, I find myself drawn to assembling something fresh and vibrant—a little bowl of brightness that requires no heat, just a bit of mindful preparation. It’s a small, reflective act of gathering berries and mint, a way to pause and savor the quiet.
Serving: 4 | Pre Time: 15 minutes | Cooking Time: 0 minutes
Ingredients
– A couple of cups of mixed fresh berries (like strawberries, blueberries, and raspberries)
– A handful of fresh mint leaves
– A splash of fresh lime juice (about 2 tablespoons)
– A drizzle of honey (about 1 tablespoon)
– A pinch of fine sea salt
Instructions
1. Rinse the mixed berries gently under cool running water in a colander, then pat them dry with a clean kitchen towel to prevent sogginess.
2. Hull the strawberries by removing the green tops with a paring knife, then slice them into bite-sized pieces.
3. Place all the berries in a large mixing bowl, taking care not to crush the delicate raspberries.
4. Pick the fresh mint leaves from their stems, discarding any tough stems, and stack them neatly on a cutting board.
5. Roll the mint leaves into a tight bundle and thinly slice them with a sharp knife to create fine ribbons, which will release their aroma more evenly.
6. Sprinkle the sliced mint over the berries in the bowl, tossing lightly with your hands to distribute it without bruising the fruit.
7. Squeeze the juice from half a lime directly into a small bowl, straining out any seeds, to get about 2 tablespoons of fresh lime juice.
8. Drizzle the lime juice and honey over the berry mixture, adding a pinch of fine sea salt to balance the sweetness.
9. Gently fold everything together with a large spoon until the berries are lightly coated, being careful not to overmix to keep the texture intact.
10. Let the salad sit at room temperature for 5 minutes to allow the flavors to meld, then serve immediately for the best freshness.
Mixing these elements creates a salad that’s both juicy and refreshing, with the mint adding a cool, herbal note that lifts the sweet-tart berries. The texture is a delightful contrast of soft berries and crisp mint, perfect for spooning over yogurt or pairing with a scoop of vanilla ice cream for a simple dessert.
Crab Cake Eggs Benedict
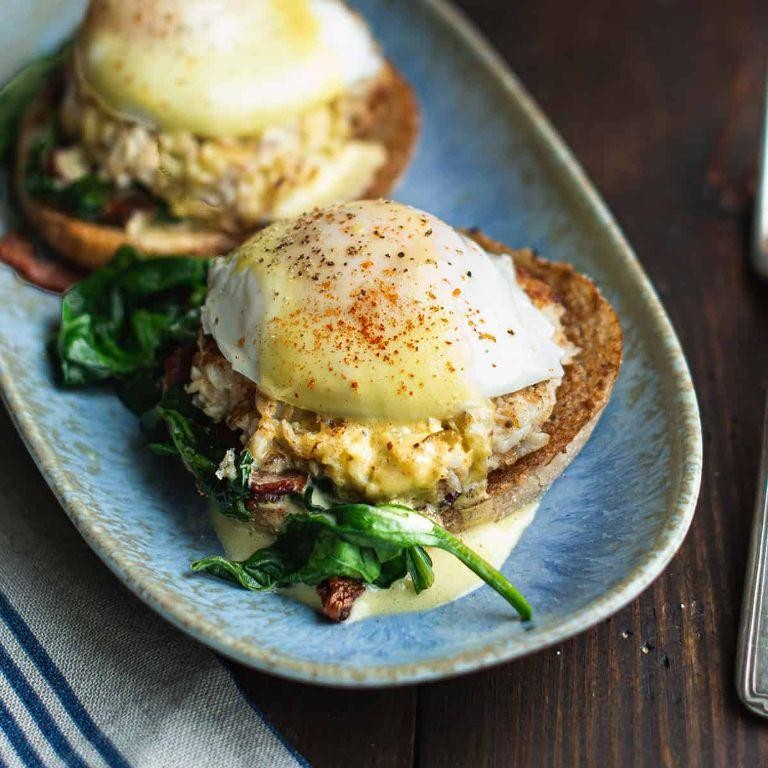
Beneath the soft morning light, I find myself craving something that feels both indulgent and comforting, a small luxury to start the day slowly. It’s a quiet moment, perfect for layering flavors that whisper of the sea and rich, velvety warmth, a gentle twist on a classic that always feels like a treat.
Serving: 2 | Pre Time: 15 minutes | Cooking Time: 20 minutes
Ingredients
– 8 ounces of lump crabmeat, picked over for shells
– 1 large egg, lightly beaten
– a quarter cup of panko breadcrumbs
– a tablespoon of mayonnaise
– a teaspoon of Dijon mustard
– a squeeze of fresh lemon juice (about half a lemon’s worth)
– a pinch of Old Bay seasoning
– a couple of tablespoons of unsalted butter
– 2 English muffins, split
– 4 large eggs, for poaching
– a splash of white vinegar
– half a cup of hollandaise sauce (store-bought or homemade)
– a few sprigs of fresh chives, chopped
Instructions
1. In a medium bowl, gently combine the lump crabmeat, the lightly beaten egg, panko breadcrumbs, mayonnaise, Dijon mustard, fresh lemon juice, and Old Bay seasoning until just mixed—be careful not to overwork it to keep the crab tender.
2. Shape the mixture into 4 equal patties, about 3 inches in diameter, and place them on a plate; chill in the refrigerator for 10 minutes to help them hold their shape while cooking.
3. Heat a couple of tablespoons of unsalted butter in a large skillet over medium heat until it melts and starts to foam slightly.
4. Carefully add the crab cakes to the skillet and cook for 4-5 minutes per side, until golden brown and crispy on the outside; tip: resist the urge to move them too soon for a better sear.
5. While the crab cakes cook, toast the split English muffins in a toaster or under a broiler until lightly golden and crisp.
6. Fill a medium saucepan with about 3 inches of water, add a splash of white vinegar, and bring to a gentle simmer over medium-low heat—tiny bubbles should rise but not boil vigorously.
7. Crack each of the 4 large eggs into a small cup, then gently slide them one at a time into the simmering water; poach for 3-4 minutes until the whites are set but the yolks are still runny, using a slotted spoon to remove them.
8. Warm the half cup of hollandaise sauce in a small saucepan over low heat, stirring occasionally, until just heated through—tip: don’t let it boil or it might separate.
9. To assemble, place a toasted English muffin half on each plate, top with a warm crab cake, then a poached egg, and drizzle generously with the hollandaise sauce.
10. Garnish with a sprinkle of chopped fresh chives for a bright, herbal finish; tip: serve immediately while everything is hot for the best texture.
Warm and inviting, this dish offers a delightful contrast: the crisp exterior of the crab cake gives way to tender, sweet meat, while the runny egg yolk mingles with the rich hollandaise in a silky embrace. For a creative touch, try serving it over a bed of lightly dressed arugula to add a peppery bite that cuts through the richness, making each forkful a layered experience of crunch and creaminess.
Vanilla Bean French Toast Casserole
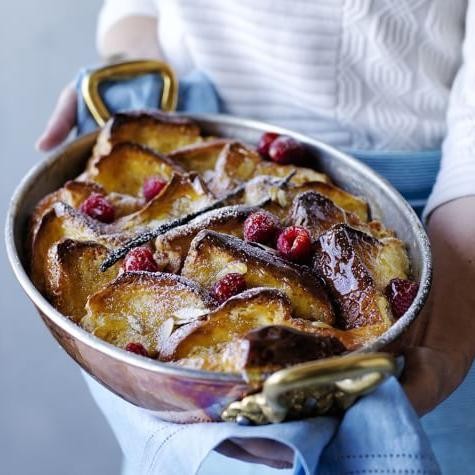
Kindly, I find myself thinking about those quiet weekend mornings when time feels expansive, and the kitchen becomes a sanctuary for slow, intentional cooking. This vanilla bean French toast casserole is one of those gentle rituals—a dish that transforms humble bread into something tender and fragrant, perfect for sharing or savoring alone with a cup of coffee.
Serving: 8 | Pre Time: 15 minutes | Cooking Time: 45 minutes
Ingredients
– A loaf of day-old challah or brioche, torn into generous chunks
– 6 large eggs
– 2 cups of whole milk
– A splash of heavy cream, about ¼ cup
– ½ cup of granulated sugar
– 1 vanilla bean, split and seeds scraped out (or 2 teaspoons of pure vanilla extract if you’re in a pinch)
– A couple of pinches of salt
– 2 tablespoons of unsalted butter, softened
– A light dusting of powdered sugar for serving
Instructions
1. Preheat your oven to 350°F and grease a 9×13-inch baking dish with the softened butter, making sure to coat the bottom and sides evenly to prevent sticking.
2. In a large mixing bowl, whisk together the eggs, whole milk, heavy cream, granulated sugar, scraped vanilla bean seeds, and salt until the mixture is smooth and the sugar has dissolved completely.
3. Tip: If using vanilla extract instead of a bean, add it at the end of whisking to preserve its aromatic quality.
4. Place the torn bread chunks into the prepared baking dish, arranging them in a single layer without packing them too tightly to allow the custard to soak through evenly.
5. Pour the egg mixture slowly over the bread, using a spatula to gently press down on any pieces that aren’t fully submerged to ensure they absorb the liquid.
6. Let the casserole sit at room temperature for 10 minutes so the bread can soak up the custard, which helps it bake up tender rather than soggy.
7. Tip: For a richer flavor, you can cover and refrigerate the assembled casserole overnight, then bring it to room temperature before baking.
8. Bake in the preheated oven for 45 minutes, or until the top is golden brown and the center is set—check by inserting a knife; it should come out clean with no liquid egg mixture.
9. Tip: If the top starts browning too quickly, loosely tent it with aluminum foil to prevent burning while the inside finishes cooking.
10. Remove from the oven and let it cool for 5-10 minutes before serving to allow the custard to firm up slightly for easier slicing.
11. Dust lightly with powdered sugar just before serving for a touch of sweetness and a pretty finish.
Finally, this casserole emerges from the oven with a custardy interior that’s soft and yielding, contrasted by a lightly crisped top infused with the warm, floral notes of vanilla. For a creative twist, serve it with a drizzle of maple syrup or a dollop of whipped cream, letting the simple flavors shine in every comforting bite.
Sparkling Strawberry Basil Lemonade

Yesterday, as the afternoon sun cast long shadows across my kitchen counter, I found myself craving something bright and effervescent—a drink that could capture the fleeting sweetness of summer even in the quiet of December. So, I gathered a few simple things and made this sparkling strawberry basil lemonade, a little ritual of stirring and muddling that felt like a gentle pause in the day.
Serving: 4 | Pre Time: 15 minutes | Cooking Time: 0 minutes
Ingredients
– About a pound of fresh strawberries, hulled and sliced
– A big handful of fresh basil leaves, plus a few extra for garnish
– 1 cup of freshly squeezed lemon juice (from about 4–5 lemons)
– 3/4 cup of granulated sugar
– 4 cups of cold sparkling water
– A couple of cups of ice cubes
Instructions
1. In a medium bowl, combine the sliced strawberries, basil leaves, and granulated sugar.
2. Using a muddler or the back of a wooden spoon, firmly press and twist the mixture for about 2 minutes until the strawberries are crushed and juicy and the basil is fragrant, releasing its oils. (Tip: Muddle gently to avoid bitter flavors from over-crushing the basil stems.)
3. Let the muddled mixture sit at room temperature for 10 minutes to allow the sugar to dissolve and the flavors to meld.
4. Strain the mixture through a fine-mesh sieve into a large pitcher, pressing down with a spoon to extract all the liquid; discard the solids.
5. Stir the freshly squeezed lemon juice into the pitcher until fully combined. (Tip: Roll the lemons on the counter before juicing to get more juice out easily.)
6. Add the ice cubes to the pitcher.
7. Slowly pour in the cold sparkling water, stirring gently to mix without losing too much fizz. (Tip: Chill the sparkling water beforehand for a crisper, more refreshing drink.)
8. Pour the lemonade into glasses, garnishing each with a fresh basil leaf.
During the first sip, you’ll notice the fizzy bubbles dancing with the tart lemon and sweet strawberry, while the basil lingers as a subtle, herbal whisper in the background. For a playful twist, try freezing some of the lemonade into ice pops or serving it over a scoop of vanilla ice cream for a quick, grown-up float.
Savory Spinach and Feta Strudel

Gently, as the afternoon light fades, I find myself thinking about the simple comfort of wrapping something savory in flaky layers—a quiet kitchen project for a slow day. It’s the kind of dish that feels both a little fancy and deeply familiar, like a warm hug from the oven.
Serving: 6 | Pre Time: 25 minutes | Cooking Time: 35 minutes
Ingredients
– A 10-ounce box of frozen chopped spinach, thawed and squeezed dry
– A couple of ounces of crumbled feta cheese
– Half a cup of finely chopped yellow onion
– A tablespoon of olive oil
– A splash of fresh lemon juice
– A pinch of ground nutmeg
– A pinch of salt and black pepper
– One sheet of frozen puff pastry, thawed
– One egg, lightly beaten
Instructions
1. Preheat your oven to 400°F and line a baking sheet with parchment paper.
2. In a medium skillet over medium heat, warm the tablespoon of olive oil.
3. Add the half cup of chopped yellow onion and sauté for about 5 minutes, until softened and translucent.
4. Tip: Let the onion cook slowly to bring out its natural sweetness without browning.
5. Transfer the sautéed onion to a mixing bowl and let it cool for a minute.
6. To the bowl, add the 10-ounce squeezed spinach, the couple of ounces of crumbled feta, the splash of lemon juice, the pinch of nutmeg, and the pinch of salt and black pepper.
7. Stir everything together until well combined.
8. Unfold the thawed puff pastry sheet on a lightly floured surface and gently roll it out to a 10×14-inch rectangle.
9. Tip: Work quickly with puff pastry to keep it cool; if it gets too warm, pop it in the fridge for 5 minutes.
10. Spoon the spinach-feta mixture evenly along one long edge of the pastry, leaving a 1-inch border.
11. Carefully roll the pastry over the filling, tucking it in snugly, and seal the edge by pressing it gently.
12. Transfer the roll to the prepared baking sheet, seam-side down.
13. Brush the top and sides of the strudel with the lightly beaten egg for a golden finish.
14. Tip: Use a pastry brush for an even coat, which helps the pastry puff beautifully.
15. Bake in the preheated oven for 30–35 minutes, until the pastry is deeply golden and crisp.
16. Remove from the oven and let it cool on the sheet for 10 minutes before slicing.
Kindly, the strudel emerges with a shatteringly crisp exterior that gives way to a tender, savory filling—the feta melts into creamy pockets, while the spinach stays bright with a hint of lemon. Serve it warm, sliced into generous pieces, perhaps with a simple side salad for a light lunch or as a standout appetizer at a cozy gathering.
Lemon Thyme Marinated Shrimp Skewers

Years have a way of softening the edges of memory, but some flavors remain sharp and clear, like the bright tang of lemon and the earthy whisper of thyme on a warm summer evening. Today, I find myself drawn back to that simplicity, to the quiet joy of threading shrimp onto skewers, the scent of citrus and herbs filling the kitchen with a promise of something light and lovely. It’s a gentle ritual, this preparation, one that slows the world down for just a moment.
Serving: 4 | Pre Time: 20 minutes | Cooking Time: 8 minutes
Ingredients
– A pound and a half of large, raw shrimp, peeled and deveined but with the tails left on for a pretty handle
– A generous third of a cup of good olive oil
– The zest and juice from two large, bright lemons
– A couple of tablespoons of fresh thyme leaves, stripped from their stems
– Three cloves of garlic, minced until they’re almost a paste
– A good pinch of kosher salt and a few cracks of fresh black pepper
– A dozen or so wooden skewers, soaked in water for at least 30 minutes so they don’t burn
Instructions
1. In a medium bowl, whisk together the olive oil, lemon zest, lemon juice, fresh thyme leaves, minced garlic, kosher salt, and black pepper until fully combined.
2. Add the peeled and deveined shrimp to the bowl with the marinade, tossing gently with your hands to ensure every shrimp is coated.
3. Cover the bowl and let the shrimp marinate in the refrigerator for exactly 15 minutes—any longer and the lemon juice can start to toughen the delicate shrimp flesh.
4. While the shrimp marinates, soak your wooden skewers in a shallow dish of cool water for at least 30 minutes to prevent them from charring on the grill.
5. Preheat your grill or a grill pan over medium-high heat until it reaches about 400°F, creating a good searing surface.
6. Thread 4 to 5 marinated shrimp onto each soaked skewer, piercing through both the head and tail end of each shrimp to keep them secure during cooking.
7. Place the shrimp skewers directly on the preheated grill grates and cook for 3 to 4 minutes on the first side, until the shrimp flesh turns opaque and develops light grill marks.
8. Using tongs, carefully flip each skewer and cook for another 3 to 4 minutes on the second side, until the shrimp are firm, curled, and completely pink with no translucent gray areas.
9. Tip: For extra flavor, brush the skewers with any remaining marinade during the first minute of cooking only, as the marinade has touched raw shrimp and shouldn’t be used later.
10. Remove the cooked shrimp skewers from the grill and let them rest on a clean plate for 2 minutes before serving, allowing the juices to redistribute.
11. Tip: If using an outdoor grill, keep a spray bottle of water nearby to tame any flare-ups from the olive oil in the marinade.
The shrimp emerge with a tender, springy bite, their sweetness perfectly balanced by the zesty lemon and aromatic thyme. Serve them straight from the skewer over a bed of fluffy couscous or alongside a simple arugula salad, letting the warm, garlicky juices mingle with the greens. For a casual gathering, arrange the skewers on a large platter with lemon wedges for squeezing—their vibrant color and inviting scent make them disappear almost as quickly as the summer light.
Decadent Chocolate-Dipped Macarons

Nestled in the quiet of my kitchen, with afternoon light filtering through the window, I find myself drawn to the delicate art of macarons—not just any, but ones cloaked in a rich, dark chocolate shell. It’s a slow, almost meditative process, turning simple almond flour and sugar into something that feels like a whispered secret. Let’s make these little treasures together, one careful step at a time.
Serving: 24 macarons | Pre Time: 45 minutes | Cooking Time: 15 minutes
Ingredients
– A cup of almond flour, sifted to keep things light
– A cup of powdered sugar, for that sweet base
– Three large egg whites, at room temperature to help them whip up nicely
– A quarter cup of granulated sugar, to stabilize the meringue
– A splash of vanilla extract, for a gentle aroma
– A couple of drops of pink gel food coloring, if you fancy a hint of color
– A cup of semi-sweet chocolate chips, for that decadent dip
– A tablespoon of coconut oil, to smooth out the chocolate
Instructions
1. Line two baking sheets with parchment paper and set them aside.
2. In a medium bowl, whisk together the sifted almond flour and powdered sugar until fully combined.
3. In a separate large bowl, use an electric mixer to beat the egg whites on medium speed until foamy, about 1 minute.
4. Gradually add the granulated sugar while continuing to beat, increasing the speed to high until stiff peaks form, which should take 3–4 minutes.
5. Gently fold in the vanilla extract and pink gel food coloring, if using, until just incorporated.
6. Add the almond flour mixture to the meringue in three batches, folding gently with a spatula after each addition until the batter flows like lava and a figure-eight pattern holds for a few seconds—this is the macaronage stage, and overmixing can lead to flat shells.
7. Transfer the batter to a piping bag fitted with a round tip and pipe 1-inch circles onto the prepared baking sheets, spacing them about 1 inch apart.
8. Tap the baking sheets firmly on the counter a few times to release any air bubbles, then let the macarons sit at room temperature for 30 minutes until a skin forms on top; they should not stick to your finger when lightly touched.
9. Preheat your oven to 300°F (150°C) while the macarons rest.
10. Bake the macarons one sheet at a time for 12–15 minutes, until they have risen and the feet are set, rotating the sheet halfway through for even baking.
11. Remove from the oven and let the macarons cool completely on the baking sheets before attempting to remove them—this prevents cracking.
12. In a microwave-safe bowl, melt the chocolate chips and coconut oil together in 30-second intervals, stirring between each, until smooth and glossy.
13. Dip the top of each cooled macaron shell into the melted chocolate, letting any excess drip off, then place them back on the parchment paper.
14. Allow the chocolate to set at room temperature for about 1 hour, or speed it up by placing them in the refrigerator for 15 minutes.
15. Pair the chocolate-dipped shells with their plain counterparts to form sandwiches, or enjoy them solo as elegant treats.
Light and crisp on the outside with a chewy interior, these macarons offer a delightful contrast to the smooth, rich chocolate coating. Their subtle sweetness pairs beautifully with a cup of herbal tea or as a festive addition to a dessert platter—try stacking them in a glass jar for a charming display that invites nibbling.
Conclusion
Joyful gatherings begin with delicious food! These 21 elegant brunch recipes offer something special for every wedding shower. I hope you find inspiration to create a memorable celebration. Try a recipe, leave a comment with your favorite, and share this roundup on Pinterest to spread the brunch love!


