Kick off your wedding celebration with desserts that dazzle! Whether you’re planning a grand reception or an intimate gathering, these 22 exquisite recipes will turn your dessert table into a showstopper. From elegant cakes to delicate pastries, each treat is designed to impress your guests and create sweet memories. Let’s explore these irresistible creations that promise to make your special day even more delicious!
Decadent Chocolate Wedding Cake
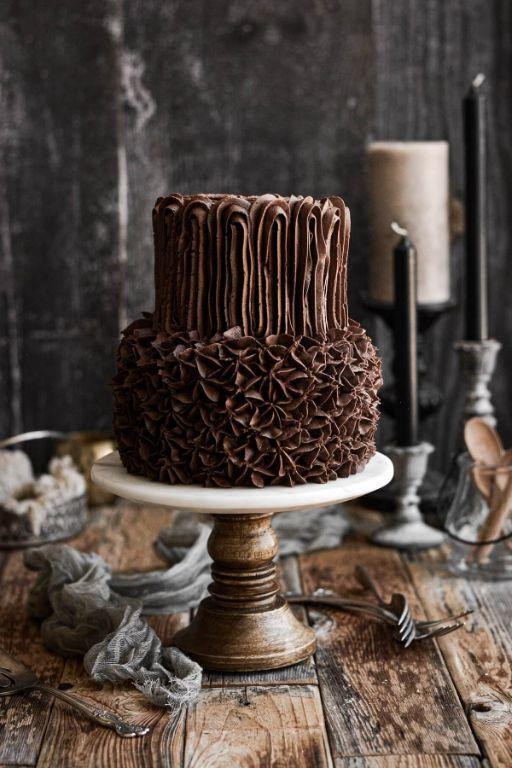
Yikes, you’re about to make a cake so luxurious it might just upstage the happy couple—welcome to the world of Decadent Chocolate Wedding Cake, where every bite is a velvety, cocoa-laden celebration. This towering masterpiece isn’t just dessert; it’s a statement piece that whispers ‘I do’ to pure indulgence, with layers so moist they’ll have you forgetting any diet resolutions faster than you can say ‘I object!’
Serving: 12 | Pre Time: 30 minutes | Cooking Time: 45 minutes
Ingredients
– 2 cups all-purpose flour, sifted
– 1¾ cups granulated sugar
– ¾ cup unsweetened cocoa powder, Dutch-processed
– 1½ tsp baking soda
– 1 tsp fine sea salt
– 1 cup buttermilk, at room temperature
– ½ cup clarified butter, melted and cooled
– 2 large pasture-raised eggs, lightly beaten
– 1 tsp pure vanilla extract
– 1 cup boiling water
– 1 cup heavy cream
– 8 oz semisweet chocolate, finely chopped
– 2 tbsp unsalted butter, softened
Instructions
1. Preheat the oven to 350°F and grease three 8-inch round cake pans, lining them with parchment paper.
2. In a large bowl, whisk together the sifted all-purpose flour, granulated sugar, Dutch-processed cocoa powder, baking soda, and fine sea salt until fully combined.
3. Add the room-temperature buttermilk, melted clarified butter, lightly beaten pasture-raised eggs, and pure vanilla extract to the dry ingredients, mixing on medium speed for 2 minutes until smooth.
4. Gradually pour in the boiling water while stirring continuously, which will thin the batter and enhance the chocolate flavor—don’t worry, it’s supposed to be runny!
5. Divide the batter evenly among the prepared pans, tapping them gently on the counter to release air bubbles.
6. Bake for 35-40 minutes, or until a toothpick inserted into the center comes out clean and the cakes spring back when lightly touched.
7. Cool the cakes in the pans on a wire rack for 10 minutes, then invert them onto the rack to cool completely—this prevents sticking and ensures even layers.
8. For the ganache, heat the heavy cream in a saucepan over medium heat until it just begins to simmer, about 3-4 minutes.
9. Pour the hot cream over the finely chopped semisweet chocolate in a heatproof bowl, letting it sit for 1 minute before whisking until glossy and smooth.
10. Whisk in the softened unsalted butter until fully incorporated, then let the ganache cool to a spreadable consistency, about 15-20 minutes.
11. Assemble the cake by placing one layer on a serving plate, spreading a thin layer of ganache over it, and repeating with the remaining layers.
12. Frost the top and sides with the remaining ganache, using an offset spatula for a smooth finish—chill for 30 minutes to set before serving.
Perfectly balanced, this cake boasts a rich, fudgy crumb that melts on the tongue, with ganache so silky it’s like a chocolate hug. Serve it chilled with a dusting of cocoa powder or alongside fresh berries for a vibrant contrast that’ll make any occasion feel like a wedding feast!
Delicate Almond Macarons
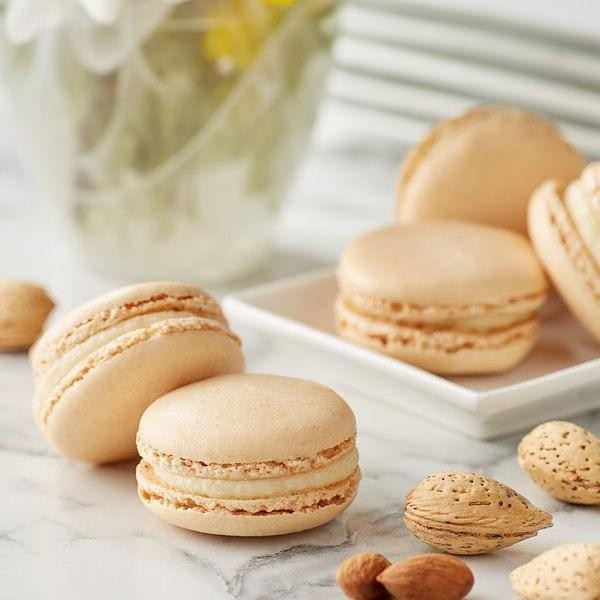
Let’s be real: almond macarons are the divas of the dessert world—finicky, fabulous, and utterly worth the fuss. They demand precision but reward you with delicate, cloud-like cookies that’ll make you feel like a pastry pro (or at least a very competent home baker). So, grab your apron and a dose of patience; we’re about to whip up some sweet magic.
Serving: 24 macarons | Pre Time: 45 minutes | Cooking Time: 15 minutes
Ingredients
– 1 ¾ cups (175g) superfine almond flour, sifted
– 1 ½ cups (150g) confectioners’ sugar, sifted
– 3 large pasture-raised egg whites, at room temperature
– ¼ cup (50g) granulated sugar
– ¼ teaspoon cream of tartar
– ½ teaspoon pure almond extract
– 2-3 drops gel-based food coloring (optional)
– ½ cup (120g) unsalted European-style butter, softened
– 1 cup (120g) confectioners’ sugar, sifted again
– 1 teaspoon pure vanilla extract
– 2 tablespoons heavy cream, at room temperature
Instructions
1. Line two baking sheets with silicone mats or parchment paper.
2. In a medium bowl, whisk together the sifted almond flour and 1 ½ cups confectioners’ sugar until fully combined.
3. In the bowl of a stand mixer fitted with the whisk attachment, combine the egg whites, granulated sugar, and cream of tartar.
4. Whip the egg white mixture on medium-high speed until stiff, glossy peaks form, about 5-7 minutes.
5. Gently fold the almond extract and optional food coloring into the meringue with a spatula until just incorporated.
6. Add the almond flour mixture to the meringue in three additions, folding gently after each until the batter flows like lava and a ribbon forms when lifted—this is the “macaronage” stage, and overmixing will deflate the batter.
7. Transfer the batter to a piping bag fitted with a ½-inch round tip.
8. Pipe 1 ½-inch circles onto the prepared baking sheets, spacing them 1 inch apart, then firmly tap the sheets on the counter to release air bubbles.
9. Let the piped macarons rest at room temperature until a skin forms on the surface, about 30-45 minutes; they should not stick when lightly touched.
10. Preheat the oven to 300°F (150°C) with a rack in the center position.
11. Bake the macarons, one sheet at a time, for 12-15 minutes, rotating the sheet halfway through, until the tops are set and the “feet” (the ruffled bottoms) are firm.
12. Cool the macarons completely on the baking sheets before removing, as they are fragile when warm.
13. For the buttercream, beat the softened butter in a clean mixer bowl with the paddle attachment on medium speed until pale and fluffy, about 3 minutes.
14. Gradually add the remaining 1 cup confectioners’ sugar and vanilla extract, beating until smooth, then drizzle in the heavy cream and beat for 1 more minute to achieve a light, spreadable consistency.
15. Pair the cooled macaron shells by size, pipe or spread a small dollop of buttercream onto the flat side of one shell, and sandwich with another, pressing gently.
16. Refrigerate the assembled macarons in an airtight container for at least 4 hours to allow the flavors to meld and the texture to soften—this “maturation” step is key for that classic chewy interior.
Ethereal and crisp on the outside with a tender, chewy center, these macarons offer a subtle almond fragrance that pairs beautifully with the rich vanilla buttercream. For a playful twist, try sandwiching them with a dollop of raspberry jam or dipping the edges in melted dark chocolate for an elegant finish that’ll impress at any gathering.
Lemon Raspberry Tartlets
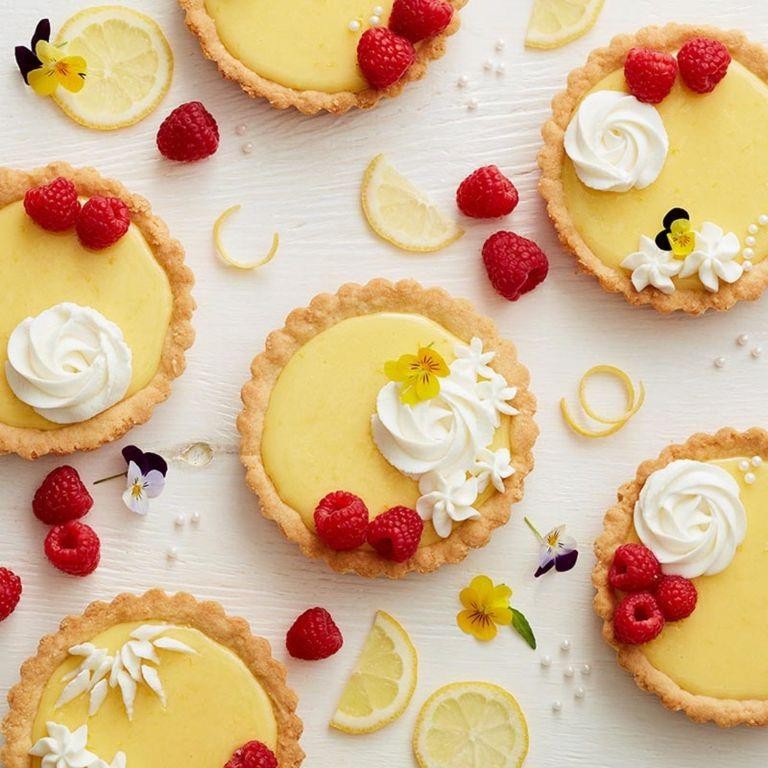
Ever had one of those days where you need a little sunshine in dessert form? These Lemon Raspberry Tartlets are here to deliver—think of them as tiny, edible bursts of joy that are equal parts zesty and sweet, with a buttery crust that practically begs to be crunched. They’re the perfect pick-me-up, whether you’re impressing guests or just treating yourself to a moment of pure, unadulterated deliciousness.
Serving: 12 | Pre Time: 25 minutes | Cooking Time: 15 minutes
Ingredients
– 1 ½ cups all-purpose flour
– ½ cup unsalted butter, chilled and cubed
– ¼ cup granulated sugar
– 1 large pasture-raised egg, lightly beaten
– 1 cup fresh raspberries
– ¾ cup granulated sugar
– 3 large pasture-raised eggs
– ½ cup freshly squeezed lemon juice
– 2 tablespoons lemon zest
– 2 tablespoons unsalted butter, melted
– Powdered sugar for dusting
Instructions
1. Preheat your oven to 350°F (175°C) and lightly grease a 12-cup mini tart pan.
2. In a food processor, pulse 1 ½ cups all-purpose flour, ½ cup chilled unsalted butter cubes, and ¼ cup granulated sugar until the mixture resembles coarse crumbs.
3. Add 1 lightly beaten pasture-raised egg to the food processor and pulse just until the dough comes together into a ball.
4. Tip: Avoid overmixing to keep the crust tender and flaky.
5. Divide the dough into 12 equal portions and press each portion into the prepared tart pan cups, forming an even layer on the bottom and up the sides.
6. Place the tart pan in the freezer for 10 minutes to firm up the crust, which helps prevent shrinkage during baking.
7. Bake the crusts in the preheated oven for 12 minutes, or until they turn a light golden brown.
8. While the crusts bake, prepare the filling by whisking together ¾ cup granulated sugar, 3 pasture-raised eggs, ½ cup freshly squeezed lemon juice, and 2 tablespoons lemon zest in a medium bowl until smooth.
9. Gradually whisk in 2 tablespoons melted unsalted butter until fully incorporated.
10. Tip: Strain the filling through a fine-mesh sieve to remove any egg bits or zest clumps for a silky texture.
11. Remove the baked crusts from the oven and let them cool for 5 minutes on a wire rack.
12. Evenly distribute 1 cup fresh raspberries among the tartlet crusts, gently pressing them into the bottom.
13. Pour the lemon filling over the raspberries in each crust, filling them almost to the top.
14. Bake the filled tartlets in the oven at 350°F (175°C) for 15 minutes, or until the filling is set and no longer jiggles in the center.
15. Tip: Check for doneness by inserting a toothpick into the center—it should come out clean.
16. Allow the tartlets to cool completely in the pan on a wire rack for at least 30 minutes.
17. Carefully remove the cooled tartlets from the pan and dust them lightly with powdered sugar before serving.
The result is a delightful contrast: a crisp, buttery crust gives way to a creamy, tangy lemon curd that’s studded with juicy raspberries, creating a burst of flavor in every bite. Serve these tartlets chilled for a refreshing treat, or garnish with extra fresh raspberries and a sprig of mint for an elegant touch at your next gathering.
Lavender Honey Madeleines
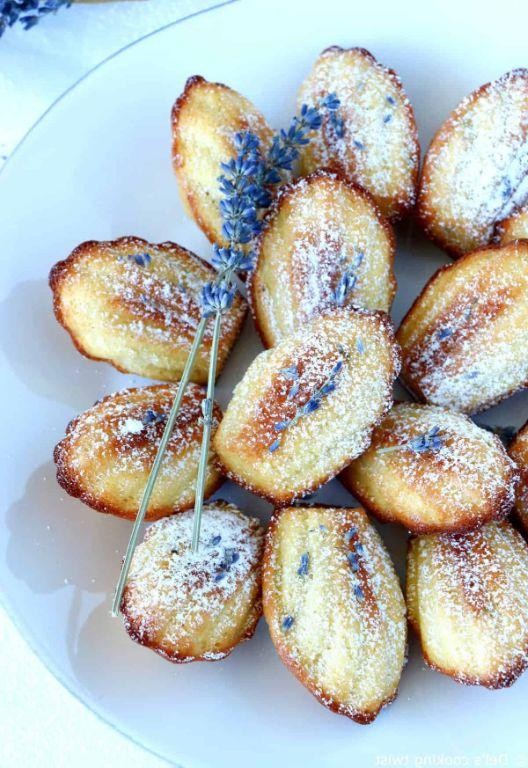
Aren’t you tired of the same old cookies? Let’s ditch the predictable and dive into something that whispers of French patisseries and afternoon whimsy—these aren’t your grandma’s tea cakes. They’re little shell-shaped clouds of joy, infused with a floral secret that’ll make your taste buds do a happy dance.
Serving: 12 | Pre Time: 20 minutes | Cooking Time: 10 minutes
Ingredients
– ¾ cup granulated sugar
– 2 large pasture-raised eggs, lightly beaten
– 1 teaspoon pure vanilla extract
– 1 cup all-purpose flour, sifted
– 1 teaspoon baking powder
– ½ cup clarified butter, cooled to room temperature
– 2 tablespoons culinary-grade lavender honey
– 1 tablespoon culinary lavender buds, finely ground
– 1 pinch fine sea salt
Instructions
1. Preheat your oven to 375°F (190°C) and generously butter and flour a standard madeleine pan.
2. In a large mixing bowl, vigorously whisk together the granulated sugar and lightly beaten pasture-raised eggs for 3-4 minutes until the mixture is pale, thick, and forms a ribbon when the whisk is lifted.
3. Whisk in the pure vanilla extract and culinary lavender honey until fully incorporated.
4. In a separate bowl, sift together the all-purpose flour, baking powder, and fine sea salt.
5. Gently fold the dry ingredients into the wet mixture using a spatula, taking care not to deflate the batter.
6. Slowly drizzle in the room-temperature clarified butter while continuously folding, ensuring it is fully emulsified. Tip: For optimal texture, ensure the clarified butter is cool but not solid to prevent the batter from seizing.
7. Fold in the finely ground culinary lavender buds until evenly distributed. Tip: Grind the lavender buds with a mortar and pestle or spice grinder to a fine powder to avoid a gritty texture.
8. Cover the bowl with plastic wrap and refrigerate the batter for a minimum of 1 hour, or up to overnight, to allow the flavors to meld and the batter to firm up.
9. Spoon 1 tablespoon of the chilled batter into each prepared madeleine mold, filling it about ¾ full.
10. Bake on the middle rack for 8-10 minutes, or until the edges are golden brown and the centers spring back lightly when touched. Tip: Avoid opening the oven door during the first 7 minutes of baking to ensure the signature ‘hump’ forms properly.
11. Immediately turn the madeleines out onto a wire rack to cool completely.
12. Dust lightly with powdered sugar just before serving, if desired.
Right out of the oven, these madeleines boast a delightfully crisp, shell-like exterior that gives way to a tender, cakey crumb. The lavender honey imparts a subtle, sophisticated floral sweetness that’s perfectly balanced, never perfumy. For a truly decadent twist, serve them slightly warm with a dollop of lemon curd or alongside a glass of chilled dessert wine.
Classic Tiramisu Cups
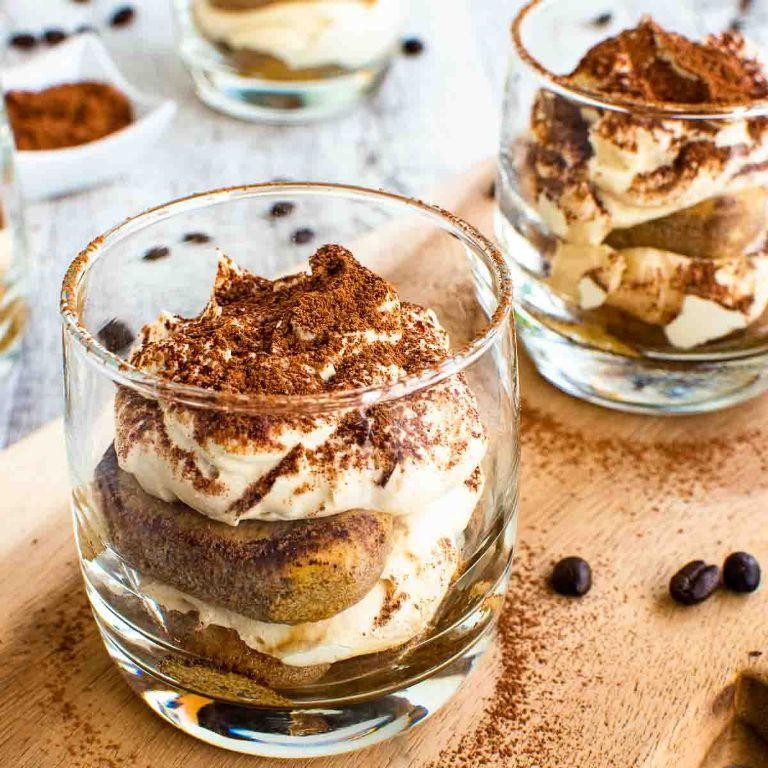
Heck, who needs a fancy Italian restaurant when you can whip up these irresistible Classic Tiramisu Cups right in your own kitchen? These little jars of joy are the perfect blend of creamy, coffee-kissed magic and a serious dose of dessert satisfaction, guaranteed to make you feel like a pastry pro without the fuss of a full-sized tray.
Serving: 6 | Pre Time: 25 minutes | Cooking Time: 0 minutes
Ingredients
- 6 ounces mascarpone cheese, at room temperature
- 3 large pasture-raised eggs, separated
- 1/2 cup granulated sugar
- 1 cup heavy whipping cream
- 1 teaspoon pure vanilla extract
- 1 1/2 cups strong brewed espresso or dark roast coffee, cooled to room temperature
- 2 tablespoons coffee liqueur (optional)
- 24 ladyfinger cookies (savoiardi)
- Unsweetened cocoa powder, for dusting
- Dark chocolate shavings, for garnish
Instructions
- Place the egg yolks and granulated sugar in a large heatproof bowl.
- Set the bowl over a saucepan of gently simmering water, ensuring the bottom does not touch the water.
- Whisk constantly for 5-7 minutes until the mixture is pale, thick, and reaches 160°F on an instant-read thermometer to ensure food safety.
- Remove the bowl from the heat and whisk in the vanilla extract.
- Allow the yolk mixture to cool completely to room temperature, about 10 minutes.
- In a separate, impeccably clean bowl, use a hand mixer to beat the egg whites on high speed until they form stiff, glossy peaks, about 3-4 minutes.
- In another chilled bowl, beat the heavy whipping cream on high speed until it holds medium peaks, about 2-3 minutes.
- Gently fold the room-temperature mascarpone cheese into the cooled yolk mixture until just combined and smooth.
- Tip: Use a large rubber spatula and fold in a figure-eight motion to maintain the mixture’s airy volume.
- Carefully fold the whipped cream into the mascarpone mixture until no white streaks remain.
- Gently fold the beaten egg whites into the combined mixture in two additions, preserving as much air as possible.
- Combine the cooled espresso and coffee liqueur (if using) in a shallow dish.
- Quickly dip each ladyfinger cookie into the coffee mixture for 1-2 seconds per side—just enough to moisten without becoming soggy.
- Place one dipped ladyfinger at the bottom of each of six 8-ounce serving glasses or jars.
- Spoon or pipe a generous layer of the mascarpone cream over the ladyfinger in each glass.
- Repeat the layers with another dipped ladyfinger and another layer of cream.
- Cover the glasses tightly with plastic wrap and refrigerate for a minimum of 4 hours, or ideally overnight, to allow the flavors to meld and the dessert to set firmly.
- Just before serving, dust the top of each cup liberally with unsweetened cocoa powder using a fine-mesh sieve.
- Garnish each cup with a sprinkle of dark chocolate shavings.
Finally, prepare for a textural symphony: the softened, coffee-infused ladyfingers give way to an impossibly light and cloud-like mascarpone cream. For a playful twist, serve these cups with a side of espresso martinis for the adults or a dollop of whipped cream and a cherry for a kid-friendly version.
Vanilla Bean Panna Cotta with Berry Compote
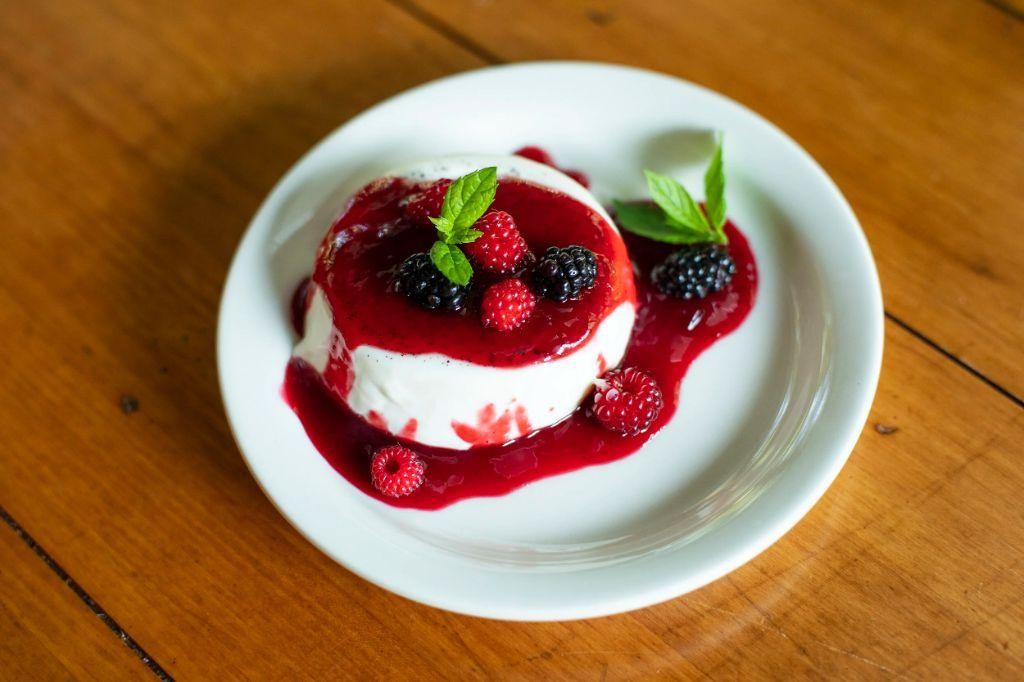
Yikes, you’ve been scrolling through dessert recipes for an hour, haven’t you? Let’s end the search with a silky, sophisticated panna cotta that’s deceptively simple to make and looks like it belongs in a fancy pastry case. This vanilla bean version topped with a vibrant berry compote is the elegant, no-bake treat your week desperately needs.
Serving: 6 | Pre Time: 20 minutes | Cooking Time: 10 minutes
Ingredients
- 2 cups heavy cream
- 1/2 cup granulated sugar
- 1 vanilla bean pod, split and seeds scraped
- 2 1/4 teaspoons unflavored powdered gelatin
- 3 tablespoons cold water
- 1 cup mixed fresh berries (such as raspberries and blueberries)
- 1/4 cup granulated sugar
- 1 tablespoon fresh lemon juice
Instructions
- In a medium saucepan, combine 2 cups heavy cream, 1/2 cup granulated sugar, and the scraped seeds from 1 vanilla bean pod.
- Place the saucepan over medium-low heat and warm the mixture, stirring frequently, until the sugar dissolves completely and tiny bubbles form around the edge, about 5-7 minutes. Do not let it boil.
- Meanwhile, in a small bowl, sprinkle 2 1/4 teaspoons unflavored powdered gelatin over 3 tablespoons cold water. Let it bloom for 5 minutes until it becomes a solid, spongy mass.
- Remove the cream mixture from the heat and immediately whisk in the bloomed gelatin until it is fully dissolved and no lumps remain, about 1 minute. Tip: For an ultra-smooth texture, strain the mixture through a fine-mesh sieve into a clean bowl to catch any undissolved gelatin bits or vanilla pod fragments.
- Divide the mixture evenly among six 4-ounce ramekins or glasses. Let them cool to room temperature for 15 minutes.
- Cover the ramekins with plastic wrap, ensuring the wrap does not touch the surface, and refrigerate for at least 4 hours, or until fully set and firm to the touch.
- While the panna cotta sets, make the compote: In a small saucepan, combine 1 cup mixed fresh berries, 1/4 cup granulated sugar, and 1 tablespoon fresh lemon juice.
- Cook over medium heat, stirring occasionally and gently mashing some berries with the back of a spoon, until the sugar dissolves and the mixture thickens to a syrupy consistency, about 5-8 minutes. Tip: For a chunkier compote, remove it from the heat just as the berries begin to break down; for a smoother sauce, cook a minute longer.
- Remove the compote from the heat and let it cool completely to room temperature, about 20 minutes. Tip: Cooling the compote fully prevents it from melting the delicate set panna cotta when served.
- To serve, run a thin knife around the edge of each ramekin to loosen the panna cotta. Invert each onto a serving plate, giving the ramekin a gentle shake if needed to release it.
- Top each panna cotta with a generous spoonful of the cooled berry compote.
Keep in mind, the magic here is in the contrast: the panna cotta should be luxuriously firm yet quiver like a custard, with the vanilla bean seeds providing tiny specks of flavor. The compote adds a bright, tangy punch that cuts through the creaminess beautifully. For a show-stopping presentation, layer the compote at the bottom of a clear glass before pouring in the cream mixture, then chill—when unmolded, you’ll get a stunning berry-topped dome.
Salted Caramel Profiteroles

Crisp, airy, and dangerously addictive, these salted caramel profiteroles are the dessert equivalent of a standing ovation—they demand your attention and reward your effort with a symphony of sweet, salty, and buttery notes. Imagine biting through a delicate choux pastry shell to find a cloud of vanilla-speckled cream, all drenched in a glossy, sea-salt-kissed caramel that’s so good, you’ll want to write it a thank-you note. Trust me, your taste buds will be sending you flowers after just one bite.
Serving: 12 | Pre Time: 25 minutes | Cooking Time: 35 minutes
Ingredients
– 1 cup water
– ½ cup unsalted European-style butter, cubed
– 1 cup all-purpose flour, sifted
– 4 large pasture-raised eggs, lightly beaten
– 1 cup granulated sugar
– ½ cup heavy cream, warmed to 110°F
– 2 tablespoons unsalted butter, cold and cubed
– 1 teaspoon flaky sea salt
– 1 cup heavy cream, chilled
– 1 teaspoon pure vanilla bean paste
– 2 tablespoons confectioners’ sugar
Instructions
1. Preheat your oven to 425°F and line a baking sheet with parchment paper.
2. In a medium saucepan, combine 1 cup water and ½ cup cubed unsalted European-style butter over medium heat until the butter melts completely.
3. Bring the mixture to a rolling boil, then immediately remove from heat and add 1 cup sifted all-purpose flour all at once.
4. Stir vigorously with a wooden spoon until the mixture forms a smooth ball that pulls away from the sides of the pan, about 1 minute.
5. Transfer the dough to a stand mixer fitted with a paddle attachment and let it cool for 5 minutes to avoid cooking the eggs.
6. With the mixer on low speed, gradually add 4 lightly beaten pasture-raised eggs, one at a time, ensuring each is fully incorporated before adding the next until the dough is glossy and holds a peak.
7. Pipe or spoon 12 equal mounds of dough onto the prepared baking sheet, spacing them 2 inches apart.
8. Bake at 425°F for 15 minutes, then reduce the oven temperature to 350°F and bake for an additional 20 minutes until the profiteroles are golden brown and sound hollow when tapped.
9. Turn off the oven, prop the door open slightly with a wooden spoon, and let the profiteroles cool inside for 10 minutes to prevent collapsing.
10. For the caramel, combine 1 cup granulated sugar in a heavy-bottomed saucepan over medium heat, swirling occasionally until it melts into an amber liquid, about 8 minutes.
11. Carefully whisk in ½ cup warmed heavy cream (it will bubble vigorously), then remove from heat and stir in 2 tablespoons cold cubed unsalted butter and 1 teaspoon flaky sea salt until smooth.
12. Let the caramel cool to room temperature, about 15 minutes, to thicken slightly.
13. For the filling, whip 1 cup chilled heavy cream with 1 teaspoon pure vanilla bean paste and 2 tablespoons confectioners’ sugar in a chilled bowl until stiff peaks form, about 3 minutes.
14. Slice each cooled profiterole horizontally and fill the bottom halves with the vanilla cream using a piping bag or spoon.
15. Replace the tops and drizzle generously with the salted caramel sauce.
Buttery and crisp on the outside, these profiteroles give way to a pillowy, vanilla-laced interior that’s perfectly balanced by the rich, salty-sweet caramel cascade. Serve them stacked high on a platter for a dramatic centerpiece, or sneak one straight from the fridge for a cool, indulgent treat that’s worth every single calorie.
Mini Pistachio Cannoli

Just when you thought cannoli couldn’t get any more irresistible, we’ve shrunk them down and packed them with a nutty twist that’ll make you forget all about the full-sized versions. These bite-sized beauties are the perfect party trick—crispy, creamy, and guaranteed to vanish faster than you can say ‘pistachio.’
Serving: 24 | Pre Time: 30 minutes | Cooking Time: 10 minutes
Ingredients
- 1 cup all-purpose flour, sifted
- 2 tablespoons granulated sugar
- 1/4 teaspoon fine sea salt
- 2 tablespoons unsalted butter, cold and cubed
- 1/4 cup dry Marsala wine
- 1 large pasture-raised egg, lightly beaten
- 1 quart vegetable oil, for frying
- 1 cup whole-milk ricotta cheese, drained
- 1/2 cup mascarpone cheese
- 1/3 cup confectioners’ sugar
- 1 teaspoon pure vanilla extract
- 1/2 cup shelled pistachios, finely chopped and toasted
- 1/4 cup mini chocolate chips
- Additional confectioners’ sugar and chopped pistachios, for dusting
Instructions
- In a large mixing bowl, combine the sifted all-purpose flour, granulated sugar, and fine sea salt.
- Add the cold, cubed unsalted butter and use your fingertips to rub it into the flour mixture until it resembles coarse crumbs.
- Pour in the dry Marsala wine and lightly beaten pasture-raised egg, then mix with a fork until a shaggy dough forms.
- Turn the dough onto a lightly floured surface and knead gently for 2 minutes until smooth, being careful not to overwork it to avoid tough shells.
- Wrap the dough in plastic wrap and refrigerate for 20 minutes to allow the gluten to relax.
- While the dough chills, prepare the filling by whisking together the drained whole-milk ricotta cheese, mascarpone cheese, confectioners’ sugar, and pure vanilla extract in a medium bowl until smooth and creamy.
- Fold in the finely chopped and toasted shelled pistachios and mini chocolate chips, then cover and refrigerate the filling until ready to use.
- Heat the vegetable oil in a deep, heavy-bottomed pot to 375°F, using a candy thermometer to ensure accuracy for perfectly crisp shells.
- Roll out the chilled dough on a floured surface to 1/16-inch thickness, then cut into 3-inch circles using a cookie cutter.
- Wrap each dough circle around a cannoli tube, sealing the edge with a dab of water and pressing firmly to adhere.
- Fry the wrapped tubes in the hot oil for 90 seconds, turning once, until golden brown and crisp, then transfer to a paper towel-lined plate to drain.
- Carefully slide the shells off the tubes while still warm, using a towel to protect your hands, and let them cool completely on a wire rack.
- Fill a pastry bag fitted with a star tip with the chilled pistachio filling and pipe it generously into both ends of each cooled shell.
- Dust the filled cannoli with additional confectioners’ sugar and chopped pistachios just before serving to maintain crunch.
Perfectly crisp shells shatter to reveal a luxuriously creamy filling studded with toasted pistachios and melty chocolate chips. For a show-stopping presentation, arrange them on a platter with a drizzle of dark chocolate ganache or serve alongside a shot of espresso for a delightful contrast.
Rose Scented Meringue Kisses
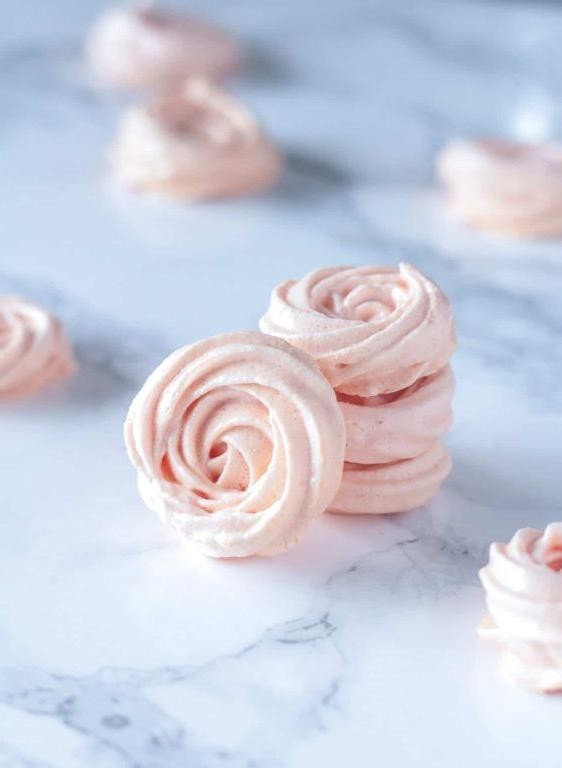
Roses are red, violets are blue, but these ethereal meringue kisses are the only sweet thing you’ll be thinking about today—they’re so light and fragrant, they practically float off the plate with a whisper of floral elegance. Forget those heavy holiday desserts; these delicate bites are the sophisticated, cloud-like treat that’ll make you feel like a pastry pro without breaking a sweat. And the best part? They’re deceptively simple to whip up, leaving you more time to admire your handiwork (and maybe sneak a few before serving).
Serving: 24 | Pre Time: 20 minutes | Cooking Time: 90 minutes
Ingredients
– 4 large egg whites, at room temperature
– 1 cup granulated sugar
– 1/4 teaspoon cream of tartar
– 1/2 teaspoon rose water
– 2-3 drops red food coloring (optional)
– 1/4 cup powdered sugar, for dusting
Instructions
1. Preheat your oven to 200°F and line two baking sheets with parchment paper.
2. In the bowl of a stand mixer fitted with the whisk attachment, combine the egg whites and cream of tartar.
3. Beat the mixture on medium speed until soft peaks form, about 2-3 minutes.
4. Gradually add the granulated sugar, 1 tablespoon at a time, while continuing to beat on medium-high speed.
5. Increase the speed to high and beat until stiff, glossy peaks form, about 5-7 minutes; the meringue should hold its shape when the whisk is lifted.
6. Gently fold in the rose water and red food coloring (if using) with a spatula until just incorporated, being careful not to deflate the mixture.
7. Transfer the meringue to a piping bag fitted with a large star tip.
8. Pipe 1-inch kisses onto the prepared baking sheets, spacing them about 1 inch apart.
9. Place the baking sheets in the preheated oven and bake for 90 minutes, or until the meringues are dry to the touch and easily lift off the parchment.
10. Turn off the oven and let the meringues cool completely inside with the door slightly ajar, about 1 hour, to prevent cracking.
11. Once cooled, lightly dust the kisses with powdered sugar using a fine-mesh sieve.
What you’ll get are crisp, airy shells that shatter delicately with each bite, releasing a subtle rose aroma that’s romantic without being overpowering. Serve them piled high on a vintage cake stand for a tea party, or crumble them over vanilla bean ice cream for an elegant dessert twist—they’re so pretty, you might just forget to eat them (but don’t, because they’re irresistible).
Champagne Poached Pears
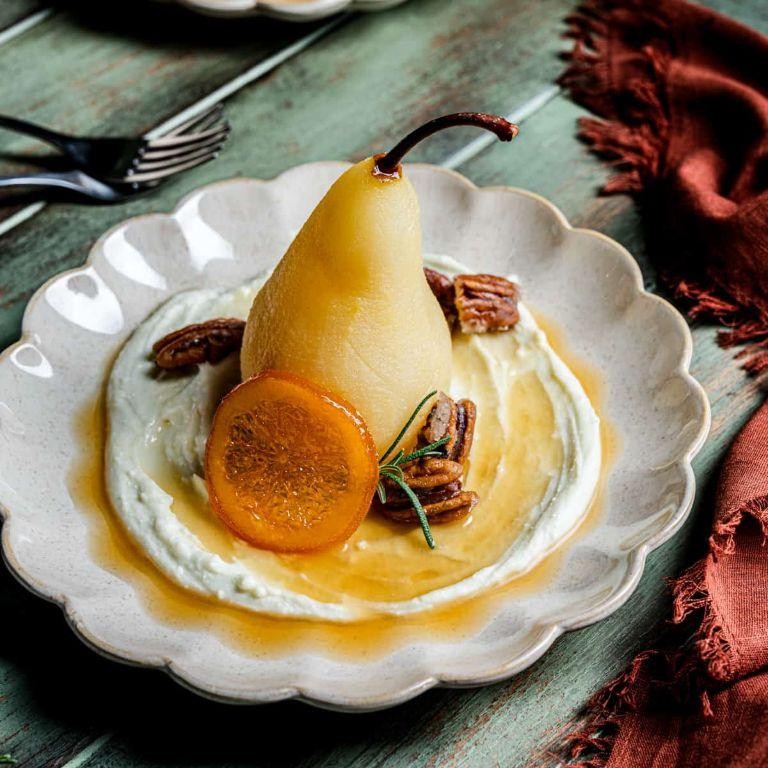
Fancy a dessert that’s as elegant as a black-tie gala but secretly a breeze to pull off? Meet Champagne Poached Pears—the sophisticated sweet that’ll have your guests thinking you hired a pastry chef. It’s basically fruit in a bubbly bath, and we’re here for every fizzy, fragrant bite.
Serving: 4 | Pre Time: 15 minutes | Cooking Time: 30 minutes
Ingredients
– 4 firm Bosc pears, peeled with stems intact
– 2 cups dry Champagne
– 1 cup granulated sugar
– 1 vanilla bean, split lengthwise and seeds scraped
– 1 cinnamon stick
– 1 strip of orange zest (about 2 inches long)
– ½ cup crème fraîche, for serving
– Fresh mint leaves, for garnish
Instructions
1. In a large saucepan, combine 2 cups dry Champagne, 1 cup granulated sugar, the scraped seeds and pod of 1 vanilla bean, 1 cinnamon stick, and 1 strip of orange zest.
2. Heat the mixture over medium heat, stirring occasionally, until the sugar dissolves completely, about 3–4 minutes.
3. Carefully place 4 peeled Bosc pears into the saucepan, ensuring they are fully submerged in the liquid.
4. Bring the liquid to a gentle simmer over medium-low heat, then reduce the heat to low to maintain a bare simmer.
5. Poach the pears for 25–30 minutes, turning them occasionally with a spoon for even coloring, until they are tender when pierced with a knife but still hold their shape.
6. Using a slotted spoon, transfer the pears to a plate to cool slightly.
7. Increase the heat to medium-high and boil the poaching liquid until it reduces to a syrupy consistency, about 10–12 minutes, then remove from heat.
8. Discard the vanilla pod, cinnamon stick, and orange zest from the syrup.
9. Serve each pear drizzled with the reduced syrup, accompanied by a dollop of crème fraîche and garnished with fresh mint leaves.
Unbelievably tender with a subtle floral note from the Champagne, these pears boast a glossy sheen and delicate texture that melts on the tongue. For a playful twist, serve them alongside a scoop of vanilla bean ice cream or crumbled amaretti cookies for added crunch.
Coconut Lime Truffles
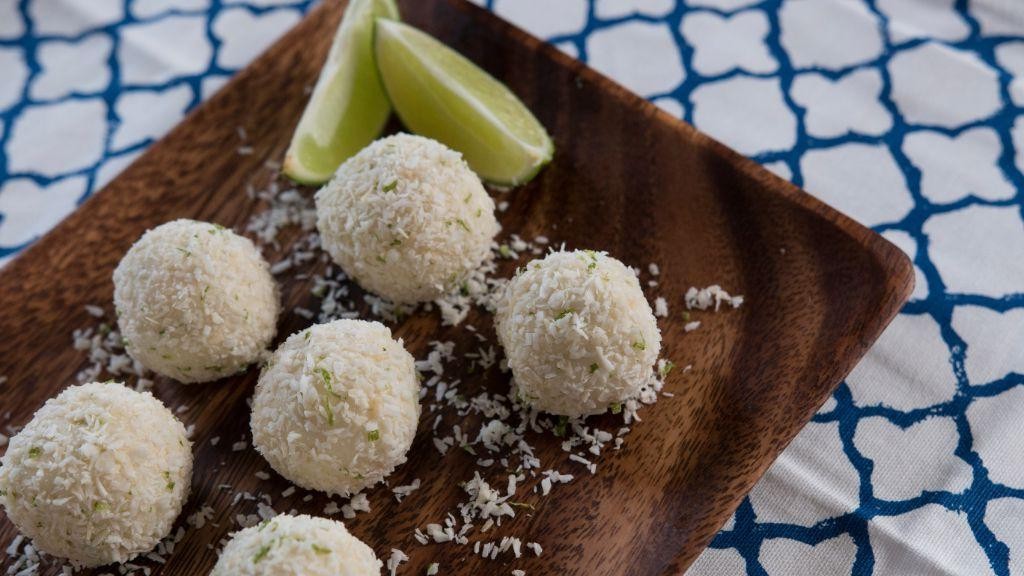
Yikes, have you ever had a dessert that felt like a tropical vacation in a bite? These Coconut Lime Truffles are here to rescue your taste buds from the mundane with a zesty, creamy punch that’ll make you forget all about that sad, store-bought chocolate bar. Get ready to roll up your sleeves and dive into some sweet, no-bake magic that’s easier than convincing your cat to take a bath!
Serving: 24 | Pre Time: 20 minutes | Cooking Time: 0 minutes
Ingredients
– 2 cups sweetened shredded coconut, finely chopped
– 1 cup full-fat coconut cream, chilled overnight
– ½ cup confectioners’ sugar, sifted
– 3 tablespoons unsalted butter, softened to 68°F
– 2 tablespoons fresh lime juice, strained
– 1 tablespoon lime zest, finely grated
– ¼ teaspoon pure vanilla extract
– ¼ teaspoon fine sea salt
– 8 ounces high-quality dark chocolate (70% cacao), finely chopped
– 1 tablespoon refined coconut oil
Instructions
1. In a medium mixing bowl, combine the sweetened shredded coconut, full-fat coconut cream, confectioners’ sugar, unsalted butter, fresh lime juice, lime zest, pure vanilla extract, and fine sea salt.
2. Using a rubber spatula, fold the mixture vigorously for 2-3 minutes until it forms a cohesive, slightly sticky dough that holds its shape when pressed.
3. Line a baking sheet with parchment paper. Scoop 1-tablespoon portions of the dough and roll them between your palms into smooth, 1-inch balls, placing them on the prepared sheet. Tip: Chill your hands in ice water for 30 seconds to prevent sticking and ensure even rolling.
4. Transfer the baking sheet to the freezer and chill the balls for 15 minutes until firm to the touch.
5. In a heatproof bowl set over a saucepan of simmering water (maintaining 160°F), melt the high-quality dark chocolate and refined coconut oil, stirring constantly with a silicone spatula until smooth and fully combined, about 3-4 minutes.
6. Remove the bowl from the heat and let the chocolate mixture cool for 2 minutes until it reaches 90°F, testing with an instant-read thermometer. Tip: Cooling slightly prevents the truffles from melting and ensures a crisp shell.
7. Using a fork, dip each chilled ball into the melted chocolate, coating it completely, then lift and gently tap to remove excess chocolate.
8. Return each coated truffle to the parchment-lined baking sheet. Immediately sprinkle with any remaining sweetened shredded coconut for garnish before the chocolate sets.
9. Allow the truffles to set at room temperature for 30 minutes until the chocolate shell is firm and glossy. Tip: For faster setting, refrigerate for 10 minutes, but avoid longer storage to maintain texture.
Crunchy on the outside with a lusciously soft center, these truffles deliver a bright lime tang that cuts through the rich coconut cream. Serve them chilled on a platter with extra lime zest for a pop of color, or crumble over vanilla ice cream for an indulgent twist that’ll have everyone begging for the recipe!
Hazelnut and Chocolate Éclairs
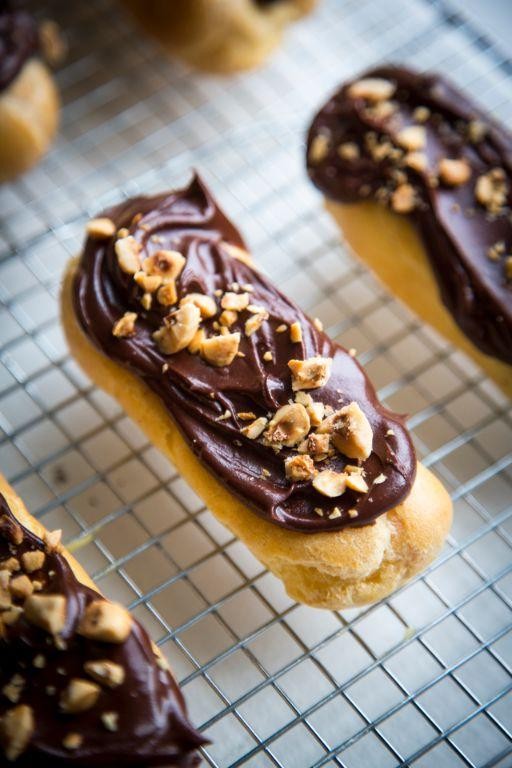
Unbelievably, there’s a way to make your kitchen feel like a Parisian patisserie without needing a beret or a dramatic accent—enter these hazelnut and chocolate éclairs, the ultimate showstopper that’s secretly a breeze to whip up. Picture this: crisp choux pastry shells, a luscious hazelnut cream filling, and a glossy chocolate glaze that’ll have you doing a happy dance before the first bite. Trust me, these little guys are about to become your new favorite party trick (or Tuesday treat—no judgment here!).
Serving: 12 | Pre Time: 30 minutes | Cooking Time: 40 minutes
Ingredients
– 1 cup water
– ½ cup unsalted butter, cut into cubes
– 1 cup all-purpose flour, sifted
– 4 large pasture-raised eggs, lightly beaten
– 1 cup heavy cream
– ½ cup hazelnut paste
– 1 tablespoon confectioners’ sugar
– 4 ounces semisweet chocolate, finely chopped
– 2 tablespoons clarified butter
Instructions
1. Preheat the oven to 425°F and line a baking sheet with parchment paper.
2. In a medium saucepan over medium-high heat, combine 1 cup water and ½ cup unsalted butter, cut into cubes, bringing it to a rolling boil.
3. Reduce the heat to low, add 1 cup all-purpose flour, sifted, and stir vigorously with a wooden spoon until the mixture forms a smooth ball that pulls away from the sides, about 2 minutes.
4. Transfer the dough to a mixing bowl and let it cool for 5 minutes to prevent the eggs from scrambling.
5. Gradually add 4 large pasture-raised eggs, lightly beaten, to the dough, mixing well after each addition until the batter is shiny and holds a V-shape when the spoon is lifted.
6. Pipe the batter into 4-inch logs on the prepared baking sheet, spacing them 2 inches apart.
7. Bake at 425°F for 15 minutes, then reduce the temperature to 375°F and bake for an additional 20 minutes until golden brown and puffed; avoid opening the oven door during baking to prevent collapse.
8. Remove the éclairs from the oven, pierce each with a skewer to release steam, and let them cool completely on a wire rack.
9. In a chilled bowl, whip 1 cup heavy cream with ½ cup hazelnut paste and 1 tablespoon confectioners’ sugar until stiff peaks form, about 3 minutes.
10. Slice each éclair horizontally and pipe the hazelnut cream into the bottom halves, then replace the tops.
11. In a heatproof bowl set over a saucepan of simmering water, melt 4 ounces semisweet chocolate, finely chopped, with 2 tablespoons clarified butter, stirring until smooth, about 5 minutes.
12. Dip the top of each éclair into the chocolate glaze, letting the excess drip off, and place them on the rack to set for 10 minutes.
13. Serve immediately or refrigerate for up to 2 hours for a firmer texture.
Voilà! You’ve just crafted éclairs with a crackly shell that gives way to a creamy, nutty interior, all wrapped in a rich chocolate cloak. For a playful twist, sprinkle with crushed hazelnuts or serve alongside a shot of espresso to balance the sweetness—because why should Paris have all the fun?
Passion Fruit Mousse with White Chocolate
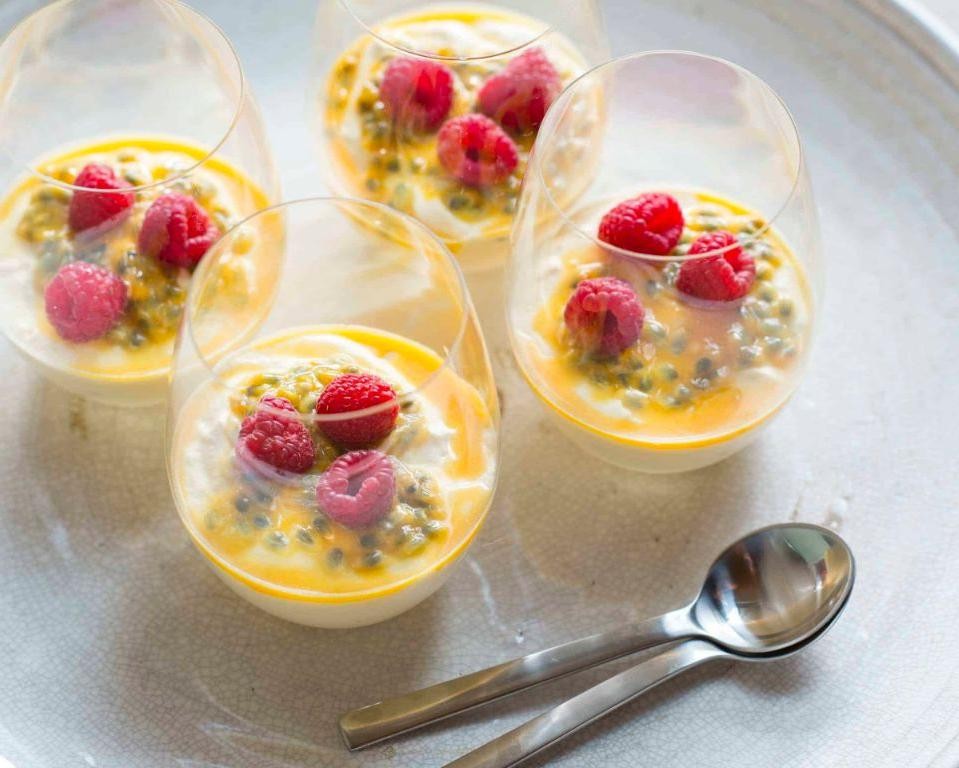
Ready to dazzle your taste buds with a dessert that’s equal parts tropical escape and creamy indulgence? This passion fruit mousse with white chocolate is a showstopper that’ll have you feeling like a pastry pro—no fancy culinary degree required. It’s the perfect blend of tangy, sweet, and downright dreamy.
Serving: 6 | Pre Time: 25 minutes | Cooking Time: 0 minutes
Ingredients
– 1 cup passion fruit purée, strained
– 8 ounces high-quality white chocolate, finely chopped
– 1 cup heavy cream, cold
– 3 large pasture-raised eggs, separated
– ¼ cup granulated sugar
– 1 teaspoon pure vanilla extract
– Pinch of cream of tartar
– Fresh mint leaves, for garnish
Instructions
1. Place the finely chopped white chocolate in a heatproof bowl. 2. Heat the passion fruit purée in a small saucepan over medium heat until it just begins to simmer, about 3–4 minutes. 3. Immediately pour the hot purée over the white chocolate and let it sit undisturbed for 1 minute. 4. Whisk the mixture gently until the chocolate is completely melted and smooth; set aside to cool slightly. Tip: Ensure the purée is hot enough to melt the chocolate fully to avoid a grainy texture. 5. In a large mixing bowl, combine the egg yolks and granulated sugar; whisk vigorously by hand for 2–3 minutes until pale and thickened. 6. Gradually stream the slightly cooled chocolate mixture into the yolk mixture while whisking constantly to temper the eggs. 7. Stir in the pure vanilla extract until fully incorporated. 8. In a separate clean bowl, using an electric mixer on medium speed, whip the cold heavy cream to stiff peaks, about 2–3 minutes; set aside. 9. In another clean bowl, add the egg whites and a pinch of cream of tartar. 10. Whip the egg whites on high speed until they form stiff, glossy peaks, about 3–4 minutes. Tip: Ensure the bowl and beaters are completely grease-free for maximum volume. 11. Gently fold one-third of the whipped cream into the chocolate mixture using a spatula until no white streaks remain. 12. Repeat with the remaining whipped cream in two additions, folding just until combined. 13. Gently fold in the whipped egg whites in two additions, being careful not to deflate the mixture. Tip: Use a light hand here to maintain the mousse’s airy texture. 14. Divide the mousse evenly among six serving glasses or ramekins. 15. Cover and refrigerate for at least 4 hours, or until fully set. 16. Garnish each serving with fresh mint leaves just before serving.
Kick back and savor this masterpiece—its velvety texture melts on the tongue, while the vibrant passion fruit cuts through the rich white chocolate for a perfectly balanced bite. Serve it chilled in elegant coupes for a dinner party, or scoop it into a crunchy tart shell for a textural twist that’ll have everyone asking for seconds.
Conclusion
These 22 exquisite wedding dessert recipes offer something special for every celebration. Whether you’re planning a big day or a cozy gathering, there’s a sweet treat here to impress your guests. We’d love to hear which recipes caught your eye—leave a comment with your favorites and share this roundup on Pinterest to spread the inspiration!


