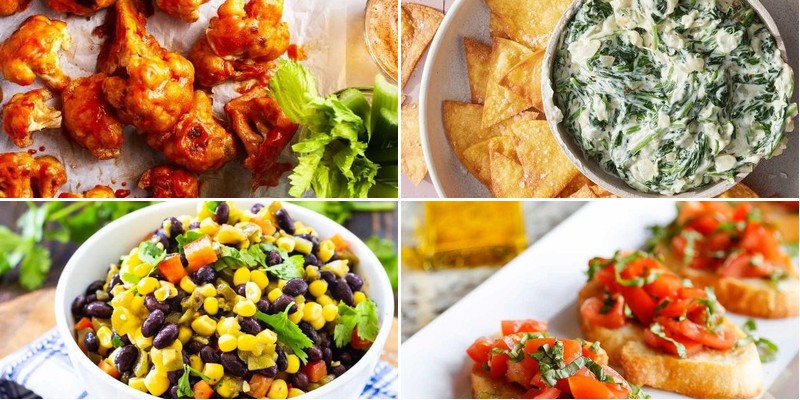
Get ready to score big with your game day spread! These 26 irresistible vegetarian tailgate recipes prove that plant-based feasting can be just as flavorful and satisfying as any traditional spread. From hearty handhelds to crowd-pleasing snacks, we’ve gathered the most delicious meat-free options that will have everyone cheering for more. Let’s dive into these game-changing dishes that’ll make your next tailgate unforgettable!
Grilled Vegetable Skewers with Herb Marinade
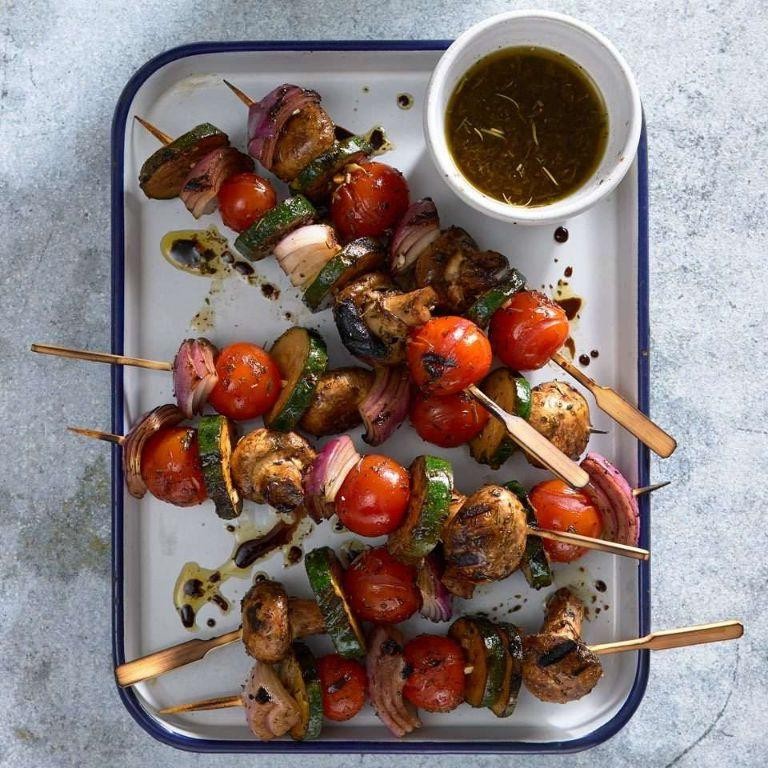
There’s something truly magical about transforming humble vegetables into elegant, flame-kissed masterpieces that capture the essence of seasonal abundance. These grilled vegetable skewers, bathed in a vibrant herb marinade, offer a symphony of colors and textures that elevate outdoor dining to an art form. The careful selection of produce and aromatic herbs creates a dish that’s both visually stunning and deeply satisfying.
3
servings75
minutes15
minutesIngredients
– 2 medium zucchini, cut into 1-inch rounds
– 1 large red bell pepper, seeded and cut into 1.5-inch squares
– 1 large yellow bell pepper, seeded and cut into 1.5-inch squares
– 1 medium red onion, cut into 1-inch wedges
– 8 ounces cremini mushrooms, stems trimmed
– 1/4 cup extra-virgin olive oil
– 3 tablespoons freshly squeezed lemon juice
– 2 tablespoons finely chopped fresh rosemary
– 1 tablespoon finely chopped fresh thyme
– 2 cloves garlic, minced
– 1 teaspoon kosher salt
– 1/2 teaspoon freshly cracked black pepper
Instructions
1. Soak 8-10 wooden skewers in cold water for 30 minutes to prevent burning during grilling.
2. Whisk together 1/4 cup extra-virgin olive oil, 3 tablespoons freshly squeezed lemon juice, 2 tablespoons finely chopped fresh rosemary, 1 tablespoon finely chopped fresh thyme, 2 cloves minced garlic, 1 teaspoon kosher salt, and 1/2 teaspoon freshly cracked black pepper in a large mixing bowl.
3. Add 2 medium zucchini cut into 1-inch rounds, 1 large red bell pepper cut into 1.5-inch squares, 1 large yellow bell pepper cut into 1.5-inch squares, 1 medium red onion cut into 1-inch wedges, and 8 ounces cremini mushrooms with trimmed stems to the marinade.
4. Gently toss the vegetables until evenly coated with the herb marinade, being careful not to break delicate mushroom caps.
5. Cover the bowl with plastic wrap and refrigerate for exactly 45 minutes to allow flavors to penetrate while maintaining vegetable texture.
6. Preheat a gas or charcoal grill to medium-high heat, approximately 425°F, ensuring grates are clean and lightly oiled.
7. Thread the marinated vegetables onto the soaked skewers, alternating colors and textures for visual appeal and even cooking.
8. Place the assembled skewers on the preheated grill and cook for 4-6 minutes per side, watching for distinct grill marks to form.
9. Rotate the skewers a quarter turn after 3 minutes to create cross-hatch grill marks that enhance visual presentation.
10. Continue grilling until vegetables are tender-crisp with slightly charred edges, approximately 12-15 minutes total cooking time.
11. Remove the skewers from the grill when vegetables yield slightly to pressure but still maintain structural integrity.
12. Transfer the grilled vegetable skewers to a serving platter and let rest for 2 minutes before serving.
Ultimately, these skewers deliver a delightful contrast of smoky char and bright herbaceous notes, with the zucchini becoming meltingly tender while the peppers retain a satisfying crunch. Unforgettable when served over creamy polenta or alongside grilled artisan bread to soak up the remaining marinade, they transform any meal into a celebration of summer’s bounty.
Spicy Black Bean and Corn Salsa with Lime
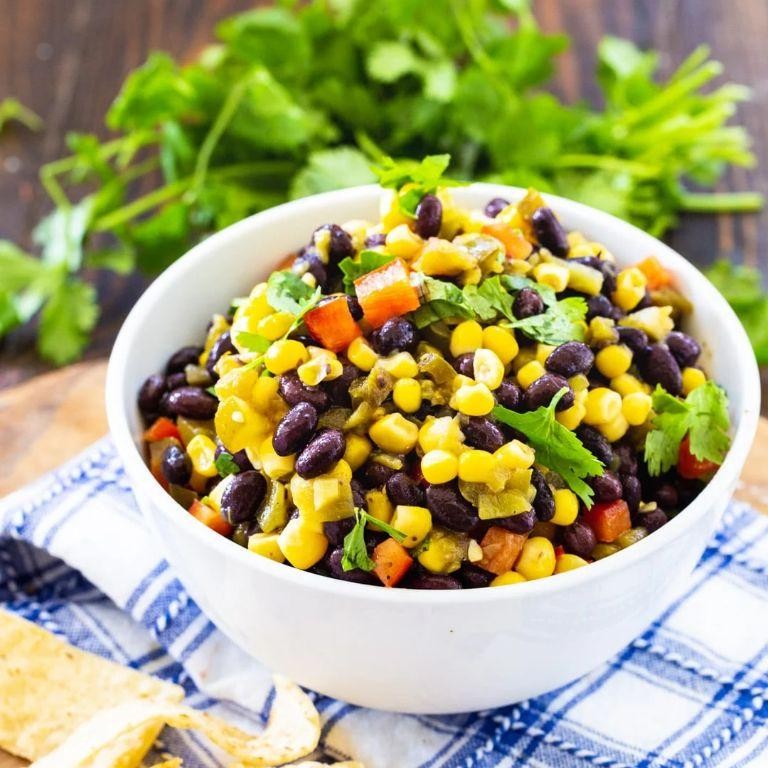
Heralding the vibrant flavors of late summer, this sophisticated salsa transforms humble ingredients into an extraordinary culinary experience. Harmoniously balancing smoky heat with bright acidity, it elevates traditional salsa with refined texture and complex flavor profiles that dance across the palate with each elegant bite.
15
minutesIngredients
– 2 cups organic black beans, thoroughly rinsed and drained
– 1½ cups fire-roasted corn kernels
– ⅓ cup finely diced red onion
– 2 medium jalapeño peppers, seeds removed and minced
– ½ cup chopped fresh cilantro leaves
– 3 tablespoons freshly squeezed lime juice
– 1 teaspoon fine sea salt
– ½ teaspoon freshly ground black pepper
– ¼ teaspoon smoked paprika
Instructions
1. Place the thoroughly rinsed organic black beans in a large mixing bowl.
2. Add the fire-roasted corn kernels to the bowl with the black beans.
3. Incorporate the finely diced red onion into the mixture.
4. Mix in the minced jalapeño peppers, ensuring even distribution.
5. Gently fold in the chopped fresh cilantro leaves.
6. Drizzle the freshly squeezed lime juice over the combined ingredients.
7. Sprinkle the fine sea salt evenly across the mixture.
8. Add the freshly ground black pepper to the bowl.
9. Incorporate the smoked paprika for depth of flavor.
10. Using a rubber spatula, gently toss all ingredients until thoroughly combined, being careful not to crush the beans.
11. Cover the bowl tightly with plastic wrap and refrigerate for exactly 45 minutes to allow flavors to meld.
12. Remove from refrigerator and give one final gentle stir before serving.
Yielded with vibrant color and textural complexity, this salsa presents a delightful contrast between the creamy black beans and crisp corn kernels. The smoky undertones from the paprika mingle beautifully with the bright lime acidity, creating a sophisticated balance that makes it exceptional served alongside grilled fish or as an elegant topping for avocado toast.
Stuffed Bell Peppers with Quinoa and Cheese
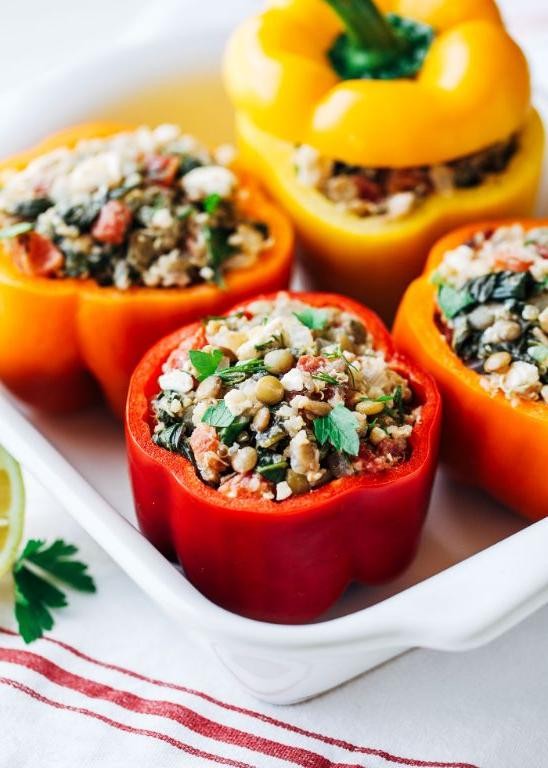
Savor the vibrant marriage of earthy grains and sweet peppers in this sophisticated yet approachable dish, where tender bell peppers cradle a fragrant filling of nutty quinoa and melted artisanal cheeses. Stuffed bell peppers transform humble ingredients into an elegant centerpiece worthy of any dinner table, offering both visual appeal and complex flavor profiles. This recipe elevates the classic comfort food through careful technique and premium ingredients, creating a dish that satisfies both the palate and the eye.
2
portions25
minutes70
minutesIngredients
– 4 large red bell peppers, halved lengthwise and seeded
– 1 cup quinoa, thoroughly rinsed
– 2 cups vegetable broth, simmering
– 1 tablespoon extra virgin olive oil
– 1 medium yellow onion, finely diced
– 3 garlic cloves, minced
– 1 teaspoon smoked paprika
– ½ teaspoon freshly ground black pepper
– 1 cup sharp white cheddar cheese, freshly grated
– ½ cup Parmesan cheese, finely grated
– ¼ cup fresh parsley, chopped
– Sea salt to season
Instructions
1. Preheat your oven to 375°F and lightly grease a 9×13-inch baking dish with olive oil.
2. Place the prepared bell pepper halves cut-side up in the baking dish, ensuring they sit evenly.
3. Heat olive oil in a medium saucepan over medium heat until shimmering, about 1 minute.
4. Add the diced onion and cook until translucent and fragrant, approximately 5-7 minutes, stirring occasionally.
5. Stir in the minced garlic and cook for exactly 1 minute until aromatic but not browned.
6. Add the rinsed quinoa to the pan and toast for 2 minutes, stirring constantly to develop nutty flavor.
7. Pour in the simmering vegetable broth, smoked paprika, and black pepper, then bring to a boil.
8. Reduce heat to low, cover tightly, and simmer for 15 minutes until quinoa has absorbed all liquid.
9. Remove from heat and let stand covered for 5 minutes to complete the steaming process.
10. Fluff the quinoa mixture with a fork, then fold in both cheeses and parsley until evenly distributed.
11. Generously season the pepper halves with sea salt inside each cavity.
12. Spoon the quinoa filling into each pepper half, mounding slightly above the edges.
13. Cover the baking dish with aluminum foil and bake for 25 minutes until peppers begin to soften.
14. Remove the foil and continue baking for 15-20 minutes until pepper edges are lightly charred and filling is golden.
15. Let rest for 5 minutes before serving to allow flavors to meld and filling to set.
Nothing compares to the textural harmony of tender-crisp peppers yielding to the fluffy quinoa filling, where the sharp cheddar provides creamy richness against the salty bite of Parmesan. The subtle smokiness from the paprika enhances the natural sweetness of the roasted peppers, creating layers of flavor that develop with each bite. For an elegant presentation, serve alongside a crisp arugula salad dressed in lemon vinaigrette to cut through the richness, or garnish with additional fresh herbs and a drizzle of high-quality olive oil.
Crispy Cauliflower Wings with Buffalo Sauce
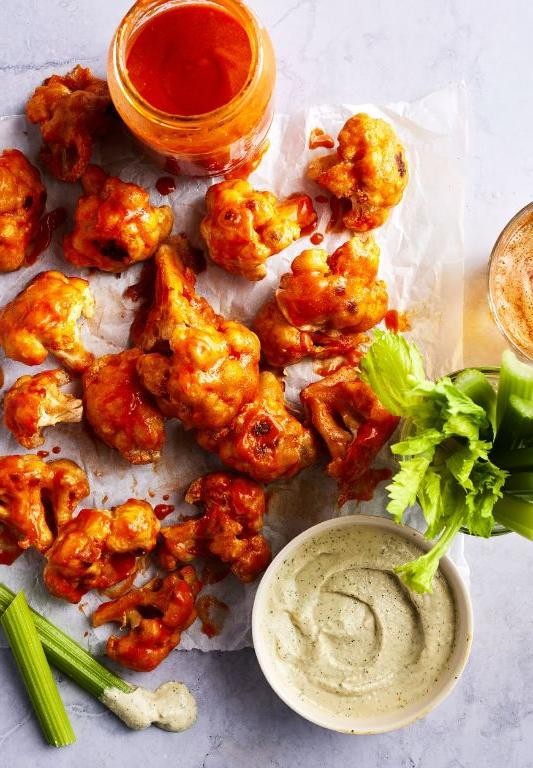
Tender cauliflower florets, when transformed through careful preparation, become an unexpectedly elegant vegetarian alternative to traditional wings. These golden-crisp morsels, cloaked in a piquant buffalo sauce, offer both visual appeal and complex flavor profiles that will delight even the most discerning palates. The magic lies in achieving that perfect textural contrast between the crisp exterior and the tender interior.
5
servings20
minutes35
minutesIngredients
– 1 large head cauliflower, cut into 2-inch florets
– 1 cup all-purpose flour
– 1 cup buttermilk
– 2 large pasture-raised eggs, lightly beaten
– 1 tablespoon smoked paprika
– 2 teaspoons garlic powder
– 1 teaspoon fine sea salt
– ½ teaspoon freshly ground black pepper
– 2 cups panko breadcrumbs
– ½ cup clarified butter
– ¾ cup buffalo sauce
– 2 tablespoons raw honey
– 1 tablespoon apple cider vinegar
– Fresh chives, finely chopped for garnish
– Crumbled blue cheese for serving
Instructions
1. Preheat your oven to 425°F and line a baking sheet with parchment paper.
2. Whisk together the all-purpose flour, smoked paprika, garlic powder, fine sea salt, and freshly ground black pepper in a large mixing bowl.
3. Combine the buttermilk and lightly beaten pasture-raised eggs in a separate bowl, whisking until fully incorporated.
4. Place the panko breadcrumbs in a third shallow dish, creating a standard breading station.
5. Dip each cauliflower floret first into the flour mixture, shaking off any excess.
6. Submerge the floured florets in the buttermilk-egg mixture, ensuring complete coverage.
7. Roll the wet florets in the panko breadcrumbs, pressing gently to adhere the coating.
8. Arrange the breaded florets in a single layer on the prepared baking sheet.
9. Drizzle the clarified butter evenly over the cauliflower florets.
10. Bake for 22-25 minutes until the coating is golden brown and crisp.
11. Meanwhile, combine the buffalo sauce, raw honey, and apple cider vinegar in a small saucepan over medium heat.
12. Simmer the sauce mixture for 3-4 minutes until slightly thickened, stirring constantly.
13. Remove the cauliflower from the oven and immediately toss with the warm buffalo sauce mixture.
14. Return the sauced cauliflower to the baking sheet and bake for an additional 5-7 minutes to set the glaze.
15. Transfer the finished cauliflower wings to a serving platter and garnish with finely chopped fresh chives.
Ultimate satisfaction comes from that first bite, where the crisp panko crust gives way to tender cauliflower beneath the tangy-spicy buffalo glaze. The subtle sweetness from the honey balances the heat beautifully, while the clarified butter ensures an exceptionally crisp texture without heaviness. Consider serving these alongside crumbled blue cheese and crisp celery sticks for a complete flavor experience that elevates casual dining to something truly special.
Loaded Sweet Potato Nachos with Avocado Cream
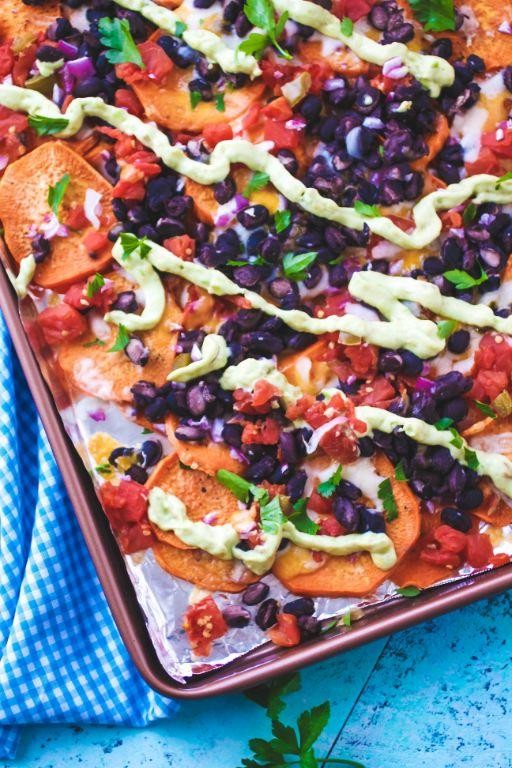
Dazzling in both presentation and flavor, these loaded sweet potato nachos elevate casual dining to gourmet heights. Thinly sliced sweet potatoes transform into crisp vessels for a symphony of sophisticated toppings, while the cooling avocado cream provides the perfect counterpoint to the spiced elements. This dish masterfully balances earthy sweetness with savory complexity in every elegant bite.
2
servings15
minutes32
minutesIngredients
– 2 large sweet potatoes, peeled and sliced into 1/4-inch rounds
– 2 tablespoons avocado oil
– 1 teaspoon smoked paprika
– 1/2 teaspoon garlic powder
– 1/4 teaspoon cayenne pepper
– 1 cup cooked black beans, rinsed and drained
– 1 cup shredded Monterey Jack cheese
– 1/2 cup crumbled cotija cheese
– 1 ripe avocado, pitted and scooped
– 1/4 cup Greek yogurt
– 1 tablespoon fresh lime juice
– 1 tablespoon chopped fresh cilantro
– 2 tablespoons pickled jalapeño slices
– 2 tablespoons sliced scallions
Instructions
1. Preheat your oven to 425°F and line a baking sheet with parchment paper.
2. In a large bowl, toss the sweet potato rounds with avocado oil until evenly coated.
3. Arrange the sweet potato rounds in a single layer on the prepared baking sheet, ensuring they don’t overlap.
4. Bake for 15 minutes, then flip each round using tongs for even crisping.
5. Continue baking for another 10-12 minutes until the edges are golden brown and crisp.
6. Remove from oven and immediately sprinkle with smoked paprika, garlic powder, and cayenne pepper.
7. Evenly distribute the black beans over the sweet potato rounds.
8. Layer both Monterey Jack and cotija cheeses across the nachos.
9. Return to oven and bake for 4-5 minutes until cheeses are fully melted and bubbly.
10. While nachos bake, combine avocado, Greek yogurt, and lime juice in a food processor.
11. Process the mixture for 45-60 seconds until completely smooth and creamy.
12. Transfer the baked nachos to a serving platter using a wide spatula.
13. Drizzle the avocado cream over the hot nachos in a zigzag pattern.
14. Garnish with chopped cilantro, pickled jalapeños, and sliced scallions.
Zesty and texturally complex, these nachos offer a delightful contrast between the crisp sweet potato base and the molten cheese layers. The avocado cream provides a cooling richness that beautifully complements the subtle heat from the spices. For an elegant presentation, serve immediately on a large wooden board with cocktail forks for easy sharing among guests.
Cheesy Spinach and Artichoke Dip with Tortilla Chips
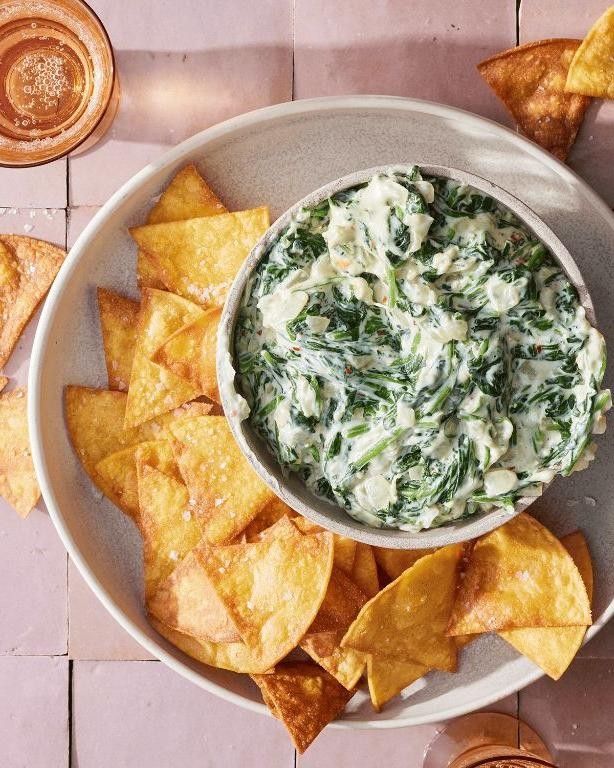
Elevating the classic party appetizer to new heights, this sophisticated dip combines creamy textures with vibrant garden flavors. Every spoonful reveals the perfect harmony between rich dairy elements and earthy vegetable notes. Crafted for both casual gatherings and elegant soirées, this dish promises to become an instant crowd-pleaser.
1
dish20
minutes35
minutesIngredients
- 2 cups freshly grated Parmigiano-Reggiano cheese
- 1½ cups high-quality cream cheese, at room temperature
- 1 cup crème fraîche
- ¾ cup mayonnaise made with avocado oil
- 4 cloves garlic, finely minced
- 1 large shallot, finely diced
- 2 tablespoons clarified butter
- 10 ounces fresh spinach leaves, thoroughly washed
- 14 ounces artichoke hearts packed in brine, drained and chopped
- ½ teaspoon freshly grated nutmeg
- ¼ teaspoon cayenne pepper
- 1 teaspoon fine sea salt
- ½ teaspoon freshly cracked black pepper
- 1 bag artisanal tortilla chips
Instructions
- Preheat your oven to 375°F and position the rack in the center of the oven.
- Heat clarified butter in a large skillet over medium heat until it shimmers, about 90 seconds.
- Sauté diced shallot until translucent and fragrant, approximately 3-4 minutes.
- Add minced garlic and cook for precisely 60 seconds until aromatic but not browned.
- Incorporate fresh spinach in three batches, wilting each addition completely before adding the next.
- Transfer the spinach mixture to a colander and press firmly with the back of a spoon to remove excess moisture.
- Combine room-temperature cream cheese, crème fraîche, and avocado oil mayonnaise in a large mixing bowl.
- Whisk the dairy mixture vigorously for 2 minutes until completely smooth and well-incorporated.
- Fold in grated Parmigiano-Reggiano cheese until evenly distributed throughout the base.
- Gently stir in drained spinach mixture and chopped artichoke hearts using a rubber spatula.
- Season the dip with fine sea salt, freshly cracked black pepper, freshly grated nutmeg, and cayenne pepper.
- Transfer the mixture to a 1.5-quart baking dish and spread into an even layer using an offset spatula.
- Bake for 22-25 minutes until the edges bubble vigorously and the surface develops golden spots.
- Let the dip rest for 8-10 minutes before serving to allow the flavors to meld properly.
- Arrange artisanal tortilla chips around the baking dish for serving.
Perfectly balanced between creamy indulgence and vegetable freshness, this dip offers a luxurious mouthfeel with subtle textural contrasts from the artichoke pieces. The golden-brown surface gives way to a velvety interior that clings beautifully to each tortilla chip. For an elegant presentation, consider serving in individual ramekins garnished with microgreens or alongside crisp vegetable crudités for a lighter alternative.
Vegan BBQ Jackfruit Sliders

Crafted for those seeking plant-based indulgence without compromise, these vegan BBQ jackfruit sliders transform humble ingredients into an elegant handheld feast. The tender, slow-simmered jackfruit mimics pulled pork’s succulent texture while absorbing the complex sweetness and smokiness of a meticulously balanced barbecue sauce. Each miniature bun cradles this sophisticated filling, creating a harmonious interplay of flavors that will delight both dedicated vegans and curious omnivores alike.
8
sliders25
minutes45
minutesIngredients
– 2 (20-ounce) cans young green jackfruit in brine, thoroughly drained and rinsed
– 2 tablespoons extra-virgin olive oil
– 1 large yellow onion, finely julienned
– 3 garlic cloves, microplaned
– 1 cup high-quality vegan barbecue sauce
– 2 tablespoons pure maple syrup
– 1 tablespoon apple cider vinegar
– 1 teaspoon smoked paprika
– ½ teaspoon freshly cracked black pepper
– ¼ teaspoon cayenne pepper
– 8 miniature brioche-style vegan slider buns
– ½ cup vegan mayonnaise
– 1 cup finely shredded red cabbage
– ¼ cup quick-pickled red onion slices
Instructions
1. Preheat your oven to 375°F and line a baking sheet with parchment paper.
2. Using your hands, meticulously shred the drained jackfruit pieces, discarding any tough core segments.
3. Heat olive oil in a large cast-iron skillet over medium heat until shimmering.
4. Sauté the julienned onion for 6-8 minutes until translucent and lightly caramelized.
5. Add the microplaned garlic and cook for 60 seconds until fragrant but not browned.
6. Incorporate the shredded jackfruit, stirring to coat evenly with the aromatics.
7. Pour in the barbecue sauce, maple syrup, and apple cider vinegar, stirring to combine thoroughly.
8. Season with smoked paprika, black pepper, and cayenne pepper, distributing evenly.
9. Transfer the skillet to the preheated oven and bake uncovered for 25 minutes.
10. Remove from oven and use two forks to further shred any remaining large jackfruit pieces.
11. Return to oven for an additional 10 minutes until the edges appear caramelized and slightly crispy.
12. Lightly toast the slider buns in a dry skillet over medium heat for 90 seconds per side.
13. Spread 1 tablespoon vegan mayonnaise on the bottom half of each toasted bun.
14. Layer 2 tablespoons shredded red cabbage over the mayonnaise.
15. Spoon ¼ cup of the hot jackfruit mixture over the cabbage layer.
16. Crown each slider with quick-pickled red onion slices and the bun tops.
Generously portioned sliders reveal a magnificent textural symphony—the pillowy softness of toasted buns gives way to the crisp cabbage, then surrenders to the remarkably tender, slow-cooked jackfruit that shreds like perfected pulled pork. The sophisticated balance of smoky-sweet barbecue glaze against the bright acidity of quick-pickled onions creates layers of flavor that unfold with each bite. For an elevated presentation, serve these miniature masterpieces on a slate board accompanied by crisp dill pickle spears and a dusting of fresh chive blossoms.
Zucchini Fritters with Yogurt Dip
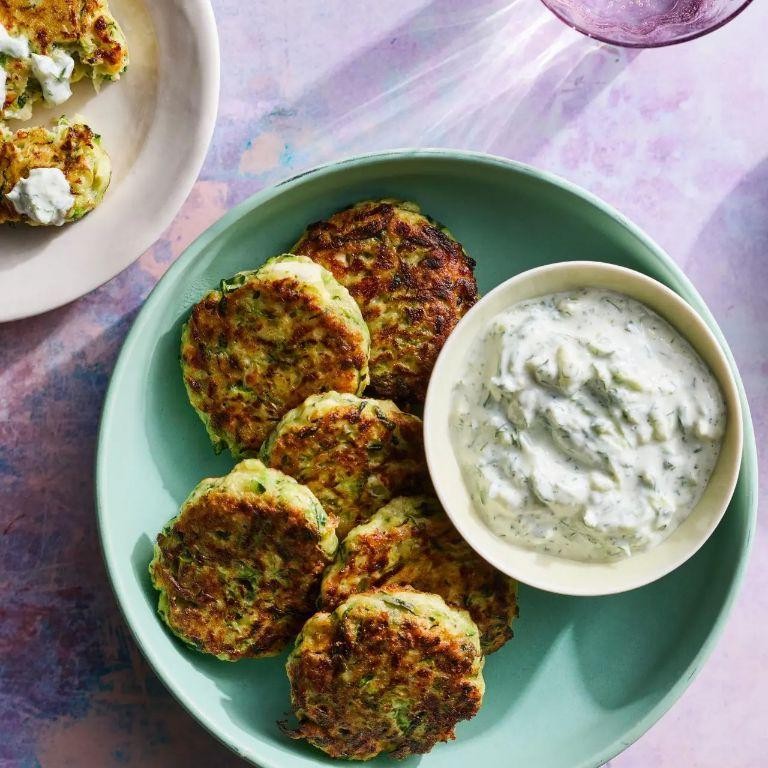
A symphony of summer’s bounty comes together in these elegant zucchini fritters, where delicate shreds of fresh zucchini are transformed into golden, crisp-edged delights. Paired with a cool, tangy yogurt dip brightened with fresh herbs and citrus, this dish celebrates seasonal produce with refined simplicity. These fritters offer a sophisticated yet approachable way to showcase zucchini’s versatile charm.
3
portions15
minutes15
minutesIngredients
- 2 medium zucchini, coarsely grated and thoroughly drained
- 1/2 cup all-purpose flour
- 1 large pasture-raised egg, lightly beaten
- 2 tablespoons finely chopped fresh dill
- 1 tablespoon freshly grated Parmigiano-Reggiano
- 1/2 teaspoon fine sea salt
- 1/4 teaspoon freshly ground black pepper
- 1/4 cup clarified butter for frying
- 1 cup whole-milk Greek yogurt
- 1 tablespoon extra virgin olive oil
- 1 teaspoon freshly squeezed lemon juice
- 1 small garlic clove, microplaned
- 1 tablespoon finely chopped fresh mint
- 1/4 teaspoon flaky sea salt
Instructions
- Place grated zucchini in a clean kitchen towel and twist tightly to extract as much liquid as possible, ensuring crisp fritters.
- Transfer drained zucchini to a medium mixing bowl.
- Add all-purpose flour, lightly beaten pasture-raised egg, finely chopped fresh dill, freshly grated Parmigiano-Reggiano, fine sea salt, and freshly ground black pepper to the bowl.
- Gently fold ingredients together until just combined, being careful not to overmix.
- Heat clarified butter in a large skillet over medium heat until it shimmers, about 350°F.
- Drop heaping tablespoons of the zucchini mixture into the hot butter, spacing them 2 inches apart.
- Flatten each portion slightly with the back of your spoon to create even discs.
- Fry for 3-4 minutes until the edges appear golden brown and crisp.
- Carefully flip each fritter using a thin spatula.
- Continue cooking for another 2-3 minutes until both sides achieve an even golden-brown crust.
- Transfer cooked fritters to a wire rack set over a baking sheet to maintain crispness.
- In a separate small bowl, combine whole-milk Greek yogurt, extra virgin olive oil, freshly squeezed lemon juice, microplaned garlic clove, finely chopped fresh mint, and flaky sea salt.
- Whisk the dip ingredients until smooth and fully incorporated.
- Serve fritters immediately alongside the prepared yogurt dip.
Unbelievably crisp exteriors give way to tender, herb-flecked interiors in these golden fritters, creating a delightful textural contrast. The cool yogurt dip provides a bright, tangy counterpoint that beautifully balances the savory notes of Parmesan and fresh dill. For an elegant presentation, arrange the fritters on a slate board with the dip in a small ceramic bowl, garnished with additional fresh herbs and lemon wedges.
Roasted Red Pepper and Hummus Wraps

Yielded from the vibrant marriage of Mediterranean flavors and contemporary convenience, these roasted red pepper and hummus wraps offer a symphony of textures and tastes in every elegant bite. Perfectly balanced between creamy sophistication and fresh vitality, they transform simple ingredients into an artful lunch or light dinner that delights both palate and presentation. Their vibrant colors and layered flavors speak to culinary refinement while remaining effortlessly accessible for any home cook.
3
wraps25
minutes30
minutesIngredients
- 4 large flour tortillas (10-inch diameter)
- 1½ cups classic hummus, preferably homemade
- 2 large red bell peppers, roasted and sliced into ¼-inch strips
- 2 cups fresh baby spinach leaves, thoroughly washed and dried
- ½ English cucumber, thinly sliced into ⅛-inch rounds
- 4 ounces feta cheese, crumbled into small pieces
- 2 tablespoons extra virgin olive oil
- 1 tablespoon freshly squeezed lemon juice
- ½ teaspoon smoked paprika
- ¼ teaspoon fine sea salt
Instructions
- Preheat your oven to 425°F and position one rack in the center.
- Place the whole red bell peppers directly on the oven rack and roast for 25-30 minutes, rotating every 10 minutes with tongs until the skins are completely blackened and blistered.
- Transfer the charred peppers to a heatproof bowl and immediately cover tightly with plastic wrap, allowing them to steam for 15 minutes—this crucial step loosens the skins for easy removal.
- While the peppers steam, combine the extra virgin olive oil, freshly squeezed lemon juice, smoked paprika, and fine sea salt in a small bowl, whisking vigorously until fully emulsified.
- Carefully peel the blackened skins from the roasted peppers under cool running water, then remove the stems and seeds before slicing them into uniform ¼-inch strips.
- Warm the flour tortillas in a dry skillet over medium heat for 30 seconds per side until pliable but not crisp—this prevents cracking when rolling.
- Spread ⅓ cup of classic hummus evenly across each tortilla, leaving a 1-inch border around the edges to prevent spillage.
- Layer ½ cup of fresh baby spinach leaves over the hummus, followed by the roasted pepper strips arranged in a single horizontal line.
- Distribute the thinly sliced English cucumber rounds evenly over the pepper strips, then sprinkle with 1 ounce of crumbled feta cheese per wrap.
- Drizzle each assembly with 1½ teaspoons of the prepared olive oil dressing, ensuring even distribution across the fillings.
- Fold the bottom edge of each tortilla up over the fillings, then tightly roll from left to right, applying gentle pressure to create a secure cylinder.
- Slice each wrapped cylinder diagonally at a 45-degree angle with a serrated knife to reveal the beautiful layered cross-section.
Final creations showcase a stunning contrast between the creamy hummus base and the smoky sweetness of roasted peppers, while the crisp cucumber and tangy feta provide bright counterpoints to the earthy spinach. For an elevated presentation, arrange the diagonal slices in a sunburst pattern on a wooden board, garnished with additional paprika and fresh herbs. These wraps maintain their structural integrity beautifully for several hours, making them ideal for elegant picnics or sophisticated packed lunches where visual appeal matters as much as flavor.
Balsamic Mushroom and Goat Cheese Crostini
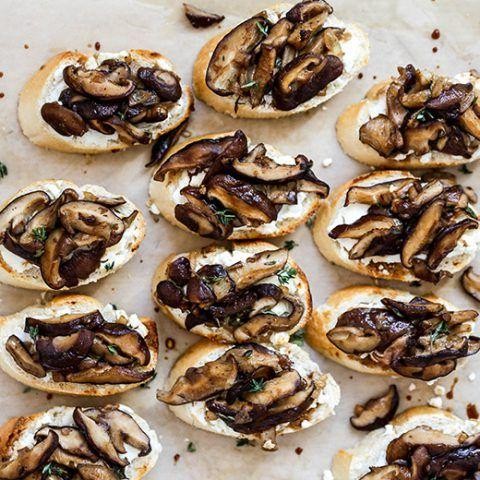
Tender, earthy mushrooms caramelized in rich balsamic reduction create an exquisite topping for crisp crostini, while creamy goat cheese provides the perfect tangy counterpoint to this elegant appetizer. This sophisticated yet approachable dish transforms simple ingredients into a culinary masterpiece that delights both the palate and the eye.
12
portions15
minutes25
minutesIngredients
– 1 French baguette, sliced into ½-inch thick rounds
– 3 tablespoons extra-virgin olive oil, divided
– 1 pound mixed wild mushrooms (cremini, shiitake, and oyster), stems removed and thinly sliced
– 2 medium shallots, finely minced
– 2 cloves garlic, finely minced
– ¼ cup high-quality balsamic vinegar
– 1 tablespoon fresh thyme leaves
– 4 ounces fresh goat cheese, at room temperature
– 2 tablespoons unsalted butter
– Kosher salt and freshly cracked black pepper
– Fresh parsley leaves for garnish
Instructions
1. Preheat your oven to 375°F and arrange baguette slices in a single layer on a baking sheet.
2. Brush each baguette slice lightly with 1 tablespoon of olive oil using a pastry brush.
3. Bake the crostini for 8-10 minutes until golden brown and crisp around the edges.
4. While the crostini bakes, heat the remaining 2 tablespoons of olive oil in a large skillet over medium-high heat.
5. Add the sliced mushrooms to the hot skillet in a single layer, working in batches if necessary to avoid overcrowding.
6. Cook the mushrooms undisturbed for 4-5 minutes until they develop a deep golden-brown sear on one side.
7. Stir the mushrooms and continue cooking for another 3-4 minutes until tender and evenly browned.
8. Add the minced shallots to the skillet and cook for 2 minutes until translucent and fragrant.
9. Stir in the minced garlic and cook for 30 seconds until aromatic but not browned.
10. Pour the balsamic vinegar into the skillet and use a wooden spoon to scrape up any browned bits from the bottom.
11. Reduce the heat to medium and simmer the mushroom mixture for 3-4 minutes until the balsamic has thickened to a glaze-like consistency.
12. Stir in the fresh thyme leaves and unsalted butter until the butter melts and creates a glossy sauce.
13. Season the mushroom mixture with kosher salt and freshly cracked black pepper to your preference.
14. Remove the crostini from the oven and let them cool for 2 minutes until warm but not hot to the touch.
15. Spread each crostini with a generous layer of room-temperature goat cheese using a small offset spatula.
16. Top the goat cheese with a spoonful of the warm balsamic mushroom mixture, ensuring even distribution.
17. Garnish each crostini with fresh parsley leaves for color and freshness.
Golden-brown crostini provide the perfect crisp foundation for the velvety goat cheese and glossy mushroom topping. The combination creates a delightful textural contrast between the crunchy bread, creamy cheese, and tender mushrooms. For an elegant presentation, arrange them on a slate board with fresh thyme sprigs and serve immediately while the crostini retain their crisp texture.
Savory Tomato and Basil Bruschetta
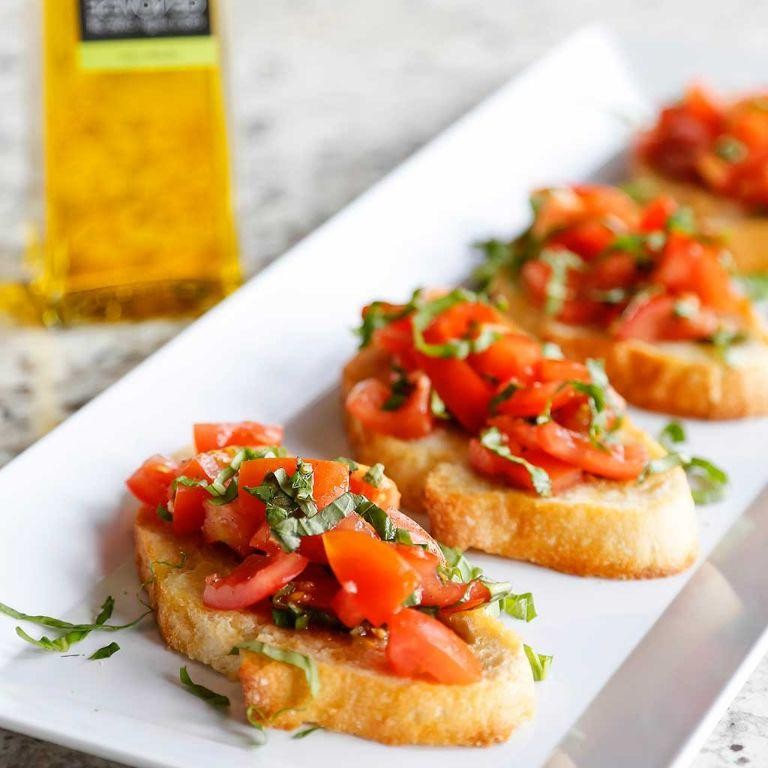
Delightfully simple yet sophisticated, this classic Italian appetizer celebrates the vibrant marriage of sun-ripened tomatoes and aromatic basil. Each crisp crostini serves as the perfect canvas for the jewel-toned topping that bursts with Mediterranean flavors. The elegant preparation transforms humble ingredients into an impressive starter worthy of any gathering.
1
baguette15
minutes10
minutesIngredients
– 1 rustic Italian baguette, sliced into ½-inch thick diagonal pieces
– 3 tablespoons extra-virgin olive oil, divided
– 2 large heirloom tomatoes, seeded and finely diced
– ¼ cup fresh basil leaves, chiffonade-cut
– 1 small shallot, minced
– 1 garlic clove, halved
– 1 tablespoon aged balsamic vinegar
– Sea salt flakes to season
– Freshly cracked black pepper to finish
Instructions
1. Preheat your oven to 375°F and arrange the baguette slices in a single layer on a baking sheet.
2. Brush each slice lightly with 2 tablespoons of olive oil, ensuring even coverage across the surface.
3. Toast the bread for 8-10 minutes until golden brown and crisp around the edges, rotating the pan halfway through for even browning.
4. While the bread toasts, combine the diced tomatoes, basil chiffonade, and minced shallot in a medium mixing bowl.
5. Drizzle the remaining tablespoon of olive oil and aged balsamic vinegar over the tomato mixture, then gently toss to combine.
6. Season the tomato mixture with sea salt flakes, being careful not to oversalt as the flavors will concentrate.
7. Remove the toasted bread from the oven and immediately rub the cut side of the garlic clove over each warm slice—this technique maximizes garlic flavor without overwhelming bitterness.
8. Let the bread cool for 2 minutes to prevent the tomato mixture from becoming soggy when assembled.
9. Spoon the tomato-basil mixture generously onto each garlic-rubbed crostini, allowing any excess liquid to remain in the bowl.
10. Finish each bruschetta with a twist of freshly cracked black pepper just before serving.
Exquisitely balanced between crisp and juicy textures, these bruschetta offer a symphony of sweet tomatoes against the peppery basil and sharp garlic notes. The slight acidity from the balsamic vinegar cuts through the richness of the olive oil beautifully. For an elegant presentation, arrange them on a slate board garnished with whole basil sprigs, or serve alongside creamy burrata for a more substantial appetizer.
Mediterranean Chickpea Salad with Feta
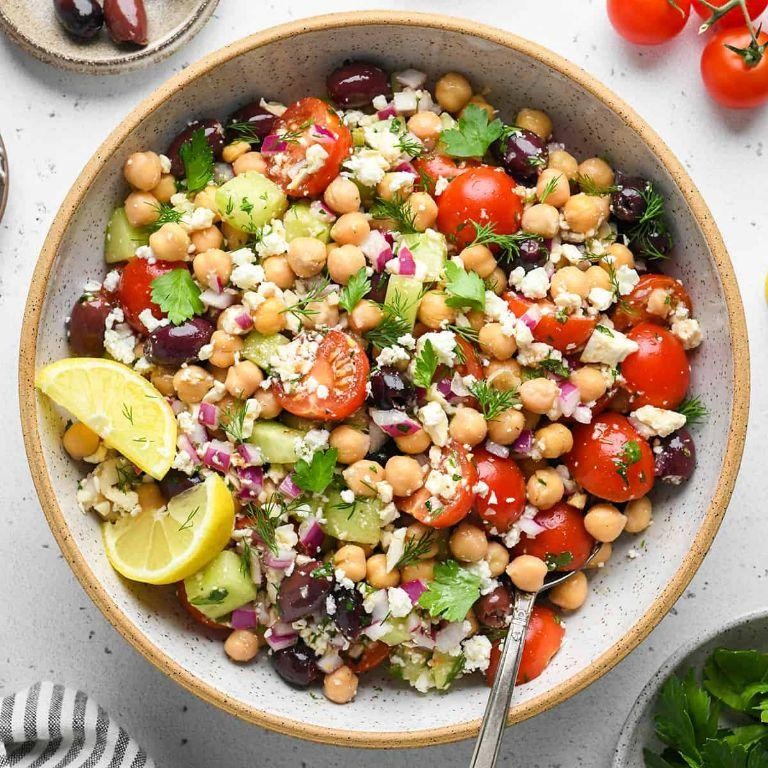
Brimming with vibrant colors and fresh Mediterranean flavors, this sophisticated chickpea salad offers a delightful interplay of textures and tastes that elevate simple ingredients into an extraordinary dish. Perfectly balanced between creamy feta, crisp vegetables, and protein-rich legumes, it provides both visual appeal and nutritional complexity. This elegant preparation transforms humble components into a refined culinary experience worthy of any gathering.
3
servings20
minutesIngredients
– 2 cups cooked chickpeas, thoroughly rinsed and drained
– 4 ounces premium feta cheese, crumbled into medium chunks
– 1 English cucumber, finely diced into ¼-inch cubes
– 1 pint cherry tomatoes, halved lengthwise
– ½ red onion, thinly sliced using mandoline
– ¼ cup extra virgin olive oil
– 2 tablespoons freshly squeezed lemon juice
– 1 teaspoon dried oregano, gently crushed between fingers
– ½ teaspoon flaky sea salt
– ¼ teaspoon freshly cracked black pepper
– 2 tablespoons fresh mint leaves, chiffonade-cut
Instructions
1. Place the rinsed chickpeas in a large mixing bowl and pat dry with paper towels to ensure proper dressing adhesion.
2. Add the diced cucumber, halved cherry tomatoes, and thinly sliced red onion to the bowl with the chickpeas.
3. In a separate small bowl, whisk together the extra virgin olive oil and freshly squeezed lemon juice until emulsified, about 30 seconds of vigorous whisking.
4. Sprinkle the crushed dried oregano, flaky sea salt, and freshly cracked black pepper into the dressing mixture, whisking to incorporate thoroughly.
5. Pour the prepared dressing over the vegetable and chickpea mixture, using a rubber spatula to gently fold everything together until evenly coated.
6. Add the crumbled feta cheese chunks to the salad, folding carefully to maintain their structural integrity and prevent excessive crumbling.
7. Allow the salad to rest at room temperature for 15 minutes to let the flavors meld and the vegetables slightly soften while absorbing the dressing.
8. Just before serving, sprinkle the chiffonade-cut fresh mint leaves over the top as a final garnish.
Unveiling a beautiful harmony of textures, this salad presents creamy feta against crisp vegetables and tender chickpeas in every bite. The bright acidity from fresh lemon juice cuts through the richness while the mint provides a refreshing finish that lingers pleasantly. Consider serving it alongside grilled lamb chops or as a stunning centerpiece in lettuce cups for an elegant appetizer presentation.
Creamy Avocado Pasta Salad
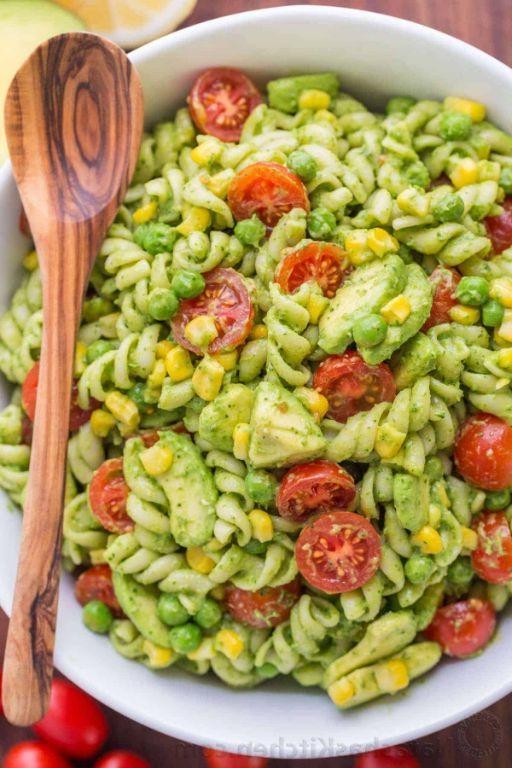
Just when you thought pasta salad couldn’t become more sophisticated, this creamy avocado creation elevates the humble dish to new culinary heights. Juxtaposing velvety textures with bright, herbaceous notes, it transforms simple ingredients into an extraordinary experience that delights both the palate and the senses. Perfect for elegant gatherings or refined weeknight dining, this recipe promises to become your new signature dish.
3
servings15
minutes10
minutesIngredients
– 8 ounces fusilli pasta
– 2 ripe Hass avocados, pitted and peeled
– ¼ cup extra-virgin olive oil
– 2 tablespoons freshly squeezed lemon juice
– 1 small shallot, finely minced
– 1 garlic clove, microplaned
– ¼ cup fresh basil leaves, chiffonade-cut
– 2 tablespoons fresh dill, finely chopped
– ½ teaspoon sea salt flakes
– ¼ teaspoon freshly cracked black pepper
– ½ cup cherry tomatoes, halved
– ¼ cup toasted pine nuts
Instructions
1. Bring 4 quarts of heavily salted water to a rolling boil in a large stockpot.
2. Add fusilli pasta and cook for precisely 8-10 minutes until al dente, testing for doneness at the 8-minute mark.
3. Drain pasta immediately and spread in a single layer on a parchment-lined baking sheet to cool completely, which prevents overcooking and maintains ideal texture.
4. In a high-speed blender, combine Hass avocado flesh, extra-virgin olive oil, and freshly squeezed lemon juice.
5. Blend on high speed for 45-60 seconds until completely smooth and emulsified, scraping down the sides once during blending.
6. Transfer avocado cream to a large mixing bowl and fold in microplaned garlic and finely minced shallot.
7. Gently incorporate chiffonade-cut basil and finely chopped dill into the avocado mixture.
8. Season the dressing with sea salt flakes and freshly cracked black pepper, adjusting seasoning carefully as avocados vary in natural saltiness.
9. Add cooled fusilli pasta to the dressing and toss meticulously until every piece is coated evenly.
10. Fold in halved cherry tomatoes and toasted pine nuts with a light hand to maintain their structural integrity.
11. Chill the completed salad for exactly 20 minutes in the refrigerator to allow flavors to meld while preserving the vibrant green color.
Velvety avocado cream clings beautifully to each pasta spiral, creating a luxurious mouthfeel that contrasts wonderfully with the crisp tomatoes and crunchy pine nuts. The bright acidity from fresh lemon juice cuts through the richness, while the herbaceous notes of basil and dill provide sophisticated complexity. For an elegant presentation, serve in individual chilled bowls garnished with additional fresh herbs and a drizzle of high-quality olive oil.
Roasted Garlic Parmesan Asparagus
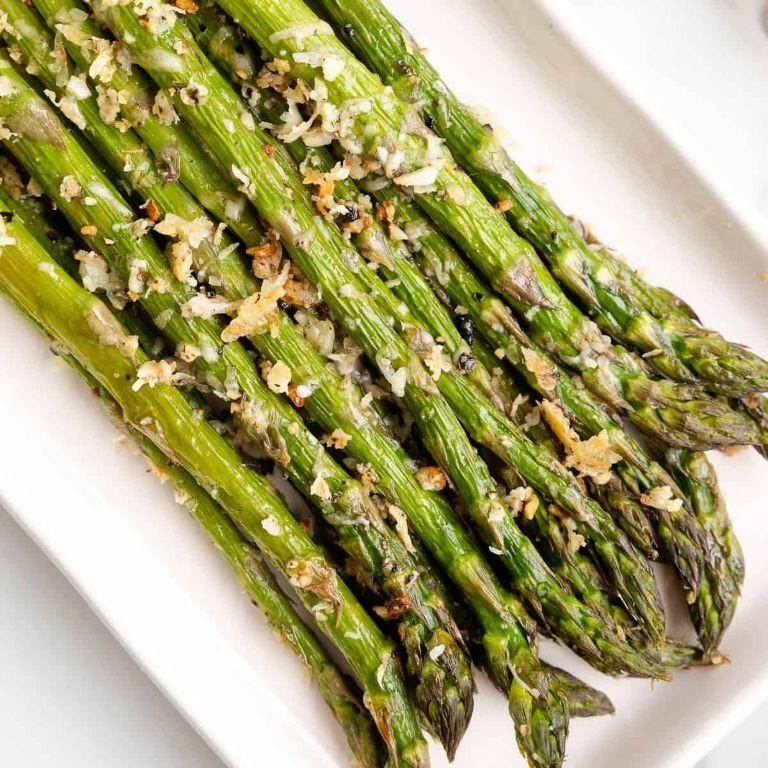
Radiant spears of emerald asparagus transform into an elegant side dish when kissed by the heat of the oven and adorned with nutty Parmesan and aromatic roasted garlic. This sophisticated preparation elevates the humble vegetable to centerpiece status, offering both visual appeal and complex flavor profiles. The caramelized edges and tender-crisp texture create a delightful contrast that will impress even the most discerning palates.
5
servings10
minutes17
minutesIngredients
– 1 pound fresh asparagus spears, woody ends trimmed
– 2 tablespoons extra virgin olive oil
– 3 large garlic cloves, finely minced
– ¼ cup freshly grated Parmigiano-Reggiano cheese
– 1 tablespoon unsalted butter, melted
– ½ teaspoon flaky sea salt
– ¼ teaspoon freshly cracked black pepper
– 1 teaspoon fresh lemon zest
Instructions
1. Preheat your oven to 425°F and position one rack in the center of the oven.
2. Rinse the asparagus spears under cold running water and pat completely dry with paper towels.
3. Snap off the woody ends of each asparagus spear where they naturally break.
4. Arrange the trimmed asparagus in a single layer on a rimmed baking sheet lined with parchment paper.
5. Drizzle the extra virgin olive oil evenly over the asparagus spears.
6. Using clean hands, gently toss the asparagus to ensure each spear is lightly coated with oil.
7. Sprinkle the finely minced garlic evenly across the asparagus.
8. Season with flaky sea salt and freshly cracked black pepper.
9. Roast in the preheated oven for 12-15 minutes until the asparagus is tender-crisp and the tips begin to caramelize.
10. Remove the baking sheet from the oven and immediately sprinkle with freshly grated Parmigiano-Reggiano cheese.
11. Drizzle the melted unsalted butter over the asparagus while still hot.
12. Return to the oven for 2-3 minutes until the cheese is lightly golden and melted.
13. Transfer the roasted asparagus to a serving platter using tongs.
14. Garnish with fresh lemon zest just before serving.
Heirloom-quality Parmigiano-Reggiano melts into golden pockets of umami richness against the asparagus’s tender-crisp texture. The roasted garlic infuses each bite with mellow sweetness, while the lemon zest provides a bright, citrusy finish that cuts through the richness. Consider serving these elegant spears alongside herb-roasted chicken or as a stunning addition to your holiday table, where their vibrant color and sophisticated flavors will undoubtedly steal the spotlight.
Caprese Skewers with Balsamic Drizzle
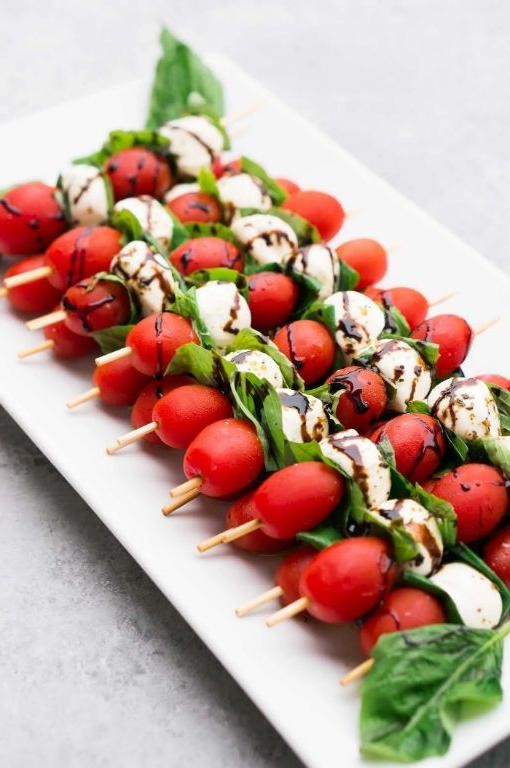
These elegant appetizers transform the classic Italian salad into portable perfection, featuring jewel-like cherry tomatoes, creamy fresh mozzarella, and aromatic basil leaves artfully arranged on slender skewers. The crowning touch comes from a rich, syrupy balsamic reduction that glistens over each component, creating a harmonious balance of sweet, tangy, and herbaceous notes that will impress at any gathering.
12
skewers15
minutes15
minutesIngredients
- 24 ripe cherry tomatoes, preferably heirloom varieties
- 16 ounces fresh mozzarella ciliegine (cherry-sized balls), drained
- 24 fresh basil leaves, preferably Genovese
- 1 cup premium aged balsamic vinegar
- 2 tablespoons extra virgin olive oil
- 1 teaspoon flaky sea salt, such as Maldon
- ½ teaspoon freshly cracked black pepper
- 12 (6-inch) wooden skewers, soaked in water for 30 minutes
Instructions
- Pour 1 cup premium aged balsamic vinegar into a small saucepan.
- Simmer the vinegar over medium-low heat until reduced by half, approximately 12-15 minutes, watching carefully to prevent burning.
- Transfer the reduced balsamic to a small glass bowl and cool completely to thicken into a syrup consistency.
- Thread one cherry tomato onto each soaked wooden skewer, piercing through the stem end for stability.
- Add one fresh basil leaf by folding it gently and sliding it next to the tomato.
- Follow with one fresh mozzarella ciliegine ball, ensuring it sits snugly against the basil.
- Repeat the tomato-basil-mozzarella pattern once more on each skewer.
- Arrange completed skewers on a serving platter in a single layer.
- Drizzle 2 tablespoons extra virgin olive oil evenly over all skewers.
- Sprinkle 1 teaspoon flaky sea salt and ½ teaspoon freshly cracked black pepper across the assembled skewers.
- Using a teaspoon, artistically drizzle the cooled balsamic reduction in zigzag patterns over the entire arrangement.
Just moments before serving, these vibrant skewers offer a delightful textural journey from the burst of juicy tomatoes to the creamy resistance of fresh mozzarella, all elevated by the aromatic basil and complex sweetness of the reduction. Consider presenting them on a marble slab with scattered edible flowers for an extra touch of sophistication, or pair with crisp rosé to complement the bright acidity.
Conclusion
Vibrant and satisfying, these 26 vegetarian tailgate recipes prove plant-based feasting can be just as delicious and crowd-pleasing. We hope you find new favorites to share at your next game day gathering! Try them out, leave a comment telling us which recipe you loved most, and don’t forget to pin this article on Pinterest to save these tasty ideas for later.


