Craving delicious meals that support your health goals without sacrificing flavor? You’re in the right place! This collection of 32 vegetarian diabetic-friendly recipes proves that managing blood sugar can be both satisfying and delicious. From quick weeknight dinners to comforting classics, these dishes will transform your approach to healthy eating. Let’s dive into these mouthwatering options that make wellness taste incredible!
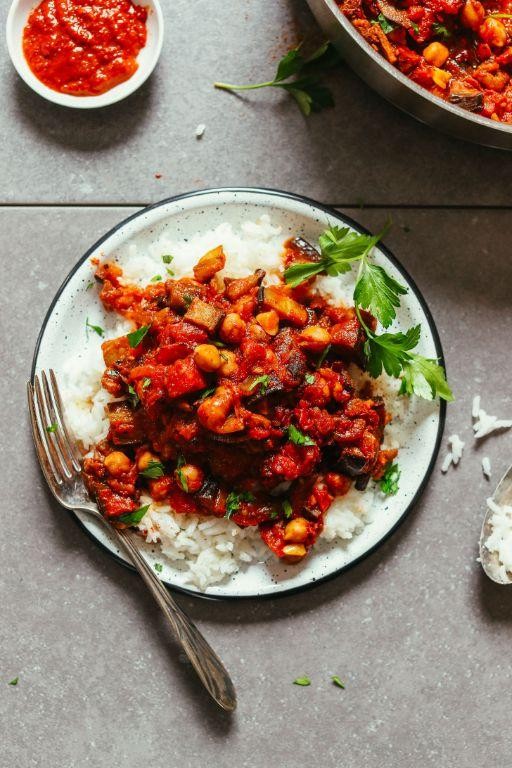
Chickpea and Spinach Curry

Very few dishes offer the perfect balance of simplicity and flavor quite like this comforting curry. Let’s walk through each step together to create a wholesome meal that’s both nourishing and deeply satisfying, perfect for busy weeknights when you want something special without the fuss.
4
servings15
minutes25
minutesIngredients
– A couple of tablespoons of olive oil
– One medium yellow onion, diced
– Three garlic cloves, minced
– One tablespoon of grated fresh ginger
– Two teaspoons of curry powder
– One teaspoon of ground cumin
– A 15-ounce can of chickpeas, drained and rinsed
– A 14.5-ounce can of diced tomatoes
– A 13.5-ounce can of coconut milk
– Five big handfuls of fresh spinach
– A generous pinch of salt
Instructions
1. Heat two tablespoons of olive oil in a large pot over medium heat until it shimmers, about 1 minute.
2. Add one diced yellow onion and cook, stirring occasionally, until translucent and soft, about 5-7 minutes.
3. Stir in three minced garlic cloves and one tablespoon of grated ginger, cooking until fragrant, about 30 seconds.
4. Sprinkle in two teaspoons of curry powder and one teaspoon of cumin, toasting the spices while stirring constantly for 1 minute to deepen their flavor.
5. Tip: Toasting spices releases their essential oils, creating a more complex curry base.
6. Pour in one can of drained chickpeas, stirring to coat them evenly with the spiced onion mixture.
7. Add one can of diced tomatoes with their juices and one can of coconut milk, stirring to combine all ingredients.
8. Bring the curry to a gentle bubble, then reduce heat to low and simmer uncovered for 15 minutes, stirring occasionally.
9. Tip: Simmering allows the flavors to meld together while the sauce thickens slightly.
10. Stir in five big handfuls of fresh spinach, one handful at a time, until all spinach has wilted into the curry, about 2-3 minutes.
11. Tip: Adding spinach in batches prevents overcrowding and ensures even wilting throughout the curry.
12. Season with a generous pinch of salt, stirring to distribute evenly before removing from heat.
Creamy coconut milk creates a luxurious sauce that clings to each chickpea, while the wilted spinach adds vibrant color and tender texture. Serve this curry over fluffy rice for a complete meal, or try scooping it up with warm naan bread for a truly comforting experience that will have everyone asking for seconds.
Zucchini Noodles with Pesto
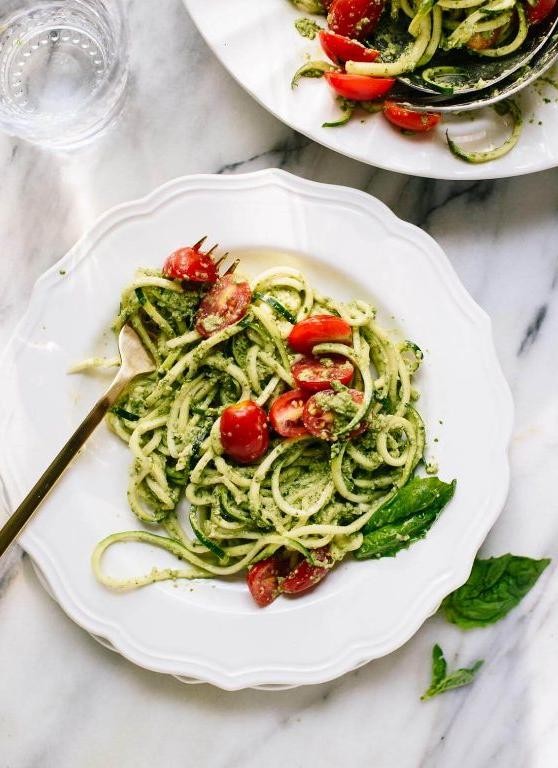
This vibrant zucchini noodle dish transforms simple vegetables into a satisfying meal that feels both light and nourishing. To make perfect zucchini noodles with pesto, you’ll need just a few fresh ingredients and about 15 minutes from start to finish. The key is handling the zucchini properly to avoid watery noodles while letting the bright pesto shine through.
2
servings15
minutesIngredients
– 2 medium zucchini
– A big handful of fresh basil leaves (about 2 cups packed)
– A couple of garlic cloves
– A generous ¼ cup of olive oil
– A small handful of pine nuts (about 3 tablespoons)
– A good sprinkle of grated Parmesan cheese (about ¼ cup)
– A squeeze of fresh lemon juice (about 1 tablespoon)
Instructions
1. Wash 2 medium zucchini thoroughly and pat them completely dry with paper towels.
2. Use a spiralizer to create long, thin zucchini noodles, applying gentle pressure to maintain their shape.
3. Spread the zucchini noodles in a single layer on a clean kitchen towel and sprinkle with a pinch of salt.
4. Let the salted noodles sit for 10 minutes to draw out excess moisture while you make the pesto.
5. Combine a big handful of fresh basil leaves, 2 garlic cloves, 3 tablespoons of pine nuts, and ¼ cup of grated Parmesan in a food processor.
6. Pulse the mixture 5-7 times until the ingredients are roughly chopped but not pureed.
7. With the food processor running on low speed, slowly drizzle in ¼ cup of olive oil until the pesto becomes smooth and emulsified.
8. Add 1 tablespoon of fresh lemon juice to the pesto and pulse 2-3 times to incorporate.
9. Use paper towels to gently press any remaining moisture from the zucchini noodles.
10. Toss the dried zucchini noodles with the prepared pesto in a large mixing bowl until evenly coated.
11. Serve immediately without heating to maintain the zucchini’s crisp texture and the pesto’s fresh flavor.
Perfectly al dente zucchini noodles provide a satisfying bite that holds the vibrant pesto beautifully. The fresh basil and lemon create a bright, herbaceous flavor that pairs wonderfully with grilled chicken or shrimp for a complete meal. For an extra touch, try topping with toasted pine nuts or cherry tomatoes for added color and texture.
Spicy Black Bean and Quinoa Salad
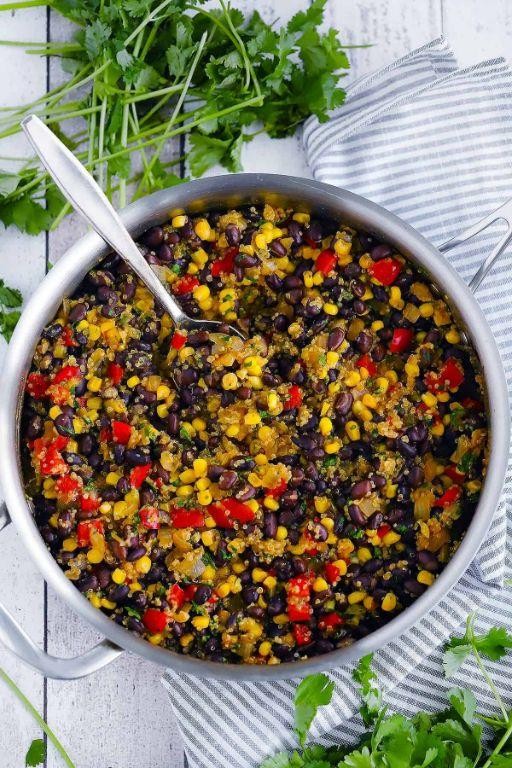
Sometimes the most satisfying meals come together quickly with pantry staples. Spicy black bean and quinoa salad is perfect for busy weeknights when you want something nutritious, flavorful, and ready in under 30 minutes. Let’s walk through each step together so you can master this vibrant dish.
3
servings15
minutes20
minutesIngredients
– 1 cup of quinoa
– 2 cups of water
– A 15-ounce can of black beans, drained and rinsed
– A couple of ears of corn, kernels sliced off
– A big handful of cherry tomatoes, halved
– A generous drizzle of olive oil
– A good squeeze of lime juice
– A pinch of chili powder
– A sprinkle of cumin
– A dash of salt
Instructions
1. Rinse 1 cup of quinoa under cold water in a fine-mesh strainer for about 1 minute to remove any bitterness.
2. Combine the rinsed quinoa and 2 cups of water in a medium saucepan, then bring to a boil over high heat.
3. Once boiling, reduce the heat to low, cover the saucepan, and simmer for exactly 15 minutes until the quinoa is tender and the water is absorbed.
4. Remove the saucepan from the heat, fluff the quinoa with a fork, and let it cool uncovered for 10 minutes to prevent it from becoming mushy.
5. Heat a large skillet over medium-high heat and add a drizzle of olive oil.
6. Add the corn kernels and cook for 4-5 minutes, stirring occasionally, until they start to brown slightly and smell sweet.
7. Transfer the cooked corn to a large mixing bowl and add the drained black beans, halved cherry tomatoes, and cooled quinoa.
8. In a small bowl, whisk together a generous drizzle of olive oil, a good squeeze of lime juice, a pinch of chili powder, a sprinkle of cumin, and a dash of salt until well combined.
9. Pour the dressing over the salad mixture and toss everything gently to coat evenly without crushing the ingredients.
10. Let the salad sit for 5 minutes to allow the flavors to meld together before serving.
Refreshingly crisp and packed with zesty heat, this salad offers a satisfying chew from the quinoa and a pop of sweetness from the corn. Try serving it in lettuce cups for a low-carb twist or alongside grilled chicken for a heartier meal—it’s versatile enough to shine at picnics or as a next-day lunch straight from the fridge.
Roasted Eggplant and Tomato Stew
Baking up a comforting stew is one of fall’s greatest pleasures, and this roasted eggplant and tomato version delivers deep, caramelized flavors with minimal effort. Let’s walk through each step together to create this satisfying vegetarian dish that’s perfect for chilly evenings.
2
servings15
minutes60
minutesIngredients
– 2 medium eggplants, cut into 1-inch cubes
– 4 large tomatoes, roughly chopped
– 1 large yellow onion, diced
– 4 cloves garlic, minced
– 1/4 cup olive oil
– 2 cups vegetable broth
– A couple of tablespoons of tomato paste
– A splash of balsamic vinegar
– 1 teaspoon dried oregano
– 1/2 teaspoon red pepper flakes
– Salt and freshly ground black pepper
Instructions
1. Preheat your oven to 425°F and line a baking sheet with parchment paper.
2. Toss the eggplant cubes with 2 tablespoons of olive oil and spread them in a single layer on the baking sheet.
3. Roast the eggplant for 25 minutes until the edges are golden brown and the centers are tender when pierced with a fork.
4. While the eggplant roasts, heat the remaining 2 tablespoons of olive oil in a large Dutch oven over medium heat.
5. Add the diced onion and cook for 6-8 minutes until translucent and slightly golden around the edges.
6. Stir in the minced garlic and cook for 1 minute until fragrant but not browned.
7. Add the tomato paste and cook for 2 minutes, stirring constantly to deepen its flavor.
8. Tip: Cooking tomato paste until it darkens slightly creates a richer base for your stew.
9. Add the chopped tomatoes, vegetable broth, balsamic vinegar, oregano, and red pepper flakes to the pot.
10. Bring the mixture to a gentle boil, then reduce heat to maintain a steady simmer.
11. Simmer uncovered for 15 minutes, allowing the tomatoes to break down and the flavors to meld.
12. Remove the roasted eggplant from the oven and carefully add it to the simmering tomato mixture.
13. Tip: Gently fold in the eggplant to maintain its shape rather than stirring vigorously.
14. Continue simmering for another 10 minutes until the stew has thickened slightly.
15. Season with salt and several grinds of black pepper, tasting and adjusting as needed.
16. Tip: Let the stew rest off heat for 5 minutes before serving to allow the flavors to fully develop.
Unbelievably creamy eggplant melts into the bright tomato base, creating a stew with both silky texture and vibrant acidity. The roasted edges of eggplant provide occasional smoky notes that contrast beautifully with the sweet tomatoes. Try serving it over creamy polenta or with crusty bread to soak up every last bit of the rich sauce.
Cauliflower and Broccoli Stir-Fry
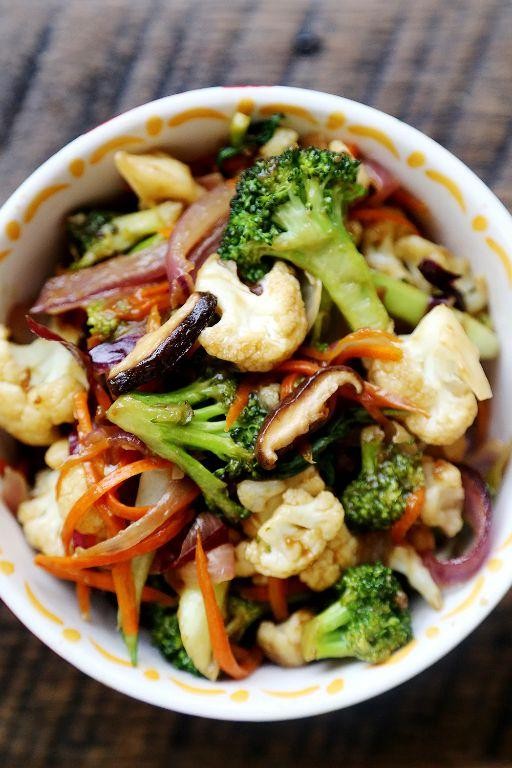
Often overlooked in the vegetable drawer, cauliflower and broccoli transform into a vibrant, quick meal when given the stir-fry treatment. Our methodical approach ensures even cooking and maximum flavor, making this perfect for weeknight dinners. On your mark, get set, let’s chop!
2
servings15
minutes9
minutesIngredients
– 1 large head of cauliflower, cut into bite-sized florets
– 1 large head of broccoli, cut into bite-sized florets
– 2 tablespoons of olive oil
– 3 cloves of garlic, minced
– A thumb-sized piece of fresh ginger, grated
– 2 tablespoons of soy sauce
– 1 tablespoon of rice vinegar
– A pinch of red pepper flakes
– A handful of sliced green onions for garnish
Instructions
1. Heat 2 tablespoons of olive oil in a large skillet or wok over medium-high heat until it shimmers, about 1 minute.
2. Add the minced garlic and grated ginger, stirring constantly for 30 seconds until fragrant but not browned.
3. Tip in the cauliflower florets and stir to coat them in the oil, cooking for 3 minutes until they start to soften at the edges.
4. Add the broccoli florets and continue stirring for another 4 minutes until both vegetables are bright green and tender-crisp.
5. Pour in 2 tablespoons of soy sauce and 1 tablespoon of rice vinegar, tossing everything to combine evenly.
6. Sprinkle a pinch of red pepper flakes over the stir-fry for a subtle heat, stirring for 1 more minute to meld flavors.
7. Remove the skillet from the heat and garnish with a handful of sliced green onions.
Lightly charred edges on the cauliflower contrast with the broccoli’s firm bite, while the soy-ginger sauce adds a savory depth. For a creative twist, serve it over quinoa or toss with cooked noodles for a heartier meal—it’s versatile enough to become a staple in your rotation.
Lentil and Vegetable Soup

Venturing into homemade soup doesn’t need to be intimidating—this lentil and vegetable soup walks you through each simple step to create a comforting, nourishing meal that’s perfect for beginners. Let’s build this soup together from the ground up, focusing on technique and timing for the best results.
4
servings15
minutes40
minutesIngredients
– A couple of tablespoons of olive oil
– One large yellow onion, chopped
– Two carrots, peeled and diced
– Two celery stalks, diced
– Three cloves of garlic, minced
– One cup of brown lentils, rinsed
– Six cups of vegetable broth
– One 14.5-ounce can of diced tomatoes
– A couple of bay leaves
– A teaspoon of dried thyme
– A splash of red wine vinegar
– A handful of fresh parsley, chopped
Instructions
1. Heat two tablespoons of olive oil in a large pot over medium heat for one minute until shimmering.
2. Add the chopped onion, diced carrots, and diced celery, then cook for 8 minutes, stirring occasionally, until the vegetables soften and the onion turns translucent.
3. Stir in the minced garlic and cook for one more minute until fragrant—be careful not to let it burn, as this can make the soup bitter.
4. Pour in the rinsed lentils, vegetable broth, diced tomatoes with their juices, bay leaves, and dried thyme, then bring everything to a boil.
5. Once boiling, reduce the heat to low, cover the pot with a lid, and simmer for 30 minutes until the lentils are tender but not mushy.
6. Remove the pot from the heat, discard the bay leaves, and stir in a splash of red wine vinegar to brighten the flavors.
7. Stir in the chopped fresh parsley just before serving to keep its color vibrant and add a fresh note.
8. Ladle the soup into bowls and serve immediately.
Delightfully hearty, this soup boasts a thick, stew-like texture with tender lentils and soft vegetables that melt together. The subtle tang from the vinegar balances the earthy lentils, making it even better when topped with a sprinkle of Parmesan or served alongside crusty bread for dipping.
Mushroom and Kale Risotto
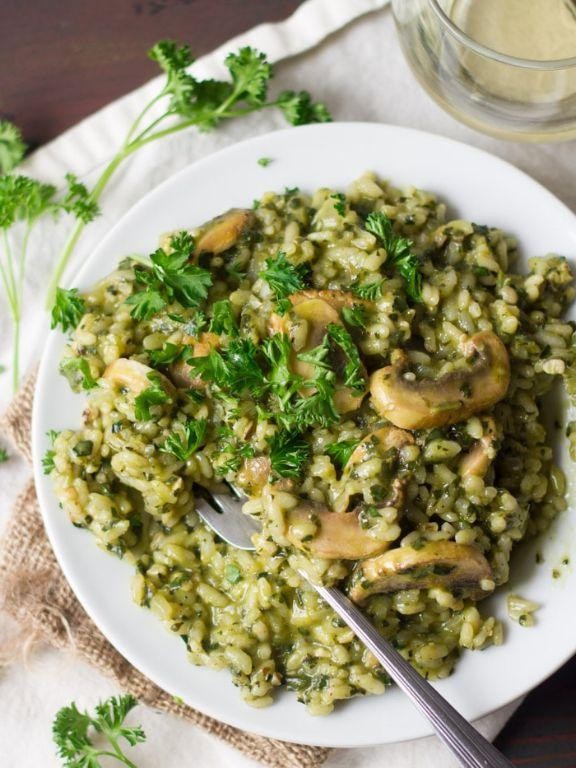
On chilly autumn evenings, nothing satisfies quite like a creamy, comforting bowl of risotto. Making perfect risotto from scratch is easier than you might think, especially when you follow these simple, methodical steps.
2
servings15
minutes40
minutesIngredients
- 1 cup of Arborio rice
- 4 cups of warm chicken or vegetable broth
- 8 ounces of sliced cremini mushrooms
- 2 cups of chopped kale
- 1 small chopped yellow onion
- 2 minced garlic cloves
- 1/2 cup of dry white wine
- 1/2 cup of grated Parmesan cheese
- 3 tablespoons of olive oil
- 2 tablespoons of unsalted butter
- A splash of fresh lemon juice
- A couple of fresh thyme sprigs
Instructions
- Heat the olive oil in a large, heavy-bottomed pot over medium heat for 2 minutes.
- Add the chopped onion and cook for 5 minutes, stirring occasionally, until it becomes translucent.
- Add the minced garlic and cook for 1 minute until fragrant.
- Add the Arborio rice and stir constantly for 2 minutes to toast the grains, which helps them absorb liquid better later.
- Pour in the white wine and stir continuously until the liquid is fully absorbed, about 3 minutes.
- Add 1 cup of warm broth and stir frequently until the liquid is nearly absorbed, about 5-7 minutes.
- Continue adding broth 1/2 cup at a time, stirring frequently and waiting until each addition is nearly absorbed before adding the next.
- After 15 minutes of adding broth, stir in the sliced mushrooms and thyme sprigs.
- Continue adding remaining broth and stirring until the rice is tender but still slightly firm to the bite, about 10 more minutes.
- Remove the thyme sprigs and stir in the chopped kale, cooking for 3 minutes until wilted.
- Remove the pot from heat and stir in the butter, Parmesan cheese, and lemon juice until creamy.
- Let the risotto rest for 2 minutes before serving to allow the flavors to meld.
Finished risotto should be creamy with distinct, tender rice grains and vibrant green kale throughout. For a restaurant-style presentation, top with extra Parmesan and a drizzle of olive oil, or serve alongside grilled chicken for a complete meal.
Grilled Portobello Mushrooms with Garlic
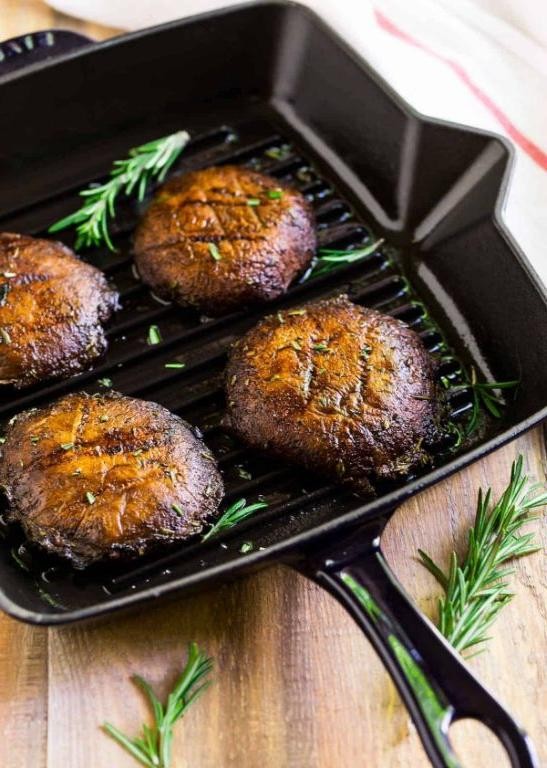
Brimming with earthy flavor and satisfying texture, grilled portobello mushrooms make for an impressive yet approachable vegetarian main or side dish. Today we’ll walk through creating perfectly grilled portobellos infused with aromatic garlic, using simple techniques that ensure restaurant-quality results every time.
4
portions10
minutes11
minutesIngredients
4 large portobello mushroom caps, a couple of tablespoons of olive oil, 3 minced garlic cloves, a splash of balsamic vinegar, a pinch of kosher salt, and a few cracks of fresh black pepper.
Instructions
1. Preheat your grill to medium-high heat (400°F) and clean the grates thoroughly with a grill brush. 2. Gently wipe the portobello caps with a damp paper towel to remove any dirt, being careful not to soak them. 3. Use a spoon to carefully scrape out the dark gills from underneath each mushroom cap—this prevents your mushrooms from turning black during cooking. 4. In a small bowl, whisk together the olive oil, minced garlic, balsamic vinegar, salt, and pepper until well combined. 5. Brush both sides of each mushroom cap generously with the garlic-oil mixture, making sure to coat all surfaces evenly. 6. Place the mushrooms gill-side up on the preheated grill and close the lid. 7. Grill for 5-6 minutes until the undersides develop deep grill marks and release easily from the grates. 8. Flip the mushrooms carefully with tongs and continue grilling for another 4-5 minutes until tender but still firm. 9. Remove from grill and let rest for 2 minutes before slicing to allow juices to redistribute. Velvety and meaty in texture, these garlic-infused mushrooms carry a wonderful smoky char that complements their natural umami richness. Serve them sliced over creamy polenta, stuffed into crusty ciabatta rolls with melted provolone, or simply enjoy as they are—their robust flavor stands beautifully on its own.
Butternut Squash and Bean Chili
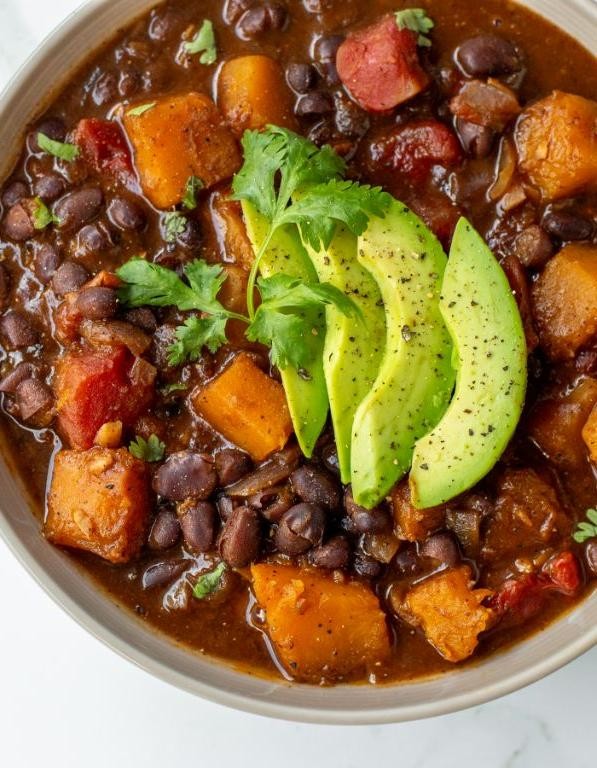
Nourishing and comforting, this butternut squash and bean chili is the perfect autumn meal that comes together with simple techniques. Let’s walk through each step methodically to build layers of flavor in this hearty vegetarian dish.
4
servings15
minutes48
minutesIngredients
– A couple tablespoons of olive oil
– One large yellow onion, chopped
– Four garlic cloves, minced
– One medium butternut squash, peeled and cubed (about 4 cups)
– Two 15-ounce cans of kidney beans, drained and rinsed
– One 28-ounce can of crushed tomatoes
– Two tablespoons of chili powder
– One teaspoon of ground cumin
– A splash of vegetable broth (about ½ cup)
– A pinch of salt
Instructions
1. Heat 2 tablespoons of olive oil in a large pot over medium heat until it shimmers.
2. Add the chopped onion and cook for 5-7 minutes, stirring occasionally, until translucent and fragrant.
3. Stir in the minced garlic and cook for exactly 1 minute until aromatic but not browned.
4. Add the cubed butternut squash and cook for 5 minutes, stirring to coat with the oil and aromatics.
5. Sprinkle in 2 tablespoons of chili powder, 1 teaspoon of cumin, and a pinch of salt, stirring constantly for 30 seconds to toast the spices.
6. Pour in the crushed tomatoes and ½ cup of vegetable broth, scraping the bottom of the pot to lift any browned bits.
7. Bring the mixture to a gentle boil, then reduce the heat to low and cover the pot.
8. Simmer for 25 minutes until the squash is fork-tender but not mushy.
9. Stir in the drained kidney beans and cook uncovered for 10 more minutes to heat through and thicken slightly.
10. Taste and adjust seasoning if needed, remembering the flavors will deepen as it rests.
Perfectly balanced between sweet squash and savory beans, this chili develops a rich, slightly chunky texture that holds up beautifully. Try serving it over baked potatoes or with cornbread for a complete meal that celebrates fall’s best flavors.
Stuffed Bell Peppers with Brown Rice

Cooking stuffed bell peppers is one of those comforting meals that feels fancy but is surprisingly straightforward to prepare. Let me walk you through creating these colorful, satisfying peppers filled with nutritious brown rice and savory ingredients. You’ll be amazed at how simple it is to make such an impressive-looking dish.
2
servings20
minutes50
minutesIngredients
– 4 large bell peppers (any color you like best)
– 1 cup of cooked brown rice
– 1 pound of ground beef
– 1 medium onion, chopped up small
– 2 cloves of garlic, minced fine
– a 15-ounce can of diced tomatoes
– a good splash of tomato sauce (about ½ cup)
– a generous sprinkle of Italian seasoning (around 1 tablespoon)
– a couple of big handfuls of shredded mozzarella cheese (about 1 cup)
– a drizzle of olive oil (roughly 1 tablespoon)
– salt and pepper to season as you go
Instructions
1. Preheat your oven to 375°F so it’s ready when you need it.
2. Carefully slice the tops off all 4 bell peppers and remove the seeds and white membranes inside.
3. Bring a large pot of salted water to a rolling boil and blanch the hollowed peppers for exactly 3 minutes until they just start to soften.
4. Drain the peppers thoroughly and stand them upright in a baking dish that fits them snugly.
5. Heat the olive oil in a large skillet over medium-high heat until it shimmers.
6. Add the chopped onion and cook for 4-5 minutes until translucent and fragrant.
7. Stir in the minced garlic and cook for 1 more minute until you can smell its aroma.
8. Add the ground beef to the skillet, breaking it up with a spoon, and cook for 6-7 minutes until no pink remains.
9. Tip: Drain any excess grease from the beef mixture for a less oily filling.
10. Mix in the cooked brown rice, diced tomatoes, tomato sauce, and Italian seasoning until well combined.
11. Simmer the filling for 5 minutes over medium heat to let the flavors meld together.
12. Season the mixture generously with salt and pepper, tasting as you go to get it just right.
13. Spoon the filling evenly into the prepared bell peppers, packing it down gently.
14. Tip: Leave about ¼ inch of space at the top to prevent bubbling over in the oven.
15. Top each pepper with a generous handful of shredded mozzarella cheese.
16. Cover the baking dish tightly with aluminum foil and bake at 375°F for 25 minutes.
17. Remove the foil and continue baking for another 10 minutes until the cheese is golden and bubbly.
18. Tip: Let the peppers rest for 5 minutes before serving so the filling sets and they’re easier to handle.
Now you’ll notice the peppers have softened perfectly while still holding their shape, creating a wonderful contrast with the hearty, savory filling. Nothing beats cutting into that cheesy top to reveal the flavorful rice and beef mixture inside. Try serving these alongside a simple green salad for a complete meal that’s both nourishing and deeply satisfying.
Cabbage and Tofu Stir-Fry
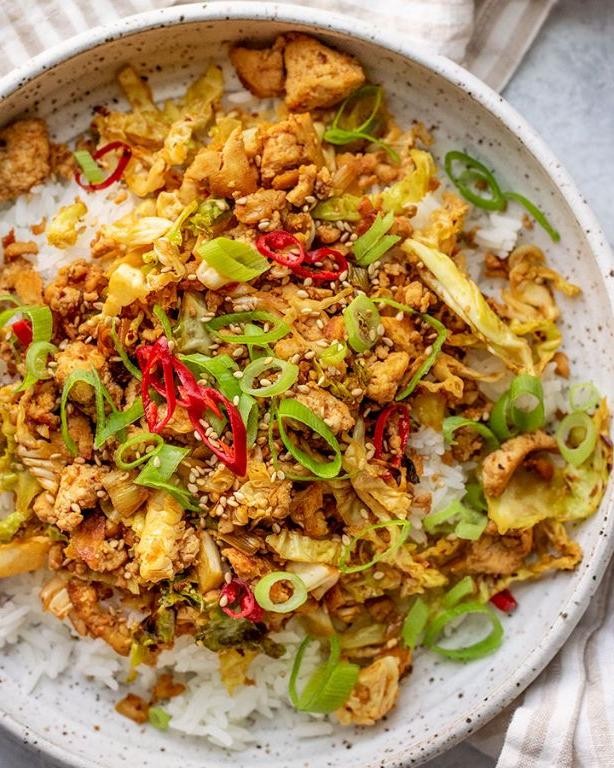
You’ve probably stared at that head of cabbage in your fridge wondering what to do with it. This simple stir-fry transforms humble ingredients into a satisfying meal that comes together in under 30 minutes, perfect for busy weeknights when you need something healthy and delicious.
2
servings15
minutes20
minutesIngredients
– 1 block of firm tofu, pressed and cubed
– 4 cups of thinly sliced green cabbage (about half a medium head)
– 2 tablespoons of vegetable oil
– 3 cloves of garlic, minced
– 1 tablespoon of fresh ginger, grated
– 2 tablespoons of soy sauce
– 1 tablespoon of rice vinegar
– A splash of sesame oil
– A couple of green onions, sliced
– 1 teaspoon of cornstarch mixed with 2 tablespoons of water
Instructions
1. Press your tofu block between paper towels with a heavy pan on top for 15 minutes to remove excess water, then cut into 1-inch cubes.
2. Heat 1 tablespoon of vegetable oil in a large skillet or wok over medium-high heat until shimmering.
3. Add tofu cubes in a single layer and cook for 4-5 minutes until golden brown on one side.
4. Flip each tofu piece and cook for another 4-5 minutes until all sides are crispy and browned.
5. Remove tofu from the skillet and set aside on a plate.
6. Add remaining 1 tablespoon of vegetable oil to the same skillet over medium-high heat.
7. Add minced garlic and grated ginger, stirring constantly for 30 seconds until fragrant but not burned.
8. Add the thinly sliced cabbage to the skillet, spreading it evenly across the surface.
9. Cook cabbage undisturbed for 2 minutes to allow some pieces to develop light browning.
10. Stir cabbage and continue cooking for 3-4 more minutes until it wilts slightly but still has some crunch.
11. Return the cooked tofu to the skillet with the cabbage.
12. Pour in soy sauce and rice vinegar, tossing everything to coat evenly.
13. Add the cornstarch-water mixture to the skillet and stir continuously for 1-2 minutes until the sauce thickens and glazes the ingredients.
14. Remove from heat and drizzle with sesame oil, then sprinkle with sliced green onions.
Each bite delivers a wonderful contrast between the crispy tofu and the tender-crisp cabbage, all coated in that savory-sweet glaze. Enjoy it over steamed rice for a complete meal, or try stuffing the stir-fry into warm tortillas for a fun fusion twist that makes excellent next-day lunches.
Sweet Potato and Avocado Salad
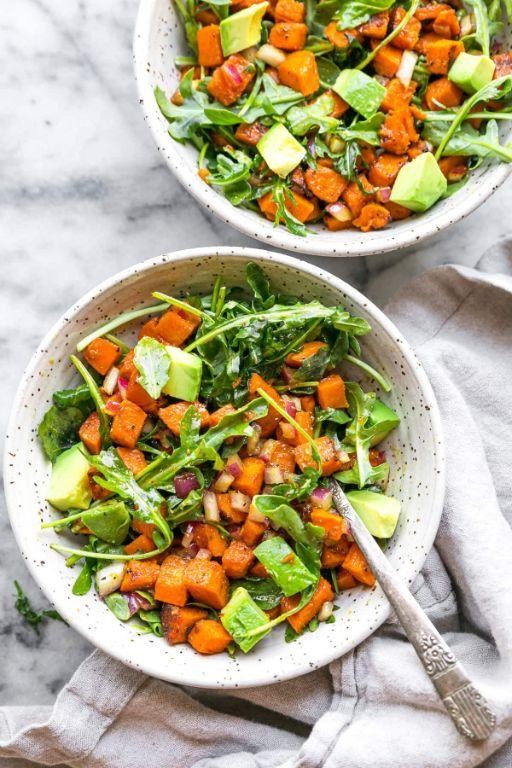
Often overlooked in the salad world, this vibrant combination brings together earthy sweet potatoes and creamy avocado in a dish that’s both nourishing and satisfying. Our methodical approach will guide you through creating perfectly roasted sweet potatoes and a balanced dressing that complements the fresh ingredients. You’ll be amazed at how these simple components transform into something truly special.
2
servings15
minutes30
minutesIngredients
– 2 medium sweet potatoes, peeled and cubed
– 2 ripe avocados
– 1/4 cup of olive oil
– 2 tablespoons of fresh lime juice
– A couple of big handfuls of baby spinach
– A generous pinch of salt
– A good grind of black pepper
– A splash of maple syrup
Instructions
1. Preheat your oven to 400°F and line a baking sheet with parchment paper.
2. Peel the sweet potatoes and cut them into 1-inch cubes for even roasting.
3. Toss the sweet potato cubes with 2 tablespoons of olive oil and a generous pinch of salt until evenly coated.
4. Spread the sweet potatoes in a single layer on the prepared baking sheet, making sure they don’t touch each other.
5. Roast for 25-30 minutes until the edges are caramelized and you can easily pierce them with a fork.
6. While the sweet potatoes roast, whisk together the remaining 2 tablespoons of olive oil, 2 tablespoons of fresh lime juice, and a splash of maple syrup in a small bowl.
7. Cut the avocados in half, remove the pits, and slice the flesh into chunks while still in the skin, then scoop out with a spoon.
8. Place the baby spinach in a large serving bowl as your base layer.
9. When the sweet potatoes are done roasting, let them cool for 5 minutes to prevent wilting the spinach.
10. Add the warm sweet potatoes and avocado chunks to the spinach bowl.
11. Drizzle the dressing over everything and toss gently to combine.
12. Finish with a good grind of black pepper and serve immediately.
Marvel at how the warm, caramelized sweet potatoes contrast with the cool, creamy avocado in every bite. The slight sweetness from the maple dressing balances the earthy spinach beautifully, creating layers of flavor and texture. Try serving this over quinoa for a heartier meal or alongside grilled chicken for added protein.
Split Pea and Carrot Soup

A comforting bowl of split pea and carrot soup is exactly what you need when the weather turns chilly. This simple recipe transforms humble ingredients into a velvety, satisfying meal that comes together with minimal effort. Let’s walk through each step together to create this nourishing dish from scratch.
4
servings15
minutes59
minutesIngredients
– 1 tablespoon of olive oil
– 1 medium yellow onion, chopped
– 2 cloves of garlic, minced
– 2 medium carrots, peeled and diced
– 1 cup of dried green split peas, rinsed
– 6 cups of vegetable broth
– A couple of bay leaves
– A pinch of salt and black pepper
Instructions
1. Heat 1 tablespoon of olive oil in a large pot over medium heat until it shimmers.
2. Add 1 chopped yellow onion and cook for 5 minutes, stirring occasionally, until translucent and fragrant.
3. Stir in 2 minced garlic cloves and cook for 1 minute until aromatic but not browned.
4. Add 2 diced carrots and cook for 3 minutes to soften slightly.
5. Pour in 1 cup of rinsed split peas, 6 cups of vegetable broth, and 2 bay leaves.
6. Bring the mixture to a boil over high heat, then reduce to a simmer.
7. Cover the pot and simmer for 45 minutes, stirring every 15 minutes to prevent sticking.
8. Remove the bay leaves and discard them.
9. Use an immersion blender to puree the soup directly in the pot until smooth, or carefully transfer to a countertop blender in batches.
10. Season with a pinch of salt and black pepper, then simmer for 5 more minutes to meld flavors.
Now you have a creamy, golden-hued soup with the earthy sweetness of carrots balancing the hearty split peas. The velvety texture makes it perfect for dunking crusty bread, or try topping it with crispy croutons for added crunch.
Mediterranean Chickpea Salad
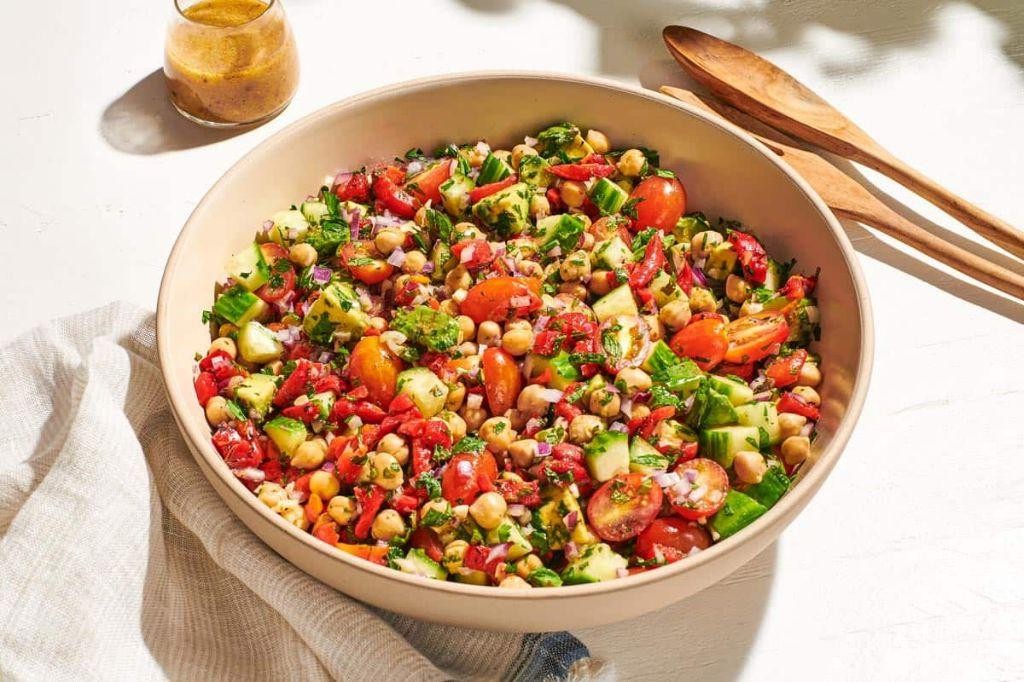
Ready to create a vibrant, protein-packed salad that comes together in minutes? Mediterranean Chickpea Salad combines fresh vegetables, briny olives, and creamy feta for a satisfying meal that’s perfect for lunch prep or a quick dinner. Let’s walk through each step methodically so you end up with perfectly balanced flavors and textures every single time.
5
servings15
minutesIngredients
– A couple of 15-ounce cans of chickpeas, rinsed and drained
– About 1 cup of cherry tomatoes, halved
– Half of a medium red onion, finely diced
– A good handful of fresh parsley, chopped
– A quarter cup of Kalamata olives, pitted and sliced
– A couple of ounces of feta cheese, crumbled
– A generous drizzle of extra virgin olive oil (about 3 tablespoons)
– A big squeeze of fresh lemon juice (about 2 tablespoons)
– A pinch of dried oregano
– A small sprinkle of salt and black pepper
Instructions
1. Rinse and drain both cans of chickpeas thoroughly in a colander, then transfer them to a large mixing bowl.
2. Halve 1 cup of cherry tomatoes and add them to the bowl with the chickpeas.
3. Finely dice half of a medium red onion and add it to the mixing bowl.
4. Chop a handful of fresh parsley until you have about 1/4 cup and add it to the bowl.
5. Slice 1/4 cup of pitted Kalamata olives and add them to the mixture.
6. Crumble 2 ounces of feta cheese directly over the salad ingredients.
7. Drizzle 3 tablespoons of extra virgin olive oil evenly over the salad.
8. Squeeze 2 tablespoons of fresh lemon juice directly over the ingredients.
9. Sprinkle 1/2 teaspoon of dried oregano, 1/4 teaspoon of salt, and 1/4 teaspoon of black pepper over the salad.
10. Gently toss all ingredients together with a large spoon until everything is evenly coated with the dressing.
11. Let the salad sit at room temperature for exactly 10 minutes to allow the flavors to meld together.
Delightfully fresh and satisfying, this salad offers a wonderful contrast between the creamy chickpeas, juicy tomatoes, and briny olives. The lemon-oregano dressing brightens everything up beautifully, making it perfect for stuffing into pita pockets or serving alongside grilled chicken for a more substantial meal.
Baked Ratatouille with Herbs
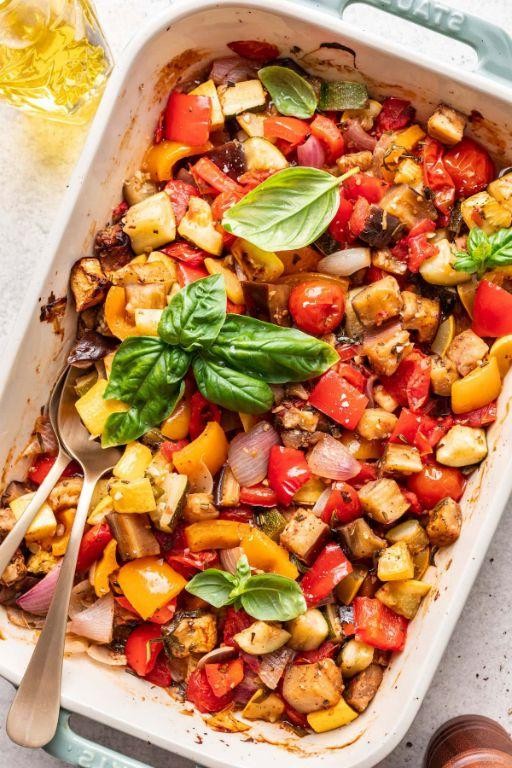
Creating this classic French vegetable dish is simpler than you might think, and baking everything together allows the flavors to meld beautifully while keeping your kitchen cool. Let me walk you through each step methodically so you can achieve that perfect tender-crisp texture and herb-infused aroma.
5
servings15
minutes45
minutesIngredients
- 1 medium eggplant, cut into 1-inch cubes
- 2 medium zucchini, sliced into ½-inch rounds
- 1 large yellow bell pepper, chopped into 1-inch pieces
- 1 pint cherry tomatoes
- 1 medium yellow onion, thinly sliced
- 3 cloves garlic, minced
- a generous ¼ cup of olive oil
- a couple of tablespoons of balsamic vinegar
- a big handful of fresh basil leaves, chopped
- a few sprigs of fresh thyme, leaves stripped
- a good pinch of salt and black pepper
Instructions
- Preheat your oven to 400°F and grab a large baking sheet.
- Combine the cubed eggplant, sliced zucchini, chopped bell pepper, cherry tomatoes, sliced onion, and minced garlic in a large mixing bowl.
- Drizzle the olive oil and balsamic vinegar over the vegetables, then toss everything with your hands until evenly coated. Tip: Don’t overcrowd the bowl—work in batches if needed to ensure each piece gets properly dressed.
- Spread the vegetables in a single layer on the baking sheet, making sure they aren’t piled on top of each other.
- Sprinkle the chopped basil, thyme leaves, salt, and black pepper evenly over the vegetables.
- Place the baking sheet in the preheated oven and bake for 25 minutes. Tip: Rotate the pan halfway through cooking for even browning.
- Remove the baking sheet from the oven and use a spatula to gently stir the vegetables.
- Return the baking sheet to the oven and bake for another 20 minutes, or until the eggplant is tender when pierced with a fork and the tomato skins have started to wrinkle. Tip: The vegetables should be caramelized at the edges but still hold their shape.
You’ll love how the vegetables become meltingly tender while maintaining their individual textures, with the herbs infusing every bite. Serve it warm over creamy polenta, toss with pasta, or enjoy it as a vibrant side dish—it’s wonderfully versatile.
Quinoa and Asparagus Pilaf
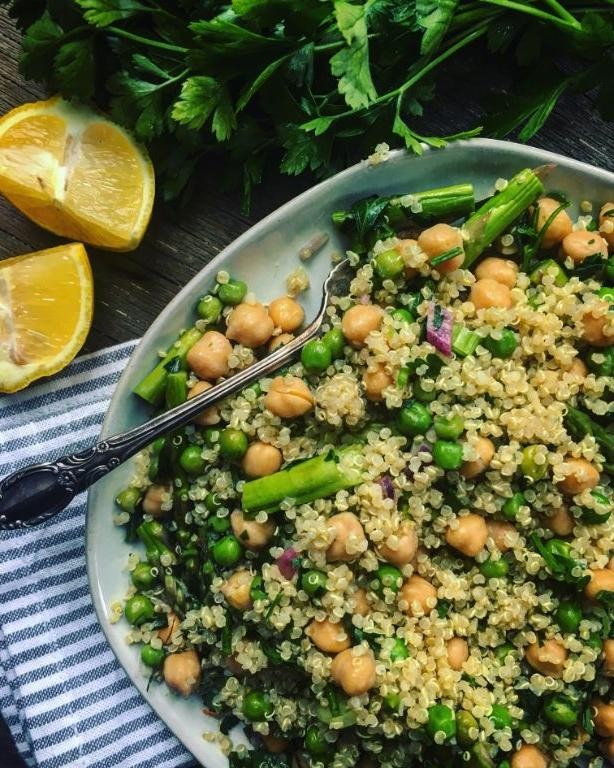
Making a wholesome, flavorful quinoa pilaf is simpler than you might think, especially when you follow these clear steps. This quinoa and asparagus version comes together in about 30 minutes for a satisfying side dish or light main course. Let’s get started with the ingredients you’ll need.
2
servings10
minutes20
minutesIngredients
- 1 cup of quinoa
- A big bunch of fresh asparagus, ends snapped off
- 1 small yellow onion, finely chopped
- A couple of cloves of garlic, minced
- 2 cups of vegetable broth
- A generous glug of olive oil
- A good squeeze of fresh lemon juice
- A handful of chopped fresh parsley
Instructions
- Rinse 1 cup of quinoa thoroughly in a fine-mesh strainer under cold running water for about 1 minute to remove its natural bitter coating.
- Heat a generous glug of olive oil in a large skillet over medium heat until it shimmers.
- Add 1 small finely chopped yellow onion and cook, stirring frequently, for about 5 minutes until it becomes soft and translucent.
- Stir in a couple of minced garlic cloves and cook for 1 more minute until fragrant.
- Add the rinsed quinoa to the skillet and toast it, stirring constantly, for 2 minutes to develop a nutty flavor.
- Pour in 2 cups of vegetable broth and bring the mixture to a full boil.
- Reduce the heat to low, cover the skillet tightly with a lid, and simmer for 15 minutes.
- While the quinoa cooks, chop your bunch of asparagus into 1-inch pieces.
- After 15 minutes, quickly arrange the asparagus pieces in a single layer on top of the quinoa.
- Cover the skillet again and continue cooking for another 5-7 minutes, just until the asparagus is bright green and tender-crisp.
- Remove the skillet from the heat and let it stand, still covered, for 5 minutes to allow the quinoa to fully absorb any remaining liquid.
- Fluff the pilaf gently with a fork to separate the grains.
- Stir in a good squeeze of fresh lemon juice and a handful of chopped fresh parsley until everything is well combined.
Light and fluffy quinoa provides the perfect base for the tender-crisp asparagus in this vibrant pilaf. The lemon juice brightens all the flavors, making it a wonderfully fresh-tasting dish. Try serving it alongside grilled chicken or flaking some salmon right over the top for a complete meal.
Conclusion
These 32 flavorful vegetarian diabetic diet recipes prove that eating for optimal health can be delicious and satisfying. We hope this collection inspires you to try new dishes that nourish your body while delighting your taste buds. Share your favorite recipes in the comments below, and don’t forget to pin this article on Pinterest to help others discover these healthy options!