Are you tired of the same old lunch routine? Whether you’re looking for quick weeknight dinners, seasonal favorites, or cozy comfort food, these 33 vegetable sandwich recipes will transform your meals. From hearty roasted veggie stacks to fresh garden creations, there’s something for every craving and occasion. Get ready to discover your new favorite sandwich—let’s dive in!
Grilled Veggie and Hummus Delight

Aren’t you tired of the same old sad desk lunches? Let’s rescue your taste buds with this grilled veggie and hummus delight that’s so good, it might just make your coworkers jealous enough to stage a lunchtime intervention. This colorful creation proves that healthy eating doesn’t have to be boring—it’s basically a party on a plate that happens to be good for you.
3
sandwiches15
minutes12
minutesIngredients
– A couple of zucchinis, sliced lengthwise
– 2 bell peppers (go wild with colors!), quartered
– 1 red onion, cut into thick rings
– A generous glug of olive oil
– A good pinch of salt and pepper
– 1 cup of your favorite hummus
– A handful of fresh parsley, chopped
– A squeeze of lemon juice
– 4 slices of crusty bread
Instructions
1. Fire up your grill to medium-high heat (around 400°F) and let it get properly hot.
2. Toss your zucchini slices, bell pepper quarters, and onion rings with that glug of olive oil until they’re nicely coated.
3. Sprinkle the salt and pepper over the veggies, making sure every piece gets some love.
4. Place the vegetables directly on the grill grates and cook for 4-5 minutes per side.
5. Flip the vegetables when you see those beautiful grill marks forming—that’s your visual cue they’re ready to turn.
6. Remove the veggies from the grill when they’re tender but still have some bite (about 8-10 minutes total).
7. While the veggies rest, toast your bread slices on the grill for 1-2 minutes per side until golden and slightly charred.
8. Spread a generous layer of hummus on each toasted bread slice.
9. Arrange the grilled vegetables artfully over the hummus-covered bread.
10. Sprinkle the chopped parsley over everything for that fresh, herby kick.
11. Finish with a squeeze of lemon juice right before serving.
Grilled to perfection, these veggies bring smoky sweetness that plays beautifully against the creamy hummus. The charred edges add satisfying crunch while the lemon brightens everything up—try stacking these open-faced and eating them like fancy savory tartines for maximum Instagram-worthy appeal.
Mediterranean Roasted Vegetable Panini

Whoever said vegetables can’t be the star of the sandwich clearly never met this glorious Mediterranean roasted veggie panini—it’s basically a vacation for your taste buds between two slices of bread, minus the sunburn and questionable souvenir shopping.
2
sandwiches15
minutes30
minutesIngredients
- 1 medium zucchini, sliced into 1/4-inch thick rounds
- 1 red bell pepper, cut into strips
- 1 small red onion, thinly sliced
- 2 tablespoons olive oil
- 1/2 teaspoon dried oregano
- 1/4 teaspoon salt
- 1/8 teaspoon black pepper
- 4 slices of sourdough bread
- 2 tablespoons pesto
- 4 slices of provolone cheese
- 1/4 cup sliced kalamata olives
Instructions
- Preheat your oven to 425°F and line a baking sheet with parchment paper.
- Toss the zucchini rounds, bell pepper strips, and red onion slices with olive oil, dried oregano, salt, and black pepper in a large bowl until evenly coated.
- Spread the vegetables in a single layer on the prepared baking sheet—don’t crowd them or they’ll steam instead of roast.
- Roast for 20-25 minutes until the veggies are tender and have some crispy, caramelized edges.
- While the vegetables roast, spread 1/2 tablespoon of pesto on one side of each slice of sourdough bread.
- Place 1 slice of provolone cheese on the pesto side of 2 bread slices.
- Top the cheese with half of the roasted vegetables and 2 tablespoons of sliced kalamata olives on each sandwich.
- Add the remaining provolone slices and close the sandwiches with the other pesto-spread bread slices, pesto-side in.
- Heat a panini press or skillet over medium heat—if using a skillet, you’ll want to press the sandwich down with a spatula or heavy pan.
- Cook each sandwich for 3-4 minutes per side until the bread is golden brown and crispy and the cheese is fully melted.
So, that first bite? You’ll get the satisfying crunch of toasted sourdough giving way to creamy, melted provolone, sweet roasted peppers, and briny olives—it’s a texture party in your mouth. Seriously, serve this with a side of potato chips for maximum crunch contrast or dunk it in a little extra pesto if you’re feeling fancy.
Avocado and Tomato Veggie Sandwich

Jeez, are you tired of sad desk lunches that make you question all your life choices? This avocado and tomato veggie sandwich is here to rescue your midday slump with the vibrant energy of a toddler on a sugar high. It’s the kind of no-cook masterpiece that makes you feel fancy without requiring any actual chef skills.
1
sandwich10
minutes3
minutesIngredients
– A couple of thick slices of sourdough bread
– One perfectly ripe avocado
– A medium-sized, juicy tomato
– A handful of fresh spinach leaves
– A tablespoon of mayonnaise
– A teaspoon of lemon juice
– A pinch of salt and a crack of black pepper
Instructions
1. Grab your two slices of sourdough bread and pop them in the toaster until they’re golden brown and crisp, about 2–3 minutes on medium setting.
2. While the bread toasts, slice your avocado in half, remove the pit, and scoop the flesh into a small bowl.
3. Mash the avocado with a fork until it’s mostly smooth but still has a few chunky bits for texture.
4. Stir in the tablespoon of mayonnaise and teaspoon of lemon juice—this keeps the avocado from turning brown and adds a zesty kick.
5. Season the avocado mix with a pinch of salt and a crack of black pepper, then give it one final stir.
6. Spread the avocado mixture evenly onto one slice of the toasted sourdough bread.
7. Slice your tomato into ¼-inch thick rounds and layer them on top of the avocado spread.
8. Top the tomato with a handful of fresh spinach leaves, pressing gently so they don’t slide off.
9. Place the second slice of toasted sourdough on top and press down lightly.
10. Use a sharp knife to slice the sandwich in half diagonally for that Instagram-worthy look.
Let’s be real—this sandwich is a textural dream with creamy avocado, juicy tomato bursts, and that satisfying crunch from the toast. Serve it with a side of sweet potato fries or wrap it in parchment paper for a picnic that screams ‘I have my life together.’
Classic Cucumber and Herb Cream Cheese Sandwich
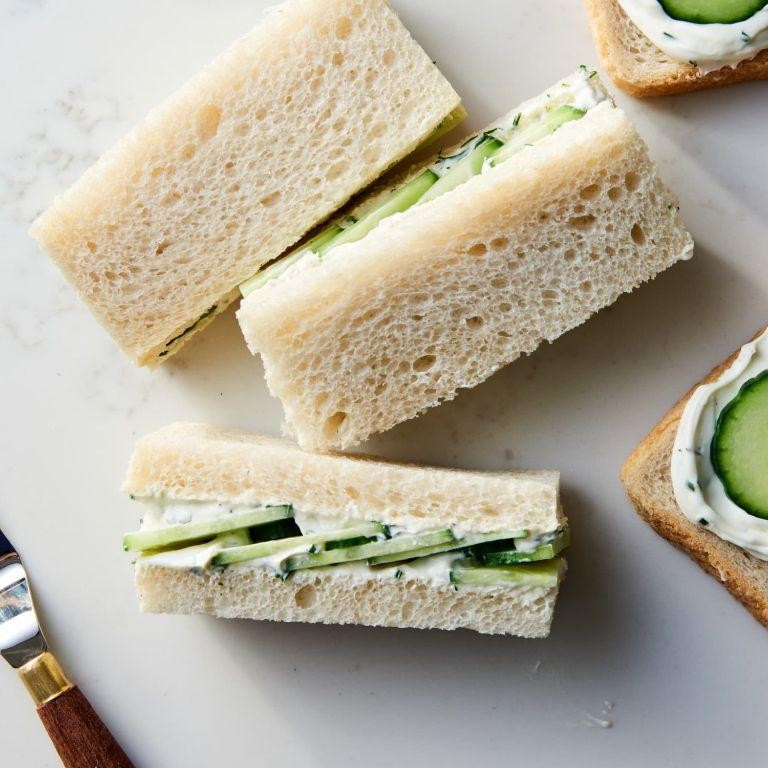
Let’s be real—sometimes you need a sandwich that’s fancier than PB&J but less effort than a Thanksgiving turkey. This cucumber and herb cream cheese situation is your new best friend for when you want to feel fancy without the fuss. It’s crisp, creamy, and basically a spa day between two slices of bread.
1
sandwich10
minutesIngredients
- 2 slices of your favorite sandwich bread (sourdough, please!)
- A generous schmear of plain cream cheese (about ¼ cup)
- Half a medium cucumber, sliced paper-thin
- A handful of fresh dill, roughly chopped
- A couple of fresh chives, snipped into tiny bits
- A squeeze of fresh lemon juice (about 1 tsp)
- A tiny pinch of salt and a crack of black pepper
Instructions
- Grab your two slices of bread and lay them flat on a cutting board.
- Spread the cream cheese evenly over one side of each slice, covering every last crumb—this prevents soggy bread later.
- Sprinkle the chopped dill and snipped chives evenly over the cream cheese on both slices.
- Arrange the paper-thin cucumber slices in a single, slightly overlapping layer on one slice of bread.
- Squeeze the fresh lemon juice directly over the cucumber layer to keep everything bright and perky.
- Season the cucumber layer with that tiny pinch of salt and a crack of black pepper.
- Carefully place the second slice of bread on top, cream cheese side down, and press gently to seal.
- Use a sharp serrated knife to slice the sandwich diagonally—clean cuts make it look extra chef-y.
Nothing beats the crunch of cool cucumber against that herby, tangy cream cheese. Try stacking the halves upright on a plate for a chic picnic vibe, or pack it for lunch and watch your coworkers get jealous.
Spicy Veggie and Sriracha Mayo Wrap

Feeling that mid-day slump where even your desk chair seems more exciting than another boring lunch? Fear not, flavor adventurer, because we’re about to inject some serious fire into your routine with a wrap that packs a punch and a whole lot of personality.
2
servings10
minutes10
minutesIngredients
– A couple of large flour tortillas
– A good glug of olive oil (about 1 tbsp)
– 1 cup of thinly sliced bell peppers (any color you fancy)
– Half a red onion, sliced into thin half-moons
– A big handful of fresh spinach (about 2 cups)
– A generous 1/4 cup of Sriracha mayo
– A pinch of salt and a crack of black pepper
Instructions
1. Heat 1 tablespoon of olive oil in a large skillet over medium-high heat until it shimmers.
2. Add your sliced bell peppers and red onion to the hot skillet, spreading them out in a single layer for the best sear.
3. Cook the vegetables for 5-7 minutes, stirring occasionally, until the peppers have softened and the onions are translucent with slightly charred edges.
4. Toss in the fresh spinach and cook for just 1-2 minutes, until it’s dramatically wilted but still bright green. (Pro tip: Wilting the spinach at the end keeps its vibrant color and prevents it from getting mushy.)
5. Season the veggie mixture with a pinch of salt and a few cracks of black pepper, then give everything one final stir and remove the skillet from the heat.
6. Warm your flour tortillas by heating them in a dry skillet for 30 seconds per side, or until soft and pliable. (This prevents them from cracking when you roll them up!)
7. Spread 2 tablespoons of Sriracha mayo in a thick stripe down the center of each warm tortilla, leaving a 2-inch border at the top and bottom.
8. Pile the sautéed veggie mixture evenly over the Sriracha mayo on each tortilla.
9. Fold the bottom edge of the tortilla up over the filling, then tightly roll from one side to the other, tucking the ingredients in as you go to create a secure bundle.
10. Slice each wrap in half on a sharp diagonal for that professional deli look. (A sharp knife is your best friend here—it cuts cleanly without squishing your beautiful creation.)
Oh my goodness, the contrast in this wrap is everything! You get the soft, warm tortilla giving way to that crunchy, slightly charred veggie filling, all slicked with the creamy, spicy kick of the Sriracha mayo. Serve it alongside a handful of crispy potato chips for the ultimate textural party, or pack it for a picnic that will definitely make your friends jealous.
Garden Fresh Caprese Sandwich

Naturally, we’ve all had those days when a sad desk lunch just won’t cut it, and your soul screams for something that tastes like a sunbeam. This garden-fresh delight is basically summer vacation between two slices of bread, a vibrant escape from the mundane that requires zero passport.
1
sandwich10
minutesIngredients
– 2 thick slices of your favorite crusty bread (like sourdough or ciabatta)
– 1 large, perfectly ripe tomato
– A couple of thick slices of fresh mozzarella cheese (about 4 ounces total)
– A big handful of fresh basil leaves
– A generous drizzle of extra virgin olive oil (about 1 tablespoon)
– A solid splash of balsamic glaze (about 2 teaspoons)
– A couple of pinches of flaky sea salt
– A few cracks of freshly ground black pepper
Instructions
1. Take your two slices of crusty bread and lay them flat on your cutting board.
2. Slice your large tomato into ¼-inch thick rounds, aiming for about 3-4 slices that will fit your bread.
3. Place the tomato slices in a single layer on the bottom slice of bread.
4. Sprinkle a pinch of flaky sea salt directly over the tomato slices to help draw out their juices.
5. Layer your thick slices of fresh mozzarella cheese evenly on top of the tomatoes.
6. Tear your big handful of fresh basil leaves by hand and scatter them over the mozzarella.
7. Drizzle the generous tablespoon of extra virgin olive oil evenly over the basil layer.
8. Follow with the solid splash of balsamic glaze, drizzling it in zig-zags across the sandwich.
9. Add a few cracks of freshly ground black pepper over the top.
10. Carefully place the top slice of bread over your assembled ingredients.
11. Press down gently on the sandwich with the palm of your hand to compact the layers slightly.
12. Use a sharp serrated knife to slice the sandwich in half diagonally, which makes it easier to eat and looks more appealing.
Really, the magic happens when you take that first bite—the creamy mozzarella melds with the juicy tomato, while the basil provides a fresh punch and the balsamic adds a sweet-tangy kick. The texture is a fantastic mess of crisp bread, soft cheese, and firm tomato that might require a napkin but is absolutely worth it. Try serving it with a side of kettle chips for the ultimate crunchy contrast or pack it for a picnic where it will undoubtedly be the star of the blanket.
Roasted Red Pepper and Mozzarella Brioche

Jeez, have you ever met a more charismatic bread than this roasted red pepper and mozzarella brioche? It’s basically the life of the party in loaf form—fluffy, cheesy, and packed with sweet, smoky peppers that’ll make you forget all about boring sandwiches.
1
loaf40
minutes35
minutesIngredients
– 3 cups of all-purpose flour (because we’re not messing around)
– 1 cup of warm whole milk (just cozy enough to wake up the yeast)
– 2 large eggs, plus one more for that golden egg wash glow-up
– ½ cup of unsalted butter, softened to room temp (no cold shoulder here)
– ¼ cup of granulated sugar (for a hint of sweet charm)
– 1 packet of active dry yeast (the tiny powerhouse)
– 1 tsp of salt (to keep things balanced)
– 1 cup of shredded mozzarella cheese (the gooey star)
– ½ cup of chopped roasted red peppers from a jar, patted dry (no soggy surprises)
– A splash of olive oil for greasing
Instructions
1. In a large bowl, whisk together the warm milk, sugar, and yeast, then let it sit for 5–10 minutes until it’s frothy and bubbly—this means your yeast is alive and ready to party.
2. Tip: If your milk is too hot (over 110°F), it’ll kill the yeast, so test it on your wrist like baby formula.
3. Beat in the 2 eggs, softened butter, and salt until everything is happily combined.
4. Gradually mix in the flour with a wooden spoon until a shaggy dough forms, then knead on a floured surface for 8–10 minutes until it’s smooth and elastic.
5. Place the dough in a lightly oiled bowl, cover it with a damp towel, and let it rise in a warm spot for 1–2 hours, or until doubled in size—patience is key here.
6. Punch down the dough to release any air bubbles, then gently knead in the shredded mozzarella and chopped roasted red peppers until evenly distributed.
7. Tip: Pat those peppers dry with a paper towel to avoid a soggy dough disaster.
8. Shape the dough into a loaf and place it in a greased 9×5-inch loaf pan.
9. Cover it again and let it rise for another 45–60 minutes until puffy and nearly reaching the pan’s rim.
10. Preheat your oven to 350°F—no peeking until it’s fully heated for even baking.
11. Whisk the remaining egg and brush it generously over the loaf for a shiny, golden crust.
12. Bake for 30–35 minutes, or until the top is deep golden brown and it sounds hollow when tapped.
13. Tip: If it browns too quickly, tent it loosely with foil to prevent burning.
14. Let it cool in the pan for 10 minutes, then transfer to a wire rack to cool completely.
My goodness, this brioche is a textural dream—soft and pillowy with gooey cheese pockets and bursts of sweet pepper. Slice it thick for a killer grilled cheese or tear into it warm; either way, it’s basically edible confetti for your taste buds.
Spinach and Artichoke Grilled Cheese
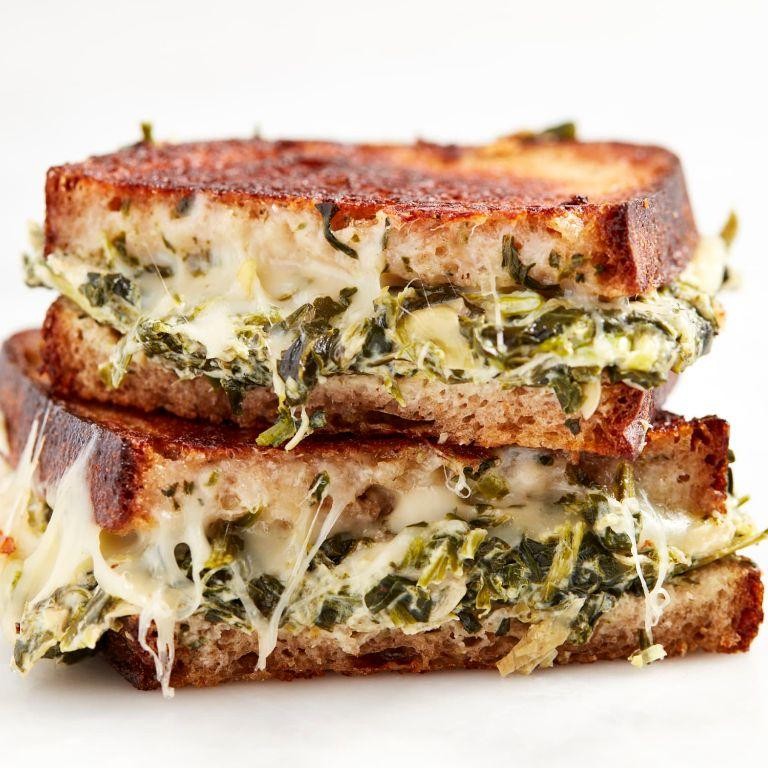
Oh, the humble grilled cheese just got a glow-up that’ll make your taste buds do a happy dance. Imagine melty, cheesy goodness hugging creamy spinach and tangy artichokes, all sandwiched between golden, buttery bread. This isn’t just a sandwich—it’s a cozy hug in food form, perfect for when you need a little extra comfort.
2
sandwiches10
minutes10
minutesIngredients
- 4 slices of sourdough bread
- A couple of tablespoons of softened butter
- 1 cup of shredded mozzarella cheese
- 1/2 cup of grated Parmesan cheese
- 1 cup of chopped fresh spinach
- 1/2 cup of chopped canned artichoke hearts, drained
- 4 ounces of softened cream cheese
- 1 minced garlic clove
- A splash of milk
- A pinch of salt
- A pinch of black pepper
Instructions
- Heat a large skillet over medium-low heat to prevent the bread from burning before the cheese melts.
- Spread softened butter evenly on one side of each bread slice.
- In a medium bowl, combine mozzarella, Parmesan, cream cheese, spinach, artichoke hearts, garlic, milk, salt, and pepper until well mixed.
- Divide the spinach-artichoke mixture evenly between two bread slices, placing it on the unbuttered sides.
- Top with the remaining bread slices, buttered sides facing out.
- Place the sandwiches in the preheated skillet and cook for 4–5 minutes, or until the bottom is golden brown and crispy.
- Carefully flip the sandwiches using a spatula to keep the filling intact.
- Cook for another 4–5 minutes until the second side is golden brown and the cheese is fully melted.
- Press down gently on the sandwiches with the spatula to help them cook evenly and stick together.
- Remove from the skillet and let rest for 1–2 minutes before slicing to avoid a messy, oozing situation.
What you get is a crispy, buttery exterior that gives way to a gooey, savory center with pops of spinach and artichoke. Serve it alongside a bowl of tomato soup for dipping, or slice it into strips for a fun, shareable appetizer that’ll disappear in seconds.
Zucchini and Pesto Baguette

Oh, the humble zucchini—often relegated to sad spiralized salads, but today? Today it’s the star of this ridiculously easy, flavor-packed baguette situation. Picture this: crusty bread, creamy pesto, and zucchini that’s actually exciting. Let’s make magic happen.
1
baguette15
minutes30
minutesIngredients
- 1 medium zucchini, sliced into thin rounds (about 2 cups)
- 1 French baguette, halved lengthwise
- ½ cup basil pesto (store-bought or homemade, no judgment)
- 1 cup shredded mozzarella cheese
- 2 tablespoons olive oil
- A pinch of salt and a few cracks of black pepper
- A squeeze of fresh lemon juice (about 1 tablespoon)
Instructions
- Preheat your oven to 375°F and line a baking sheet with parchment paper.
- Slice the zucchini into ¼-inch thick rounds—thin enough to cook quickly but thick enough to hold their shape.
- Toss the zucchini slices with olive oil, salt, and pepper in a bowl until they’re lightly coated.
- Arrange the zucchini in a single layer on the baking sheet and roast for 15–18 minutes, flipping halfway, until tender and lightly golden at the edges.
- While the zucchini roasts, slice the baguette lengthwise and place it cut-side up on another baking sheet.
- Spread the pesto evenly over both halves of the baguette, going all the way to the edges for maximum flavor in every bite.
- Sprinkle the shredded mozzarella over the pesto, covering the surface evenly.
- Once the zucchini is roasted, arrange the slices in a single layer over the cheese-covered baguette.
- Drizzle the zucchini with a squeeze of fresh lemon juice to brighten everything up.
- Bake the assembled baguette for 10–12 minutes, or until the cheese is melted and bubbly and the edges of the bread are crisp.
- Let it cool for 2–3 minutes before slicing into portions—this keeps the toppings from sliding off.
The first bite delivers a satisfying crunch from the toasted baguette, followed by the creamy, herby pesto and tender zucchini. Serve it sliced as a hearty appetizer, or pair it with a simple salad for a lazy dinner that feels fancier than it is.
Eggplant and Olive Tapenade Sub

Hooray for a sandwich that makes your taste buds do a happy dance! This eggplant and olive tapenade sub is the culinary equivalent of finding money in your pocket—unexpectedly delightful and ridiculously satisfying. Get ready to transform humble ingredients into a Mediterranean masterpiece that’ll have you questioning why you ever settled for boring lunch options.
2
sandwiches15
minutes25
minutesIngredients
– 1 large eggplant, sliced into ½-inch rounds
– 2 sub rolls, the good crusty kind
– 1 cup pitted Kalamata olives
– 2 cloves garlic, minced
– A generous glug of olive oil (about ¼ cup)
– A squeeze of fresh lemon juice (about 1 tbsp)
– A handful of fresh basil leaves
– A couple of slices of provolone cheese
– A pinch of salt and freshly ground black pepper
Instructions
1. Preheat your oven to 400°F and line a baking sheet with parchment paper.
2. Arrange the eggplant slices in a single layer on the baking sheet.
3. Brush both sides of each eggplant slice with olive oil using about 2 tablespoons total.
4. Sprinkle the eggplant with salt and pepper.
5. Roast for 20 minutes until the eggplant is tender and golden brown around the edges.
6. While the eggplant roasts, combine the Kalamata olives, minced garlic, remaining olive oil, and lemon juice in a food processor.
7. Pulse the mixture 5-7 times until it forms a coarse paste—don’t over-process it into mush!
8. Slice the sub rolls lengthwise, being careful not to cut all the way through.
9. Spread the olive tapenade generously on the bottom half of each roll.
10. Layer the roasted eggplant slices over the tapenade.
11. Top with provolone cheese slices.
12. Place the assembled subs on the baking sheet and bake for 5 minutes at 400°F until the cheese is melted and bubbly.
13. Remove from oven and tuck fresh basil leaves between the layers.
14. Cut each sub in half diagonally for that professional sandwich shop look.
Just imagine that first bite: the creamy roasted eggplant melts into the briny olive tapenade while the provolone adds a gooey richness that makes this sub pure comfort food magic. Serve it warm with extra napkins because this beauty tends to be gloriously messy—perfect for when you want to feel fancy without the fuss.
Caramelized Onion and Mushroom Club
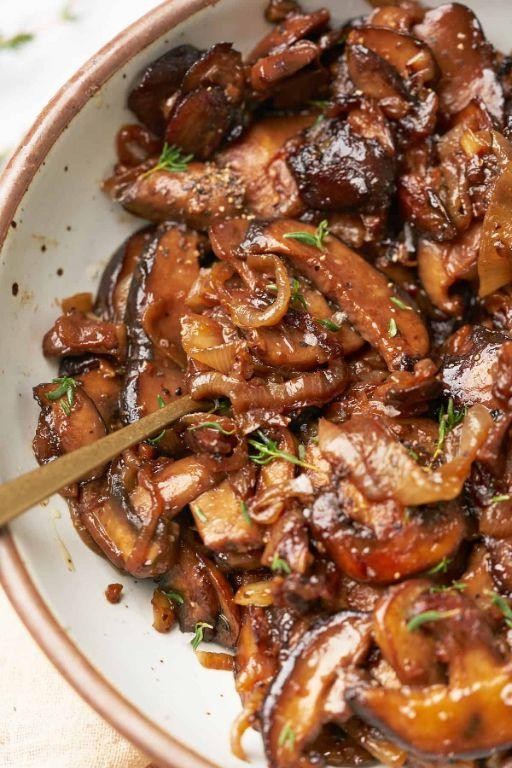
Gather ’round, sandwich enthusiasts, because we’re about to elevate your lunch game from “meh” to “more, please!” This isn’t just a sandwich; it’s a flavor party between two slices of bread where caramelized onions and savory mushrooms are the guests of honor. Get ready for a club so good, it might just start charging membership dues.
3
sandwiches20
minutes60
minutesIngredients
- 2 large yellow onions, thinly sliced
- 8 ounces of cremini mushrooms, sliced
- 3 tablespoons of olive oil
- 1 tablespoon of balsamic vinegar
- 1 teaspoon of brown sugar
- 12 slices of thick-cut bacon
- 1/2 cup of mayonnaise
- 8 slices of sourdough bread, toasted
- 4 leaves of crisp romaine lettuce
- 2 large tomatoes, sliced
Instructions
- Heat 2 tablespoons of olive oil in a large skillet over medium-low heat.
- Add the thinly sliced onions and cook for 10 minutes, stirring occasionally, until they begin to soften.
- Sprinkle the brown sugar over the onions and continue cooking for 25-30 minutes, stirring every 5 minutes, until they turn a deep golden brown. Tip: Don’t rush this step—low and slow is the secret to truly caramelized onions!
- While the onions cook, arrange the bacon slices on a baking sheet and bake at 400°F for 18-20 minutes until crispy.
- Remove the caramelized onions from the skillet and set aside.
- Add the remaining 1 tablespoon of olive oil to the same skillet and increase the heat to medium-high.
- Add the sliced mushrooms and cook for 6-8 minutes, stirring occasionally, until they release their liquid and turn golden brown.
- Drizzle the balsamic vinegar over the mushrooms and cook for 1 more minute, then remove from heat.
- Toast all 8 slices of sourdough bread until golden brown. Tip: A sturdy bread like sourdough holds up beautifully against these juicy fillings without getting soggy.
- Spread 1 tablespoon of mayonnaise on one side of each toasted bread slice.
- On 4 slices of bread, layer 3 slices of bacon, followed by the caramelized onions, then the mushrooms.
- Top with romaine lettuce and tomato slices. Tip: For the ultimate structural integrity, place the lettuce against the mayo-spread bread—it creates a moisture barrier!
- Complete each sandwich with the remaining 4 slices of bread, mayo-side down.
- Slice each sandwich diagonally and serve immediately.
Forget everything you thought you knew about club sandwiches. The final creation delivers a magnificent textural symphony—crispy bacon and toast give way to tender, sweet onions and earthy mushrooms, all brought together by that tangy balsamic kiss. Serve it with a side of pickle spears for that perfect acidic crunch, or go full indulgence and pair it with sweet potato fries for the ultimate comfort meal.
Buffalo Cauliflower Sandwich with Ranch

Let’s be real—sometimes you want that spicy, saucy Buffalo wing experience without the chicken commitment. This Buffalo Cauliflower Sandwich with Ranch is here to deliver all the fiery fun and cool creaminess you crave, wrapped up in a toasty bun that’s basically a hug for your taste buds. It’s the plant-based party starter that’ll have even the most devoted carnivores asking for seconds.
2
sandwiches15
minutes30
minutesIngredients
– 1 head of cauliflower, chopped into bite-sized florets
– 1 cup of all-purpose flour
– 1 cup of milk (or plant-based milk for a vegan twist)
– 2 tablespoons of olive oil
– A generous ½ cup of Buffalo sauce
– A couple of burger buns, toasted
– A big dollop of ranch dressing for slathering
– A pinch of salt and a crack of black pepper
Instructions
1. Preheat your oven to 425°F and line a baking sheet with parchment paper.
2. In a large bowl, whisk together the flour, milk, salt, and pepper until you’ve got a smooth, pancake-batter-like consistency—no lumps allowed!
3. Toss the cauliflower florets in the batter, making sure each piece is fully coated for maximum crispiness.
4. Spread the battered cauliflower in a single layer on the baking sheet, drizzle with olive oil, and bake for 20 minutes until the edges start to golden.
5. Pull the baking sheet out and generously brush each floret with Buffalo sauce, then pop it back in the oven for another 10 minutes until they’re sticky and slightly charred.
6. While the cauliflower finishes, toast your burger buns until they’re golden and crisp—this keeps them from getting soggy later.
7. Slather the bottom bun with a hearty amount of ranch dressing, pile on the Buffalo cauliflower, and top with the other bun.
8. Serve immediately with extra ranch on the side for dipping, because why hold back?
My favorite thing about this sandwich is the crunch-tender contrast of the cauliflower against the soft bun, with the spicy Buffalo heat mellowed by that cool, creamy ranch. Try serving it with crispy sweet potato fries or a simple slaw to balance the heat—it’s a game-changer for lunch or a casual dinner.
Sweet Potato and Black Bean BBQ Sandwich

Hang onto your napkins, folks, because this sandwich is about to become your new favorite messy masterpiece that’ll have you forgetting all about pulled pork. Seriously, sweet potatoes and black beans are teaming up for a smoky, saucy showdown that’s so good, you might just high-five your oven.
2
sandwiches15
minutes28
minutesIngredients
– 2 medium sweet potatoes, peeled and cubed
– 1 can (15 oz) black beans, rinsed and drained
– 1 cup of your favorite BBQ sauce
– 1/4 cup mayo
– A couple of soft burger buns
– A splash of olive oil
– A pinch of salt
Instructions
1. Preheat your oven to 400°F and line a baking sheet with parchment paper.
2. Toss the cubed sweet potatoes with a splash of olive oil and a pinch of salt until they’re evenly coated.
3. Spread the sweet potatoes in a single layer on the baking sheet—don’t crowd them, or they’ll steam instead of crisp up (tip: this ensures they get nicely caramelized).
4. Roast for 20-25 minutes, flipping halfway through, until the edges are golden and you can easily pierce them with a fork.
5. While the sweet potatoes roast, mix the black beans and BBQ sauce in a bowl until everything’s happily coated.
6. Once the sweet potatoes are done, gently fold them into the BBQ-black bean mixture—be careful not to mash them too much to keep some texture.
7. Toast your burger buns lightly in the oven for 2-3 minutes until they’re just golden (tip: this prevents them from getting soggy under all that saucy goodness).
8. Spread a generous layer of mayo on the bottom half of each bun—it adds creaminess and helps hold everything together.
9. Pile the sweet potato and black bean mixture high onto the buns, then top with the other half.
10. Serve immediately while it’s warm and messy.
Seriously, the combo of tender sweet potatoes and smoky beans creates a texture that’s both hearty and satisfyingly saucy. For a fun twist, throw on some pickled onions or serve it with extra BBQ sauce for dipping—your taste buds will thank you.
Mushroom and Swiss Focaccia

Gather ’round, carb connoisseurs and fungi fanatics, because we’re about to transform your basic bread game into a mushroom-packed masterpiece that’ll make your taste buds do a happy dance. This isn’t just focaccia—it’s a fluffy, savory cloud of deliciousness that’ll have you questioning all your previous bread life choices.
8
portions30
minutes35
minutesIngredients
– 3 ½ cups of all-purpose flour (because we’re fancy but not THAT fancy)
– 1 ¼ cups of warm water (think baby bottle warm, not hot tub hot)
– 2 tablespoons of olive oil (the good stuff you hide from guests)
– 2 teaspoons of instant yeast (the magic fairy dust)
– 1 teaspoon of sugar (yeast’s favorite snack)
– 1 ½ teaspoons of salt (the flavor enhancer)
– 8 ounces of sliced cremini mushrooms (the earthy little guys)
– 1 cup of shredded Swiss cheese (the melty wonder)
– 1 tablespoon of fresh thyme leaves (the aromatic sprinkles)
– A generous sprinkle of flaky sea salt for drama
Instructions
1. Combine 1 ¼ cups warm water (about 110°F), 2 teaspoons instant yeast, and 1 teaspoon sugar in a large bowl and let it sit for 5 minutes until foamy.
2. Mix in 3 ½ cups all-purpose flour, 1 ½ teaspoons salt, and 2 tablespoons olive oil until a shaggy dough forms.
3. Knead the dough on a floured surface for 8-10 minutes until smooth and elastic (pro tip: if it sticks to your hands, you need more flour).
4. Place the dough in a lightly oiled bowl, cover with a damp towel, and let rise in a warm spot for 1 hour until doubled in size.
5. While dough rises, sauté 8 ounces sliced cremini mushrooms in 1 tablespoon olive oil over medium heat for 6-8 minutes until golden brown and moisture has evaporated.
6. Press the risen dough into a greased 9×13 inch baking pan, creating deep dimples with your fingers.
7. Top the dough evenly with cooked mushrooms, 1 cup shredded Swiss cheese, and 1 tablespoon fresh thyme leaves.
8. Let the topped dough rise for 20 minutes while preheating your oven to 400°F.
9. Bake for 20-25 minutes until the crust is golden brown and cheese is bubbly (kitchen timer tip: set it for 20 minutes and check from there).
10. Remove from oven and immediately sprinkle with flaky sea salt while still hot.
11. Let cool in the pan for 10 minutes before slicing (resistance is futile, but necessary for clean cuts).
Just imagine that first bite: the crisp, salty crust giving way to a tender, airy interior studded with earthy mushrooms and pockets of gooey Swiss cheese. This beauty pairs perfectly with a hearty soup or stands alone as the star of any charcuterie board—if it lasts long enough to make it to the board, that is.
Kale and White Bean Vegan Sandwich

Zesty doesn’t even begin to describe this plant-powered masterpiece that’ll make your taste buds do a happy dance while your carnivore friends stare in jealous awe. This isn’t just a sandwich—it’s a flavor party between two slices of bread where kale finally gets the glow-up it deserves and white beans become the creamy superstar you never knew you needed.
2
sandwiches10
minutes7
minutesIngredients
– 2 big handfuls of fresh kale, stems removed and roughly chopped
– 1 can (15 oz) of white beans, drained and rinsed
– 2 cloves of garlic, minced
– A generous glug of olive oil (about 2 tablespoons)
– A good squeeze of lemon juice (about 1 tablespoon)
– A pinch of red pepper flakes for that subtle kick
– 4 slices of your favorite crusty bread
– Salt to make everything pop
Instructions
1. Heat 1 tablespoon of olive oil in a large skillet over medium heat until it shimmers.
2. Add the minced garlic and cook for exactly 1 minute until fragrant but not browned—burnt garlic is the villain of this story.
3. Toss in the chopped kale and cook for 3-4 minutes, stirring constantly until it’s wilted and bright green.
4. Transfer the kale mixture to a medium bowl and let it cool for 2 minutes—patience prevents a mushy situation.
5. Add the drained white beans, remaining olive oil, lemon juice, red pepper flakes, and salt to the bowl.
6. Mash everything together with a fork until the beans are creamy but still have some texture—think chunky, not baby food.
7. Toast your bread slices in a toaster or dry skillet until golden brown and crispy around the edges.
8. Divide the kale and white bean mixture evenly between two slices of toast.
9. Top with the remaining toast slices and press down gently—this sandwich deserves a good hug.
10. Cut each sandwich in half diagonally because triangles just taste better, science says.
Remarkably creamy meets satisfyingly crunchy in every single bite, with the white beans creating this luxurious spread that perfectly balances the kale’s earthy notes. The lemon zing cuts through the richness while the red pepper flakes add just enough heat to keep things interesting—try serving it with sweet potato fries for the ultimate texture contrast or pack it for a picnic where it’ll hold up beautifully without getting soggy.
Beet and Goat Cheese Open-Face Sandwich

Jazz up your lunch routine with this vibrant creation that proves beets aren’t just for salads anymore. This open-face masterpiece brings together earthy sweetness and tangy creaminess in a way that’ll make you forget boring sandwiches ever existed. Trust me, your taste buds will throw a little party when they meet this colorful combo.
2
sandwiches15
minutes60
minutesIngredients
– 2 slices of crusty sourdough bread
– 1 medium beet (about the size of your fist)
– 2 ounces of creamy goat cheese
– A big handful of fresh arugula
– A generous drizzle of extra virgin olive oil
– A couple of tablespoons of balsamic glaze
– A pinch of flaky sea salt
– A few cracks of black pepper
Instructions
1. Preheat your oven to 400°F and line a baking sheet with parchment paper.
2. Scrub the beet thoroughly under cold running water to remove any dirt.
3. Wrap the cleaned beet tightly in aluminum foil, creating a sealed packet.
4. Roast the beet packet directly on the oven rack for 45-60 minutes until easily pierced with a fork.
5. Carefully unwrap the beet (watch for steam!) and let it cool until you can handle it comfortably.
6. Use your fingers to slip the beet skin off—it should peel away easily when properly roasted.
7. Slice the peeled beet into ¼-inch thick rounds using a sharp knife.
8. Toast your sourdough slices until golden brown and crispy around the edges.
9. Spread goat cheese evenly across each warm toast, going all the way to the edges.
10. Arrange beet slices in a single layer over the goat cheese, slightly overlapping them.
11. Top with that handful of fresh arugula, letting some leaves peek out artistically.
12. Drizzle everything with olive oil in a zigzag pattern for even coverage.
13. Add the balsamic glaze in decorative swirls—this isn’t just flavor, it’s edible art!
14. Finish with that pinch of flaky salt and several cracks of black pepper.
My goodness, that creamy goat cheese against the sweet roasted beets creates the most delightful contrast. The peppery arugula adds just enough bite to balance everything out, while the crispy toast provides the perfect sturdy base. Try serving these beauties alongside a simple soup or cut them into elegant triangles for your next fancy brunch—they’re almost too pretty to eat!
Eggplant Parmesan Sandwich on Ciabatta

Jazz up your lunch game with this crispy, cheesy masterpiece that turns the classic Italian comfort dish into handheld perfection. Just when you thought eggplant parm couldn’t get any better, we stuffed it between two slices of ciabatta bread and created a sandwich that’ll make you forget all about that sad desk salad. Seriously, your taste buds are about to throw a party and everyone’s invited!
4
sandwiches25
minutes25
minutesIngredients
– 1 medium eggplant, sliced into ½-inch rounds
– 1 cup all-purpose flour
– 2 large eggs, beaten
– 1 cup breadcrumbs
– ½ cup grated Parmesan cheese
– 2 cups marinara sauce
– 1 cup shredded mozzarella cheese
– 4 ciabatta rolls, sliced open
– ¼ cup olive oil
– A couple of fresh basil leaves
– A pinch of salt and black pepper
Instructions
1. Preheat your oven to 400°F and line a baking sheet with parchment paper.
2. Arrange the eggplant slices in a single layer on paper towels and sprinkle both sides with salt to draw out moisture—let them sit for 15 minutes, then pat dry thoroughly (this prevents sogginess!).
3. Set up three shallow bowls: one with flour, one with beaten eggs, and one with breadcrumbs mixed with Parmesan cheese.
4. Dredge each eggplant slice first in flour, shaking off excess, then dip in egg, and finally coat evenly in the breadcrumb mixture.
5. Heat olive oil in a large skillet over medium-high heat until shimmering, about 2 minutes.
6. Fry eggplant slices in batches for 3-4 minutes per side until golden brown and crispy, transferring them to the prepared baking sheet.
7. Spoon 2 tablespoons of marinara sauce over each fried eggplant slice.
8. Top each slice with a generous sprinkle of mozzarella cheese.
9. Bake for 12-15 minutes until the cheese is bubbly and slightly browned.
10. Lightly toast the ciabatta rolls in the oven during the last 2 minutes of baking for extra crunch.
11. Place 2-3 basil leaves on the bottom half of each ciabatta roll.
12. Stack 2-3 eggplant parmesan slices on top of the basil.
13. Close the sandwiches with the top halves of the ciabatta rolls.
Unbelievably satisfying, this sandwich delivers a symphony of textures—crispy breaded eggplant gives way to molten cheese and tangy marinara, all hugged by that chewy ciabatta. For an extra kick, drizzle with balsamic glaze or serve with a side of garlicky arugula salad to cut through the richness. Trust me, this handheld wonder will have you planning your next lunch before you’ve even finished the first bite!
Herb-Marinated Tofu and Avocado Sandwich

So, you’ve decided to upgrade your sad desk lunch from a sad desk sandwich to something that actually makes your taste buds throw a party. This herb-marinated tofu and avocado situation is here to save your midday meal from utter boredom—no more soggy bread or bland fillings, promise.
2
sandwiches20
minutes10
minutesIngredients
– 1 block of firm tofu, pressed and sliced into ½-inch thick slabs
– 2 tablespoons of olive oil
– A big handful of fresh basil leaves
– A couple of sprigs of fresh cilantro, chopped
– 1 clove of garlic, minced
– A generous squeeze of lemon juice (about 1 tablespoon)
– A pinch of salt and a crack of black pepper
– 1 ripe avocado, pitted and sliced
– 4 slices of your favorite bread (sourdough, please!)
Instructions
1. In a shallow dish, whisk together the olive oil, minced garlic, lemon juice, salt, and pepper to create your marinade.
2. Add the tofu slabs to the marinade, flipping to coat both sides, and let them soak for at least 15 minutes—longer if you’re patient (tip: marinate for up to an hour in the fridge for maximum flavor absorption).
3. Heat a non-stick skillet over medium-high heat and carefully place the marinated tofu in the pan.
4. Cook the tofu for 4–5 minutes per side, until golden brown and slightly crispy on the edges (tip: don’t overcrowd the pan—cook in batches if needed to avoid steaming).
5. While the tofu cooks, toast your bread slices until golden and crisp.
6. Mash the avocado in a small bowl with a fork until it’s creamy but still a bit chunky.
7. Spread the mashed avocado evenly onto two slices of the toasted bread.
8. Layer the cooked tofu slabs on top of the avocado.
9. Sprinkle the fresh basil and cilantro over the tofu (tip: tear the basil leaves by hand for a more rustic look and better aroma).
10. Top with the remaining bread slices, press gently, and slice each sandwich in half diagonally. Devour this beauty immediately—the creamy avocado hugs the savory, herby tofu like they’re long-lost pals, and the crisp bread adds the perfect crunch. Try serving it with a side of sweet potato fries or a simple salad for a full meal that’ll make your coworkers jealous.
Conclusion
Magnificent! With 33 vegetable sandwich recipes for every craving and occasion, you’ll never run out of delicious lunch ideas. We hope these creative combinations inspire your next meal! Try a few recipes and let us know which ones become your favorites in the comments below. Don’t forget to share this tasty roundup with fellow food lovers on Pinterest!