Ready to transform your weeknight dinners? Whether you’re craving quick comfort food or seasonal favorites, these 21 delicious vegan gluten-free recipes make it easy to savor every bite. From hearty mains to flavorful sides, there’s something here for every home cook. Let’s dive into these mouthwatering dishes that promise to delight your taste buds and simplify your evenings!
Creamy Vegan Risotto with Roasted Vegetables
Savor the rich, comforting flavors of this plant-based classic, where creamy arborio rice meets perfectly roasted seasonal vegetables. This methodical guide will walk you through each step to achieve that signature velvety texture without any dairy. Let’s begin by preparing our vegetables for roasting.
Serving: 4 | Pre Time: 15 minutes | Cooking Time: 45 minutes
Ingredients
– 1 medium butternut squash, peeled and diced into 1/2-inch cubes
– 2 medium carrots, peeled and sliced into 1/4-inch rounds
– 1 large red onion, cut into 1-inch wedges
– 3 tablespoons extra-virgin olive oil, divided
– 1 1/2 cups arborio rice
– 4 cups low-sodium vegetable stock, kept at a simmer
– 1/2 cup dry white wine
– 1/4 cup nutritional yeast
– 2 tablespoons freshly squeezed lemon juice
– 1 teaspoon fine sea salt
– 1/2 teaspoon freshly cracked black pepper
– 1/4 cup raw cashews, soaked for 4 hours and drained
– 1/2 cup filtered water
– 2 tablespoons chopped fresh flat-leaf parsley
Instructions
1. Preheat your oven to 425°F (218°C) and line a large, rimmed baking sheet with parchment paper.
2. In a large mixing bowl, combine the diced butternut squash, sliced carrots, and red onion wedges.
3. Drizzle the vegetables with 2 tablespoons of extra-virgin olive oil, 1/2 teaspoon of the fine sea salt, and 1/4 teaspoon of the freshly cracked black pepper; toss until evenly coated.
4. Spread the vegetables in a single layer on the prepared baking sheet and roast for 25-30 minutes, or until tender and caramelized at the edges, stirring once halfway through.
5. While the vegetables roast, prepare the cashew cream by blending the soaked cashews with 1/2 cup of filtered water on high speed for 60-90 seconds until completely smooth and creamy; set aside.
6. Heat the remaining 1 tablespoon of extra-virgin olive oil in a large, heavy-bottomed Dutch oven or saucepan over medium heat.
7. Add the arborio rice and toast, stirring constantly, for 2-3 minutes until the grains become slightly translucent at the edges and emit a nutty aroma.
8. Pour in the dry white wine and cook, stirring, until the liquid is fully absorbed, about 1-2 minutes.
9. Begin adding the simmering vegetable stock one ladleful (about 1/2 cup) at a time, stirring continuously and allowing each addition to be nearly fully absorbed before adding the next. Tip: Maintain a gentle simmer throughout this process to properly release the rice’s starches.
10. Continue this process until the rice is al dente and the mixture is creamy, which should take 18-22 minutes and use most or all of the stock.
11. Remove the risotto from the heat and immediately stir in the prepared cashew cream, nutritional yeast, remaining 1/2 teaspoon of fine sea salt, remaining 1/4 teaspoon of black pepper, and the freshly squeezed lemon juice.
12. Gently fold in the roasted vegetables until just combined. Tip: Avoid over-stirring after adding the vegetables to maintain their shape and texture.
13. Let the risotto rest, covered, for 3 minutes off the heat to allow the flavors to meld. Tip: This resting period is crucial for the risotto to achieve its final, luxurious consistency.
14. Garnish with the chopped fresh flat-leaf parsley before serving.
Finished with a final stir, this risotto boasts a luxuriously creamy body from the blended cashews and a bright, savory depth from the nutritional yeast. For a stunning presentation, serve it in shallow bowls topped with an extra sprinkle of parsley and a drizzle of high-quality olive oil. The sweet, caramelized roasted vegetables provide delightful textural contrast to the velvety rice in every bite.
Chickpea and Quinoa Stuffed Bell Peppers
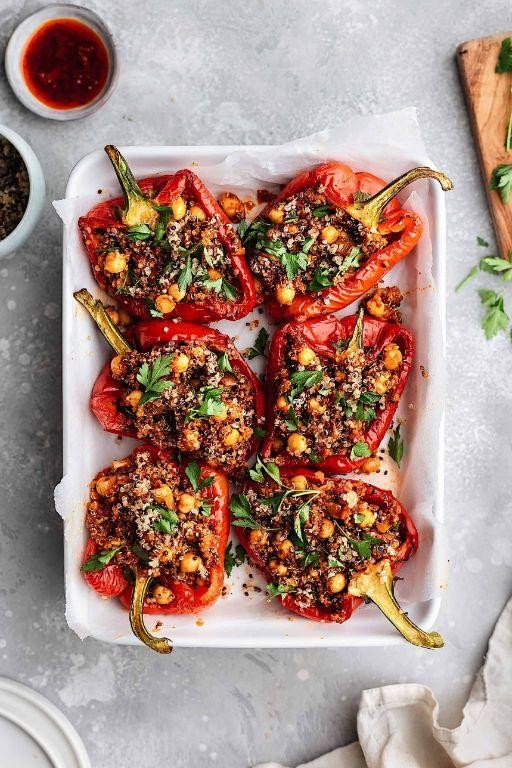
Zesty yet wholesome, these stuffed bell peppers combine protein-packed chickpeas and nutty quinoa for a satisfying vegetarian meal that’s as nutritious as it is delicious. Perfect for a weeknight dinner or meal prep, this recipe walks you through each step with precision to ensure perfect results every time. Let’s get cooking.
Serving: 4 | Pre Time: 15 minutes | Cooking Time: 40 minutes
Ingredients
– 4 large bell peppers, tops removed and seeds discarded
– 1 cup quinoa, rinsed thoroughly
– 2 cups vegetable broth
– 1 (15-ounce) can chickpeas, drained and rinsed
– 1 small yellow onion, finely diced
– 2 cloves garlic, minced
– 2 tablespoons extra-virgin olive oil
– 1 teaspoon ground cumin
– ½ teaspoon smoked paprika
– ¼ cup fresh parsley, finely chopped
– ½ cup shredded Monterey Jack cheese
– Kosher salt to taste
Instructions
1. Preheat your oven to 375°F (190°C) and lightly grease a baking dish with olive oil.
2. In a medium saucepan, combine the rinsed quinoa and vegetable broth, bring to a boil over high heat, then reduce to a simmer, cover, and cook for 15 minutes until the liquid is absorbed and quinoa is fluffy.
3. While the quinoa cooks, heat 2 tablespoons of extra-virgin olive oil in a large skillet over medium heat, add the finely diced yellow onion, and sauté for 5 minutes until translucent and fragrant.
4. Add the minced garlic to the skillet and cook for 1 minute, stirring constantly to prevent burning.
5. Stir in the drained chickpeas, ground cumin, and smoked paprika, cooking for 3 minutes to toast the spices and warm the chickpeas through.
6. Remove the skillet from heat and fold in the cooked quinoa, finely chopped fresh parsley, and kosher salt to taste, mixing until evenly combined.
7. Spoon the quinoa-chickpea mixture into the hollowed bell peppers, packing it gently to fill each pepper completely.
8. Arrange the stuffed peppers upright in the prepared baking dish, sprinkle the shredded Monterey Jack cheese evenly over the tops, and cover the dish with aluminum foil.
9. Bake at 375°F (190°C) for 25 minutes, then remove the foil and bake for an additional 10 minutes until the cheese is golden and bubbly and the peppers are tender when pierced with a fork.
10. Let the peppers rest for 5 minutes before serving to allow the filling to set slightly.
Mouthwatering and hearty, these peppers offer a delightful contrast between the tender, slightly sweet bell pepper shells and the savory, spiced filling with a satisfying chew from the quinoa. For a creative twist, try drizzling with a tahini-lemon sauce or serving alongside a crisp green salad to balance the richness.
Zucchini Noodles with Avocado Pesto Sauce

This vibrant, plant-based dish transforms humble zucchini into delicate noodles tossed with a creamy, herbaceous avocado pesto sauce—a perfect light meal that’s both nourishing and quick to prepare.
Serving: 2 | Pre Time: 15 minutes | Cooking Time: 5 minutes
Ingredients
– 2 medium zucchini, spiralized into noodles
– 1 ripe Hass avocado, pitted and peeled
– ¼ cup raw pine nuts, lightly toasted
– 1 cup fresh basil leaves, packed
– 2 cloves garlic, minced
– 2 tablespoons extra-virgin olive oil
– 1 tablespoon freshly squeezed lemon juice
– ¼ teaspoon fine sea salt
– ¼ teaspoon freshly ground black pepper
– 2 tablespoons nutritional yeast (optional, for a cheesy flavor)
Instructions
1. Spiralize the zucchini into noodles using a spiralizer, then place them in a colander set over a bowl to drain excess moisture for 10 minutes.
2. In a dry skillet over medium heat, toast the pine nuts for 2–3 minutes, stirring constantly until golden brown and fragrant, then transfer to a plate to cool.
3. In a food processor, combine the avocado, toasted pine nuts, basil leaves, minced garlic, olive oil, lemon juice, sea salt, black pepper, and nutritional yeast (if using).
4. Process the mixture on high speed for 30–45 seconds, scraping down the sides once, until it forms a smooth, creamy pesto sauce with a vibrant green color.
5. Pat the zucchini noodles dry with a clean kitchen towel to remove any remaining moisture, which helps prevent a watery sauce.
6. In a large mixing bowl, gently toss the zucchini noodles with the avocado pesto sauce until evenly coated, using tongs to avoid breaking the noodles.
7. Divide the dressed zucchini noodles between two serving plates, serving immediately for the best texture and flavor.
Fresh from the bowl, this dish offers a satisfying crunch from the zucchini noodles contrasted with the velvety, herb-infused pesto. For a creative twist, top it with grilled shrimp or cherry tomatoes, or chill it briefly for a refreshing cold pasta salad alternative.
Lentil and Spinach Coconut Curry
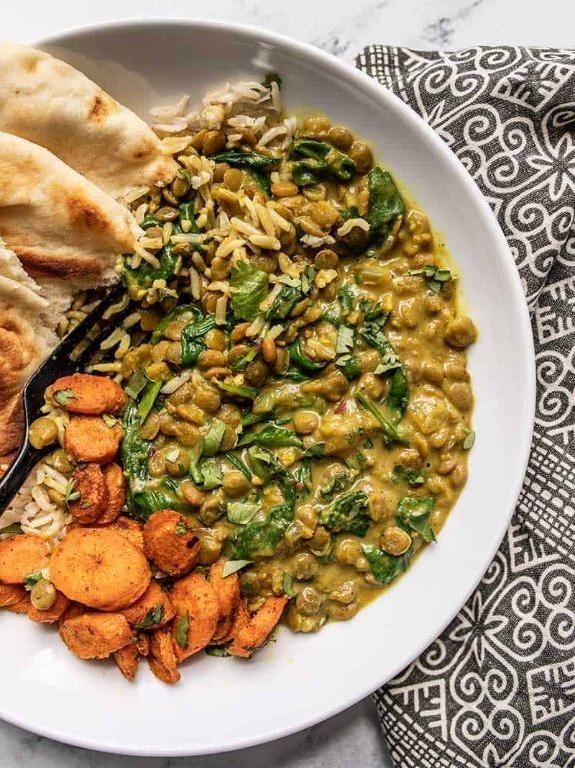
Savor a comforting, nutrient-packed meal that comes together with minimal fuss—this Lentil and Spinach Coconut Curry is a one-pot wonder perfect for busy weeknights. Simply simmer red lentils and fresh spinach in a rich coconut milk base infused with aromatic spices for a dish that’s both hearty and healthful.
Serving: 4 | Pre Time: 15 minutes | Cooking Time: 30 minutes
Ingredients
– 1 tablespoon clarified butter
– 1 medium yellow onion, finely diced
– 3 garlic cloves, minced
– 1 tablespoon freshly grated ginger
– 1 tablespoon curry powder
– 1 teaspoon ground turmeric
– 1 cup dried red lentils, rinsed and drained
– 1 (13.5-ounce) can full-fat coconut milk
– 2 cups low-sodium vegetable broth
– 4 cups fresh spinach leaves, stems removed
– 1 tablespoon freshly squeezed lime juice
– Fine sea salt, to season
Instructions
1. Heat the clarified butter in a large Dutch oven or heavy-bottomed pot over medium heat until shimmering, about 2 minutes.
2. Add the finely diced yellow onion and sauté, stirring frequently, until translucent and lightly golden, 5–7 minutes.
3. Stir in the minced garlic and freshly grated ginger, cooking until fragrant, about 1 minute.
4. Sprinkle in the curry powder and ground turmeric, toasting the spices while stirring constantly for 30 seconds to release their oils.
5. Tip: Toasting spices briefly enhances their depth and prevents a raw, gritty taste in the final dish.
6. Add the rinsed red lentils, full-fat coconut milk, and low-sodium vegetable broth, stirring to combine.
7. Bring the mixture to a gentle boil, then reduce the heat to low, cover, and simmer for 20 minutes, stirring occasionally.
8. Tip: A gentle simmer prevents the lentils from breaking down too much, ensuring they retain a slight bite.
9. Uncover the pot and fold in the fresh spinach leaves, allowing them to wilt completely into the curry, about 2–3 minutes.
10. Remove from heat and stir in the freshly squeezed lime juice.
11. Season with fine sea salt, starting with ½ teaspoon and adjusting as needed.
12. Tip: Add salt at the end to control seasoning accurately, as the lentils absorb liquid during cooking.
13. Let the curry rest, uncovered, for 5 minutes to allow the flavors to meld.
Now, ladle the curry into bowls while still warm. Notice how the creamy coconut milk coats each lentil, creating a velvety texture that contrasts with the tender spinach. For a creative twist, serve it over a bed of jasmine rice or with warm naan to soak up every last drop of the fragrant, golden-hued sauce.
Sweet Potato and Black Bean Enchiladas

Finally, let’s create a comforting vegetarian dish that’s both nourishing and deeply satisfying. This recipe transforms humble ingredients into a flavorful meal perfect for weeknight dinners or casual gatherings. Follow these methodical steps to achieve perfectly baked enchiladas every time.
Serving: 6 | Pre Time: 25 minutes | Cooking Time: 35 minutes
Ingredients
– 2 large sweet potatoes, peeled and diced into ½-inch cubes
– 1 tablespoon extra-virgin olive oil
– 1 teaspoon ground cumin
– 1 teaspoon smoked paprika
– ½ teaspoon fine sea salt
– 1 (15-ounce) can black beans, drained and rinsed
– 1 cup shredded Monterey Jack cheese
– ½ cup chopped fresh cilantro
– 12 (6-inch) corn tortillas
– 2 cups red enchilada sauce
– ½ cup crumbled queso fresco
Instructions
1. Preheat your oven to 400°F (204°C) and line a baking sheet with parchment paper.
2. Toss the diced sweet potatoes with extra-virgin olive oil, ground cumin, smoked paprika, and fine sea salt until evenly coated.
3. Spread the seasoned sweet potatoes in a single layer on the prepared baking sheet.
4. Roast the sweet potatoes for 20-25 minutes until tender and lightly caramelized at the edges, stirring once halfway through.
5. Transfer the roasted sweet potatoes to a large mixing bowl and let cool for 5 minutes.
6. Add the drained black beans, shredded Monterey Jack cheese, and chopped fresh cilantro to the bowl with the sweet potatoes.
7. Gently fold the mixture until all ingredients are evenly distributed.
8. Warm the corn tortillas by wrapping them in a damp kitchen towel and microwaving for 30 seconds to make them pliable.
9. Spread ½ cup of red enchilada sauce evenly across the bottom of a 9×13-inch baking dish.
10. Place ⅓ cup of the sweet potato and black bean filling along the center of each warmed tortilla.
11. Roll each tortilla tightly around the filling and place seam-side down in the prepared baking dish.
12. Pour the remaining 1½ cups of red enchilada sauce over the assembled enchiladas, ensuring all surfaces are covered.
13. Sprinkle the crumbled queso fresco evenly over the sauced enchiladas.
14. Cover the baking dish with aluminum foil and bake at 400°F (204°C) for 20 minutes.
15. Remove the foil and continue baking for an additional 10-15 minutes until the cheese is melted and the sauce is bubbling around the edges.
16. Let the enchiladas rest for 5 minutes before serving to allow the filling to set.
Beyond the oven, these enchiladas emerge with a wonderful contrast of textures—the tender sweet potatoes and creamy beans nestled inside slightly chewy tortillas, all enveloped in a tangy, aromatic sauce. For a vibrant presentation, garnish with additional fresh cilantro and serve alongside a crisp jicama slaw to balance the rich flavors.
Mushroom and Cauliflower Shepherd’s Pie

Envision a comforting, savory pie that transforms humble vegetables into a hearty main dish perfect for chilly evenings. This Mushroom and Cauliflower Shepherd’s Pie layers a rich, umami-packed mushroom filling beneath a velvety cauliflower mash, creating a satisfying vegetarian twist on a classic. Follow these methodical steps to build this dish from the ground up, ensuring each component shines.
Serving: 6 | Pre Time: 25 minutes | Cooking Time: 45 minutes
Ingredients
- 1 large head cauliflower, cut into florets
- 2 tablespoons clarified butter
- 1/4 cup heavy cream, warmed
- 1/2 teaspoon freshly grated nutmeg
- 1 tablespoon extra-virgin olive oil
- 1 large yellow onion, finely diced
- 2 cloves garlic, minced
- 1 pound cremini mushrooms, sliced 1/4-inch thick
- 1 tablespoon tomato paste
- 1 cup vegetable broth
- 1 tablespoon Worcestershire sauce
- 1 teaspoon fresh thyme leaves
- 1/2 cup frozen peas
- 1/2 cup grated Parmesan cheese
Instructions
- Preheat your oven to 400°F (204°C).
- Place the cauliflower florets in a large pot and cover with cold water.
- Bring the water to a boil over high heat, then reduce to a simmer and cook for 12-15 minutes until the florets are fork-tender.
- Drain the cauliflower thoroughly in a colander, letting it steam-dry for 2 minutes to remove excess moisture.
- Transfer the drained cauliflower to a food processor.
- Add the clarified butter, warmed heavy cream, and freshly grated nutmeg to the food processor.
- Process the mixture on high for 45-60 seconds until completely smooth and creamy, scraping down the sides once. Tip: Warming the cream prevents the mash from cooling too quickly and ensures a silky texture.
- Heat the extra-virgin olive oil in a large skillet over medium heat.
- Add the finely diced yellow onion and cook for 5-7 minutes, stirring occasionally, until translucent and soft.
- Add the minced garlic and cook for 1 minute until fragrant.
- Increase the heat to medium-high and add the sliced cremini mushrooms.
- Cook the mushrooms for 8-10 minutes, stirring occasionally, until they have released their liquid and are deeply browned. Tip: Avoid overcrowding the pan to allow the mushrooms to sear properly and develop rich flavor.
- Stir in the tomato paste and cook for 1 minute to caramelize slightly.
- Pour in the vegetable broth and Worcestershire sauce, scraping up any browned bits from the bottom of the skillet.
- Add the fresh thyme leaves and bring the mixture to a simmer.
- Cook for 5-7 minutes until the liquid has reduced by half and thickened slightly.
- Stir in the frozen peas and cook for 2 minutes until heated through.
- Transfer the mushroom mixture to a 9×13-inch baking dish, spreading it into an even layer.
- Carefully spread the cauliflower mash over the mushroom layer, sealing it to the edges.
- Sprinkle the grated Parmesan cheese evenly over the top of the cauliflower mash.
- Bake in the preheated oven for 20-25 minutes until the top is golden brown and the filling is bubbling at the edges. Tip: For extra browning, broil for the final 2-3 minutes, watching closely to prevent burning.
- Remove the dish from the oven and let it rest for 10 minutes before serving.
Savor the contrast between the creamy, nutty cauliflower topping and the savory, earthy mushroom filling beneath. The Parmesan forms a delicate, crispy crust that adds a salty counterpoint to the vegetables. For a creative presentation, serve individual portions in rustic bowls garnished with a sprinkle of microgreens or a drizzle of truffle oil to elevate the earthy notes.
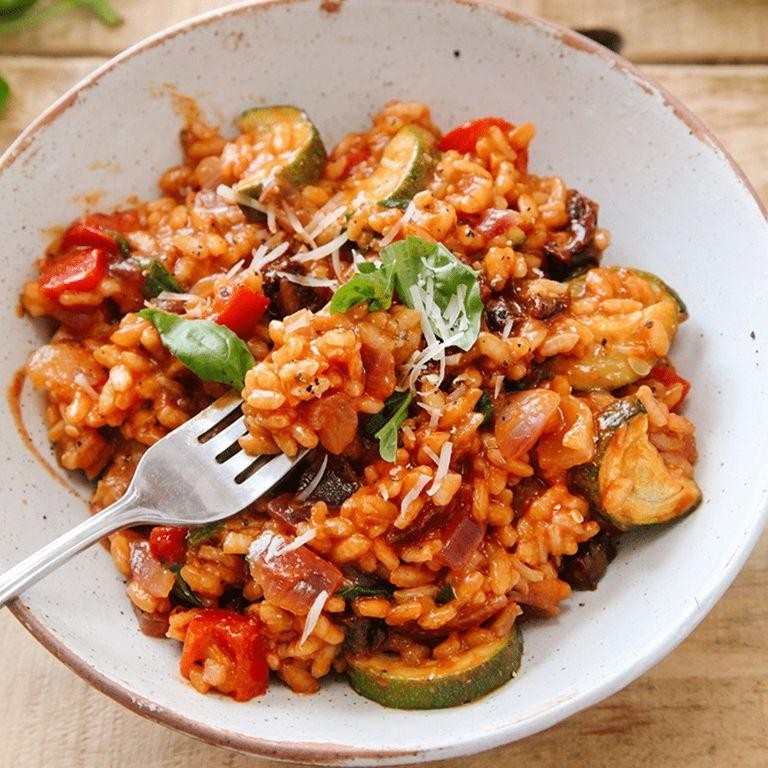
Roasted Eggplant and Tomato Pasta

Just when you need a comforting yet sophisticated weeknight dinner, this roasted eggplant and tomato pasta delivers with minimal effort. Join me in creating a dish where caramelized vegetables meld into a rich, savory sauce that clings perfectly to al dente pasta. We’ll walk through each step methodically to ensure success even if you’re new to roasting vegetables.
Serving: 4 | Pre Time: 15 minutes | Cooking Time: 40 minutes
Ingredients
– 1 large eggplant, cut into 1-inch cubes
– 2 cups cherry tomatoes, halved
– 3 tablespoons extra-virgin olive oil, divided
– 4 cloves garlic, minced
– 1 teaspoon dried oregano
– ½ teaspoon crushed red pepper flakes
– 12 ounces dried rigatoni pasta
– ¼ cup freshly grated Parmigiano-Reggiano cheese
– ¼ cup fresh basil leaves, torn
– Kosher salt and freshly ground black pepper
Instructions
1. Preheat your oven to 425°F and line a large baking sheet with parchment paper.
2. In a large bowl, toss the eggplant cubes and cherry tomato halves with 2 tablespoons of extra-virgin olive oil, 1 teaspoon of kosher salt, and ½ teaspoon of freshly ground black pepper until evenly coated.
3. Spread the vegetables in a single layer on the prepared baking sheet, ensuring they aren’t crowded to promote even roasting.
4. Roast the vegetables in the preheated oven for 25–30 minutes, or until the eggplant is golden brown and tender and the tomatoes have collapsed, stirring halfway through for uniform cooking.
5. While the vegetables roast, bring a large pot of generously salted water to a rolling boil over high heat.
6. Add the rigatoni pasta to the boiling water and cook according to package instructions until al dente, typically 10–12 minutes, then drain, reserving ½ cup of the pasta cooking water.
7. In a large skillet over medium heat, warm the remaining 1 tablespoon of extra-virgin olive oil.
8. Add the minced garlic, dried oregano, and crushed red pepper flakes to the skillet, sautéing for 1–2 minutes until fragrant but not browned to avoid bitterness.
9. Tip the roasted vegetables into the skillet, stirring to combine with the garlic and spices.
10. Add the drained pasta and ¼ cup of the reserved pasta water to the skillet, tossing vigorously to emulsify the sauce and coat the pasta evenly, adding more pasta water if needed for a silky consistency.
11. Remove the skillet from the heat and stir in the freshly grated Parmigiano-Reggiano cheese until melted and creamy.
12. Fold in the torn fresh basil leaves just before serving to preserve their bright color and aroma.
Buttery roasted eggplant and sweet, burst tomatoes create a luxuriously thick sauce that clings to every ridge of the rigatoni. The subtle heat from red pepper flakes and aromatic basil elevate this humble dish, making it ideal for a cozy dinner or elegant enough for guests when garnished with extra cheese and a drizzle of olive oil.
Vegan Caesar Salad with Grilled Tofu

Crafting a satisfying vegan Caesar salad requires thoughtful ingredient swaps and careful technique to achieve the classic creamy, umami-rich profile without animal products. This version features crispy grilled tofu and a cashew-based dressing that delivers depth and texture. Follow these precise steps to create a balanced, restaurant-quality salad at home.
Serving: 4 | Pre Time: 25 minutes | Cooking Time: 15 minutes
Ingredients
– 1 large head of romaine lettuce, washed and torn into bite-sized pieces
– 14 ounces extra-firm tofu, pressed and cut into ½-inch thick slabs
– 1 cup raw cashews, soaked in hot water for 20 minutes
– ¼ cup nutritional yeast
– 2 tablespoons capers, drained
– 2 cloves garlic, minced
– 3 tablespoons freshly squeezed lemon juice
– 2 tablespoons extra-virgin olive oil, plus 1 tablespoon for grilling
– 1 teaspoon Dijon mustard
– ½ teaspoon sea salt
– ¼ teaspoon freshly ground black pepper
– 2 tablespoons vegan Parmesan-style shreds (optional)
Instructions
1. Preheat a grill pan or outdoor grill to medium-high heat (400°F).
2. Brush both sides of the tofu slabs evenly with 1 tablespoon of extra-virgin olive oil.
3. Place tofu on the grill; cook for 5-7 minutes per side until distinct grill marks form and edges are lightly crisped.
4. Transfer grilled tofu to a cutting board; slice into 1-inch strips and set aside.
5. Drain soaked cashews and combine them in a high-speed blender with nutritional yeast, capers, minced garlic, lemon juice, 2 tablespoons extra-virgin olive oil, Dijon mustard, sea salt, and black pepper.
6. Blend on high for 60-90 seconds until the mixture is completely smooth and creamy, scraping down the sides once halfway through.
7. In a large mixing bowl, toss the torn romaine lettuce with ¾ of the prepared dressing until leaves are evenly coated.
8. Divide the dressed lettuce among four plates, arranging it in a loose, layered mound.
9. Artfully arrange the grilled tofu strips over each salad portion.
10. Drizzle the remaining dressing over the tofu and lettuce.
11. Garnish each plate with a sprinkle of vegan Parmesan-style shreds, if using.
12. Serve immediately while the tofu retains its warmth and crisp exterior.
Ultimately, this salad offers a delightful contrast: the cool, crisp romaine against the warm, smoky tofu, all unified by the rich, tangy dressing. For a creative twist, serve it alongside grilled asparagus or atop a slice of toasted sourdough for a hearty open-faced sandwich.
Cashew Alfredo with Broccoli and Peas
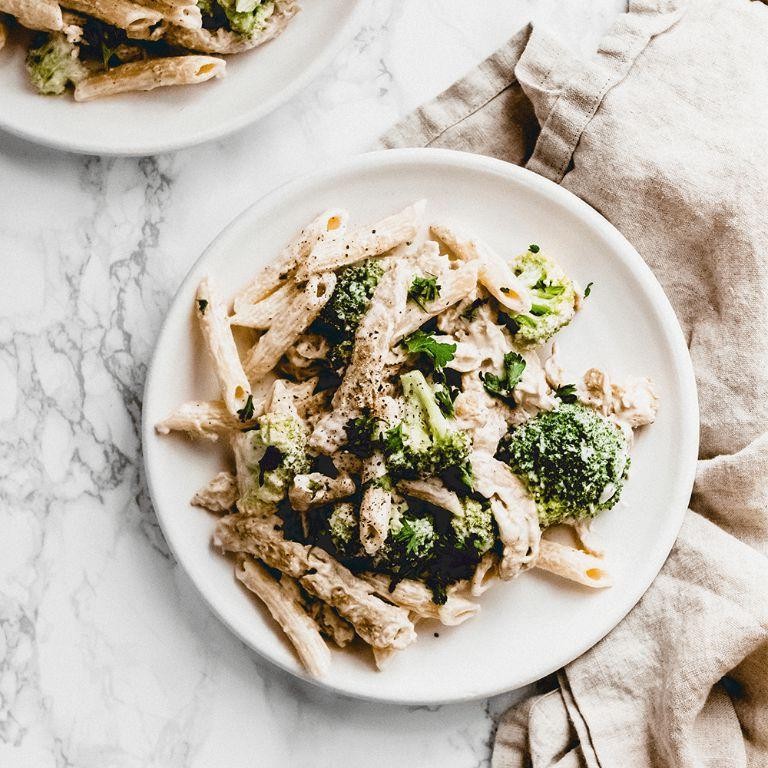
Venturing into plant-based comfort food, this creamy cashew Alfredo transforms simple ingredients into a luxurious pasta dish. By blending soaked cashews into a velvety sauce, we’ll create a rich base that clings beautifully to fettuccine while roasted broccoli and sweet peas add vibrant color and texture. Follow each step precisely for a restaurant-quality result you can achieve in your own kitchen.
Serving: 4 | Pre Time: 20 minutes | Cooking Time: 25 minutes
Ingredients
– 1 cup raw cashews, soaked overnight
– 12 ounces dried fettuccine pasta
– 3 cups broccoli florets, cut into uniform 1-inch pieces
– 1 cup frozen petite peas
– 4 cloves garlic, minced
– 2 tablespoons extra-virgin olive oil
– 1 tablespoon nutritional yeast
– 1 teaspoon freshly squeezed lemon juice
– ½ teaspoon freshly grated nutmeg
– ½ teaspoon fine sea salt
– ¼ teaspoon freshly ground black pepper
– 2 cups filtered water, warmed to 120°F
Instructions
1. Drain the soaked raw cashews and transfer them to a high-speed blender.
2. Add the warmed filtered water, nutritional yeast, minced garlic, lemon juice, nutmeg, sea salt, and black pepper to the blender.
3. Blend the mixture on high speed for 90 seconds until completely smooth and creamy, scraping down the sides once with a rubber spatula.
4. Preheat your oven to 425°F and line a baking sheet with parchment paper.
5. Toss the broccoli florets with 1 tablespoon of extra-virgin olive oil on the prepared baking sheet, arranging them in a single layer.
6. Roast the broccoli for 18-20 minutes until the edges are caramelized and the stems are fork-tender, rotating the pan halfway through cooking.
7. While the broccoli roasts, bring a large pot of generously salted water to a rolling boil over high heat.
8. Add the dried fettuccine pasta to the boiling water and cook for 9-11 minutes until al dente, stirring occasionally to prevent sticking.
9. During the last 2 minutes of pasta cooking, add the frozen petite peas directly to the boiling water to blanch them.
10. Reserve ½ cup of the starchy pasta cooking water, then drain the pasta and peas thoroughly in a colander.
11. Return the drained pasta and peas to the warm pot and immediately pour in the blended cashew sauce.
12. Toss the pasta with the sauce over low heat for 2-3 minutes, adding reserved pasta water 1 tablespoon at a time until the sauce reaches a silky consistency that coats each strand.
13. Gently fold in the roasted broccoli florets, being careful not to break them apart.
14. Drizzle the remaining 1 tablespoon of extra-virgin olive oil over the finished dish and toss once more to combine.
15. Divide the pasta among four warmed bowls and serve immediately.
Glistening with a velvety sauce that clings to every strand of pasta, this dish offers a surprisingly rich mouthfeel from the blended cashews. The roasted broccoli provides satisfying caramelized notes that contrast beautifully with the sweet pop of peas—try garnishing with toasted pine nuts or a sprinkle of smoked paprika for an elegant presentation that elevates the humble ingredients.
Butternut Squash and Kale Stew

Embrace the cozy flavors of fall with this hearty, nutrient-packed stew that transforms humble ingredients into a comforting meal. Perfect for chilly evenings, this one-pot wonder combines sweet butternut squash with earthy kale in a savory broth that simmers to perfection. Follow these clear steps to create a dish that’s both nourishing and deeply satisfying.
Serving: 4 | Pre Time: 15 minutes | Cooking Time: 35 minutes
Ingredients
– 2 tablespoons extra-virgin olive oil
– 1 medium yellow onion, finely diced
– 3 cloves garlic, minced
– 1 medium butternut squash (about 2 pounds), peeled, seeded, and cut into 1-inch cubes
– 4 cups low-sodium vegetable broth
– 1 (14.5-ounce) can diced tomatoes, undrained
– 1 teaspoon dried thyme
– ½ teaspoon smoked paprika
– ¼ teaspoon red pepper flakes
– 1 bunch lacinato kale (about 8 ounces), stems removed and leaves torn into bite-sized pieces
– 1 (15-ounce) can cannellini beans, rinsed and drained
– Kosher salt and freshly ground black pepper, to taste
Instructions
1. Heat 2 tablespoons extra-virgin olive oil in a large Dutch oven or heavy-bottomed pot over medium heat until shimmering, about 2 minutes.
2. Add 1 medium yellow onion, finely diced, and cook, stirring occasionally, until translucent and softened, 5–7 minutes.
3. Stir in 3 cloves garlic, minced, and cook until fragrant, 30 seconds.
4. Add 1 medium butternut squash, peeled, seeded, and cut into 1-inch cubes, and cook, stirring occasionally, for 5 minutes to lightly brown the edges.
5. Pour in 4 cups low-sodium vegetable broth and 1 (14.5-ounce) can diced tomatoes, undrained, scraping the bottom of the pot to release any browned bits.
6. Stir in 1 teaspoon dried thyme, ½ teaspoon smoked paprika, and ¼ teaspoon red pepper flakes.
7. Bring the mixture to a boil, then reduce the heat to low, cover, and simmer until the squash is tender when pierced with a fork, 20–25 minutes.
8. Add 1 bunch lacinato kale, stems removed and leaves torn into bite-sized pieces, and 1 (15-ounce) can cannellini beans, rinsed and drained, stirring until the kale wilts, about 5 minutes.
9. Season with kosher salt and freshly ground black pepper to taste, then remove from heat.
Just ladle this stew into bowls while hot, noting how the butternut squash softens into creamy bites that contrast with the tender kale and hearty beans. The smoky paprika and hint of heat from the red pepper flakes create a warm, layered flavor that deepens as it rests. For a creative twist, top it with a dollop of garlicky yogurt or serve alongside crusty whole-grain bread to soak up every last drop of the savory broth.
Quinoa and Lentil Veggie Burger
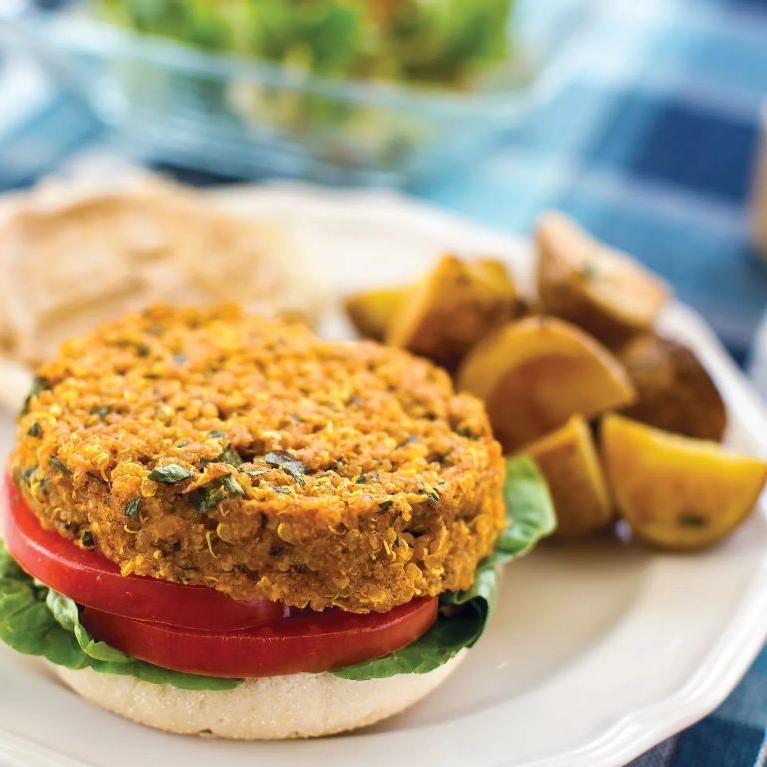
Gone are the days of bland veggie burgers that crumble at first bite. This quinoa and lentil version delivers a hearty, satisfying patty with a perfect balance of earthy flavors and a firm yet tender texture that holds together beautifully on the bun. Let’s build it step by step, focusing on technique for the best results.
Serving: 4 | Pre Time: 25 minutes | Cooking Time: 15 minutes
Ingredients
– ¾ cup dry quinoa, rinsed
– ½ cup dry green lentils, rinsed
– 2 cups vegetable broth
– 1 large pasture-raised egg, lightly beaten
– ½ cup finely diced yellow onion
– 2 cloves garlic, minced
– ½ cup rolled oats (old-fashioned)
– 2 tbsp extra-virgin olive oil, divided
– 1 tsp smoked paprika
– ½ tsp ground cumin
– ¼ tsp fine sea salt
– ¼ tsp freshly ground black pepper
– 4 whole-grain burger buns
– 4 leaves butter lettuce
– 4 slices heirloom tomato
– 4 tbsp garlic aioli
Instructions
1. In a medium saucepan, combine the rinsed quinoa, rinsed lentils, and vegetable broth. Bring to a boil over high heat, then reduce heat to low, cover, and simmer for 18 minutes until the liquid is absorbed and the grains are tender. Tip: Let the mixture cool completely in the pan to prevent a gummy texture.
2. While the grains cool, heat 1 tablespoon of extra-virgin olive oil in a small skillet over medium heat. Add the finely diced yellow onion and sauté for 5 minutes until translucent and softened.
3. Add the minced garlic to the skillet and cook for 1 minute until fragrant, then remove from heat and let cool slightly.
4. Transfer the cooled quinoa-lentil mixture to a large mixing bowl. Add the sautéed onion-garlic mixture, lightly beaten pasture-raised egg, rolled oats, smoked paprika, ground cumin, fine sea salt, and freshly ground black pepper.
5. Using a fork or your hands, mix thoroughly until all ingredients are evenly incorporated and the mixture holds together when pressed. Tip: If the mixture feels too wet, add 1 more tablespoon of rolled oats; if too dry, add 1 teaspoon of water.
6. Divide the mixture into 4 equal portions and shape each into a ¾-inch thick patty, pressing firmly to compact. Place on a parchment-lined plate and refrigerate for 10 minutes to firm up.
7. Heat the remaining 1 tablespoon of extra-virgin olive oil in a large non-stick skillet or griddle over medium heat. Carefully add the patties and cook for 5 minutes until the bottom is golden brown and crisp.
8. Flip the patties using a thin spatula and cook for another 5 minutes until the second side is golden brown and the internal temperature reaches 165°F. Tip: Avoid pressing down on the patties while cooking to retain moisture.
9. While the patties cook, lightly toast the whole-grain burger buns in a toaster or on the skillet for 1-2 minutes until warm and slightly crisp.
10. To assemble, spread 1 tablespoon of garlic aioli on the bottom half of each toasted bun. Top with a cooked patty, 1 leaf of butter lettuce, and 1 slice of heirloom tomato, then cover with the top bun.
What makes this burger exceptional is its substantial, meaty bite from the lentils and quinoa, complemented by the smoky paprika and earthy cumin. The crisp exterior gives way to a moist, flavorful interior that pairs wonderfully with the creamy aioli and fresh toppings. For a creative twist, crumble a patty over a salad or serve it open-faced with a fried egg on top for a hearty breakfast.
Stuffed Portobello Mushrooms with Herb Quinoa
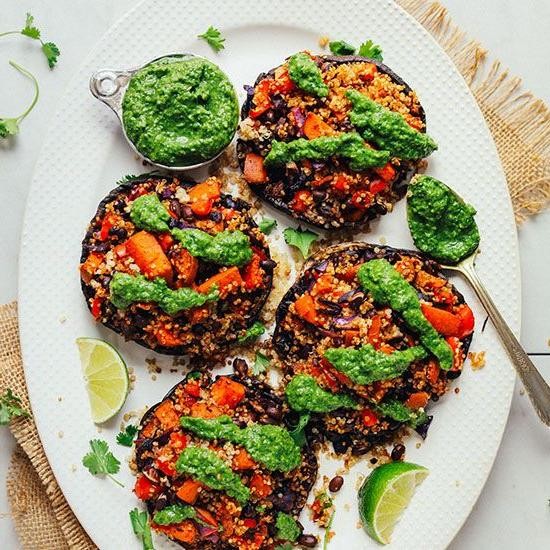
Ever find yourself craving a hearty yet healthy meal that feels indulgent but won’t weigh you down? These stuffed portobello mushrooms are your answer, combining earthy flavors with a protein-packed quinoa filling that’s surprisingly simple to make from scratch. Let’s walk through each step together to ensure perfect results every time.
Serving: 4 | Pre Time: 20 minutes | Cooking Time: 35 minutes
Ingredients
– 4 large portobello mushroom caps, stems and gills removed
– 1 cup uncooked quinoa, rinsed thoroughly
– 2 cups vegetable broth
– 2 tablespoons clarified butter
– 1 small yellow onion, finely diced
– 2 cloves garlic, minced
– 1/4 cup fresh parsley, finely chopped
– 1 tablespoon fresh thyme leaves
– 1/2 cup grated Parmesan cheese
– 1/4 cup pine nuts, toasted
– 1 tablespoon extra-virgin olive oil
– 1/2 teaspoon kosher salt
– 1/4 teaspoon freshly ground black pepper
Instructions
1. Preheat your oven to 400°F and line a baking sheet with parchment paper.
2. Brush the portobello caps with extra-virgin olive oil and season both sides with kosher salt and freshly ground black pepper.
3. Arrange the mushrooms gill-side up on the prepared baking sheet and roast for 15 minutes until they release their liquid and become tender.
4. While the mushrooms roast, heat clarified butter in a medium saucepan over medium heat until shimmering.
5. Add the finely diced yellow onion and sauté for 5-7 minutes until translucent and fragrant.
6. Stir in the minced garlic and cook for 1 additional minute, being careful not to let it brown.
7. Add the rinsed quinoa to the saucepan and toast for 2 minutes, stirring constantly to coat each grain with butter.
8. Pour in the vegetable broth, bring to a boil, then reduce heat to low, cover, and simmer for 15 minutes until the liquid is absorbed.
9. Remove the quinoa from heat, fluff with a fork, and let it rest covered for 5 minutes to finish steaming.
10. Transfer the cooked quinoa to a mixing bowl and fold in the finely chopped parsley, fresh thyme leaves, grated Parmesan cheese, and toasted pine nuts.
11. Carefully spoon the quinoa mixture into the roasted portobello caps, mounding it slightly.
12. Return the stuffed mushrooms to the oven and bake for 10 minutes at 400°F until the filling is heated through and the cheese melts.
13. For a golden finish, broil the mushrooms for 2-3 minutes, watching closely to prevent burning.
14. Remove from the oven and let rest for 5 minutes before serving to allow the flavors to meld.
Finally, you’ll notice the mushrooms become meaty and tender while the quinoa filling stays light and fluffy with pops of nutty crunch from the pine nuts. For an elegant presentation, drizzle with a balsamic reduction or serve alongside a simple arugula salad dressed with lemon vinaigrette.
Spicy Vegetable Stir-Fry with Tofu
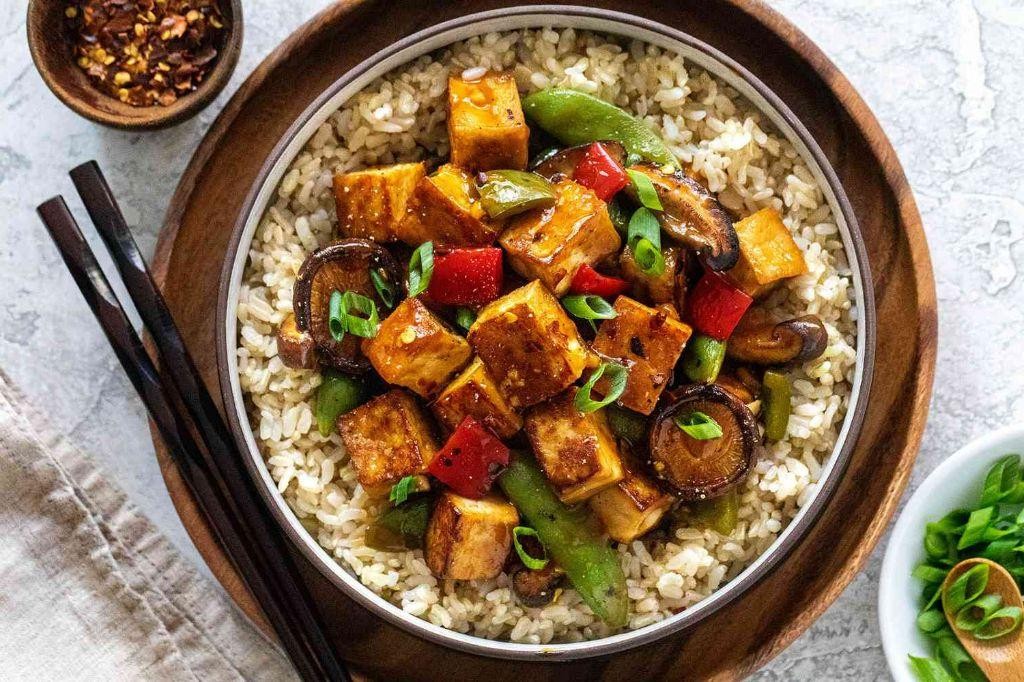
Many home cooks find stir-frying intimidating, but this Spicy Vegetable Stir-Fry with Tofu breaks the process into manageable, foolproof steps that build flavor and texture methodically. Mastering the high-heat technique ensures crisp-tender vegetables and perfectly seared tofu every time.
Serving: 4 | Pre Time: 20 minutes | Cooking Time: 15 minutes
Ingredients
– 1 (14-ounce) block extra-firm tofu, pressed and cubed into 1-inch pieces
– 3 tablespoons refined avocado oil, divided
– 1 tablespoon toasted sesame oil
– 4 cloves garlic, minced
– 1 tablespoon freshly grated ginger
– 1 large red bell pepper, julienned
– 2 medium carrots, cut into ¼-inch diagonal slices
– 1 small head broccoli, cut into small florets
– 4 ounces shiitake mushrooms, stems removed and caps sliced
– 3 tablespoons low-sodium soy sauce
– 2 tablespoons rice vinegar
– 1 tablespoon sambal oelek
– 1 teaspoon granulated sugar
– 2 scallions, thinly sliced
– 1 tablespoon toasted sesame seeds
Instructions
1. Press the tofu block between paper towels with a heavy skillet for 15 minutes to remove excess moisture, then cut into 1-inch cubes.
2. Heat 2 tablespoons of refined avocado oil in a large wok or skillet over high heat until shimmering, about 1 minute.
3. Add the tofu cubes in a single layer and cook undisturbed for 3–4 minutes until golden brown on one side.
4. Flip each tofu piece and cook for another 3–4 minutes until all sides are crisped, then transfer to a plate.
5. Reduce heat to medium-high and add the remaining 1 tablespoon of refined avocado oil and toasted sesame oil to the wok.
6. Add minced garlic and grated ginger, stirring constantly for 30 seconds until fragrant but not browned.
7. Increase heat to high and add julienned red bell pepper and carrot slices, stir-frying for 2 minutes until slightly softened.
8. Tip: Add vegetables in order of density—carrots and peppers first—to ensure even cooking.
9. Incorporate broccoli florets and sliced shiitake mushrooms, continuing to stir-fry for 3–4 minutes until vegetables are crisp-tender.
10. In a small bowl, whisk together low-sodium soy sauce, rice vinegar, sambal oelek, and granulated sugar until the sugar dissolves.
11. Return the crisped tofu to the wok with the vegetables.
12. Pour the sauce mixture over the tofu and vegetables, tossing vigorously to coat everything evenly for 1 minute until the sauce thickens slightly.
13. Tip: A quick toss over high heat helps the sauce cling to the ingredients without making them soggy.
14. Remove from heat and fold in sliced scallions and toasted sesame seeds.
15. Tip: Let the stir-fry rest for 2 minutes off the heat to allow the flavors to meld before serving.
Delightfully, this dish balances crisp tofu edges with vibrant, tender-crisp vegetables in a glossy, umami-rich sauce. The sambal oelek provides a steady, building heat that complements the savory soy and bright rice vinegar. Serve it over steamed jasmine rice or alongside cold sesame noodles for a satisfying meal that highlights textural contrasts.
Coconut Curry with Chickpeas and Spinach

Aromatic and deeply satisfying, this coconut curry with chickpeas and spinach is a vibrant one-pot meal that comes together with minimal effort. As we walk through each step, you’ll learn how to layer flavors and achieve a perfectly balanced, creamy sauce that clings beautifully to the chickpeas and wilted greens.
Serving: 4 | Pre Time: 15 minutes | Cooking Time: 25 minutes
Ingredients
– 2 tablespoons clarified butter (ghee)
– 1 large yellow onion, finely diced
– 3 cloves garlic, minced
– 1 tablespoon freshly grated ginger
– 2 tablespoons red curry paste
– 1 (13.5-ounce) can full-fat coconut milk
– 1 cup vegetable broth
– 2 (15-ounce) cans chickpeas, drained and rinsed
– 5 ounces fresh baby spinach leaves
– 1 tablespoon freshly squeezed lime juice
– 1/4 cup fresh cilantro leaves, roughly chopped
– Kosher salt, as needed
Instructions
1. Heat the clarified butter in a large Dutch oven or heavy-bottomed pot over medium heat until shimmering, about 2 minutes.
2. Add the finely diced yellow onion and cook, stirring occasionally, until translucent and lightly golden, 6–8 minutes.
3. Stir in the minced garlic and freshly grated ginger, cooking until fragrant, about 1 minute.
4. Add the red curry paste and cook, stirring constantly, for 1 full minute to toast the spices and deepen their flavor.
5. Pour in the full-fat coconut milk and vegetable broth, scraping the bottom of the pot to incorporate any browned bits.
6. Bring the mixture to a gentle simmer over medium heat, then reduce to maintain a low simmer.
7. Add the drained and rinsed chickpeas, stirring to coat them in the sauce.
8. Simmer uncovered for 15 minutes, stirring occasionally, to allow the flavors to meld and the sauce to thicken slightly.
9. Stir in the fresh baby spinach leaves, one handful at a time, until just wilted, about 2 minutes.
10. Remove the pot from the heat and stir in the freshly squeezed lime juice and roughly chopped fresh cilantro leaves.
11. Season with kosher salt as needed, starting with 1/2 teaspoon and adjusting to your preference.
Zesty and creamy, this curry boasts a velvety texture from the coconut milk that perfectly coats the tender chickpeas. The wilted spinach adds a pop of color and a delicate earthiness, while the lime juice provides a bright, finishing acidity. For a creative twist, serve it over a bed of jasmine rice or with warm naan bread to soak up every last drop of the fragrant sauce.
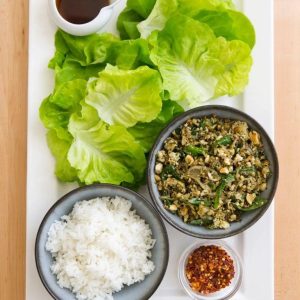
Thai Basil and Tofu Lettuce Wraps
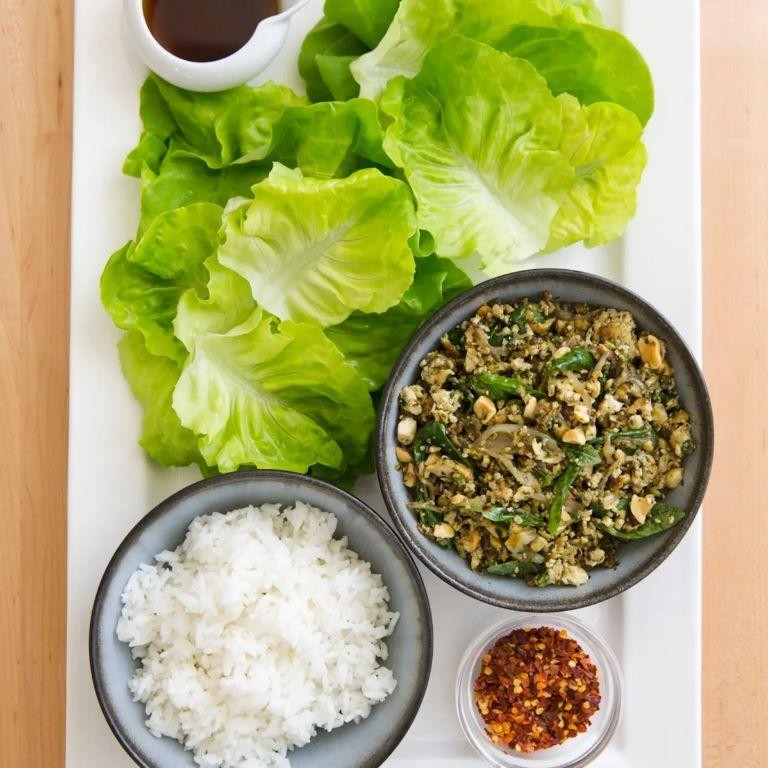
Perfect for a quick, flavorful weeknight dinner, these Thai Basil and Tofu Lettuce Wraps come together with minimal fuss. Preparing them involves a simple stir-fry technique that yields a vibrant, aromatic filling ready to be tucked into crisp lettuce leaves.
Serving: 4 | Prep Time: 20 minutes | Cooking Time: 15 minutes
Ingredients
- 1 (14-ounce) block extra-firm tofu, pressed and crumbled
- 2 tablespoons toasted sesame oil
- 3 cloves garlic, finely minced
- 1 tablespoon fresh ginger, finely grated
- 1 medium shallot, thinly sliced
- 2 Thai bird’s eye chilies, thinly sliced (seeds removed for less heat)
- 3 tablespoons soy sauce
- 1 tablespoon oyster sauce
- 1 teaspoon granulated sugar
- 1 cup fresh Thai basil leaves, loosely packed
- 1 head butter lettuce, leaves separated and washed
- 1 lime, cut into wedges
Instructions
- Place the crumbled tofu between several layers of paper towels and press firmly for 10 minutes to remove excess moisture.
- Heat the toasted sesame oil in a large wok or skillet over medium-high heat until it shimmers, about 90 seconds.
- Add the minced garlic, grated ginger, sliced shallot, and sliced chilies to the hot oil. Stir-fry for 45 seconds until fragrant but not browned.
- Increase the heat to high and add the pressed, crumbled tofu to the wok. Cook, stirring frequently, for 5-7 minutes until the tofu is lightly golden and has a slightly dry, crumbly texture.
- Pour the soy sauce, oyster sauce, and granulated sugar over the tofu mixture. Stir continuously for 2 minutes until the sauces are fully incorporated and coat the tofu evenly.
- Remove the wok from the heat and immediately stir in the fresh Thai basil leaves until just wilted, about 30 seconds. Tip: Adding the basil off the heat preserves its vibrant color and delicate aroma.
- Arrange the clean, dry butter lettuce leaves on a serving platter. Tip: Pat the lettuce leaves completely dry to prevent the filling from making them soggy.
- Spoon the hot tofu and basil mixture into the center of each lettuce leaf.
- Serve immediately with lime wedges on the side for squeezing. Tip: For optimal texture, assemble the wraps just before serving to maintain the contrast between the warm filling and cool, crisp lettuce.
You’ll find the filling boasts a satisfying, crumbly texture from the well-browned tofu, perfectly contrasted by the cool, crisp lettuce cup. The flavor profile is a bold harmony of savory, sweet, and spicy notes, punctuated by the distinct licorice-like aroma of fresh Thai basil. For a creative presentation, serve the components family-style and let guests assemble their own wraps, offering additional toppings like pickled vegetables or crushed roasted peanuts.
Conclusion
Craving something wholesome and satisfying? This collection proves that vegan, gluten-free dinners can be incredibly delicious and easy to make. We hope you find a new favorite to savor tonight! Don’t forget to leave a comment telling us which recipe you loved most and share this roundup on Pinterest to inspire other home cooks.