Hearts are fluttering and chocolate is calling your name! Whether you’re planning a romantic dinner for two or just want to sweeten the day, these Valentine’s Day desserts are guaranteed to impress your special someone. From decadent chocolate creations to elegant fruit-forward treats, we’ve gathered 24 irresistible recipes that will make your celebration unforgettable. Get ready to fall in love with these delicious ideas—let’s dive in!
Chocolate-Dipped Strawberries with a Twist
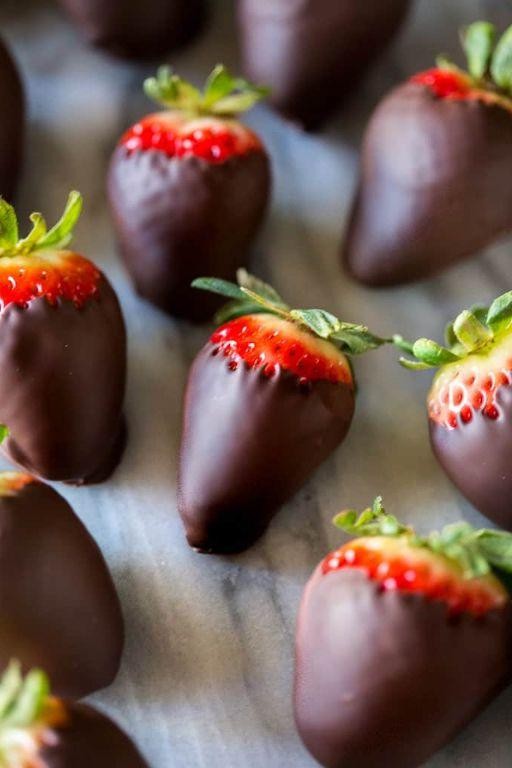
Make your basic chocolate-dipped strawberries a distant memory. Melt, dip, and dazzle with these upgraded beauties that bring the crunch and zing your dessert table deserves. Trust me, your followers will beg for the recipe.
20
strawberries15
minutes5
minutesIngredients
– 1 pound of fresh strawberries (the bigger, the better for dipping)
– 8 ounces of high-quality dark chocolate chips
– 1 cup of crushed pretzels (for that salty-sweet crunch)
– 1/2 cup of white chocolate chips
– A splash of coconut oil (about 1 tablespoon)
– A couple of pinches of flaky sea salt
Instructions
1. Rinse 1 pound of fresh strawberries under cool water and pat them completely dry with paper towels.
2. Line a baking sheet with parchment paper.
3. Pour 1 cup of crushed pretzels into a shallow bowl.
4. Melt 8 ounces of dark chocolate chips with 1 tablespoon of coconut oil in a microwave-safe bowl, heating in 30-second bursts and stirring between each until smooth.
5. Hold a strawberry by the stem and dip it halfway into the melted dark chocolate, letting excess drip back into the bowl.
6. Immediately roll the chocolate-dipped portion in the crushed pretzels to coat evenly.
7. Place the strawberry on the prepared baking sheet.
8. Repeat steps 5-7 with all remaining strawberries.
9. Melt 1/2 cup of white chocolate chips in another microwave-safe bowl using the same 30-second burst method.
10. Drizzle the melted white chocolate over the pretzel-coated strawberries using a fork or piping bag.
11. Sprinkle a couple of pinches of flaky sea salt over the strawberries while the chocolate is still wet.
12. Refrigerate the baking sheet for 20-25 minutes, or until all chocolate coatings are completely set and firm to the touch.
13. Remove from refrigerator and serve immediately.
These treats deliver an addictive crunch from the pretzels against the rich dark chocolate, while the sea salt and white chocolate drizzle balance each bite perfectly. Try stacking them on a tiered stand for your next gathering or packing them in mini cupcake liners for easy grab-and-go indulgence.
Decadent Red Velvet Cupcakes with Cream Cheese Frosting
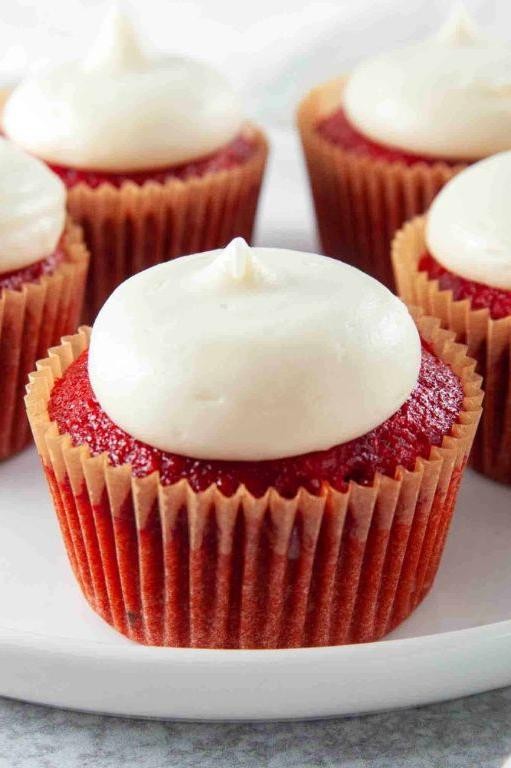
Tired of basic desserts? These red velvet cupcakes deliver that iconic crimson crumb with tangy cream cheese frosting that’ll have everyone begging for your recipe.
12
cupcakes20
minutes20
minutesIngredients
– 1 and ½ cups all-purpose flour
– 1 cup granulated sugar
– ½ cup unsalted butter, softened
– 2 large eggs
– ¾ cup buttermilk
– 2 tablespoons cocoa powder
– 1 tablespoon red food coloring
– 1 teaspoon vanilla extract
– 1 teaspoon baking soda
– 1 teaspoon white vinegar
– A pinch of salt
– 8 ounces cream cheese, room temp
– 4 tablespoons butter, softened
– 2 cups powdered sugar
– A splash of vanilla extract
Instructions
1. Preheat your oven to 350°F and line a muffin tin with 12 cupcake liners.
2. Whisk together flour, cocoa powder, and salt in a medium bowl.
3. Beat softened butter and sugar with an electric mixer on medium speed for 2 minutes until light and fluffy.
4. Add eggs one at a time, beating well after each addition.
5. Mix in vanilla extract and red food coloring until the batter is uniformly crimson.
6. Alternate adding the dry ingredients and buttermilk to the butter mixture, beginning and ending with dry ingredients.
7. In a small cup, quickly stir together baking soda and vinegar until it foams.
8. Immediately fold the foaming vinegar mixture into the batter until just combined.
9. Divide the batter evenly among the 12 cupcake liners, filling each about ⅔ full.
10. Bake for 18-20 minutes until a toothpick inserted in the center comes out clean.
11. Cool cupcakes in the pan for 5 minutes, then transfer to a wire rack to cool completely.
12. For the frosting, beat room temperature cream cheese and butter together until smooth.
13. Gradually add powdered sugar while mixing on low speed to prevent a sugar cloud.
14. Beat in vanilla extract until the frosting is creamy and spreadable.
15. Frost cooled cupcakes using a piping bag or offset spatula.
Crave that perfect bite? The tender, moist crumb contrasts beautifully with the tangy cream cheese frosting. Try topping with crushed red velvet crumbs for extra texture, or serve slightly chilled for a firmer frosting that holds its shape.
Heart-Shaped Raspberry Linzer Cookies
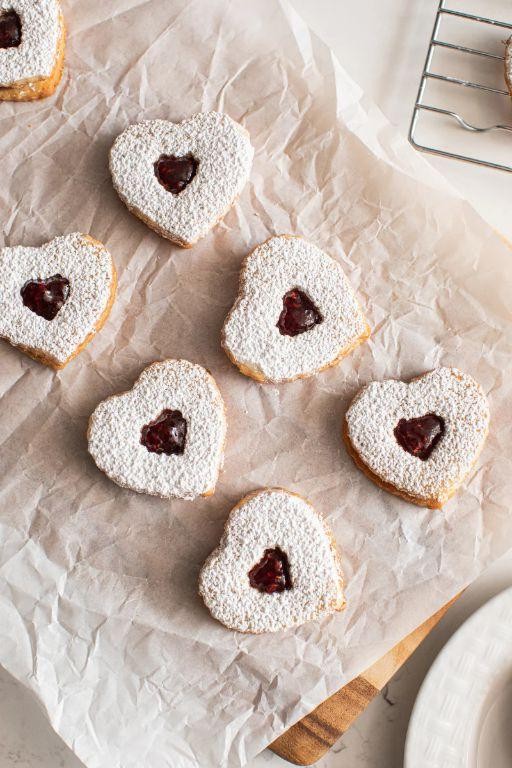
Craving something sweet and adorable? These heart-shaped raspberry linzer cookies will steal your Valentine’s Day—or any day. Combine buttery shortbread with tart jam for a treat that’s as pretty as it is delicious.
24
cookies30
minutes12
minutesIngredients
– 2 cups all-purpose flour
– 1 cup unsalted butter (softened)
– 1/2 cup granulated sugar
– 1 large egg
– 1 tsp vanilla extract
– A pinch of salt
– 1/2 cup raspberry jam
– A dusting of powdered sugar
Instructions
1. Beat 1 cup softened unsalted butter and 1/2 cup granulated sugar in a bowl with a hand mixer on medium speed for 2 minutes until fluffy.
2. Crack in 1 large egg and add 1 tsp vanilla extract, then mix for 30 seconds until just combined—don’t overmix to keep cookies tender.
3. Whisk 2 cups all-purpose flour and a pinch of salt in a separate bowl, then gradually stir into the wet ingredients until a dough forms.
4. Divide the dough in half, flatten each into a disc, wrap in plastic, and chill in the fridge for 1 hour to prevent spreading.
5. Preheat your oven to 350°F and line two baking sheets with parchment paper.
6. Roll one dough disc on a floured surface to 1/4-inch thickness, then use a heart-shaped cookie cutter to cut out bases.
7. Cut centers from half the hearts with a smaller heart cutter to create “windows” for the jam.
8. Arrange all pieces 1 inch apart on baking sheets and bake for 10–12 minutes until edges are lightly golden.
9. Cool cookies completely on a wire rack for 15 minutes to avoid jam melting.
10. Spread 1/2 tsp raspberry jam on each solid heart base, then top with a windowed heart.
11. Dust the assembled cookies with powdered sugar using a fine-mesh sieve for even coverage.
Rich, buttery layers crumble with each bite, revealing a tangy raspberry center. Serve them stacked on a vintage plate for a cozy tea time or pack in a cute box for gifting—they’re almost too pretty to eat!
Rich and Creamy Chocolate Mousse
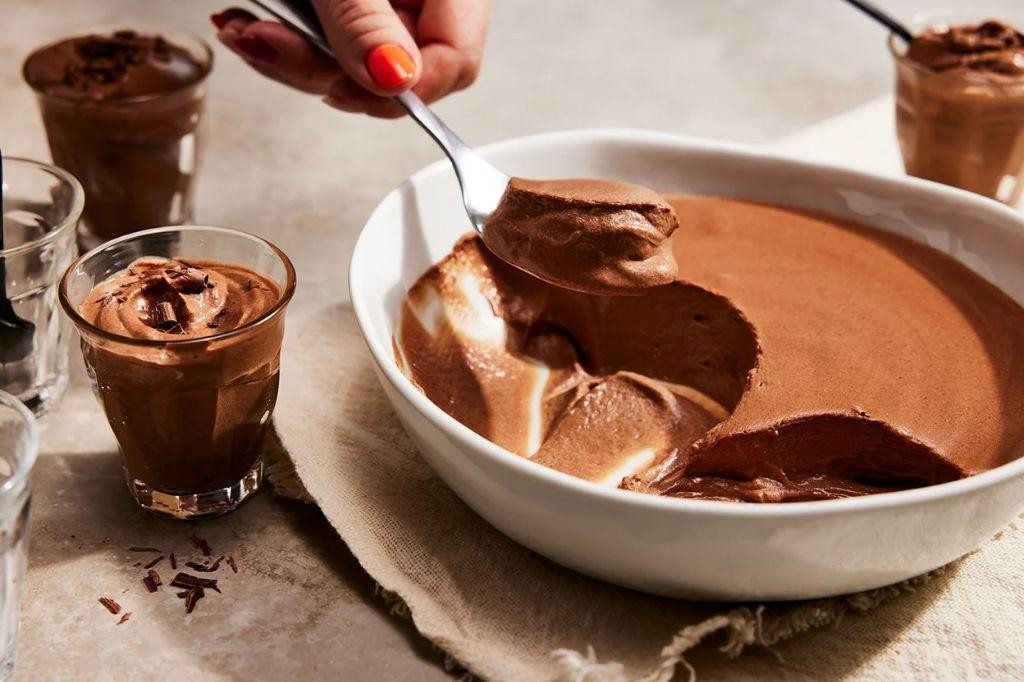
Forget complicated desserts—this chocolate mousse delivers maximum indulgence with minimal effort. Fold together rich chocolate and fluffy cream for a dessert that’s impossibly smooth and decadent. Trust me, your spoon will keep diving back in for more.
5
servings5
minutesIngredients
– 8 ounces of high-quality dark chocolate, chopped
– 3 large eggs, separated
– 2 tablespoons of granulated sugar
– 1 cup of heavy cream
– A pinch of salt
– A splash of vanilla extract
Instructions
1. Chop 8 ounces of dark chocolate into small, even pieces for quick melting.
2. Melt the chocolate in a heatproof bowl set over a saucepan of gently simmering water, stirring until completely smooth.
3. Remove the melted chocolate from heat and let it cool for 5 minutes to avoid scrambling the eggs.
4. Separate 3 eggs, placing the yolks in one bowl and the whites in a clean, dry mixing bowl.
5. Whisk the egg yolks into the cooled chocolate until fully combined and glossy.
6. Add a splash of vanilla extract to the chocolate mixture and stir to incorporate.
7. In a separate bowl, whip 1 cup of heavy cream with an electric mixer on medium-high speed until stiff peaks form, about 3–4 minutes.
8. Gently fold one-third of the whipped cream into the chocolate mixture to lighten it.
9. Fold in the remaining whipped cream until no white streaks remain, being careful not to deflate the mixture.
10. Clean the mixer beaters thoroughly to ensure the egg whites whip properly.
11. Add a pinch of salt to the egg whites and whip on medium speed until foamy, about 1 minute.
12. Gradually add 2 tablespoons of sugar while whipping, then increase speed to high and whip until glossy, stiff peaks form, about 2–3 more minutes.
13. Fold the whipped egg whites into the chocolate mixture in two additions, using a spatula and cutting through the center each time to maintain airiness.
14. Divide the mousse evenly among 4–6 serving glasses or ramekins.
15. Chill the mousse in the refrigerator for at least 4 hours, or until set and firm.
Not just a dessert—this mousse is a textural dream with velvety richness that melts on your tongue. Layer it with fresh berries for a stunning parfait, or top with shaved chocolate and a sprinkle of sea salt for an elegant finish. Each spoonful is pure, unapologetic chocolate bliss.
Luscious Lemon Tart with Berry Garnish
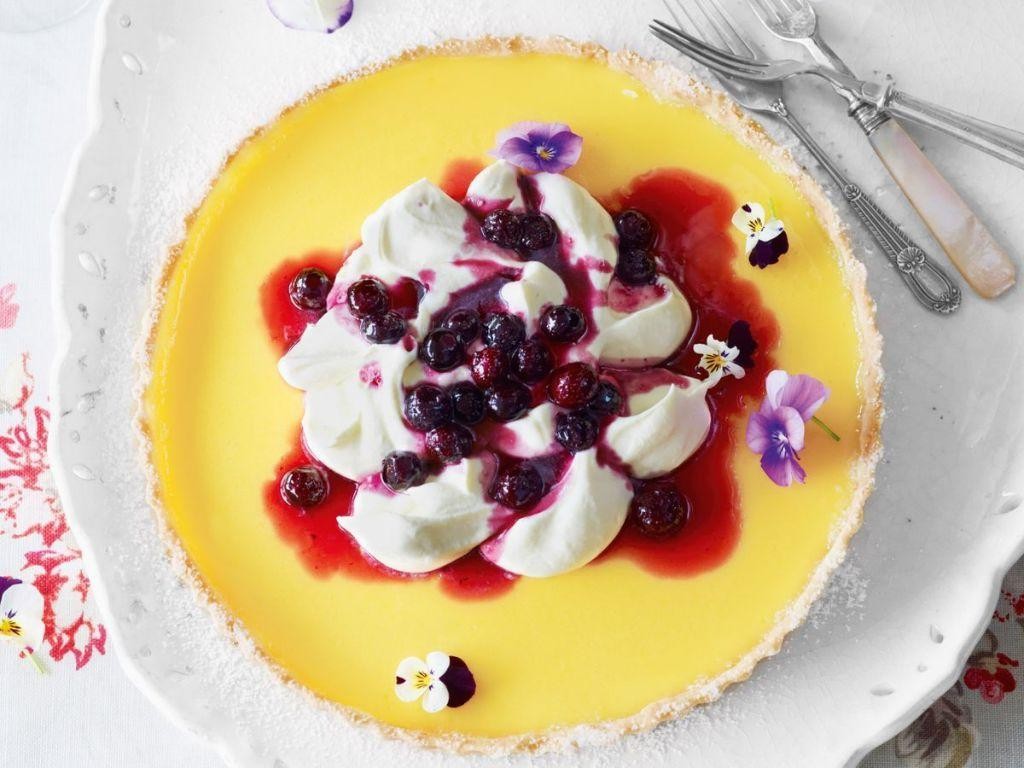
Get ready to wow your taste buds with this sunshine-bright lemon tart that’s about to become your new dessert obsession. Grab your berries and let’s make magic happen—this beauty comes together faster than you can scroll through your feed.
8
servings25
minutes45
minutesIngredients
– 1 ½ cups of all-purpose flour
– A good pinch of salt
– ½ cup of cold cubed butter
– 3 tablespoons of ice water
– 4 large eggs
– 1 cup of granulated sugar
– ½ cup of fresh lemon juice
– 2 tablespoons of lemon zest
– A splash of heavy cream
– A handful of mixed fresh berries
– A dusting of powdered sugar
Instructions
1. Preheat your oven to 375°F.
2. Combine 1 ½ cups flour and a pinch of salt in a large bowl.
3. Cut in ½ cup cold cubed butter until the mixture resembles coarse crumbs.
4. Sprinkle 3 tablespoons ice water over the mixture and mix until the dough comes together.
5. Press the dough into a 9-inch tart pan, making sure to push it up the sides evenly.
6. Chill the crust in the freezer for 15 minutes to prevent shrinking.
7. Bake the crust for 18-20 minutes until lightly golden around the edges.
8. Whisk together 4 eggs and 1 cup sugar in a medium bowl until smooth.
9. Stir in ½ cup lemon juice, 2 tablespoons lemon zest, and a splash of heavy cream.
10. Pour the lemon filling into the warm crust.
11. Return the tart to the oven and bake at 350°F for 22-25 minutes until the center is set but still slightly jiggly.
12. Let the tart cool completely on a wire rack for at least 2 hours.
13. Arrange a handful of mixed fresh berries over the cooled tart.
14. Dust generously with powdered sugar just before serving.
Outrageously creamy lemon filling melts against that crisp, buttery crust in every bite. The fresh berries add pops of juicy sweetness that cut through the tang perfectly—try serving chilled slices with extra berries and a dollop of whipped cream for ultimate indulgence.
Velvety Rosewater Panna Cotta
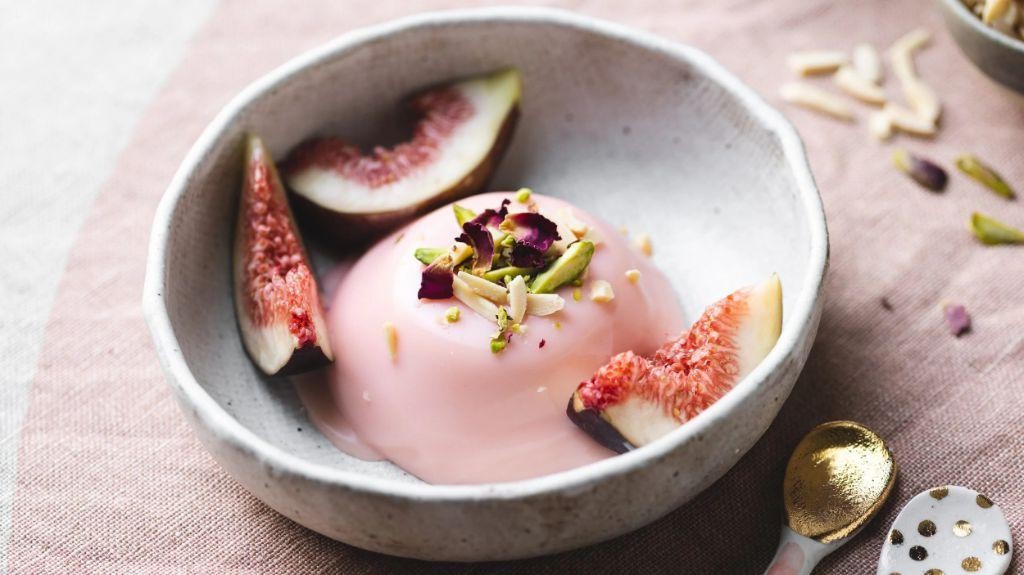
Whip up this floral dream that’s smoother than your favorite silk pajamas. Rosewater panna cotta brings elegant vibes with minimal effort—perfect for impressing guests or treating yourself. Get ready to shake up dessert night with this creamy, fragrant showstopper.
4
portions15
minutes5
minutesIngredients
– 2 cups of heavy cream
– 1/2 cup of granulated sugar
– 1 packet (about 2 1/4 tsp) of unflavored gelatin
– 3 tbsp of cold water
– 2 tsp of rosewater
– A splash of vanilla extract
– A pinch of salt
Instructions
1. Sprinkle the gelatin over 3 tbsp of cold water in a small bowl and let it sit for 5 minutes until it blooms and looks spongy.
2. Pour 2 cups of heavy cream into a saucepan and heat it over medium-low until it’s just steaming (about 160°F)—don’t let it boil.
3. Whisk in 1/2 cup of granulated sugar and a pinch of salt until fully dissolved, about 2 minutes.
4. Remove the saucepan from heat and stir in the bloomed gelatin mixture until it’s completely melted and smooth.
5. Mix in 2 tsp of rosewater and a splash of vanilla extract for that floral, aromatic kick.
6. Strain the mixture through a fine-mesh sieve into a jug to catch any lumps—this ensures a silky texture.
7. Divide the liquid evenly among 4 ramekins or glasses.
8. Cover each ramekin with plastic wrap, pressing it directly onto the surface to prevent a skin from forming.
9. Refrigerate for at least 4 hours, or until set firm (overnight is ideal for the best consistency).
10. To serve, dip the bottom of each ramekin in warm water for 10 seconds, then run a knife around the edge and invert onto a plate.
A delicate wobble and floral aroma make each spoonful pure bliss. Top with edible rose petals or fresh berries for a pop of color, or layer it with raspberry coulis for a stunning dessert parfait. This panna cotta melts on your tongue like a creamy cloud—elevate your dessert game without breaking a sweat.
White Chocolate and Raspberry Cheesecake
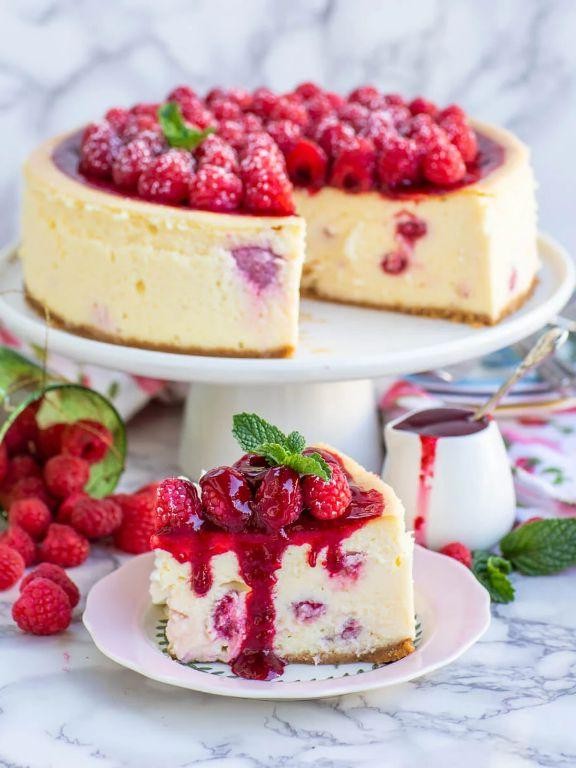
Y’all, this white chocolate raspberry cheesecake is about to break the internet. Whip up this creamy dreamy situation that’s pure dessert perfection. Get ready for your new signature party showstopper.
8
servings25
minutes60
minutesIngredients
– 2 cups of graham cracker crumbs
– 1/2 cup of melted butter
– 3 blocks of cream cheese at room temp
– 1 cup of granulated sugar
– 3 large eggs
– 1 cup of white chocolate chips, melted
– 1 teaspoon of vanilla extract
– 1 cup of fresh raspberries
– A splash of lemon juice
Instructions
1. Preheat your oven to 325°F.
2. Mix graham cracker crumbs with melted butter until fully combined.
3. Press the crumb mixture firmly into the bottom of a 9-inch springform pan.
4. Bake the crust for 10 minutes until lightly golden, then let it cool completely.
5. Beat cream cheese with sugar on medium speed for 3 minutes until smooth and creamy.
6. Add eggs one at a time, mixing just until each egg disappears into the batter.
7. Stir in melted white chocolate and vanilla extract until fully incorporated.
8. Gently fold in fresh raspberries being careful not to overmix and crush them.
9. Pour the cheesecake filling over the cooled crust and smooth the top.
10. Bake at 325°F for 45-50 minutes until the edges are set but the center still jiggles slightly.
11. Turn off the oven and crack the door open, letting the cheesecake cool inside for 1 hour to prevent cracking.
12. Refrigerate for at least 4 hours, preferably overnight, before serving.
Heavenly creamy texture meets tart raspberry bursts in every bite. The white chocolate adds this luxurious silkiness that melts on your tongue. Try serving it with extra fresh raspberries and a drizzle of melted white chocolate for that extra wow factor.
Romantic Strawberry Shortcake Bites
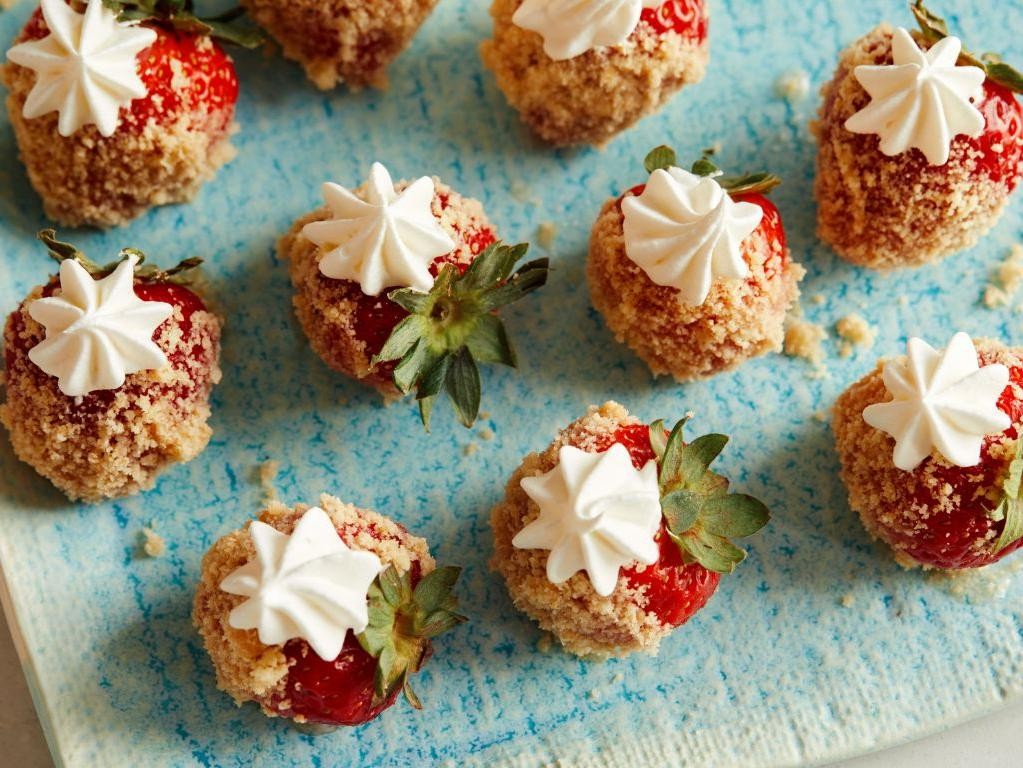
Melt into these adorable strawberry shortcake bites that’ll have your taste buds doing backflips. Perfect for date night or treating yourself—no fancy skills required, just pure deliciousness.
12
bites15
minutes15
minutesIngredients
– 1 cup of all-purpose flour
– 1/2 cup of granulated sugar
– 1/2 cup of unsalted butter, cold and cubed
– 1/4 cup of heavy cream
– 1 teaspoon of vanilla extract
– 1/2 teaspoon of baking powder
– A pinch of salt
– 1 cup of fresh strawberries, diced
– A couple of tablespoons of powdered sugar for dusting
Instructions
1. Preheat your oven to 350°F and line a baking sheet with parchment paper.
2. In a medium bowl, whisk together the flour, granulated sugar, baking powder, and salt until combined.
3. Add the cold, cubed butter and use your fingers or a pastry cutter to work it into the flour mixture until it resembles coarse crumbs.
4. Pour in the heavy cream and vanilla extract, then stir just until a soft dough forms—don’t overmix to keep the texture tender.
5. Gently fold in the diced strawberries until evenly distributed throughout the dough.
6. Scoop tablespoon-sized portions of dough and roll them into balls, placing them about 2 inches apart on the prepared baking sheet.
7. Bake for 12–15 minutes, or until the edges are lightly golden and the tops are set.
8. Let the bites cool on the baking sheet for 5 minutes before transferring to a wire rack to cool completely.
9. Dust the cooled bites generously with powdered sugar using a fine-mesh sieve for an even coating.
Keep these bites stored in an airtight container to maintain their soft texture. The buttery shortcake melts in your mouth, while the juicy strawberries add a burst of freshness—try stacking them with extra whipped cream for an indulgent twist.
Classic Tiramisu with a Valentine’s Day Spin
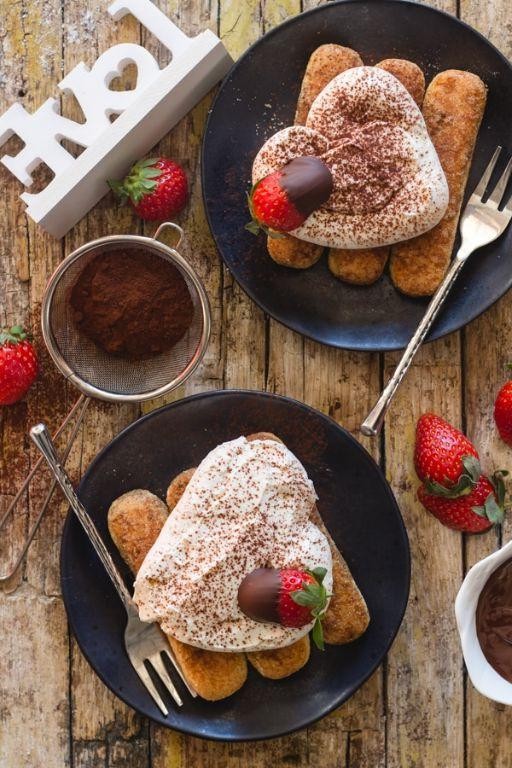
Okay, let’s make this iconic dessert with a romantic twist. Grab your ingredients and get ready to impress.
9
portions30
minutes10
minutesIngredients
- 1 package of ladyfinger cookies
- 1 cup of strong brewed coffee, cooled
- 2 tablespoons of coffee liqueur (optional, for adults)
- 3 large egg yolks
- 1/4 cup of granulated sugar
- 8 ounces of mascarpone cheese, at room temp
- 1 cup of heavy cream
- A splash of vanilla extract
- A couple of tablespoons of cocoa powder for dusting
- A handful of fresh raspberries for garnish
- Heart-shaped cookie cutter (for the V-Day spin)
Instructions
- Brew 1 cup of strong coffee and let it cool completely to room temperature.
- Pour the cooled coffee into a shallow bowl and stir in 2 tablespoons of coffee liqueur if using.
- In a medium heatproof bowl, whisk together 3 large egg yolks and 1/4 cup of granulated sugar until pale and slightly thickened.
- Place the bowl over a pot of simmering water (double boiler method) and whisk continuously for 5-7 minutes until the mixture reaches 160°F on a kitchen thermometer—this pasteurizes the eggs safely.
- Remove the yolk mixture from heat and let it cool for 10 minutes, whisking occasionally to prevent a skin from forming.
- In a separate large bowl, beat 8 ounces of room-temperature mascarpone cheese with a spatula until smooth and creamy.
- Gently fold the cooled yolk mixture into the mascarpone until fully combined and no streaks remain.
- In another bowl, whip 1 cup of heavy cream with a splash of vanilla extract until stiff peaks form.
- Fold the whipped cream into the mascarpone mixture in two additions, being careful not to deflate the air—this keeps the tiramisu light.
- Quickly dip each ladyfinger cookie into the coffee mixture for 2-3 seconds per side; don’t oversoak or they’ll get mushy.
- Arrange a single layer of dipped ladyfingers in the bottom of an 8×8 inch dish.
- Spread half of the mascarpone cream evenly over the ladyfinger layer.
- Repeat with another layer of dipped ladyfingers and the remaining cream.
- Cover the dish with plastic wrap and refrigerate for at least 4 hours, or ideally overnight, to set.
- Just before serving, use a heart-shaped cookie cutter to press gently into the top layer, creating heart outlines.
- Dust the entire surface with cocoa powder through a fine sieve, then remove the cutter to reveal clean heart shapes.
- Garnish with fresh raspberries around the edges for a pop of color and tartness.
After chilling, the tiramisu sets into creamy, dreamy layers that melt in your mouth. The coffee-kissed ladyfingers soften just enough to contrast the rich mascarpone cream. Serve it in the dish with the heart designs visible, or scoop individual portions onto plates for a stunning, romantic dessert.
Dark Chocolate Fondue with Dippables
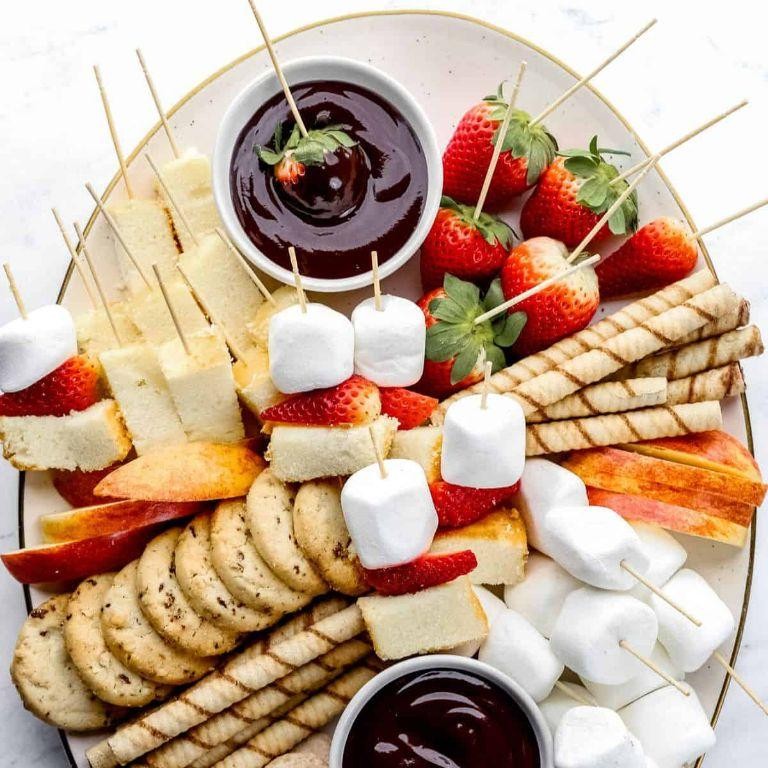
Grab your favorite dipping crew because this dark chocolate fondue is about to become your new obsession. Get ready to dunk everything in sight into this silky, rich chocolate pool that’s perfect for sharing or keeping all to yourself.
3
servings10
minutes5
minutesIngredients
– 2 cups of high-quality dark chocolate chips
– 1 cup of heavy cream
– A splash of vanilla extract
– A pinch of sea salt
– Your favorite dippables: strawberries, banana slices, marshmallows, pretzel rods, and pound cake cubes
Instructions
1. Chop your dark chocolate chips if they’re large chunks to ensure even melting.
2. Pour 1 cup of heavy cream into a medium saucepan.
3. Heat the cream over medium-low heat until small bubbles form around the edges, about 3-4 minutes.
4. Remove the saucepan from heat immediately to prevent scorching.
5. Add the 2 cups of dark chocolate chips to the hot cream.
6. Let the chocolate sit in the hot cream for 1 minute without stirring.
7. Whisk the chocolate and cream together until completely smooth and glossy.
8. Stir in a splash of vanilla extract for flavor enhancement.
9. Add a pinch of sea salt to balance the sweetness.
10. Transfer the fondue to your serving bowl or fondue pot.
11. Arrange your dippables on a large platter around the fondue bowl.
12. Serve immediately while warm and fluid.
Keep this fondue warm in a fondue pot or over a tea light to maintain that perfect dipping consistency. The dark chocolate provides that sophisticated bitter-sweet contrast that pairs beautifully with sweet strawberries and salty pretzels. Try drizzling any leftover fondue over ice cream for an instant dessert upgrade the next day.
Elegant Raspberry and Champagne Chiffon Cake
Oh my god, this raspberry champagne chiffon cake will literally stop your holiday party in its tracks. Whip up this showstopper that balances tart berries with bubbly sophistication. Watch guests go wild for that cloud-like texture and elegant flavor combo.
10
servings25
minutes55
minutesIngredients
– 2 cups of cake flour
– 1 ½ cups of granulated sugar
– A big pinch of salt
– ½ cup of vegetable oil
– 7 room-temp egg yolks
– ¾ cup of champagne
– A couple drops of pink food coloring
– 1 cup of fresh raspberries
– 7 egg whites at room temp
– ½ teaspoon of cream of tartar
– A dusting of powdered sugar
Instructions
1. Preheat your oven to 325°F and grab a 10-inch tube pan—don’t grease it, the batter needs to climb those sides.
2. Whisk together 2 cups cake flour, 1 ½ cups sugar, and that big pinch of salt in a large bowl.
3. Make a well in the center and pour in ½ cup vegetable oil, 7 egg yolks, and ¾ cup champagne.
4. Beat that mixture on medium speed for 2 minutes until perfectly smooth.
5. Mash 1 cup fresh raspberries with a fork and stir them into the batter with a couple drops of pink food coloring.
6. In a separate clean bowl, whip 7 egg whites with ½ teaspoon cream of tartar until stiff peaks form—tip: no yolk traces or they won’t fluff up.
7. Gently fold the egg whites into the raspberry batter in three additions, keeping it airy.
8. Pour the batter into your ungreased tube pan and smooth the top.
9. Bake at 325°F for 55 minutes—test with a skewer; it should come out clean.
10. Immediately invert the pan onto a bottle neck and let it cool completely upside down for 2 hours.
11. Run a thin knife around the edges to release the cake from the pan.
12. Dust the top generously with powdered sugar right before serving.
Your chiffon cake will be incredibly light with a subtle champagne buzz and bursts of raspberry. Slice it thick for dessert or serve with extra berries and whipped cream for a brunch centerpiece that feels fancy but totally doable.
Heart-Warming Molten Lava Cakes
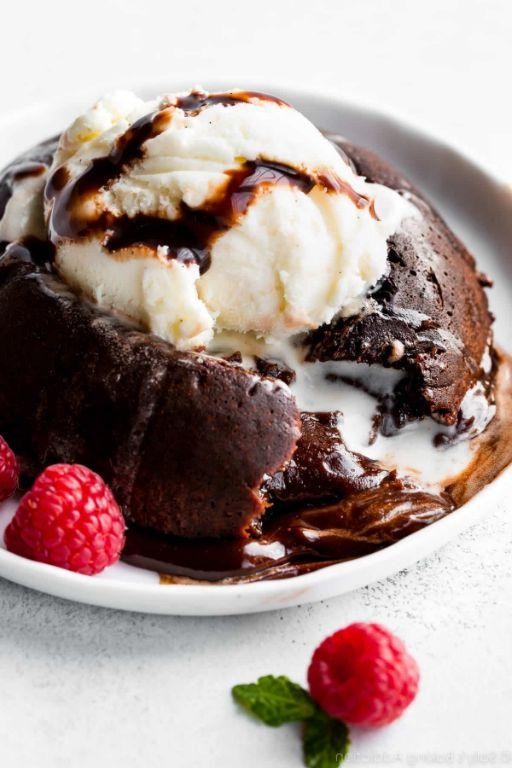
Seriously craving that ooey-gooey chocolate center? These molten lava cakes deliver pure decadence in under 30 minutes. Skip the bakery—your kitchen’s about to become dessert central.
5
cakes15
minutes14
minutesIngredients
- 4 ounces of that fancy dark chocolate bar you’ve been saving
- Half a cup of unsalted butter, plus an extra dab for greasing
- 1 cup of powdered sugar
- 2 large eggs
- 2 egg yolks (save the whites for tomorrow’s omelet!)
- A generous splash of vanilla extract
- Half a cup of all-purpose flour
- A pinch of salt to balance the sweetness
- Cocoa powder for dusting your ramekins
Instructions
- Preheat your oven to 425°F and grab four 6-ounce ramekins.
- Grease each ramekin thoroughly with butter, then dust with cocoa powder, tapping out any excess. Tip: This prevents sticking and adds a hint of extra chocolate flavor.
- Chop the dark chocolate into small pieces and combine with butter in a microwave-safe bowl.
- Microwave the chocolate-butter mixture in 30-second bursts, stirring after each, until completely smooth and melted.
- Whisk the powdered sugar into the warm chocolate mixture until no lumps remain.
- Beat in the whole eggs, egg yolks, and vanilla extract until the batter is glossy and well-combined.
- Gently fold in the flour and salt just until incorporated—don’t overmix! Tip: Overmixing can make the cakes dense instead of light.
- Divide the batter evenly among the prepared ramekins, filling each about three-quarters full.
- Bake for 12–14 minutes, until the edges are set but the centers still jiggle slightly when shaken. Tip: Underbaking is key here—that jiggle is your molten center!
- Let the cakes cool in the ramekins for exactly 1 minute before running a knife around the edges.
- Invert each ramekin onto a plate, tap firmly, and carefully lift to reveal your lava cake.
Know that moment when you break into the cake and warm chocolate cascades out? That’s the magic. Serve immediately with a scoop of vanilla ice cream melting into the lava, or dust with extra powdered sugar for a snowy effect. Perfect for impressing dates or treating yourself—no sharing required.
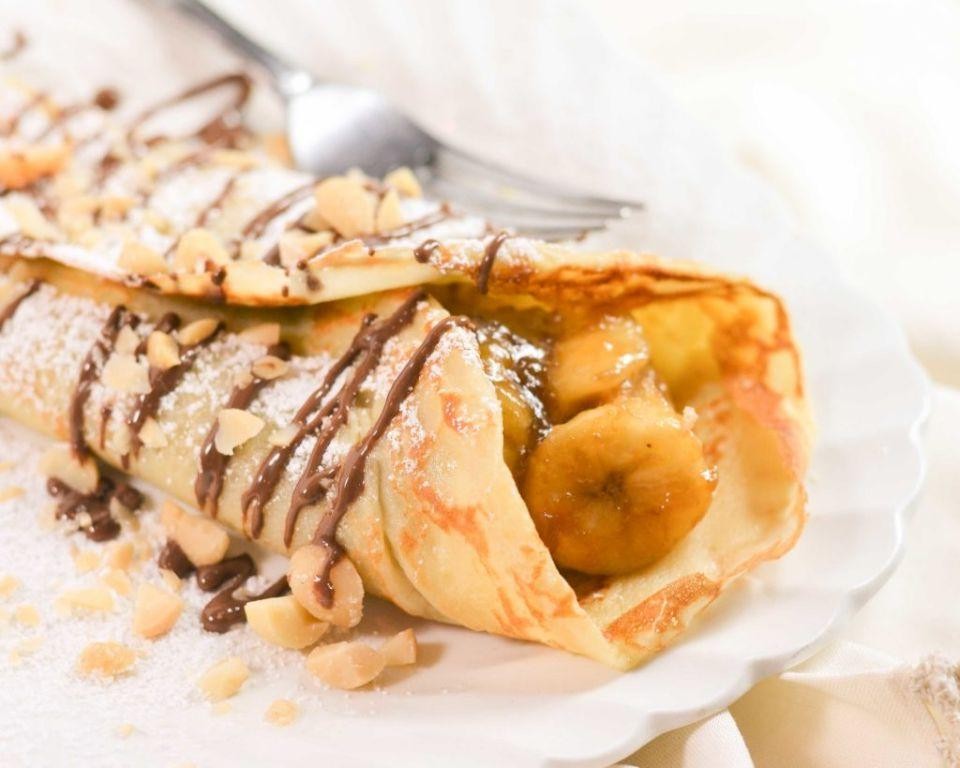
Caramelized Banana and Nutella Crepes
Elevate your breakfast game with these caramelized banana and Nutella crepes that’ll make you feel like a Parisian pastry chef. Get ready to transform simple ingredients into pure magic that’ll have everyone begging for your recipe.
3
crepes20
minutes20
minutesIngredients
- 1 cup all-purpose flour
- 2 large eggs
- 1 ¼ cups whole milk
- A splash of vanilla extract
- A couple tablespoons of melted butter
- A pinch of salt
- 2 ripe bananas
- ¼ cup brown sugar
- 3 tablespoons Nutella
- Extra butter for the pan
Instructions
- Whisk together 1 cup flour, 2 eggs, 1 ¼ cups milk, vanilla extract, melted butter, and salt in a large bowl until smooth.
- Let the batter rest for 15 minutes to allow the gluten to relax for more tender crepes.
- Heat a non-stick skillet over medium heat and melt a small pat of butter to coat the surface.
- Pour ¼ cup of batter into the hot skillet, immediately tilting to spread it into a thin, even circle.
- Cook for 60-90 seconds until the edges lift easily and the bottom develops golden spots.
- Flip the crepe carefully using a thin spatula and cook for another 30 seconds on the second side.
- Transfer cooked crepes to a plate and repeat with remaining batter, stacking them as you go.
- Slice 2 bananas into ¼-inch thick rounds and sprinkle with ¼ cup brown sugar in a separate pan.
- Cook bananas over medium-high heat for 3-4 minutes until the sugar melts and caramelizes into a glossy coating.
- Spread about 1 tablespoon of Nutella onto each warm crepe while they’re still pliable.
- Top with caramelized banana slices, then fold the crepe into quarters or roll it up tightly.
- Serve immediately while the Nutella is melty and the bananas are still warm from the pan.
These crepes deliver that perfect contrast between the delicate, buttery wrapper and the gooey, warm filling. The caramelized bananas add a deep, toffee-like sweetness that plays beautifully against the rich hazelnut chocolate. Try serving them with a dusting of powdered sugar or a scoop of vanilla ice cream for the ultimate indulgence.
Conclusion
Perfect for creating sweet memories, these 24 Valentine’s Day desserts offer something special for every home cook. Whether you’re a baking novice or seasoned pro, you’ll find the perfect treat to express your love. We’d love to hear which recipes become your favorites—leave a comment below and share this roundup on Pinterest to spread the love!