Managing type 1 diabetes doesn’t mean sacrificing flavor or variety in your meals. Many delicious, nutrient-packed recipes can help you maintain stable blood sugar levels while satisfying your taste buds. From quick weeknight dinners to comforting classics, this collection offers 25 balanced meal ideas that make healthy eating enjoyable and stress-free. Let’s dive in and discover some new favorites for your kitchen!
Grilled Chicken with Quinoa and Green Veggies
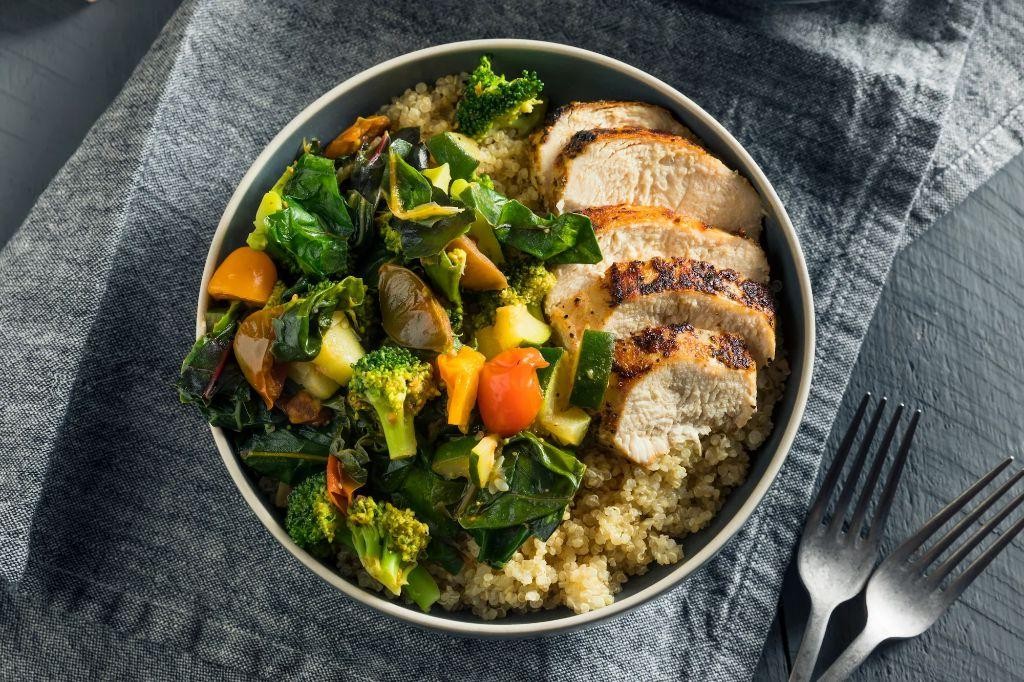
A quiet afternoon like this makes me crave something wholesome and nourishing, something that feels like a gentle embrace after a long day. This grilled chicken with quinoa and green veggies is my go-to when I need both comfort and vitality, a simple meal that somehow always feels special.
2
portions15
minutes30
minutesIngredients
– 2 boneless, skinless chicken breasts
– 1 cup tri-color quinoa
– 2 cups low-sodium chicken broth
– 2 tablespoons golden extra virgin olive oil
– 1 teaspoon coarse sea salt
– ½ teaspoon freshly cracked black pepper
– 1 teaspoon smoked paprika
– 2 cloves aromatic garlic, minced
– 1 bunch vibrant asparagus, trimmed
– 1 cup sweet green peas
– 1 lemon, juiced
– 2 tablespoons chopped fresh parsley
Instructions
1. Rinse 1 cup tri-color quinoa under cold water in a fine-mesh strainer for 1 minute to remove bitterness.
2. Combine quinoa and 2 cups low-sodium chicken broth in a medium saucepan over high heat.
3. Bring to a boil, then reduce heat to low, cover, and simmer for 15 minutes until liquid is absorbed.
4. Remove quinoa from heat and let stand covered for 5 minutes to steam.
5. Fluff quinoa with a fork and set aside.
6. Pat 2 boneless, skinless chicken breasts dry with paper towels.
7. Rub chicken with 1 tablespoon golden extra virgin olive oil, 1 teaspoon coarse sea salt, ½ teaspoon freshly cracked black pepper, and 1 teaspoon smoked paprika.
8. Preheat grill to medium-high heat (400°F).
9. Grill chicken for 6-7 minutes per side until internal temperature reaches 165°F.
10. Remove chicken from grill and let rest for 5 minutes before slicing.
11. While chicken rests, heat remaining 1 tablespoon golden extra virgin olive oil in a large skillet over medium heat.
12. Sauté 2 cloves minced aromatic garlic for 30 seconds until fragrant.
13. Add 1 bunch trimmed vibrant asparagus and cook for 4-5 minutes until bright green and tender-crisp.
14. Stir in 1 cup sweet green peas and cook for 2 more minutes until heated through.
15. Combine cooked quinoa and vegetable mixture in a large bowl.
16. Toss with juice of 1 lemon and 2 tablespoons chopped fresh parsley.
17. Divide quinoa mixture between plates and top with sliced grilled chicken.
The tender chicken yields juicy bites against the fluffy quinoa, while the crisp-tender vegetables provide fresh contrast. This dish feels equally beautiful served family-style in a large ceramic bowl or plated individually with extra lemon wedges for squeezing.
Baked Salmon with Lemon and Dill

Baking salmon feels like a quiet conversation with the sea, a gentle ritual where lemon and dill whisper their bright, earthy secrets into the firm flesh, transforming an ordinary evening into something softly memorable.
5
servings10
minutes15
minutesIngredients
– 1 ½ pounds fresh, skin-on salmon fillet
– 2 tablespoons rich extra virgin olive oil
– 1 large, vibrant lemon
– 2 tablespoons freshly chopped dill
– 3 cloves aromatic garlic, minced
– ½ teaspoon flaky sea salt
– ¼ teaspoon finely ground black pepper
Instructions
1. Preheat your oven to 400°F and line a baking sheet with parchment paper.
2. Pat the salmon fillet completely dry with paper towels to ensure a crisp skin.
3. Drizzle the olive oil evenly over both sides of the salmon.
4. Squeeze the juice from half the lemon directly onto the salmon.
5. Rub the minced garlic gently into the flesh of the salmon.
6. Sprinkle the chopped dill, sea salt, and black pepper evenly over the top.
7. Thinly slice the remaining lemon half and arrange the slices atop the salmon.
8. Place the salmon skin-side down on the prepared baking sheet.
9. Bake for 12–15 minutes, until the salmon flakes easily with a fork but remains moist in the center.
10. Let the salmon rest for 5 minutes before serving to allow the juices to redistribute.
Delicate flakes yield to the fork, revealing a moist interior perfumed with garlic and the bright kiss of lemon. The dill lingers like a fresh garden breeze, making this salmon lovely alongside roasted asparagus or nestled into a bed of herbed quinoa for a complete, nourishing meal.
Zucchini Noodles with Pesto and Cherry Tomatoes
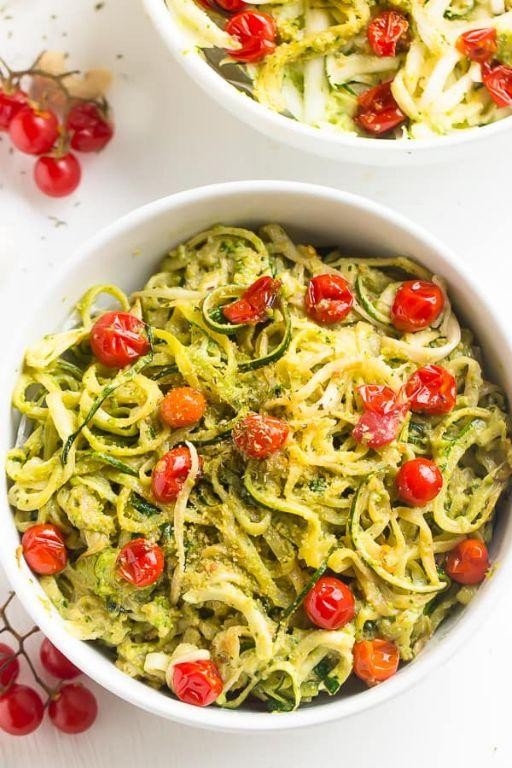
Cradling my spiralizer this quiet afternoon, I find myself drawn to the simple elegance of transforming humble vegetables into something delicate and nourishing, a gentle reminder that the most satisfying meals often begin with the freshest ingredients. There’s a particular comfort in watching zucchini ribbons curl into tender noodles, ready to be tossed with vibrant pesto and sweet, bursting tomatoes—a dish that feels both light and deeply satisfying.
2
servings25
minutesIngredients
– 4 medium firm zucchini, ends trimmed
– 2 cups fresh basil leaves, packed
– ½ cup rich extra virgin olive oil
– ⅓ cup toasted pine nuts
– 2 cloves fresh garlic, peeled
– ½ cup finely grated Parmesan cheese
– 1 pint sweet cherry tomatoes, halved
– ¼ tsp coarse sea salt
– ⅛ tsp freshly cracked black pepper
Instructions
1. Rinse the zucchini under cool running water and pat completely dry with a clean kitchen towel.
2. Using a spiralizer fitted with the medium blade, spiralize all zucchini into noodle-like strands, collecting them in a large mixing bowl.
3. Sprinkle the zucchini noodles with ¼ teaspoon coarse sea salt and gently toss to distribute evenly.
4. Let the salted zucchini noodles rest for 10 minutes to draw out excess moisture.
5. While the zucchini rests, combine 2 cups packed fresh basil leaves, ⅓ cup toasted pine nuts, and 2 peeled garlic cloves in a food processor.
6. Pulse the mixture 5-6 times until the ingredients are roughly chopped and combined.
7. With the food processor running on low speed, slowly drizzle in ½ cup rich extra virgin olive oil until a smooth pesto forms.
8. Transfer the pesto to a small bowl and stir in ½ cup finely grated Parmesan cheese until fully incorporated.
9. Halve 1 pint of sweet cherry tomatoes lengthwise using a sharp knife.
10. After 10 minutes, gently squeeze small handfuls of zucchini noodles over the sink to remove excess liquid.
11. Return the dried zucchini noodles to the large mixing bowl.
12. Add the prepared pesto and halved cherry tomatoes to the zucchini noodles.
13. Using tongs, gently toss everything together until the noodles are evenly coated with pesto.
14. Season the mixture with ⅛ teaspoon freshly cracked black pepper and toss once more.
15. Divide the zucchini noodle mixture evenly among four serving plates.
Offering a delightful contrast between the cool, crisp noodles and the room-temperature pesto, this dish celebrates summer’s bounty in every forkful. The zucchini maintains a satisfying al dente bite while the cherry tomatoes release their sweet juices, creating a light sauce that clings to each strand. For an elegant presentation, try serving it in wide, shallow bowls garnished with extra basil leaves and a sprinkle of Parmesan, perfect for a leisurely lunch on the patio.
Stuffed Bell Peppers with Lean Turkey and Black Beans
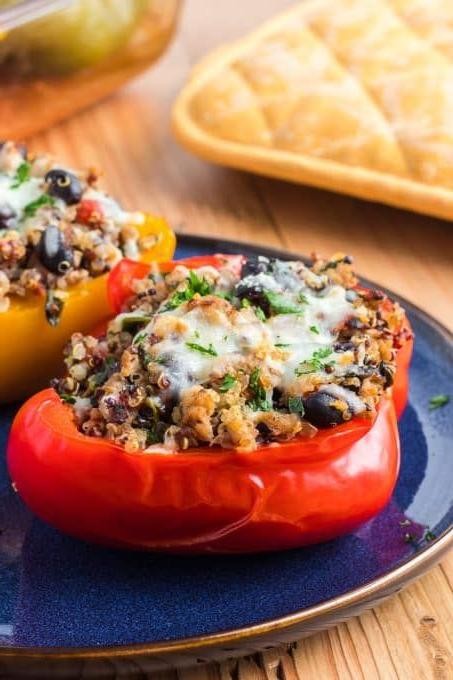
Vaguely, I find myself drawn to the kitchen on afternoons like this, where the light slants just so and the world outside feels hushed. There’s something quietly comforting about preparing stuffed bell peppers, each one becoming its own little edible vessel of warmth and nourishment, especially when filled with lean turkey and earthy black beans.
4
servings20
minutes50
minutesIngredients
– 4 large, vibrant bell peppers (mixed colors for visual appeal)
– 1 pound lean ground turkey
– 1 cup cooked black beans, rinsed and drained
– 1 cup finely diced sweet yellow onion
– 2 cloves fragrant garlic, minced
– 1 cup cooked long-grain white rice
– 1 cup rich tomato sauce
– 1/2 cup shredded sharp cheddar cheese
– 2 tablespoons extra virgin olive oil
– 1 teaspoon smoked paprika
– 1/2 teaspoon dried oregano
– 1/4 teaspoon freshly ground black pepper
– 1/4 teaspoon fine sea salt
Instructions
1. Preheat your oven to 375°F and lightly grease a 9×13-inch baking dish with olive oil.
2. Carefully slice the tops off the bell peppers and remove all seeds and membranes, creating hollow vessels.
3. Heat 2 tablespoons of extra virgin olive oil in a large skillet over medium heat until shimmering.
4. Add the finely diced sweet yellow onion and sauté for 4-5 minutes until translucent and fragrant.
5. Stir in the minced fragrant garlic and cook for 1 minute until golden and aromatic.
6. Add the lean ground turkey to the skillet, breaking it apart with a wooden spoon as it cooks.
7. Cook the turkey for 6-8 minutes until no pink remains, stirring occasionally for even browning.
8. Sprinkle in the smoked paprika, dried oregano, freshly ground black pepper, and fine sea salt, stirring to coat the mixture evenly.
9. Gently fold in the cooked black beans, cooked long-grain white rice, and rich tomato sauce until fully incorporated.
10. Spoon the turkey and bean mixture evenly into the hollowed bell peppers, packing it gently.
11. Arrange the stuffed peppers upright in the prepared baking dish and cover tightly with aluminum foil.
12. Bake at 375°F for 25 minutes until the peppers begin to soften.
13. Remove the foil and sprinkle the shredded sharp cheddar cheese evenly over the tops.
14. Return to the oven uncovered for 10-12 minutes until the cheese is bubbly and lightly golden.
15. Let the peppers rest for 5 minutes before serving to allow the filling to set. Sometimes the simplest meals feel the most complete, with tender-crisp peppers giving way to the savory, well-spiced filling. Serve them alongside a crisp green salad or with a dollop of cool sour cream for contrast, letting each component shine in its own right.
Cauliflower Rice Stir-Fry with Tofu

Evenings like this call for something simple yet deeply satisfying, where the gentle sizzle from the stove fills the quiet kitchen and the aroma of garlic and ginger begins to weave through the air, inviting a moment of calm presence with each chop and stir.
2
servings20
minutes17
minutesIngredients
– 1 large head of cauliflower, broken into tender florets
– 14 ounces of firm tofu, pressed and cubed into bite-sized pieces
– 2 tablespoons of toasted sesame oil, fragrant and golden
– 3 cloves of garlic, minced to release their pungent warmth
– 1 tablespoon of freshly grated ginger, bright and zesty
– 1/2 cup of low-sodium soy sauce, rich and savory
– 1/4 cup of rice vinegar, with a clean, tangy finish
– 1 tablespoon of pure maple syrup, for a whisper of sweetness
– 2 cups of colorful mixed vegetables (like crisp bell peppers and snap peas)
– 2 tablespoons of chopped green onions, for a fresh, sharp garnish
– 1 teaspoon of red pepper flakes, for a subtle, warming heat
Instructions
1. Press the firm tofu between paper towels with a heavy pan for 15 minutes to remove excess moisture, then cut into 1-inch cubes for even cooking.
2. Break the large head of cauliflower into tender florets and pulse in a food processor until it resembles rice-like grains, being careful not to over-process into mush.
3. Heat 1 tablespoon of fragrant toasted sesame oil in a large skillet or wok over medium-high heat until it shimmers.
4. Add the cubed tofu and cook for 5-7 minutes, turning occasionally, until golden brown and crisp on all edges.
5. Stir in the minced garlic and freshly grated ginger, cooking for 1 minute until fragrant but not browned to avoid bitterness.
6. Pour in the rich low-sodium soy sauce, clean rice vinegar, and pure maple syrup, stirring to coat the tofu evenly.
7. Add the colorful mixed vegetables and sauté for 3-4 minutes until they are bright and slightly tender but still crisp.
8. Mix in the cauliflower rice and cook for 4-5 minutes, stirring frequently, until it is heated through and has softened slightly.
9. Sprinkle with the chopped green onions and subtle red pepper flakes, tossing gently to distribute.
Fluffy and light, the cauliflower rice absorbs the savory-sweet sauce while keeping a delicate bite, contrasted by the crisp tofu and vibrant vegetables. For a cozy twist, serve it nestled in lettuce cups or topped with a drizzle of chili crisp to highlight its comforting, umami-rich layers.
Slow-Cooked Beef Stew with Assorted Vegetables

Sometimes, the most comforting meals are the ones that take their time, simmering quietly while the world moves outside. Slow-cooked beef stew with assorted vegetables feels like a warm embrace on a cool afternoon, each ingredient melding together in a patient dance of flavor and texture. There’s a quiet satisfaction in knowing that something so simple can become so deeply nourishing.
3
servings25
minutes165
minutesIngredients
– 2 pounds chuck roast, cut into 1-inch cubes
– 3 tablespoons rich extra virgin olive oil
– 1 large yellow onion, finely diced
– 3 cloves garlic, minced
– 4 cups hearty beef broth
– 1 cup dry red wine, such as Cabernet Sauvignon
– 2 tablespoons tomato paste
– 2 teaspoons Worcestershire sauce
– 1 teaspoon dried thyme
– 3 large carrots, peeled and sliced into ½-inch rounds
– 2 medium Yukon Gold potatoes, peeled and cubed
– 2 stalks celery, sliced
– 1 bay leaf
– 1 teaspoon kosher salt
– ½ teaspoon freshly cracked black pepper
– 2 tablespoons all-purpose flour
– ¼ cup cold water
Instructions
1. Pat the chuck roast cubes dry with paper towels to ensure a golden-brown sear.
2. Heat 2 tablespoons of rich extra virgin olive oil in a large Dutch oven over medium-high heat until it shimmers.
3. Sear the beef cubes in a single layer for 4–5 minutes per side until deeply browned, working in batches to avoid overcrowding.
4. Transfer the seared beef to a clean plate, leaving the drippings in the pot.
5. Add the remaining 1 tablespoon of rich extra virgin olive oil to the pot and sauté the finely diced yellow onion for 5–7 minutes until translucent.
6. Stir in the minced garlic and cook for 1 minute until fragrant.
7. Deglaze the pot with 1 cup dry red wine, scraping up any browned bits from the bottom with a wooden spoon.
8. Simmer the wine for 3–4 minutes until reduced by half.
9. Whisk in 2 tablespoons tomato paste and cook for 1 minute to deepen its flavor.
10. Return the seared beef and any accumulated juices to the pot.
11. Pour in 4 cups hearty beef broth and 2 teaspoons Worcestershire sauce.
12. Add 1 teaspoon dried thyme, 1 bay leaf, 1 teaspoon kosher salt, and ½ teaspoon freshly cracked black pepper.
13. Bring the stew to a gentle boil, then reduce the heat to low, cover, and simmer for 1 hour and 30 minutes.
14. Stir in the sliced carrots, cubed Yukon Gold potatoes, and sliced celery.
15. Cover and continue simmering for 45–60 minutes until the vegetables are fork-tender.
16. In a small bowl, whisk 2 tablespoons all-purpose flour with ¼ cup cold water until smooth to create a slurry.
17. Stir the slurry into the stew and simmer uncovered for 10–15 minutes until the broth thickens slightly.
18. Remove and discard the bay leaf before serving.
Zestfully tender beef falls apart at the slightest touch, while the vegetables hold their shape yet melt in your mouth. The rich, wine-kissed broth clings to each spoonful, making it perfect ladled over a slice of crusty bread or alongside buttery mashed potatoes for a truly comforting meal.
Herb-Marinated Grilled Shrimp Skewers
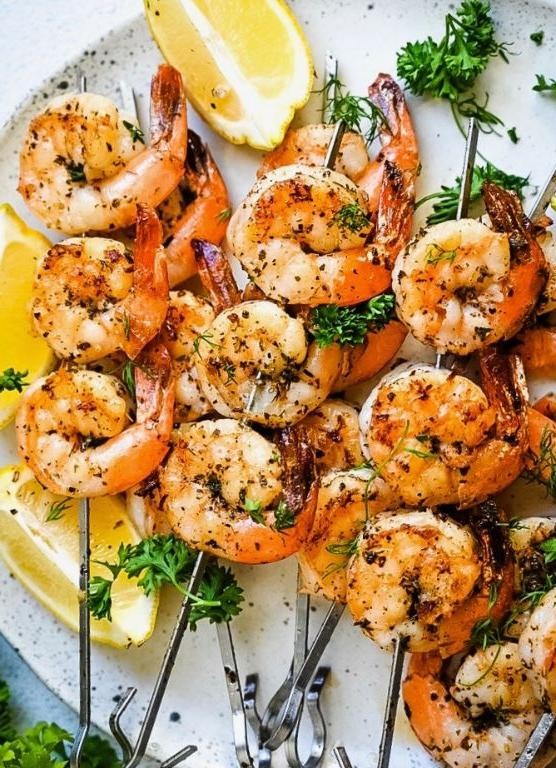
Unwinding after a long day, I find myself drawn to simple pleasures—like the gentle sizzle of shrimp meeting the grill, releasing scents of lemon and herbs into the evening air. These skewers feel like a quiet celebration, each bite carrying the warmth of summer gatherings and unhurried moments. There’s something deeply comforting in their simplicity, a reminder that the best meals often come from just a few thoughtful ingredients.
8
skewers25
minutes4
minutesIngredients
- 1 pound large wild-caught shrimp, peeled and deveined
- ¼ cup golden extra virgin olive oil
- 3 cloves fragrant garlic, minced
- 2 tablespoons freshly squeezed lemon juice
- 1 tablespoon finely chopped fresh parsley
- 1 teaspoon finely chopped fresh rosemary
- ½ teaspoon flaky sea salt
- ¼ teaspoon cracked black pepper
- 8 sturdy wooden skewers, soaked in water
Instructions
- Place wooden skewers in a shallow dish and cover completely with cool water; soak for 30 minutes to prevent burning on the grill.
- In a medium glass bowl, whisk together golden extra virgin olive oil, freshly squeezed lemon juice, minced fragrant garlic, finely chopped fresh parsley, finely chopped fresh rosemary, flaky sea salt, and cracked black pepper until fully combined.
- Add 1 pound of large wild-caught shrimp to the marinade, tossing gently with your hands to coat each piece thoroughly.
- Cover the bowl with plastic wrap and refrigerate for exactly 20 minutes—this brief marinating time keeps the shrimp tender without becoming mushy.
- Preheat your grill to medium-high heat, about 400°F, and lightly oil the grates with a folded paper towel dipped in olive oil.
- Thread 4-5 marinated shrimp onto each soaked wooden skewer, piercing through both the head and tail ends for secure grilling.
- Place shrimp skewers directly on the preheated grill and cook for 2 minutes until you see grill marks forming on the underside.
- Flip each skewer carefully with tongs and cook for another 2 minutes until the shrimp turn opaque pink and firm to the touch.
- Remove skewers from the grill immediately when done to prevent overcooking.
Nothing compares to the tender bounce of perfectly grilled shrimp against your teeth, their sweetness heightened by the rosemary’s piney notes and lemon’s bright acidity. Nestle them over creamy polenta or toss with crisp greens for a light supper, letting the garlic-infused oil mingle with other elements on the plate. This dish seems to capture sunlight in every bite, making ordinary evenings feel quietly special.
Vegetable Omelette with Spinach and Feta

Just now, as the afternoon light slants across the kitchen counter, I find myself reaching for the familiar comfort of eggs and greens, a quiet ritual that feels like coming home to myself. There’s something deeply soothing about the gentle sizzle of vegetables in the pan, the way the spinach wilts into emerald silk, and the salty crumble of feta that ties it all together—a simple, nourishing embrace in a bowl.
1
servings10
minutes9
minutesIngredients
– 3 large farm-fresh eggs, beaten until pale and frothy
– 1 cup fresh baby spinach leaves, tender and vibrant green
– 1/4 cup crumbled feta cheese, briny and creamy
– 1 tablespoon rich extra-virgin olive oil
– 1/4 cup finely diced sweet yellow onion
– 1/4 cup diced ripe red bell pepper
– 1/8 teaspoon finely ground black pepper
– 1/8 teaspoon kosher salt
Instructions
1. Heat 1 tablespoon of rich extra-virgin olive oil in a 10-inch nonstick skillet over medium heat until it shimmers, about 1 minute.
2. Add 1/4 cup finely diced sweet yellow onion and 1/4 cup diced ripe red bell pepper to the skillet, stirring occasionally until the onion turns translucent and the pepper softens, about 4 minutes.
3. Tip: Sauté the vegetables slowly to deepen their sweetness without browning.
4. Pile 1 cup fresh baby spinach leaves into the skillet, stirring gently until the leaves wilt completely and turn dark green, about 1 minute.
5. Pour 3 large farm-fresh eggs, beaten until pale and frothy, evenly over the vegetables in the skillet.
6. Tip: Let the eggs set for 30 seconds undisturbed to create a stable base before stirring.
7. Sprinkle 1/4 cup crumbled feta cheese, 1/8 teaspoon kosher salt, and 1/8 teaspoon finely ground black pepper evenly over the egg surface.
8. Use a spatula to lift the edges of the omelette, tilting the skillet to let uncooked egg flow underneath, repeating until the top is mostly set but still slightly wet, about 2–3 minutes.
9. Fold one half of the omelette over the other with the spatula, pressing gently to seal.
10. Cook for 1 more minute until the center is firm and the bottom is golden brown.
11. Tip: Slide the omelette onto a plate immediately to prevent overcooking from residual heat.
Velvety and warm, the omelette cradles the softened vegetables in a tender egg blanket, each bite yielding to the creamy, salty feta that melts into the greens. Serve it alongside toasted sourdough for a rustic crunch, or tuck it into a soft tortilla with a drizzle of hot sauce—it’s a quiet meal that holds the gentle rhythm of a slow morning, even in the heart of the afternoon.
Spaghetti Squash with Marinara and Turkey Meatballs
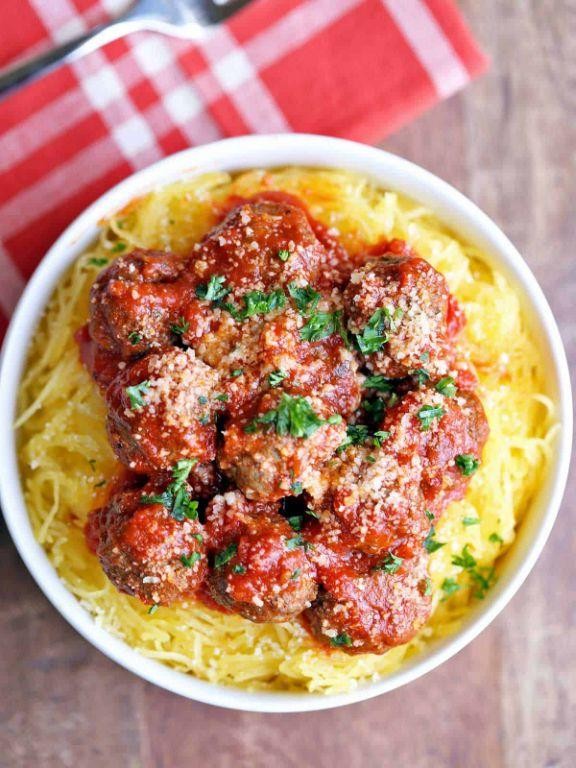
Venturing into the kitchen on this quiet afternoon feels like unfolding a familiar story, one where simple ingredients transform into something comforting and nourishing, a gentle reminder of how cooking can be both meditation and meal.
2
servings20
minutes55
minutesIngredients
– 1 medium spaghetti squash, with a firm, pale yellow skin
– 2 tablespoons rich extra virgin olive oil
– 1/2 teaspoon coarse sea salt
– 1/4 teaspoon freshly cracked black pepper
– 1 pound lean ground turkey
– 1/2 cup finely grated Parmesan cheese
– 1/4 cup fresh breadcrumbs from a crusty loaf
– 1 large farm-fresh egg, lightly beaten
– 2 cloves garlic, minced to a fragrant paste
– 1 teaspoon dried oregano, with its earthy aroma
– 2 cups robust marinara sauce, simmered with basil
– Fresh basil leaves, torn for garnish
Instructions
1. Preheat your oven to 400°F and line a baking sheet with parchment paper.
2. Carefully slice the spaghetti squash in half lengthwise using a sharp chef’s knife, scooping out the seeds and stringy pulp with a sturdy spoon.
3. Drizzle the cut sides of the squash with 1 tablespoon of olive oil, then season evenly with 1/4 teaspoon of salt and 1/8 teaspoon of black pepper.
4. Place the squash halves cut-side down on the prepared baking sheet and roast for 35–40 minutes, until the flesh is tender and easily shreds with a fork.
5. While the squash roasts, combine the ground turkey, Parmesan cheese, breadcrumbs, beaten egg, minced garlic, dried oregano, remaining 1/4 teaspoon salt, and 1/8 teaspoon black pepper in a large mixing bowl.
6. Gently mix the ingredients with your hands just until combined, being careful not to overwork the meat to keep the meatballs tender.
7. Shape the mixture into 1-inch meatballs, placing them on a separate parchment-lined tray as you go.
8. Heat the remaining 1 tablespoon of olive oil in a large skillet over medium heat, then add the meatballs in a single layer, browning them for 3–4 minutes per side until golden.
9. Pour the marinara sauce over the meatballs, reduce the heat to low, cover the skillet, and simmer for 15 minutes until the meatballs are cooked through to 165°F internally.
10. Once the squash is roasted, use a fork to scrape the flesh into spaghetti-like strands, dividing it between two bowls.
11. Top the squash strands with the marinara sauce and turkey meatballs, garnishing generously with torn fresh basil leaves.
Zesty and wholesome, the spaghetti squash strands hold their slight crunch against the velvety marinara, while the turkey meatballs offer a savory, herb-kissed bite. For a cozy twist, sprinkle with extra Parmesan and serve alongside a crisp green salad, letting the flavors mingle like old friends at the table.
Chickpea Salad with Cucumber and Mint
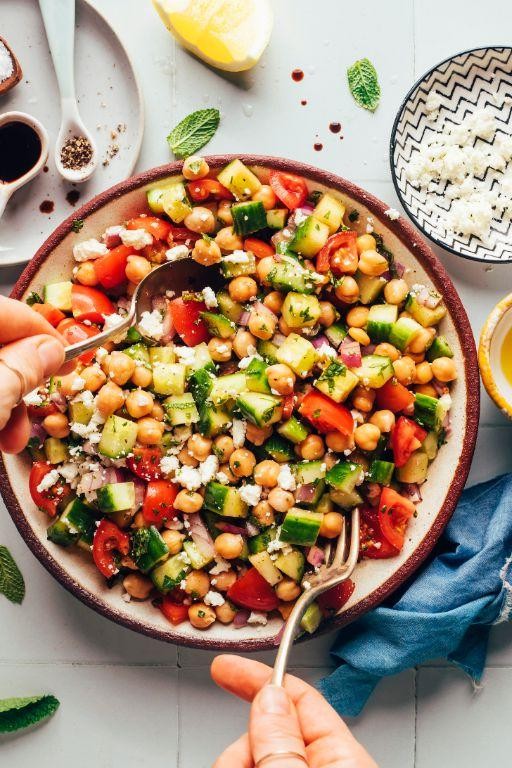
Cradling a bowl of this simple salad feels like holding summer in your hands—the kind of quiet afternoon where time slows and every ingredient speaks softly. There’s something deeply comforting about the way crisp cucumbers mingle with earthy chickpeas, all lifted by the bright whisper of fresh mint. It’s a dish that doesn’t ask for much, just a little patience and attention to the small details.
4
servings15
minutesIngredients
– 2 (15-ounce) cans of plump, tender chickpeas, rinsed and drained
– 1 large English cucumber, finely diced with its cool, crisp skin still on
– 1/4 cup of finely chopped fresh mint leaves, fragrant and bright green
– 1/4 cup of rich extra virgin olive oil
– 3 tablespoons of freshly squeezed lemon juice, tart and vibrant
– 1/2 teaspoon of fine sea salt
– 1/4 teaspoon of freshly cracked black pepper
Instructions
1. Place the rinsed and drained chickpeas into a large mixing bowl.
2. Add the finely diced English cucumber to the bowl with the chickpeas.
3. Sprinkle the finely chopped fresh mint leaves over the chickpea and cucumber mixture.
4. Pour the rich extra virgin olive oil evenly over the ingredients in the bowl.
5. Drizzle the freshly squeezed lemon juice across the salad.
6. Sprinkle the fine sea salt and freshly cracked black pepper over everything.
7. Gently toss all ingredients together with a large spoon until evenly coated, being careful not to crush the chickpeas.
8. Let the salad rest at room temperature for 15 minutes to allow the flavors to meld together.
9. Taste and adjust seasoning if needed before serving.
The salad emerges with a wonderful contrast of textures—the firm chickpeas against the watery crunch of cucumber, all bound by the silky olive oil. That bright mint and lemon dance through each bite, making it feel both refreshing and substantial. I love serving it scooped into butter lettuce cups for a light lunch, or piled alongside grilled fish for a complete meal that tastes like sunshine.
Lentil Soup with Carrots and Celery

Dappled autumn light filters through my kitchen window as I prepare this simple, grounding meal—there’s something deeply comforting about the earthy aroma of lentils simmering with humble vegetables, a quiet ritual that feels like coming home to myself after a long, hurried day.
4
servings15
minutes46
minutesIngredients
– 1 tablespoon rich extra virgin olive oil
– 1 medium yellow onion, finely diced
– 2 crisp carrots, peeled and chopped into ¼-inch coins
– 2 stalks fresh celery, sliced thin
– 2 cloves aromatic garlic, minced
– 1 cup dried brown lentils, rinsed and drained
– 6 cups homemade vegetable broth
– 1 bay leaf, fragrant and whole
– ½ teaspoon coarse sea salt
– ¼ teaspoon freshly cracked black pepper
– 1 tablespoon bright lemon juice, freshly squeezed
Instructions
1. Heat the rich extra virgin olive oil in a large Dutch oven over medium heat for 1 minute until shimmering.
2. Add the finely diced yellow onion and sauté for 5 minutes, stirring occasionally, until translucent and fragrant.
3. Stir in the chopped carrots and sliced celery, cooking for 4 more minutes until slightly softened.
4. Add the minced aromatic garlic and cook for 30 seconds, just until fragrant—be careful not to burn it.
5. Tip: Toasting the rinsed brown lentils for 1 minute in the pot before adding liquid deepens their nutty flavor.
6. Pour in the homemade vegetable broth and drop in the whole bay leaf, bringing everything to a gentle boil.
7. Reduce heat to low, cover the pot, and simmer for 35 minutes until lentils are tender but not mushy.
8. Tip: Resist stirring too often—this helps the lentils maintain their structure and prevents breaking.
9. Remove the bay leaf and stir in the coarse sea salt, freshly cracked black pepper, and bright lemon juice.
10. Tip: Let the soup rest off heat for 5 minutes before serving—this allows the flavors to meld beautifully.
Using a ladle, I love how the soup pours thick and velvety into bowls, each spoonful revealing the tender lentils and sweet carrots softened into submission. The lemon juice lifts the earthy depths with a bright, clean finish—perfect alongside crusty bread for dipping or topped with a drizzle of olive oil for extra richness.
Oven-Roasted Brussels Sprouts with Balsamic Glaze

Dappled afternoon light filters through the kitchen window as I prepare this simple dish, the kind that transforms humble ingredients into something quietly spectacular. There’s a gentle rhythm to roasting Brussels sprouts, each step unfolding slowly like pages in a well-loved journal, filling the space with warmth and anticipation. It’s a recipe that feels like a soft exhale, a moment to pause and savor the small, earthy joys of autumn.
5
servings10
minutes38
minutesIngredients
– 1 ½ pounds of firm, vibrant Brussels sprouts, trimmed and halved
– 3 tablespoons of golden, extra virgin olive oil
– ¾ teaspoon of flaky sea salt
– ½ teaspoon of freshly cracked black pepper
– 2 tablespoons of rich, aged balsamic glaze
– 1 tablespoon of raw honey with floral notes
Instructions
1. Preheat your oven to 400°F and line a large, rimmed baking sheet with parchment paper for easy cleanup.
2. In a large mixing bowl, toss the halved Brussels sprouts with the extra virgin olive oil until each piece glistens lightly.
3. Sprinkle the flaky sea salt and freshly cracked black pepper evenly over the sprouts, tossing again to coat thoroughly.
4. Spread the seasoned Brussels sprouts in a single layer on the prepared baking sheet, ensuring they aren’t crowded to promote even browning.
5. Roast the sprouts in the preheated oven for 20 minutes, then rotate the pan 180 degrees to account for any hot spots.
6. Continue roasting for another 10–15 minutes, until the outer leaves are deeply caramelized and crisp at the edges.
7. While the sprouts roast, whisk together the aged balsamic glaze and raw honey in a small bowl until smooth and well combined.
8. Remove the baking sheet from the oven and drizzle the balsamic-honey mixture evenly over the hot Brussels sprouts.
9. Gently toss the sprouts on the sheet to coat them in the glaze, using a spatula to avoid breaking the tender halves.
10. Return the pan to the oven for a final 3–5 minutes, just until the glaze thickens and clings to the sprouts. A final drizzle of balsamic glaze can add extra sheen and tang just before serving.
As you lift a forkful, the crisp, almost charred edges give way to tender, sweet centers, while the balsamic glaze lends a sticky, tangy depth that clings to each bite. Try scattering these over a bed of creamy polenta or alongside roasted chicken, where their bold flavor stands up beautifully to richer dishes.
Almond-Crusted Baked Tilapia

Sometimes the simplest meals become the most memorable, when golden almonds create a delicate crust around tender tilapia fillets, transforming an ordinary Wednesday into something quietly special. This gentle baking method coaxes out the fish’s natural sweetness while the almonds offer their toasty warmth, a dish that feels both nourishing and celebratory in its subtle way.
2
servings15
minutes15
minutesIngredients
– 4 fresh tilapia fillets (about 6 ounces each)
– 1 cup finely chopped raw almonds
– ½ cup panko breadcrumbs
– 2 large farm-fresh eggs
– ¼ cup all-purpose flour
– 2 tablespoons rich extra virgin olive oil
– 1 teaspoon smoked paprika
– ½ teaspoon garlic powder
– ½ teaspoon sea salt flakes
– ¼ teaspoon freshly ground black pepper
– 1 lemon, cut into wedges
Instructions
1. Preheat your oven to 400°F and line a baking sheet with parchment paper.
2. Pat the tilapia fillets completely dry with paper towels to ensure the coating adheres properly.
3. In a shallow bowl, whisk the eggs until uniformly blended and frothy.
4. Place the flour in a separate shallow dish, seasoning it with the sea salt and black pepper.
5. Combine the chopped almonds, panko breadcrumbs, smoked paprika, and garlic powder in a third shallow bowl, mixing thoroughly.
6. Dredge each tilapia fillet first in the seasoned flour, shaking off any excess.
7. Dip the floured fillet into the beaten eggs, allowing any extra to drip back into the bowl.
8. Press the egg-coated fillet firmly into the almond mixture, ensuring both sides are evenly covered.
9. Arrange the coated fillets in a single layer on the prepared baking sheet.
10. Drizzle the olive oil evenly over the top of each fillet to help achieve a golden crust.
11. Bake for 12-15 minutes until the almond coating is deeply golden brown and the fish flakes easily with a fork.
12. Squeeze fresh lemon juice over the hot fillets immediately after removing from the oven.
Just out of the oven, the almond crust shatters delicately against the fork before giving way to the moist, flaky fish beneath. The subtle smokiness from the paprika mingles with the bright lemon in a way that feels both comforting and elegant. For a complete meal, serve these fillets over a bed of lemon-herb quinoa or alongside roasted asparagus spears, letting the simple beauty of the dish speak for itself.
Quinoa Salad with Avocado and Lime
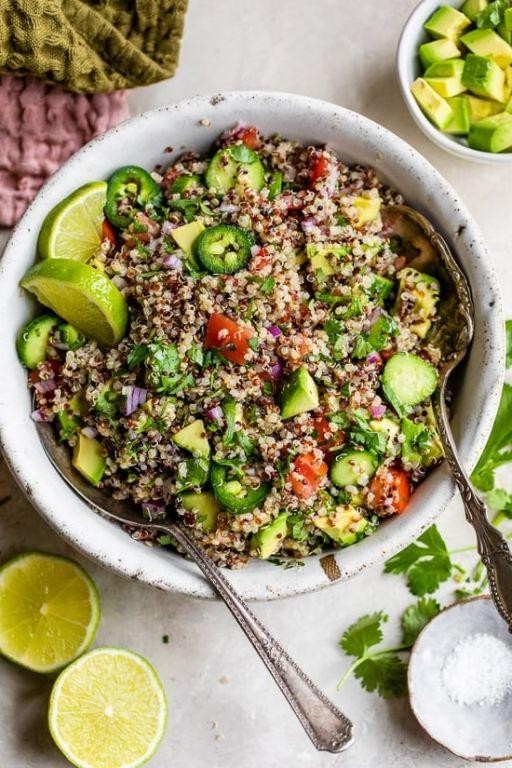
Nestled between the crisp autumn air and the lingering warmth of summer, this quinoa salad feels like a gentle transition on a plate. Sometimes the simplest combinations—the creamy, the tart, the earthy—bring the most comfort, especially when prepared with a quiet, unhurried hand. Let’s begin by gathering what we need.
2
servings15
minutes20
minutesIngredients
– 1 cup of fluffy, well-rinsed quinoa
– 2 cups of cool, filtered water
– 1 large, perfectly ripe avocado, diced
– 1/4 cup of freshly squeezed lime juice
– 2 tablespoons of rich extra virgin olive oil
– 1/4 cup of finely chopped fresh cilantro
– 1/2 teaspoon of fine sea salt
– 1/4 teaspoon of freshly cracked black pepper
Instructions
1. Rinse 1 cup of fluffy quinoa thoroughly under cold running water in a fine-mesh strainer for 1 full minute to remove any bitterness.
2. Combine the rinsed quinoa and 2 cups of cool, filtered water in a medium saucepan.
3. Bring the mixture to a rolling boil over high heat, then immediately reduce the heat to low and cover the pan tightly.
4. Simmer the quinoa for exactly 15 minutes, until all the water is absorbed and the grains are tender with visible little spirals.
5. Remove the pan from the heat and let the quinoa stand, covered, for 5 full minutes to steam and fluff.
6. Transfer the cooked quinoa to a large mixing bowl and spread it into an even layer to cool to room temperature, about 10–12 minutes.
7. While the quinoa cools, dice 1 large, perfectly ripe avocado into 1/2-inch cubes and add them to the bowl.
8. Pour 1/4 cup of freshly squeezed lime juice and 2 tablespoons of rich extra virgin olive oil over the quinoa and avocado.
9. Add 1/4 cup of finely chopped fresh cilantro, 1/2 teaspoon of fine sea salt, and 1/4 teaspoon of freshly cracked black pepper.
10. Gently fold all ingredients together with a spatula until evenly combined, being careful not to mash the avocado.
This salad offers a delightful contrast: the quinoa’s light, fluffy texture cradles the buttery avocado, while the lime brightens every bite. Try serving it alongside grilled fish or scooping it into crisp lettuce cups for a fresh, handheld meal.
Turkey Lettuce Wraps with Garlic and Ginger
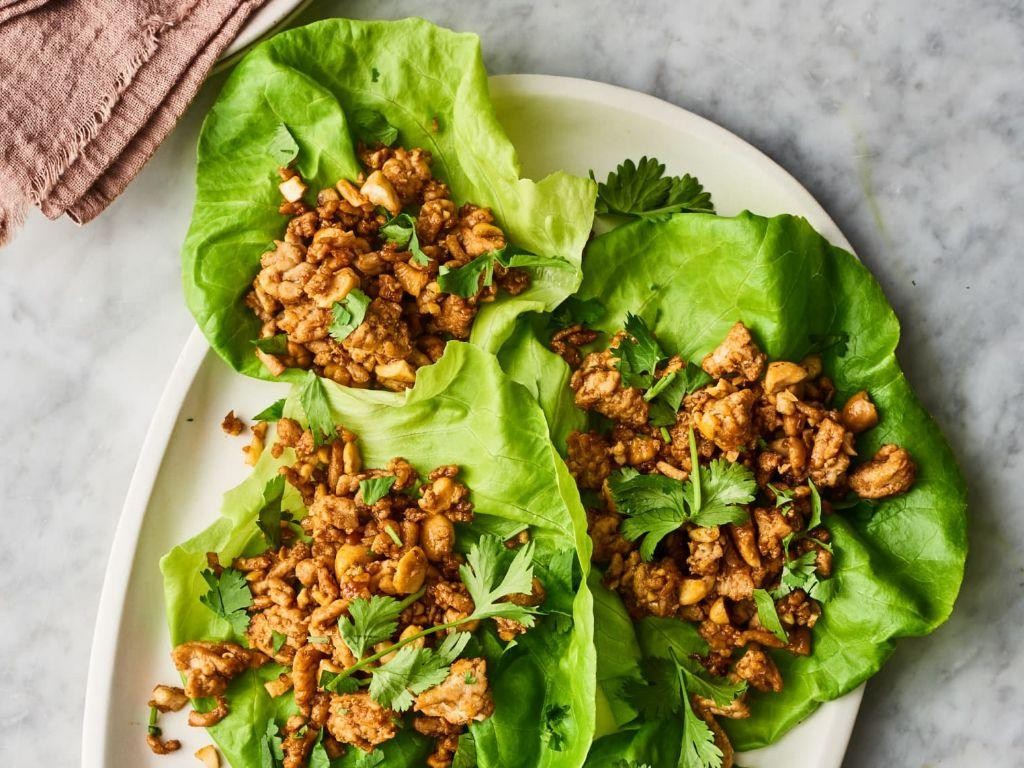
Zestful moments in the kitchen often arrive unexpectedly, like today when the crisp autumn air outside my window seemed to call for something light yet deeply satisfying. There’s a quiet comfort in preparing food that feels both nourishing and celebratory, where each ingredient tells its own gentle story before coming together in harmony.
8
wraps15
minutes13
minutesIngredients
– 1 lb ground turkey
– 8 large butter lettuce leaves
– 3 cloves fresh garlic, minced
– 1 tbsp freshly grated ginger root
– 2 tbsp toasted sesame oil
– ¼ cup low-sodium soy sauce
– 1 tbsp rice vinegar
– 1 tsp raw honey
– 2 green onions, thinly sliced
– ½ cup shredded carrots
– ¼ cup chopped water chestnuts
Instructions
1. Heat 1 tablespoon of toasted sesame oil in a large skillet over medium heat until it shimmers.
2. Add 1 lb of ground turkey, breaking it apart with a wooden spoon until no pink remains, about 6-8 minutes.
3. Stir in 3 cloves of minced fresh garlic and 1 tablespoon of freshly grated ginger root, cooking until fragrant, about 1 minute.
4. Pour in ¼ cup of low-sodium soy sauce, 1 tablespoon of rice vinegar, and 1 teaspoon of raw honey, stirring to coat the turkey completely.
5. Add ½ cup of shredded carrots and ¼ cup of chopped water chestnuts, cooking for 3 minutes until carrots soften slightly.
6. Remove from heat and fold in 2 thinly sliced green onions.
7. Rinse 8 large butter lettuce leaves and pat them completely dry with paper towels.
8. Spoon the warm turkey mixture evenly into the center of each lettuce leaf.
Delicate butter lettuce cups cradle the savory filling, their cool crispness contrasting beautifully with the warm, aromatic turkey scented with ginger and garlic. The water chestnuts provide satisfying crunch alongside the tender carrots, making each bite a textural adventure that feels both light and deeply comforting when served immediately with extra green onions scattered over top.
Mushroom and Bean Chili

Kind of like the slow, steady rain tapping at my window this afternoon, this chili asks for patience and rewards it with deep, earthy comfort. Letting the mushrooms and beans mingle feels like watching autumn settle in—quiet, inevitable, and deeply satisfying.
4
servings20
minutes76
minutesIngredients
- 2 tablespoons rich extra virgin olive oil
- 1 large yellow onion, finely diced
- 3 cloves fragrant garlic, minced
- 1 pound mixed wild mushrooms, roughly chopped
- 1 tablespoon smoky ground cumin
- 1 teaspoon sweet paprika
- 1/4 teaspoon fiery cayenne pepper
- 1 (28-ounce) can fire-roasted diced tomatoes
- 2 (15-ounce) cans plump kidney beans, drained and rinsed
- 2 cups rich vegetable broth
- 1 teaspoon coarse sea salt
- 1/2 teaspoon freshly cracked black pepper
- 1/4 cup fresh cilantro, roughly chopped
Instructions
- Heat the rich extra virgin olive oil in a large Dutch oven over medium heat until it shimmers.
- Add the finely diced yellow onion and cook for 8-10 minutes, stirring occasionally, until translucent and fragrant.
- Stir in the minced fragrant garlic and cook for 1 minute until golden and aromatic.
- Add the roughly chopped mixed wild mushrooms and cook for 12-15 minutes, stirring occasionally, until they release their liquid and turn deep golden brown.
- Sprinkle in the smoky ground cumin, sweet paprika, and fiery cayenne pepper, stirring constantly for 1 minute to toast the spices.
- Pour in the fire-roasted diced tomatoes with their juices, scraping any browned bits from the bottom of the pot.
- Add the drained and rinsed plump kidney beans and rich vegetable broth, stirring to combine.
- Season with coarse sea salt and freshly cracked black pepper, then bring to a gentle simmer.
- Reduce heat to low, cover, and simmer for 45 minutes, stirring occasionally, until the chili thickens slightly.
- Stir in the roughly chopped fresh cilantro just before serving.
Ladle this chili into deep bowls and notice how the beans hold their shape while the mushrooms melt into the rich tomato broth. The gentle heat from the cayenne lingers behind the earthy cumin, making it perfect for spooning over cornbread or scooping with tortilla chips on a chilly evening. Leftovers taste even better the next day, when the flavors have truly settled into one another.
Spinach and Ricotta Stuffed Chicken Breasts
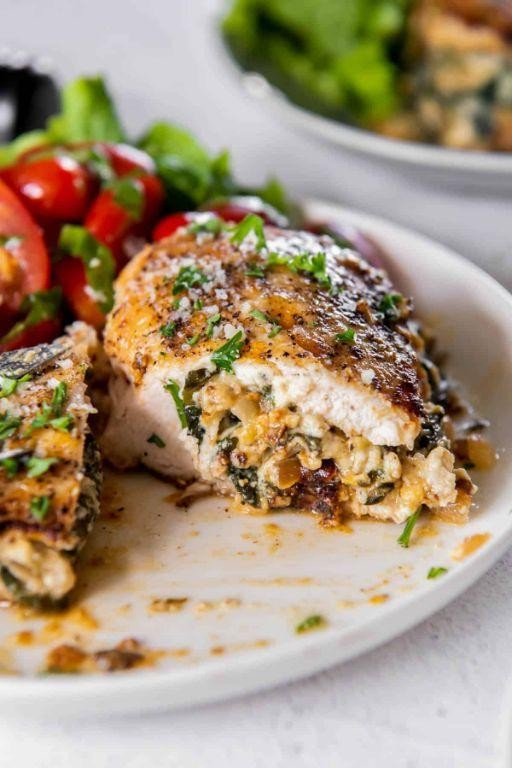
Today, as golden afternoon light spills across my kitchen counter, I find myself drawn to this comforting dish that feels like a gentle embrace after a long day. There’s something quietly beautiful about transforming simple ingredients into something nourishing and elegant.
3
portions15
minutes35
minutesIngredients
– 4 boneless, skinless chicken breasts
– 2 cups fresh spinach leaves, washed and patted dry
– 1 cup whole milk ricotta cheese, creamy and smooth
– 1/2 cup grated Parmesan cheese, sharp and nutty
– 2 cloves garlic, minced and fragrant
– 1 tablespoon fresh basil, finely chopped
– 1 teaspoon lemon zest, bright and citrusy
– 1/2 teaspoon sea salt, coarse and flaky
– 1/4 teaspoon black pepper, freshly ground
– 2 tablespoons olive oil, golden and fruity
– 1/2 cup chicken broth, rich and savory
Instructions
1. Preheat your oven to 375°F and lightly grease a baking dish with olive oil.
2. Using a sharp knife, carefully cut a horizontal pocket into each chicken breast, being careful not to cut all the way through.
3. In a medium bowl, combine the fresh spinach, creamy ricotta, sharp Parmesan, fragrant garlic, fresh basil, bright lemon zest, coarse sea salt, and freshly ground black pepper.
4. Gently stuff each chicken breast pocket with the spinach and ricotta mixture, dividing it evenly among the four breasts.
5. Secure the openings with toothpicks to prevent the filling from escaping during cooking.
6. Heat the golden olive oil in a large oven-safe skillet over medium-high heat until it shimmers.
7. Place the stuffed chicken breasts in the hot skillet and sear for 3-4 minutes per side until golden brown.
8. Pour the rich chicken broth around the chicken in the skillet.
9. Transfer the skillet to the preheated oven and bake for 25-30 minutes until the internal temperature reaches 165°F.
10. Remove from oven and let rest for 5 minutes before removing toothpicks and serving.
Your finished chicken emerges with a beautifully golden exterior giving way to the creamy, vibrant green filling inside. The ricotta becomes wonderfully melted and lush against the tender chicken, while the lemon zest provides just enough brightness to cut through the richness. You might serve these elegant breasts sliced over creamy polenta or alongside roasted seasonal vegetables for a complete meal that feels both special and comforting.
Roasted Eggplant with Tahini Dressing
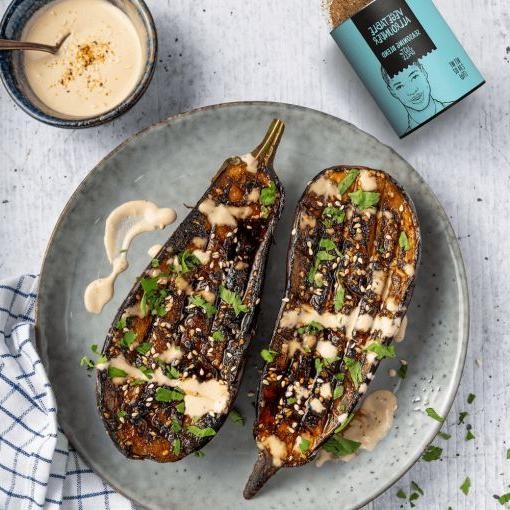
Dipping into the quiet of the afternoon, I find myself drawn to the simple, earthy comfort of roasting vegetables, letting their deep, caramelized flavors fill the kitchen with a warmth that feels like a gentle embrace.
5
servings15
minutes30
minutesIngredients
- 2 medium, glossy purple eggplants
- 3 tablespoons rich extra virgin olive oil
- 1 teaspoon coarse sea salt
- 1/2 teaspoon freshly cracked black pepper
- 1/4 cup creamy, well-stirred tahini
- 2 tablespoons freshly squeezed lemon juice
- 1 small garlic clove, finely minced
- 3 tablespoons cool water
- 1 tablespoon chopped fresh parsley
- 1 teaspoon toasted sesame seeds
Instructions
- Preheat your oven to 425°F and line a large baking sheet with parchment paper.
- Cut the eggplants into 1-inch cubes, leaving the skin on for texture and nutrients.
- Toss the eggplant cubes with olive oil, sea salt, and black pepper in a large bowl until evenly coated.
- Spread the eggplant in a single layer on the prepared baking sheet, ensuring pieces don’t touch for even browning.
- Roast for 25-30 minutes, flipping halfway through, until the edges are deeply golden and the centers are tender when pierced with a fork.
- While the eggplant roasts, whisk together the tahini, lemon juice, and minced garlic in a small bowl until smooth.
- Gradually add the cool water, whisking continuously, until the dressing reaches a pourable, creamy consistency.
- Transfer the roasted eggplant to a serving platter and drizzle generously with the tahini dressing.
- Garnish with chopped fresh parsley and toasted sesame seeds for a pop of color and nutty crunch.
Off the heat, the eggplant softens into silky, melt-in-your-mouth morsels, their smoky sweetness balanced by the bright, garlicky tahini dressing. Try serving it warm over a bed of fluffy quinoa or alongside grilled chicken for a complete meal that feels both nourishing and indulgent.
Conclusion
Keeping your meals balanced and delicious is simple with these 25 nutritious Type 1 Diabetes recipes. We hope this collection inspires you in the kitchen—give them a try, leave a comment with your favorite, and share this roundup on Pinterest to help others discover tasty, healthy options!


