Zesty, comforting, and downright delicious—your Thanksgiving menu just got a whole lot more exciting! Whether you’re a seasoned pro or a first-time host, our roundup of 30 Turkey Day recipes has something for everyone. From classic sides to show-stopping mains, get ready to inspire your feast and create memories around the table. Let’s dive into these mouthwatering dishes!
Herb-Roasted Turkey with Apple Cider Gravy
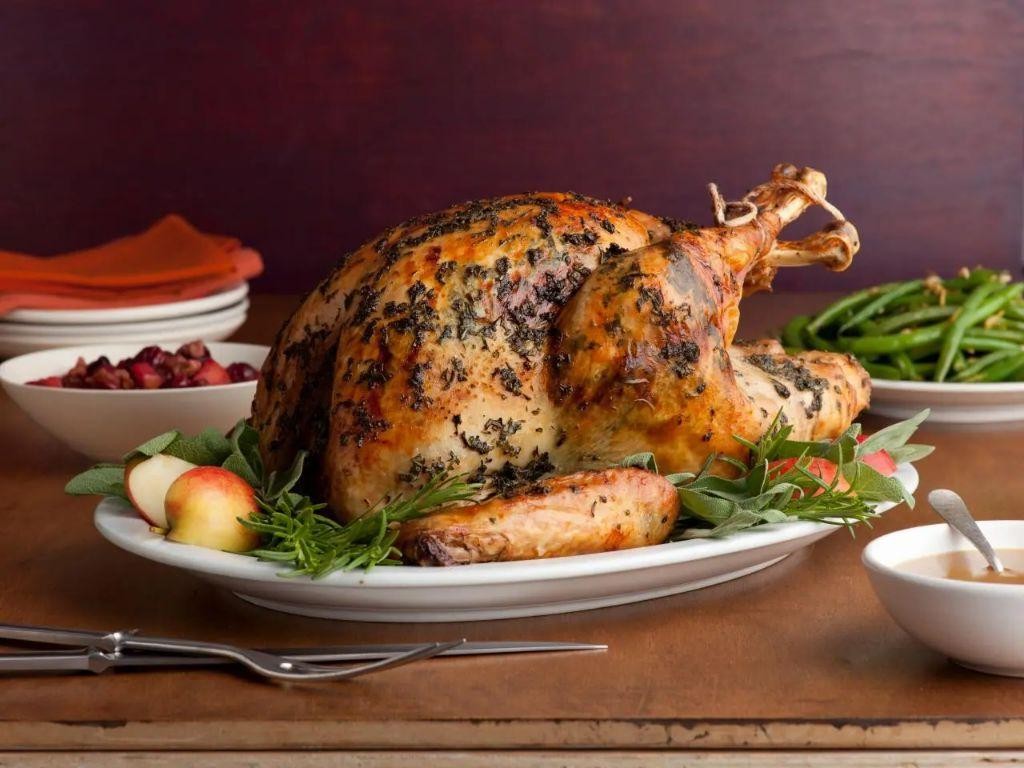
Holiday cooking just got easier with this cozy, flavorful turkey recipe. You’ll love how the herbs and apple cider come together for a juicy main dish that feels special without being fussy. It’s perfect for a festive dinner or a comforting weekend meal.
Serving: 6 | Pre Time: 20 minutes | Cooking Time: 90 minutes
Ingredients
– 1 (12-pound) whole turkey
– 2 tablespoons olive oil
– 1 tablespoon kosher salt
– 1 teaspoon black pepper
– 2 tablespoons fresh rosemary, chopped
– 2 tablespoons fresh thyme, chopped
– 2 cups apple cider
– 1 cup chicken broth
– 2 tablespoons all-purpose flour
– 2 tablespoons unsalted butter
Instructions
1. Preheat your oven to 325°F.
2. Pat the turkey dry with paper towels.
3. Rub the turkey all over with olive oil.
4. Season the turkey evenly with kosher salt and black pepper.
5. Sprinkle the chopped rosemary and thyme over the turkey, pressing gently to adhere.
6. Place the turkey breast-side up on a rack in a roasting pan.
7. Roast the turkey in the preheated oven for 90 minutes, or until a meat thermometer inserted into the thickest part of the thigh reads 165°F. Tip: For even browning, rotate the pan halfway through cooking.
8. Transfer the turkey to a cutting board and let it rest for 20 minutes. Tip: Resting allows juices to redistribute, keeping the meat moist.
9. While the turkey rests, pour the pan drippings into a measuring cup and skim off excess fat.
10. In a saucepan over medium heat, melt the unsalted butter.
11. Whisk in the all-purpose flour and cook for 1 minute until golden.
12. Gradually whisk in the apple cider and chicken broth until smooth.
13. Add the reserved pan drippings to the saucepan.
14. Bring the mixture to a simmer, whisking constantly, and cook for 5 minutes until thickened. Tip: If the gravy is too thick, thin it with a splash of broth.
15. Carve the turkey and serve it with the gravy.
Zesty herbs and sweet apple cider create a gravy that’s rich and tangy, perfectly complementing the tender, juicy turkey. For a fun twist, serve slices over mashed sweet potatoes or with a side of roasted Brussels sprouts—it’s a meal that feels both comforting and celebratory.
Sausage and Cranberry Stuffing
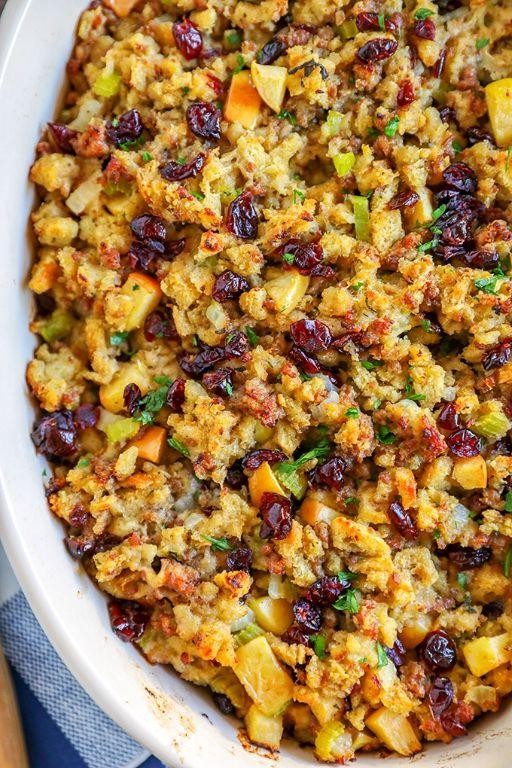
Finally, a stuffing that steals the show! You know those holiday side dishes that everyone politely takes a scoop of? This isn’t one of them. With savory sausage and sweet-tart cranberries, it’s the star of the plate.
Serving: 8 | Pre Time: 20 minutes | Cooking Time: 60 minutes
Ingredients
– 1 lb Italian sausage (casings removed)
– 1 cup unsalted butter
– 2 large yellow onions (diced)
– 4 stalks celery (diced)
– 3 cloves garlic (minced)
– 12 cups day-old bread cubes (1-inch pieces)
– 1 1/2 cups dried cranberries
– 2 cups chicken broth
– 2 large eggs (beaten)
– 1/4 cup fresh parsley (chopped)
– 2 tsp dried sage
– 1 tsp dried thyme
– 1 tsp kosher salt
– 1/2 tsp black pepper
Instructions
1. Preheat your oven to 350°F (175°C) and grease a 9×13-inch baking dish.
2. Heat a large skillet or Dutch oven over medium-high heat for 1 minute.
3. Add 1 lb Italian sausage to the hot skillet, breaking it into small crumbles with a wooden spoon.
4. Cook the sausage for 6-8 minutes, stirring occasionally, until it is browned and no longer pink.
5. Transfer the cooked sausage to a large mixing bowl using a slotted spoon, leaving the rendered fat in the skillet.
6. Add 1 cup unsalted butter to the skillet with the sausage fat and melt it over medium heat.
7. Add 2 large diced yellow onions and 4 diced celery stalks to the melted butter.
8. Cook the vegetables for 8-10 minutes, stirring frequently, until they are soft and translucent.
9. Add 3 minced garlic cloves to the skillet and cook for 1 more minute until fragrant.
10. Pour the cooked vegetable mixture into the large bowl with the sausage.
11. Add 12 cups day-old bread cubes, 1 1/2 cups dried cranberries, 1/4 cup chopped fresh parsley, 2 tsp dried sage, 1 tsp dried thyme, 1 tsp kosher salt, and 1/2 tsp black pepper to the bowl.
12. Gently toss all the dry ingredients together until evenly combined.
13. In a separate medium bowl, whisk together 2 cups chicken broth and 2 beaten eggs until smooth.
14. Pour the broth-egg mixture over the dry ingredients in the large bowl.
15. Use a large spoon or your hands to fold the mixture until the bread is evenly moistened, being careful not to crush the bread cubes.
16. Transfer the stuffing mixture to the greased 9×13-inch baking dish and spread it into an even layer.
17. Cover the dish tightly with aluminum foil.
18. Bake at 350°F (175°C) for 40 minutes.
19. Remove the foil and bake uncovered for an additional 20 minutes, or until the top is golden brown and crispy.
20. Let the stuffing rest at room temperature for 10 minutes before serving.
Most importantly, this stuffing bakes up with a perfect contrast: a crispy, golden top gives way to a moist, savory interior packed with juicy cranberries. The sweet-tart pops from the fruit cut beautifully through the rich sausage. Try serving it alongside roast turkey, or get creative and use any leftovers to stuff bell peppers or mushrooms for a fantastic next-day meal.
Sweet Potato Casserole with Marshmallow Topping
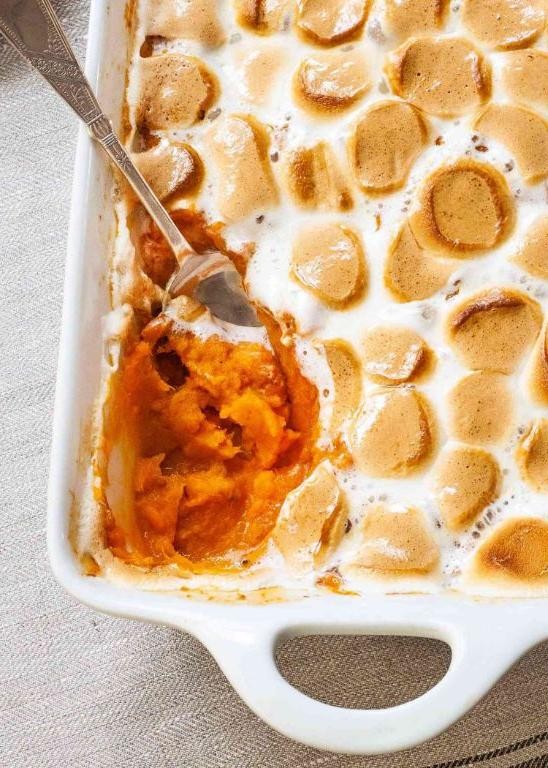
Savor the cozy flavors of fall with this classic side dish that’s both creamy and delightfully sweet. It’s the perfect make-ahead comfort food for holiday gatherings or a special weeknight dinner. You’ll love how the marshmallows get all golden and toasty on top.
Serving: 8 | Pre Time: 20 minutes | Cooking Time: 45 minutes
Ingredients
– 3 pounds sweet potatoes
– 1/2 cup unsalted butter, melted
– 1/2 cup granulated sugar
– 1/4 cup milk
– 2 large eggs
– 1 teaspoon vanilla extract
– 1/2 teaspoon salt
– 2 cups mini marshmallows
Instructions
1. Preheat your oven to 375°F.
2. Peel the sweet potatoes and cut them into 1-inch cubes.
3. Place the sweet potato cubes in a large pot and cover with water.
4. Bring the water to a boil over high heat, then reduce to a simmer and cook for 15–20 minutes until the potatoes are fork-tender.
5. Drain the sweet potatoes thoroughly in a colander.
6. Transfer the drained sweet potatoes to a large mixing bowl.
7. Add the melted butter, granulated sugar, milk, eggs, vanilla extract, and salt to the bowl.
8. Use a potato masher or electric mixer to blend everything until smooth and creamy.
9. Spread the sweet potato mixture evenly into a 9×13-inch baking dish.
10. Bake at 375°F for 25 minutes until the edges are lightly set.
11. Remove the baking dish from the oven and evenly sprinkle the mini marshmallows over the top.
12. Return the dish to the oven and bake for an additional 5–7 minutes, watching closely until the marshmallows are puffed and golden brown.
13. Let the casserole cool for 10 minutes before serving.
That irresistible marshmallow topping forms a crisp, caramelized crust over the velvety sweet potato base. Try serving it warm with a drizzle of maple syrup or a sprinkle of toasted pecans for extra crunch.
Green Bean Almondine with Garlic and Lemon
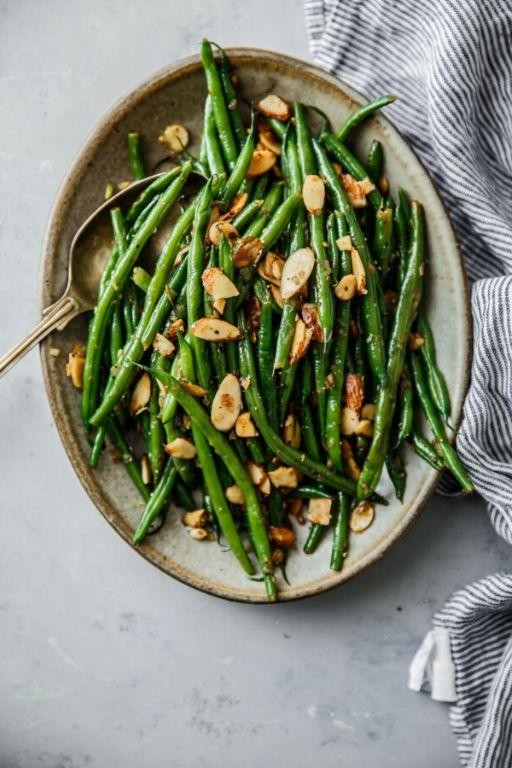
Tired of the same old veggie sides? This green bean almondine is about to become your new go-to—it’s crisp, garlicky, and bright with lemon, and it comes together in just minutes. You’ll love how the toasted almonds add a nutty crunch that makes it feel special without any fuss.
Serving: 4 | Pre Time: 10 minutes | Cooking Time: 15 minutes
Ingredients
– 1 lb fresh green beans, trimmed
– 1/4 cup sliced almonds
– 3 cloves garlic, minced
– 2 tbsp unsalted butter
– 2 tbsp olive oil
– 1 tbsp fresh lemon juice
– 1/2 tsp salt
– 1/4 tsp black pepper
Instructions
1. Bring a large pot of salted water to a boil over high heat.
2. Add the green beans and cook for 4–5 minutes until crisp-tender, then drain and set aside.
3. In a large skillet, toast the sliced almonds over medium heat for 2–3 minutes, stirring constantly until golden brown, and transfer to a plate.
4. In the same skillet, melt the butter with the olive oil over medium heat.
5. Add the minced garlic and cook for 1 minute until fragrant, being careful not to let it burn.
6. Add the blanched green beans to the skillet and toss to coat in the garlic butter.
7. Cook the green beans for 3–4 minutes, stirring occasionally, until heated through and slightly caramelized.
8. Stir in the toasted almonds, fresh lemon juice, salt, and black pepper, and toss everything together for 1 minute.
9. Remove from heat and serve immediately.
The green beans stay crisp-tender, while the toasted almonds add a satisfying crunch and nutty depth. For a creative twist, sprinkle with grated Parmesan or serve alongside grilled chicken for a complete meal.
Creamy Mashed Potatoes with Roasted Garlic

There’s nothing quite like a bowl of creamy mashed potatoes to make a meal feel complete, especially when they’re infused with the sweet, mellow flavor of roasted garlic. You’re going to love how simple this version is to make, and it’s guaranteed to be the star of your dinner table.
Serving: 6 | Pre Time: 15 minutes | Cooking Time: 60 minutes
Ingredients
– 3 lbs russet potatoes, peeled and quartered
– 1 whole head of garlic
– 1/2 cup unsalted butter, softened
– 1 cup whole milk, warmed
– 1 tsp salt
– 1/2 tsp black pepper
Instructions
1. Preheat your oven to 400°F.
2. Slice the top 1/4 inch off the head of garlic to expose the cloves.
3. Place the garlic head on a piece of aluminum foil, drizzle it with 1 tbsp of olive oil, and wrap it tightly.
4. Roast the wrapped garlic in the preheated oven for 40 minutes, or until the cloves are soft and golden brown.
5. While the garlic roasts, place the quartered potatoes in a large pot and cover them with cold water by 2 inches.
6. Add 1 tsp of salt to the pot and bring the water to a boil over high heat.
7. Reduce the heat to medium and simmer the potatoes for 15-20 minutes, until they are fork-tender.
8. Drain the potatoes thoroughly in a colander and return them to the warm pot.
9. Let the potatoes sit in the pot for 2 minutes to allow excess steam to evaporate. (Tip: This prevents watery mashed potatoes.)
10. Squeeze the soft, roasted garlic cloves from their skins into a small bowl.
11. Mash the roasted garlic with a fork until it forms a smooth paste.
12. Add the softened butter and garlic paste to the warm potatoes.
13. Use a potato masher to begin mashing the potatoes until the butter is melted and incorporated.
14. Gradually pour in the warmed milk while continuing to mash. (Tip: Warm milk helps the potatoes stay hot and absorb better.)
15. Switch to a hand mixer or a sturdy whisk and beat the potatoes on medium speed for 1-2 minutes until they are smooth and creamy. (Tip: Do not overmix, or the potatoes can become gluey.)
16. Season the mashed potatoes with the remaining 1/2 tsp of salt and 1/2 tsp of black pepper, stirring to combine.
17. Taste and adjust seasoning if necessary, then serve immediately.
You’ll find these potatoes are incredibly smooth and rich, with a deep, caramelized sweetness from the garlic that’s far more complex than raw garlic could ever provide. They’re perfect as-is, but for a fun twist, try folding in some chopped fresh chives or a handful of shredded sharp cheddar cheese just before serving.
Classic Pumpkin Pie with Whipped Cream
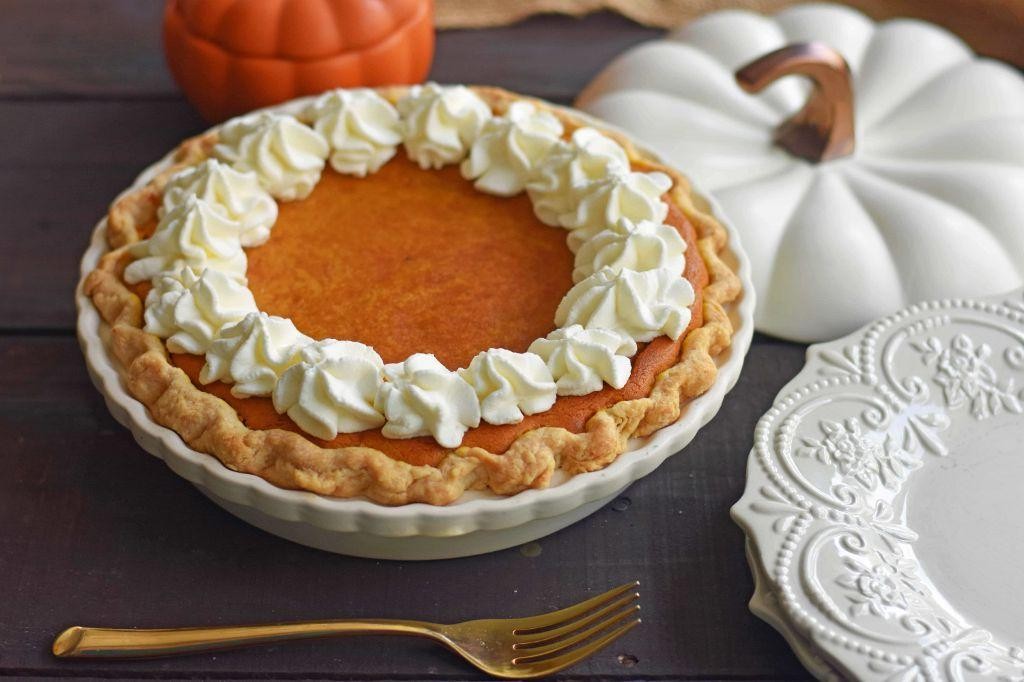
Whether you’re hosting Thanksgiving dinner or just craving a cozy fall dessert, this classic pumpkin pie is the perfect treat. It’s surprisingly simple to make from scratch, and that homemade whipped cream on top takes it to another level.
Serving: 8 | Pre Time: 20 minutes | Cooking Time: 55 minutes
Ingredients
– 1 9-inch pie crust
– 1 15-ounce can pumpkin puree
– 3 large eggs
– 1 cup granulated sugar
– 1 1/2 tsp ground cinnamon
– 1/2 tsp ground ginger
– 1/4 tsp ground nutmeg
– 1/4 tsp ground cloves
– 1/2 tsp salt
– 1 12-ounce can evaporated milk
– 1 cup heavy whipping cream
– 2 tbsp powdered sugar
– 1 tsp vanilla extract
Instructions
1. Preheat your oven to 425°F.
2. Place the 9-inch pie crust in a pie dish and crimp the edges.
3. In a large bowl, whisk together the 15-ounce can of pumpkin puree and 3 large eggs until smooth.
4. Add 1 cup granulated sugar, 1 1/2 tsp ground cinnamon, 1/2 tsp ground ginger, 1/4 tsp ground nutmeg, 1/4 tsp ground cloves, and 1/2 tsp salt to the bowl. Whisk until fully combined.
5. Gradually pour in the 12-ounce can of evaporated milk while whisking to create a smooth filling. Tip: For the best texture, avoid overmixing once the milk is added.
6. Pour the filling into the prepared pie crust.
7. Bake at 425°F for 15 minutes.
8. Reduce the oven temperature to 350°F and continue baking for 40-45 minutes. Tip: The pie is done when the center jiggles slightly but the edges are set. A knife inserted near the center should come out clean.
9. Remove the pie from the oven and let it cool completely on a wire rack, about 2 hours.
10. While the pie cools, make the whipped cream by chilling a medium bowl and beaters for 10 minutes.
11. Pour 1 cup heavy whipping cream into the chilled bowl.
12. Add 2 tbsp powdered sugar and 1 tsp vanilla extract.
13. Beat on medium-high speed until stiff peaks form, about 2-3 minutes. Tip: Stop beating as soon as peaks hold their shape to prevent the cream from turning grainy.
14. Serve the cooled pie with dollops of whipped cream on top.
The pie sets to a beautifully smooth, custard-like texture with warm spices that fill your kitchen with the scent of fall. For a creative twist, try adding a sprinkle of toasted pecans or a drizzle of caramel sauce over the whipped cream before serving.
Cranberry Orange Relish
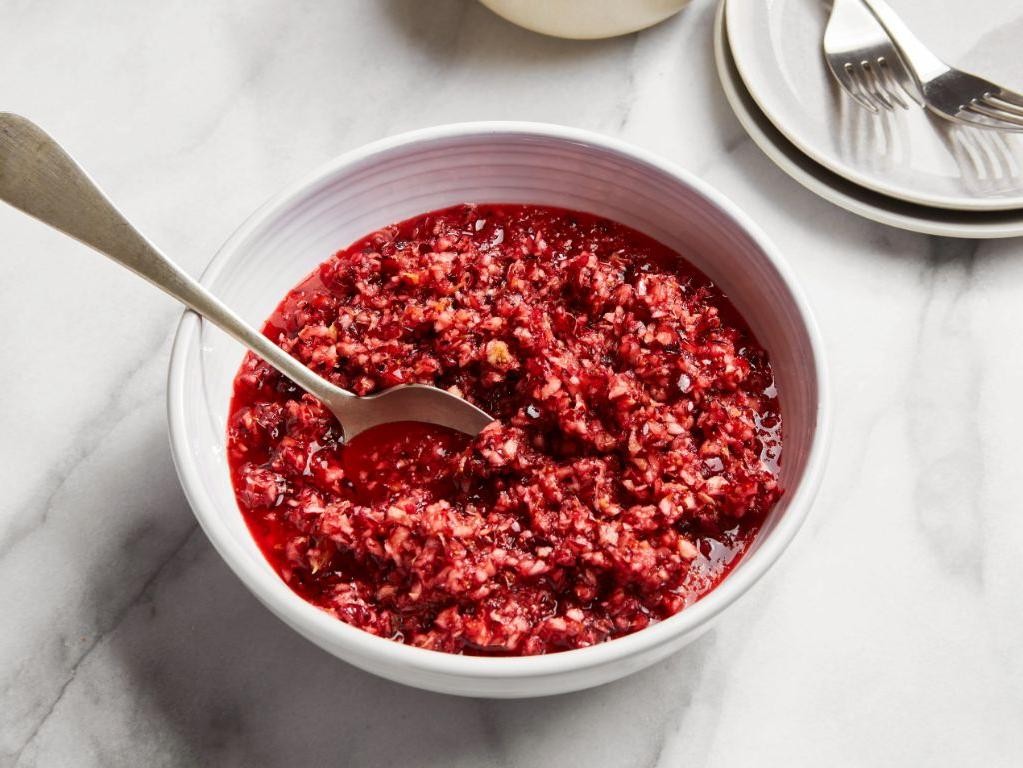
Let’s be real—holiday meals can get a bit predictable. This cranberry orange relish is the bright, tangy sidekick your table needs to shake things up. It’s a no-cook wonder that comes together in minutes, and the fresh, zesty flavor cuts through all the rich holiday classics perfectly.
Serving: 8 | Pre Time: 15 minutes | Cooking Time: 0 minutes
Ingredients
– 12 ounces fresh cranberries
– 1 large navel orange
– 1 cup granulated sugar
– 1/4 cup orange juice
– 1/2 teaspoon ground cinnamon
Instructions
1. Rinse 12 ounces of fresh cranberries under cold water in a colander, then pat them completely dry with paper towels—this prevents a watery relish.
2. Zest the entire large navel orange using a fine grater, being careful to avoid the bitter white pith.
3. Peel the orange and remove any remaining white pith from the segments.
4. Roughly chop the orange segments into 1/2-inch pieces.
5. Combine the dried cranberries, orange zest, chopped orange, 1 cup granulated sugar, 1/4 cup orange juice, and 1/2 teaspoon ground cinnamon in a large mixing bowl.
6. Stir the mixture vigorously with a wooden spoon for about 2 minutes until the sugar begins to dissolve and coats the ingredients evenly.
7. Cover the bowl tightly with plastic wrap and refrigerate it for at least 4 hours, or ideally overnight, to allow the flavors to meld and the cranberries to soften slightly—this step is key for the best texture.
8. Before serving, give the relish a final stir to redistribute any juices that have settled at the bottom.
9. Transfer the relish to a serving bowl using a slotted spoon if you prefer a less juicy consistency.
So, what do you get? A relish with a fantastic texture—the cranberries soften just enough to be pleasantly tender while still offering a slight pop, all suspended in a glossy, syrupy juice. The flavor is a perfect balance of tart, sweet, and warmly spiced. Try it spooned over baked brie, swirled into yogurt, or as a bold topping for your morning oatmeal.
Maple Glazed Carrots
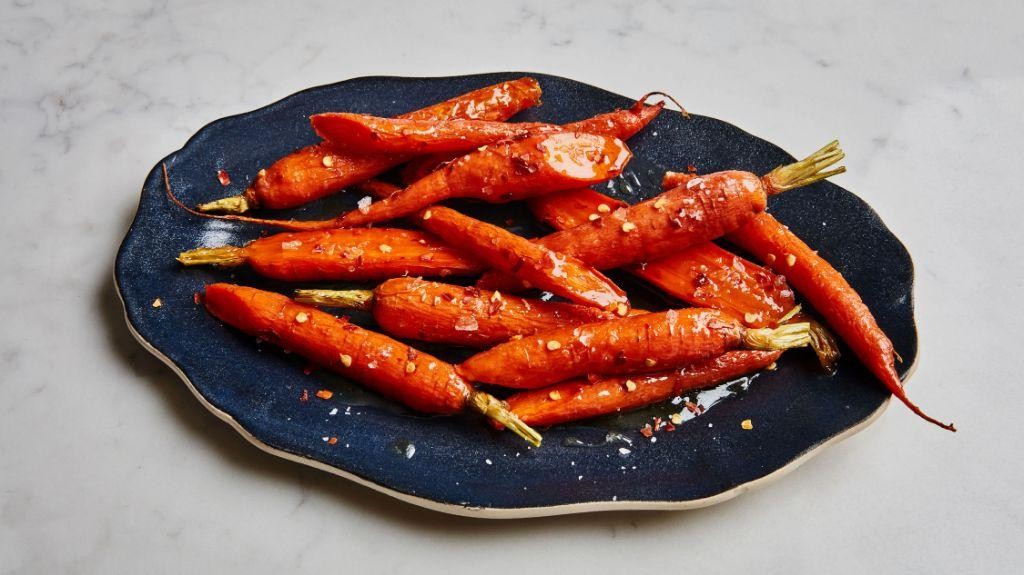
Nothing says cozy comfort like a simple side dish that feels special. Maple glazed carrots are that perfect sweet-and-savory addition to your holiday table or weeknight dinner, and you can whip them up with minimal fuss. They’re a total crowd-pleaser that makes veggies the star.
Serving: 4 | Pre Time: 10 minutes | Cooking Time: 20 minutes
Ingredients
– 1 pound carrots, peeled and sliced into 1/2-inch rounds
– 2 tablespoons unsalted butter
– 3 tablespoons pure maple syrup
– 1/2 teaspoon salt
– 1/4 teaspoon black pepper
– 1 tablespoon fresh thyme leaves
Instructions
1. Preheat your oven to 400°F and line a large baking sheet with parchment paper for easy cleanup.
2. Place the sliced carrots in a single layer on the prepared baking sheet.
3. In a small microwave-safe bowl, melt the butter in the microwave for 20-30 seconds until liquid.
4. Whisk the melted butter, maple syrup, salt, and black pepper together in the bowl until fully combined.
5. Pour the maple butter mixture evenly over the carrots on the baking sheet.
6. Use your hands or a spatula to toss the carrots until they are thoroughly coated in the glaze.
7. Roast the carrots in the preheated oven for 15 minutes.
8. Remove the baking sheet from the oven and sprinkle the fresh thyme leaves over the carrots.
9. Toss the carrots again gently to distribute the thyme and return the sheet to the oven.
10. Roast for an additional 5-10 minutes, until the carrots are tender when pierced with a fork and the glaze is bubbling and slightly caramelized around the edges.
11. Transfer the glazed carrots to a serving dish immediately.
Mouthwatering and tender, these carrots have a beautiful glossy sheen with caramelized, sticky-sweet edges. The fresh thyme adds an herby brightness that cuts through the richness perfectly. Try serving them over a bed of creamy mashed potatoes or alongside a juicy roasted chicken for a complete, comforting meal.
Butternut Squash Soup with Sage

Warm, cozy, and perfect for chilly evenings, this butternut squash soup is a hug in a bowl. You’ll love how the sweet squash balances with earthy sage, creating a comforting dish that’s surprisingly simple to make. Let’s get cooking!
Serving: 4 | Pre Time: 15 minutes | Cooking Time: 35 minutes
Ingredients
– 1 medium butternut squash (about 2 lbs), peeled, seeded, and cubed
– 2 tbsp olive oil
– 1 medium yellow onion, diced
– 2 cloves garlic, minced
– 4 cups vegetable broth
– 1/2 cup heavy cream
– 8 fresh sage leaves
– 1/2 tsp salt
– 1/4 tsp black pepper
Instructions
1. Preheat your oven to 400°F and line a baking sheet with parchment paper.
2. Toss the cubed butternut squash with 1 tbsp olive oil, salt, and pepper on the baking sheet.
3. Roast the squash for 25 minutes until tender and lightly browned, stirring halfway through for even cooking.
4. While the squash roasts, heat the remaining 1 tbsp olive oil in a large pot over medium heat.
5. Add the diced onion and cook for 5 minutes until softened, stirring occasionally.
6. Stir in the minced garlic and cook for 1 minute until fragrant.
7. Add the roasted squash and vegetable broth to the pot, bringing it to a simmer.
8. Let the mixture simmer for 10 minutes to blend the flavors.
9. Carefully transfer the soup to a blender and blend until smooth, working in batches if needed to avoid spills.
10. Return the blended soup to the pot over low heat.
11. Stir in the heavy cream until fully incorporated.
12. In a small skillet, heat 1 tsp olive oil over medium heat and fry the sage leaves for 30 seconds until crisp, then set aside on paper towels.
13. Ladle the soup into bowls and top with the crispy sage leaves.
Ultra-smooth and velvety, this soup has a rich, sweet flavor with a hint of savory sage. Serve it with crusty bread for dipping, or drizzle with a swirl of cream for an extra touch of indulgence. It’s a fall favorite that’ll warm you right up!
Cornbread and Pecan Dressing
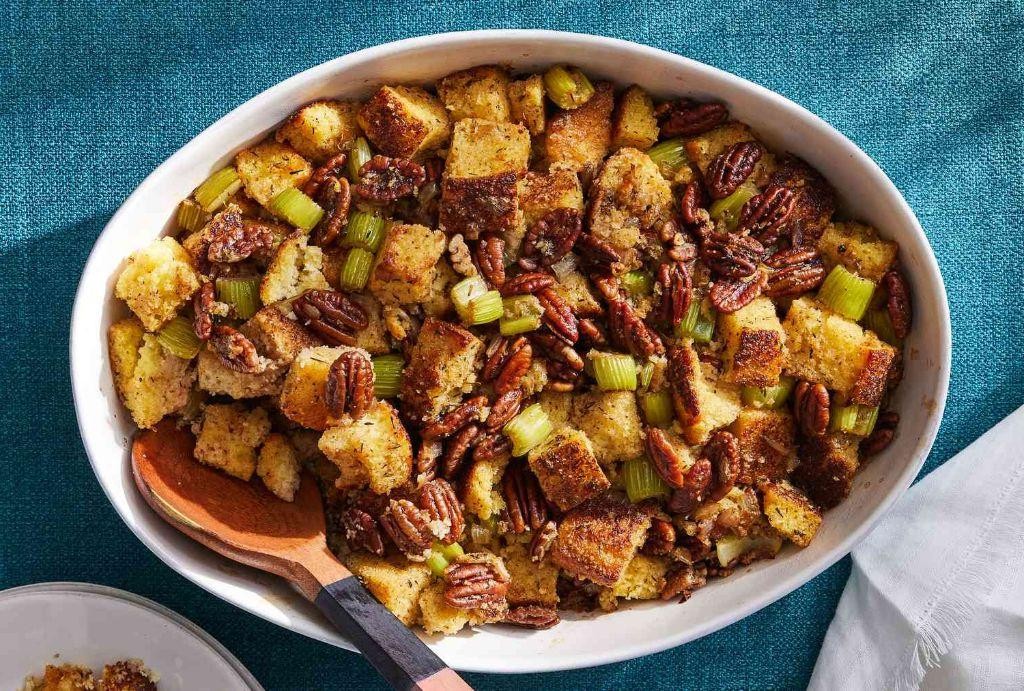
Holiday meals just got a whole lot cozier with this comforting side. You’ll love how the sweet cornbread and crunchy pecans come together in this classic dressing—it’s the perfect savory-sweet bite to round out your feast.
Serving: 8 | Pre Time: 20 minutes | Cooking Time: 45 minutes
Ingredients
– 6 cups crumbled cornbread
– 1 cup chopped pecans
– 1 cup diced yellow onion
– 1 cup diced celery
– 3/4 cup unsalted butter
– 2 large eggs
– 2 cups chicken broth
– 1 tsp dried sage
– 1 tsp dried thyme
– 1/2 tsp black pepper
– 1/2 tsp salt
Instructions
1. Preheat your oven to 375°F and grease a 9×13-inch baking dish.
2. Spread the crumbled cornbread and chopped pecans on a baking sheet and toast in the preheated oven for 8-10 minutes until lightly golden, stirring halfway through for even browning.
3. While the cornbread toasts, melt 1/2 cup of the unsalted butter in a large skillet over medium heat.
4. Add the diced yellow onion and diced celery to the skillet and sauté for 6-8 minutes until softened and translucent.
5. In a large mixing bowl, whisk together the 2 large eggs and 2 cups chicken broth until fully combined.
6. Stir in the dried sage, dried thyme, black pepper, and salt into the egg mixture.
7. Add the toasted cornbread and pecans along with the sautéed vegetables to the bowl, gently folding everything together until evenly moistened.
8. Melt the remaining 1/4 cup unsalted butter and drizzle it over the mixture, then transfer it to the prepared baking dish, pressing down lightly.
9. Cover the dish with aluminum foil and bake at 375°F for 25 minutes.
10. Remove the foil and bake for an additional 20 minutes until the top is crispy and golden brown.
11. Let the dressing rest for 10 minutes before serving to allow it to set properly.
The result is a wonderfully textured dish with a crispy top and a moist, tender interior. The pecans add a delightful crunch that contrasts with the soft cornbread, while the herbs bring a savory depth. Try serving it alongside roasted turkey or even as a hearty base for a poached egg breakfast the next day.
Roasted Brussels Sprouts with Bacon and Parmesan
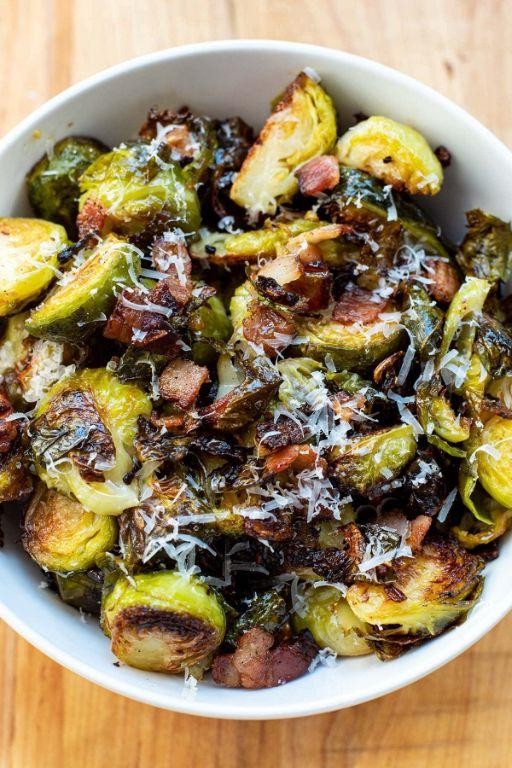
Gather around, because I’ve got a side dish that’ll make you forget all those soggy, bland Brussels sprouts of your past. This roasted version with crispy bacon and savory Parmesan is a total game-changer for weeknight dinners or holiday feasts. You’re going to love how simple it is to pull together with just a handful of ingredients.
Serving: 4 | Pre Time: 10 minutes | Cooking Time: 25 minutes
Ingredients
– 1 pound Brussels sprouts
– 4 slices thick-cut bacon
– 2 tablespoons olive oil
– 1/2 teaspoon kosher salt
– 1/4 teaspoon black pepper
– 1/4 cup grated Parmesan cheese
Instructions
1. Preheat your oven to 400°F and line a rimmed baking sheet with parchment paper for easy cleanup.
2. Trim the stem ends off the Brussels sprouts, remove any loose outer leaves, and cut each sprout in half lengthwise.
3. Chop the bacon into 1/2-inch pieces and scatter them evenly across the prepared baking sheet.
4. In a large bowl, toss the halved Brussels sprouts with olive oil, kosher salt, and black pepper until evenly coated.
5. Spread the Brussels sprouts in a single layer on the baking sheet with the bacon, arranging them cut-side down to maximize browning.
6. Roast in the preheated oven for 20-25 minutes, or until the sprouts are tender and caramelized with golden-brown edges and the bacon is crispy.
7. Immediately sprinkle the grated Parmesan cheese over the hot sprouts and bacon right on the baking sheet.
8. Toss everything gently to melt the cheese and combine, then transfer to a serving dish.
9. Ready to dig in? This dish delivers a perfect mix of textures—crispy bacon, tender-crisp sprouts, and that salty, melted Parmesan. Roast it up for a cozy family meal or serve it alongside grilled chicken for an easy upgrade. Honestly, it might just become your new favorite way to eat veggies!
Pecan Pie with a Buttery Crust
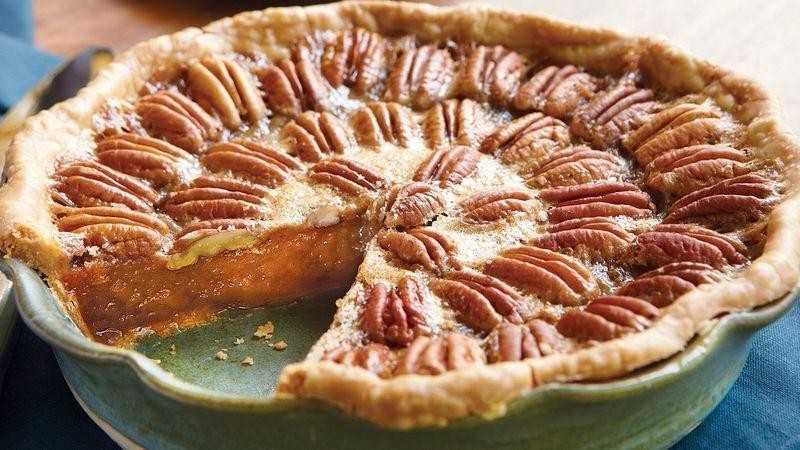
Remember that holiday dessert you always wish you could make? This pecan pie with a buttery crust is your answer—it’s surprisingly simple to whip up and delivers that classic, gooey-sweet filling everyone loves.
Serving: 8 | Pre Time: 20 minutes | Cooking Time: 50 minutes
Ingredients
– 1 1/4 cups all-purpose flour
– 1/2 cup unsalted butter, cold and cubed
– 1/4 cup ice water
– 3 large eggs
– 1 cup light corn syrup
– 1 cup granulated sugar
– 2 tbsp unsalted butter, melted
– 1 tsp vanilla extract
– 1/4 tsp salt
– 2 cups pecan halves
Instructions
1. Preheat your oven to 350°F (175°C).
2. In a large bowl, combine 1 1/4 cups all-purpose flour and 1/2 cup cold, cubed unsalted butter.
3. Use a pastry cutter or your fingers to work the butter into the flour until the mixture resembles coarse crumbs.
4. Gradually add 1/4 cup ice water, mixing just until the dough comes together.
5. Tip: Handle the dough minimally to keep the crust flaky.
6. Press the dough into a 9-inch pie dish, trimming any excess edges.
7. In a separate bowl, whisk 3 large eggs until smooth.
8. Add 1 cup light corn syrup, 1 cup granulated sugar, 2 tbsp melted unsalted butter, 1 tsp vanilla extract, and 1/4 tsp salt to the eggs, whisking until fully combined.
9. Stir in 2 cups pecan halves until evenly coated.
10. Pour the filling into the prepared crust, spreading the pecans evenly.
11. Tip: Arrange some pecans on top for a decorative look before baking.
12. Bake at 350°F (175°C) for 50 minutes, or until the filling is set and the crust is golden brown.
13. Tip: Check the pie at 45 minutes—if the crust browns too quickly, cover the edges with foil.
14. Remove the pie from the oven and let it cool completely on a wire rack, about 2 hours.
Buttery and crisp, this pie boasts a rich, caramel-like filling studded with toasted pecans. Serve it warm with a scoop of vanilla ice cream for a cozy treat, or slice it cold for a firm, satisfying texture that holds up perfectly.
Apple Crisp with Oatmeal Topping
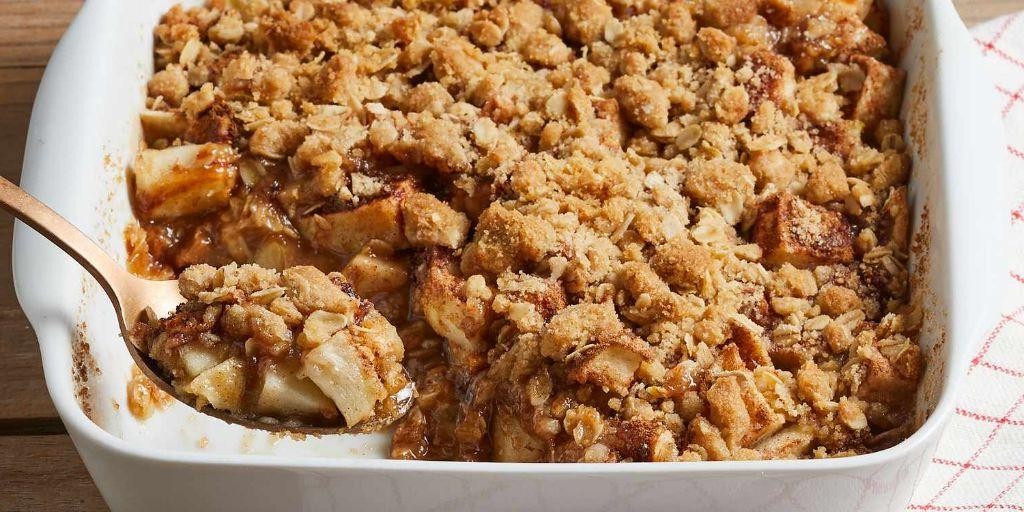
Savor the cozy flavors of fall with this easy apple crisp topped with a crunchy oatmeal streusel. You’ll love how the sweet, tender apples bake up under that golden-brown topping—it’s the perfect dessert for a chilly evening or a weekend treat. Plus, it comes together with simple ingredients you probably already have in your pantry.
Serving: 6 | Pre Time: 20 minutes | Cooking Time: 45 minutes
Ingredients
– 6 cups peeled and sliced apples
– 1/2 cup granulated sugar
– 1 tbsp lemon juice
– 1 tsp ground cinnamon
– 1/4 tsp salt
– 1 cup old-fashioned rolled oats
– 3/4 cup all-purpose flour
– 3/4 cup packed brown sugar
– 1/2 cup unsalted butter, cold and cubed
Instructions
1. Preheat your oven to 375°F and lightly grease a 9×9-inch baking dish.
2. In a large bowl, combine the sliced apples, granulated sugar, lemon juice, cinnamon, and salt, tossing until evenly coated.
3. Tip: Use a mix of tart and sweet apple varieties like Granny Smith and Honeycrisp for a balanced flavor.
4. Transfer the apple mixture to the prepared baking dish, spreading it into an even layer.
5. In a separate bowl, mix the oats, flour, and brown sugar until well combined.
6. Add the cold cubed butter to the oat mixture, using your fingers or a pastry cutter to work it in until the mixture resembles coarse crumbs.
7. Tip: Keep the butter cold to ensure the topping stays crisp and doesn’t become greasy.
8. Sprinkle the oat topping evenly over the apples in the baking dish, covering them completely.
9. Place the dish in the preheated oven and bake for 45 minutes, or until the topping is golden brown and the apples are bubbling around the edges.
10. Tip: Check the crisp at 40 minutes—if the topping browns too quickly, loosely tent it with aluminum foil to prevent burning.
11. Remove the crisp from the oven and let it cool on a wire rack for at least 15 minutes before serving.
You’ll adore the contrast between the soft, spiced apples and the crunchy, buttery oat topping. Serve it warm with a scoop of vanilla ice cream for an extra indulgent touch, or enjoy it plain as a comforting snack any time of day.
Homemade Dinner Rolls with Honey Butter

Oh, there’s nothing quite like the smell of fresh-baked rolls filling your kitchen. You know that cozy, warm feeling you get when you pull something homemade out of the oven? That’s exactly what these fluffy dinner rolls deliver, especially when you slather them with sweet honey butter. It’s a simple joy that makes any meal feel special.
Serving: 12 | Pre Time: 120 minutes | Cooking Time: 20 minutes
Ingredients
– 1 cup warm whole milk (110°F)
– 2 1/4 tsp active dry yeast
– 1/4 cup granulated sugar
– 1/3 cup unsalted butter, melted
– 1 large egg
– 1 tsp salt
– 3 1/2 cups all-purpose flour
– 1/2 cup unsalted butter, softened
– 1/4 cup honey
Instructions
1. Combine 1 cup warm whole milk (110°F), 2 1/4 tsp active dry yeast, and 1/4 cup granulated sugar in a large bowl. Let it sit for 5 minutes until foamy.
2. Tip: Use a thermometer to check the milk temperature; too hot will kill the yeast.
3. Add 1/3 cup melted unsalted butter, 1 large egg, and 1 tsp salt to the yeast mixture. Whisk until smooth.
4. Gradually stir in 3 1/2 cups all-purpose flour with a wooden spoon until a shaggy dough forms.
5. Turn the dough onto a lightly floured surface and knead for 8 minutes until smooth and elastic.
6. Place the dough in a greased bowl, cover with a damp towel, and let rise in a warm place for 1 hour until doubled in size.
7. Punch down the dough and divide it into 12 equal pieces. Roll each piece into a smooth ball.
8. Arrange the dough balls in a greased 9×13-inch baking dish, cover, and let rise for 45 minutes.
9. Preheat your oven to 375°F.
10. Bake the rolls for 18-20 minutes until golden brown on top.
11. Tip: Check for doneness by tapping a roll; it should sound hollow.
12. While the rolls bake, beat 1/2 cup softened unsalted butter and 1/4 cup honey in a small bowl until creamy.
13. Tip: For extra flavor, add a pinch of salt to the honey butter.
14. Remove the rolls from the oven and brush them generously with the honey butter while still warm.
15. Let the rolls cool in the pan for 5 minutes before serving.
Buttery and soft, these rolls have a tender crumb that pulls apart beautifully. The honey butter soaks in, giving them a sweet, glossy finish that’s irresistible. Serve them warm alongside a hearty soup or use them as mini sliders for your next gathering—they’re versatile enough for any occasion.
Spiced Pear Cranberry Sauce
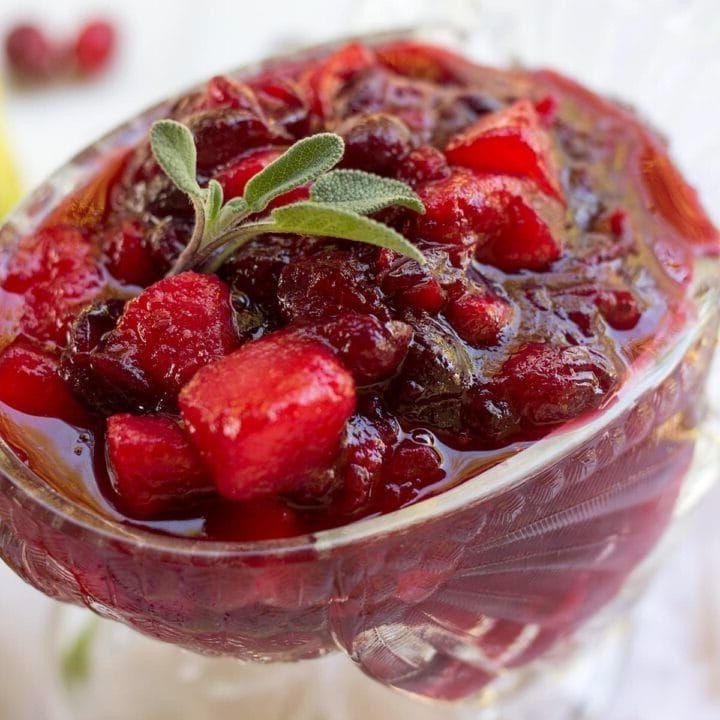
Unbelievably easy to make and packed with festive flavor, this spiced pear cranberry sauce will become your new holiday staple. You’ll love how the sweet pears balance the tart cranberries, all warmed up with cozy spices. It’s the perfect upgrade from the canned stuff.
Serving: 8 | Pre Time: 10 minutes | Cooking Time: 20 minutes
Ingredients
– 2 cups fresh cranberries
– 2 large ripe pears, peeled and diced
– 1 cup granulated sugar
– 1/2 cup water
– 1/2 cup orange juice
– 1 cinnamon stick
– 1/4 tsp ground cloves
– 1/4 tsp ground ginger
– 1/8 tsp salt
Instructions
1. Rinse the 2 cups of fresh cranberries under cold water in a colander and drain them thoroughly.
2. Peel the 2 large ripe pears, core them, and dice them into 1/2-inch pieces.
3. Combine the cranberries, diced pears, 1 cup of granulated sugar, 1/2 cup of water, and 1/2 cup of orange juice in a medium saucepan.
4. Add the 1 cinnamon stick, 1/4 tsp of ground cloves, 1/4 tsp of ground ginger, and 1/8 tsp of salt to the saucepan.
5. Place the saucepan over medium-high heat and bring the mixture to a boil, stirring occasionally with a wooden spoon.
6. Once boiling, reduce the heat to medium-low and let it simmer uncovered for 15 minutes, stirring every 5 minutes to prevent sticking.
7. After 15 minutes, remove the saucepan from the heat and discard the cinnamon stick.
8. Use a potato masher to gently mash about half of the cranberries and pears directly in the saucepan for a chunkier texture.
9. Let the sauce cool in the saucepan for 10 minutes to thicken slightly before transferring it to a serving bowl.
10. Cover the bowl with plastic wrap and refrigerate the sauce for at least 2 hours to allow the flavors to meld and the sauce to set.
Delightfully chunky with a glossy sheen, this sauce offers a perfect balance of sweet and tart with warm spice notes. Serve it chilled alongside your holiday turkey, spread it on a leftover sandwich, or even spoon it over vanilla ice cream for a festive dessert twist.
Chocolate Hazelnut Tart
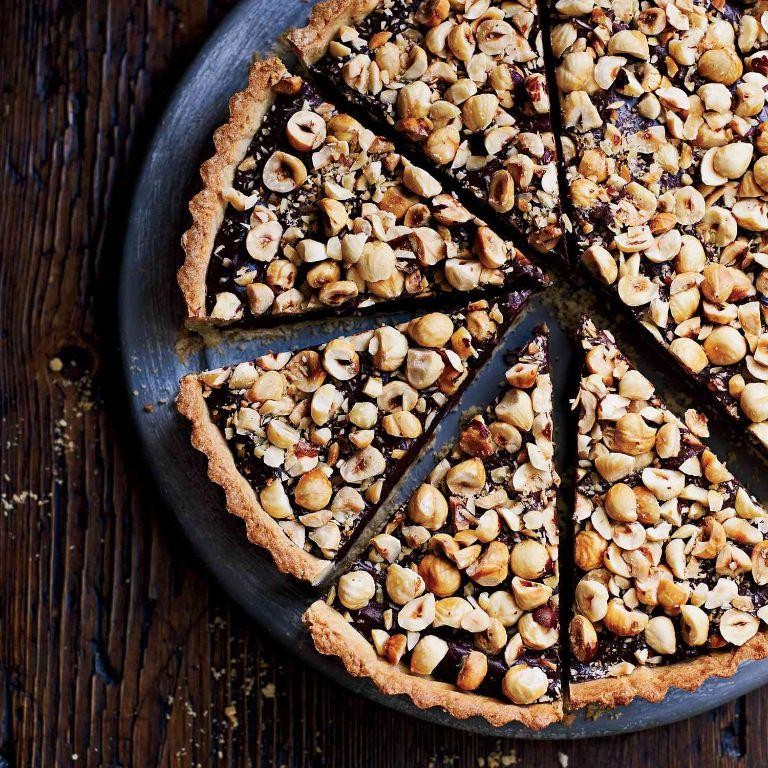
Fancy a dessert that feels like a warm hug? This chocolate hazelnut tart combines a buttery crust with a rich, nutty filling. You’ll love how simple it is to make something so impressive.
Serving: 8 | Pre Time: 20 minutes | Cooking Time: 35 minutes
Ingredients
– 1 1/4 cups all-purpose flour
– 1/2 cup unsalted butter, cold and cubed
– 1/4 cup granulated sugar
– 1/4 teaspoon salt
– 1 cup hazelnuts, toasted and chopped
– 1 cup semisweet chocolate chips
– 3/4 cup heavy cream
– 2 large eggs
– 1/2 cup light brown sugar
– 1 teaspoon vanilla extract
Instructions
1. Preheat your oven to 350°F.
2. In a food processor, pulse 1 1/4 cups all-purpose flour, 1/2 cup cold cubed unsalted butter, 1/4 cup granulated sugar, and 1/4 teaspoon salt until the mixture resembles coarse crumbs.
3. Press the dough evenly into a 9-inch tart pan with a removable bottom, going up the sides.
4. Bake the crust for 15 minutes at 350°F until lightly golden; let it cool slightly on a wire rack.
5. Sprinkle 1 cup toasted chopped hazelnuts and 1 cup semisweet chocolate chips over the cooled crust.
6. In a medium bowl, whisk together 3/4 cup heavy cream, 2 large eggs, 1/2 cup light brown sugar, and 1 teaspoon vanilla extract until smooth.
7. Pour the cream mixture over the hazelnuts and chocolate in the crust.
8. Bake the tart at 350°F for 20 minutes, or until the filling is set and no longer jiggles in the center.
9. Remove the tart from the oven and let it cool completely on a wire rack before slicing.
10. Serve the tart at room temperature or chilled.
Really, the magic is in that crunchy hazelnut layer against the smooth chocolate—it’s a texture dream. For a fun twist, drizzle it with caramel or top with a scoop of vanilla ice cream to balance the richness.
Conclusion
Deliciously, this roundup offers everything you need for a memorable Thanksgiving feast. From classic sides to show-stopping desserts, there’s a recipe here for every home cook. We hope you find inspiration to try something new this year! Share your favorites in the comments below, and if you loved this list, please pin it to your Pinterest boards to save for later. Happy cooking and Happy Turkey Day!