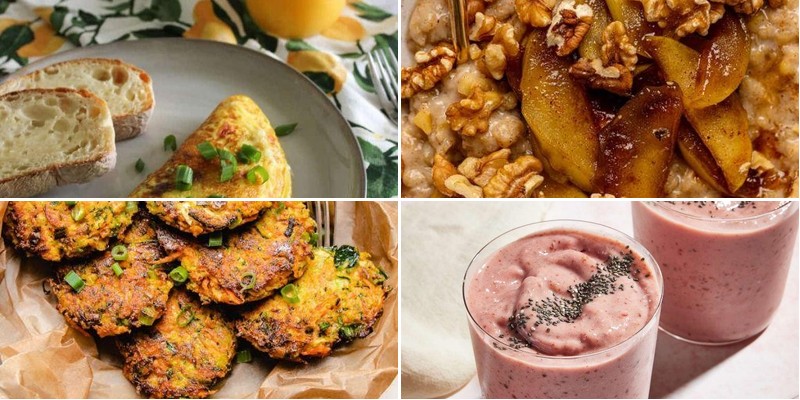
Oh, the daily dilemma of feeding a picky toddler! If you’re tired of breakfast battles and searching for creative, nutritious options your little one will actually eat, you’ve come to the right place. We’ve gathered 27 delightful recipes that turn morning meals into fun, stress-free experiences. Get ready to discover tasty ideas that will have even the fussiest eaters asking for more!
Banana Oatmeal Pancakes
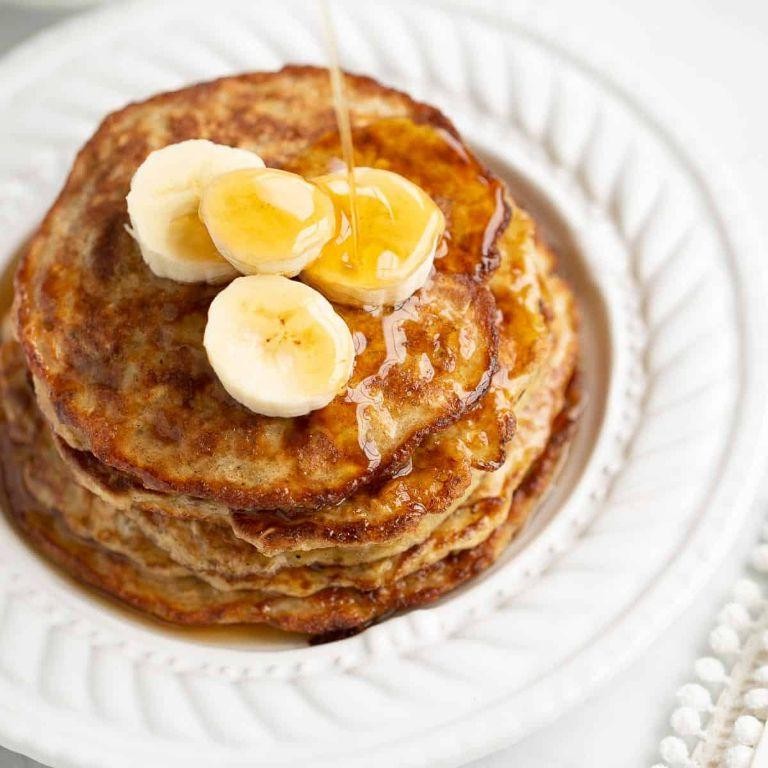
Kickstart your morning with these banana oatmeal pancakes that’ll make your taste buds do a happy dance and your regular pancakes green with envy. Who knew your overripe bananas could transform into such fluffy, golden-brown perfection? It’s basically breakfast magic with a side of “why didn’t I make these sooner?”
3
servings10
minutes20
minutesIngredients
– 2 very ripe bananas (the spottier, the sweeter—trust me on this)
– 1 cup old-fashioned rolled oats (not instant, they hold their texture better)
– 2 large eggs at room temperature (they incorporate more smoothly)
– 1/2 cup whole milk (or your favorite milk alternative)
– 1 tbsp pure maple syrup (the real stuff, none of that pancake syrup imposter)
– 1 tsp baking powder (your fluffiness secret weapon)
– 1/2 tsp ground cinnamon (because everything’s better with cinnamon)
– 1/4 tsp salt (to balance all that sweetness)
– 2 tbsp unsalted butter for cooking (plus extra for serving if you’re feeling decadent)
Instructions
1. Combine 2 very ripe bananas, 1 cup old-fashioned rolled oats, 2 large eggs, 1/2 cup whole milk, 1 tbsp pure maple syrup, 1 tsp baking powder, 1/2 tsp ground cinnamon, and 1/4 tsp salt in a blender.
2. Blend on high speed for 45-60 seconds until the mixture is completely smooth and no oat pieces remain.
3. Let the batter rest for 5 minutes to allow the oats to absorb moisture and thicken slightly.
4. Meanwhile, heat a non-stick skillet or griddle over medium heat (350°F if using an electric griddle).
5. Melt 1/2 tbsp unsalted butter in the heated skillet, swirling to coat the surface evenly.
6. Pour 1/4 cup portions of batter onto the skillet, leaving space between each pancake.
7. Cook for 2-3 minutes until bubbles form on the surface and the edges look set.
8. Flip each pancake carefully using a thin spatula when the bottoms are golden brown.
9. Cook for another 1-2 minutes on the second side until golden brown and cooked through.
10. Transfer cooked pancakes to a wire rack (this prevents sogginess better than stacking them).
11. Repeat steps 5-10 with remaining batter, adding more butter as needed.
Zesty banana flavor meets hearty oat texture in every bite, creating pancakes that are somehow both comforting and exciting. Serve them stacked high with extra maple syrup and fresh berries, or get wild with a dollop of Greek yogurt and a sprinkle of toasted walnuts. These might just become your new weekend tradition—they’re that good.
Spinach and Cheese Mini Muffins

Perfectly portable and packed with personality, these spinach and cheese mini muffins are the snack that refuses to be boring. They’re basically a breakfast superhero in disguise—saving busy mornings one delicious bite at a time. Who knew something so tiny could deliver such a mighty flavor punch?
24
muffins15
minutes14
minutesIngredients
- 1 cup all-purpose flour (I always sift mine first for extra fluffiness)
- 1 tsp baking powder (the fresh stuff makes all the difference)
- ½ tsp salt (I’m partial to fine sea salt for even distribution)
- 1 large egg, preferably at room temperature for better mixing
- ½ cup whole milk (the richness is worth it, trust me)
- ¼ cup melted unsalted butter (cooled slightly so it doesn’t cook the egg)
- 1 cup finely chopped fresh spinach (pack it lightly when measuring)
- ¾ cup shredded sharp cheddar cheese (the extra sharp variety gives that wonderful tang)
Instructions
- Preheat your oven to 375°F and generously grease a 24-cup mini muffin tin with butter or cooking spray.
- Whisk together 1 cup all-purpose flour, 1 tsp baking powder, and ½ tsp salt in a medium bowl until fully combined.
- In a separate large bowl, vigorously beat 1 large egg until pale and frothy, about 1 minute.
- Pour ½ cup whole milk and ¼ cup melted unsalted butter into the beaten egg, whisking continuously until emulsified.
- Gently fold the dry ingredients into the wet mixture using a spatula, mixing just until no flour streaks remain—overmixing makes tough muffins.
- Add 1 cup finely chopped fresh spinach and ¾ cup shredded sharp cheddar cheese to the batter, folding gently until evenly distributed.
- Spoon the batter into prepared muffin cups, filling each about ¾ full for perfect domed tops.
- Bake at 375°F for 12-14 minutes until the edges are golden brown and a toothpick inserted comes out clean.
- Let the muffins cool in the pan for 5 minutes before transferring to a wire rack—this prevents steaming and soggy bottoms.
Unbelievably tender with pockets of melted cheddar and vibrant spinach flecks, these mini marvels boast a texture that’s simultaneously light and satisfying. Serve them warm alongside tomato soup for dunking, or pack them cold in lunchboxes where they’ll still taste fantastic hours later.
Berry Yogurt Parfait
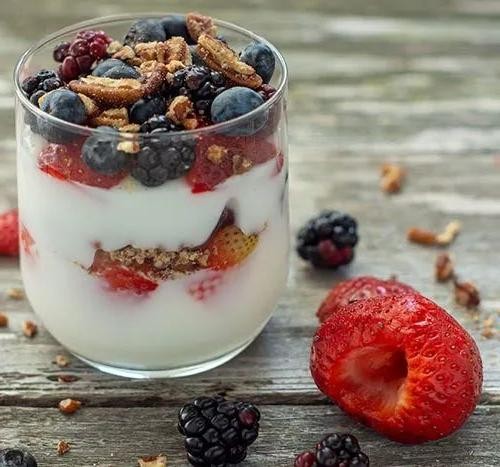
Hooray for a breakfast that looks like it took hours but actually comes together faster than you can say “I need coffee”! This berry yogurt parfait is the ultimate morning lifesaver—layers of creamy goodness and fruity freshness that’ll make you feel fancy without the fuss. Honestly, it’s so simple even your sleepy self can nail it before the caffeine kicks in.
1
servings10
minutesIngredients
– 1 cup plain Greek yogurt (I’m team full-fat for maximum creaminess, but any works!)
– 1 cup mixed fresh berries (strawberries, blueberries, raspberries—go wild with what’s in season)
– 1/2 cup granola (the crunchy, clumpy kind is my secret to texture heaven)
– 2 tbsp honey (local if you’ve got it—it adds a floral hint that’s *chef’s kiss*)
Instructions
1. Wash and pat dry 1 cup of mixed fresh berries with a paper towel to remove excess moisture.
2. Slice any large strawberries into bite-sized pieces, about 1/4-inch thick, for even layering.
3. Spoon 2 tablespoons of plain Greek yogurt into the bottom of a clear glass or jar to create the first layer.
4. Top the yogurt with 1/4 cup of the prepared mixed berries, spreading them evenly.
5. Sprinkle 2 tablespoons of granola over the berries for a crunchy contrast.
6. Repeat the layers: add another 2 tablespoons of yogurt, followed by 1/4 cup berries and 2 tablespoons granola.
7. Drizzle 1 tablespoon of honey over the top layer for a touch of sweetness.
8. Finish with a final 2 tablespoons of yogurt and the remaining berries and granola.
9. Drizzle the last tablespoon of honey over everything just before serving.
A symphony of textures awaits—creamy yogurt, juicy berries, and that granola crunch make every spoonful a delight. Try serving it in mason jars for a picnic-perfect vibe, or layer it in wine glasses to impress your brunch crew. Honestly, it’s so good you might just eat it for dessert too!
Sweet Potato and Apple Hash
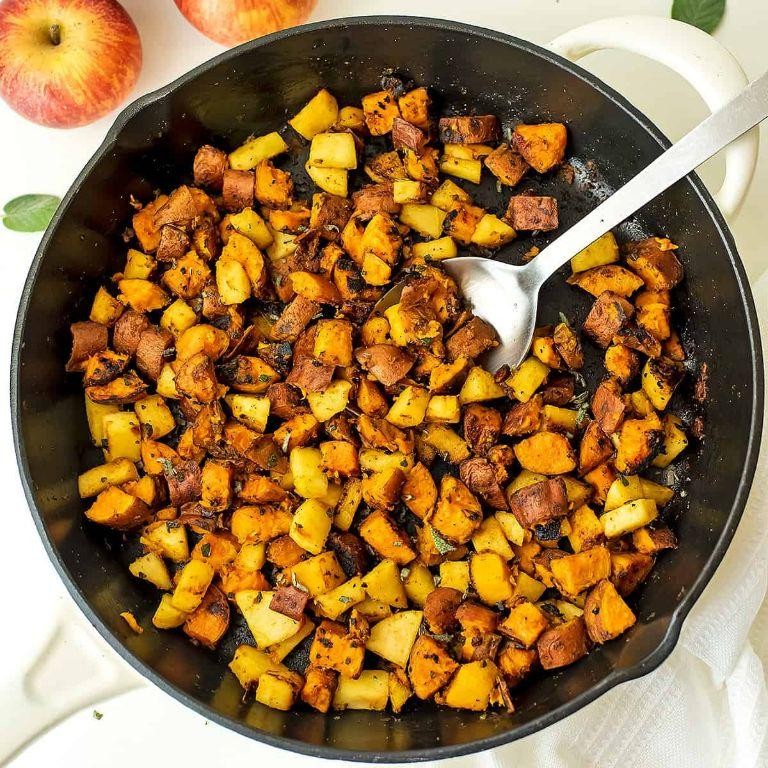
Brace yourselves, folks—this sweet potato and apple hash is about to become your breakfast soulmate, the kind of dish that makes you actually want to roll out of bed on a chilly morning. It’s the perfect sweet-savory mashup that’ll have you questioning why you ever settled for boring old potatoes.
2
servings15
minutes22
minutesIngredients
- 2 medium sweet potatoes, peeled and diced into ½-inch cubes (trust me, uniform size is key for even cooking)
- 1 large crisp apple, cored and chopped (I’m team Honeycrisp for that perfect sweet-tart balance)
- 1 small yellow onion, diced (because everything starts with onion, right?)
- 2 tbsp extra virgin olive oil (my go-to for that lovely fruity flavor)
- ½ tsp smoked paprika (for that smoky hug in every bite)
- ¼ tsp cinnamon (just a whisper—it makes the apples sing)
- Salt and freshly cracked black pepper (don’t be shy here)
- 2 large eggs (room temp eggs fry up so much nicer, I swear)
- Fresh parsley, chopped (for that final herby flourish)
Instructions
- Heat 2 tablespoons of olive oil in a large skillet over medium heat until it shimmers, about 1 minute.
- Add diced sweet potatoes to the skillet and cook for 8 minutes, stirring occasionally, until they just begin to soften at the edges.
- Tip: Don’t overcrowd the pan—give those sweet potato cubes some breathing room for optimal browning.
- Stir in the diced onion and cook for 4 more minutes until the onion turns translucent.
- Add the chopped apple, smoked paprika, cinnamon, ½ teaspoon salt, and ¼ teaspoon black pepper to the skillet.
- Cook everything together for 6-7 minutes, stirring frequently, until the sweet potatoes are tender when pierced with a fork and the apples are softened but still hold their shape.
- Tip: If the hash starts sticking, add a splash of water to deglaze—those browned bits are flavor gold.
- Create two wells in the hash with the back of a spoon and crack an egg into each well.
- Cover the skillet and cook for 3-4 minutes until the egg whites are fully set but the yolks are still runny.
- Tip: For firm yolks, cook covered for an additional 1-2 minutes—your eggs, your rules.
- Sprinkle with fresh parsley and serve immediately.
Zesty, sweet, and savory all at once, this hash delivers crispy-edged sweet potatoes against tender apples with that glorious runny yolk weaving everything together. Try serving it over a bed of peppery arugula or stuffed into a warm tortilla for a breakfast taco twist that’ll make your mornings infinitely more exciting.
Mini Avocado Toasts

Aren’t you tired of basic avocado toast? Let’s shrink it down to irresistible, bite-sized perfection that’ll make your brunch spread the undisputed champion of any gathering. These mini marvels pack all the creamy, crunchy goodness you crave into perfectly poppable portions that disappear faster than your resolution to eat just one.
16
portions15
minutes10
minutesIngredients
– 4 slices sourdough bread (the tangier, the better for cutting through that rich avocado)
– 2 ripe avocados (give them a gentle squeeze—they should yield slightly like a perfectly firm pillow)
– 1 tbsp fresh lime juice (bottled just won’t give you that bright zing)
– 1/4 tsp kosher salt (I’m generous here because it really makes the avocado flavor pop)
– 1/8 tsp black pepper (freshly cracked, please—your taste buds will thank you)
– 2 tbsp extra virgin olive oil (my go-to for that fruity finish)
– 1/4 cup microgreens (these delicate greens add elegance without overwhelming)
– 1/4 cup radish slices (paper-thin for maximum crunch and visual appeal)
Instructions
1. Preheat your oven to 400°F—this ensures your bread gets perfectly crisp without burning.
2. Cut each bread slice into 4 equal squares using a serrated knife for clean edges.
3. Arrange bread squares in a single layer on a baking sheet and brush both sides with olive oil using a pastry brush.
4. Bake for 8-10 minutes until edges are golden brown and centers are crisp—watch closely during the last 2 minutes as they can go from perfect to burnt quickly.
5. While bread toasts, halve avocados, remove pits, and scoop flesh into a medium bowl with a spoon.
6. Add lime juice, salt, and pepper to the avocado bowl immediately to prevent browning.
7. Mash avocado mixture with a fork until mostly smooth but with some small chunks for texture variation.
8. Let toasted bread squares cool for 3 minutes on a wire rack so they don’t get soggy when topped.
9. Spoon approximately 1 tablespoon of avocado mixture onto each cooled bread square, spreading gently to edges.
10. Top each mini toast with 5-6 microgreens and 2-3 radish slices arranged in a decorative pattern.
11. Serve immediately on a platter for easy grabbing. But these mini avocado toasts deliver that satisfying crunch-to-cream ratio in every single bite. Bright lime cuts through the richness while paper-thin radishes add peppery contrast that makes these impossible to eat just one.
Zucchini and Carrot Fritters
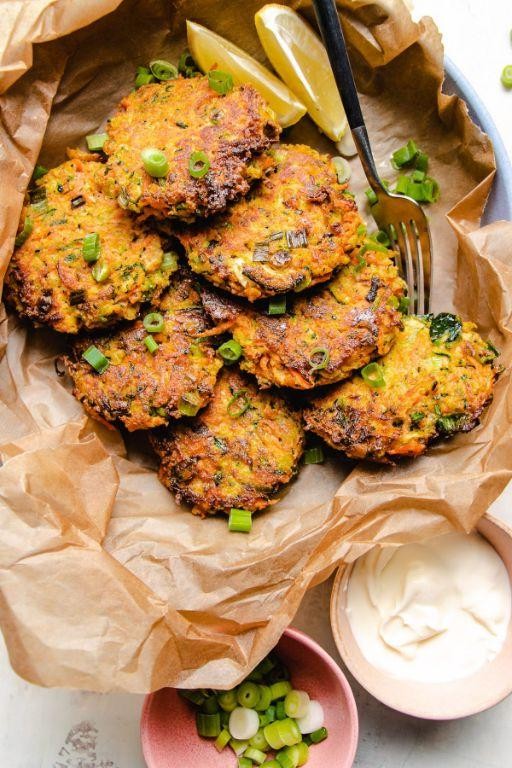
Kick those boring vegetable sides to the curb, because these zucchini and carrot fritters are about to become your new kitchen obsession—they’re crispy, golden, and packed with enough veggie power to make you feel virtuous while secretly devouring them like potato chips. Seriously, who knew getting your daily greens (and oranges) could be this deliciously addictive? Let’s turn those humble garden staples into something truly spectacular.
12
fritters15
minutes21
minutesIngredients
– 2 medium zucchinis, grated (squeeze out that excess moisture like you’re wringing out a tiny vegetable towel)
– 1 large carrot, grated (the orange adds such happy color to the party)
– 1/2 cup all-purpose flour (I sometimes swap in almond flour for a gluten-free twist)
– 1 large egg, lightly beaten (room temperature eggs incorporate so much better)
– 2 tbsp grated Parmesan cheese (because everything’s better with cheese)
– 1 tbsp olive oil for frying (extra virgin is my go-to for that fruity kick)
– 1/2 tsp garlic powder (fresh minced works too, but powder distributes more evenly)
– 1/4 tsp black pepper (freshly ground makes all the difference)
– 1/4 tsp salt (I use sea salt for that clean flavor)
Instructions
1. Place grated zucchini in a clean kitchen towel and squeeze firmly over the sink until no more liquid drips out.
2. Combine squeezed zucchini, grated carrot, flour, egg, Parmesan, garlic powder, pepper, and salt in a large mixing bowl.
3. Mix with a fork until all ingredients are fully incorporated and a thick batter forms.
4. Heat olive oil in a large skillet over medium heat until it shimmers visibly.
5. Drop heaping tablespoons of batter into the hot skillet, spacing them 2 inches apart.
6. Flatten each fritter slightly with the back of your spoon to ensure even cooking.
7. Cook for 3-4 minutes until the edges appear golden brown and crispy.
8. Flip each fritter carefully using a thin spatula.
9. Cook for another 3 minutes on the second side until deeply golden and crisp.
10. Transfer cooked fritters to a paper towel-lined plate to drain excess oil.
11. Repeat with remaining batter, adding more oil to the skillet if needed.
What makes these fritters truly magical is that perfect contrast between the crispy, lacy edges and the tender vegetable interior—they’re like little edible doilies that taste way better than they sound. Serve them stacked high with a dollop of Greek yogurt or tuck them into pita pockets with fresh herbs for the ultimate veg-forward sandwich situation that’ll make even the most committed carnivores swoon.
Pumpkin Spice Waffles
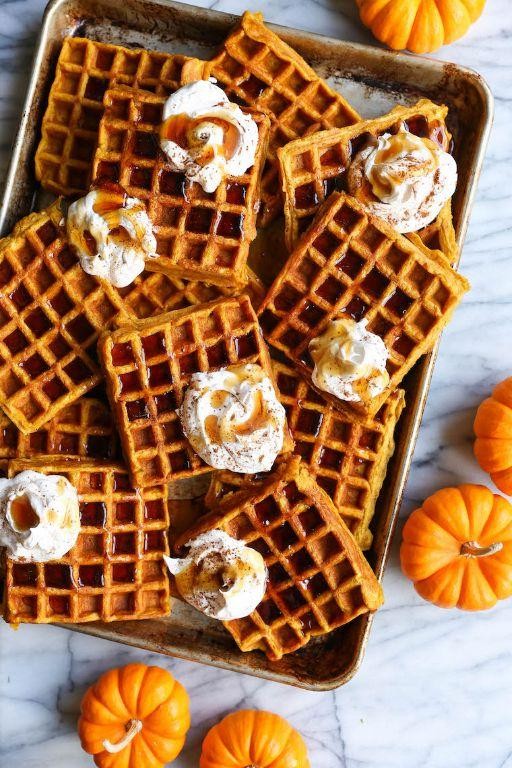
Fall is basically pumpkin spice season, and these waffles are the cozy hug your breakfast table desperately needs. Forget basic pancakes—these crispy-edged, warmly spiced wonders will make you the undisputed brunch champion of your friend group.
5
servings10
minutes25
minutesIngredients
– 2 cups all-purpose flour (I always spoon and level mine for accuracy)
– 2 tablespoons granulated sugar (just enough to make them sing)
– 1 tablespoon baking powder (fresh is key for maximum fluff)
– 1 teaspoon pumpkin pie spice (the star of the show, obviously)
– ½ teaspoon salt (balances the sweetness perfectly)
– 2 large eggs at room temperature (they incorporate so much better this way)
– 1¾ cups whole milk (the richness is worth it, trust me)
– ½ cup canned pumpkin puree (not pumpkin pie filling—big difference!)
– ¼ cup melted unsalted butter (cooled slightly so it doesn’t cook the eggs)
– 1 teaspoon pure vanilla extract (the good stuff makes all the difference)
Instructions
1. Preheat your waffle iron to 375°F—medium-high heat gives that perfect golden crunch.
2. Whisk together flour, sugar, baking powder, pumpkin pie spice, and salt in a large bowl.
3. In a separate bowl, beat the room temperature eggs until frothy, about 1 minute.
4. Add milk, pumpkin puree, melted butter, and vanilla to the eggs, whisking until smooth.
5. Pour the wet ingredients into the dry ingredients, stirring gently until just combined—lumps are totally fine!
6. Let the batter rest for 5 minutes while your waffle iron heats fully—this helps activate the baking powder.
7. Lightly grease the preheated waffle iron with non-stick spray or brush with melted butter.
8. Pour ½ cup batter onto the center of the iron, close the lid, and cook for 4-5 minutes until steam stops escaping.
9. Carefully remove the waffle when it’s deep golden brown and crisp—don’t peek too early or you’ll lose heat!
10. Repeat with remaining batter, keeping cooked waffles warm in a 200°F oven on a baking sheet.
Seriously, these waffles have the most incredible crisp exterior that gives way to a tender, spiced interior. The pumpkin flavor shines without being overwhelming, making them perfect stacked high with maple syrup or even topped with whipped cream and candied pecans for extra drama.
Cheesy Scrambled Egg Cups

Dare I say we’ve cracked the code on the most delightful breakfast hack? These Cheesy Scrambled Egg Cups are your new best friend for busy mornings, delivering all the cozy comfort of scrambled eggs in a perfectly portable, muffin-shaped package that’s basically edible sunshine.
6
cups10
minutes20
minutesIngredients
- 6 large eggs (I prefer room temp eggs here—they whip up fluffier!)
- 1/4 cup whole milk (the secret to creamy, dreamy eggs)
- 1 cup shredded cheddar cheese (because more cheese is always the answer)
- 1/4 cup diced bell peppers (any color you fancy—I’m partial to red for a sweet crunch)
- 2 tbsp unsalted butter, melted (extra virgin olive oil is my go-to, but butter adds that rich diner-style flavor)
- 1/2 tsp salt (don’t skimp—eggs need a good seasoning friend)
- 1/4 tsp black pepper (freshly ground, if you’re feeling fancy)
- Cooking spray (for greasing—trust me, nobody wants stuck-on egg cups)
Instructions
- Preheat your oven to 350°F and generously spray a 6-cup muffin tin with cooking spray to prevent sticking.
- Crack the 6 large eggs into a medium bowl, then pour in the 1/4 cup whole milk.
- Whisk the eggs and milk vigorously for about 1 minute until the mixture is fully combined and slightly frothy. Tip: A vigorous whisk incorporates air for fluffier eggs.
- Stir in the 1 cup shredded cheddar cheese, 1/4 cup diced bell peppers, 1/2 tsp salt, and 1/4 tsp black pepper until evenly distributed.
- Drizzle the 2 tbsp melted butter into the egg mixture and stir gently to combine.
- Evenly divide the egg mixture among the 6 prepared muffin cups, filling each about 3/4 full.
- Bake in the preheated oven for 18–20 minutes, or until the tops are lightly golden and the centers are set (no jiggle when you shake the tin). Tip: Use a toothpick inserted into the center—if it comes out clean, they’re ready.
- Remove the muffin tin from the oven and let the egg cups cool in the pan for 5 minutes. Tip: This resting time helps them firm up for easy removal.
- Carefully run a butter knife around the edges of each cup to loosen, then transfer to a plate.
Buttery, cheesy, and delightfully fluffy, these cups boast a tender texture with pockets of melted cheddar and crisp peppers. Serve them warm with a dash of hot sauce for a kick, or tuck them into a breakfast sandwich for the ultimate grab-and-go glory.
Blueberry Overnight Oats
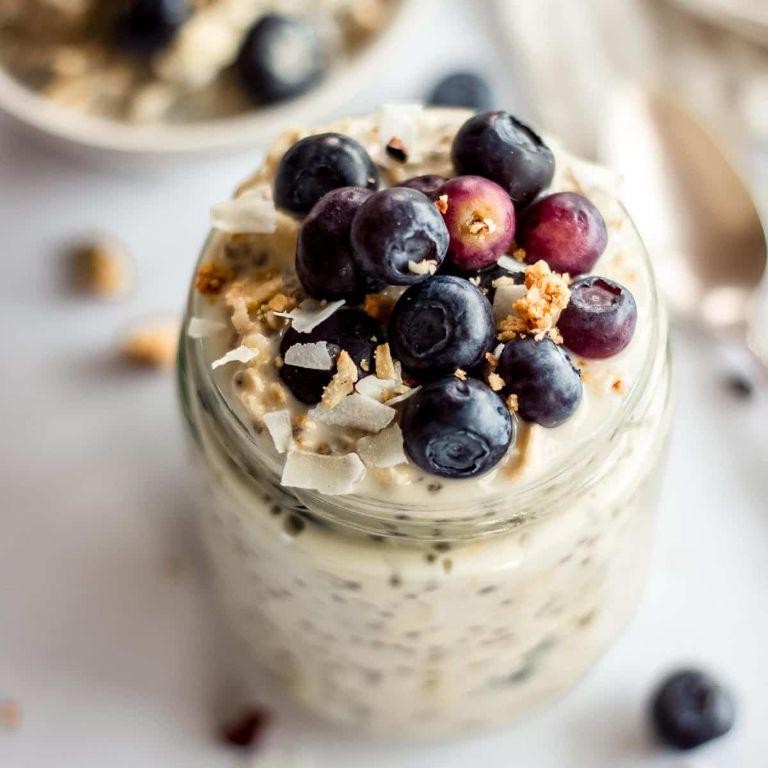
Pssst… want to know the secret to looking like a morning person without actually being one? Meet your new breakfast BFF: blueberry overnight oats, the magical jar of deliciousness that does all the work while you’re catching Z’s. It’s basically meal prep for people who’d rather hit snooze than chop things at 6 AM.
2
servings10
minutesIngredients
– 1 cup old-fashioned rolled oats (the hearty kind that won’t turn to mush overnight)
– 1 cup milk of your choice (I’m team whole milk for maximum creaminess, but almond works too)
– 1/2 cup Greek yogurt (the thick, tangy kind that makes everything better)
– 2 tablespoons maple syrup (the real stuff—none of that pancake impostor syrup)
– 1 teaspoon vanilla extract (because everything deserves a little vanilla hug)
– 1 cup fresh blueberries (the plump ones that burst with juicy goodness)
– Pinch of salt (just a tiny one to make all the flavors pop)
Instructions
1. Grab a medium-sized mixing bowl and add 1 cup of old-fashioned rolled oats.
2. Pour in 1 cup of milk, making sure all the oats get coated for even soaking.
3. Spoon in 1/2 cup of Greek yogurt and stir until no white streaks remain.
4. Drizzle 2 tablespoons of maple syrup into the mixture.
5. Add 1 teaspoon of vanilla extract and a pinch of salt.
6. Gently fold in 1 cup of fresh blueberries, being careful not to crush them.
7. Divide the mixture evenly between two 12-ounce jars with airtight lids.
8. Seal the jars tightly and refrigerate for at least 8 hours or overnight.
9. Remove from refrigerator and stir thoroughly before serving.
The oats transform into this creamy, dreamy texture that’s somehow both substantial and light, while the blueberries become little bursts of sweet-tart goodness throughout. Try topping with extra fresh berries and a sprinkle of granola for crunch, or honestly, eat it straight from the jar while scrolling through your phone—we won’t judge.
Whole Grain French Toast Sticks

Kickstarting your morning just got infinitely more delicious with these whole grain French toast sticks that transform basic breakfast into finger-food fabulousness. They’re basically French toast’s cooler, more portable cousin that won’t leave you with syrup-drenched sleeves. Perfect for busy mornings when you’re simultaneously herding cats and trying to remember where you left your coffee mug.
5
servings10
minutes12
minutesIngredients
– 4 slices of hearty whole grain bread (I prefer the kind with visible seeds for extra crunch)
– 2 large eggs (room temperature eggs mix more smoothly with the milk)
– 1/2 cup whole milk (the creamier the better for maximum richness)
– 1 tablespoon pure maple syrup (the real stuff – no pancake syrup imposters allowed)
– 1 teaspoon vanilla extract (my secret weapon for that bakery-quality aroma)
– 1/2 teaspoon ground cinnamon (because everything’s better with cinnamon)
– 2 tablespoons unsalted butter (for that golden, buttery crispness we all crave)
Instructions
1. Cut each slice of whole grain bread into three equal sticks using a serrated knife for clean cuts.
2. Crack the room temperature eggs into a shallow baking dish and whisk vigorously until fully blended.
3. Pour the whole milk into the egg mixture and whisk until completely combined.
4. Add the pure maple syrup, vanilla extract, and ground cinnamon to the liquid mixture and whisk for 30 seconds until fully incorporated.
5. Dip each bread stick into the egg mixture, turning to coat all sides evenly but not soaking too long (about 3 seconds per side).
6. Melt 1 tablespoon of unsalted butter in a large non-stick skillet over medium heat until bubbling but not browned.
7. Place 6 coated bread sticks in the skillet, leaving space between them for even cooking.
8. Cook for 2-3 minutes until the bottom develops deep golden-brown color and crisp edges.
9. Flip each stick using tongs and cook for another 2-3 minutes until all sides are evenly golden.
10. Transfer the cooked sticks to a wire rack (this prevents sogginess better than paper towels).
11. Melt the remaining tablespoon of butter and repeat the cooking process with the remaining bread sticks.
The result is pure breakfast magic – crispy golden exteriors giving way to soft, custardy centers with just the right cinnamon warmth. Serve them standing up in a glass like edible flower arrangements, or go full kid-at-heart and create dipping stations with extra maple syrup, fruit compote, or even a quick yogurt dip for the ultimate morning treat.
Homemade Granola Bars
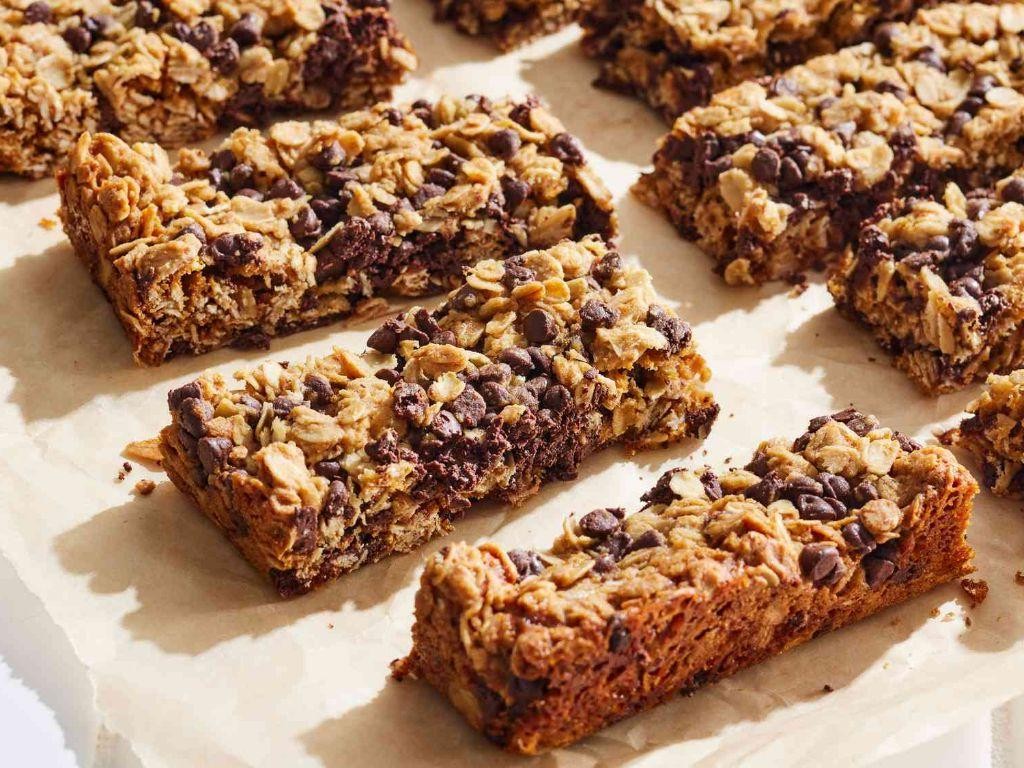
Alright, let’s tackle those overpriced, cardboard-tasting granola bars from the store—because honestly, your wallet and taste buds deserve better than that sad, crumbly disappointment.
12
bars15
minutes12
minutesIngredients
- 2 cups old-fashioned rolled oats (not the instant kind—they turn to mush, and we’re not making oatmeal here)
- 1/2 cup creamy peanut butter (the kind that sticks to the roof of your mouth, because texture matters)
- 1/3 cup honey (local if you’ve got it—bees work hard, so should your flavor)
- 1/4 cup melted coconut oil (extra virgin, because it adds a subtle tropical vibe)
- 1/2 cup mini chocolate chips (because life’s too short for regular-sized ones)
- 1/4 tsp fine sea salt (just a pinch to make the sweet stuff pop)
Instructions
- Preheat your oven to 325°F and line an 8×8-inch baking pan with parchment paper, letting the edges hang over for easy lifting later—no one wants a stuck-on bar situation.
- Spread the rolled oats in a single layer on a baking sheet and toast them in the preheated oven for 10 minutes, stirring halfway, until they’re lightly golden and smell nutty (this deepens the flavor and avoids sogginess).
- In a medium saucepan over low heat, combine the peanut butter, honey, and melted coconut oil, stirring constantly with a spatula for about 2–3 minutes until the mixture is smooth and fully blended—don’t walk away or it might scorch!
- Remove the saucepan from the heat and immediately stir in the toasted oats, mini chocolate chips, and fine sea salt, mixing until everything is evenly coated and no dry spots remain.
- Transfer the mixture to the prepared baking pan and press it down firmly and evenly with the back of a measuring cup (this prevents crumbly bars—press hard!).
- Refrigerate the pan for at least 2 hours, or until the bars are completely firm and hold their shape when lifted.
- Use the parchment paper edges to lift the slab out of the pan, then cut it into 12 even bars with a sharp knife, wiping the blade clean between cuts for neat edges.
Perfectly chewy with a hint of crunch, these bars are packed with peanut butter richness and melty chocolate pockets—toss one in your lunchbox or crumble it over yogurt for a breakfast upgrade that’s anything but basic.
Peach and Chia Seed Smoothie
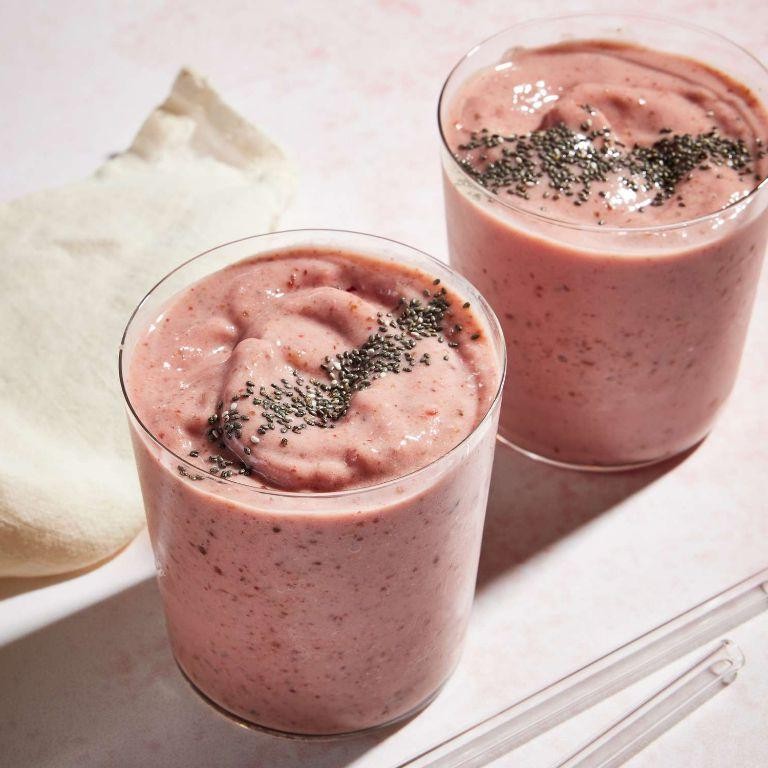
Mmm, is there anything more tragically delicious than watching summer’s juiciest peaches disappear? This peach and chia seed smoothie is basically a sunshine-packed rescue mission for your blender, blending sweet stone fruit with the magical thickening powers of chia seeds. Consider it your liquid hug for those mornings when you’d rather hit snooze than chew breakfast.
2
servings5
minutesIngredients
- 2 cups frozen peach slices (I swear by frozen—they give that perfect milkshake texture without diluting everything with ice)
- 1 cup plain Greek yogurt (the extra-thick kind that stands up to your spoon like a champ)
- 1 cup unsweetened almond milk (vanilla adds a subtle sweetness, but plain works too if you’re watching sugar)
- 2 tablespoons chia seeds (these tiny powerhouses turn your smoothie into a satisfying, spoonable treat)
- 1 tablespoon honey (local if you can—it makes me feel like a fancy bee whisperer)
- ½ teaspoon vanilla extract (the real stuff, because life’s too short for imitation)
Instructions
- Add 2 cups frozen peach slices, 1 cup Greek yogurt, 1 cup almond milk, 2 tablespoons chia seeds, 1 tablespoon honey, and ½ teaspoon vanilla extract to your blender pitcher.
- Secure the blender lid tightly—trust me, peach splatter art is only cute on Pinterest.
- Blend on high speed for 45–60 seconds until completely smooth and no peach chunks remain.
- Stop the blender and scrape down the sides with a spatula to incorporate any stubborn bits.
- Blend again for another 15 seconds to ensure everything is perfectly creamy.
- Pour the smoothie immediately into glasses—chia seeds start thickening fast, so don’t dawdle!
Just look at that gorgeous peachy hue! The chia seeds work their magic, transforming this from a basic sip into a luxuriously thick, almost pudding-like texture that clings to your spoon. I love serving it in a mason jar with an extra sprinkle of chia seeds on top—it’s basically breakfast and a Instagram moment in one glorious glass.
Tiny Veggie Omelets

Oh, the humble egg—usually the star of breakfast, but today it’s playing backup dancer to a veggie-packed party! These tiny veggie omelets are basically your morning scramble’s cooler, more organized cousin, perfect for when you want to feel fancy without the fuss. They’re so adorable, you might hesitate to eat them… but don’t worry, that feeling passes quickly.
12
omelets10
minutes15
minutesIngredients
- 4 large eggs (I prefer room temp eggs here—they whip up fluffier and don’t shock the pan)
- 1/4 cup whole milk (the full-fat kind makes these extra creamy and dreamy)
- 1/2 cup finely chopped bell peppers (I’m team red for sweetness, but use whatever color makes you happy)
- 1/4 cup finely chopped onion (yellow onion is my go-to for that classic savory kick)
- 1 tbsp extra virgin olive oil (my trusty non-stick hero for almost everything)
- 1/4 tsp salt (don’t be shy—eggs need a good friend)
- 1/8 tsp black pepper (freshly ground if you’re feeling extra)
Instructions
- Preheat your oven to 375°F—this ensures even cooking and prevents soggy bottoms.
- Grease a 12-cup mini muffin tin thoroughly with the extra virgin olive oil, making sure every cup is coated to avoid sticking nightmares.
- Crack the 4 large eggs into a medium mixing bowl, checking for any rogue shell pieces.
- Pour in the 1/4 cup whole milk—this adds moisture and helps create a tender texture.
- Add the 1/4 tsp salt and 1/8 tsp black pepper directly to the egg mixture.
- Whisk the eggs, milk, salt, and pepper vigorously for about 45 seconds until fully combined and slightly frothy.
- Stir in the 1/2 cup finely chopped bell peppers and 1/4 cup finely chopped onion until evenly distributed. Tip: Chop veggies small so they cook quickly and don’t overwhelm the tiny omelets.
- Carefully pour the egg and veggie mixture into the prepared muffin cups, filling each about 3/4 full to allow for rising.
- Bake at 375°F for 12-15 minutes, until the tops are lightly golden and the centers feel firm when gently pressed. Tip: Don’t open the oven door early—it can cause them to deflate!
- Remove the tin from the oven and let the omelets cool in the pan for 2 minutes to set.
- Use a small knife or offset spatula to gently loosen the edges of each omelet from the tin.
- Transfer the tiny veggie omelets to a serving plate. Tip: Serve immediately for the best texture, as they can get rubbery if left sitting too long.
Amazingly light and fluffy, these bite-sized wonders pack a savory punch with sweet bell pepper notes and a hint of onion sharpness. Arrange them on a platter with toothpicks for a party appetizer, or stack them high with a drizzle of hot sauce for a breakfast that’s seriously snackable.
Apple Cinnamon Porridge
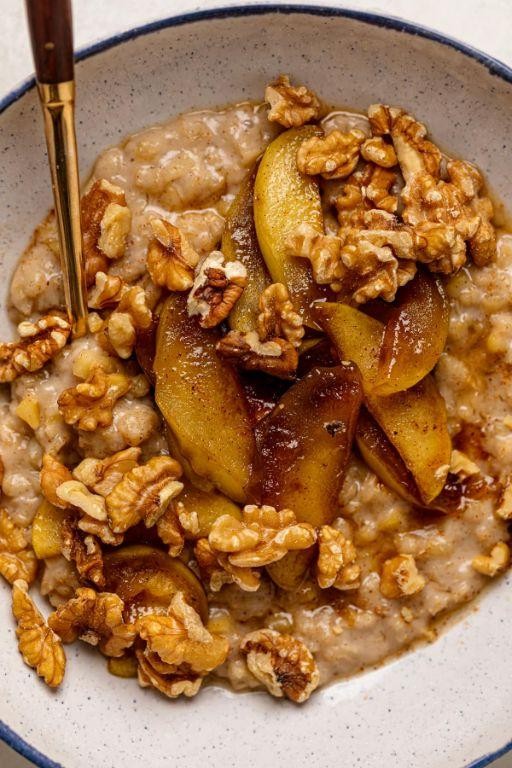
Virtually every crisp autumn morning demands a breakfast that feels like a warm hug from your favorite flannel shirt—and this apple cinnamon porridge is exactly that cozy, soul-warming hero. It’s basically fall in a bowl, ready to banish any lingering summer vibes with its spiced, sweet charm. Let’s dive in and make your kitchen smell like a cinnamon-scented dream!
2
servings5
minutes12
minutesIngredients
– 1 cup old-fashioned rolled oats (not the instant kind—they hold their texture better, trust me!)
– 2 cups whole milk (for extra creaminess; swap with almond milk if you’re feeling plant-based)
– 1 large apple, peeled and diced (I’m partial to Honeycrisp for their sweet-tart punch)
– 2 tbsp brown sugar (because life’s too short for white sugar here)
– 1 tsp ground cinnamon (go heavy if you’re a spice fiend like me)
– 1/2 tsp vanilla extract (the real stuff, please—imitation vanilla is a culinary crime)
– Pinch of salt (to balance the sweetness and make flavors pop)
Instructions
1. Combine the oats, milk, diced apple, brown sugar, cinnamon, and salt in a medium saucepan over medium heat.
2. Stir continuously with a wooden spoon for 2 minutes to prevent the oats from sticking to the bottom.
3. Reduce the heat to low and simmer uncovered for 8–10 minutes, stirring occasionally, until the porridge thickens and the apples soften.
4. Remove the saucepan from the heat and stir in the vanilla extract until fully incorporated.
5. Let the porridge sit for 2 minutes off the heat to allow it to thicken further before serving.
This porridge boasts a velvety, creamy texture with tender apple bits that melt in your mouth. The cinnamon adds a warm, aromatic kick that pairs perfectly with the subtle sweetness. Try topping it with a drizzle of maple syrup or a handful of toasted walnuts for an extra crunch that’ll make your taste buds sing!
Quinoa Fruit Bowl
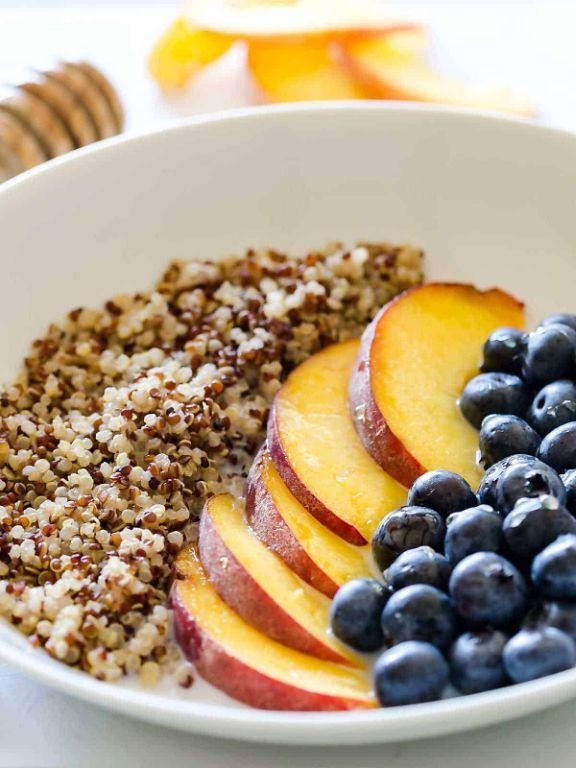
Just when you thought quinoa couldn’t get more exciting, it decided to throw a fruit party in a bowl! This vibrant quinoa fruit bowl is basically breakfast’s answer to confetti—colorful, celebratory, and guaranteed to make your morning brighter. Who knew healthy could be this much fun?
2
servings25
minutes20
minutesIngredients
– 1 cup quinoa (I always rinse mine—it removes that bitter coating and makes all the difference)
– 2 cups water (cold tap water works perfectly here)
– 1 cup chopped strawberries (the riper, the sweeter—I hunt for those deep red ones)
– 1 cup blueberries (fresh or frozen, though frozen gives you that nice chill factor)
– 1 banana, sliced (wait until the last minute to slice—nobody likes brown, mushy banana)
– 2 tablespoons honey (local if you can get it—the flavor is just more complex)
– 1 tablespoon fresh lime juice (bottled just doesn’t have the same zing, trust me)
– ¼ cup chopped mint leaves (tear, don’t chop—releases more fragrance)
Instructions
1. Rinse 1 cup quinoa under cold running water in a fine-mesh strainer for 1 minute, rubbing grains between your fingers to remove the saponin coating.
2. Combine rinsed quinoa and 2 cups water in a medium saucepan over high heat.
3. Bring to a rolling boil, then immediately reduce heat to low and cover saucepan tightly with a lid.
4. Simmer quinoa for exactly 15 minutes—set a timer because overcooked quinoa turns mushy.
5. Remove saucepan from heat and let quinoa stand covered for 5 minutes to steam and fluff up.
6. Fluff quinoa with a fork, spreading it evenly on a baking sheet to cool to room temperature for 20 minutes.
7. While quinoa cools, slice 1 banana into ¼-inch rounds and place in a large mixing bowl.
8. Chop 1 cup strawberries into bite-sized pieces and add to the same bowl.
9. Measure 1 cup blueberries and add to the fruit mixture.
10. Whisk together 2 tablespoons honey and 1 tablespoon fresh lime juice in a small bowl until fully combined.
11. Tear ¼ cup mint leaves by hand and sprinkle over the fruit mixture.
12. Pour cooled quinoa over the fruit and mint in the large mixing bowl.
13. Drizzle honey-lime dressing over the quinoa and fruit mixture.
14. Gently toss everything together with a large spoon until evenly coated and combined.
You’ll love the contrast between the fluffy quinoa and the juicy fruit bursts—each bite is like a little flavor explosion. Yellow bananas against red strawberries create such a cheerful visual, and the mint adds that refreshing kick that makes this bowl feel extra special. Try serving it in clear glass bowls to really show off all those beautiful layers!
Conclusion
Nourishing your little one has never been easier with these 27 toddler breakfast recipes! We hope these ideas bring joy to your mornings and make mealtime stress-free. Give them a try, leave a comment sharing your family’s favorites, and don’t forget to pin this article on Pinterest to save these delicious recipes for later!