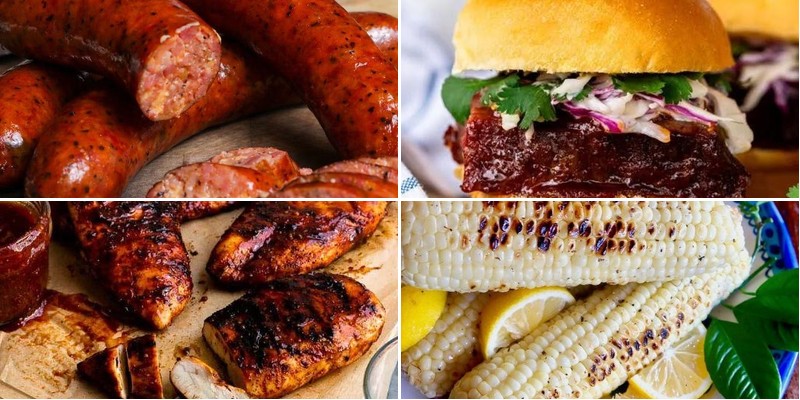
Nothing says Texas like the irresistible aroma of slow-smoked barbecue wafting through the air. From tender brisket to fall-off-the-bone ribs, these 29 mouthwatering recipes capture the heart and soul of authentic Lone Star flavor. Whether you’re firing up the smoker for a weekend feast or craving some serious comfort food, get ready to discover your new favorite BBQ creations that’ll have everyone coming back for seconds!
Smoky Texas Brisket with Classic BBQ Sauce
Under the quiet hum of the afternoon, there’s something deeply comforting about preparing a brisket—the slow transformation of a simple cut into something tender and soul-warming, filling the kitchen with whispers of smoke and spice.
12
servings20
minutes660
minutesIngredients
- 1 whole untrimmed beef brisket (about 12 pounds), with a generous fat cap
- 1/4 cup coarse kosher salt
- 1/4 cup freshly cracked black pepper
- 2 tablespoons smoked paprika, with its deep rust hue
- 1 tablespoon garlic powder, finely ground
- 1 cup ketchup, rich and tangy
- 1/2 cup apple cider vinegar, bright and acidic
- 1/4 cup dark brown sugar, packed and molasses-kissed
- 2 tablespoons Worcestershire sauce, umami-rich and complex
- 1 tablespoon yellow mustard, smooth and mild
- 1 teaspoon onion powder, finely milled
- 1/2 teaspoon cayenne pepper, for a subtle warmth
Instructions
- Pat the brisket dry with paper towels, ensuring the surface is completely moisture-free.
- Combine the kosher salt, black pepper, smoked paprika, and garlic powder in a small bowl.
- Rub the spice mixture evenly over all sides of the brisket, pressing gently to adhere.
- Preheat your smoker to 225°F using oak or hickory wood for authentic smoke flavor.
- Place the brisket fat-side up on the smoker grate, away from direct heat.
- Smoke the brisket for 6 hours, maintaining a steady temperature of 225°F.
- Check the internal temperature with a meat thermometer; it should read around 165°F.
- Wrap the brisket tightly in butcher paper to preserve moisture, a crucial step for tenderness.
- Return the wrapped brisket to the smoker, increasing the temperature to 250°F.
- Continue cooking until the internal temperature reaches 203°F, about 4 more hours.
- Remove the brisket from the smoker and let it rest, still wrapped, for 1 full hour.
- While the brisket rests, combine ketchup, apple cider vinegar, brown sugar, Worcestershire, mustard, onion powder, and cayenne in a saucepan.
- Simmer the sauce over medium-low heat for 15 minutes, stirring occasionally until slightly thickened.
- Unwrap the rested brisket and slice against the grain into 1/4-inch thick pieces.
- Serve the sliced brisket drizzled with the warm BBQ sauce.
What emerges is a brisket so tender it nearly falls apart at the touch of a fork, with a smoky bark that crackles subtly between your teeth. The sauce, tangy and lightly sweet, clings to each slice, enhancing the deep beefiness without overpowering it. For a memorable twist, pile the slices onto toasted brioche buns with a crisp cabbage slaw, letting the textures and flavors dance together in every messy, joyful bite.
Spicy Jalapeño Texas Sausages

Cradling a warm cast iron skillet, I remember how these sausages first found their way into my kitchen—a gift from a Texas friend who promised they’d whisper stories of smoky mesquite and sun-scorched plains. Slowly, deliberately, I let the memories steep like tea leaves, each spice unfolding in the quiet hum of the stove. There’s something gentle in the way these flavors bloom, a slow dance of heat and heritage that asks only for patience and presence.
4
servings15
minutes32
minutesIngredients
– 1 pound fresh jalapeño Texas sausages, coiled like sleeping serpents
– 2 tablespoons golden-hued avocado oil, shimmering with subtle richness
– 1 large yellow onion, thinly sliced into translucent half-moons
– 2 cloves garlic, minced into fragrant confetti
– 1 red bell pepper, sliced into crimson ribbons
– 1 cup low-sodium chicken broth, steaming and savory
– 1 teaspoon smoked paprika, rust-colored and earthy
– ½ teaspoon freshly cracked black pepper, aromatic and bold
Instructions
1. Heat a large cast-iron skillet over medium heat for 3 minutes until a water droplet sizzles upon contact.
2. Pour 2 tablespoons of golden-hued avocado oil into the skillet, swirling to coat the surface evenly.
3. Arrange 1 pound of fresh jalapeño Texas sausages in the skillet without overcrowding, leaving space between each.
4. Sear sausages for 4-5 minutes per side until a deep mahogany crust forms, resisting the urge to move them prematurely for better browning.
5. Transfer sausages to a clean plate using tongs, letting their residual heat continue gently cooking the interior.
6. Add 1 large thinly sliced yellow onion to the skillet, stirring occasionally for 6-7 minutes until edges caramelize to a honeyed amber.
7. Stir in 2 cloves of minced garlic and 1 sliced red bell pepper, cooking for 2 minutes until fragrant but not browned.
8. Sprinkle 1 teaspoon smoked paprika and ½ teaspoon freshly cracked black pepper over the vegetables, toasting for 30 seconds to awaken their oils.
9. Pour 1 cup of low-sodium chicken broth into the skillet, scraping any browned bits from the bottom with a wooden spoon.
10. Return sausages to the skillet, nestling them among the vegetables in a single layer.
11. Reduce heat to low, cover, and simmer for 12 minutes until sausages reach an internal temperature of 165°F on an instant-read thermometer.
12. Remove from heat and rest uncovered for 3 minutes to allow juices to redistribute evenly. The snap of each sausage casing gives way to a juicy, coarse-grained interior where smoky paprika melds with the bright kick of jalapeño. Try tucking them into warm corn tortillas with pickled red onions, or slice them over creamy polenta—each bite carries the warmth of a Texas sunset held close against the cooling evening.
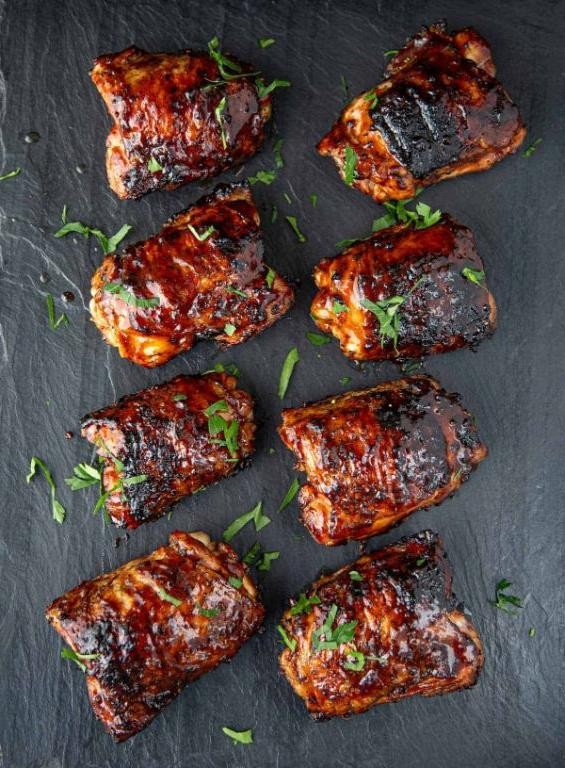
Authentic Texas BBQ Ribs with Dry Rub
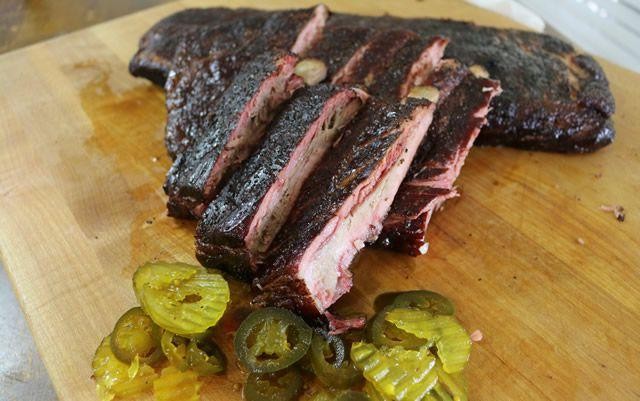
Zigzagging through my memories of Texas backroads, I recall the scent of smoke-kissed ribs drifting from roadside stands, a culinary tradition that demands patience and reverence. Today, I’m recreating that magic in my own kitchen, letting the slow dance of heat and spice transform simple ingredients into something profound. There’s a quiet joy in this process, like watching clouds form on a lazy afternoon.
2
racks20
minutes330
minutesIngredients
– 2 racks of meaty pork ribs
– 1/4 cup of dark brown sugar with rich molasses notes
– 2 tablespoons of smoked paprika with deep crimson hue
– 1 tablespoon of coarse kosher salt with satisfying crunch
– 1 tablespoon of freshly cracked black pepper with aromatic warmth
– 1 teaspoon of garlic powder with earthy sweetness
– 1 teaspoon of onion powder with subtle sharpness
– 1/2 teaspoon of cayenne pepper with gentle heat
– 1 cup of apple cider vinegar with bright tanginess
Instructions
1. Pat the meaty pork ribs completely dry with paper towels to ensure the rub adheres properly.
2. Combine the dark brown sugar, smoked paprika, coarse kosher salt, freshly cracked black pepper, garlic powder, onion powder, and cayenne pepper in a small bowl.
3. Generously massage the spice mixture onto both sides of the ribs, covering every surface evenly.
4. Wrap the seasoned ribs tightly in plastic wrap and refrigerate for exactly 8 hours to allow flavors to penetrate deeply.
5. Preheat your smoker or oven to 225°F, maintaining this low temperature for slow cooking.
6. Place the ribs bone-side down on the cooking grate, arranging them with space between for air circulation.
7. Cook for 3 hours without opening the lid to maintain consistent temperature and smoke infusion.
8. Mix the apple cider vinegar with 1/2 cup of water in a spray bottle after the initial cooking period.
9. Lightly spritz the ribs every 45 minutes to keep them moist and create a flavorful bark.
10. Continue cooking for another 2 hours until the meat pulls back from the bones by 1/4 inch.
11. Check for doneness by inserting a toothpick between the bones; it should slide through with slight resistance.
12. Rest the ribs wrapped in foil for 30 minutes before slicing to redistribute juices evenly. Velvety bark gives way to tender meat that nearly melts at the touch, while the spice rub creates a complex melody of sweet heat and smoke. Serve these ribs with pickled onions to cut through the richness, or pile them on cornbread with extra sauce for dripping, messy perfection.
Texas-Style Smoked Pulled Pork Sandwiches

Evenings like this, when the air carries just enough chill to make warmth feel like a gift, I find myself drawn to the slow, steady ritual of smoking pork—a quiet meditation that fills the kitchen with the kind of comfort only time and smoke can build. There’s something deeply grounding about watching the meat transform, hour by hour, into something tender enough to fall apart with a gentle tug, each moment spent waiting feeling like an investment in the rich, soulful flavors to come. It’s a process that asks for patience but rewards it generously, wrapping you in the smoky, savory embrace of Texas tradition, one that feels both timeless and deeply personal, like a story told through scent and taste alone.
8
sandwiches20
minutes540
minutesIngredients
– 5 pounds of bone-in pork shoulder, with a generous marbling of fat
– 1/4 cup of coarse kosher salt, for a clean, balanced seasoning
– 1/4 cup of freshly cracked black pepper, with its earthy, pungent aroma
– 2 tablespoons of smoked paprika, lending a deep, rustic sweetness
– 1 tablespoon of garlic powder, for a subtle, savory undertone
– 1/2 cup of apple cider vinegar, with its bright, tangy sharpness
– 1/4 cup of dark brown sugar, adding a molasses-like richness
– 8 soft brioche buns, their golden, buttery crumb perfect for soaking up juices
– 1 cup of your favorite tangy barbecue sauce, for a glossy, flavorful finish
Instructions
1. Pat the 5 pounds of bone-in pork shoulder completely dry with paper towels to ensure the rub adheres well and promotes a crisp bark.
2. In a small bowl, combine 1/4 cup of coarse kosher salt, 1/4 cup of freshly cracked black pepper, 2 tablespoons of smoked paprika, and 1 tablespoon of garlic powder, mixing thoroughly with your fingers to break up any clumps.
3. Rub the seasoning mixture evenly over all sides of the pork shoulder, pressing gently to form a cohesive crust that will deepen in flavor during smoking.
4. Preheat your smoker to 225°F, using hardwood like oak or hickory for an authentic, robust smoke flavor that penetrates the meat slowly.
5. Place the seasoned pork shoulder directly on the smoker grate, fat-side up, so the rendering fat bastes the meat as it cooks, keeping it moist and tender.
6. Smoke the pork for 6 to 8 hours, or until the internal temperature reaches 165°F, checking periodically with a meat thermometer to avoid overcooking.
7. Tip: Spritz the pork every hour with a mixture of 1/2 cup apple cider vinegar and 1/4 cup dark brown sugar to keep the surface moist and add layers of tangy sweetness.
8. Once the pork hits 165°F, tightly wrap it in aluminum foil to trap steam and continue cooking until the internal temperature reaches 203°F, which may take another 2 to 3 hours.
9. Remove the wrapped pork from the smoker and let it rest, still wrapped, for 1 full hour to allow the juices to redistribute evenly throughout the meat.
10. Unwrap the pork and use two forks to shred it into tender, smoky strands, discarding any large pieces of fat or bone for a clean, pullable texture.
11. Toss the shredded pork with 1 cup of your favorite tangy barbecue sauce until every strand is lightly coated and glistening with flavor.
12. Lightly toast 8 soft brioche buns on a dry skillet over medium heat for 1 to 2 minutes per side, just until they’re warm and slightly crisp around the edges.
13. Pile the saucy pulled pork generously onto the toasted buns, serving immediately while the meat is still warm and the buns are at their peak softness.
14. Tip: For extra depth, mix a spoonful of the pork’s resting juices into the shredded meat before saucing to amplify the natural smokiness and richness.
15. Tip: If the bark feels too firm after resting, chop it finely and stir it into the shredded pork for added texture and a concentrated burst of seasoning.
Nothing compares to the way the pork shreds apart with almost no effort, its fibers soaked in smoky sweetness and tangy sauce, creating a messy, joyful bite that demands to be eaten with both hands. The soft brioche bun cradles the heap of meat gently, its buttery crumb softening under the weight of juices, while the crisp edges of the toasted bun provide just enough structure to keep everything from collapsing. For a twist, try piling it onto a baked sweet potato or stuffing it into crispy tacos with a slaw of shredded cabbage and lime—each variation lets the pork’s deep, slow-cooked character shine in new, comforting ways.
Tangy BBQ Chicken with Homemade Marinade

Yielding to the slow rhythm of an autumn afternoon, I find myself drawn to the kitchen, where the promise of tangy barbecue chicken fills the air with sweet anticipation. There’s something deeply comforting about this dish—the way the homemade marinade clings to each piece, the gentle sizzle as it meets the heat, creating a meal that feels like a warm embrace after a long day.
4
servings15
minutes45
minutesIngredients
– 4 bone-in, skin-on chicken thighs with golden-brown skin
– 1/2 cup rich ketchup with deep tomato notes
– 1/4 cup raw honey with floral undertones
– 2 tablespoons apple cider vinegar with bright acidity
– 1 tablespoon Worcestershire sauce with umami depth
– 2 cloves fresh garlic, finely minced
– 1 teaspoon smoked paprika with earthy warmth
– 1/2 teaspoon onion powder with subtle sweetness
– 1/4 teaspoon cayenne pepper for gentle heat
– 1 tablespoon extra virgin olive oil with fruity notes
– 1/2 teaspoon coarse sea salt with mineral complexity
– 1/4 teaspoon freshly cracked black pepper
Instructions
1. Combine ketchup, honey, apple cider vinegar, Worcestershire sauce, minced garlic, smoked paprika, onion powder, cayenne pepper, olive oil, sea salt, and black pepper in a medium mixing bowl.
2. Whisk the marinade ingredients vigorously for 60 seconds until completely smooth and well incorporated.
3. Place chicken thighs in a large resealable plastic bag or shallow baking dish.
4. Pour the marinade over the chicken, ensuring each piece is thoroughly coated on all sides.
5. Seal the bag or cover the dish with plastic wrap and refrigerate for exactly 4 hours—this allows the flavors to penetrate deeply while keeping the chicken safe.
6. Preheat your oven to 375°F and line a baking sheet with aluminum foil for easy cleanup.
7. Arrange the marinated chicken thighs skin-side up on the prepared baking sheet, spacing them 2 inches apart for even cooking.
8. Bake for 35 minutes until the chicken skin becomes crispy and develops a rich caramel color.
9. Increase the oven temperature to 425°F and continue baking for 10 additional minutes to create a sticky glaze.
10. Check for doneness by inserting a meat thermometer into the thickest part of a thigh—it should register 165°F.
11. Remove the baking sheet from the oven and let the chicken rest for 8 minutes before serving to allow juices to redistribute. A final drizzle of the pan juices over the chicken before serving enhances both flavor and visual appeal. Always pat chicken dry with paper towels before marinating to help the sauce adhere better. Arriving at the table, the chicken offers a perfect contrast—crispy skin giving way to incredibly tender meat that falls cleanly from the bone. The homemade marinade creates a beautiful balance where the honey’s sweetness plays against the vinegar’s brightness, while the smoked paprika lends a subtle campfire essence that lingers pleasantly. Consider serving it over creamy polenta or with grilled corn to catch every last drop of the tangy sauce.
Mesquite-Grilled Texas Skirt Steak Tacos
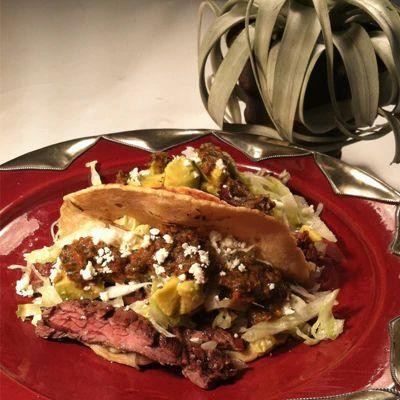
There’s something quietly grounding about the scent of mesquite smoke curling through the evening air, a ritual that turns simple ingredients into something deeply comforting. This recipe for skirt steak tacos feels like a slow exhale, each step measured and mindful, inviting you to savor the process as much as the result. Let’s begin with what you’ll need.
8
tacos35
minutes10
minutesIngredients
– 1.5 pounds of well-marbled skirt steak
– 3 tablespoons of robust extra virgin olive oil
– 2 tablespoons of freshly squeezed lime juice
– 2 teaspoons of aromatic ground cumin
– 1 teaspoon of smoky chipotle powder
– 1 teaspoon of coarse kosher salt
– 1/2 teaspoon of finely ground black pepper
– 8 small, warm corn tortillas
– 1/2 cup of finely chopped fresh cilantro
– 1/2 cup of diced sweet white onion
– 1 ripe, juicy lime cut into wedges
Instructions
1. Pat the skirt steak dry with paper towels to ensure a good sear.
2. In a small bowl, whisk together the olive oil, lime juice, cumin, chipotle powder, salt, and black pepper until fully combined.
3. Brush the marinade evenly over both sides of the steak, coating it thoroughly.
4. Let the steak rest at room temperature for 30 minutes to allow the flavors to penetrate.
5. Preheat a mesquite charcoal grill to high heat, around 450°F, until the coals are ash-covered and glowing.
6. Place the steak directly over the heat and grill for 3–4 minutes per side for medium-rare, or until internal temperature reaches 130°F.
7. Transfer the steak to a cutting board and let it rest for 10 minutes to redistribute juices.
8. While the steak rests, warm the corn tortillas on the cooler side of the grill for 30 seconds per side until pliable.
9. Slice the steak thinly against the grain into 1/4-inch strips.
10. Divide the steak evenly among the warm tortillas.
11. Top each taco with a sprinkle of chopped cilantro and diced onion.
12. Serve immediately with lime wedges on the side for squeezing over the top. During those final moments, the tender, smoky steak contrasts beautifully with the crisp freshness of cilantro and onion, while a squeeze of lime brightens every bite. For a quiet twist, try stacking the tacos open-faced and drizzling with a touch of crema, letting the colors and textures shine in the soft evening light.
Savory Beef Burnt Ends with Texas Spice

Venturing into the quiet kitchen this afternoon, I find myself drawn to the slow, meditative process of transforming humble ingredients into something deeply comforting. There’s something almost sacred about watching smoke curl from the smoker, knowing what magic unfolds within.
6
portions20
minutes330
minutesIngredients
– 3 pounds well-marbled beef chuck roast, cut into 2-inch cubes
– 1/4 cup dark brown sugar with rich molasses notes
– 2 tablespoons smoked paprika with deep crimson color
– 1 tablespoon coarse kosher salt with clean mineral finish
– 2 teaspoons freshly cracked black pepper with aromatic warmth
– 1 teaspoon garlic powder with earthy sweetness
– 1 teaspoon onion powder with subtle sharpness
– 1/2 teaspoon cayenne pepper with gentle heat
– 1 cup robust beef broth with rich umami depth
– 1/2 cup sticky honey with floral notes
– 1/4 cup Worcestershire sauce with complex tang
– 2 tablespoons apple cider vinegar with bright acidity
Instructions
1. Preheat your smoker to 250°F using hickory wood for authentic Texas flavor.
2. Pat the beef chuck cubes completely dry with paper towels to ensure proper bark formation.
3. Combine dark brown sugar, smoked paprika, kosher salt, black pepper, garlic powder, onion powder, and cayenne pepper in a large bowl.
4. Toss the dried beef cubes in the spice mixture until every surface is thoroughly coated.
5. Arrange the seasoned beef cubes in a single layer on smoker racks, leaving space between pieces for smoke circulation.
6. Smoke the beef cubes for 3 hours at 250°F until they develop a dark mahogany crust.
7. Transfer the smoked beef cubes to a disposable aluminum pan while maintaining the smoker temperature.
8. Whisk together beef broth, honey, Worcestershire sauce, and apple cider vinegar in a separate bowl.
9. Pour the liquid mixture over the smoked beef cubes in the aluminum pan, stirring gently to coat.
10. Cover the pan tightly with aluminum foil, creating a secure seal to trap steam.
11. Return the covered pan to the smoker and continue cooking for 2 more hours at 250°F.
12. Remove the foil cover and cook uncovered for 30 minutes until the sauce thickens and glazes the beef.
13. Test for doneness by pressing a cube – it should yield easily like softened butter.
14. Rest the burnt ends for 15 minutes in the pan to allow flavors to meld completely. My favorite way to serve these is over creamy stone-ground grits, where the tender beef cubes create beautiful crimson streaks through the white background. Each bite offers that perfect contrast between the caramelized crust and the meltingly tender interior, with the Texas spices building warmth that lingers pleasantly on the palate.
Texas Twang Lemon Pepper Grilled Corn

Floating through the kitchen this afternoon, I find myself drawn to the quiet ritual of preparing corn, the way each step unfolds like a slow, deliberate breath. There’s something grounding about the simplicity of grilling, the way fire and time transform humble ingredients into something memorable, especially when lemon and pepper dance together with that Texas twang.
3
servings10
minutes12
minutesIngredients
– 4 ears of sweet summer corn, husks removed
– 3 tablespoons of rich unsalted butter, softened
– 2 tablespoons of freshly squeezed lemon juice
– 1 teaspoon of finely grated lemon zest
– 1 tablespoon of coarse kosher salt
– 2 teaspoons of freshly cracked black pepper
– 1/4 cup of finely chopped fresh parsley
Instructions
1. Preheat your outdoor grill to medium-high heat, aiming for 400°F, and lightly oil the grates to prevent sticking.
2. In a small bowl, combine the softened unsalted butter, freshly squeezed lemon juice, and finely grated lemon zest, stirring until fully blended and creamy.
3. Brush the sweet summer corn ears evenly with the lemon-butter mixture, coating all sides for maximum flavor infusion.
4. Place the coated corn directly on the preheated grill grates, arranging them in a single layer without overcrowding.
5. Grill the corn for 10–12 minutes, turning every 2–3 minutes with tongs, until kernels are tender and show light char marks.
6. Sprinkle the coarse kosher salt and freshly cracked black pepper evenly over the hot grilled corn while rotating for even coverage.
7. Remove the corn from the grill and transfer to a serving platter, letting it rest for 2 minutes to allow flavors to meld.
8. Garnish the grilled corn with the finely chopped fresh parsley just before serving for a bright, fresh finish.
Buttery and vibrant, this corn carries a tender crunch from the grill, with the lemon zest cutting through the richness in the most delightful way. I love serving it alongside smoky meats or simply on its own, the parsley adding a garden-fresh whisper that makes every bite feel like a slow, sun-drenched afternoon.
Pitmaster-Approved BBQ Chicken Thighs
Dusk settles softly outside my kitchen window as I prepare tonight’s meal, the quiet rhythm of cooking offering space for reflection after a long day. There’s something deeply comforting about the ritual of preparing barbecue chicken thighs, each step a meditation in patience and flavor building that transforms simple ingredients into something extraordinary.
2
portions35
minutes25
minutesIngredients
– 2 pounds bone-in, skin-on chicken thighs with golden-brown skin
– 1/4 cup rich, dark molasses
– 2 tablespoons smooth Dijon mustard with its subtle tang
– 2 tablespoons raw, unfiltered apple cider vinegar
– 1 tablespoon smoked paprika with its deep crimson hue
– 1 teaspoon coarse kosher salt with its satisfying crunch
– 1/2 teaspoon freshly cracked black pepper
– 1/4 teaspoon cayenne pepper for gentle warmth
– 2 tablespoons golden, mild-flavored olive oil
Instructions
1. Pat the chicken thighs completely dry with paper towels to ensure crisp skin during cooking.
2. Whisk together molasses, Dijon mustard, apple cider vinegar, smoked paprika, kosher salt, black pepper, and cayenne pepper in a medium bowl until fully combined.
3. Brush both sides of each chicken thigh generously with the spice mixture, making sure to get under the skin where possible.
4. Let the chicken rest at room temperature for exactly 30 minutes to allow the flavors to penetrate deeply.
5. Preheat your grill to medium heat, maintaining a consistent 375°F temperature across the cooking surface.
6. Lightly brush the grill grates with olive oil to prevent sticking before placing the chicken.
7. Arrange the chicken thighs skin-side down on the grill, listening for that satisfying sizzle as they make contact.
8. Grill for 8-10 minutes until the skin develops deep golden grill marks and releases easily when lifted.
9. Flip the chicken thighs carefully using tongs, being mindful not to tear the delicate skin.
10. Continue grilling for another 12-15 minutes until the internal temperature reaches 175°F when tested with an instant-read thermometer.
11. Transfer the chicken to a clean platter and let it rest undisturbed for 5 minutes to allow the juices to redistribute evenly. Using the sharp tip of your thermometer, pierce the thickest part of the thigh near the bone to get the most accurate reading, as this ensures perfectly cooked meat without dryness. Understanding how the sweet molasses caramelizes against the heat while the vinegar cuts through the richness creates that perfect balance barbecue lovers crave. The skin becomes shatteringly crisp while the meat beneath remains incredibly moist and tender, making these thighs wonderful served over creamy polenta or shredded into corn tortillas with pickled red onions for contrasting brightness.
Honey-Glazed Texas BBQ Bacon-Wrapped Shrimp

A quiet evening calls for something that bridges the gap between simple comfort and special occasion cooking. As the sun dips low, there’s a particular joy in preparing these shrimp, where sweet honey and smoky barbecue mingle in the most inviting way.
8
portions15
minutes20
minutesIngredients
– 1 pound large, wild-caught shrimp, peeled and deveined
– 8 slices thick-cut applewood smoked bacon
– 1/3 cup raw, golden honey
– 1/4 cup bold, tomato-based barbecue sauce
– 2 tablespoons rich, unsalted butter
– 1 teaspoon fragrant smoked paprika
– 1/2 teaspoon finely ground black pepper
– 1/4 teaspoon flaky sea salt
Instructions
1. Preheat your oven to 400°F and line a rimmed baking sheet with aluminum foil.
2. Pat the peeled and deveined shrimp completely dry with paper towels to ensure the bacon adheres properly.
3. Wrap each shrimp snugly with one half-slice of thick-cut bacon, securing it with a soaked wooden toothpick.
4. Arrange the wrapped shrimp in a single layer on the prepared baking sheet, ensuring they do not touch.
5. In a small saucepan over medium-low heat, melt the unsalted butter completely.
6. Whisk in the raw honey, bold barbecue sauce, fragrant smoked paprika, and finely ground black pepper until the mixture is smooth and well combined.
7. Brush half of the honey glaze generously over the top and sides of each bacon-wrapped shrimp.
8. Bake for 10 minutes at 400°F until the bacon begins to render and crisp at the edges.
9. Remove the baking sheet from the oven and carefully flip each shrimp using kitchen tongs.
10. Brush the remaining honey glaze evenly over the shrimp, getting into all the crevices.
11. Return the baking sheet to the oven and bake for another 8-10 minutes until the bacon is fully crispy and the shrimp are opaque.
12. Sprinkle the flaky sea salt lightly over the hot shrimp immediately after removing them from the oven.
Glazed to a sticky, caramelized perfection, these shrimp offer a wonderful contrast of textures—the crisp bacon giving way to tender, juicy seafood within. The sweet heat from the glaze clings to every bite, making them irresistible straight from the pan or arranged over a bed of creamy grits for a truly comforting meal.
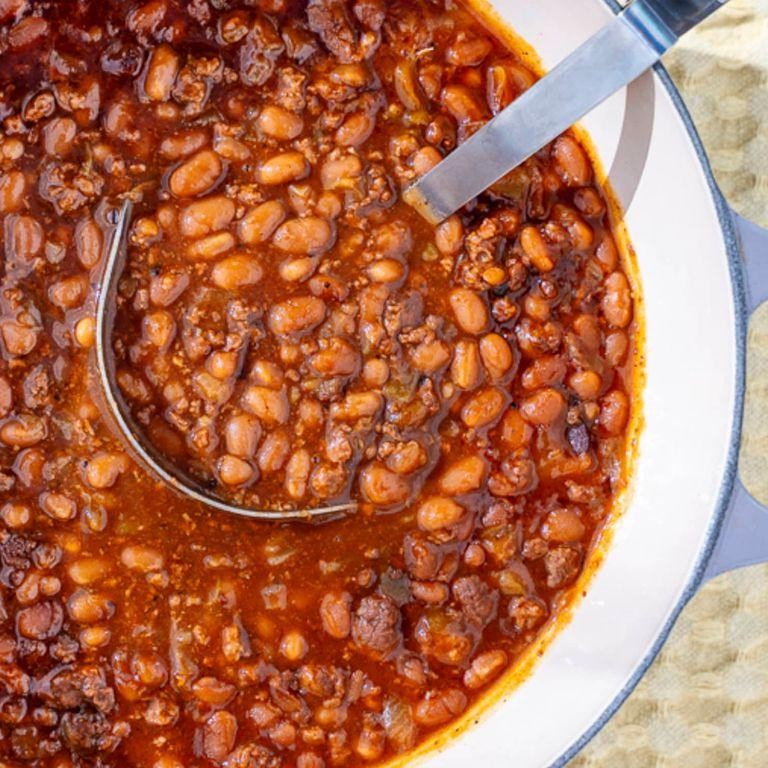
Texas Cowboy Beans with BBQ Flair
Wandering through my kitchen this quiet afternoon, I find myself drawn to the slow, comforting rhythm of bean preparation, the way each ingredient tells its own story before blending into something greater. There’s something deeply satisfying about letting flavors meld together over gentle heat, filling the space with warmth and nostalgia.
6
servings25
minutes210
minutesIngredients
– 1 pound dried pinto beans, carefully sorted and rinsed
– 6 slices thick-cut bacon, chopped into smoky bits
– 1 large yellow onion, finely diced
– 3 cloves fresh garlic, minced to aromatic perfection
– 1 cup bold barbecue sauce, preferably hickory-smoked
– ¼ cup dark brown sugar, packed for rich sweetness
– 2 tablespoons Worcestershire sauce, for tangy depth
– 1 tablespoon spicy Dijon mustard
– 1 teaspoon smoked paprika, for a subtle warmth
– ½ teaspoon coarse sea salt
– ¼ teaspoon freshly cracked black pepper
– 4 cups rich beef broth
Instructions
1. Place the sorted pinto beans in a large Dutch oven and cover with 2 inches of cold water, soaking them overnight for optimal tenderness.
2. Drain the soaked beans thoroughly and return them to the clean Dutch oven.
3. Cook the chopped bacon in a skillet over medium heat for 8-10 minutes until crispy and golden brown, then transfer to a paper towel-lined plate.
4. Pour off all but 2 tablespoons of the rendered bacon fat from the skillet.
5. Sauté the diced onion in the reserved bacon fat over medium heat for 6-8 minutes until translucent and fragrant.
6. Add the minced garlic and cook for 1 minute more, stirring constantly to prevent burning.
7. Combine the sautéed onion mixture, crispy bacon, barbecue sauce, brown sugar, Worcestershire sauce, Dijon mustard, smoked paprika, salt, and pepper with the drained beans in the Dutch oven.
8. Pour the beef broth over the bean mixture, ensuring all ingredients are fully submerged.
9. Bring the mixture to a gentle boil over high heat, then immediately reduce to a low simmer.
10. Cover the Dutch oven and simmer for 2-3 hours, stirring occasionally, until the beans are tender and the sauce has thickened noticeably.
11. Remove the lid during the final 30 minutes of cooking to allow the sauce to reduce to your desired consistency.
12. Let the beans rest off heat for 15 minutes before serving to allow flavors to fully integrate.
Now the beans settle into a beautiful marriage of textures—creamy interiors giving way to the smoky bacon bits, while the barbecue sauce creates a glossy, sweet-tangy glaze that clings to every spoonful. Nothing compares to serving these cowboy beans straight from the pot, perhaps ladled over cornbread or alongside grilled sausages on a cool evening.
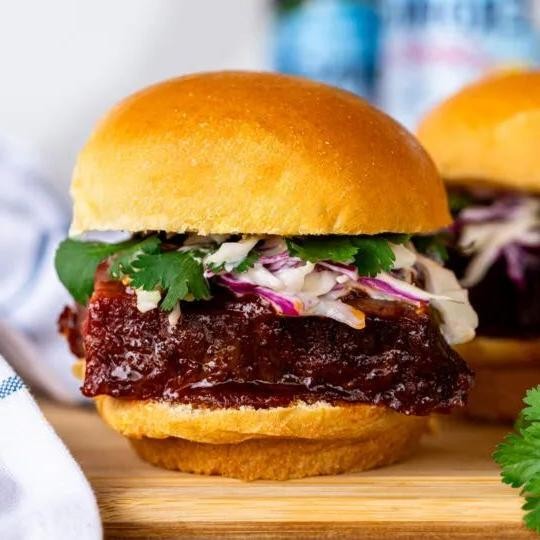
Zesty BBQ Brisket Sliders with Crunchy Slaw
Remembering how the slow, smoky scent of barbecue used to drift through my grandmother’s screen door on Sunday afternoons, I find myself craving those same comforting flavors today—the kind that settle deep in your bones and make a simple meal feel like a cherished tradition. There’s something quietly magical about transforming humble ingredients into tender, falling-apart brisket nestled between soft buns, each bite layered with zesty sauce and crisp, refreshing slaw.
12
sandwiches25
minutes240
minutesIngredients
– 3 pounds well-marbled beef brisket
– 1 cup tangy, smoky BBQ sauce
– 2 tablespoons rich Worcestershire sauce
– 1 tablespoon fragrant smoked paprika
– 1 teaspoon finely ground black pepper
– 1/2 cup creamy mayonnaise
– 2 tablespoons bright apple cider vinegar
– 1 teaspoon golden honey
– 3 cups finely shredded green cabbage
– 1/2 cup thinly sliced crisp red onion
– 12 soft, pillowy slider buns
Instructions
1. Preheat your oven to 300°F and pat the 3 pounds of well-marbled beef brisket completely dry with paper towels.
2. Rub the brisket evenly with 1 tablespoon of fragrant smoked paprika and 1 teaspoon of finely ground black pepper, massaging the spices into all surfaces.
3. Place the seasoned brisket in a deep roasting pan, fat-side up, and pour 1/2 cup of water into the bottom of the pan to create steam.
4. Cover the pan tightly with heavy-duty aluminum foil and slow-roast for 4 hours until the brisket is fork-tender and pulls apart easily.
5. Carefully transfer the brisket to a cutting board, reserving 1/2 cup of the pan juices, and let it rest for 20 minutes to redistribute the juices.
6. Shred the brisket using two forks, pulling along the grain into bite-sized pieces.
7. In a medium bowl, whisk together 1 cup of tangy, smoky BBQ sauce, 2 tablespoons of rich Worcestershire sauce, and the reserved 1/2 cup of pan juices.
8. Toss the shredded brisket thoroughly with the sauce mixture until every piece is coated.
9. In a separate large bowl, whisk 1/2 cup of creamy mayonnaise, 2 tablespoons of bright apple cider vinegar, and 1 teaspoon of golden honey until smooth.
10. Add 3 cups of finely shredded green cabbage and 1/2 cup of thinly sliced crisp red onion to the dressing, tossing until the slaw is evenly coated.
11. Let the slaw rest for 10 minutes to slightly soften while toasting the 12 soft, pillowy slider buns at 350°F for 3-4 minutes until lightly golden.
12. Assemble sliders by placing a generous portion of saucy brisket on each bottom bun, topping with a heap of crunchy slaw, and crowning with the top bun.
The tender brisket practically melts against the crisp slaw, creating a beautiful contrast of textures where smoky sweetness meets bright, vinegary crunch. Try serving these sliders open-faced with an extra drizzle of BBQ sauce and a sprinkle of fresh parsley for a more elegant presentation, or pack them for picnics where the slaw helps keep the buns from getting soggy.
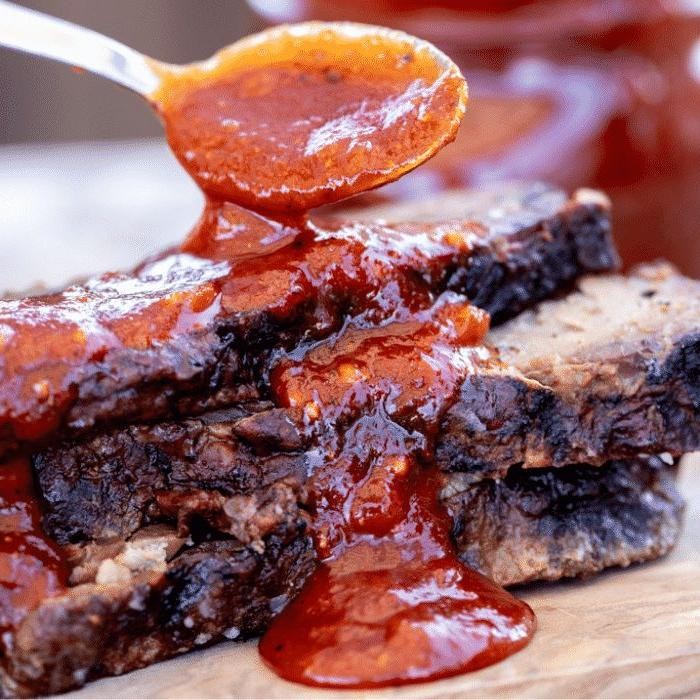
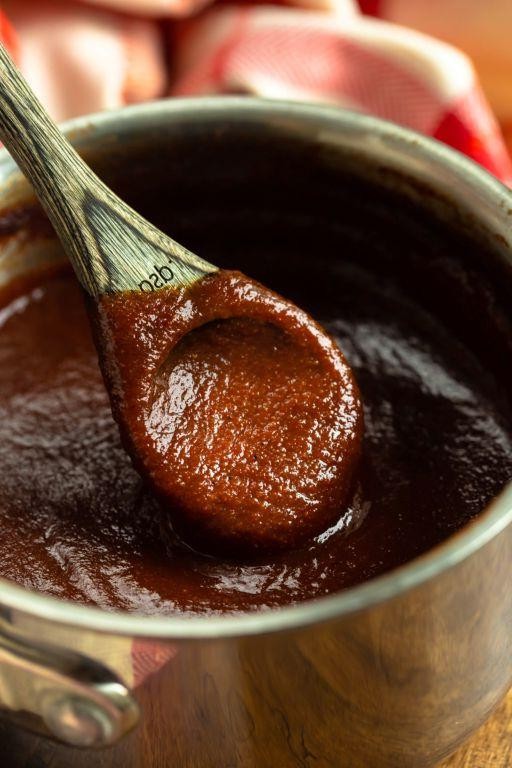
Homemade Texas BBQ Sauce with a Kick
Sometimes the best recipes come from quiet afternoons when the kitchen becomes a sanctuary, and today I found myself craving that deep, smoky sweetness only a homemade barbecue sauce can provide—the kind that carries memories of Texas sunsets and backyard gatherings in every spoonful. This version has just enough heat to make you pause and appreciate the complexity, a gentle kick that lingers without overwhelming the soul-warming base notes. Making it from scratch feels like bottling up comfort, each ingredient adding its own story to the jar.
1
jar5
minutes24
minutesIngredients
– 1 cup rich ketchup
– ½ cup robust apple cider vinegar
– ¼ cup dark molasses
– ¼ cup raw honey
– 2 tablespoons Worcestershire sauce
– 1 tablespoon smoked paprika
– 1 teaspoon garlic powder
– 1 teaspoon onion powder
– ½ teaspoon cayenne pepper
– ½ teaspoon finely ground black pepper
– ¼ cup unsalted butter
Instructions
1. Combine the rich ketchup, robust apple cider vinegar, dark molasses, raw honey, and Worcestershire sauce in a medium saucepan over medium heat.
2. Whisk the mixture continuously for 2 minutes until the ingredients are fully incorporated and the sauce appears smooth.
3. Stir in the smoked paprika, garlic powder, onion powder, cayenne pepper, and finely ground black pepper until no dry spots remain.
4. Reduce the heat to low and simmer the sauce uncovered for 20 minutes, stirring every 5 minutes to prevent sticking.
5. Cut the unsalted butter into small cubes and add them to the saucepan.
6. Stir gently until the butter melts completely and emulsifies into the sauce, about 2 minutes.
7. Remove the saucepan from heat and let the sauce cool to room temperature, which takes approximately 30 minutes.
8. Transfer the cooled sauce to an airtight glass jar using a ladle or funnel.
9. Refrigerate the sealed jar for at least 4 hours before using to allow the flavors to meld. For the best texture, let the sauce sit overnight if possible—this helps the spices fully bloom and the consistency thicken beautifully. Freshly made barbecue sauce can sometimes separate; if this happens, simply give it a vigorous stir before serving to recombine. Storing it in glass preserves the vibrant flavor without absorbing any metallic notes from other containers. Finally, the glossy, velvety texture clings perfectly to ribs or brushed onto grilled chicken, while the initial sweetness gives way to a slow-building warmth that makes every bite memorable.
Conclusion
Craving authentic Texas BBQ? This collection brings the Lone Star State’s legendary flavors right to your kitchen. From tender brisket to smoky ribs, these recipes guarantee unforgettable meals. Fire up the grill, try your favorites, and let us know which ones stole the show in the comments below! Loved this roundup? Share the BBQ love by pinning this article to your Pinterest boards.


