Craving something sweet but short on time? You’ve come to the right place! We’ve gathered 29 irresistible dessert recipes perfect for effortless indulgence—from quick no-bake treats to decadent delights that come together in minutes. Whether you’re satisfying a sudden sweet tooth or planning a cozy night in, these easy-to-make desserts promise maximum flavor with minimal effort. Get ready to discover your new favorite treats!
No-Bake Chocolate Peanut Butter Bars

Baking doesn’t always require an oven, especially when you’re craving something rich and satisfying. These no-bake chocolate peanut butter bars come together with minimal effort and deliver maximum flavor, making them perfect for busy weeknights or last-minute dessert cravings. Let’s walk through each step together to create these irresistible treats.
16
bars20
minutes4
minutesIngredients
- 2 cups graham cracker crumbs (about 14 full sheets, crushed fine)
- 1 cup creamy peanut butter (natural or regular both work well)
- 1/2 cup unsalted butter, melted (salted butter works too, just reduce added salt)
- 1/4 cup granulated sugar (adjust to your preferred sweetness level)
- 1 1/2 cups semi-sweet chocolate chips (milk chocolate can be substituted)
- 1/2 cup heavy cream (whipping cream works equally well)
- 1 teaspoon vanilla extract (pure extract recommended for best flavor)
- 1/4 teaspoon salt (enhances both chocolate and peanut butter flavors)
Instructions
- Line an 8×8-inch baking pan with parchment paper, leaving overhang on two opposite sides for easy removal later.
- Combine graham cracker crumbs, peanut butter, melted butter, granulated sugar, and salt in a medium bowl until the mixture resembles wet sand and holds together when pressed.
- Firmly press the peanut butter mixture into the prepared pan using the bottom of a measuring cup to create an even, compact layer.
- Place the pan in the refrigerator to chill while preparing the chocolate topping, about 15 minutes.
- Heat heavy cream in a small saucepan over medium heat until small bubbles form around the edges, about 3-4 minutes—do not let it boil.
- Pour the hot cream over chocolate chips in a heatproof bowl and let sit undisturbed for 2 minutes to allow the chocolate to melt gently.
- Add vanilla extract to the chocolate mixture and whisk slowly from the center outward until smooth and glossy, about 1 minute.
- Remove the chilled crust from the refrigerator and pour the chocolate ganache over the peanut butter layer, spreading evenly with an offset spatula.
- Return the pan to the refrigerator and chill until completely set, about 2 hours—the chocolate should be firm to the touch.
- Use the parchment paper overhang to lift the entire bar block from the pan and transfer to a cutting board.
- Cut into 16 even squares using a sharp knife wiped clean between cuts for neat edges.
Marbled with distinct layers, these bars offer a satisfying contrast between the crunchy peanut butter base and the smooth chocolate topping. The rich, nutty flavor deepens when served slightly chilled, though letting them sit at room temperature for 10 minutes before serving softens the texture beautifully. For an elegant twist, sprinkle with flaky sea salt before the chocolate sets or drizzle with melted white chocolate after cutting.
Easy Lemon Drizzle Cake
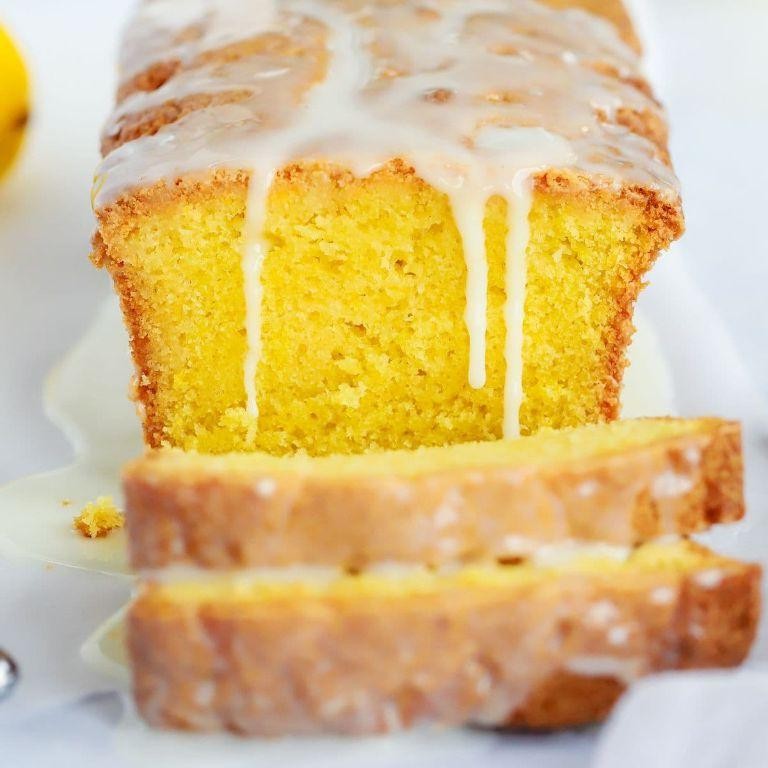
Now, let’s create a simple yet delightful lemon drizzle cake that’s perfect for beginners and bakes up beautifully every time. This classic treat combines tender cake with a zesty lemon glaze that soaks right in for maximum flavor. Follow these methodical steps for foolproof results every time you bake.
8
servings15
minutes50
minutesIngredients
– 1 ½ cups all-purpose flour (spoon and level for accuracy)
– 1 cup granulated sugar
– ½ cup unsalted butter, softened (or margarine)
– 2 large eggs at room temperature
– ½ cup whole milk
– 2 teaspoons baking powder
– ½ teaspoon salt
– Zest of 2 lemons
– ¼ cup fresh lemon juice (about 2 lemons)
– ½ cup powdered sugar (sifted to avoid lumps)
Instructions
1. Preheat your oven to 350°F and grease an 8-inch loaf pan thoroughly, then line it with parchment paper leaving overhang on two sides for easy removal.
2. In a medium bowl, whisk together 1 ½ cups all-purpose flour, 2 teaspoons baking powder, and ½ teaspoon salt until fully combined and no streaks remain.
3. In a separate large bowl, beat ½ cup softened unsalted butter and 1 cup granulated sugar together with an electric mixer on medium speed for exactly 2 minutes until pale and fluffy.
4. Add 2 large eggs one at a time to the butter mixture, beating for 30 seconds after each addition until fully incorporated and the mixture appears smooth.
5. Stir in the zest of 2 lemons until evenly distributed throughout the butter and egg mixture.
6. Alternate adding the flour mixture and ½ cup whole milk to the wet ingredients in three additions, beginning and ending with flour, mixing on low speed just until combined after each addition.
7. Pour the batter into your prepared loaf pan and use a spatula to spread it evenly into all corners, then gently tap the pan on the counter twice to remove air bubbles.
8. Bake at 350°F for 45-50 minutes until the top is golden brown and a toothpick inserted into the center comes out completely clean with no crumbs attached.
9. While the cake bakes, whisk together ¼ cup fresh lemon juice and ½ cup sifted powdered sugar in a small bowl until the sugar fully dissolves and the glaze is smooth.
10. Remove the cake from the oven and immediately poke numerous holes all over the top surface using a skewer or fork, reaching about halfway down into the cake.
11. Slowly pour the lemon glaze evenly over the warm cake, allowing it to soak completely into the holes you created for maximum moisture distribution.
12. Let the cake cool completely in the pan on a wire rack for at least 2 hours before using the parchment paper overhang to lift it out for slicing. Just imagine biting into this cake’s tender, moist crumb that practically melts in your mouth while the bright lemon flavor dances across your palate. The glaze creates a delightful sugary crust on top that contrasts beautifully with the soft interior, making it perfect for afternoon tea or as a lunchbox treat that stays fresh for days.
Quick Oreo Cheesecake
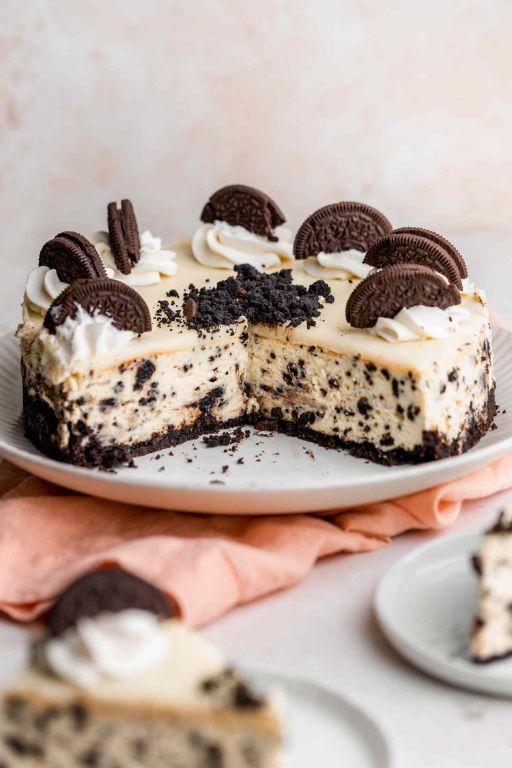
Wondering how to create a decadent dessert without spending hours in the kitchen? This Quick Oreo Cheesecake delivers that classic creamy texture and chocolatey crunch in a fraction of the time. We’ll walk through each simple step to ensure your no-bake creation turns out perfectly every time.
8
servings30
minutesIngredients
– 24 Oreo cookies, divided (save 4 for garnish)
– 5 tablespoons unsalted butter, melted (use more if crust seems dry)
– 16 ounces cream cheese, softened to room temperature
– 1 cup powdered sugar, sifted to prevent lumps
– 1 teaspoon vanilla extract
– 1 ½ cups heavy whipping cream, chilled
– ¼ cup granulated sugar
Instructions
1. Place 20 Oreo cookies in a zip-top bag and crush them into fine crumbs using a rolling pin.
2. Transfer the cookie crumbs to a medium bowl and pour in the melted butter.
3. Mix the crumbs and butter until the mixture resembles wet sand and holds together when pressed.
4. Press the crumb mixture firmly into the bottom of a 9-inch springform pan using the bottom of a measuring cup.
5. Chill the crust in the refrigerator for 15 minutes while preparing the filling.
6. Beat the softened cream cheese with an electric mixer on medium speed for 2 minutes until smooth and creamy.
7. Add the sifted powdered sugar and vanilla extract to the cream cheese.
8. Beat the mixture for another 2 minutes until fully combined and no sugar lumps remain.
9. In a separate clean bowl, whip the chilled heavy cream with granulated sugar on high speed for 3-4 minutes until stiff peaks form.
10. Gently fold the whipped cream into the cream cheese mixture using a spatula until no white streaks remain.
11. Spread the filling evenly over the chilled crust using an offset spatula.
12. Crush the remaining 4 Oreo cookies into coarse chunks and sprinkle them over the top.
13. Cover the pan with plastic wrap and refrigerate for at least 6 hours, or overnight for best results.
14. Run a knife around the edge of the pan before releasing the springform collar.
Smooth and creamy with satisfying cookie crunch throughout, this cheesecake develops richer flavor when chilled overnight. Serve chilled slices with a drizzle of chocolate sauce or alongside a scoop of vanilla ice cream for an extra indulgent treat.
Simple Raspberry Sorbet
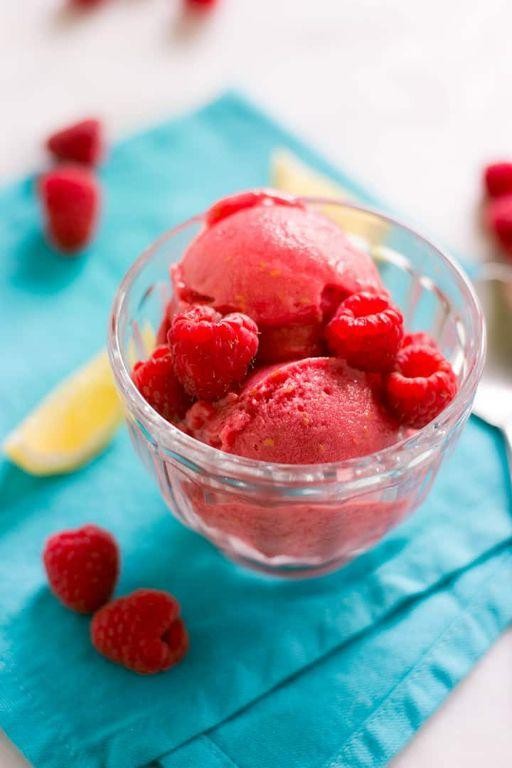
Zesty and refreshing, this simple raspberry sorbet requires minimal ingredients but delivers maximum flavor. Follow these methodical steps to create a perfectly smooth frozen dessert that will impress your guests. You’ll be amazed at how professional results come from such straightforward techniques.
5
servings25
minutes4
minutesIngredients
– 4 cups fresh or frozen raspberries (thaw if frozen)
– 1 cup granulated sugar (adjust for sweetness preference)
– 1 cup water
– 2 tablespoons fresh lemon juice (about 1 medium lemon)
– Pinch of salt (enhances fruit flavor)
Instructions
1. Combine 1 cup water and 1 cup granulated sugar in a small saucepan.
2. Heat the mixture over medium heat, stirring constantly until the sugar completely dissolves, about 3-4 minutes.
3. Remove the simple syrup from heat and let it cool to room temperature, approximately 20 minutes.
4. Place 4 cups raspberries in a blender or food processor.
5. Add the cooled simple syrup to the blender with the raspberries.
6. Squeeze 2 tablespoons fresh lemon juice into the blender.
7. Add a pinch of salt to balance the flavors.
8. Blend the mixture on high speed until completely smooth, about 1-2 minutes.
9. Strain the puree through a fine-mesh sieve into a bowl to remove all seeds.
10. Press the puree through the sieve with a spatula to extract maximum liquid.
11. Discard the seeds left in the sieve.
12. Pour the strained mixture into a shallow freezer-safe container.
13. Cover the container tightly with plastic wrap or a lid.
14. Freeze the sorbet for 1 hour until the edges begin to set.
15. Remove the container from the freezer after 1 hour.
16. Scrape the partially frozen sorbet with a fork to break up ice crystals.
17. Return the container to the freezer for another 30 minutes.
18. Repeat the scraping process every 30 minutes for 2-3 hours until the sorbet reaches scoopable consistency.
The finished sorbet has a vibrant ruby color and intensely concentrated raspberry flavor that’s both tart and sweet. Its smooth, creamy texture melts beautifully on the tongue without any iciness. For an elegant presentation, serve scoops in chilled glasses with fresh mint sprigs or layer it with vanilla ice cream for a stunning dessert parfait.
Microwave Mug Brownie
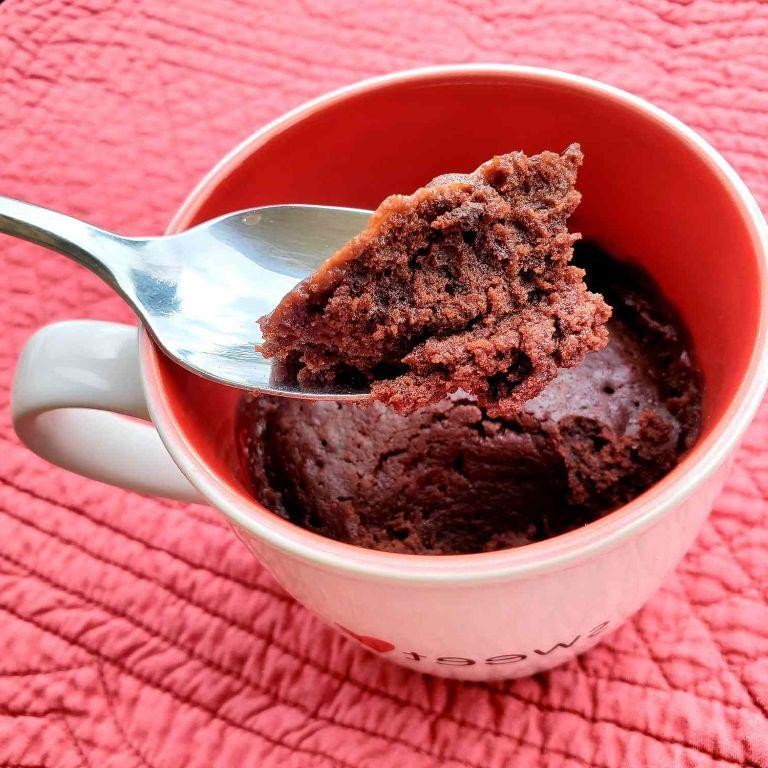
Oftentimes, you crave something sweet and chocolatey but don’t want to heat up the whole oven or wait for a full batch to bake. This microwave mug brownie is your perfect solution, delivering a warm, fudgy treat in just minutes with minimal cleanup. Let’s walk through this simple process together to create your single-serving dessert.
1
servings5
minutes1
minutesIngredients
– 3 tablespoons all-purpose flour
– 2 tablespoons granulated sugar
– 1 tablespoon unsweetened cocoa powder
– 2 tablespoons milk (or any plant-based alternative)
– 1 tablespoon vegetable oil (or any neutral oil)
– 1/4 teaspoon vanilla extract
– 1 tablespoon chocolate chips (optional, for extra richness)
Instructions
1. Select a 12-ounce microwave-safe mug and ensure it’s completely dry inside.
2. Measure 3 tablespoons of all-purpose flour directly into your mug.
3. Add 2 tablespoons of granulated sugar to the same mug.
4. Spoon 1 tablespoon of unsweetened cocoa powder into the mug.
5. Use a fork or small whisk to thoroughly combine all dry ingredients until no streaks remain.
6. Pour 2 tablespoons of milk into the mug with the dry mixture.
7. Add 1 tablespoon of vegetable oil to the mug.
8. Measure 1/4 teaspoon of vanilla extract and add it to the mug.
9. Stir the wet and dry ingredients together until you have a smooth, thick batter with no dry pockets.
10. If using, fold 1 tablespoon of chocolate chips into the batter until evenly distributed.
11. Tap the mug gently on the counter to settle the batter and remove any air bubbles.
12. Microwave the mug on high power for 60 seconds at 1100 watts.
13. Check the brownie’s doneness by inserting a toothpick—it should come out with moist crumbs but not wet batter.
14. If needed, microwave for additional 15-second intervals until the toothpick test shows moist crumbs.
15. Carefully remove the mug from the microwave using oven mitts, as it will be very hot.
16. Let the brownie rest in the mug for 2 minutes to finish cooking and set properly.
Varying the cooking time by just 10-15 seconds can transform your brownie from fudgy to cake-like, so adjust based on your microwave’s power and personal preference. The result is a wonderfully rich, moist dessert with deep chocolate flavor that’s perfect straight from the mug, though you could also top it with a scoop of vanilla ice cream for an extra indulgent treat.
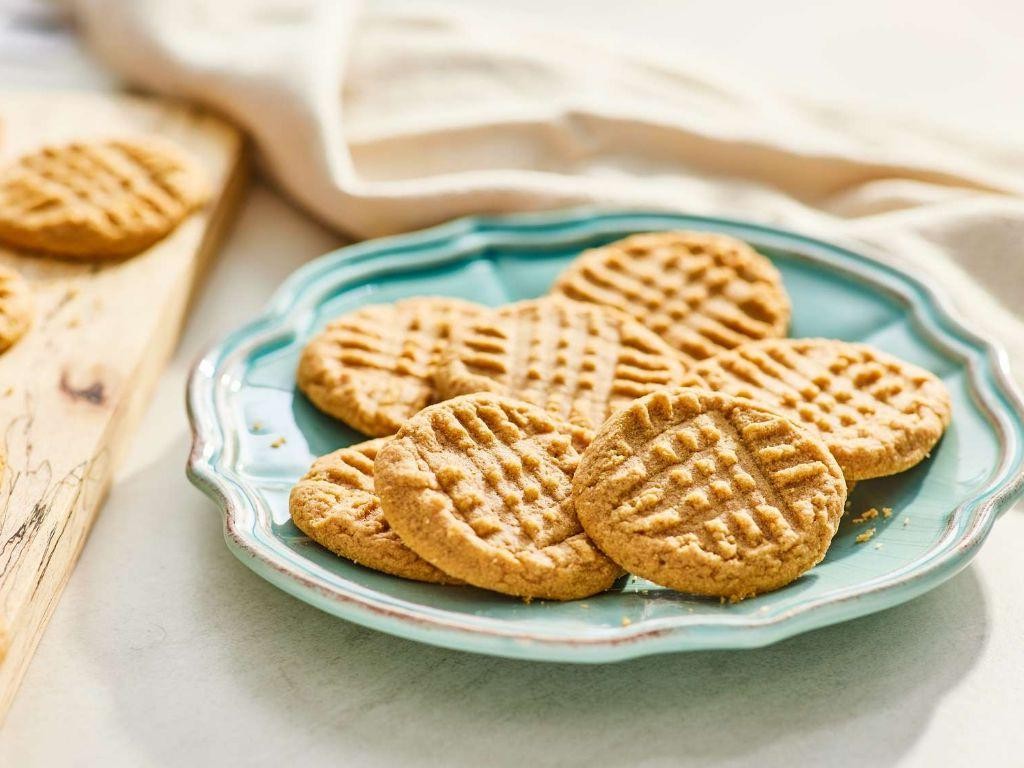
Three-Ingredient Peanut Butter Cookies
Zesty and straightforward, these three-ingredient peanut butter cookies prove that delicious treats don’t require complicated recipes. Perfect for beginners or anyone short on time, this method guides you through creating chewy, nutty cookies with minimal effort. Let’s walk through each simple step together to ensure perfect results every time.
24
cookies15
minutes12
minutesIngredients
– 1 cup creamy peanut butter (natural or regular both work)
– 1 cup granulated sugar (adjust slightly for sweetness preference)
– 1 large egg (room temperature blends more easily)
Instructions
1. Preheat your oven to 350°F and line a baking sheet with parchment paper.
2. Measure exactly 1 cup of peanut butter into a medium mixing bowl.
3. Add precisely 1 cup of granulated sugar to the same bowl.
4. Crack 1 large egg into the bowl with the other ingredients.
5. Use a wooden spoon or spatula to stir the mixture for 2-3 minutes until completely smooth and well combined.
6. Scoop tablespoon-sized portions of dough and roll them between your palms to form smooth balls.
7. Place the dough balls 2 inches apart on your prepared baking sheet.
8. Use a fork to press straight down on each ball, then press again perpendicular to create a classic crisscross pattern.
9. Bake the cookies at 350°F for exactly 10-12 minutes until the edges are lightly golden.
10. Remove the baking sheet from the oven and let cookies cool on the sheet for 5 minutes before transferring.
Chewy with a satisfying peanut butter richness, these cookies develop a slightly crisp edge while remaining soft in the center. Consider pressing a chocolate kiss into the center immediately after baking for a festive variation, or enjoy them alongside a cold glass of milk for the perfect simple treat.
Vanilla Bean Panna Cotta
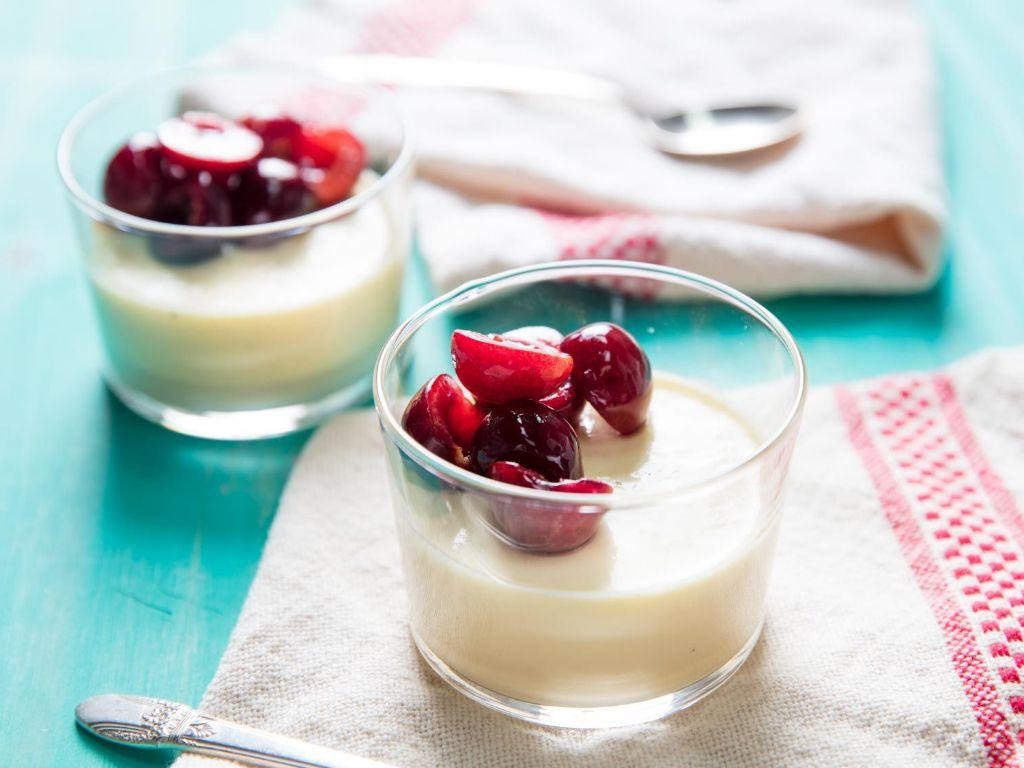
Keeping dessert simple yet elegant is my philosophy, and vanilla bean panna cotta perfectly embodies this approach with its creamy, delicate texture that requires no baking. Knowing how to bloom gelatin properly ensures a smooth, wobble-free result every time. Let’s walk through each step together to create this classic Italian dessert in your own kitchen.
6
portions15
minutes12
minutesIngredients
– 2 cups heavy cream (use high-fat for best texture)
– 1/2 cup granulated sugar (adjust sweetness if preferred)
– 1 vanilla bean, split lengthwise (or 2 tsp pure vanilla extract)
– 1 packet (2 1/4 tsp) unflavored gelatin
– 3 tbsp cold water (for blooming gelatin)
Instructions
1. Sprinkle the gelatin packet evenly over 3 tablespoons of cold water in a small bowl.
2. Let the gelatin mixture sit undisturbed for 5 minutes until it becomes spongy and absorbs all the water.
3. Pour 2 cups of heavy cream into a medium saucepan over medium heat.
4. Add 1/2 cup granulated sugar to the cream and whisk continuously until the sugar completely dissolves, about 3-4 minutes.
5. Scrape the seeds from one split vanilla bean into the cream mixture using the back of your knife.
6. Heat the cream mixture until small bubbles form around the edges and it reaches 180°F on a kitchen thermometer, about 5-7 minutes.
7. Remove the saucepan from heat immediately when it reaches temperature.
8. Whisk the bloomed gelatin into the hot cream mixture until no visible granules remain, about 1 minute.
9. Strain the mixture through a fine-mesh sieve into a pouring pitcher to remove any vanilla bean fragments.
10. Divide the strained mixture evenly among 6 ramekins or serving glasses.
11. Cool the ramekins at room temperature for 20 minutes until no longer steaming.
12. Cover each ramekin tightly with plastic wrap, ensuring the wrap doesn’t touch the surface.
13. Refrigerate the panna cotta for at least 4 hours, or overnight for best results.
14. Check that the panna cotta is fully set by gently jiggling a ramekin—it should wobble like firm Jell-O.
15. Run a thin knife around the edge of each ramekin to loosen the panna cotta if unmolding.
Offering a sophisticated yet simple dessert, this vanilla bean panna cotta delivers a silky-smooth texture that melts on your tongue with pure vanilla warmth. The clean, creamy flavor pairs beautifully with fresh berry compote or a drizzle of caramel sauce for contrast. Serve it chilled in elegant glasses for dinner parties or enjoy it straight from the ramekin for a comforting treat.
Simple Strawberry Shortcake
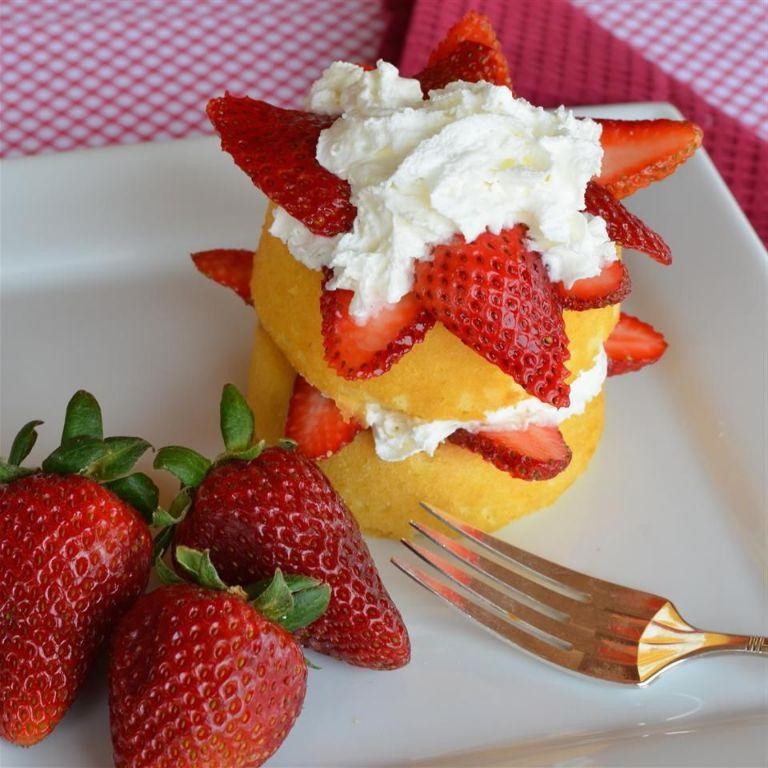
Zesty and vibrant, this classic strawberry shortcake brings summer sweetness to your table any time of year. We’ll build this dessert methodically, starting with tender biscuits and finishing with juicy berries. Follow each step precisely for foolproof results that will impress your guests.
6
portions25
minutes15
minutesIngredients
– 2 cups all-purpose flour (spoon and level for accuracy)
– 1/4 cup granulated sugar (plus 1 tbsp for berries)
– 1 tbsp baking powder
– 1/2 tsp salt
– 1/2 cup cold unsalted butter, cubed (keep refrigerated until use)
– 3/4 cup cold heavy cream (plus extra for brushing)
– 1 lb fresh strawberries, hulled and sliced
– 1 cup cold heavy whipping cream
Instructions
1. Preheat your oven to 425°F and line a baking sheet with parchment paper.
2. Whisk together 2 cups flour, 1/4 cup sugar, 1 tbsp baking powder, and 1/2 tsp salt in a large bowl.
3. Cut 1/2 cup cold butter into the dry ingredients using a pastry cutter until mixture resembles coarse crumbs.
4. Pour 3/4 cup cold cream over the mixture and stir just until a shaggy dough forms.
5. Turn dough onto a lightly floured surface and gently pat into a 1-inch thick rectangle.
6. Cut dough into 6 squares using a sharp knife and transfer to prepared baking sheet.
7. Brush biscuit tops with additional heavy cream and bake for 12-15 minutes until golden brown.
8. While biscuits bake, combine sliced strawberries with 1 tbsp sugar in a medium bowl.
9. Let strawberries macerate at room temperature for 15 minutes to release their juices.
10. Whip 1 cup cold heavy cream with an electric mixer on medium-high speed until stiff peaks form.
11. Remove biscuits from oven and cool completely on a wire rack, about 30 minutes.
12. Split cooled biscuits horizontally using a serrated knife.
13. Spoon macerated strawberries with their juices over bottom biscuit halves.
14. Top strawberries with generous dollops of whipped cream.
15. Place biscuit tops over the whipped cream at a slight angle.
Ready to serve immediately, this shortcake features flaky, buttery biscuits that contrast beautifully with the juicy strawberries and cloud-like whipped cream. For a decorative touch, garnish with whole strawberries and mint leaves, or layer individual components in clear glasses for a parfait-style presentation that showcases the vibrant colors.
Lemon Posset with Berries
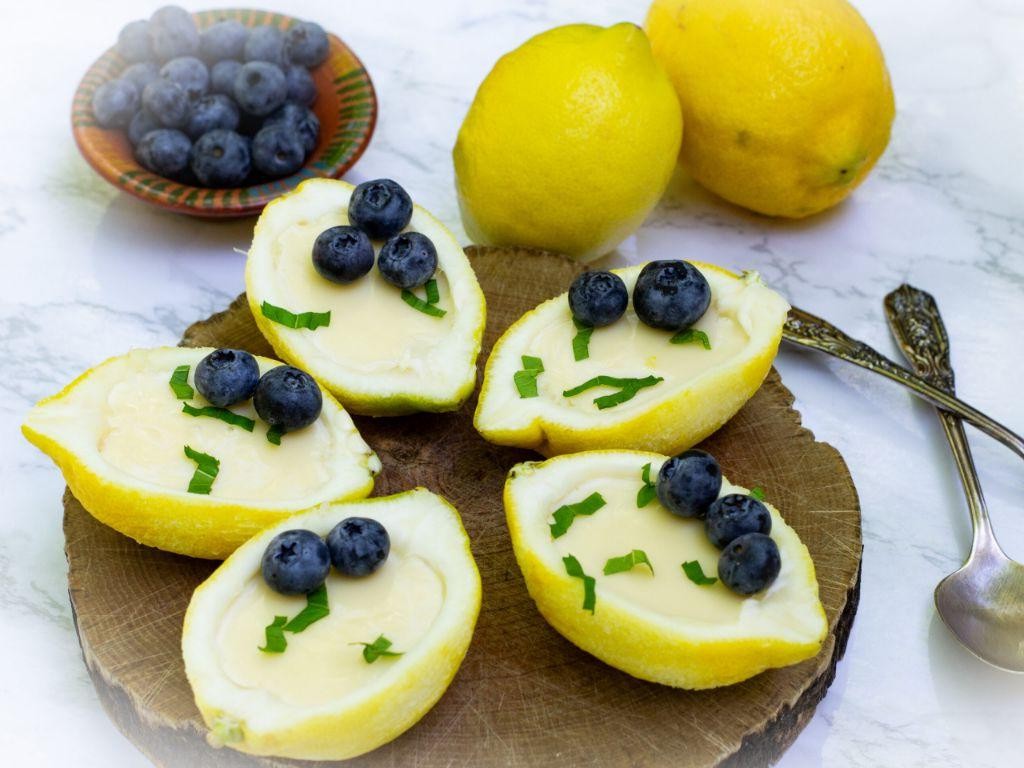
Making this elegant lemon posset with berries is surprisingly simple, requiring just a few ingredients and no special equipment. Follow these precise steps to create a dessert that’s both creamy and refreshing, perfect for impressing guests or treating yourself. Let’s walk through each action methodically to ensure your success.
2
servings15
minutes5
minutesIngredients
- 2 cups heavy cream (use full-fat for best texture)
- ¾ cup granulated sugar (adjust slightly for sweetness preference)
- ⅓ cup fresh lemon juice (about 2–3 lemons, strained)
- 1 cup mixed fresh berries (such as raspberries, blueberries, or sliced strawberries)
- 1 tsp lemon zest (for garnish, optional but recommended)
Instructions
- Combine 2 cups heavy cream and ¾ cup granulated sugar in a medium saucepan over medium heat.
- Stir continuously with a whisk until the sugar fully dissolves, about 3–4 minutes—do not let it boil.
- Remove the saucepan from heat and let it cool for 2 minutes to prevent curdling when adding lemon juice.
- Gradually whisk in ⅓ cup fresh lemon juice until the mixture thickens slightly, about 1 minute.
- Strain the mixture through a fine-mesh sieve into a pourable container to remove any lumps.
- Divide the posset evenly among 4 serving glasses or ramekins.
- Cover each glass with plastic wrap, pressing it directly onto the surface to prevent skin formation.
- Refrigerate the possets for at least 4 hours, or until fully set and firm to the touch.
- Top each chilled posset with ¼ cup mixed fresh berries just before serving.
- Sprinkle ¼ tsp lemon zest over the berries for a bright, aromatic finish.
Delightfully smooth and tangy, this posset pairs its velvety texture with the juicy burst of fresh berries. For a creative twist, layer the berries at the bottom before pouring the cream mixture, or drizzle with honey for extra sweetness.
Classic Rice Pudding
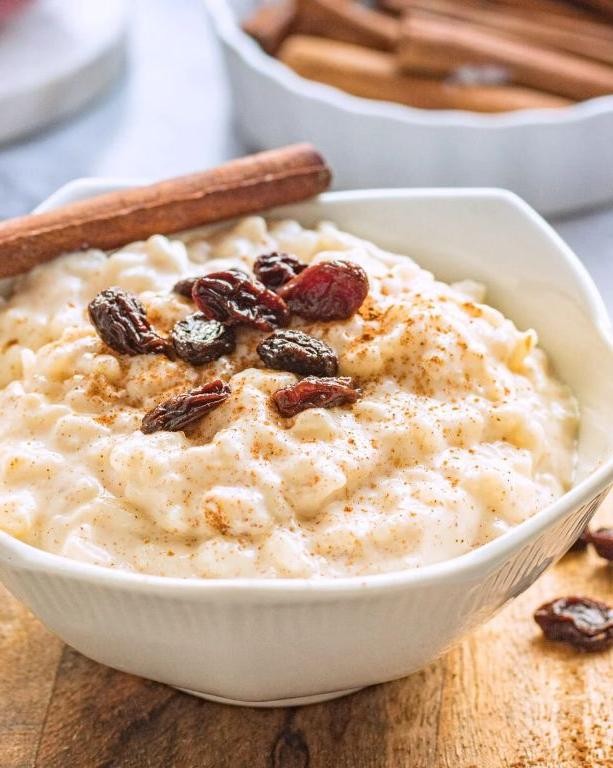
Comforting and creamy, classic rice pudding transforms simple pantry staples into a nostalgic dessert that feels like a warm hug. This methodical approach ensures perfect texture every time, guiding you through each stage with precision so even first-time cooks can achieve dessert success.
6
servings10
minutes27
minutesIngredients
– 1 cup short-grain white rice (rinsed until water runs clear)
– 4 cups whole milk (for richest texture)
– 1/2 cup granulated sugar (adjust for sweetness preference)
– 1/4 teaspoon salt (enhances flavor)
– 1 teaspoon vanilla extract (add after cooking)
– 1/2 teaspoon ground cinnamon (plus extra for garnish)
– 2 large eggs (at room temperature)
Instructions
1. Combine rinsed rice, milk, sugar, and salt in a heavy-bottomed saucepan over medium heat.
2. Bring the mixture to a gentle simmer, stirring constantly with a wooden spoon to prevent sticking.
3. Reduce heat to low and cover the saucepan, maintaining a bare simmer for 25 minutes.
4. Check consistency at 25 minutes – the rice should be tender but still slightly firm to the bite.
5. Whisk eggs vigorously in a separate bowl until pale yellow and frothy.
6. Temper the eggs by slowly pouring 1/2 cup of the hot rice mixture into the eggs while whisking continuously.
7. Pour the tempered egg mixture back into the saucepan, stirring constantly for 2 minutes until fully incorporated.
8. Remove from heat and stir in vanilla extract and cinnamon until evenly distributed.
9. Transfer the pudding to serving bowls and let cool for 15 minutes at room temperature.
10. Cover with plastic wrap pressed directly against the surface to prevent skin formation.
11. Refrigerate for at least 2 hours until thoroughly chilled and set.
Buttery rice grains suspended in a velvety custard create a dessert that’s both comforting and elegant. The cinnamon adds warmth without overpowering the delicate vanilla notes, making it perfect served chilled with fresh berries or warmed slightly with a drizzle of caramel sauce for contrasting temperatures.
Effortless Chocolate Mousse
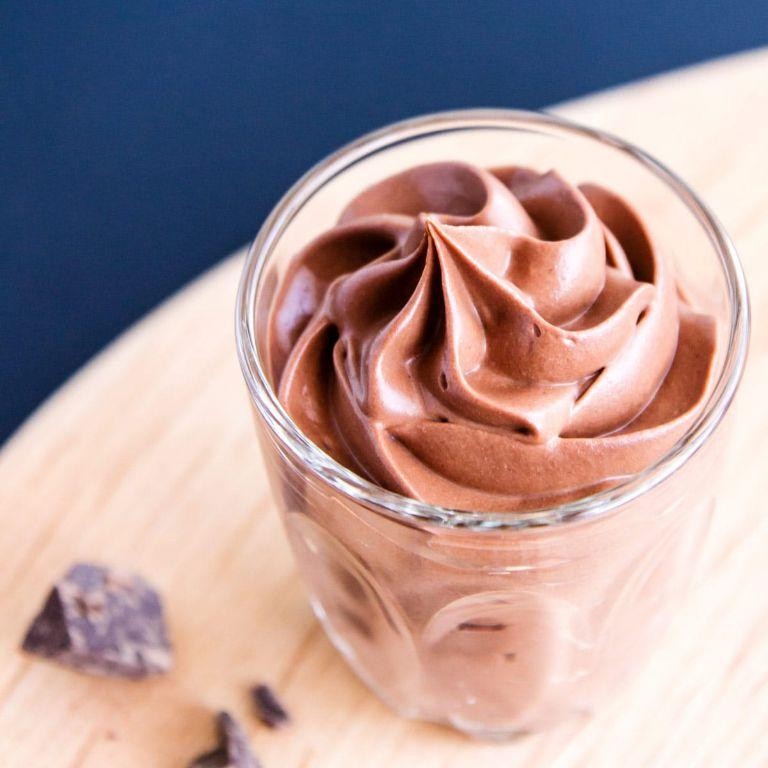
Baking doesn’t have to be complicated to be impressive, and this effortless chocolate mousse proves just that. With minimal ingredients and straightforward techniques, you’ll create a dessert that feels both luxurious and approachable, perfect for weeknight treats or last-minute entertaining.
6
servings25
minutes4
minutesIngredients
– 8 ounces semisweet chocolate chips (or chopped chocolate bars for smoother melting)
– 2 cups heavy whipping cream, divided
– 3 large egg whites, at room temperature
– 1/4 cup granulated sugar
– 1 teaspoon vanilla extract
– Pinch of salt (enhances chocolate flavor)
Instructions
1. Place the chocolate chips in a medium heatproof bowl.
2. Heat 1/2 cup of heavy cream in a small saucepan over medium heat until small bubbles form around the edges (about 3-4 minutes), being careful not to let it boil.
3. Pour the hot cream over the chocolate chips and let it sit undisturbed for 2 minutes to allow the chocolate to soften.
4. Whisk the chocolate and cream mixture gently until completely smooth and glossy, creating a ganache base.
5. Let the chocolate ganache cool to room temperature, about 15-20 minutes, while you prepare the other components.
6. In a large mixing bowl, combine the remaining 1 1/2 cups of heavy cream, vanilla extract, and pinch of salt.
7. Using an electric mixer on medium-high speed, whip the cream mixture until soft peaks form (about 2-3 minutes), being careful not to over-whip into butter.
8. In a separate clean bowl, whip the egg whites on medium speed until foamy, about 1 minute.
9. Gradually add the granulated sugar to the egg whites while continuing to whip on medium-high speed.
10. Continue whipping the egg whites until stiff, glossy peaks form (about 2-3 more minutes).
11. Fold one-third of the whipped cream into the cooled chocolate ganache using a spatula to lighten the mixture.
12. Gently fold in the remaining whipped cream until just combined, being careful not to deflate the mixture.
13. Add the whipped egg whites to the chocolate mixture and fold gently until no white streaks remain.
14. Divide the mousse evenly among 6 serving glasses or bowls.
15. Cover the mousse with plastic wrap and refrigerate for at least 4 hours, or until set.
The finished mousse achieves an airy, cloud-like texture that melts smoothly on the tongue, with deep chocolate flavor balanced by just the right sweetness. For an elegant presentation, top with fresh berries or shaved chocolate before serving, or layer it with crushed cookies in parfait glasses for added texture contrast.
Quick Berry Parfait
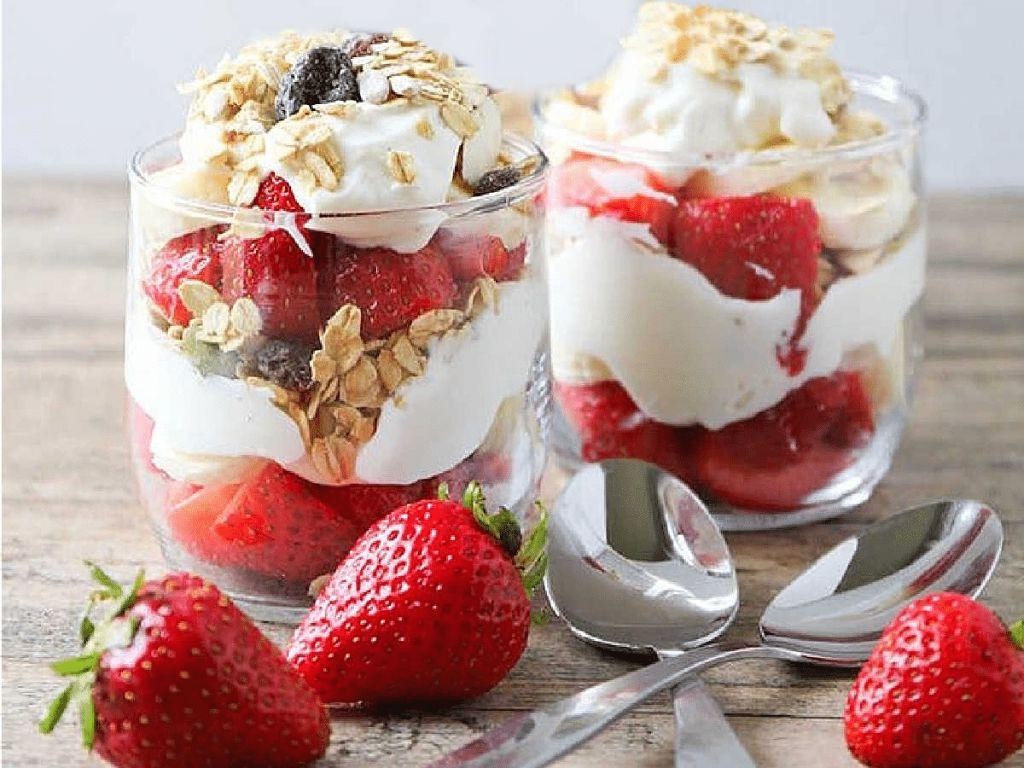
Whether you’re rushing out the door or need a quick breakfast solution, this berry parfait comes together in minutes while delivering impressive flavor and nutrition. With layers of creamy yogurt, crunchy granola, and fresh berries, it’s the perfect balance of textures and tastes that will keep you satisfied all morning long.
4
portions15
minutesIngredients
– 2 cups plain Greek yogurt (full-fat for creamier texture, or low-fat for lighter option)
– 1 cup mixed fresh berries (strawberries, blueberries, raspberries – frozen berries work too if thawed)
– 1 cup granola (any favorite brand, or homemade for extra crunch)
– 2 tablespoons honey (adjust sweetness to preference, maple syrup works as substitute)
– 1 teaspoon vanilla extract (pure extract recommended for best flavor)
Instructions
1. Wash all fresh berries thoroughly under cold running water and pat dry with paper towels.
2. Hull strawberries and slice them into ¼-inch thick pieces using a sharp knife.
3. Combine Greek yogurt, honey, and vanilla extract in a medium bowl, whisking until fully incorporated and smooth.
4. Select four 8-ounce parfait glasses or clear mason jars for optimal visual appeal of the layers.
5. Spoon 2 tablespoons of the yogurt mixture into the bottom of each glass, spreading it evenly with the back of your spoon.
6. Add 1 tablespoon of granola over the yogurt layer in each glass, pressing down gently to create a compact base.
7. Arrange a layer of mixed berries over the granola, dividing them evenly among the four glasses.
8. Repeat the layering process with another 2 tablespoons of yogurt mixture in each glass.
9. Top each parfait with the remaining granola, creating a crunchy finishing layer.
10. Garnish with a few extra berries on top for visual presentation.
11. Chill the completed parfaits in the refrigerator for at least 15 minutes before serving to allow flavors to meld.
Creating this parfait yields a delightful contrast between the cool, creamy yogurt and the crisp granola layers. The natural sweetness of the berries shines through without overwhelming the palate, while the honey adds just enough subtle sweetness to balance the tangy yogurt. Consider serving these in individual portions for brunch gatherings or preparing them the night before for grab-and-go breakfasts that maintain their perfect texture.
Caramel Apple Dip
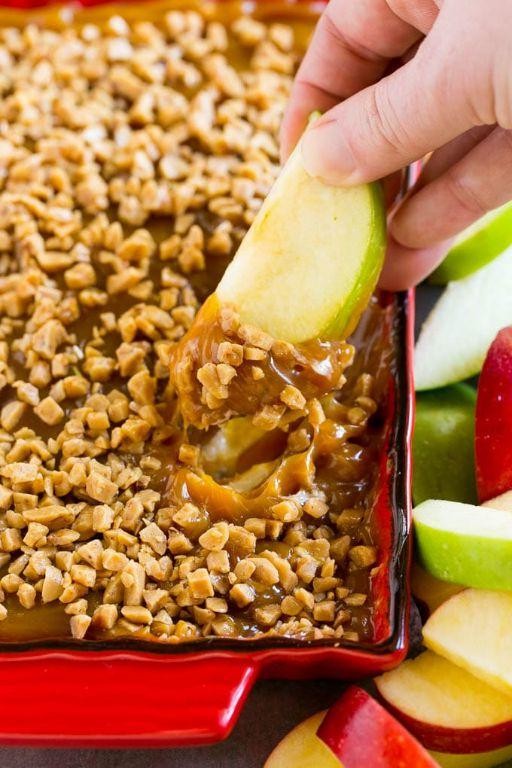
Gathering around a bowl of this creamy, sweet dip with crisp apple slices is one of autumn’s simplest pleasures. This caramel apple dip comes together in minutes with just a few pantry staples, making it perfect for last-minute gatherings or cozy nights in. Follow these straightforward steps to create a dessert that tastes like you spent hours in the kitchen.
2
servings15
minutesIngredients
– 1 (8 oz) package cream cheese, softened to room temperature for easier mixing
– 1/2 cup brown sugar, packed firmly for maximum caramel flavor
– 1/4 cup granulated sugar, for balanced sweetness
– 1 teaspoon vanilla extract, pure recommended for best flavor
– 1/2 cup caramel sauce, store-bought or homemade
– 1/4 teaspoon sea salt, to enhance all flavors
– 3-4 apples, sliced just before serving to prevent browning
Instructions
1. Place the softened cream cheese in a medium mixing bowl.
2. Using an electric mixer on medium speed, beat the cream cheese for 1 minute until completely smooth and free of lumps.
3. Add the packed brown sugar and granulated sugar to the bowl.
4. Beat the mixture on medium-high speed for 2 full minutes until the sugars are fully incorporated and the texture becomes light and fluffy.
5. Pour in the vanilla extract and add the sea salt.
6. Continue beating for 30 more seconds to evenly distribute the vanilla and salt throughout the mixture.
7. Switch to a spatula and gently fold in the caramel sauce, leaving some visible swirls for visual appeal.
8. Transfer the dip to a serving bowl and cover with plastic wrap.
9. Refrigerate the dip for at least 30 minutes to allow the flavors to meld and the texture to firm up slightly.
10. While the dip chills, wash and slice your apples into wedges, removing the cores.
11. Arrange the apple slices around the chilled dip bowl just before serving.
The finished dip boasts a wonderfully creamy texture with distinct caramel swirls that contrast beautifully against the crisp apple slices. This versatile creation works equally well as a dessert dip with apples or spread between graham crackers for a quick treat. For an elegant presentation, drizzle extra caramel sauce over the top and sprinkle with chopped nuts before serving.
Instant Pot Bread Pudding
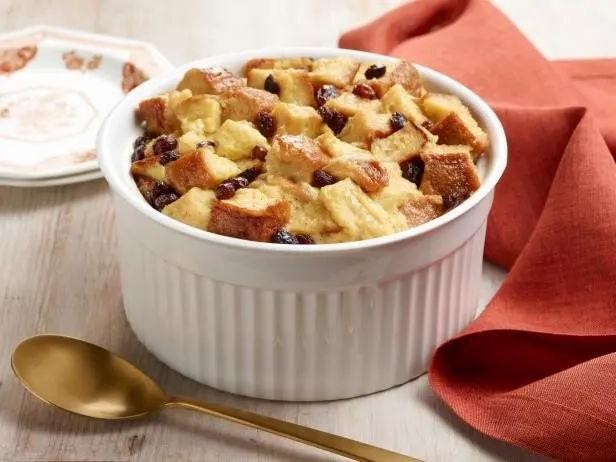
Perfect for transforming stale bread into a comforting dessert, this Instant Pot bread pudding simplifies the classic with modern convenience while delivering that familiar custardy texture everyone loves. Preparing this cozy treat requires just a few pantry staples and about an hour from start to finish, making it ideal for both weeknight cravings and impromptu gatherings.
6
servings25
minutes40
minutesIngredients
– 4 cups cubed stale bread (about ½-inch pieces, or fresh bread toasted lightly)
– 2 cups whole milk (for richer custard, or 2% milk for lighter texture)
– 3 large eggs (room temperature for smoother blending)
– ½ cup granulated sugar (adjust slightly for sweetness preference)
– 1 teaspoon vanilla extract (pure for best flavor, or imitation)
– ½ teaspoon ground cinnamon (add a pinch more for extra warmth)
– ¼ teaspoon salt (enhances sweetness, use fine sea salt or table salt)
– 1 cup water (for the Instant Pot, to create steam)
Instructions
1. Grease a 7-inch round heatproof bowl that fits inside your Instant Pot with butter or non-stick spray.
2. Place the cubed stale bread evenly into the prepared bowl.
3. In a separate medium bowl, whisk the 2 cups whole milk, 3 large eggs, ½ cup granulated sugar, 1 teaspoon vanilla extract, ½ teaspoon ground cinnamon, and ¼ teaspoon salt until fully combined and smooth.
4. Pour the milk and egg mixture over the bread cubes in the bowl, pressing down gently with a spatula to ensure all bread is submerged.
5. Let the bread soak for 15 minutes at room temperature to absorb the custard.
6. Pour 1 cup water into the inner pot of the Instant Pot.
7. Cover the bowl tightly with aluminum foil to prevent condensation from dripping into the pudding.
8. Place a trivet in the Instant Pot and carefully set the covered bowl on top.
9. Secure the lid, set the valve to “Sealing,” and pressure cook on High for 30 minutes.
10. Allow a natural pressure release for 10 minutes, then carefully turn the valve to “Venting” to release any remaining steam.
11. Remove the bowl using oven mitts, uncover, and check that the pudding is set by inserting a knife into the center—it should come out clean.
12. Let the pudding cool for 10 minutes before serving warm.
Unbelievably creamy with a soft, custard-soaked interior and lightly spiced aroma, this bread pudding pairs wonderfully with a drizzle of caramel sauce or a scoop of vanilla ice cream. For a festive twist, sprinkle toasted pecans over the top or add a handful of chocolate chips to the bread mixture before cooking.
Banana Foster Sundae
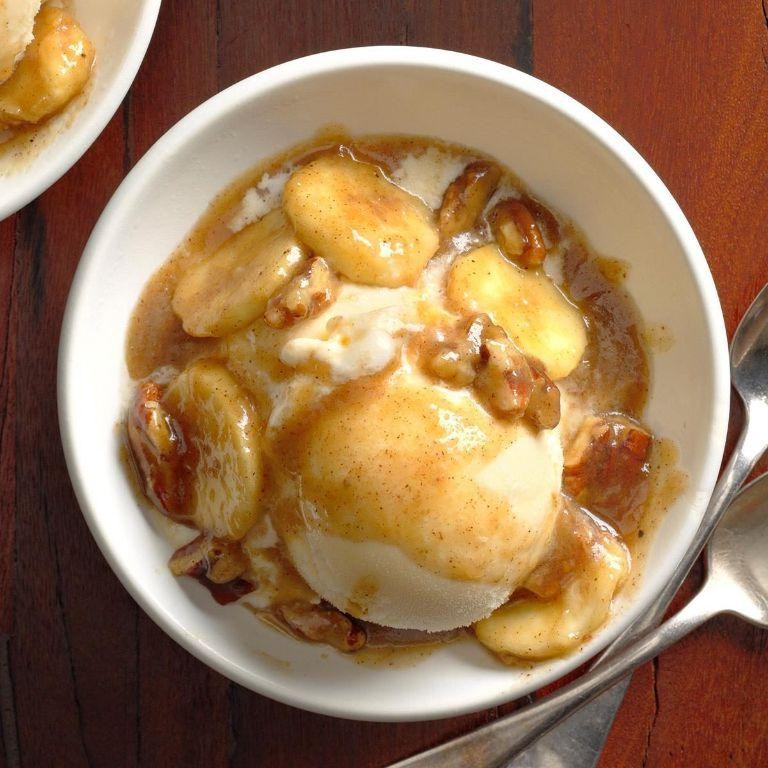
Unbelievably simple yet impressively elegant, this Banana Foster Sundae transforms basic ingredients into a restaurant-worthy dessert. Using just a few pantry staples, you’ll create warm, caramelized bananas in a rich buttery sauce that pairs perfectly with cold ice cream. Follow these methodical steps to master this classic New Orleans treat in your own kitchen.
2
servings5
minutes5
minutesIngredients
– 2 ripe bananas, sliced into 1/2-inch rounds (firm but ripe works best)
– 2 tablespoons unsalted butter (salted works too, adjust salt later)
– 1/4 cup packed brown sugar (light or dark both work)
– 1/4 teaspoon ground cinnamon
– 1/4 cup dark rum (or substitute 1 tablespoon vanilla extract for alcohol-free)
– 1 pint vanilla ice cream (high-quality makes a difference)
– 1/4 cup chopped pecans (toasted pecans add extra crunch)
Instructions
1. Place a large skillet over medium heat and add the 2 tablespoons of unsalted butter.
2. Swirl the skillet continuously until the butter melts completely and begins to foam slightly, about 1 minute.
3. Add the 1/4 cup packed brown sugar and 1/4 teaspoon ground cinnamon to the melted butter.
4. Stir constantly with a wooden spoon until the sugar dissolves completely and forms a smooth sauce, about 2 minutes.
5. Carefully arrange the sliced bananas in a single layer in the skillet.
6. Cook the bananas undisturbed for 1 minute until the bottoms begin to caramelize.
7. Gently flip each banana slice using tongs and cook for 1 more minute until softened.
8. Remove the skillet from the heat source completely before proceeding.
9. Pour the 1/4 cup dark rum into the skillet away from your face.
10. Return the skillet to medium heat and tilt it slightly to ignite the alcohol if using a gas stove, or simply cook for 30 seconds if electric.
11. Scoop the vanilla ice cream into 4 serving bowls while the sauce is still warm.
12. Spoon the warm banana mixture evenly over the ice cream in each bowl.
13. Sprinkle the 1/4 cup chopped pecans over each sundae for texture.
Outrageously delicious, this sundae offers the perfect contrast between warm, soft bananas in buttery caramel and cold, creamy ice cream. The toasted pecans provide a satisfying crunch that complements the silky sauce beautifully. For an extra special presentation, serve immediately in chilled bowls with long spoons to capture every layer of flavor.
Honey Lavender Ice Cream
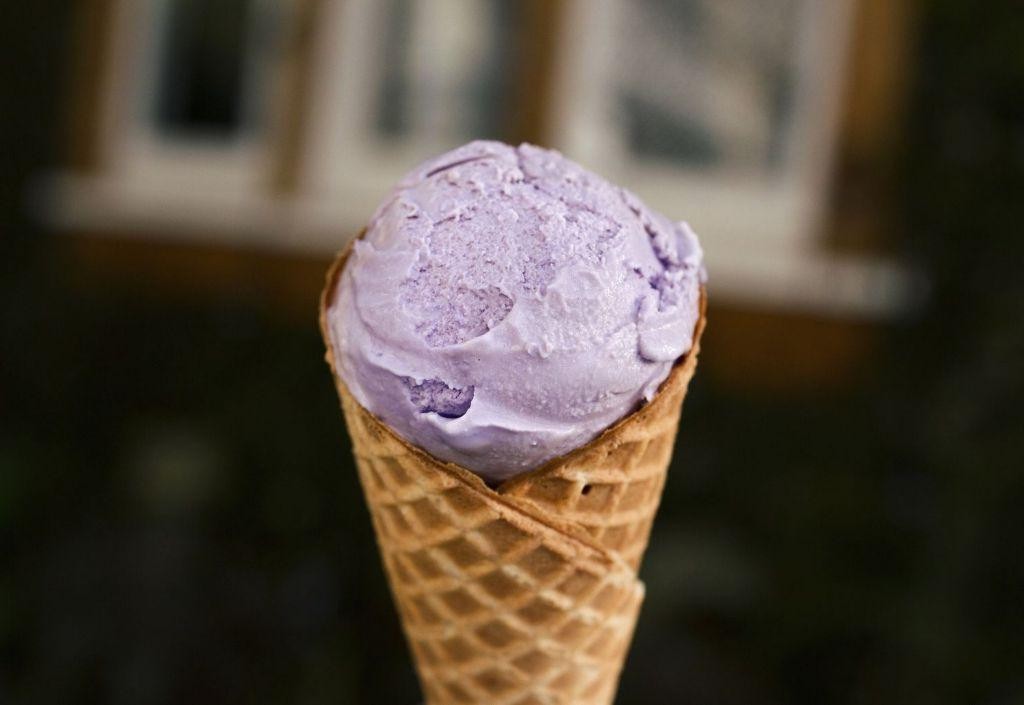
Zesty and floral, this honey lavender ice cream transforms simple ingredients into an elegant frozen dessert that feels both rustic and sophisticated. Let’s walk through each step methodically to ensure your ice cream base is perfectly smooth and infused with delicate lavender flavor before churning to creamy perfection.
1
batch30
minutes45
minutesIngredients
– 2 cups heavy cream (use full-fat for richest texture)
– 1 cup whole milk (don’t substitute lower fat varieties)
– 3/4 cup honey (preferably local for best flavor)
– 1/4 cup granulated sugar (helps prevent ice crystals)
– 4 large egg yolks (room temperature blends more smoothly)
– 2 tablespoons dried culinary lavender buds (food-grade only)
– 1/4 teaspoon fine sea salt (enhances all flavors)
Instructions
1. Combine 2 cups heavy cream, 1 cup whole milk, 3/4 cup honey, and 1/4 cup granulated sugar in a medium saucepan.
2. Heat the mixture over medium heat until it reaches 170°F on a candy thermometer, stirring occasionally with a wooden spoon.
3. Add 2 tablespoons dried culinary lavender buds to the hot cream mixture.
4. Cover the saucepan and let the lavender steep for 25 minutes exactly to extract flavor without bitterness.
5. Strain the mixture through a fine-mesh sieve into a clean bowl, pressing gently on the lavender buds to extract all flavor.
6. Whisk 4 large egg yolks in a separate bowl until pale yellow and slightly thickened.
7. Slowly pour 1 cup of the warm lavender-infused cream into the egg yolks while whisking constantly to temper them.
8. Pour the tempered egg mixture back into the remaining cream in the saucepan.
9. Cook over medium-low heat, stirring constantly with a silicone spatula, until the custard thickens and coats the back of a spoon at 175°F.
10. Immediately remove from heat and stir in 1/4 teaspoon fine sea salt.
11. Chill the custard in an ice bath until it reaches 40°F, about 20 minutes with occasional stirring.
12. Transfer the chilled custard to your ice cream maker and churn according to manufacturer’s instructions until it reaches soft-serve consistency.
13. Transfer the churned ice cream to an airtight container and freeze for at least 4 hours until firm.
Keeping its velvety texture even when fully frozen, this ice cream delivers subtle floral notes that complement the honey’s natural sweetness beautifully. Try serving scoops between crisp lavender shortbread cookies or drizzled with extra honey for an elegant presentation that highlights its delicate balance of flavors.
Conclusion
Embark on a sweet journey with these 29 irresistible dessert recipes—perfect for effortless indulgence and guaranteed to satisfy every craving. We hope you discover new favorites and enjoy creating these treats as much as we do! Don’t forget to leave a comment with your top picks and share this roundup on Pinterest to spread the sweetness.