From elegant dinner parties to casual weekend treats, tartlets are the perfect bite-sized delights that elevate any occasion. Whether you’re craving savory appetizers or sweet indulgences, these miniature marvels offer endless possibilities for creativity in your kitchen. Get ready to discover 32 irresistible recipes that will make you the star of every gathering—let’s dive into these delightful tartlet inspirations!
Lemon Curd Tartlets with Fresh Berries
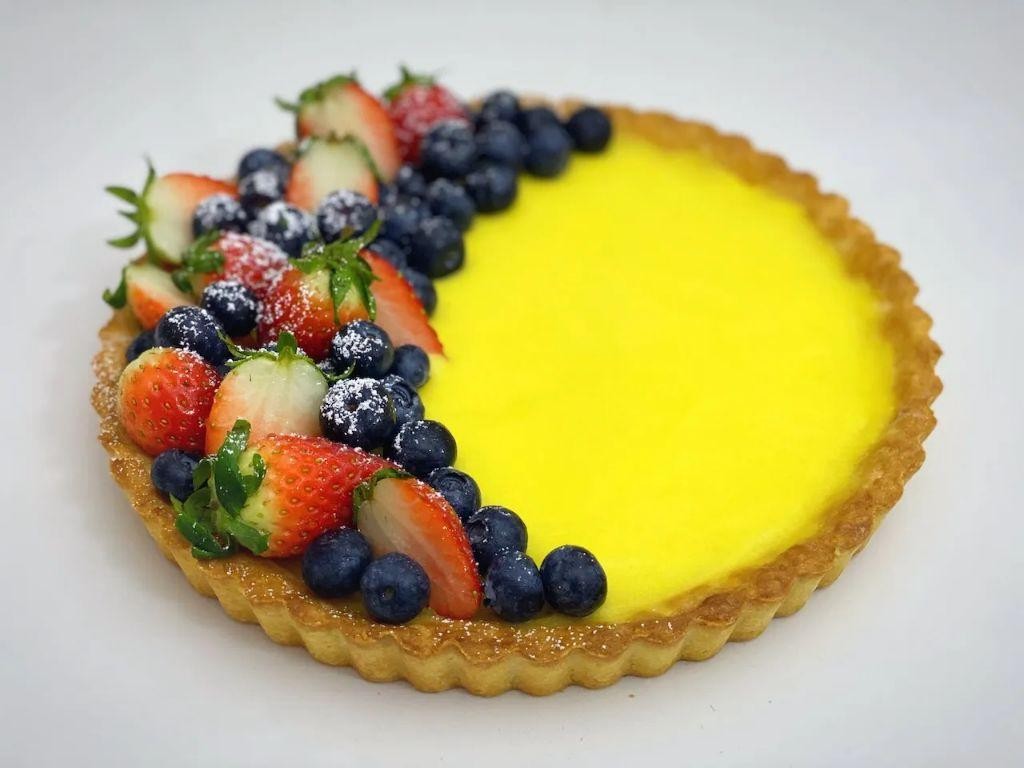
Baking these lemon curd tartlets with fresh berries is like capturing sunshine in a pastry shell. You get that perfect balance of bright, zesty lemon and sweet, juicy berries in every bite. They’re surprisingly simple to make but look impressively elegant for any occasion.
8
tartlets45
minutes30
minutesIngredients
- 1 ½ cups all-purpose flour
- ½ cup unsalted European-style butter, chilled and cubed
- ¼ cup granulated sugar
- 1 large pasture-raised egg yolk
- 2 tablespoons ice water
- ¾ cup fresh lemon juice, strained
- 3 large pasture-raised eggs, lightly beaten
- 2 large pasture-raised egg yolks
- ¾ cup granulated sugar
- ½ cup unsalted European-style butter, cut into ½-inch cubes
- 1 teaspoon pure lemon zest, finely grated
- 1 cup mixed fresh berries (raspberries, blueberries, blackberries)
- 2 tablespoons confectioners’ sugar for dusting
Instructions
- Combine 1 ½ cups all-purpose flour, ½ cup chilled cubed butter, and ¼ cup granulated sugar in a food processor.
- Pulse the mixture until it resembles coarse meal with pea-sized butter pieces.
- Add 1 egg yolk and 2 tablespoons ice water to the food processor.
- Pulse just until the dough begins to clump together, being careful not to overmix.
- Turn the dough out onto a lightly floured surface and gather it into a disc.
- Wrap the dough tightly in plastic wrap and refrigerate for exactly 30 minutes at 40°F.
- Preheat your oven to 375°F and lightly grease 8 individual tartlet pans.
- Roll the chilled dough to ⅛-inch thickness between two sheets of parchment paper.
- Cut the dough into circles slightly larger than your tartlet pans.
- Press the dough circles into the prepared pans, ensuring even coverage up the sides.
- Prick the bottom of each tartlet shell 5-6 times with a fork to prevent puffing.
- Line each shell with parchment paper and fill with pie weights or dried beans.
- Bake the tartlet shells at 375°F for 15 minutes until the edges are lightly golden.
- Remove the parchment and weights and continue baking for 5 more minutes until the bottoms appear dry.
- Transfer the tartlet shells to a wire rack to cool completely to room temperature.
- Whisk together ¾ cup fresh lemon juice, 3 lightly beaten eggs, 2 egg yolks, and ¾ cup granulated sugar in a heatproof bowl.
- Place the bowl over a saucepan of gently simmering water, ensuring the bottom doesn’t touch the water.
- Cook the lemon mixture while constantly whisking until it thickens to coat the back of a spoon, about 8-10 minutes.
- Remove the bowl from heat and immediately whisk in ½ cup cubed butter until fully incorporated and glossy.
- Stir in 1 teaspoon finely grated lemon zest until evenly distributed.
- Strain the lemon curd through a fine-mesh sieve into a clean bowl to ensure silky smooth texture.
- Pour the warm lemon curd into the cooled tartlet shells, filling each ¾ full.
- Refrigerate the filled tartlets for at least 2 hours until the curd is completely set.
- Arrange 1 cup mixed fresh berries artfully over the set lemon curd.
- Dust the assembled tartlets lightly with 2 tablespoons confectioners’ sugar just before serving.
Mouthwatering doesn’t even begin to describe these tartlets—the crisp, buttery shell shatters to reveal that velvety lemon curd, while the fresh berries add bursts of juicy sweetness. The contrast between the tart lemon and sweet berries creates a flavor dance that’s simply irresistible. For an extra special presentation, try serving them on a slate board with edible flowers scattered around.
Savory Tomato Basil Tartlets
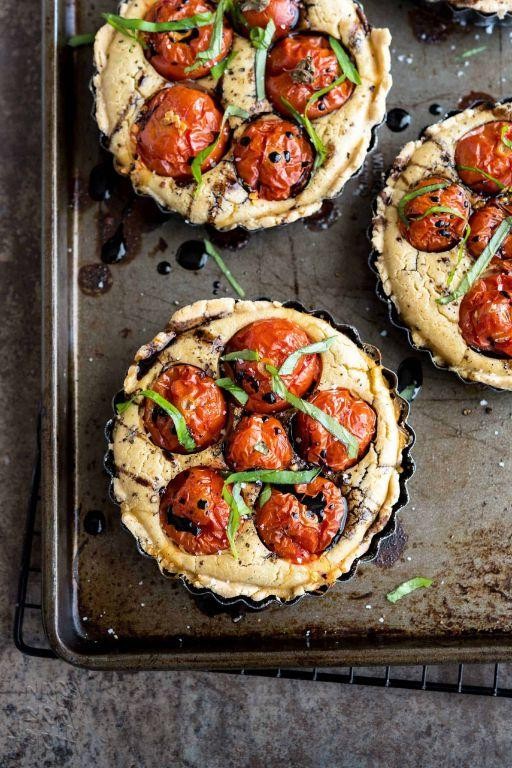
Aren’t you always looking for those impressive yet easy appetizers that make you look like a culinary pro? These savory tomato basil tartlets deliver that perfect balance of buttery crust and bright, fresh flavors. You’ll love how they come together with minimal fuss but maximum impact.
12
tartlets15
minutes20
minutesIngredients
– 1 sheet frozen puff pastry, thawed
– 2 medium heirloom tomatoes, thinly sliced
– 1/2 cup whole milk ricotta cheese
– 1/4 cup freshly grated Parmigiano-Reggiano
– 2 tablespoons extra virgin olive oil
– 1/4 cup fresh basil leaves, chiffonade cut
– 1 large pasture-raised egg, lightly beaten
– 1/2 teaspoon flaky sea salt
– 1/4 teaspoon freshly cracked black pepper
Instructions
1. Preheat your oven to 400°F and line a baking sheet with parchment paper.
2. Unfold the thawed puff pastry sheet onto a lightly floured surface.
3. Using a 3-inch round cutter, cut 12 circles from the pastry sheet.
4. Place the pastry circles on the prepared baking sheet, spacing them 1 inch apart.
5. Prick each pastry circle 5-6 times with a fork to prevent excessive puffing.
6. Brush each pastry circle lightly with the beaten egg using a pastry brush.
7. In a small bowl, combine the ricotta cheese, Parmigiano-Reggiano, and 1 tablespoon olive oil.
8. Spoon 1 teaspoon of the cheese mixture onto the center of each pastry circle.
9. Arrange 2-3 overlapping tomato slices over the cheese mixture on each tartlet.
10. Drizzle the remaining 1 tablespoon olive oil evenly over the tomato slices.
11. Sprinkle the flaky sea salt and cracked black pepper over the assembled tartlets.
12. Bake for 18-20 minutes until the pastry edges are golden brown and puffed.
13. Remove the tartlets from the oven and transfer to a wire cooling rack.
14. Immediately sprinkle the chiffonade basil over the warm tartlets.
15. Allow the tartlets to cool for 5 minutes before serving.
Each bite delivers that satisfying contrast between the flaky, buttery crust and the juicy tomatoes. The creamy ricotta base mellows the bright acidity while the fresh basil adds that final aromatic touch. Enjoy them warm as passed appetizers or arrange them on a wooden board with prosciutto for an elegant starter.
Chocolate Ganache Tartlets with Sea Salt
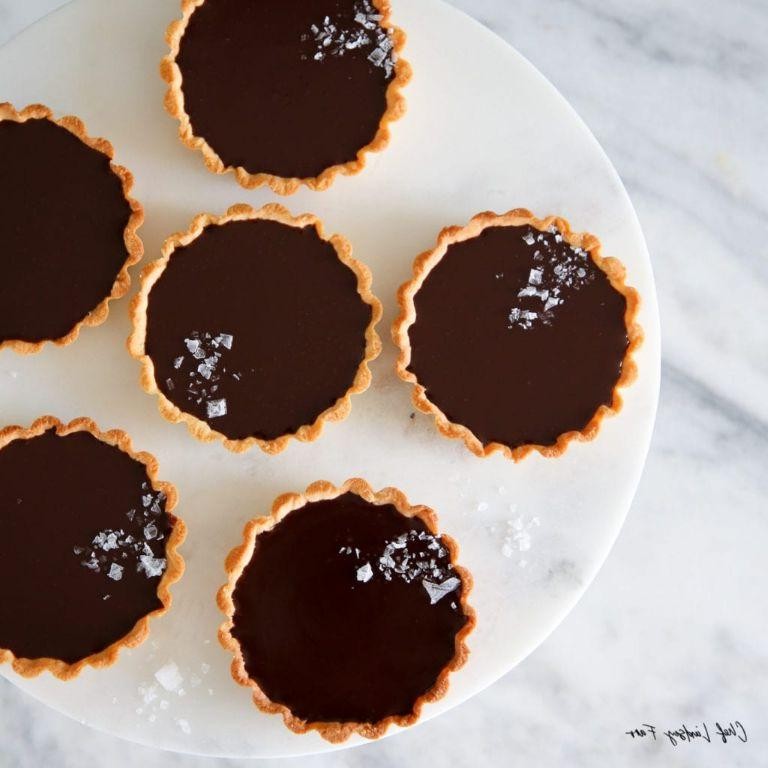
Diving into these chocolate ganache tartlets feels like discovering the perfect balance of elegance and comfort. You get that rich, velvety chocolate filling nestled in a crisp, buttery shell, all finished with a sprinkle of flaky sea salt that makes each bite absolutely unforgettable. They’re surprisingly simple to make but look impressively professional—perfect for when you want to treat yourself or impress guests without spending hours in the kitchen.
3
tartlets30
minutes27
minutesIngredients
- 1 ¼ cups all-purpose flour
- ½ cup unsalted European-style butter, cold and cubed
- ¼ cup granulated sugar
- 1 large pasture-raised egg yolk
- 2 tablespoons ice water
- 8 ounces high-quality dark chocolate (70% cacao), finely chopped
- ¾ cup heavy cream
- 2 tablespoons unsalted butter, at room temperature
- ½ teaspoon pure vanilla extract
- Flaky sea salt, for garnish
Instructions
- Combine 1 ¼ cups all-purpose flour, ½ cup cold cubed unsalted European-style butter, and ¼ cup granulated sugar in a food processor.
- Pulse the mixture until it resembles coarse crumbs, about 10-12 short pulses.
- Add 1 large pasture-raised egg yolk and 2 tablespoons ice water to the food processor.
- Pulse just until the dough begins to clump together, being careful not to overmix.
- Tip: Handle the dough minimally to prevent the butter from warming, which ensures a flakier crust.
- Turn the dough out onto a lightly floured surface and gently press it into a disc.
- Wrap the dough disc tightly in plastic wrap and refrigerate for 30 minutes until firm.
- Preheat your oven to 350°F (175°C).
- Roll out the chilled dough to ⅛-inch thickness on a floured surface.
- Cut the dough into rounds slightly larger than your tartlet pans.
- Press the dough rounds into 4-inch tartlet pans, trimming any excess.
- Prick the bottoms of the crusts all over with a fork.
- Line each crust with parchment paper and fill with pie weights or dried beans.
- Tip: Using weights prevents the crust from puffing up during baking, giving you an even base for the ganache.
- Bake the crusts at 350°F for 15 minutes until the edges are lightly golden.
- Remove the parchment and weights and bake for another 5-7 minutes until the bottoms are fully cooked.
- Transfer the baked crusts to a wire rack to cool completely.
- Place 8 ounces finely chopped high-quality dark chocolate in a heatproof bowl.
- Heat ¾ cup heavy cream in a small saucepan over medium heat until it just begins to simmer, about 3-4 minutes.
- Pour the hot cream over the chopped chocolate and let it stand undisturbed for 2 minutes.
- Whisk the chocolate and cream together gently until smooth and glossy.
- Whisk in 2 tablespoons room temperature unsalted butter and ½ teaspoon pure vanilla extract until fully incorporated.
- Tip: For an ultra-smooth ganache, avoid vigorous whisking which can incorporate air bubbles.
- Divide the ganache evenly among the cooled tartlet shells.
- Let the tartlets set at room temperature for 1 hour until the ganache is firm but still slightly soft.
- Sprinkle flaky sea salt evenly over the surface of each tartlet just before serving.
Seriously, that first bite is pure magic—the crisp shell shatters to reveal the silky ganache that melts instantly on your tongue. The sea salt doesn’t just sit on top; it bursts through the richness, making you appreciate the chocolate even more. Try serving these slightly chilled with fresh raspberries or a dollop of whipped crème fraîche to cut through the intensity.
Goat Cheese and Caramelized Onion Tartlets
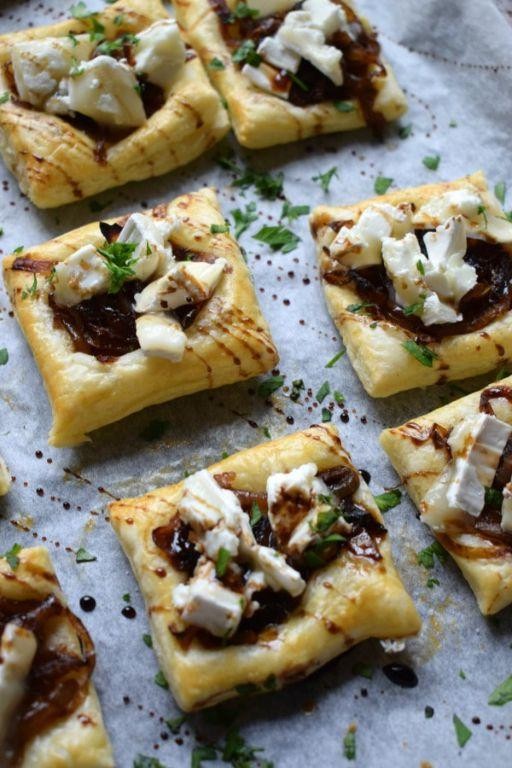
Fancy a bite-sized appetizer that feels both elegant and completely approachable? These goat cheese and caramelized onion tartlets deliver that perfect balance of creamy, sweet, and savory flavors. You’ll love how the flaky pastry contrasts with the rich filling.
12
tartlets25
minutes55
minutesIngredients
- 1 package frozen puff pastry sheets, thawed
- 2 tablespoons extra virgin olive oil
- 2 large yellow onions, thinly sliced
- 1 teaspoon granulated sugar
- 1 tablespoon aged balsamic vinegar
- 4 ounces fresh goat cheese, crumbled
- 1/4 cup heavy cream
- 1 large pasture-raised egg, lightly beaten
- 1 teaspoon fresh thyme leaves
- 1/4 teaspoon freshly ground black pepper
- 1/4 teaspoon kosher salt
Instructions
- Preheat your oven to 400°F and line a baking sheet with parchment paper.
- Roll out the thawed puff pastry sheets to 1/8-inch thickness on a lightly floured surface.
- Cut the pastry into 3-inch rounds using a biscuit cutter or glass.
- Press the pastry rounds into a mini muffin tin, creating small cups.
- Prick the bottom of each pastry cup with a fork to prevent puffing.
- Heat olive oil in a large skillet over medium-low heat until shimmering.
- Add thinly sliced onions and cook for 5 minutes, stirring occasionally.
- Sprinkle sugar over the onions and continue cooking for 25-30 minutes until deep golden brown.
- Stir in balsamic vinegar and cook for 1 minute until absorbed.
- Remove the caramelized onions from heat and let cool slightly.
- Combine crumbled goat cheese, heavy cream, beaten egg, thyme leaves, black pepper, and kosher salt in a medium bowl.
- Fold the cooled caramelized onions into the goat cheese mixture until fully incorporated.
- Spoon approximately 1 tablespoon of the filling into each pastry cup.
- Bake at 400°F for 18-20 minutes until the pastry is golden brown and the filling is set.
- Let the tartlets cool in the pan for 5 minutes before transferring to a wire rack.
The flaky, buttery pastry provides the perfect crunch against the velvety smooth filling, where the tangy goat cheese beautifully balances the sweet depth of slowly caramelized onions. Serve these warm alongside a crisp arugula salad dressed with lemon vinaigrette, or pair them with a chilled rosé for an effortless yet impressive gathering starter.
Fresh Fruit Tartlets with Vanilla Custard
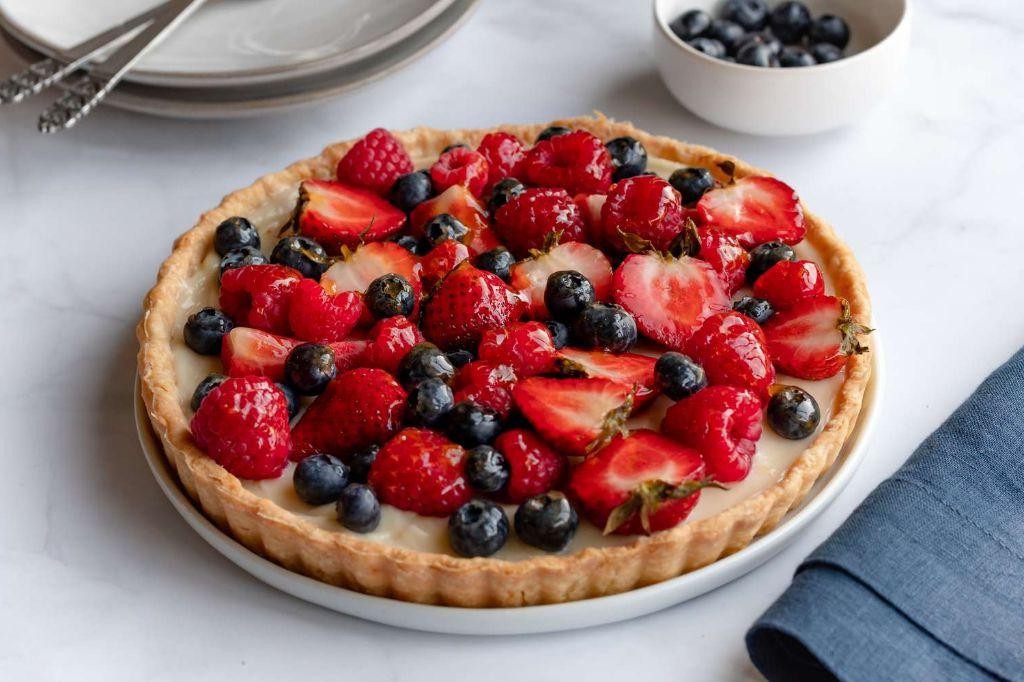
Every time you want to impress guests but keep things simple, these elegant fruit tartlets deliver. You get buttery, crisp shells filled with silky vanilla custard and topped with vibrant seasonal fruits. They look like they came from a fancy bakery but are totally achievable in your own kitchen.
6
tartlets45
minutes25
minutesIngredients
- 1 ¼ cups all-purpose flour
- ½ cup unsalted European-style butter, chilled and cubed
- ¼ cup granulated sugar
- 1 large pasture-raised egg yolk
- 2 tablespoons ice water
- 1 cup whole milk
- ½ cup heavy cream
- 3 large pasture-raised egg yolks
- ¼ cup granulated sugar
- 1 tablespoon cornstarch
- 1 Madagascar bourbon vanilla bean, split and scraped
- 2 cups assorted fresh berries (raspberries, blueberries, sliced strawberries)
- 2 tablespoons apricot preserves
- 1 tablespoon water
Instructions
- Combine 1 ¼ cups all-purpose flour and ¼ cup granulated sugar in a food processor.
- Add ½ cup chilled, cubed European-style butter and pulse until mixture resembles coarse crumbs.
- Whisk together 1 large pasture-raised egg yolk and 2 tablespoons ice water in a small bowl.
- Drizzle the egg mixture into the food processor while pulsing until dough just comes together.
- Turn dough onto a lightly floured surface and gently knead into a disc.
- Wrap the dough disc tightly in plastic wrap and refrigerate for 30 minutes.
- Preheat your oven to 375°F.
- Roll the chilled dough to ⅛-inch thickness on a lightly floured surface.
- Cut dough into 4-inch circles using a biscuit cutter or inverted bowl.
- Press dough circles into standard muffin tin cavities, ensuring even coverage.
- Prick the bottom of each tartlet shell 5-6 times with a fork to prevent puffing.
- Line each shell with parchment paper and fill with pie weights or dried beans.
- Bake tartlet shells at 375°F for 15 minutes until edges are lightly golden.
- Remove parchment and weights carefully using oven mitts.
- Return shells to oven and bake for 5 more minutes until bottoms are fully cooked.
- Transfer baked shells to a wire rack and cool completely to room temperature.
- Combine 1 cup whole milk, ½ cup heavy cream, and scraped seeds from 1 Madagascar bourbon vanilla bean in a saucepan.
- Heat the milk mixture over medium heat until steaming but not boiling, about 180°F.
- Whisk together 3 large pasture-raised egg yolks, ¼ cup granulated sugar, and 1 tablespoon cornstarch in a separate bowl until pale and thick.
- Slowly pour the hot milk mixture into the egg mixture while whisking constantly to temper the eggs.
- Return the combined mixture to the saucepan over medium-low heat.
- Cook the custard while stirring continuously with a silicone spatula until thickened, about 3-4 minutes.
- Strain the custard through a fine-mesh sieve into a clean bowl to remove any lumps.
- Press plastic wrap directly onto the surface of the custard to prevent a skin from forming.
- Refrigerate the custard for at least 2 hours until completely chilled and set.
- Spoon the chilled vanilla custard into the cooled tartlet shells, filling each ¾ full.
- Arrange 2 cups assorted fresh berries decoratively over the custard in each tartlet.
- Combine 2 tablespoons apricot preserves and 1 tablespoon water in a small saucepan.
- Heat the apricot mixture over low heat until melted and smooth, about 2 minutes.
- Brush the warm apricot glaze gently over the arranged berries using a pastry brush.
- Refrigerate the finished tartlets for 15 minutes to set the glaze before serving.
Smooth vanilla custard contrasts beautifully with the crisp, buttery shells and juicy fresh fruit. The apricot glaze adds just enough shine to make these tartlets look professionally finished. Serve them chilled with afternoon tea or as a light dessert after a summer meal—they’re equally perfect for casual gatherings and special occasions.
Mini Quiche Tartlets with Spinach and Feta

Gosh, you know those days when you want something fancy but don’t have hours to spend in the kitchen? These mini quiche tartlets are your new best friend—they come together quickly but taste like you spent all afternoon baking. Perfect for brunch, parties, or just treating yourself.
24
tartlets15
minutes28
minutesIngredients
- 1 package frozen puff pastry sheets, thawed
- 2 tablespoons clarified butter
- 1 small yellow onion, finely diced
- 2 cloves garlic, minced
- 4 cups fresh spinach leaves, roughly chopped
- 4 pasture-raised eggs, lightly beaten
- 1/2 cup heavy cream
- 3/4 cup crumbled feta cheese
- 1/4 teaspoon freshly grated nutmeg
- 1/2 teaspoon kosher salt
- 1/4 teaspoon freshly cracked black pepper
Instructions
- Preheat your oven to 375°F.
- Roll out the thawed puff pastry sheets to 1/8-inch thickness on a lightly floured surface.
- Cut the pastry into 3-inch circles using a biscuit cutter or glass.
- Press each pastry circle into the cups of a standard mini muffin tin.
- Prick the bottom of each pastry cup 2-3 times with a fork to prevent puffing.
- Heat clarified butter in a skillet over medium heat until shimmering.
- Sauté the diced yellow onion for 4-5 minutes until translucent.
- Add minced garlic and cook for 30 seconds until fragrant.
- Stir in the chopped spinach and cook for 2-3 minutes until wilted.
- Transfer the spinach mixture to a colander and press out excess liquid with a spatula.
- Whisk together the lightly beaten eggs and heavy cream in a medium bowl until fully incorporated.
- Stir in the crumbled feta cheese, freshly grated nutmeg, kosher salt, and black pepper.
- Fold the drained spinach mixture into the egg mixture until evenly distributed.
- Spoon the filling into the prepared pastry cups, filling each 3/4 full.
- Bake at 375°F for 18-20 minutes until the pastry is golden brown and the filling is set.
- Remove from oven and let cool in the pan for 5 minutes before transferring to a wire rack.
Finally, these tartlets emerge from the oven with flaky, buttery crusts and creamy, savory centers. The feta provides a delightful salty tang that balances beautifully with the earthy spinach. For an elegant presentation, serve them warm on a wooden board with a drizzle of herb-infused olive oil and fresh dill sprigs.
Raspberry Almond Tartlets with Honey Glaze
Craving something sweet but sophisticated? These raspberry almond tartlets are just the thing. You get buttery crust, nutty filling, and tart berries all in one perfect bite-sized package.
12
tartlets45
minutes32
minutesIngredients
- 1 ¼ cups all-purpose flour
- ½ cup unsalted European-style butter, chilled and cubed
- 3 tablespoons granulated sugar
- 1 large pasture-raised egg yolk
- 2 tablespoons ice water
- ¾ cup almond flour
- ¼ cup confectioners’ sugar
- 6 tablespoons unsalted butter, softened
- 1 large pasture-raised egg, lightly beaten
- ½ teaspoon pure almond extract
- 1 cup fresh raspberries
- 2 tablespoons wildflower honey
- 1 teaspoon warm water
Instructions
- Combine 1 ¼ cups all-purpose flour, ½ cup chilled cubed butter, and 3 tablespoons granulated sugar in a food processor.
- Pulse until mixture resembles coarse crumbs, about 10 pulses.
- Add 1 egg yolk and 2 tablespoons ice water, then pulse just until dough begins to clump together.
- Turn dough onto a lightly floured surface and gently knead into a disc.
- Wrap dough tightly in plastic wrap and refrigerate for 30 minutes until firm.
- Preheat your oven to 375°F and lightly grease a mini tart pan.
- Roll chilled dough to ⅛-inch thickness on a floured surface.
- Cut dough into circles slightly larger than your tart molds using a round cutter.
- Press dough circles into tart molds, ensuring even coverage up the sides.
- Prick the bottom of each tart shell several times with a fork to prevent puffing.
- Freeze tart shells for 15 minutes before baking to help maintain shape.
- Bake empty tart shells at 375°F for 12 minutes until lightly golden.
- Meanwhile, prepare the frangipane by creaming 6 tablespoons softened butter with ¼ cup confectioners’ sugar until pale and fluffy.
- Beat in 1 lightly beaten egg and ½ teaspoon almond extract until fully incorporated.
- Fold in ¾ cup almond flour until the mixture is smooth and homogeneous.
- Divide the frangipane evenly among the partially baked tart shells, filling each about ⅔ full.
- Arrange 3-4 fresh raspberries gently on top of the frangipane in each tartlet.
- Return tartlets to the oven and bake at 375°F for 18-20 minutes until filling is set and golden.
- Cool tartlets in the pan for 10 minutes, then transfer to a wire rack.
- Whisk together 2 tablespoons honey and 1 teaspoon warm water to create a thin glaze.
- Brush the honey glaze lightly over the cooled tartlets using a pastry brush.
Buttery and crisp, these tartlets offer the perfect textural contrast to the creamy almond filling. The raspberries provide a bright, tart counterpoint to the honey’s floral sweetness. Serve them slightly warm with vanilla bean ice cream for an elegant dessert, or enjoy at room temperature with afternoon tea.
Smoked Salmon and Dill Tartlets
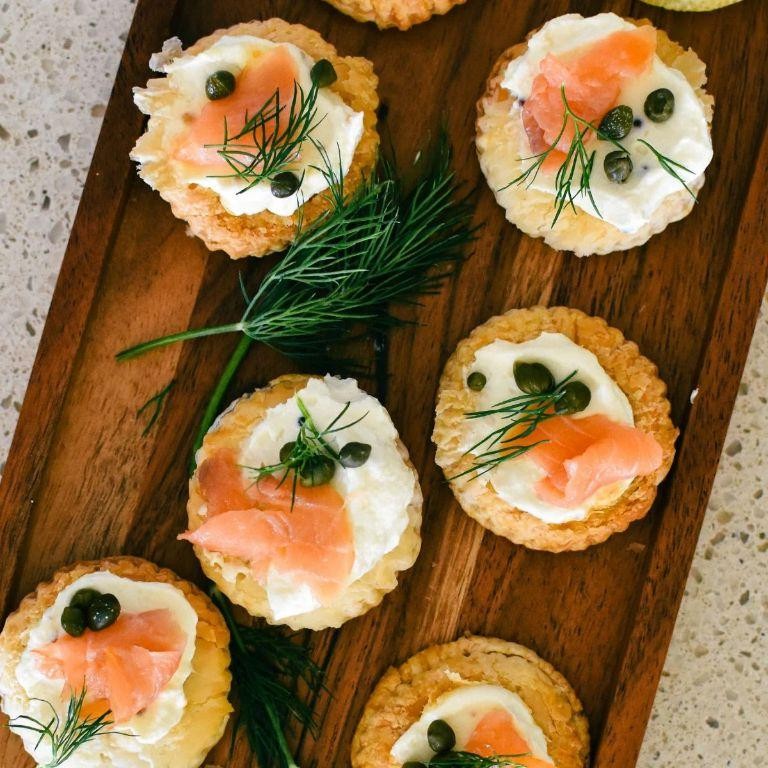
Now, imagine having the perfect elegant appetizer that looks fancy but comes together with minimal fuss. These smoked salmon and dill tartlets deliver that impressive wow factor for any gathering, combining flaky pastry with creamy, savory filling that everyone will love.
24
tartlets30
minutes15
minutesIngredients
– 1 package frozen puff pastry sheets, thawed
– 4 ounces cold-smoked salmon, finely chopped
– 8 ounces cream cheese, softened to room temperature
– 1/4 cup crème fraîche
– 2 tablespoons fresh dill, finely minced
– 1 tablespoon fresh chives, finely chopped
– 1 teaspoon lemon zest, freshly grated
– 1/2 teaspoon freshly ground black pepper
– 1 large pasture-raised egg, lightly beaten
– 1 tablespoon whole milk
Instructions
1. Preheat your oven to 400°F and line two baking sheets with parchment paper.
2. Unfold the thawed puff pastry sheets on a lightly floured surface.
3. Using a 3-inch round cookie cutter, cut 24 circles from the pastry sheets, rerolling scraps as needed.
4. Press each pastry circle into the cups of a mini muffin tin, ensuring the pastry reaches the top edges.
5. Prick the bottom of each pastry cup 3-4 times with a fork to prevent puffing.
6. Chill the pastry cups in the refrigerator for 15 minutes to maintain shape during baking.
7. Brush the chilled pastry cups lightly with the beaten egg wash.
8. Bake for 12-15 minutes until golden brown and fully puffed.
9. Remove from oven and immediately press down the centers with a small spoon to create wells.
10. Let the pastry shells cool completely in the pan for 20 minutes.
11. While shells cool, combine softened cream cheese and crème fraîche in a medium bowl.
12. Whisk vigorously until completely smooth and well incorporated.
13. Fold in the chopped smoked salmon, minced dill, chopped chives, lemon zest, and black pepper.
14. Mix gently until all ingredients are evenly distributed throughout the filling.
15. Spoon approximately 1 tablespoon of filling into each cooled pastry shell.
16. Garnish each tartlet with additional fresh dill sprigs before serving.
17. Refrigerate assembled tartlets for at least 30 minutes to allow flavors to meld.
18. Serve chilled directly from the refrigerator for best texture. Perfectly flaky pastry shells give way to the luxurious cream cheese filling, with the smoked salmon providing delicate saltiness that balances the bright citrus notes. Present these on a tiered stand for parties or pack them individually for elegant picnics where their sophisticated appearance belies how simple they are to create.
Apple Cinnamon Tartlets with Walnut Crumble
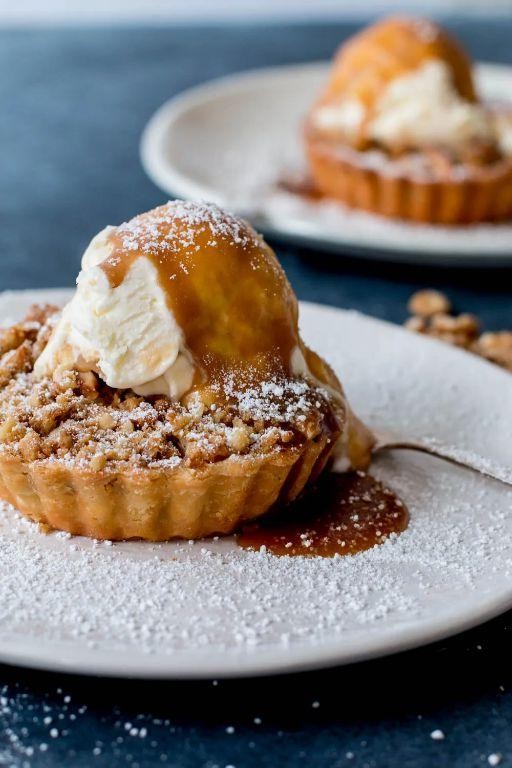
Every autumn, you crave those warm, spiced apple desserts that make your kitchen smell incredible. These individual tartlets deliver that cozy feeling in perfect personal portions, with a buttery crust and crunchy walnut topping that’s impossible to resist.
8
portions65
minutes30
minutesIngredients
- 1 ½ cups all-purpose flour, sifted
- ½ cup unsalted European-style butter, chilled and cubed
- 3 tablespoons granulated sugar
- ¼ teaspoon fine sea salt
- 3-4 tablespoons ice-cold water
- 2 large Honeycrisp apples, peeled, cored, and thinly sliced
- ¼ cup light brown sugar, packed
- 1 teaspoon ground Ceylon cinnamon
- ¼ teaspoon freshly grated nutmeg
- 1 tablespoon freshly squeezed lemon juice
- ½ cup walnuts, toasted and finely chopped
- 2 tablespoons unsalted butter, melted
- 1 tablespoon all-purpose flour
- 1 large pasture-raised egg, lightly beaten
- 1 tablespoon turbinado sugar
Instructions
- Preheat your oven to 375°F (190°C) and position a rack in the center.
- Combine 1 ½ cups sifted all-purpose flour, ½ cup chilled cubed butter, 3 tablespoons granulated sugar, and ¼ teaspoon fine sea salt in a food processor.
- Pulse the mixture until it resembles coarse crumbs with pea-sized butter pieces, about 10-12 pulses.
- Add 3 tablespoons ice-cold water through the feed tube while pulsing, just until the dough begins to clump. Tip: If the dough feels dry, add the remaining 1 tablespoon water, but avoid overmixing to keep the crust flaky.
- Turn the dough onto a lightly floured surface and gather it into a disc.
- Wrap the dough tightly in plastic wrap and refrigerate for 30 minutes until firm.
- Roll the chilled dough to ⅛-inch thickness on a floured surface.
- Cut the dough into 4-inch circles using a biscuit cutter or inverted bowl.
- Press each dough circle into the wells of a standard muffin tin, ensuring the edges are even.
- Prick the bottom of each tartlet shell 3-4 times with a fork to prevent puffing.
- Freeze the tartlet shells for 15 minutes while preparing the filling.
- Toss 2 thinly sliced Honeycrisp apples with ¼ cup packed light brown sugar, 1 teaspoon Ceylon cinnamon, ¼ teaspoon freshly grated nutmeg, and 1 tablespoon freshly squeezed lemon juice in a medium bowl.
- Let the apple mixture macerate for 10 minutes until slightly softened and juicy.
- Combine ½ cup finely chopped toasted walnuts, 2 tablespoons melted butter, and 1 tablespoon all-purpose flour in a small bowl to form the crumble.
- Spoon the apple mixture evenly into the chilled tartlet shells, filling them just below the rim.
- Sprinkle the walnut crumble evenly over each tartlet, covering the apples completely.
- Brush the exposed pastry edges lightly with 1 lightly beaten pasture-raised egg.
- Sprinkle 1 tablespoon turbinado sugar over the crumble and egg-washed edges.
- Bake for 25-30 minutes until the crust is golden brown and the filling is bubbling at the edges. Tip: Rotate the pan halfway through baking for even browning.
- Cool the tartlets in the pan for 10 minutes before transferring to a wire rack. Tip: Run a thin knife around the edges while warm for easy removal.
You’ll love the contrast between the flaky, buttery crust and the tender spiced apples beneath that crunchy walnut topping. Serve these warm with a drizzle of caramel sauce or a scoop of vanilla bean ice cream for the ultimate fall treat that feels both elegant and comforting.
Vanilla Bean Custard Tartlets with Lavender

You know that feeling when you want something elegant but not fussy? Yeah, these vanilla bean custard tartlets with lavender are exactly that—sophisticated enough for a dinner party but simple enough for a cozy night in. They combine creamy, rich custard with the subtle floral notes of lavender in a buttery, crisp shell that just melts in your mouth.
6
tartlets85
minutes65
minutesIngredients
– 1 ¼ cups all-purpose flour
– ½ cup unsalted European-style butter, chilled and cubed
– 3 tablespoons granulated sugar
– 1 large pasture-raised egg yolk
– 2 tablespoons ice water
– 1 ½ cups heavy cream
– ½ cup whole milk
– 1 whole vanilla bean, split and scraped
– 1 teaspoon culinary-grade dried lavender buds
– 4 large pasture-raised egg yolks, lightly beaten
– ⅓ cup granulated sugar
– Pinch of fine sea salt
Instructions
1. Combine 1 ¼ cups all-purpose flour, ½ cup chilled cubed unsalted European-style butter, and 3 tablespoons granulated sugar in a food processor.
2. Pulse the mixture until it resembles coarse crumbs, about 10 pulses.
3. Add 1 large pasture-raised egg yolk and 2 tablespoons ice water to the food processor.
4. Pulse just until the dough begins to clump together, avoiding overmixing.
5. Turn the dough out onto a lightly floured surface and gently press it into a disc.
6. Wrap the dough tightly in plastic wrap and refrigerate for 1 hour to relax the gluten.
7. Preheat your oven to 375°F and lightly grease six 4-inch tartlet pans.
8. Roll the chilled dough to ⅛-inch thickness on a floured surface.
9. Carefully press the dough into the prepared tartlet pans, trimming any excess.
10. Prick the bottoms of the tartlet shells with a fork to prevent puffing.
11. Line each shell with parchment paper and fill with pie weights or dried beans.
12. Blind bake the shells for 15 minutes at 375°F until the edges are lightly golden.
13. Remove the parchment and weights and bake for another 5 minutes until the bottoms are set.
14. Combine 1 ½ cups heavy cream, ½ cup whole milk, the scraped seeds from 1 split vanilla bean, and 1 teaspoon culinary-grade dried lavender buds in a saucepan.
15. Heat the mixture over medium heat until it just begins to simmer, then remove from heat.
16. Steep the lavender and vanilla in the cream mixture for 20 minutes to infuse the flavors.
17. Strain the infused cream through a fine-mesh sieve into a clean bowl, pressing on the solids.
18. Whisk together 4 lightly beaten large pasture-raised egg yolks, ⅓ cup granulated sugar, and a pinch of fine sea salt in a separate bowl until pale and thick.
19. Slowly pour the warm infused cream into the egg mixture while whisking constantly to temper the eggs.
20. Strain the custard through a fine-mesh sieve again to ensure smoothness.
21. Divide the custard evenly among the pre-baked tartlet shells.
22. Bake the filled tartlets at 325°F for 20-25 minutes until the custard is set but still slightly jiggly in the center.
23. Cool the tartlets completely on a wire rack, then refrigerate for at least 2 hours to firm up.
Decadently smooth and fragrant, these tartlets feature a custard that’s velvety with pronounced vanilla and a whisper of lavender. The crisp, buttery shell provides the perfect textural contrast to the creamy filling. For a stunning presentation, garnish with fresh edible lavender flowers or a dusting of powdered sugar just before serving.
Blue Cheese and Fig Jam Tartlets
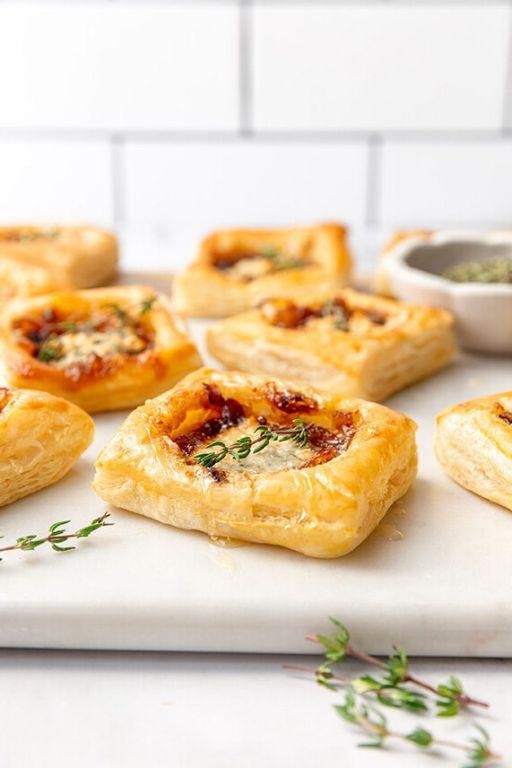
Zesty flavors and elegant simplicity come together in these delightful tartlets. You’ll love how the tangy blue cheese balances with sweet fig jam in these buttery pastry cups. They’re perfect for entertaining or as a fancy snack that feels special but comes together easily.
12
tartlets20
minutes18
minutesIngredients
- 1 package frozen puff pastry sheets, thawed
- 4 ounces high-quality blue cheese, crumbled
- 1/2 cup artisanal fig jam
- 2 tablespoons clarified butter, melted
- 1 large pasture-raised egg, lightly beaten
- 1 tablespoon fresh thyme leaves
- 1/4 teaspoon freshly cracked black pepper
- 1/4 teaspoon Maldon sea salt flakes
Instructions
- Preheat your oven to 400°F and line a baking sheet with parchment paper.
- Roll out the thawed puff pastry sheets to 1/8-inch thickness on a lightly floured surface.
- Using a 3-inch round cutter, cut 12 circles from the pastry sheets, rerolling scraps as needed.
- Press each pastry circle into the cups of a mini muffin tin, ensuring the pastry reaches the bottom and sides.
- Brush the inside of each pastry cup with melted clarified butter using a pastry brush.
- Place 1 teaspoon of fig jam into the bottom of each pastry cup, spreading it evenly.
- Divide the crumbled blue cheese evenly among the tartlets, about 2 teaspoons per cup.
- Sprinkle fresh thyme leaves over the cheese in each tartlet.
- Season with freshly cracked black pepper and Maldon sea salt flakes.
- Brush the exposed pastry edges with the lightly beaten pasture-raised egg using a clean pastry brush.
- Bake for 15-18 minutes, or until the pastry is golden brown and puffed, and the cheese is bubbling.
- Remove from oven and let cool in the pan for 5 minutes before transferring to a wire rack.
Notably creamy and complex, these tartlets offer a wonderful contrast between the flaky, buttery crust and the rich, tangy filling. The sweet fig jam caramelizes slightly in the oven, creating beautiful flavor layers that make these perfect for pairing with crisp white wine or as part of a sophisticated appetizer spread.
Strawberry Cream Cheese Tartlets
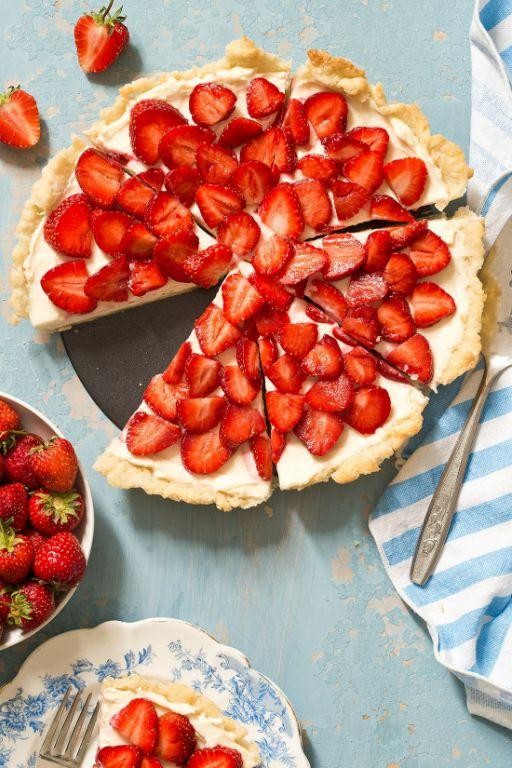
Just when you think desserts can’t get any better, these strawberry cream cheese tartlets come along and prove you wrong. They’re the perfect little bites that feel fancy but are surprisingly simple to make at home. You’ll love how the buttery crust contrasts with the creamy filling and fresh fruit.
12
tartlets30
minutes15
minutesIngredients
- 1 ½ cups all-purpose flour
- ½ cup unsalted European-style butter, chilled and cubed
- 3 tablespoons granulated sugar
- 1 large pasture-raised egg yolk
- 2 tablespoons ice water
- 8 ounces full-fat cream cheese, softened to room temperature
- ¼ cup crème fraîche
- ⅓ cup confectioners’ sugar
- 1 teaspoon pure vanilla extract
- 1 pint fresh strawberries, hulled and thinly sliced
- 2 tablespoons strawberry preserves, warmed
- Fresh mint sprigs for garnish
Instructions
- Preheat your oven to 375°F and lightly grease 12 mini tart pans.
- Combine the all-purpose flour and granulated sugar in a food processor.
- Add the chilled, cubed European-style butter and pulse until the mixture resembles coarse crumbs.
- Whisk together the pasture-raised egg yolk and ice water in a small bowl.
- Drizzle the egg mixture into the food processor while pulsing until the dough just comes together.
- Turn the dough onto a floured surface and gently knead it into a smooth disc.
- Wrap the dough in plastic wrap and refrigerate for exactly 30 minutes to prevent shrinkage during baking.
- Roll the chilled dough to ⅛-inch thickness on a lightly floured surface.
- Cut the dough into circles slightly larger than your tart pans.
- Press the dough circles into the prepared tart pans, ensuring even coverage.
- Prick the bottom of each tart shell several times with a fork to prevent bubbling.
- Bake the tart shells for 12-15 minutes until golden brown around the edges.
- Transfer the baked tart shells to a wire rack and cool completely to room temperature.
- Beat the softened cream cheese with an electric mixer on medium speed until smooth and creamy.
- Add the crème fraîche, confectioners’ sugar, and pure vanilla extract to the cream cheese.
- Continue beating the mixture for 2-3 minutes until light and fluffy.
- Spoon or pipe the cream cheese filling into the cooled tart shells, filling them three-quarters full.
- Arrange the thinly sliced fresh strawberries in concentric circles over the filling.
- Brush the strawberries lightly with warmed strawberry preserves to create a glossy finish.
- Garnish each tartlet with fresh mint sprigs just before serving.
Delicate and elegant, these tartlets offer a wonderful textural contrast between the crisp pastry and lush cream cheese filling. The bright acidity of fresh strawberries cuts through the richness beautifully, making them perfect for afternoon tea or as a light dessert finale. For an extra special presentation, arrange them on a tiered stand with edible flowers scattered between the layers.
Pumpkin Spice Tartlets with Pecan Topping
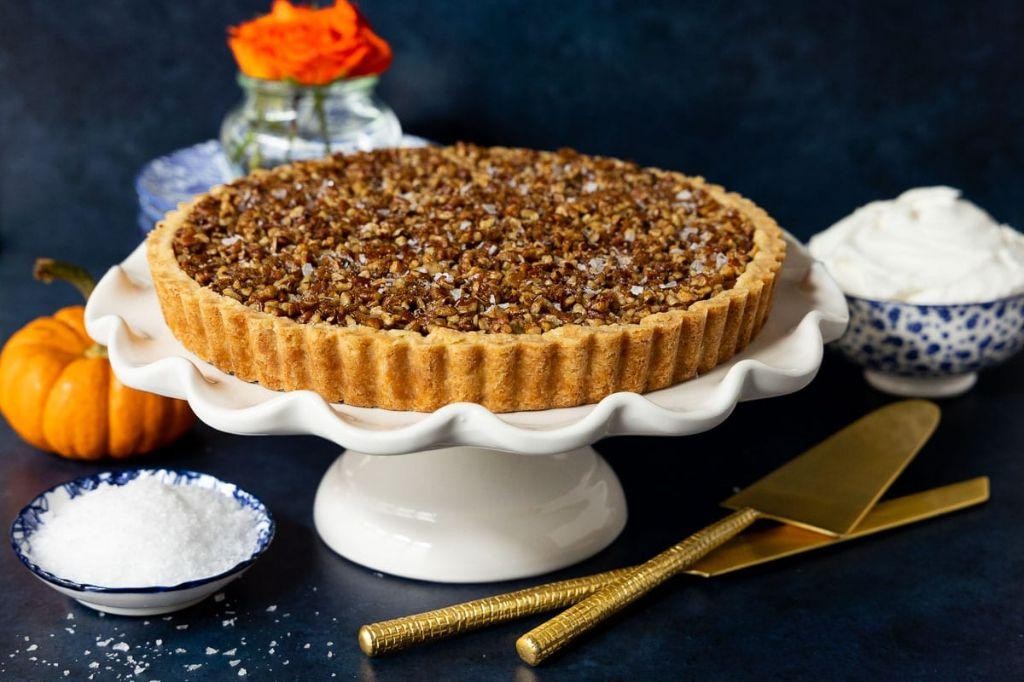
Let’s be honest—you’ve been dreaming of that perfect fall dessert. These pumpkin spice tartlets deliver all the cozy vibes with a buttery crust, spiced filling, and crunchy pecan topping that’ll make your kitchen smell like autumn heaven.
8
tartlets25
minutes40
minutesIngredients
- 1 ½ cups all-purpose flour
- ½ cup cold unsalted butter, cubed
- 3 tbsp granulated sugar
- 1 large pasture-raised egg, lightly beaten
- 1 cup pumpkin purée
- ¾ cup heavy cream
- 2 large pasture-raised eggs
- ½ cup dark brown sugar
- 1 tsp ground cinnamon
- ½ tsp ground ginger
- ¼ tsp freshly grated nutmeg
- ⅛ tsp ground cloves
- ½ cup chopped pecans
- 2 tbsp maple syrup
- 1 tbsp clarified butter
Instructions
- Preheat your oven to 350°F and lightly grease eight 4-inch tartlet pans.
- Combine 1 ½ cups all-purpose flour, ½ cup cold cubed unsalted butter, and 3 tbsp granulated sugar in a food processor.
- Pulse the mixture until it resembles coarse crumbs, about 10-12 pulses.
- Add 1 lightly beaten pasture-raised egg and pulse just until the dough begins to clump together.
- Tip: Handle the dough minimally to prevent the butter from warming and creating a tough crust.
- Divide the dough into eight equal portions and press each into the prepared tartlet pans.
- Prick the bottoms of the crusts several times with a fork to prevent bubbling.
- Bake the crusts for 12 minutes until lightly golden around the edges.
- Whisk together 1 cup pumpkin purée, ¾ cup heavy cream, 2 pasture-raised eggs, ½ cup dark brown sugar, 1 tsp cinnamon, ½ tsp ginger, ¼ tsp nutmeg, and ⅛ tsp cloves until completely smooth.
- Tip: Strain the filling through a fine-mesh sieve for an exceptionally silky texture.
- Pour the filling into the partially baked crusts, filling each about ⅔ full.
- Return the tartlets to the oven and bake for 18 minutes until the filling is set but still slightly jiggly in the center.
- Combine ½ cup chopped pecans, 2 tbsp maple syrup, and 1 tbsp clarified butter in a small bowl.
- Sprinkle the pecan mixture evenly over the partially baked tartlets.
- Tip: Use clarified butter for the topping to prevent burning while achieving maximum crispness.
- Bake for an additional 8-10 minutes until the pecans are fragrant and lightly toasted.
- Transfer the tartlets to a wire rack and cool completely before removing from the pans.
Each bite offers a delightful contrast—the crisp pecan topping gives way to velvety spiced pumpkin nestled in a tender, buttery crust. Enjoy them slightly warmed with a dollop of whipped cream, or try drizzling with caramel sauce for an extra indulgent treat.
Peach and Thyme Tartlets with Whipped Cream
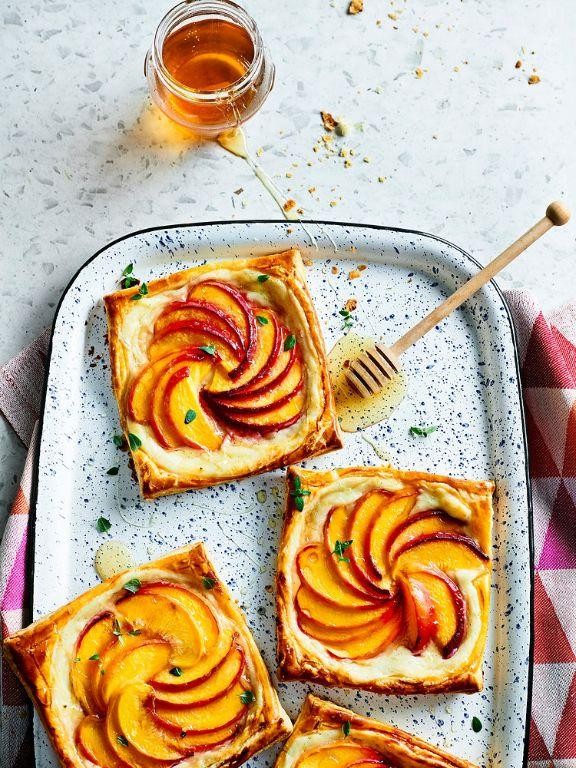
These peach and thyme tartlets with whipped cream are the perfect little dessert when you want something fancy but don’t want to spend all day in the kitchen. They combine sweet summer peaches with earthy thyme in a buttery crust that’s just irresistible. You’ll love how impressive they look while being surprisingly simple to make.
6
portions30
minutes22
minutesIngredients
– 1 ½ cups all-purpose flour
– ½ cup cold European-style butter, cubed
– 3 tablespoons granulated sugar
– 1 large pasture-raised egg, lightly beaten
– 2 tablespoons ice water
– 3 ripe yellow peaches, pitted and thinly sliced
– 2 teaspoons fresh thyme leaves
– 1 tablespoon turbinado sugar
– 1 cup heavy whipping cream
– 2 tablespoons confectioners’ sugar
– 1 teaspoon pure vanilla extract
Instructions
1. Combine 1 ½ cups all-purpose flour, ½ cup cold cubed European-style butter, and 3 tablespoons granulated sugar in a food processor.
2. Pulse the mixture until it resembles coarse meal with pea-sized butter pieces remaining.
3. Add 1 lightly beaten pasture-raised egg and 2 tablespoons ice water to the food processor.
4. Pulse just until the dough begins to clump together, being careful not to overmix.
5. Turn the dough out onto a lightly floured surface and gently press it into a disc.
6. Wrap the dough tightly in plastic wrap and refrigerate for exactly 30 minutes to allow the gluten to relax.
7. Preheat your oven to 375°F and lightly grease 6 individual tartlet pans.
8. Roll the chilled dough to ¼-inch thickness on a floured surface.
9. Cut the dough into circles slightly larger than your tartlet pans.
10. Press the dough circles into the prepared pans, trimming any excess from the edges.
11. Arrange thinly sliced yellow peaches in concentric circles in each tartlet shell.
12. Sprinkle 2 teaspoons fresh thyme leaves evenly over the peaches.
13. Dust the tartlets with 1 tablespoon turbinado sugar for a caramelized finish.
14. Bake at 375°F for 18-22 minutes until the crust is golden brown and peaches are tender.
15. Transfer the tartlets to a wire rack and cool completely to room temperature.
16. Chill 1 cup heavy whipping cream and your mixing bowl in the refrigerator for 15 minutes.
17. Whip the chilled cream with 2 tablespoons confectioners’ sugar and 1 teaspoon pure vanilla extract until soft peaks form.
18. Dollop the whipped cream onto the cooled tartlets just before serving.
Now you have these beautiful individual desserts ready to impress. Nothing beats the contrast between the flaky, buttery crust and those juicy, thyme-kissed peaches. Try serving them with a drizzle of honey or alongside a glass of dessert wine for an extra special treat.
Ricotta Lemon Tartlets with Pine Nuts
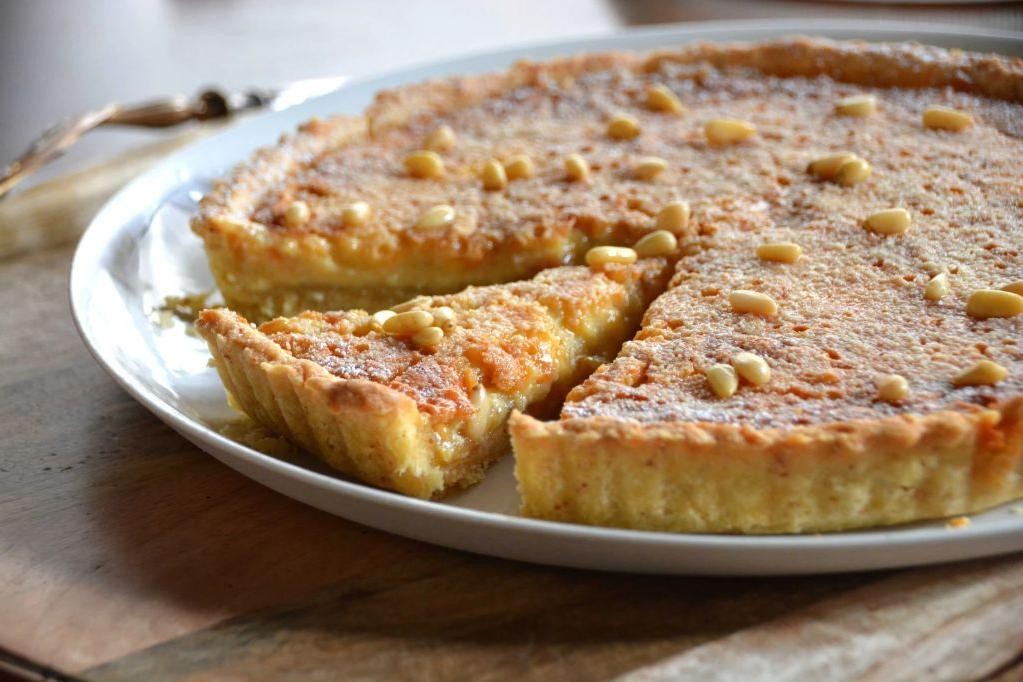
Unexpectedly delightful, these ricotta lemon tartlets are the perfect little treat when you want something sweet but not too heavy. You get that creamy, dreamy ricotta filling with just the right zing of lemon to keep things interesting. They’re surprisingly simple to whip up for a last-minute dessert or elegant afternoon snack.
12
tartlets20
minutes22
minutesIngredients
- 1 package (14 oz) refrigerated pie crust, thawed
- 1 cup whole-milk ricotta cheese, drained
- 1/4 cup granulated sugar
- 1 large pasture-raised egg, lightly beaten
- 2 tbsp fresh lemon zest
- 1 tbsp freshly squeezed lemon juice
- 1/2 tsp pure vanilla extract
- 1/4 cup pine nuts
- 1 tbsp clarified butter, melted
- 1 tbsp turbinado sugar
Instructions
- Preheat your oven to 375°F and lightly grease a standard 12-cup muffin tin with clarified butter.
- Unroll the pie crust on a lightly floured surface and use a 3-inch round cutter to create 12 circles, re-rolling scraps as needed.
- Gently press each dough circle into the prepared muffin cups, ensuring the dough reaches the bottom and sides without stretching.
- In a medium bowl, combine the drained ricotta, granulated sugar, lightly beaten egg, lemon zest, lemon juice, and vanilla extract until fully incorporated.
- Divide the ricotta mixture evenly among the 12 tartlet shells, filling each about three-quarters full.
- Sprinkle pine nuts evenly over the filling in each tartlet.
- Brush the exposed edges of the tartlet crusts with remaining melted clarified butter using a pastry brush.
- Lightly sprinkle turbinado sugar over the crust edges for a sparkling finish.
- Bake for 18-22 minutes, or until the crust is golden brown and the filling is set with a slight jiggle in the center.
- Transfer the muffin tin to a wire rack and let the tartlets cool completely, about 45 minutes, before carefully removing them with an offset spatula.
These tartlets offer a beautiful contrast between the flaky, buttery crust and the creamy, citrus-kissed filling. The pine nuts add a subtle crunch and toasty flavor that complements the bright lemon perfectly. Try serving them slightly warm with a drizzle of local honey or alongside fresh berries for an extra special presentation.
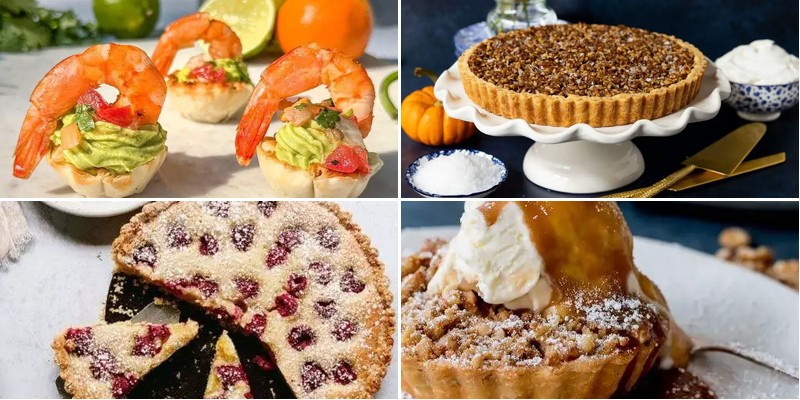
Shrimp and Avocado Tartlets with Lime Zest
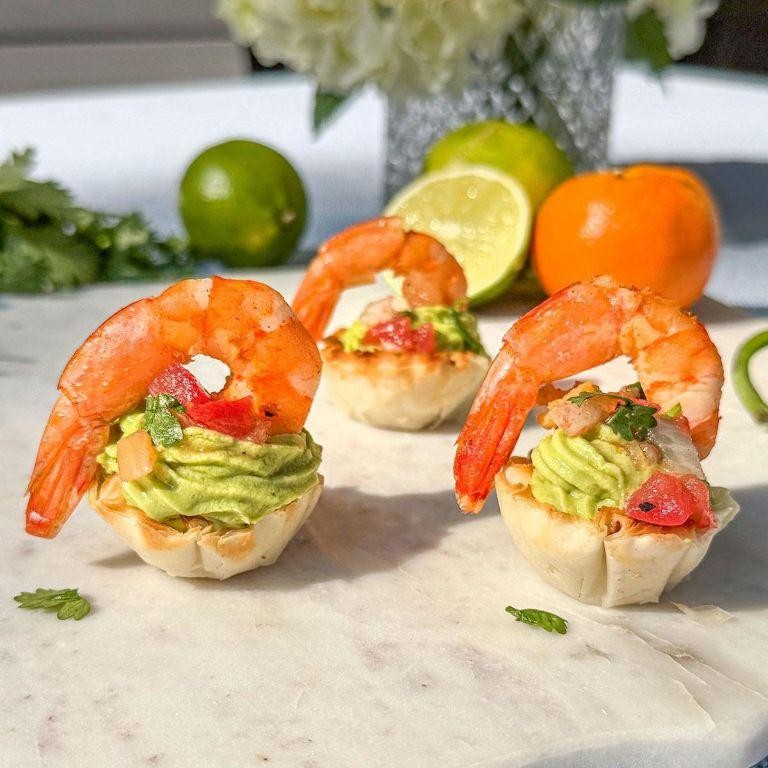
Looking for that perfect appetizer that wows guests but comes together in minutes? These shrimp and avocado tartlets deliver elegant flavor with minimal effort. You’ll love how the bright lime zest cuts through the rich avocado and tender shrimp.
24
portions20
minutes15
minutesIngredients
– 24 frozen phyllo dough tartlet shells
– 1 pound wild-caught shrimp (21-25 count), peeled and deveined
– 2 tablespoons extra virgin olive oil
– 2 ripe Hass avocados
– 1/4 cup crème fraîche
– 2 tablespoons freshly squeezed lime juice
– 1 teaspoon lime zest, finely grated
– 1/4 cup micro cilantro
– 1/2 teaspoon flaky sea salt
– 1/4 teaspoon freshly cracked black pepper
Instructions
1. Preheat your oven to 375°F and arrange the frozen phyllo tartlet shells on a parchment-lined baking sheet.
2. Bake the tartlet shells for 8-10 minutes until golden brown and crisp, then transfer to a wire rack to cool completely.
3. Pat the shrimp completely dry with paper towels to ensure proper searing.
4. Heat the extra virgin olive oil in a large skillet over medium-high heat until shimmering.
5. Sear the shrimp for 2-3 minutes per side until opaque and lightly caramelized.
6. Transfer the cooked shrimp to a cutting board and chop into 1/4-inch pieces.
7. Halve the Hass avocados lengthwise, remove the pits, and scoop the flesh into a medium bowl.
8. Immediately add the lime juice to the avocado and mash with a fork until slightly chunky.
9. Fold in the crème fraîche until fully incorporated to create a stable, creamy base.
10. Gently stir in the chopped shrimp, lime zest, flaky sea salt, and black pepper.
11. Spoon the shrimp-avocado mixture into the cooled tartlet shells using a small cookie scoop for even portions.
12. Garnish each tartlet with micro cilantro just before serving.
Unbelievably creamy avocado contrasts with the firm, sweet shrimp in these elegant bites. The crisp phyllo shells provide the perfect textural counterpoint to the rich filling, while the lime zest adds a bright, aromatic finish that lingers on the palate. For a stunning presentation, arrange them on a slate board with extra lime wedges for squeezing over individual servings.
Conclusion
Now you have a treasure trove of tartlet inspiration for any gathering! From sweet to savory, these 32 recipes offer something perfect for every occasion. We’d love to hear which tartlets become your favorites—leave a comment below and share your baking adventures. Don’t forget to pin this article to your Pinterest boards so you can easily return to these delightful recipes whenever inspiration strikes!