Juicy, vibrant, and utterly intoxicating—this orange tarte will transport you straight to sun-drenched Mediterranean orchards with every single bite. Just imagine the perfect harmony of buttery, flaky crust embracing a luscious orange filling that bursts with intense citrus flavor, creating a dessert experience so profound it will haunt your taste memories for weeks.
Why This Recipe Works
- The secret lies in the triple orange assault—fresh orange zest, freshly squeezed juice, and candied orange slices create layers of citrus intensity that build upon each other with every bite, delivering a flavor experience that single-note orange desserts can only dream of achieving.
- Our buttery, shortbread-like crust provides the perfect textural counterpoint—crisp yet tender, it shatters beautifully against the smooth, creamy filling while absorbing just enough orange essence to become part of the flavor symphony rather than just a vehicle.
- The careful temperature control during baking ensures the filling sets to that magical consistency—firm enough to slice cleanly yet yielding enough to melt on your tongue, creating that perfect mouthfeel that separates good tarts from legendary ones.
- We use both granulated sugar and a touch of honey to balance the orange’s natural acidity, creating a complex sweetness that enhances rather than masks the citrus notes, allowing the fruit’s bright, sunny character to shine through with uncompromised intensity.
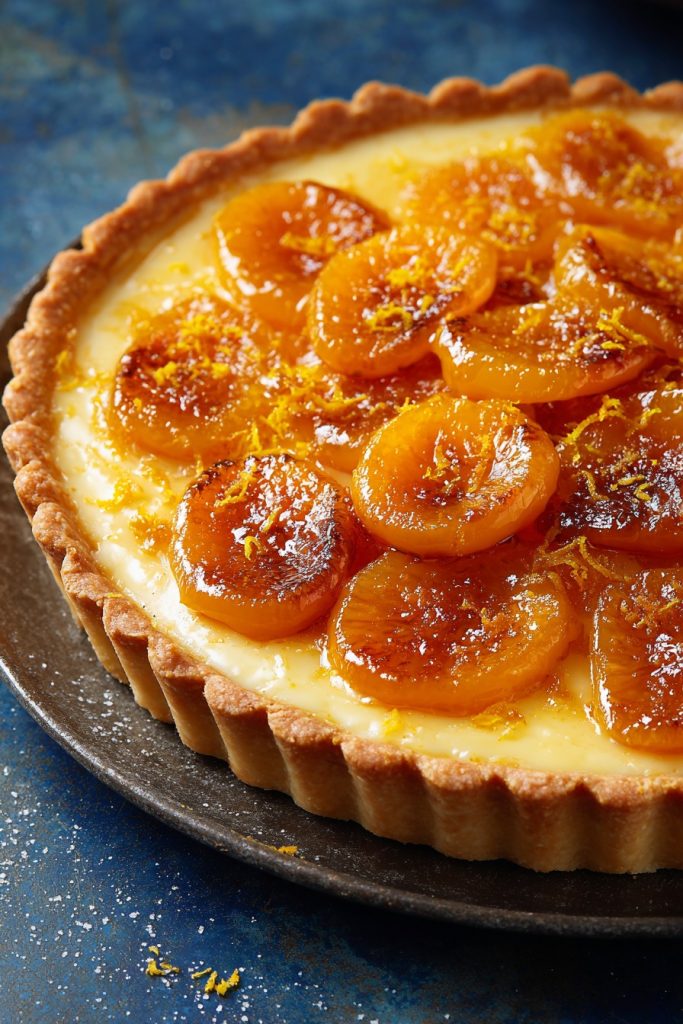
- The final caramelized orange topping isn’t just decorative—it adds crucial textural contrast and concentrated flavor bursts that elevate each slice from delicious to unforgettable, creating multiple sensory experiences within a single dessert.
Ingredients
- 2 cups all-purpose flour, sifted
- 1 cup unsalted butter, chilled and cubed
- 1/2 cup granulated sugar
- 1/4 teaspoon salt
- 4 large eggs, room temperature
- 1 cup freshly squeezed orange juice
- 2 tablespoons orange zest, finely grated
- 3/4 cup granulated sugar
- 1/4 cup honey
- 1/2 cup heavy cream
- 3 medium oranges, thinly sliced for topping
- 1/4 cup brown sugar for caramelizing
- 1 teaspoon vanilla extract
- 1/4 teaspoon ground cardamom
Equipment Needed
- 9-inch tart pan with removable bottom
- Stand mixer or food processor
- Medium saucepan
- Zester or microplane
- Juicer
- Rolling pin
- Parchment paper
- Baking weights or dried beans
- Whisk
- Mixing bowls
- Pastry brush
Instructions
Crafting the Perfect Buttery Crust
Begin by combining the sifted all-purpose flour, chilled cubed unsalted butter, granulated sugar, and salt in your food processor. Pulse this mixture in short, sharp bursts until it resembles coarse sand with visible pea-sized butter pieces—this texture is absolutely crucial for achieving that signature flaky, tender crust that will shatter beautifully against your teeth. Transfer this magical mixture to a clean surface and gently knead it just until it comes together into a cohesive dough, being careful not to overwork it and develop too much gluten. Flatten the dough into a disc, wrap it tightly in plastic wrap, and refrigerate for exactly 45 minutes—this chilling period allows the butter to firm up properly and the flour to hydrate evenly, ensuring your crust bakes up perfectly crisp rather than shrinking or becoming tough. Roll the chilled dough out between two sheets of parchment paper to a 12-inch circle, then carefully transfer it to your 9-inch tart pan, pressing it gently into the corners and up the sides. Pro tip: Chill the shaped crust in the freezer for 15 minutes before baking to prevent shrinkage and ensure maximum flakiness.
Blind Baking for Structural Perfection
Preheat your oven to 375°F and line your chilled tart crust with parchment paper, then fill it generously with baking weights or dried beans—this step is non-negotiable for preventing the crust from puffing up or slumping during baking. Place the weighted crust on the middle oven rack and bake for exactly 18-20 minutes until the edges just begin to turn golden brown and the bottom appears set but not colored. Carefully remove the parchment and weights, then return the crust to the oven for another 5-7 minutes until the entire surface develops a pale golden hue and feels dry to the touch—this second baking phase ensures the crust cooks through completely and develops that essential structural integrity needed to support the luscious orange filling. Watch closely during these final minutes, as the difference between perfectly baked and over-browned happens in mere moments. Allow the crust to cool completely on a wire rack while you prepare the filling—rushing this cooling process could cause your beautiful crust to crack or become soggy when the warm filling is added.
Creating the Intense Orange Filling
Assembling and Final Baking
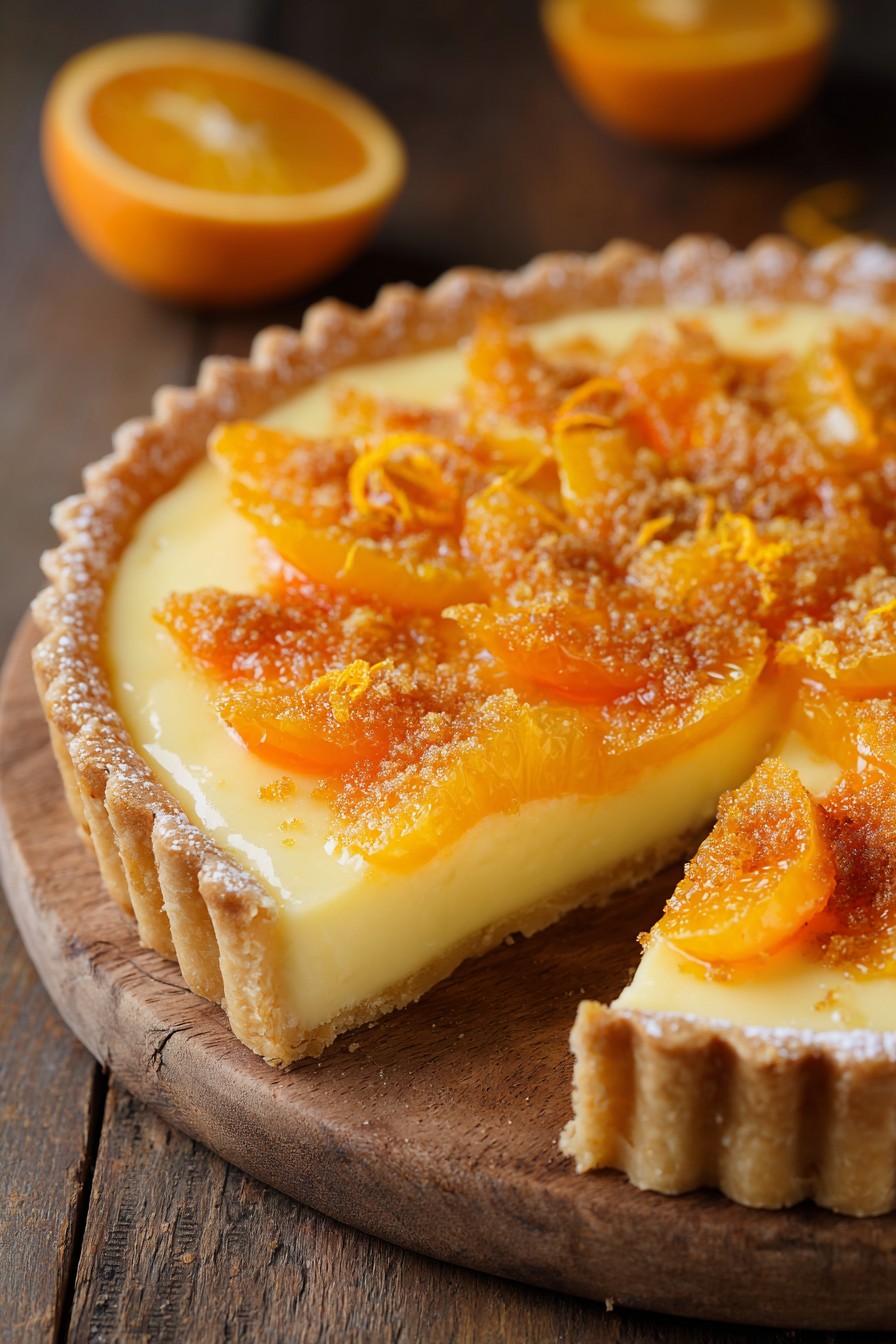
Pour the warm, strained orange filling into your completely cooled tart crust, using a spatula to spread it evenly and ensure it reaches all the way to the edges without overflowing. Arrange the thinly sliced oranges in concentric circles over the filling, slightly overlapping them to create a beautiful, sun-like pattern that will caramelize beautifully during baking. Sprinkle the brown sugar evenly over the orange slices—this will create that gorgeous, glass-like caramelized topping that provides both visual drama and incredible textural contrast. Carefully transfer the assembled tart to your preheated 350°F oven and bake for 25-30 minutes until the filling is set around the edges but still has a slight jiggle in the center, and the orange slices have developed deep caramelization with some charred edges. The aroma filling your kitchen should be intensely citrusy with notes of caramel and warm spice—this sensory cue tells you the magical transformation is nearly complete.
Cooling and Serving for Maximum Impact
Remove the tart from the oven and place it on a wire rack to cool completely to room temperature—this gradual cooling process allows the filling to set properly and develop its signature creamy-yet-firm texture that slices cleanly. Resist the temptation to cut into the tart while it’s still warm, as the filling needs this cooling time to achieve its perfect consistency and allow the flavors to meld and intensify. Once completely cool, carefully remove the tart from the pan by pressing up from the removable bottom, then transfer it to a serving platter using a large spatula for support. For the cleanest slices, use a sharp knife dipped in hot water and wiped clean between cuts—this professional technique ensures each serving looks as spectacular as it tastes. Pro tip: Allow the tart to rest at room temperature for at least 2 hours after cooling to let the flavors fully develop and harmonize before serving.
Tips and Tricks
For the most intense orange flavor imaginable, seek out blood oranges or Cara Cara oranges when they’re in season—their complex, berry-like undertones and vibrant crimson flesh will transform this tart into an absolute showstopper that will have your guests talking for weeks. The natural variations in these specialty oranges create stunning visual patterns in your finished tart, with each slice becoming a unique work of edible art that photographs beautifully for your social media feeds. When zesting your oranges, be absolutely meticulous about avoiding the bitter white pith beneath the colorful outer skin—use a light touch and rotate the fruit frequently to capture only the aromatic oil-rich zest that contains the true essence of orange flavor. For an extra flavor boost, consider steeping the orange zest in the heavy cream for 30 minutes before making the filling—this simple extra step allows the citrus oils to infuse more deeply into the dairy base, creating layers of flavor that unfold gradually with each bite. If your orange slices release too much juice during baking and make the filling slightly watery, try pre-baking them on a parchment-lined sheet at 300°F for 15 minutes to concentrate their flavor and reduce excess moisture—this professional technique ensures your tart maintains perfect structural integrity. For the most spectacular caramelization on your orange topping, use a kitchen torch during the final minutes of baking to spot-caramelize any areas that need more color—this controlled approach prevents over-baking the delicate filling while achieving that professional bakery-style finish. When measuring your flour, always use the spoon-and-level method rather than scooping directly from the bag—this ensures accuracy and prevents a dense, tough crust that can ruin the delicate textural balance of your finished tart. For an extra flavor dimension that will surprise and delight your guests, add a tablespoon of Grand Marnier or Cointreau to the filling—the orange liqueur enhances the citrus notes while adding sophisticated alcoholic warmth that makes this dessert feel truly special occasion-worthy.
Recipe Variations
- Chocolate-Orange Dream: Add 1/2 cup of finely chopped dark chocolate to the crust mixture and swirl 1/4 cup of chocolate ganache into the filling before adding the orange topping—the bitter dark chocolate creates an incredible contrast with the bright citrus that will make your taste buds dance with joy.
- Spiced Citrus Sensation: Incorporate 1 teaspoon of cinnamon, 1/2 teaspoon of nutmeg, and 1/4 teaspoon of cloves into the filling for a warm, aromatic version that feels like Christmas in every bite—perfect for holiday gatherings where you want to impress with complex, layered flavors.
- Coconut-Orange Tropical Twist: Replace the heavy cream with coconut cream and add 1/2 cup of toasted coconut flakes to the crust—this tropical variation transports the classic orange tart to island paradise territory with creamy coconut notes that complement the citrus beautifully.
- Berry-Orange Fusion: Arrange fresh raspberries or sliced strawberries between the orange slices before baking—the berries’ natural acidity and jewel-like appearance create stunning visual appeal and add another layer of fruity complexity that makes each slice absolutely irresistible.
- Savory-Sweet Rosemary Orange: Infuse the filling with 2 fresh rosemary sprigs during the cooking process, then remove them before pouring—the herbal, piney notes of rosemary create an unexpected sophistication that elevates this dessert to restaurant-quality status.
Frequently Asked Questions
Can I use bottled orange juice instead of fresh?
Absolutely not—this is one area where compromise will dramatically diminish your final result. Freshly squeezed orange juice contains vibrant, living flavors and aromatic compounds that bottled juice simply cannot replicate due to pasteurization and storage processes. The difference is particularly noticeable in baked goods where the orange flavor needs to stand up to heat and meld with other ingredients. Fresh juice provides brighter acidity, more complex flavor notes, and that essential “just-picked” quality that makes this tart so extraordinary. If you must use bottled, seek out cold-pressed, not-from-concentrate varieties, but understand that your tart will lack the explosive freshness that defines this recipe.
How long does the tart keep, and what’s the best storage method?
This orange tart maintains its spectacular quality for up to 3 days when stored properly in the refrigerator, covered loosely with plastic wrap or in an airtight container. The flavors actually continue to develop and intensify during the first 24 hours, making day-two slices particularly magical. For longer storage, you can freeze individual slices on a parchment-lined baking sheet before transferring them to freezer bags—they’ll keep for up to 2 months and thaw beautifully at room temperature in about an hour. Always bring refrigerated slices to room temperature before serving to restore the perfect texture and allow the full flavor spectrum to shine through.
My crust shrank during baking—what went wrong?
Crust shrinkage typically occurs when the dough isn’t chilled sufficiently before baking, causing the butter to melt too quickly and the gluten to contract dramatically. Ensure your dough chills for the full 45 minutes in the refrigerator, and don’t skip the additional 15-minute freezer chill after shaping it in the pan. Also, avoid stretching the dough when transferring it to the pan—instead, lift and gently press it into place. Using ceramic baking weights rather than beans provides more even pressure and heat distribution, further preventing shrinkage. If shrinkage still occurs, don’t despair—simply fill any gaps with extra orange slices before serving.
Can I make this recipe gluten-free or dairy-free?
Absolutely—for a gluten-free version, substitute the all-purpose flour with a 1:1 gluten-free baking blend that includes xanthan gum, and consider adding an extra tablespoon of butter to compensate for typically drier GF flours. For dairy-free, use vegan butter in the crust and coconut cream instead of heavy cream in the filling—the coconut actually complements the orange beautifully. Be aware that these substitutions will alter the texture slightly, with gluten-free crusts being more crumbly and dairy-free fillings having a lighter consistency, but the explosive orange flavor will still shine through magnificently.
Summary
This spectacular orange tarte delivers an unforgettable citrus experience with its perfect balance of buttery crust, intense orange filling, and caramelized topping. Each element works in harmonious synergy to create a dessert that’s both visually stunning and explosively flavorful, guaranteed to become your new signature showstopper for any occasion.
Orange Tarte
4
servings45
minutes55
minutesIngredients
Instructions
- 1 Combine flour, butter, sugar, and salt in food processor until coarse crumbs form. Knead gently, chill 45 minutes, then roll out and fit into 9-inch tart pan. Freeze 15 minutes.
- 2 Preheat oven to 375°F. Line crust with parchment and weights, bake 18-20 minutes. Remove weights, bake 5-7 minutes more until golden. Cool completely.
- 3 Whisk orange juice, zest, sugar, honey, and cream in saucepan until sugar dissolves. Temper eggs with warm mixture, then combine and cook until thickened, 8-10 minutes. Strain and add vanilla and cardamom.
- 4 Pour filling into cooled crust, arrange orange slices, sprinkle with brown sugar. Bake at 350°F for 25-30 minutes until set with slight jiggle.
- 5 Cool completely on wire rack, then remove from pan. Let rest 2 hours before slicing with hot knife for clean cuts.


