
Ready to score big with your game day spread? We’ve gathered 26 mouthwatering tailgate recipes that will make you the MVP of any football party. From crowd-pleasing appetizers to hearty mains and irresistible desserts, these easy-to-make dishes are guaranteed to fuel the fun and keep your guests cheering for more. Get ready to tackle game day hunger with these epic recipes!
Spicy Buffalo Chicken Dip

Bold flavors and creamy textures come together in this crowd-pleasing appetizer that transforms classic buffalo wing elements into a scoopable dip perfect for game days or casual gatherings.
1
servings15
minutes25
minutesIngredients
– 2 cups shredded rotisserie chicken breast
– 8 ounces cream cheese, softened to room temperature
– 1/2 cup Frank’s RedHot sauce
– 1/2 cup ranch dressing
– 1/2 cup sharp white cheddar cheese, freshly grated
– 1/4 cup blue cheese crumbles
– 2 tablespoons unsalted butter
– 1 teaspoon Worcestershire sauce
– 1/2 teaspoon garlic powder
– 1/4 teaspoon smoked paprika
– 2 tablespoons scallions, thinly sliced
– Celery sticks and tortilla chips for serving
Instructions
1. Preheat your oven to 375°F and lightly grease a 1-quart baking dish with nonstick spray.
2. Combine softened cream cheese, ranch dressing, and Worcestershire sauce in a large mixing bowl, whisking until completely smooth and lump-free.
3. Fold in shredded rotisserie chicken, ensuring each strand is evenly coated with the creamy base.
4. Incorporate Frank’s RedHot sauce gradually, adjusting to your preferred spice level while maintaining the dip’s creamy consistency.
5. Melt unsalted butter in a small saucepan over medium heat, then whisk in garlic powder and smoked paprika until fragrant, about 30 seconds.
6. Pour the spiced butter mixture into the chicken base, stirring thoroughly to distribute flavors evenly.
7. Gently fold in 1/4 cup of the grated sharp white cheddar cheese and all blue cheese crumbles, being careful not to overmix.
8. Transfer the dip mixture to your prepared baking dish, spreading it into an even layer with a spatula.
9. Top with remaining 1/4 cup sharp white cheddar cheese, creating complete coverage for optimal browning.
10. Bake at 375°F for 20-25 minutes until the edges are bubbling vigorously and the surface develops golden-brown spots.
11. Remove from oven and let rest for 5 minutes to allow the proteins to reabsorb moisture and prevent a runny texture.
12. Garnish with thinly sliced scallions just before serving to maintain their crisp freshness.
Your finished dip should boast a luxuriously creamy base with distinct pockets of melted cheese, delivering the perfect balance of tangy heat from the buffalo sauce and cooling ranch notes. The subtle smokiness from the paprika elevates the classic flavor profile, making it exceptional when served warm with crisp celery sticks that provide a refreshing contrast to the richness.
Grilled Bacon-Wrapped Jalapeño Poppers
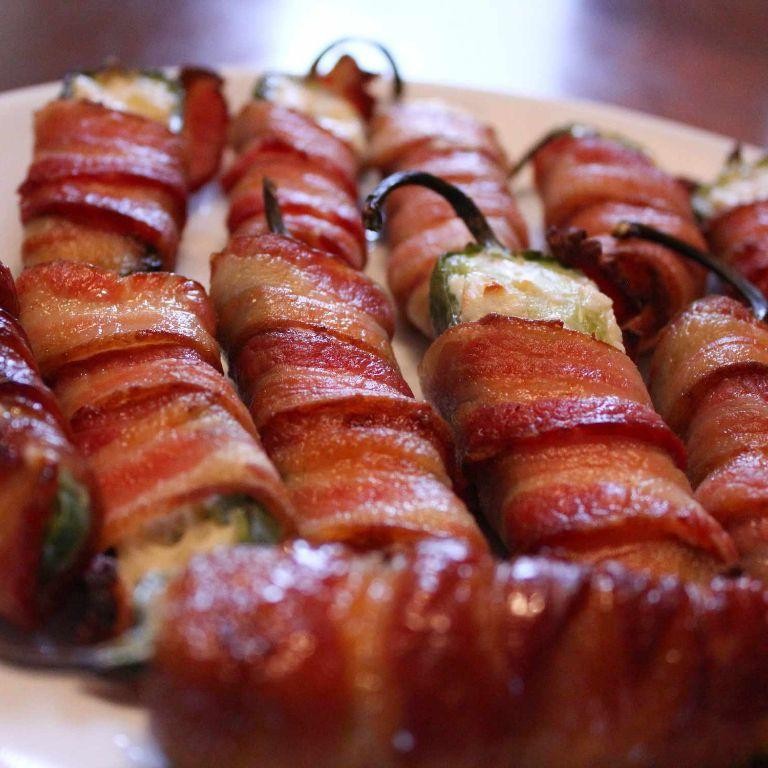
Yield perfectly balanced appetizers by mastering this grilled bacon-wrapped jalapeño poppers recipe, where smoky, spicy, and creamy elements unite through precise technique. You’ll learn to control heat distribution while achieving optimal bacon crispiness. Following these methodical steps ensures consistent results every time you fire up the grill.
12
poppers20
minutes27
minutesIngredients
– 12 fresh jalapeño peppers, halved lengthwise and seeded
– 8 ounces cream cheese, softened to room temperature
– 1 cup sharp white cheddar cheese, freshly grated
– 2 tablespoons fresh chives, finely minced
– 1 teaspoon smoked paprika
– 12 slices thick-cut applewood-smoked bacon, halved crosswise
– 2 tablespoons pure maple syrup
Instructions
1. Preheat your gas or charcoal grill to medium heat, maintaining a consistent 375°F temperature across the cooking surface.
2. Combine 8 ounces softened cream cheese, 1 cup freshly grated sharp white cheddar, 2 tablespoons minced fresh chives, and 1 teaspoon smoked paprika in a medium mixing bowl, blending until fully incorporated.
3. Spoon approximately 1 tablespoon of the cheese mixture into each of the 12 halved and seeded jalapeño pepper cavities, filling them evenly without overflowing.
4. Wrap each stuffed jalapeño half with one piece of the halved thick-cut applewood-smoked bacon, securing the ends with toothpicks inserted at a 45-degree angle to prevent unraveling.
5. Arrange the bacon-wrapped poppers seam-side down on the preheated grill grates, spacing them 2 inches apart for proper air circulation.
6. Grill for 12-15 minutes, then carefully flip each popper using tongs when the bacon develops deep golden-brown coloring on the bottom surface.
7. Continue grilling for another 10-12 minutes until the bacon becomes crispy and renders most of its fat, while the peppers soften but maintain structural integrity.
8. Brush each popper lightly with 2 tablespoons pure maple syrup during the final 3 minutes of cooking to create a caramelized glaze.
9. Transfer the finished poppers to a wire rack using heat-safe tongs, allowing them to rest for 5 minutes before serving to set the cheese filling.
Heavenly contrasts define these poppers, where the crispy bacon exterior gives way to molten cheese and tender-crisp peppers. The maple glaze provides subtle sweetness that balances the jalapeño’s gentle heat beautifully. For an elegant presentation, serve them atop a cedar plank with drizzled crema and micro-cilantro garnish.
Loaded Nacho Supreme with Queso

Zesty and satisfying, this loaded nacho supreme transforms simple ingredients into a showstopping appetizer perfect for game day or casual entertaining. Let’s build this masterpiece layer by layer, ensuring every chip gets its fair share of toppings and flavor. Follow these precise steps for nacho perfection that will have everyone reaching for more.
4
servings20
minutes25
minutesIngredients
- 1 bag (13 oz) restaurant-style tortilla chips
- 2 cups shredded Monterey Jack cheese, freshly grated
- 1 cup sharp cheddar cheese, freshly grated
- 1 lb ground beef (80/20 blend)
- 1 packet (1 oz) taco seasoning mix
- 1 cup pico de gallo, freshly prepared
- 1/2 cup pickled jalapeño slices
- 1/2 cup sour cream
- 1/4 cup fresh cilantro leaves, roughly chopped
- 1 batch queso sauce (prepared separately)
- 1 tbsp extra virgin olive oil
Instructions
- Preheat your oven to 375°F and position one rack in the center.
- Heat 1 tablespoon extra virgin olive oil in a large skillet over medium-high heat until shimmering.
- Add 1 pound ground beef to the skillet, breaking it apart with a wooden spoon.
- Cook the beef for 6-8 minutes, stirring occasionally, until no pink remains and it develops golden-brown edges.
- Drain excess fat from the skillet using a slotted spoon, leaving about 1 tablespoon for flavor.
- Sprinkle 1 packet taco seasoning over the cooked beef and stir to coat evenly.
- Cook the seasoned beef for 1 additional minute to bloom the spices, then remove from heat.
- Arrange 1 bag restaurant-style tortilla chips in a single layer on a large, rimmed baking sheet.
- Sprinkle 2 cups shredded Monterey Jack cheese evenly over the chips, ensuring coverage to the edges.
- Distribute the seasoned ground beef mixture evenly over the cheese layer.
- Top with 1 cup sharp cheddar cheese, creating a second cheese layer.
- Scatter 1/2 cup pickled jalapeño slices across the surface for consistent heat distribution.
- Bake the nachos on the center rack for 12-15 minutes, until cheeses are fully melted and bubbly with light browning at the edges.
- Remove the baking sheet from the oven using oven mitts and place on a heat-safe surface.
- Immediately drizzle the prepared queso sauce over the hot nachos in a zigzag pattern.
- Dot the surface with 1/2 cup sour cream using a teaspoon, creating small dollops.
- Spoon 1 cup pico de gallo evenly across the nachos, allowing the juices to mingle with the cheeses.
- Garnish with 1/4 cup fresh cilantro leaves, scattered generously over the top.
Each chip offers the perfect balance of crispy texture against the molten cheeses and hearty beef. The bright acidity from the pico de gallo cuts through the richness, while the jalapeños provide consistent heat throughout. For an elegant presentation, serve individual portions in small cast iron skillets, keeping the layers intact and the chips crisp until the last bite.
Smoky Barbecue Pulled Pork Sliders
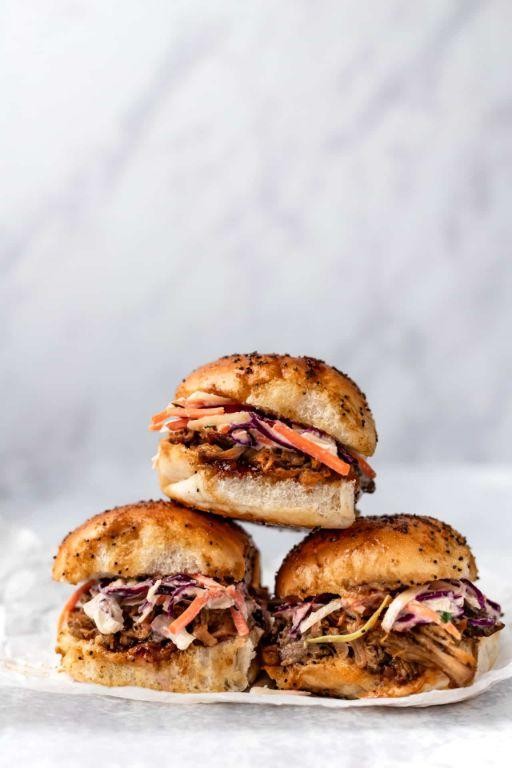
Just imagine tender, slow-cooked pork shoulder infused with complex smoky notes, perfectly nestled between soft slider buns. Juicy barbecue pulled pork sliders bring together sweet, tangy, and savory flavors in every bite. Mastering this classic requires patience and attention to technique, but the results are well worth the effort.
12
sandwiches20
minutes420
minutesIngredients
– 4 lb bone-in pork shoulder, trimmed of excess fat
– 2 tbsp smoked paprika
– 1 tbsp freshly ground black pepper
– 2 tsp kosher salt
– 1 tsp garlic powder
– 1 tsp onion powder
– ½ tsp cayenne pepper
– 1 cup apple cider vinegar
– ½ cup dark brown sugar, firmly packed
– ¼ cup Worcestershire sauce
– 2 tbsp Dijon mustard
– 1 cup quality barbecue sauce
– 12 potato slider buns
– 1 cup homemade coleslaw
Instructions
1. Pat the pork shoulder completely dry with paper towels to ensure proper crust formation.
2. Combine smoked paprika, black pepper, kosher salt, garlic powder, onion powder, and cayenne pepper in a small bowl.
3. Rub the spice mixture evenly over all surfaces of the pork shoulder, pressing firmly to adhere.
4. Preheat your smoker or oven to 225°F and place the pork shoulder fat-side up on the rack.
5. Cook for 6-7 hours until the internal temperature reaches 195°F and the meat shreds easily with forks.
6. While the pork cooks, whisk together apple cider vinegar, dark brown sugar, Worcestershire sauce, and Dijon mustard in a saucepan.
7. Simmer the vinegar mixture over medium heat for 8-10 minutes until slightly reduced and syrupy.
8. Transfer the cooked pork shoulder to a large cutting board and let rest for 30 minutes to redistribute juices.
9. Using two forks, shred the pork completely, discarding any large fat deposits and the bone.
10. Combine the shredded pork with the reduced vinegar mixture and barbecue sauce in a large bowl.
11. Toast the potato slider buns lightly in a 350°F oven for 3-4 minutes until golden around the edges.
12. Assemble sliders by placing ¼ cup of pulled pork mixture on each bottom bun half.
13. Top each slider with approximately 1 tablespoon of homemade coleslaw and cover with the top bun half. Zesty, perfectly balanced sliders feature tender pork that melts in your mouth with a subtle smoky backbone. The crisp coleslaw provides refreshing contrast to the rich, saucy meat, while the soft potato buns absorb just enough juice without becoming soggy. For an elevated presentation, serve these sliders on a wooden board with pickle spears and extra barbecue sauce for dipping.
Zesty Italian Sausage Hoagies

A perfectly balanced hoagie begins with quality ingredients and careful preparation, creating that signature combination of spicy, savory, and fresh flavors in every bite. Assembling these Zesty Italian Sausage Hoagies requires methodical attention to each component, from properly cooked sausages to the toasted bread that holds everything together. Follow these precise steps to achieve restaurant-quality results in your own kitchen.
2
sandwiches15
minutes25
minutesIngredients
– 4 Italian-style pork sausages (approximately 1 pound total)
– 4 hoagie rolls, split lengthwise
– 2 tablespoons extra virgin olive oil
– 1 large yellow onion, thinly sliced
– 2 large bell peppers (1 red, 1 green), julienned
– 4 slices provolone cheese
– ¼ cup mayonnaise
– 2 tablespoons whole grain mustard
– 1 teaspoon dried oregano
– ½ teaspoon crushed red pepper flakes
– Kosher salt to season
Instructions
1. Preheat a large cast-iron skillet over medium-high heat until droplets of water sizzle upon contact.
2. Place sausages in the dry skillet, arranging them with space between each for even browning.
3. Cook sausages for 6-8 minutes, turning every 2 minutes until all sides develop a deep golden-brown crust.
4. Transfer sausages to a plate and reduce heat to medium, pouring off all but 1 tablespoon of rendered fat.
5. Add olive oil to the skillet, then immediately add sliced onions and bell peppers.
6. Sauté vegetables for 8-10 minutes, stirring occasionally until onions become translucent and peppers soften but retain slight crispness.
7. Season vegetables with kosher salt during the final 2 minutes of cooking to draw out natural sweetness.
8. Return sausages to the skillet, nestling them among the vegetables, and cook for an additional 4-5 minutes until internal temperature reaches 160°F.
9. While sausages finish cooking, arrange hoagie rolls cut-side up on a baking sheet and toast under a broiler for 90 seconds until lightly golden.
10. Combine mayonnaise, whole grain mustard, dried oregano, and crushed red pepper flakes in a small bowl, whisking until fully incorporated.
11. Spread the seasoned mayonnaise mixture evenly on both cut sides of each toasted hoagie roll.
12. Place one cooked sausage in each prepared roll, then top with equal portions of the sautéed onion-pepper mixture.
13. Lay one slice of provolone cheese over the vegetable mixture on each hoagie.
14. Return assembled hoagies to the broiler for 45-60 seconds until cheese becomes bubbly and begins to brown at the edges. Our Zesty Italian Sausage Hoagies deliver a satisfying contrast of textures, from the crisp-tender vegetables to the juicy, well-seasoned sausage and melted provolone. The spicy kick from the pepper flakes balances beautifully with the creamy mustard-mayo spread, creating layers of flavor in every bite. For a creative twist, serve these open-faced with a side of giardiniera or slice them diagonally for easy sharing at gatherings.
Cheesy Baked Pretzel Bites

Getting perfectly cheesy, soft pretzel bites right at home is simpler than you might think, especially when you follow these methodical steps that ensure golden-brown perfection every single time. This recipe walks you through creating tender dough pockets filled with molten cheese, then baking them to achieve that signature pretzel crust. Let’s begin by gathering our ingredients and preparing our workspace.
24
bites75
minutes27
minutesIngredients
– 3½ cups bread flour
– 1 tablespoon granulated sugar
– 2¼ teaspoons instant yeast
– 1½ teaspoons fine sea salt
– 1¼ cups warm whole milk (110°F)
– 2 tablespoons unsalted European-style butter, melted
– 8 ounces sharp white cheddar cheese, cut into ½-inch cubes
– 6 cups filtered water
– ¼ cup baking soda
– 1 large pasture-raised egg, lightly beaten
– 2 tablespoons coarse pretzel salt
Instructions
1. Combine bread flour, granulated sugar, instant yeast, and fine sea salt in the bowl of a stand mixer fitted with a dough hook attachment.
2. Pour warm whole milk (110°F) and melted unsalted European-style butter into the dry ingredients.
3. Mix on low speed for 2 minutes until a shaggy dough forms, then increase to medium speed and knead for 6 minutes until smooth and elastic.
4. Transfer dough to a lightly oiled bowl, cover with a damp kitchen towel, and let rise in a warm place for 1 hour until doubled in size.
5. Punch down the risen dough and turn it out onto a lightly floured surface.
6. Roll dough into a 12×8-inch rectangle using a rolling pin, then cut into 24 equal squares with a bench scraper.
7. Place one sharp white cheddar cheese cube in the center of each dough square.
8. Pinch dough edges tightly around each cheese cube to form sealed balls, ensuring no cheese is exposed.
9. Bring filtered water and baking soda to a rolling boil in a large stainless steel pot.
10. Working in batches of 6, boil pretzel bites for 30 seconds exactly, then remove with a slotted spoon to a wire rack.
11. Arrange boiled pretzel bites on a parchment-lined baking sheet, spacing them 1 inch apart.
12. Brush each pretzel bite evenly with lightly beaten pasture-raised egg using a pastry brush.
13. Sprinkle coarse pretzel salt generously over the tops of the egg-washed pretzel bites.
14. Bake in a preheated 425°F oven for 12-14 minutes until deep golden brown and puffed.
15. Transfer baked pretzel bites to a cooling rack and let rest for 5 minutes before serving. What makes these pretzel bites truly exceptional is the contrast between the crisp, salty exterior and the pillow-soft interior that gives way to molten cheddar. The cheese maintains a perfect pull without becoming greasy, while the pretzel crust provides satisfying crunch. Serve them warm with whole-grain mustard aioli or beer cheese dip for an elevated game-day spread that will disappear within minutes.
Savory Chili-Stuffed Cornbread Muffins

Perfect for chilly autumn evenings, these savory chili-stuffed cornbread muffins combine comforting cornbread with a hearty, spiced filling. Preparing these delightful handheld meals requires careful attention to temperature and timing for optimal texture. Let’s begin by gathering our ingredients and following these precise steps.
12
muffins15
minutes22
minutesIngredients
- 1 ½ cups fine-grind cornmeal
- ½ cup all-purpose flour
- 2 teaspoons baking powder
- 1 teaspoon kosher salt
- 2 pasture-raised eggs, lightly beaten
- 1 cup buttermilk
- ¼ cup clarified butter, melted
- 2 cups prepared beef chili, chilled
- ½ cup sharp cheddar cheese, finely grated
- 2 tablespoons unsalted butter for greasing
Instructions
- Preheat your oven to 400°F and generously grease a 12-cup muffin tin with unsalted butter, ensuring complete coverage of each cup.
- Whisk together 1 ½ cups fine-grind cornmeal, ½ cup all-purpose flour, 2 teaspoons baking powder, and 1 teaspoon kosher salt in a large mixing bowl until thoroughly combined.
- In a separate bowl, combine 2 lightly beaten pasture-raised eggs, 1 cup buttermilk, and ¼ cup melted clarified butter, whisking until the mixture appears smooth and emulsified.
- Pour the wet ingredients into the dry ingredients and stir gently until just combined, being careful not to overmix—this prevents tough muffins.
- Spoon approximately 1 tablespoon of cornbread batter into the bottom of each prepared muffin cup, spreading it evenly to create a base layer.
- Place 2 heaping tablespoons of chilled beef chili into the center of each muffin cup, ensuring the chili remains contained within the cornbread base.
- Cover the chili completely with remaining cornbread batter, sealing the edges carefully to prevent leakage during baking.
- Sprinkle ½ cup finely grated sharp cheddar cheese evenly over the tops of all muffins.
- Bake at 400°F for 18-22 minutes until the tops are golden brown and a toothpick inserted into the cornbread portion comes out clean.
- Allow muffins to cool in the tin for 5 minutes before transferring to a wire rack—this resting period helps them set properly.
Lusciously moist cornbread encases a warmly spiced chili center that bursts with flavor upon each bite. The contrast between the crumbly, slightly sweet cornbread exterior and the rich, savory filling creates exceptional textural complexity. Consider serving these alongside a crisp green salad or topping with a dollop of cooling sour cream for added dimension.
Classic Deviled Egg Trio

Haven’t you noticed how deviled eggs always disappear first at gatherings? This classic trio offers three distinct flavor profiles that elevate the humble egg into elegant party fare. Let’s methodically create these crowd-pleasing appetizers from start to finish.
24
portions30
minutes12
minutesIngredients
– 12 large pasture-raised eggs
– 1/2 cup high-quality mayonnaise
– 2 tablespoons Dijon mustard
– 1 tablespoon white wine vinegar
– 1/4 teaspoon smoked Spanish paprika
– 1 tablespoon fresh chives, finely minced
– 2 slices applewood-smoked bacon, cooked crisp and crumbled
– 1 tablespoon prepared horseradish
– 1/4 cup sharp white cheddar cheese, finely grated
– 1/4 teaspoon cayenne pepper
– Kosher salt to taste
– Freshly ground black pepper to taste
Instructions
1. Place 12 large pasture-raised eggs in a single layer in a large saucepan.
2. Cover the eggs with cold water until they are submerged by 1 inch.
3. Bring the water to a rolling boil over high heat.
4. Immediately remove the saucepan from heat and cover with a tight-fitting lid.
5. Let the eggs stand in the hot water for exactly 12 minutes.
6. Transfer the eggs to an ice water bath using a slotted spoon.
7. Allow the eggs to cool completely in the ice bath for 15 minutes.
8. Gently tap each egg on the counter to crack the shell.
9. Peel the eggs under cool running water to help remove the shell cleanly.
10. Slice each peeled egg in half lengthwise using a sharp knife.
11. Carefully remove the yolks and place them in a medium mixing bowl.
12. Arrange the 24 empty egg white halves on a serving platter.
13. Mash the egg yolks with a fork until they achieve a fine, crumbly texture.
14. Add 1/2 cup high-quality mayonnaise to the mashed yolks.
15. Incorporate 2 tablespoons Dijon mustard into the yolk mixture.
16. Stir in 1 tablespoon white wine vinegar until fully combined.
17. Divide the yolk mixture equally among three small bowls.
18. To the first bowl, add 1/4 teaspoon smoked Spanish paprika and 1 tablespoon finely minced fresh chives.
19. To the second bowl, mix in 2 slices of crumbled applewood-smoked bacon and 1 tablespoon prepared horseradish.
20. To the third bowl, combine 1/4 cup finely grated sharp white cheddar cheese and 1/4 teaspoon cayenne pepper.
21. Season each yolk mixture separately with kosher salt and freshly ground black pepper to taste.
22. Spoon or pipe each flavored yolk mixture into 8 egg white halves.
23. Garnish the paprika-chive eggs with an additional sprinkle of smoked Spanish paprika.
24. Top the bacon-horseradish eggs with extra bacon crumbles.
25. Finish the cheddar-cayenne eggs with a light dusting of cayenne pepper.
For optimal texture, chill the assembled deviled eggs for at least 30 minutes before serving to allow the flavors to meld. The creamy yolk filling contrasts beautifully with the firm egg whites, while the trio offers a progression from smoky to spicy to tangy. Consider serving them on a tiered stand with fresh herb garnishes for an impressive presentation that showcases all three variations at once.
Crispy Southern Fried Chicken Wings

Just imagine biting into chicken wings with the perfect balance of crispy, craggy crust and juicy, tender meat. Today we’re mastering the art of Southern fried chicken wings using a methodical approach that ensures consistent results every time. This technique focuses on proper temperature control and seasoning distribution for wings that rival your favorite restaurant’s version.
2
servings260
minutes14
minutesIngredients
- 2 pounds chicken wings, separated into drumettes and flats
- 1 cup buttermilk
- 2 cups all-purpose flour
- 1 tablespoon smoked paprika
- 2 teaspoons garlic powder
- 1 teaspoon cayenne pepper
- 1 tablespoon kosher salt
- 1 teaspoon freshly ground black pepper
- 4 cups peanut oil
- 1 tablespoon cornstarch
Instructions
- Place chicken wings in a large bowl and pour buttermilk over them, ensuring all pieces are fully coated.
- Cover the bowl with plastic wrap and refrigerate for exactly 4 hours to allow the buttermilk to tenderize the meat.
- In a separate large bowl, combine all-purpose flour, smoked paprika, garlic powder, cayenne pepper, kosher salt, and black pepper, whisking until evenly distributed.
- Remove wings from buttermilk, allowing excess liquid to drip off before transferring to the flour mixture.
- Toss wings in the flour mixture, pressing firmly to create a thick, even coating on all surfaces.
- Place coated wings on a wire rack and let rest for 15 minutes to allow the coating to hydrate properly.
- Heat peanut oil in a heavy-bottomed Dutch oven to 350°F, using a deep-fry thermometer to monitor temperature accurately.
- Carefully lower 6-8 wings into the hot oil using tongs, maintaining oil temperature between 325-350°F throughout frying.
- Fry wings for 12-14 minutes, turning occasionally with tongs until they achieve a deep golden-brown color.
- Transfer cooked wings to a clean wire rack set over a baking sheet to drain excess oil while maintaining crispiness.
- Sprinkle wings with additional kosher salt immediately after removing from oil while the surface is still hot.
Here you’ll find wings with an audible crunch giving way to incredibly moist, flavorful meat. The combination of smoked paprika and cayenne creates a complex heat profile that builds gradually with each bite. Consider serving these alongside a cooling buttermilk ranch dip or drizzling with hot honey for a sweet-spicy contrast that elevates the entire experience.
Garlic Herb Grilled Vegetable Skewers
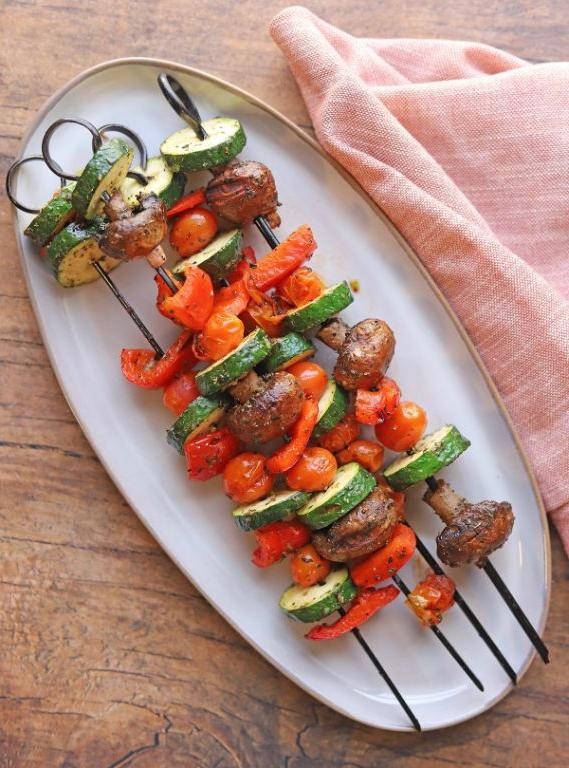
These garlic herb grilled vegetable skewers transform simple produce into a vibrant, smoky masterpiece perfect for any summer gathering. The methodical preparation ensures each vegetable cooks to perfection, while the aromatic herb marinade infuses every bite with complex flavor. Today we’ll walk through each precise step to create skewers with ideal char and tender-crisp texture.
8
skewers25
minutes12
minutesIngredients
- 2 medium zucchini, cut into 1-inch thick rounds
- 1 large red bell pepper, seeded and cut into 1½-inch squares
- 1 medium red onion, cut into 1-inch wedges
- 8 ounces cremini mushrooms, stems trimmed
- ¼ cup extra-virgin olive oil
- 3 tablespoons freshly squeezed lemon juice
- 4 garlic cloves, finely minced
- 1 tablespoon fresh rosemary leaves, finely chopped
- 2 teaspoons fresh thyme leaves
- 1 teaspoon kosher salt
- ½ teaspoon freshly cracked black pepper
- 8 (10-inch) wooden skewers, soaked in water for 30 minutes
Instructions
- Combine ¼ cup extra-virgin olive oil, 3 tablespoons freshly squeezed lemon juice, 4 finely minced garlic cloves, 1 tablespoon finely chopped fresh rosemary, 2 teaspoons fresh thyme leaves, 1 teaspoon kosher salt, and ½ teaspoon freshly cracked black pepper in a large mixing bowl.
- Add 2 medium zucchini cut into 1-inch rounds, 1 large red bell pepper cut into 1½-inch squares, 1 medium red onion cut into 1-inch wedges, and 8 ounces stem-trimmed cremini mushrooms to the marinade.
- Toss vegetables thoroughly until evenly coated with marinade, ensuring each piece glistens with the herb-infused oil mixture.
- Let vegetables marinate at room temperature for 20 minutes to allow flavors to penetrate while you preheat the grill.
- Preheat a gas or charcoal grill to medium-high heat, approximately 425°F, creating two cooking zones for direct and indirect heat.
- Thread marinated vegetables alternately onto 8 pre-soaked wooden skewers, grouping similar cooking times together and leaving ¼-inch space between pieces.
- Place skewers on the preheated grill over direct heat and cook for 3 minutes until visible grill marks form on the bottom.
- Rotate skewers 90 degrees and cook for another 3 minutes to create cross-hatch grill marks.
- Flip skewers and repeat the grilling process on the second side for 6 minutes total, rotating halfway through.
- Move skewers to indirect heat and continue cooking for 4-5 minutes until vegetables are tender-crisp when pierced with a fork but not mushy.
- Transfer grilled vegetable skewers to a clean platter and let rest for 2 minutes before serving to allow juices to redistribute.
Keep these skewers warm by tenting loosely with foil, which prevents steaming while maintaining ideal serving temperature. The finished vegetables should offer a satisfying contrast between smoky charred exteriors and perfectly tender interiors, with the garlic-herb marinade creating a bright, aromatic flavor profile. Consider serving them over creamy polenta or alongside grilled proteins for a complete meal that highlights summer’s bounty at its peak.
Tangy Sweet and Sour Meatballs
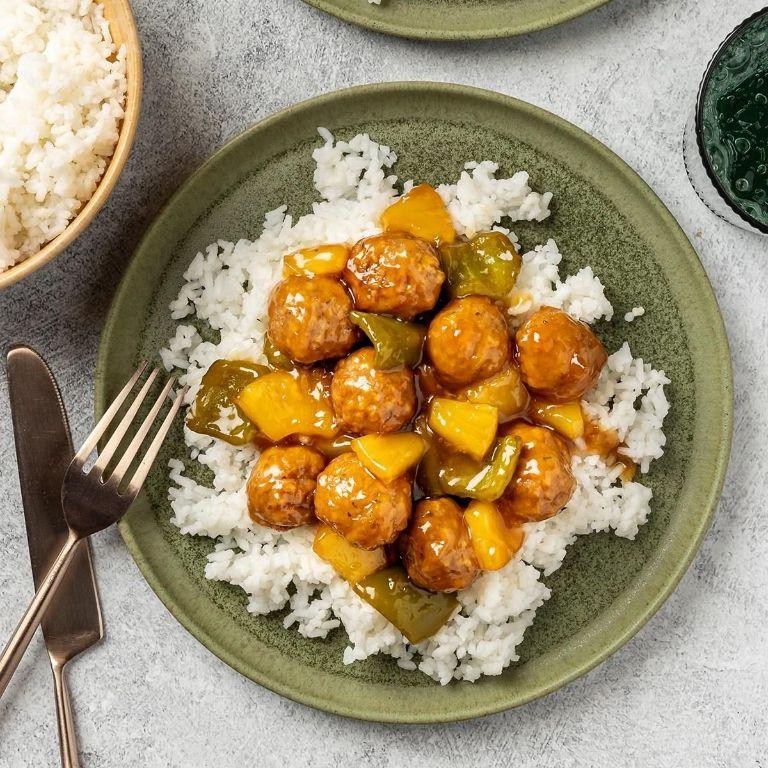
Venturing into the world of sweet and sour flavors brings us to these perfectly balanced meatballs, where tangy pineapple and rich tomato create a symphony of taste that will become your new weeknight favorite. This methodical approach ensures even beginners achieve restaurant-quality results with confidence and precision.
3
servings15
minutes25
minutesIngredients
- 1 pound ground chuck (80/20 blend)
- ½ cup panko breadcrumbs
- 1 large pasture-raised egg, lightly beaten
- 2 tablespoons whole milk
- 1 teaspoon Worcestershire sauce
- ½ teaspoon garlic powder
- ½ teaspoon onion powder
- ¼ teaspoon freshly ground black pepper
- 2 tablespoons avocado oil
- 1 cup pineapple juice
- ½ cup ketchup
- ¼ cup rice vinegar
- 2 tablespoons light brown sugar
- 1 tablespoon soy sauce
- 1 teaspoon cornstarch
- 1 tablespoon cold water
- ½ cup diced fresh pineapple
- ¼ cup thinly sliced scallions
Instructions
- Combine ground chuck, panko breadcrumbs, beaten pasture-raised egg, whole milk, Worcestershire sauce, garlic powder, onion powder, and freshly ground black pepper in a large mixing bowl.
- Mix the ingredients using your hands until just combined, being careful not to overwork the meat.
- Portion the mixture into 1½-inch balls using a cookie scoop or tablespoon measure.
- Heat avocado oil in a large skillet over medium-high heat until shimmering, about 2 minutes.
- Arrange meatballs in a single layer in the hot skillet, leaving space between each one.
- Sear meatballs for 3-4 minutes until a deep golden-brown crust forms on the bottom.
- Flip each meatball carefully using tongs and cook for another 3-4 minutes until browned on all sides.
- Transfer partially cooked meatballs to a clean plate using a slotted spoon.
- Reduce skillet heat to medium and pour pineapple juice into the pan drippings.
- Add ketchup, rice vinegar, light brown sugar, and soy sauce to the skillet.
- Whisk the sauce ingredients together until fully incorporated and bring to a simmer.
- Create a slurry by mixing cornstarch with cold water in a small bowl until smooth.
- Slowly drizzle the cornstarch slurry into the simmering sauce while continuously whisking.
- Cook the sauce for 2-3 minutes until it thickens enough to coat the back of a spoon.
- Return the meatballs to the skillet along with any accumulated juices.
- Add diced fresh pineapple to the skillet and stir gently to coat everything in sauce.
- Cover the skillet and simmer for 8-10 minutes until meatballs reach an internal temperature of 165°F.
- Sprinkle thinly sliced scallions over the finished dish just before serving.
Each meatball emerges tender and juicy, with the glossy sauce clinging perfectly to every curve. Expect a delightful contrast between the savory meat and bright, tangy-sweet sauce that makes this dish incredibly addictive. Elevate your presentation by serving over jasmine rice or as an impressive appetizer skewered with colorful bell peppers for your next gathering.
Refreshing Lemonade Sangria

Zesty and vibrant, this lemonade sangria transforms classic summer refreshment into an elegant party beverage. Perfect for warm afternoons or festive gatherings, it combines citrus brightness with sophisticated fruit notes in a methodical preparation that ensures consistent results every time.
6
servings20
minutesIngredients
– 1 bottle (750ml) crisp Sauvignon Blanc, chilled
– 2 cups freshly squeezed lemon juice, strained
– 1/2 cup premium orange liqueur
– 1/4 cup simple syrup
– 1 lemon, thinly sliced into rounds
– 1 orange, thinly sliced into rounds
– 1 cup fresh strawberries, hulled and quartered
– 1/2 cup fresh mint leaves, gently bruised
– 2 cups chilled sparkling water
Instructions
1. Combine the chilled Sauvignon Blanc, strained lemon juice, orange liqueur, and simple syrup in a large glass pitcher.
2. Stir the mixture with a long-handled spoon for exactly 30 seconds to ensure thorough integration of flavors.
3. Add the lemon rounds, orange rounds, quartered strawberries, and bruised mint leaves to the pitcher.
4. Gently press the fruit slices against the pitcher’s sides with the back of a spoon to release their essential oils.
5. Cover the pitcher tightly with plastic wrap and refrigerate for precisely 4 hours to allow flavors to meld.
6. Remove the pitcher from refrigeration and discard any mint leaves that have darkened significantly.
7. Slowly pour the chilled sparkling water down the side of the pitcher to preserve carbonation.
8. Stir the sangria gently with two upward folding motions to incorporate the sparkling water without deflating it.
9. Ladle the sangria into ice-filled glasses, ensuring each serving contains both liquid and fruit components.
10. Serve immediately while the bubbles remain active and the fruit maintains its structural integrity. Yearning for that perfect balance? The finished sangria delivers crisp acidity from the citrus, subtle sweetness from the liqueur, and effervescent lift from the sparkling water. For an elegant presentation, serve in tall Collins glasses garnished with additional mint sprigs, allowing the vibrant fruit colors to shine through the pale golden liquid.
Creamy Spinach and Artichoke Dip
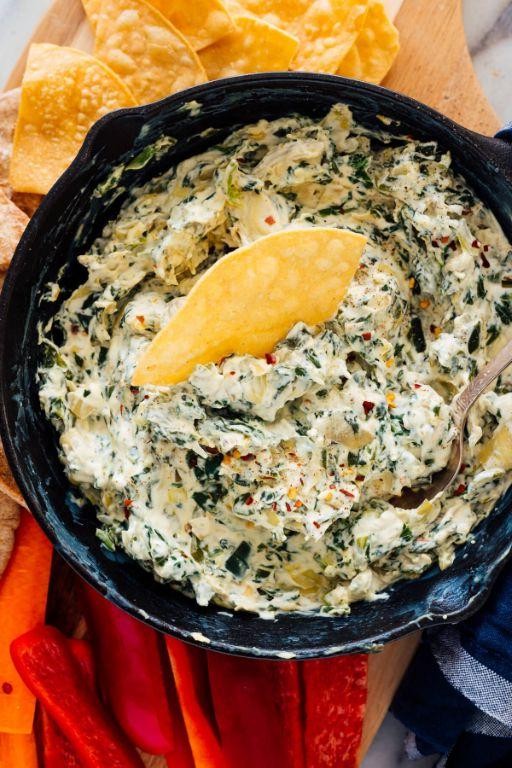
This creamy spinach and artichoke dip transforms simple ingredients into an elegant appetizer that’s perfect for gatherings. Today we’ll walk through each step methodically to ensure your dip achieves the perfect balance of creamy texture and vibrant flavor.
8
servings25
minutes36
minutesIngredients
– 2 tablespoons clarified butter
– 1 cup finely diced yellow onion
– 3 cloves garlic, minced
– 10 ounces frozen chopped spinach, thawed and thoroughly squeezed
– 14 ounces artichoke hearts, drained and chopped
– 8 ounces cream cheese, softened to room temperature
– 1 cup full-fat sour cream
– 1 cup freshly grated Parmesan cheese
– 1/2 cup mayonnaise
– 1 teaspoon smoked paprika
– 1/2 teaspoon freshly ground black pepper
– 1/4 teaspoon cayenne pepper
Instructions
1. Preheat your oven to 375°F and lightly grease a 2-quart baking dish with clarified butter.
2. Heat the remaining clarified butter in a large skillet over medium heat until shimmering.
3. Add the finely diced yellow onion and cook for 5-7 minutes until translucent and fragrant.
4. Stir in the minced garlic and cook for exactly 1 minute until aromatic but not browned.
5. Add the thoroughly squeezed spinach and chopped artichoke hearts, cooking for 3 minutes while stirring constantly.
6. Transfer the vegetable mixture to a large mixing bowl and allow it to cool for 5 minutes.
7. Add the softened cream cheese to the bowl and mix until completely incorporated.
8. Fold in the full-fat sour cream, freshly grated Parmesan cheese, and mayonnaise until homogeneous.
9. Season the mixture with smoked paprika, freshly ground black pepper, and cayenne pepper, mixing thoroughly.
10. Spread the dip evenly into the prepared baking dish using a spatula.
11. Bake at 375°F for 20-25 minutes until the edges are bubbling and the surface is golden brown.
12. Remove from oven and let rest for 5 minutes before serving.
Now your dip should display a beautifully golden crust with a luxuriously creamy interior that clings perfectly to dippers. The subtle smokiness from the paprika complements the bright acidity of the artichokes, while the triple-cream base creates an irresistibly smooth texture. Consider serving this warm dip in individual ramekins with crostini or using it as an elegant filling for stuffed mushrooms at your next dinner party.
Hearty Beef Teriyaki Skewers

Venturing into Asian-inspired grilling brings us to these perfectly balanced beef skewers that masterfully blend sweet and savory flavors. Let’s walk through creating these tender, glazed delights that will transport your taste buds straight to your favorite Japanese restaurant.
8
skewers50
minutes13
minutesIngredients
– 1.5 pounds beef sirloin, cut into 1-inch cubes
– 1/2 cup naturally brewed soy sauce
– 1/4 cup mirin
– 3 tablespoons granulated sugar
– 2 tablespoons freshly grated ginger
– 2 garlic cloves, microplaned
– 1 tablespoon toasted sesame oil
– 2 teaspoons cornstarch
– 2 tablespoons cold filtered water
– 2 scallions, thinly sliced on the bias
– 1 tablespoon toasted white sesame seeds
Instructions
1. Combine 1/2 cup naturally brewed soy sauce, 1/4 cup mirin, 3 tablespoons granulated sugar, 2 tablespoons freshly grated ginger, and 2 microplaned garlic cloves in a medium saucepan.
2. Whisk the mixture over medium heat until the sugar completely dissolves, about 2 minutes.
3. Reserve 1/4 cup of the teriyaki marinade in a separate bowl for basting.
4. Place 1.5 pounds of beef sirloin cubes into the remaining marinade, ensuring each piece is fully coated.
5. Cover the bowl with plastic wrap and refrigerate for exactly 45 minutes to allow the flavors to penetrate the meat.
6. While the beef marinates, soak 8-10 bamboo skewers in cold water for 30 minutes to prevent burning.
7. Thread the marinated beef cubes onto the soaked skewers, leaving 1/4-inch space between each piece for even cooking.
8. Preheat your grill to 425°F, creating both direct and indirect heat zones.
9. Place the skewers over direct heat and grill for 3 minutes until visible grill marks form.
10. Flip the skewers and grill for another 3 minutes on the opposite side.
11. Move the skewers to indirect heat and brush with the reserved teriyaki sauce.
12. Continue grilling for 4-6 minutes until the internal temperature reaches 135°F for medium-rare.
13. Create the glaze by combining 2 teaspoons cornstarch with 2 tablespoons cold filtered water in the reserved marinade saucepan.
14. Bring the mixture to a simmer over medium heat, stirring constantly until it thickens to a glossy consistency, about 90 seconds.
15. Brush the thickened glaze over the cooked skewers during the final minute of grilling.
16. Transfer the skewers to a serving platter and garnish with thinly sliced scallions and toasted white sesame seeds. Lasting impressions come from the caramelized crust giving way to juicy, pink-centered beef that practically melts in your mouth. The glossy teriyaki glaze provides a perfect balance of sweet and salty notes that cling to every bite. Consider serving these skewers over steamed jasmine rice with quick-pickled vegetables for a complete meal that highlights the complex flavor profile.
Ultimate Chocolate Chip Cookie Ice Cream Sandwiches

Meticulously crafted chocolate chip cookies enveloping premium ice cream create the ultimate handheld dessert experience that balances crisp edges with chewy centers. This methodical approach ensures perfectly textured cookies that hold their shape when sandwiched, while professional techniques guarantee optimal flavor development. Follow these precise steps to achieve bakery-quality results in your own kitchen.
12
sandwiches25
minutes12
minutesIngredients
- 2¼ cups all-purpose flour, sifted
- 1 teaspoon baking soda
- 1 teaspoon fine sea salt
- 1 cup European-style unsalted butter, clarified and cooled to 68°F
- ¾ cup granulated sugar
- ¾ cup dark brown sugar, firmly packed
- 2 large pasture-raised eggs, lightly beaten
- 2 teaspoons pure vanilla extract
- 2 cups semisweet chocolate callets
- 1 quart premium vanilla bean ice cream, slightly softened
Instructions
- Preheat your conventional oven to 375°F and position racks in the upper and lower thirds.
- Line two heavy-gauge baking sheets with parchment paper.
- Whisk together sifted flour, baking soda, and fine sea salt in a medium mixing bowl.
- Cream clarified butter with granulated and dark brown sugars in a stand mixer fitted with paddle attachment on medium speed for exactly 3 minutes until pale and fluffy.
- Add lightly beaten pasture-raised eggs one at a time, mixing for 30 seconds after each addition until fully incorporated.
- Mix in pure vanilla extract until just combined.
- Gradually add dry ingredients to wet ingredients on low speed, mixing only until no flour streaks remain.
- Fold in semisweet chocolate callets using a silicone spatula until evenly distributed.
- Portion dough using a #20 cookie scoop (3 tablespoons) onto prepared baking sheets, spacing 2 inches apart.
- Bake for 10-12 minutes, rotating sheets halfway through, until edges are golden brown and centers appear slightly underdone.
- Transfer cookies to wire racks and cool completely to room temperature, about 45 minutes.
- Scoop slightly softened premium vanilla bean ice cream onto flat side of one cooled cookie using a 2-ounce ice cream scoop.
- Press second cookie flat side down onto ice cream until filling reaches edges.
- Immediately wrap each sandwich tightly in parchment paper and freeze for minimum 4 hours until firm.
Heavenly texture contrasts emerge between the crisp cookie exterior and creamy ice cream center, while the vanilla bean specks complement the deep chocolate notes. For an elegant presentation, roll the ice cream edges in crushed toasted pecans or drizzle with warm chocolate ganache before serving. These sandwiches maintain perfect structural integrity straight from the freezer, making them ideal for outdoor gatherings or sophisticated dessert platters.
Conclusion
Outstanding game day feasts start here! These 26 tailgate recipes will transform your football gatherings into unforgettable celebrations. Whether you’re hosting a crowd or just cheering from home, these crowd-pleasing dishes guarantee delicious success. Try your favorites, then come back and tell us which recipes scored big with your crew! Don’t forget to pin this article to your game day board for easy reference all season long.


