Baking delicious desserts without sugar might sound impossible, but we’re here to prove it’s not only doable—it’s delightful! Whether you’re cutting back on sugar or just craving something naturally sweet, these 20 sugar-free recipes are perfect for easy, satisfying treats. From rich chocolate cakes to fruity delights, get ready to indulge guilt-free. Let’s dive in and discover your new favorite dessert!
Almond Flour Sugar-Free Brownies
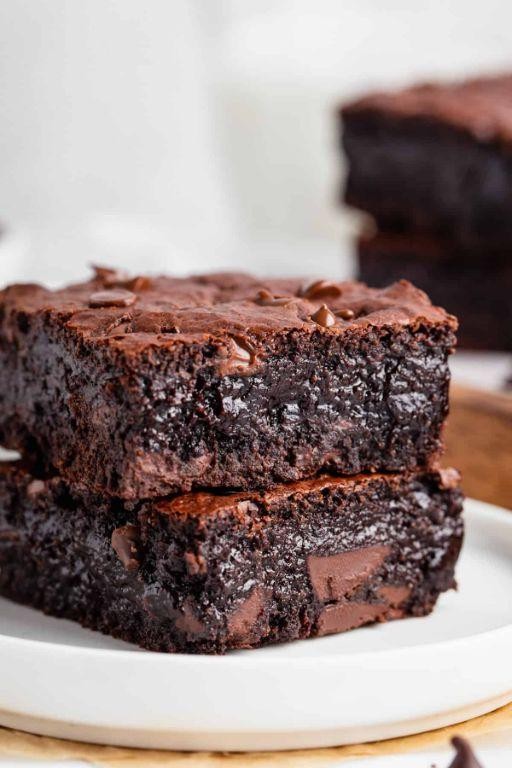
Very rarely do I find a dessert that satisfies my sweet tooth without the sugar crash, but these almond flour brownies are a game-changer—I whipped them up last weekend when my neighbor dropped by unexpectedly, and we ended up devouring the whole batch with our afternoon coffee. They’re so fudgy and rich, you’d never guess they’re sugar-free, and they’ve become my go-to for guilt-free indulgence when I’m craving something chocolatey but want to keep things light. Honestly, I love how simple they are to make, even on a busy weeknight, and they always impress anyone who tries them, from my keto friends to my kids who just think they’re ‘mom’s special brownies.’
Serving: 9 | Pre Time: 15 minutes | Cooking Time: 25 minutes
Ingredients
– 2 cups of almond flour, which gives that lovely nutty base
– ½ cup of unsweetened cocoa powder for that deep chocolate kick
– 1 teaspoon of baking powder to help them rise just right
– A pinch of salt to balance the flavors
– 3 large eggs, beaten until they’re nice and frothy
– ½ cup of melted coconut oil, which adds moisture without being heavy
– ½ cup of your favorite sugar-free sweetener—I use erythritol, but any granulated one works
– 1 teaspoon of vanilla extract for a hint of warmth
– A splash of almond milk if the batter feels too thick, though I often skip it
– A handful of sugar-free chocolate chips for extra gooey pockets, because why not?
Instructions
1. Preheat your oven to 350°F and grab an 8×8-inch baking pan, lining it with parchment paper for easy cleanup—trust me, this saves so much scrubbing later.
2. In a medium bowl, whisk together the almond flour, cocoa powder, baking powder, and salt until everything’s evenly combined and no lumps remain.
3. In a separate large bowl, crack the eggs and beat them with a fork or whisk for about 30 seconds until they’re lightly frothy and uniform in color.
4. Pour the melted coconut oil into the eggs, then add the sugar-free sweetener and vanilla extract, stirring vigorously until the mixture is smooth and well-blended.
5. Tip: If the batter seems too thick or dry at this point, add a splash of almond milk and mix it in—this helps achieve that perfect fudgy texture without overmixing.
6. Gradually add the dry ingredients from the medium bowl to the wet mixture, folding gently with a spatula until just combined; overmixing can make the brownies dense, so stop as soon as you see no flour streaks.
7. Fold in the sugar-free chocolate chips, distributing them evenly throughout the batter for those delightful melty bits in every bite.
8. Pour the batter into the prepared pan, using the spatula to spread it into an even layer and smooth the top.
9. Bake in the preheated oven for 20-25 minutes; start checking at 20 minutes by inserting a toothpick into the center—it should come out with a few moist crumbs, not wet batter, as they’ll firm up as they cool.
10. Tip: Let the brownies cool completely in the pan on a wire rack for at least 30 minutes before cutting; this prevents them from crumbling and makes slicing into neat squares a breeze.
11. Once cooled, lift them out using the parchment paper, slice into 9 squares, and serve immediately or store in an airtight container.
12. Tip: For an extra treat, I sometimes warm a square in the microwave for 10 seconds and top it with a dollop of whipped cream or a sprinkle of sea salt—it brings out the chocolate flavor even more.
Ultimately, these brownies come out incredibly moist and dense, with a rich chocolatey depth that doesn’t taste ‘diet’ at all; the almond flour adds a subtle nuttiness that pairs perfectly with the gooey chocolate chips. I love serving them slightly warm with a scoop of sugar-free ice cream for a decadent dessert, or even crumbling them over yogurt for a breakfast twist—they’re versatile enough to enjoy any time of day.
Keto Cheesecake with Berry Topping
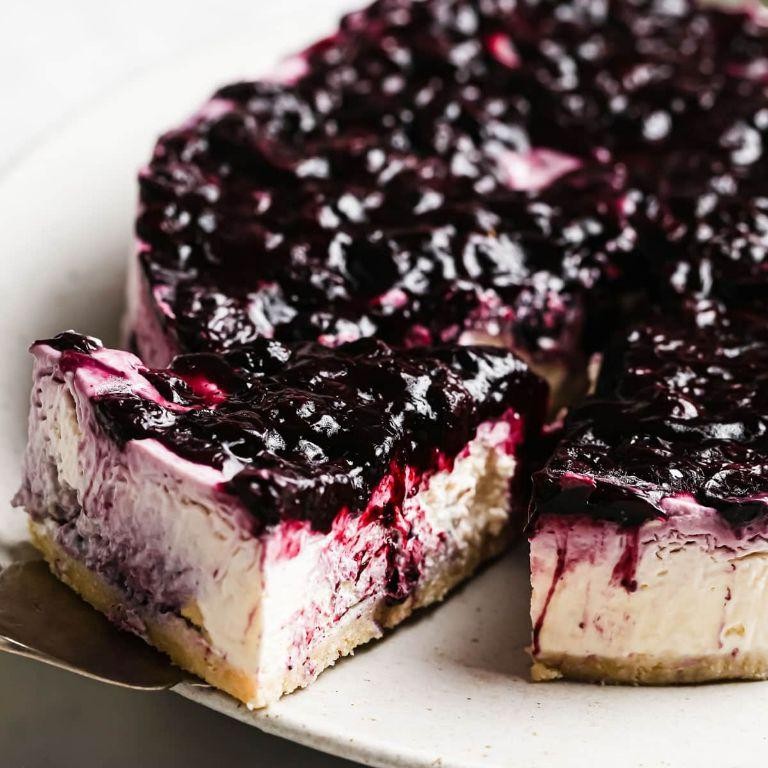
A few weeks ago, I was craving something sweet but wanted to stick to my keto goals—enter this dreamy cheesecake that’s become my go-to treat. Honestly, it’s so rich and creamy, you won’t believe it’s low-carb, and that berry topping adds just the right touch of freshness to balance it all out. I love making it on Sundays to have slices ready for the week ahead (if it lasts that long!).
Serving: 8 | Pre Time: 20 minutes | Cooking Time: 50 minutes
Ingredients
– For the crust: about 2 cups of almond flour, ⅓ cup of melted unsalted butter, and a couple of tablespoons of granulated erythritol.
– For the filling: 2 packages (16 ounces total) of full-fat cream cheese at room temperature, ¾ cup of granulated erythritol, 3 large eggs, a splash of vanilla extract, and ½ cup of sour cream.
– For the topping: 2 cups of mixed fresh berries (like strawberries and blueberries), ¼ cup of water, and 2 tablespoons of granulated erythritol.
Instructions
1. Preheat your oven to 350°F and grab a 9-inch springform pan—I always line the bottom with parchment paper to prevent sticking.
2. In a medium bowl, mix the almond flour, melted butter, and 2 tablespoons of erythritol until it looks like wet sand.
3. Press the crust mixture firmly into the bottom of the pan, using a flat-bottomed cup to even it out, then bake for 10 minutes until lightly golden. Tip: Let the crust cool completely before adding the filling to avoid a soggy bottom.
4. In a large bowl, beat the cream cheese with an electric mixer on medium speed for 2 minutes until smooth and fluffy.
5. Add ¾ cup of erythritol to the cream cheese and beat for another minute until well combined.
6. Crack in the eggs one at a time, beating after each addition just until incorporated—overmixing can cause cracks, so go easy here.
7. Stir in the vanilla extract and sour cream by hand until the filling is silky and uniform.
8. Pour the filling over the cooled crust and smooth the top with a spatula.
9. Bake the cheesecake at 350°F for 45–50 minutes; the edges should be set, but the center will still jiggle slightly when you gently shake the pan. Tip: Place a pan of water on the oven rack below to create steam and prevent cracking.
10. Turn off the oven, crack the door open, and let the cheesecake cool inside for 1 hour to set slowly.
11. While it cools, make the topping: in a small saucepan, combine the berries, water, and 2 tablespoons of erythritol, then simmer over medium heat for 8–10 minutes until the berries break down and the sauce thickens. Tip: Mash some berries with a fork for a chunkier texture if you like.
12. Remove the cheesecake from the oven, let it cool to room temperature, then refrigerate for at least 4 hours or overnight.
13. Once chilled, run a knife around the edges, release the springform pan, and spoon the berry topping over the cheesecake before serving.
Every bite of this keto cheesecake is luxuriously smooth with a nutty crust that holds up beautifully, and the berry sauce adds a tangy sweetness that cuts through the richness. I sometimes sprinkle a little lemon zest on top for an extra zing, or serve it with a dollop of whipped cream for a truly indulgent dessert that feels anything but restrictive.
No-Bake Peanut Butter Bars
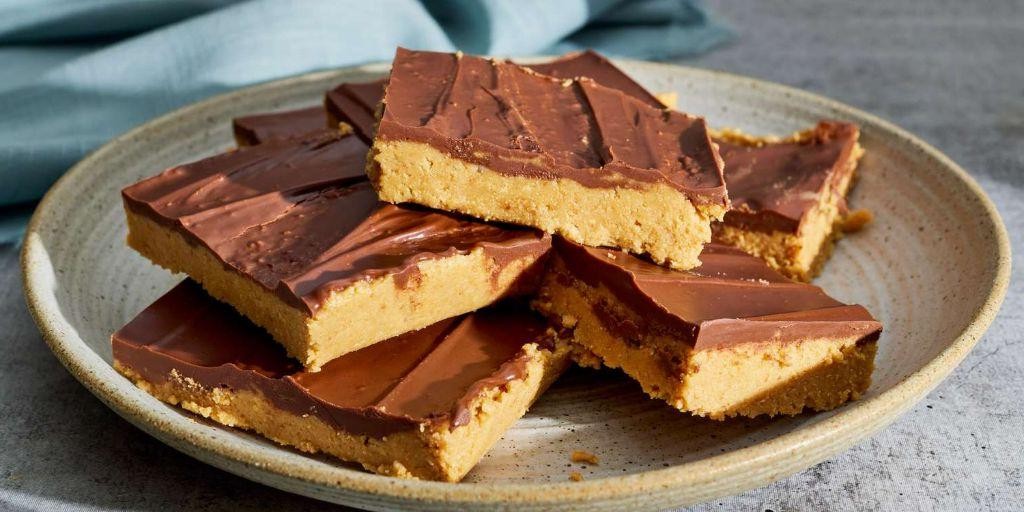
Haven’t we all had those days where we crave something sweet but can’t bear the thought of turning on the oven? I certainly have—especially during those sweltering summer afternoons when my kitchen feels like a sauna. That’s exactly why these No-Bake Peanut Butter Bars have become my go-to treat; they come together in minutes with just a few pantry staples, and the rich, creamy result always feels like a little victory.
Serving: 16 | Pre Time: 15 minutes | Cooking Time: 0 minutes
Ingredients
– 2 cups of graham cracker crumbs (I usually crush a whole sleeve—it’s oddly satisfying!)
– 1 cup of creamy peanut butter (go for the good stuff, not the natural kind that separates)
– 1/2 cup of unsalted butter, softened (just leave it on the counter for 30 minutes)
– 2 cups of powdered sugar (sifted if you’re feeling fancy, but I often skip it)
– A 12-ounce bag of semi-sweet chocolate chips
– A splash of milk or cream (about 2 tablespoons, for smoothing things out)
Instructions
1. Line an 8×8-inch baking pan with parchment paper, letting the edges hang over for easy removal later.
2. In a large mixing bowl, combine the graham cracker crumbs, creamy peanut butter, softened butter, and powdered sugar.
3. Use a wooden spoon or your hands to mix everything until it forms a thick, crumbly dough that holds together when pressed. Tip: If the mixture seems too dry, add a teaspoon of milk at a time until it comes together.
4. Press the dough evenly into the prepared pan, using the bottom of a glass to smooth it into a compact layer.
5. In a microwave-safe bowl, melt the chocolate chips with the splash of milk or cream in 30-second intervals, stirring between each, until smooth and glossy. Tip: Don’t overheat the chocolate—it can seize up and become grainy.
6. Pour the melted chocolate over the peanut butter layer, spreading it evenly with a spatula to cover completely.
7. Let the bars chill in the refrigerator for at least 2 hours, or until the chocolate is fully set. Tip: For faster setting, pop them in the freezer for 30 minutes, but don’t forget about them!
8. Once firm, use the parchment paper to lift the slab out of the pan and cut it into 16 even squares with a sharp knife.
Oozing with peanut butter goodness and topped with a crackly chocolate shell, these bars strike the perfect balance between fudgy and crisp. I love serving them straight from the fridge for a cool, satisfying bite, or crumbling one over vanilla ice cream for an indulgent twist. Trust me, they disappear fast—I’ve learned to hide a few in the back for myself!
Lemon Coconut Energy Bites
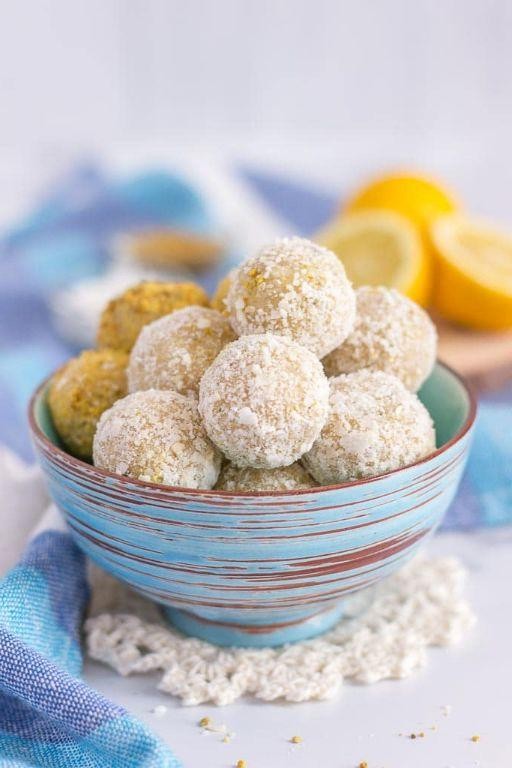
Gosh, I don’t know about you, but my afternoons always seem to hit a slump right around 3 PM. That’s when I crave something sweet, energizing, and easy to grab—no baking required. These lemon coconut energy bites have become my go-to solution, and I love whipping up a batch on Sunday to get me through the week.
Serving: 12 bites | Pre Time: 15 minutes | Cooking Time: 0 minutes
Ingredients
– 1 cup of old-fashioned rolled oats (not the quick-cook kind)
– 1/2 cup of creamy almond butter, straight from the jar
– 1/3 cup of pure maple syrup, the good sticky stuff
– A generous 1/4 cup of unsweetened shredded coconut, plus a little extra for rolling
– The zest from one large, bright lemon (about 1 tablespoon)
– A big pinch of fine sea salt
– A splash of pure vanilla extract, about 1 teaspoon
Instructions
1. In a medium mixing bowl, combine the 1 cup of rolled oats, 1/2 cup of almond butter, 1/3 cup of maple syrup, 1/4 cup of shredded coconut, the zest from one lemon, a pinch of salt, and 1 teaspoon of vanilla extract.
2. Use a sturdy spatula or your clean hands to mix everything together until it’s fully combined and forms a thick, sticky dough. Tip: If the mixture seems too dry to hold together, add another tablespoon of maple syrup.
3. Place the bowl with the dough in your refrigerator for 15 minutes. This chills the fats and makes the dough much easier to handle and roll.
4. While the dough chills, spread about 2 tablespoons of extra shredded coconut on a small plate or piece of parchment paper.
5. Remove the dough from the fridge. Use a tablespoon or a small cookie scoop to portion the dough, rolling each portion between your palms to form a smooth, round ball about 1 inch in diameter. Tip: Lightly dampen your hands with water to prevent the sticky dough from clinging.
6. Roll each finished ball in the reserved shredded coconut on the plate until lightly coated on all sides.
7. Place the finished energy bites on a plate or baking sheet lined with parchment paper. Tip: For best texture, let them set in the refrigerator for at least 1 hour before serving to allow the flavors to meld and the bites to firm up.
8. Transfer the bites to an airtight container. They can be stored in the refrigerator for up to 2 weeks.
You’ll love the chewy texture from the oats paired with the bright, zesty pop of lemon. Yes, these bites are fantastic straight from the fridge, but I also love crumbling one over a bowl of vanilla yogurt for a quick breakfast or packing a couple in my bag for a hike.
Dark Chocolate Avocado Mousse
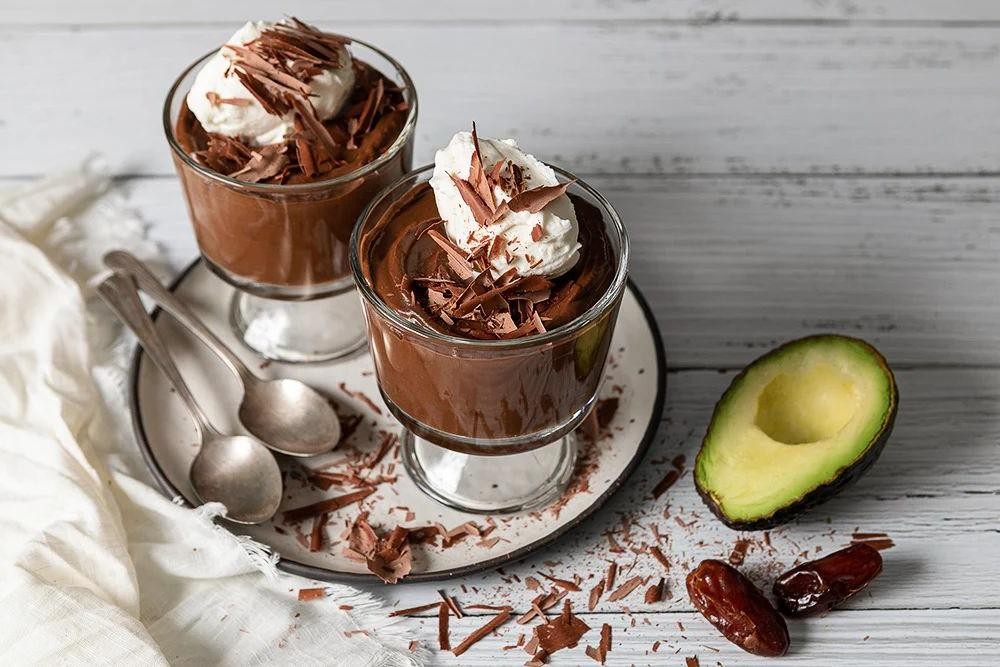
Unbelievably, I discovered this rich, velvety dessert while trying to sneak more greens into my kids’ diets—it’s now our favorite guilt-free treat after a long day. Honestly, I was skeptical about avocado in dessert, but one bite of this creamy mousse made me a believer, and it’s become my go-to for impressing guests without spending hours in the kitchen.
Serving: 4 | Pre Time: 15 minutes | Cooking Time: 0 minutes
Ingredients
- 2 ripe avocados, pitted and scooped out (look for ones that yield slightly to gentle pressure)
- 1/2 cup of dark chocolate chips (I use 70% cacao for that deep flavor)
- 1/4 cup of pure maple syrup (a good glug from the bottle works)
- 1/4 cup of unsweetened cocoa powder
- 1 teaspoon of vanilla extract (just a splash for aroma)
- A pinch of salt (like a tiny sprinkle from your fingers)
- Optional: a couple of tablespoons of almond milk if you want it extra smooth
Instructions
- Place the dark chocolate chips in a microwave-safe bowl and microwave them in 30-second intervals, stirring after each interval, until fully melted and smooth—this usually takes about 1 to 1.5 minutes total.
- Tip: To prevent the chocolate from seizing, make sure no water gets into the bowl during melting.
- Add the pitted and scooped avocado flesh to a food processor or high-speed blender.
- Pour the melted dark chocolate over the avocados in the processor.
- Add the pure maple syrup, unsweetened cocoa powder, vanilla extract, and a pinch of salt to the mixture.
- Blend everything on high speed for 1 to 2 minutes, scraping down the sides with a spatula halfway through, until the mixture is completely smooth and no avocado chunks remain.
- Tip: If the mousse seems too thick, add a tablespoon of almond milk at a time and blend again until it reaches your desired consistency—this helps avoid a grainy texture.
- Taste the mousse and adjust sweetness if needed by blending in an extra teaspoon of maple syrup, but avoid over-blending to keep it airy.
- Divide the mousse evenly among four serving glasses or bowls.
- Cover the glasses with plastic wrap and refrigerate them for at least 30 minutes to let the mousse set and flavors meld together.
- Tip: For best results, chill it for up to 2 hours; this allows the mousse to firm up nicely without becoming too hard.
- Serve the mousse chilled, straight from the refrigerator.
My favorite part? This mousse has an incredibly silky texture that melts in your mouth, with a deep chocolate flavor that’s not overly sweet—it’s like a decadent pudding but lighter. I love topping it with fresh berries or a sprinkle of sea salt for a fancy touch, and it’s so versatile you can even spread it on toast for a breakfast treat. Honestly, it’s the kind of dessert that makes you forget it’s packed with healthy fats, and it always disappears fast in my house!
Sugar-Free Vanilla Mug Cake
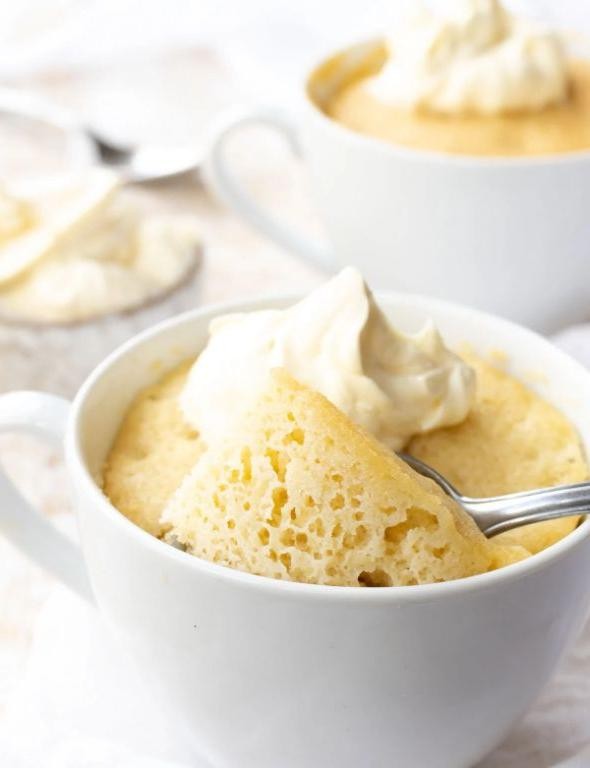
Haven’t you ever had one of those nights where you’re craving something sweet and cozy, but you don’t want to commit to a whole batch of baking? That’s exactly where I found myself last Tuesday after a long day, and this little mug cake was my saving grace—no sugar needed, just pure vanilla comfort in minutes.
Serving: 1 | Pre Time: 2 minutes | Cooking Time: 1 minute
Ingredients
– A quarter cup of all-purpose flour
– A couple of tablespoons of your favorite sugar-free sweetener (I use erythritol)
– A quarter teaspoon of baking powder
– A tiny pinch of salt
– Three tablespoons of milk (any kind works—I go for almond)
– A tablespoon of melted butter or oil
– A splash of vanilla extract
– One egg white (save the yolk for another recipe!)
Instructions
1. Grab a microwave-safe mug—I like one that holds about 12 ounces so it doesn’t overflow.
2. Add the quarter cup of all-purpose flour, two tablespoons of sugar-free sweetener, quarter teaspoon of baking powder, and a tiny pinch of salt directly into the mug.
3. Use a fork to whisk the dry ingredients together right in the mug until they’re evenly mixed; this helps avoid lumps later.
4. Pour in three tablespoons of milk, one tablespoon of melted butter or oil, a splash of vanilla extract, and the egg white.
5. Stir everything vigorously with the fork for about 30 seconds until the batter is smooth and no dry spots remain—tip: scrape the bottom and sides to get it all incorporated.
6. Microwave the mug on high for 60 seconds exactly; it should puff up and look set on top when done.
7. Let it cool in the mug for a minute or two before digging in—tip: this keeps it from being too hot and helps the texture firm up a bit.
8. Enjoy it straight from the mug or tip it onto a plate if you prefer.
You’ll love how this cake turns out fluffy and moist, with a warm vanilla aroma that fills the kitchen. I sometimes top mine with a dollop of whipped cream or a sprinkle of cinnamon for an extra treat—perfect for those impromptu dessert moments!
Raspberry Chia Seed Pudding
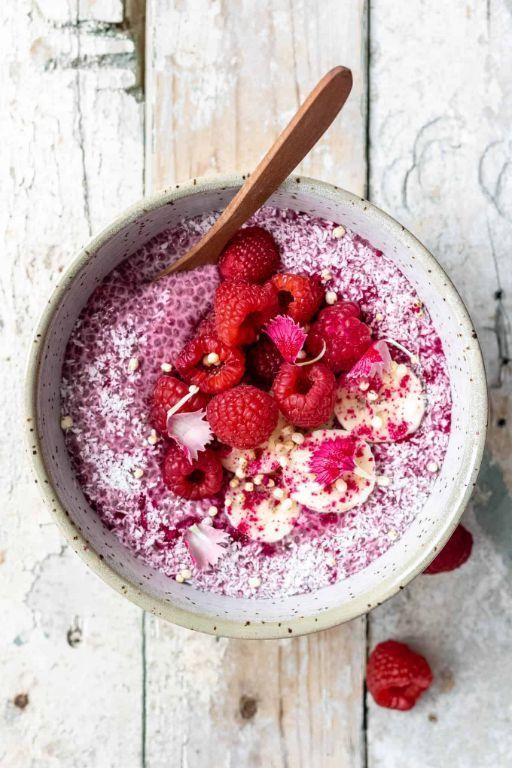
Browsing through my recipe notebook this morning, I stumbled upon my all-time favorite make-ahead breakfast—raspberry chia seed pudding. It’s the kind of simple, nourishing dish I whip up on Sunday evenings to set myself up for a smooth week ahead, and honestly, it feels like a little hug in a jar every time I dig in. Trust me, once you try this creamy, fruity delight, you’ll be hooked just like I am!
Serving: 2 | Pre Time: 5 minutes | Cooking Time: 0 minutes
Ingredients
– 1/2 cup of chia seeds (I love how they puff up!)
– 1 cup of unsweetened almond milk, or whatever milk you have on hand
– A big handful of fresh raspberries, about 1/2 cup
– 1 tablespoon of pure maple syrup, for a touch of sweetness
– A tiny splash of vanilla extract, maybe 1/2 teaspoon
– A pinch of salt, to balance the flavors
Instructions
1. Grab a medium-sized mixing bowl and pour in 1/2 cup of chia seeds.
2. Add 1 cup of unsweetened almond milk to the bowl with the chia seeds.
3. Tip: Give the mixture a good whisk right away to prevent the chia seeds from clumping together—this ensures a smooth pudding later.
4. Stir in 1 tablespoon of pure maple syrup until it’s fully combined with the milk and chia seeds.
5. Add a tiny splash of vanilla extract, about 1/2 teaspoon, and a pinch of salt to the bowl.
6. Gently fold in a big handful of fresh raspberries, roughly 1/2 cup, mashing them slightly with a fork to release their juices and create a pretty pink swirl.
7. Cover the bowl tightly with plastic wrap or a lid to keep it fresh.
8. Place the covered bowl in the refrigerator and let it chill for at least 4 hours, or ideally overnight, so the chia seeds can fully absorb the liquid and thicken.
9. Tip: If you’re in a rush, give the pudding a stir after 30 minutes to help it set faster—it won’t be as thick, but it’ll still be delicious!
10. Once chilled, remove the bowl from the refrigerator and give the pudding a final stir to check the consistency; it should be thick and creamy, like a custard.
11. Tip: For an extra burst of flavor, top each serving with a few extra fresh raspberries right before eating—it adds a lovely freshness and color.
12. Divide the pudding evenly between two serving jars or bowls, and it’s ready to enjoy!
Gliding my spoon through this pudding, I’m always amazed by its velvety texture and the bright, tangy pop from the raspberries. It’s perfect straight from the fridge on a busy morning, or get creative by layering it with granola and a drizzle of honey for a decadent parfait—either way, it’s a breakfast win that feels both indulgent and wholesome.
Vegan Chocolate Chip Cookies
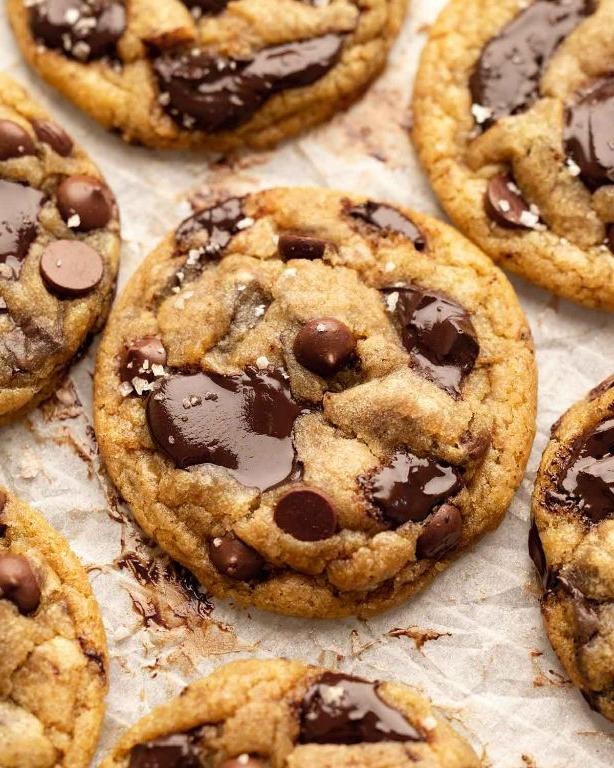
Whenever I’m craving something sweet but want to keep it plant-based, these vegan chocolate chip cookies are my absolute go-to. They’re the perfect blend of chewy and crisp, and honestly, I’ve fooled more than one non-vegan friend with this recipe. I love whipping up a batch on lazy Sunday afternoons—the smell alone is pure comfort.
Serving: 12 | Pre Time: 15 minutes | Cooking Time: 12 minutes
Ingredients
– A couple of cups of all-purpose flour
– A good scoop of baking soda
– A generous pinch of salt
– A stick of vegan butter, softened (I like the Earth Balance brand)
– About three-quarters of a cup of brown sugar, packed
– A quarter cup of granulated sugar
– A splash of vanilla extract
– A quarter cup of unsweetened almond milk
– A heaping cup of vegan chocolate chips
Instructions
1. Preheat your oven to 350°F and line two baking sheets with parchment paper.
2. In a medium bowl, whisk together the all-purpose flour, baking soda, and salt until well combined.
3. In a large mixing bowl, use an electric mixer to cream the softened vegan butter, brown sugar, and granulated sugar together for about 2 minutes, until light and fluffy.
4. Add the vanilla extract and almond milk to the butter-sugar mixture, and mix on low speed until just incorporated.
5. Gradually add the dry flour mixture to the wet ingredients, mixing on low until a soft dough forms, being careful not to overmix.
6. Gently fold in the vegan chocolate chips with a spatula until evenly distributed throughout the dough.
7. Scoop out tablespoon-sized portions of dough and roll them into balls, placing them about 2 inches apart on the prepared baking sheets.
8. Bake in the preheated oven for 10-12 minutes, until the edges are golden brown but the centers still look slightly soft.
9. Remove the baking sheets from the oven and let the cookies cool on the sheets for 5 minutes before transferring them to a wire rack to cool completely.
Just out of the oven, these cookies have a wonderfully soft, chewy center with crisp edges that hold up perfectly. I love serving them warm with a glass of cold almond milk, or crumbling them over dairy-free ice cream for an extra-decadent treat—they’re so good, you won’t even miss the dairy!
Spiced Pumpkin Pie with Almond Crust

Venturing into my kitchen on this crisp December day, I’m reminded of cozy holiday gatherings where a homemade pumpkin pie always steals the show. This spiced version with an almond crust is my go-to for its nutty twist and warm, comforting flavors—it’s the kind of dessert that makes everyone ask for seconds, and I love how simple it is to pull together, even on busy evenings.
Serving: 8 | Pre Time: 20 minutes | Cooking Time: 50 minutes
Ingredients
– A cup and a half of almond flour for that nutty crust
– A couple of tablespoons of melted butter to bind it all together
– A pinch of salt to balance the sweetness
– A 15-ounce can of pumpkin puree (I always grab the plain kind)
– Three-quarters of a cup of granulated sugar for just the right sweetness
– Two large eggs to give it that creamy texture
– A splash of heavy cream, about half a cup
– A teaspoon each of cinnamon and nutmeg for that classic spiced kick
– Half a teaspoon of ginger for a little extra warmth
Instructions
1. Preheat your oven to 350°F (175°C) to get it nice and toasty.
2. In a medium bowl, mix the almond flour, melted butter, and salt until it forms a crumbly dough—tip: if it’s too dry, add a tiny bit more butter until it holds together when pressed.
3. Press the dough evenly into a 9-inch pie dish, going up the sides, and bake for 10 minutes until lightly golden; this pre-baking helps prevent a soggy crust.
4. In a large bowl, whisk together the pumpkin puree, granulated sugar, eggs, heavy cream, cinnamon, nutmeg, and ginger until smooth and well combined.
5. Pour the pumpkin mixture into the pre-baked crust, smoothing the top with a spatula.
6. Bake the pie at 350°F for 40-50 minutes, or until the center is set and a knife inserted comes out clean—tip: if the edges brown too quickly, cover them loosely with foil.
7. Let the pie cool completely on a wire rack for at least 2 hours to firm up before slicing.
8. Serve chilled or at room temperature, and for an extra touch, I like to top it with a dollop of whipped cream.
Hearty and aromatic, this pie boasts a creamy, spiced filling that pairs perfectly with the crunchy almond crust. I often serve it with a drizzle of caramel or alongside a hot cup of coffee for a cozy treat that’s sure to impress at any gathering.
Coconut Milk Rice Pudding
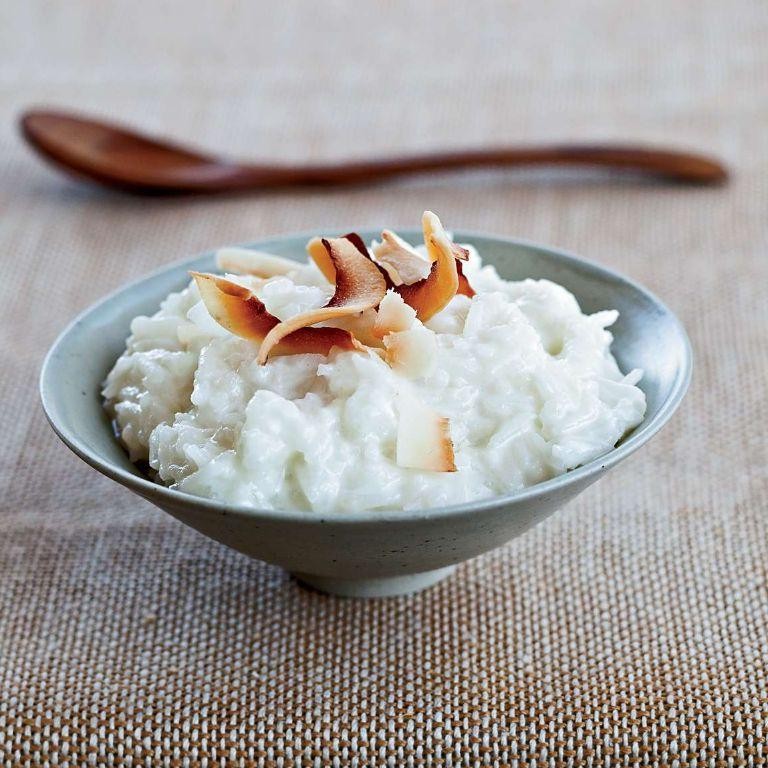
Venturing into my kitchen on a chilly evening, I was craving something cozy yet tropical—enter this dreamy Coconut Milk Rice Pudding. It’s my go-to when I want a dessert that feels indulgent but is surprisingly simple to whip up, and it always reminds me of a beach vacation I took years ago where I first fell in love with coconut-infused treats.
Serving: 6 | Pre Time: 5 minutes | Cooking Time: 45 minutes
Ingredients
– 1 cup of short-grain white rice (I like using Arborio for that creamy texture)
– 4 cups of full-fat coconut milk (about two cans—go for the good stuff!)
– 1/2 cup of granulated sugar (just enough to sweeten it up without overpowering)
– A pinch of salt (trust me, it makes all the difference)
– 1 teaspoon of vanilla extract (a splash for that warm, aromatic kick)
– A couple of cinnamon sticks (optional, but they add such a cozy vibe)
– A handful of toasted coconut flakes for topping (because crunch is everything)
Instructions
1. Rinse 1 cup of short-grain white rice under cold water in a fine-mesh strainer until the water runs clear—this removes excess starch and prevents clumping.
2. In a medium saucepan, combine the rinsed rice, 4 cups of full-fat coconut milk, 1/2 cup of granulated sugar, and a pinch of salt over medium heat.
3. Bring the mixture to a gentle boil, stirring occasionally to dissolve the sugar, which should take about 5 minutes.
4. Reduce the heat to low and add 1 teaspoon of vanilla extract and a couple of cinnamon sticks, if using, then simmer uncovered for 30–35 minutes, stirring every 5–10 minutes to prevent sticking—the pudding will thicken as it cooks.
5. Check for doneness by tasting a spoonful; the rice should be tender but not mushy, and the liquid should be mostly absorbed, leaving a creamy consistency.
6. Remove the saucepan from the heat and discard the cinnamon sticks, then let the pudding cool for 10 minutes to set further—it will continue to thicken as it sits.
7. Serve warm or chilled, topped with a handful of toasted coconut flakes for added texture and flavor.
8. Tip: For a richer taste, toast the coconut flakes in a dry skillet over medium heat for 2–3 minutes until golden brown, watching closely to avoid burning.
9. Tip: If the pudding seems too thick after cooling, stir in a splash of coconut milk to loosen it up to your preferred consistency.
10. Tip: Store leftovers in an airtight container in the fridge for up to 3 days; the flavors meld beautifully over time, making it even more delicious the next day.
You’ll love the velvety, creamy texture that melts in your mouth, with just the right hint of sweetness from the coconut milk. Try serving it with fresh mango slices or a drizzle of honey for a tropical twist that’ll transport you straight to paradise.
No-Sugar-Added Banana Bread
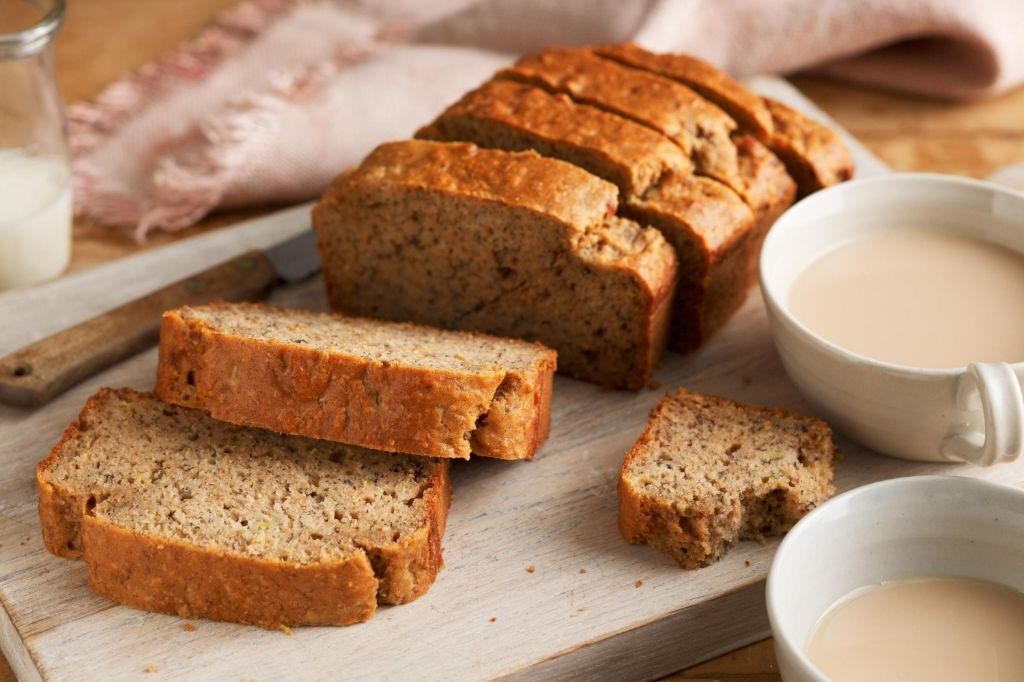
Diving into my kitchen this afternoon, I realized I had a bunch of overripe bananas begging to be used—you know the ones, almost black and super sweet. It was the perfect excuse to whip up my favorite no-sugar-added banana bread, a recipe I’ve tweaked over the years to satisfy my sweet tooth without the guilt. Honestly, there’s nothing cozier than the smell of this bread baking on a chilly day.
Serving: 8 | Pre Time: 15 minutes | Cooking Time: 60 minutes
Ingredients
– About 3 of those super ripe, spotty bananas (you’ll get roughly 1 and 1/2 cups mashed)
– A couple of large eggs
– A generous 1/3 cup of melted coconut oil
– A splash of pure vanilla extract, maybe 2 teaspoons
– 1 and 3/4 cups of whole wheat flour
– 1 teaspoon of baking soda
– A good pinch of salt, about 1/2 teaspoon
– A handful of chopped walnuts, around 3/4 cup (optional, but so good for crunch)
Instructions
1. Preheat your oven to 350°F and grease a 9×5-inch loaf pan with a bit of coconut oil or line it with parchment paper.
2. In a large mixing bowl, peel and mash those ripe bananas with a fork until smooth and no big chunks remain—this is key for even sweetness throughout the bread.
3. Crack in the two large eggs and whisk them into the mashed bananas until fully combined.
4. Pour in the melted coconut oil and the splash of vanilla extract, then stir everything together until the mixture looks uniform.
5. In a separate medium bowl, whisk together the whole wheat flour, baking soda, and that pinch of salt to ensure the leavening is evenly distributed.
6. Gradually add the dry ingredients to the wet banana mixture, folding gently with a spatula just until no flour streaks are visible; overmixing can make the bread dense, so stop as soon as it’s combined.
7. If using, fold in the chopped walnuts until they’re evenly scattered through the batter.
8. Pour the batter into your prepared loaf pan, smoothing the top with the spatula so it bakes evenly.
9. Place the pan in the preheated oven and bake for 55 to 60 minutes; to test for doneness, insert a toothpick into the center—it should come out clean or with just a few moist crumbs attached.
10. Remove the pan from the oven and let the bread cool in the pan on a wire rack for 10 minutes to set, then carefully turn it out to cool completely, which helps prevent it from getting soggy.
After cooling, this banana bread turns out wonderfully moist and dense, with a natural sweetness from the bananas that’s just right. I love slicing it thick and toasting it lightly for breakfast, or serving it warm with a smear of almond butter for an extra protein kick—it’s so satisfying you won’t miss the sugar at all.
Strawberry Yogurt Parfait
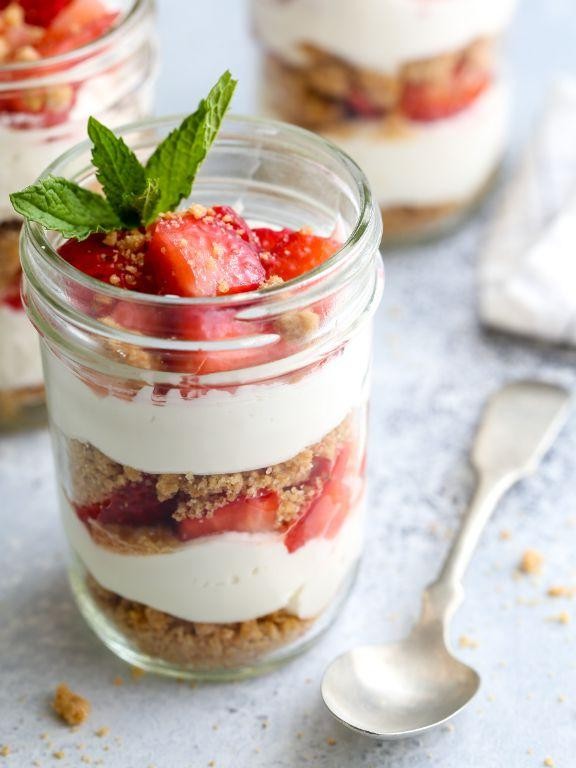
Vivid memories of summer picnics always make me crave something fresh and creamy, and this strawberry yogurt parfait is my go-to for a quick, satisfying treat. I love how it comes together in minutes but feels special enough for a weekend brunch or a sweet afternoon pick-me-up. Honestly, I’ve been known to make a double batch just to have leftovers for breakfast the next day—it’s that good!
Serving: 4 | Pre Time: 15 minutes | Cooking Time: 0 minutes
Ingredients
– A couple of cups of fresh strawberries, hulled and sliced
– A generous 2 cups of plain Greek yogurt
– A half cup of granola (I prefer the kind with almonds and honey)
– A drizzle of honey, about 2 tablespoons
– A splash of vanilla extract, roughly 1 teaspoon
– A pinch of salt, just to balance the sweetness
Instructions
1. Wash and hull 2 cups of fresh strawberries, then slice them into thin, even pieces—this ensures every bite has a bit of berry.
2. In a medium bowl, combine 2 cups of plain Greek yogurt with 1 teaspoon of vanilla extract and a pinch of salt, stirring until smooth and well-blended. Tip: Using full-fat yogurt gives a creamier texture that holds up better in the parfait.
3. Drizzle 2 tablespoons of honey into the yogurt mixture, folding it in gently to create a sweet, tangy base without overmixing.
4. Grab four serving glasses or jars and start layering: spoon about 2 tablespoons of the yogurt mixture into the bottom of each glass.
5. Add a layer of sliced strawberries on top of the yogurt, using roughly a quarter of the total strawberries per glass for even distribution.
6. Sprinkle 2 tablespoons of granola over the strawberries in each glass, pressing lightly to help it stick. Tip: Toasting the granola for 5 minutes at 350°F beforehand adds a nice crunch, but it’s optional if you’re short on time.
7. Repeat the layers—yogurt, strawberries, granola—once more in each glass, ending with a final dollop of yogurt on top.
8. Garnish each parfait with any remaining strawberry slices and a light sprinkle of granola for visual appeal. Tip: Assemble these just before serving to keep the granola from getting soggy; if prepping ahead, store the components separately in the fridge.
Absolutely delightful in its simplicity, this parfait offers a creamy contrast from the yogurt against the juicy burst of strawberries and the satisfying crunch of granola. For a fun twist, try swapping in different seasonal fruits like blueberries or peaches, or drizzle with a bit of melted dark chocolate for an extra indulgent touch.
Paleo Lemon Bars
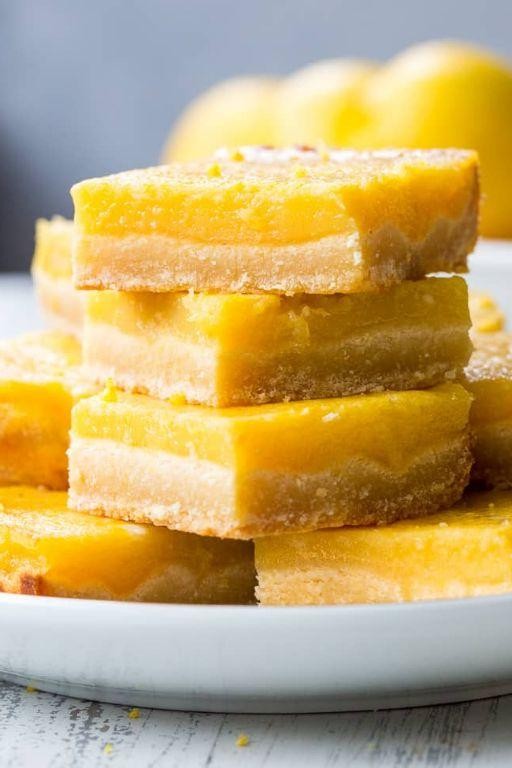
Diving into my kitchen this afternoon, I realized I needed a treat that felt indulgent yet wholesome—something to satisfy my sweet tooth without derailing my healthy eating goals. That’s when I remembered these Paleo Lemon Bars, a recipe I’ve tweaked over the years to get just right, perfect for when you’re craving something bright and zesty but want to keep it grain-free and refined sugar-free.
Serving: 12 | Pre Time: 20 minutes | Cooking Time: 25 minutes
Ingredients
– For the crust: about 2 cups of almond flour, a good ¼ cup of coconut oil (melted), a couple of tablespoons of maple syrup, and a pinch of salt.
– For the filling: 4 large eggs, the juice and zest from 3 lemons (you’ll get roughly ½ cup of juice), a ½ cup of maple syrup, a ¼ cup of coconut flour, and a splash of vanilla extract.
Instructions
1. Preheat your oven to 350°F and line an 8×8 inch baking pan with parchment paper, leaving some overhang for easy removal later—this little trick saves so much hassle!
2. In a medium bowl, mix the almond flour, melted coconut oil, 2 tablespoons of maple syrup, and a pinch of salt until it forms a crumbly dough.
3. Press the dough evenly into the bottom of the prepared pan, using your fingers or the back of a spoon to create a firm, compact layer.
4. Bake the crust for 10 minutes at 350°F, just until it starts to turn lightly golden around the edges—don’t overbake it, as it’ll go back in the oven later.
5. While the crust bakes, whisk together the eggs, lemon juice, lemon zest, ½ cup of maple syrup, coconut flour, and vanilla extract in a large bowl until smooth and well combined.
6. Pour the lemon filling over the hot crust immediately after removing it from the oven, spreading it evenly with a spatula.
7. Return the pan to the oven and bake at 350°F for 20–25 minutes, until the filling is set and doesn’t jiggle when you gently shake the pan—a toothpick inserted should come out clean.
8. Let the bars cool completely in the pan on a wire rack for at least 1 hour, then transfer to the refrigerator to chill for another 2 hours to firm up fully.
9. Once chilled, use the parchment paper overhang to lift the bars out of the pan, place them on a cutting board, and slice into 12 squares with a sharp knife wiped clean between cuts for neat edges.
Out of the fridge, these bars have a delightfully firm yet tender texture that melts in your mouth, with a tangy lemon punch balanced by the subtle sweetness of maple. I love serving them chilled with a dusting of extra lemon zest or alongside a cup of herbal tea for an afternoon pick-me-up—they’re so refreshing, you might just forget they’re Paleo!
Fruity Chia Popsicles
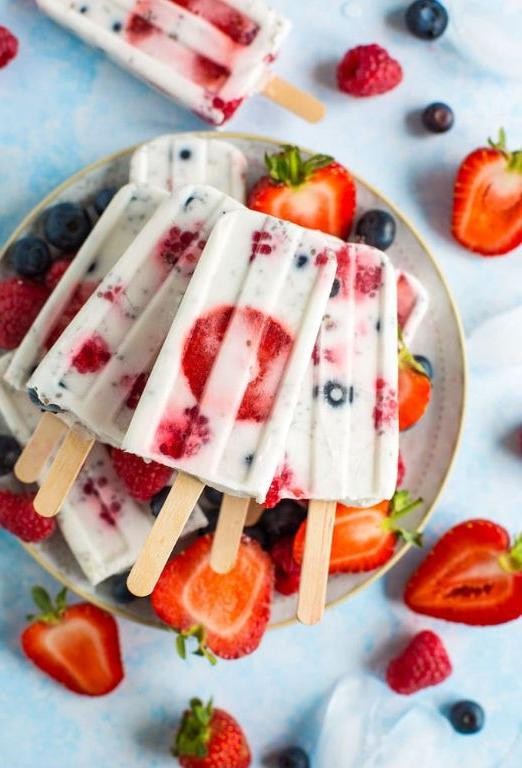
Just when I thought my freezer couldn’t hold another popsicle experiment, these fruity chia popsicles became my go-to summer treat. I started making them after a particularly hot day when my kids begged for something sweet but I wanted to keep it healthy—now they’re our favorite afternoon snack. Honestly, I love how simple they are to whip up while multitasking in the kitchen.
Serving: 6 | Pre Time: 10 minutes | Cooking Time: 0 minutes
Ingredients
– 2 cups of fresh strawberries, hulled and chopped
– 1 cup of plain Greek yogurt
– 2 tablespoons of chia seeds
– 1/4 cup of honey
– A splash of vanilla extract
– A couple of tablespoons of water, if needed
Instructions
1. In a blender, combine 2 cups of chopped strawberries, 1 cup of Greek yogurt, 2 tablespoons of chia seeds, 1/4 cup of honey, and a splash of vanilla extract.
2. Blend the mixture on high speed for about 30 seconds until it’s completely smooth and no strawberry chunks remain—tip: if it’s too thick, add a couple of tablespoons of water to help it blend easily.
3. Pour the blended mixture evenly into 6 popsicle molds, filling each mold to about 1/4 inch from the top to allow for expansion as it freezes.
4. Insert popsicle sticks into each mold, making sure they’re centered and straight so they don’t tilt while freezing.
5. Place the filled molds in the freezer and let them freeze for at least 6 hours, or overnight for best results—tip: I like to set a timer so I don’t forget about them!
6. Once fully frozen, remove the popsicles from the molds by running warm water over the outside for 10-15 seconds until they slide out easily—tip: be gentle to avoid breaking them.
Grab one of these popsicles on a warm day, and you’ll love the creamy texture from the yogurt paired with the subtle crunch of chia seeds. The strawberry flavor shines through with just the right sweetness, making them perfect for serving at backyard barbecues or as a refreshing dessert after dinner. Sometimes, I even sprinkle a little extra chia on top for added texture before freezing!
Zucchini Chocolate Chip Muffins
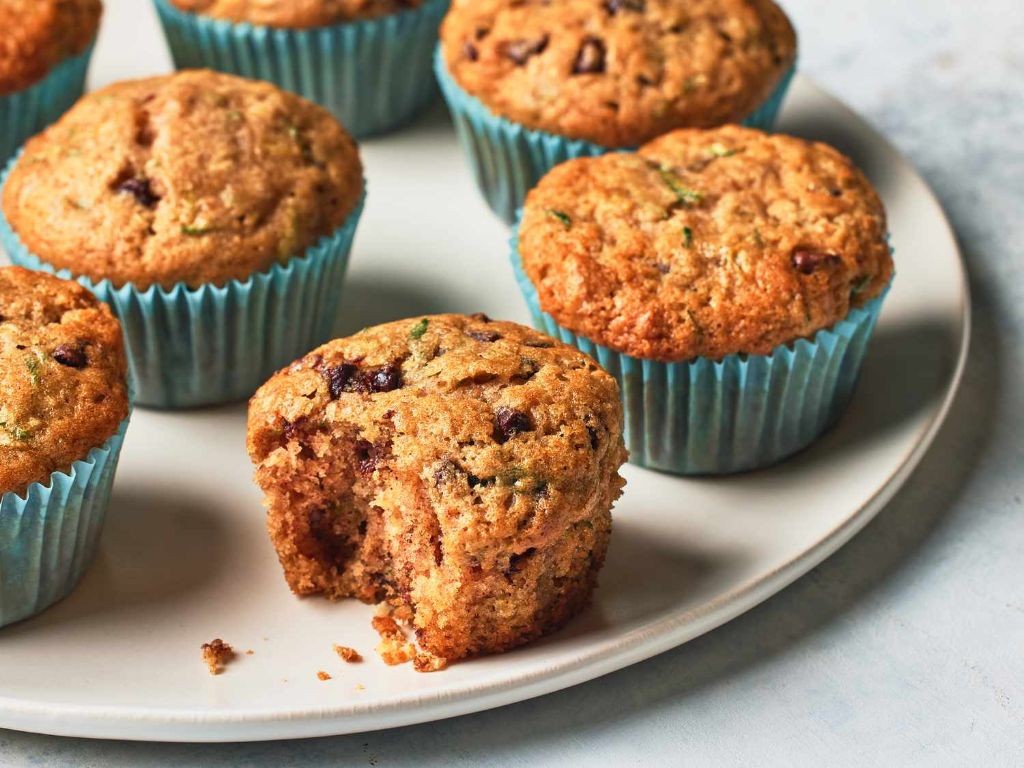
Baking these zucchini chocolate chip muffins always reminds me of my grandma’s kitchen—where sneaking veggies into sweets felt like a delicious secret. I love how the zucchini keeps them incredibly moist, and the chocolate chips make them feel like a treat, even for breakfast. Let’s get baking!
Serving: 12 | Pre Time: 15 minutes | Cooking Time: 25 minutes
Ingredients
– 2 cups of all-purpose flour, spooned and leveled
– 1 teaspoon of baking soda
– ½ teaspoon of baking powder
– ½ teaspoon of salt
– 1 teaspoon of ground cinnamon
– 2 large eggs, at room temperature
– ¾ cup of granulated sugar
– ½ cup of vegetable oil
– 1 teaspoon of vanilla extract
– 1 ½ cups of grated zucchini, squeezed dry with a kitchen towel
– 1 cup of semi-sweet chocolate chips
Instructions
1. Preheat your oven to 375°F and line a 12-cup muffin tin with paper liners.
2. In a medium bowl, whisk together the all-purpose flour, baking soda, baking powder, salt, and ground cinnamon until well combined.
3. In a large bowl, whisk the eggs until frothy, about 30 seconds.
4. Add the granulated sugar to the eggs and whisk vigorously until pale and slightly thickened, about 1 minute.
5. Pour in the vegetable oil and vanilla extract, whisking until fully incorporated.
6. Gently fold the grated zucchini into the wet ingredients using a spatula.
7. Tip: Squeezing the zucchini dry prevents the batter from getting too watery, ensuring fluffy muffins.
8. Gradually add the dry ingredients to the wet mixture, folding just until no flour streaks remain—overmixing can lead to tough muffins.
9. Fold in the semi-sweet chocolate chips until evenly distributed.
10. Divide the batter evenly among the muffin cups, filling each about ¾ full.
11. Tip: For taller muffin tops, let the batter rest in the tin for 5 minutes before baking.
12. Bake at 375°F for 20-25 minutes, or until a toothpick inserted into the center comes out clean with no wet batter.
13. Tip: Rotate the pan halfway through baking for even browning if your oven has hot spots.
14. Remove the muffins from the oven and let them cool in the tin for 5 minutes.
15. Transfer the muffins to a wire rack to cool completely, about 30 minutes.
Fresh from the oven, these muffins have a tender crumb with pockets of melty chocolate that pair perfectly with the subtle zucchini sweetness. I love serving them warm with a dollop of whipped cream for dessert or packing them in lunchboxes—they stay moist for days!
Conclusion
Lovingly crafted, these 20 sugar-free desserts prove that healthy baking can be absolutely delicious. We hope you’ve found some new favorites to try in your own kitchen! Don’t forget to leave a comment below telling us which recipe you’re most excited about, and be sure to share this roundup on Pinterest to inspire fellow home bakers. Happy baking!


