Ready to welcome spring’s vibrant flavors to your table? As the days grow longer and farmers’ markets burst with fresh produce, it’s the perfect time to explore light, colorful vegetarian dishes. From quick weeknight dinners to impressive weekend feasts, these recipes celebrate the season’s bounty in delicious ways. Let’s dive into these delightful springtime creations that will make your meals as fresh and inviting as the season itself!
Asparagus and Pea Risotto
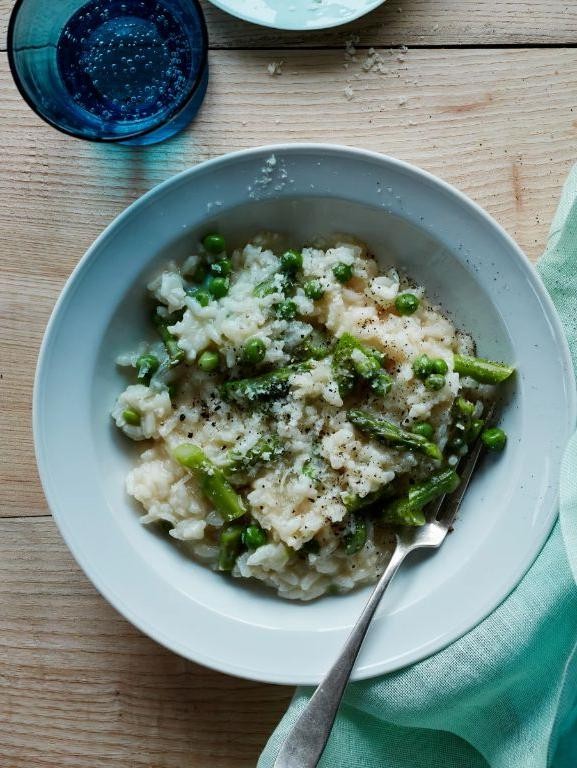
Zestful spring flavors come alive in this elegant risotto, where tender asparagus spears and sweet green peas create a vibrant celebration of the season. This creamy, comforting dish transforms humble ingredients into something truly special with proper technique and attention to detail.
3
servings15
minutes35
minutesIngredients
– 1 ½ cups Arborio rice (the high starch content creates that perfect creamy texture)
– 1 bunch fresh asparagus, trimmed and cut into 1-inch pieces (I always snap off the woody ends rather than cutting them)
– 1 cup fresh or frozen peas (frozen work beautifully here and maintain their bright green color)
– 1 medium yellow onion, finely diced (this forms the flavor foundation)
– 4 cups warm chicken or vegetable broth (keeping it warm prevents the rice from cooling)
– ½ cup dry white wine (I prefer Sauvignon Blanc for its crisp acidity)
– ½ cup grated Parmesan cheese, plus more for serving
– 3 tablespoons unsalted butter, divided
– 2 tablespoons extra virgin olive oil (my go-to for its fruity notes)
– 2 cloves garlic, minced
– 1 teaspoon lemon zest (this brightens all the flavors)
– Salt and freshly ground black pepper
Instructions
1. Heat the chicken broth in a medium saucepan over medium heat until it reaches a gentle simmer, then reduce heat to low to maintain warmth.
2. Melt 1 tablespoon butter with the olive oil in a large, heavy-bottomed pot over medium heat.
3. Add the diced onion and cook for 4-5 minutes until translucent and fragrant, stirring occasionally.
4. Add the minced garlic and cook for 1 minute until fragrant but not browned.
5. Add the Arborio rice and toast for 2 minutes, stirring constantly until the grains become slightly translucent around the edges.
6. Pour in the white wine and cook while stirring until the liquid is completely absorbed, about 2 minutes.
7. Add 1 cup of warm broth to the rice and stir continuously until the liquid is nearly absorbed.
8. Continue adding broth ½ cup at a time, stirring constantly and waiting until each addition is absorbed before adding the next.
9. After 15 minutes of adding broth, stir in the asparagus pieces and peas.
10. Continue adding remaining broth and stirring until the rice is al dente and the mixture is creamy, about 5-7 more minutes.
11. Remove the pot from heat and stir in the remaining 2 tablespoons butter, Parmesan cheese, and lemon zest.
12. Season with salt and pepper to taste, then let rest for 2 minutes before serving.
Miraculously creamy yet maintaining distinct grain texture, this risotto delivers bright spring flavors in every spoonful. The tender asparagus provides satisfying crunch while the sweet peas burst with freshness against the rich, cheesy background. For an elegant presentation, garnish with extra Parmesan shavings and serve immediately while the risotto maintains its luxurious, flowing consistency.
Spinach and Strawberry Salad with Balsamic Vinaigrette

Radiant with vibrant colors and fresh flavors, this spinach and strawberry salad celebrates the beautiful transition between seasons. The sweet juiciness of ripe strawberries pairs exquisitely with the earthy depth of fresh spinach, while a homemade balsamic vinaigrette ties everything together with its perfect balance of tangy and sweet. It’s the kind of dish that feels both elegant and effortlessly simple—ideal for a light lunch or as a stunning starter for dinner guests.
5
servings15
minutes4
minutesIngredients
- 6 cups fresh baby spinach—I always look for the brightest green leaves with no wilting
- 1½ cups sliced fresh strawberries, preferably at peak ripeness for maximum sweetness
- ¼ cup crumbled feta cheese—I love the creamy saltiness it adds against the sweet berries
- ¼ cup chopped walnuts, lightly toasted for deeper flavor
- 3 tablespoons extra virgin olive oil, my go-to for its fruity notes
- 2 tablespoons balsamic vinegar, aged if you have it for richer complexity
- 1 tablespoon honey, which I find balances the vinegar’s acidity beautifully
- ½ teaspoon Dijon mustard, just enough to emulsify the dressing
- ¼ teaspoon fine sea salt, to enhance all the flavors
- ⅛ teaspoon freshly ground black pepper, because freshly cracked makes all the difference
Instructions
- Place the baby spinach in a large salad bowl, ensuring any excess moisture is patted dry with paper towels to prevent a watery dressing.
- Slice the strawberries into ¼-inch thick pieces and arrange them over the spinach.
- Sprinkle the crumbled feta cheese evenly across the salad.
- Toast the chopped walnuts in a dry skillet over medium heat for 3-4 minutes, stirring frequently until fragrant and lightly golden—watch carefully as nuts can burn quickly.
- Scatter the toasted walnuts over the salad ingredients.
- In a small bowl, whisk together the extra virgin olive oil and balsamic vinegar until well combined.
- Add the honey and Dijon mustard to the dressing, whisking vigorously for about 30 seconds to create a stable emulsion.
- Season the dressing with fine sea salt and freshly ground black pepper, whisking again to incorporate.
- Drizzle the dressing over the salad just before serving—this prevents the spinach from wilting prematurely.
- Gently toss the salad with salad tongs or two large spoons, ensuring all components are lightly coated with dressing.
Marvel at how the crisp spinach leaves provide a tender base for the juicy strawberries, while the toasted walnuts add satisfying crunch and the feta offers creamy contrast. The balsamic vinaigrette clings perfectly to each ingredient, creating a harmony of sweet, tangy, and savory notes in every bite. For an elegant presentation, consider serving it on individual chilled plates garnished with a few whole strawberries and an extra drizzle of reduced balsamic glaze.
Carrot and Ginger Soup with Fresh Herbs

On crisp autumn afternoons, few dishes offer the same comforting embrace as this velvety carrot and ginger soup, where earthy sweetness meets vibrant spice in perfect harmony. The addition of fresh herbs at the finish elevates this humble classic into something truly extraordinary, creating a bowl that feels both nourishing and sophisticated. Each spoonful delivers warmth that seems to settle right into your bones, making it the ideal companion for changing seasons.
4
servings15
minutes40
minutesIngredients
– 2 tablespoons extra virgin olive oil (my go-to for its fruity notes that complement the carrots beautifully)
– 1 large yellow onion, chopped (I find yellow onions provide the perfect balance of sweetness and structure)
– 3 cloves garlic, minced (freshly minced garlic makes all the difference here)
– 2 tablespoons freshly grated ginger (don’t skimp—this gives the soup its signature zing)
– 2 pounds carrots, peeled and chopped into 1-inch pieces (look for vibrant, firm carrots for the best flavor)
– 4 cups vegetable broth (homemade if you have it, but a good quality store-bought works wonderfully)
– 1 cup heavy cream (this creates that luxurious, silky texture we’re after)
– 1 teaspoon kosher salt (I prefer kosher for its clean flavor)
– ½ teaspoon freshly ground black pepper
– ¼ cup chopped fresh parsley (added at the end for that bright, fresh finish)
– 2 tablespoons chopped fresh chives (these provide a delicate oniony note that rounds out the flavors)
Instructions
1. Heat 2 tablespoons of extra virgin olive oil in a large Dutch oven or heavy-bottomed pot over medium heat until shimmering.
2. Add 1 chopped yellow onion and cook for 6-8 minutes, stirring occasionally, until the onion becomes translucent and fragrant.
3. Stir in 3 minced garlic cloves and 2 tablespoons of freshly grated ginger, cooking for exactly 1 minute until aromatic but not browned.
4. Add 2 pounds of chopped carrots to the pot, stirring to coat them evenly with the onion mixture.
5. Pour in 4 cups of vegetable broth, ensuring all carrots are submerged in the liquid.
6. Bring the mixture to a boil over high heat, then immediately reduce to a simmer.
7. Cover the pot and simmer for 25-30 minutes, until the carrots are completely tender when pierced with a fork.
8. Carefully transfer the hot soup in batches to a blender, filling no more than halfway to prevent overflow.
9. Blend on high speed for 45-60 seconds until completely smooth and velvety.
10. Return the blended soup to the pot and place over low heat.
11. Stir in 1 cup of heavy cream until fully incorporated and the soup is heated through.
12. Season with 1 teaspoon of kosher salt and ½ teaspoon of freshly ground black pepper, tasting and adjusting if needed.
13. Remove from heat and stir in ¼ cup of chopped fresh parsley and 2 tablespoons of chopped fresh chives just before serving.
Creamy and vibrant, this soup achieves a texture that feels like liquid silk with just enough body to cling to your spoon. The ginger provides a warm, spicy kick that dances beautifully with the carrots’ natural sweetness, while the fresh herbs add bursts of brightness in every bite. Consider serving it in shallow bowls garnished with an extra drizzle of cream and herb sprigs for an elegant presentation that belies its simple preparation.
Radish and Avocado Toast with Lemon Zest
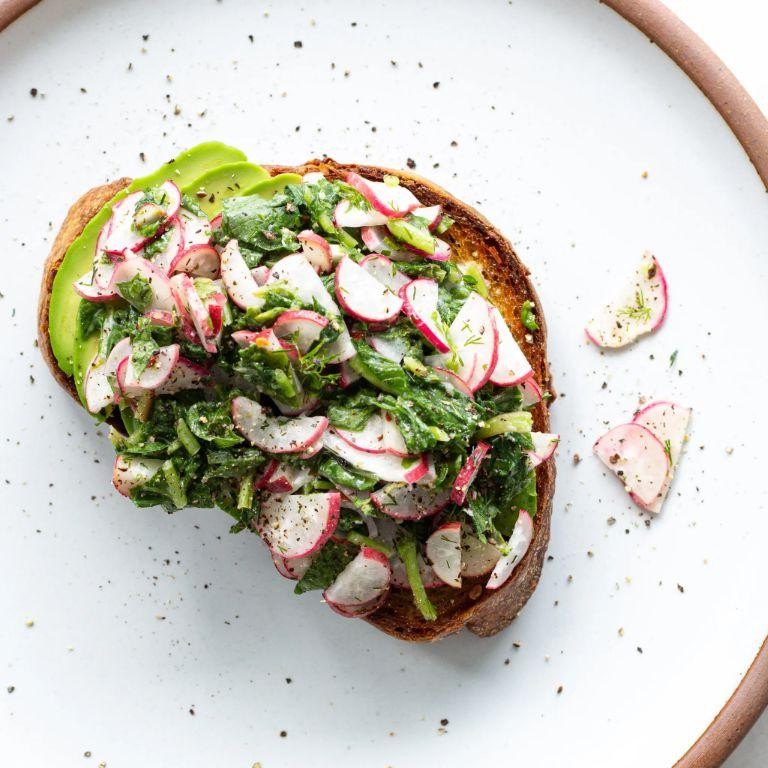
Nothing elevates the humble avocado toast quite like the crisp, peppery bite of fresh radishes and the bright zing of lemon zest. This sophisticated yet simple combination transforms your morning routine into a culinary experience worthy of any brunch table. The contrasting textures and vibrant flavors create a dish that feels both indulgent and refreshingly light.
2
servings10
minutes4
minutesIngredients
- 2 slices of thick-cut sourdough bread (I find the tangy flavor complements the other ingredients beautifully)
- 1 large ripe avocado (look for one that yields slightly to gentle pressure)
- 4-5 small radishes, thinly sliced (I prefer the vibrant red variety for visual appeal)
- 1 tablespoon extra virgin olive oil (my go-to for its fruity notes)
- 1 teaspoon fresh lemon zest (use organic lemons when possible)
- ½ teaspoon flaky sea salt (Maldon salt adds wonderful texture)
- Freshly cracked black pepper to taste (I always grind it directly over the toast)
Instructions
- Toast the sourdough bread slices in a toaster or oven until golden brown and crisp around the edges, about 3-4 minutes at 400°F if using an oven.
- While the bread toasts, cut the avocado in half, remove the pit, and scoop the flesh into a small bowl.
- Mash the avocado with a fork until mostly smooth but with some small chunks remaining for texture.
- Thinly slice the radishes using a sharp knife or mandoline, aiming for uniformly thin rounds about ⅛-inch thick.
- Zest one lemon using a microplane, being careful to avoid the bitter white pith beneath the yellow skin.
- Spread the mashed avocado evenly over the warm toasted bread slices.
- Arrange the radish slices in a single, slightly overlapping layer across the avocado.
- Drizzle the extra virgin olive oil evenly over both toasts.
- Sprinkle the fresh lemon zest evenly across the prepared toasts.
- Season generously with flaky sea salt and freshly cracked black pepper.
The resulting toast offers a delightful contrast between the creamy avocado and crisp radishes, while the lemon zest cuts through the richness with its citrusy brightness. Try serving it alongside poached eggs for a more substantial breakfast, or pair it with a simple green salad for a light lunch that feels anything but ordinary.
Lemon and Herb Quinoa Stuffed Bell Peppers

Yield to the vibrant allure of Mediterranean-inspired cuisine with these Lemon and Herb Quinoa Stuffed Bell Peppers, where tender bell peppers cradle a fragrant filling of fluffy quinoa, zesty lemon, and aromatic herbs. Each bite offers a harmonious balance of bright citrus notes and earthy undertones, making this dish both nourishing and deeply satisfying. Perfect for weeknight dinners or elegant gatherings, these stuffed peppers bring a touch of sunshine to any table.
2
servings20
minutes50
minutesIngredients
– 4 large bell peppers, any color—I love using a mix of red and yellow for visual appeal
– 1 cup quinoa, rinsed well to remove any bitterness
– 2 cups vegetable broth, my preferred base for extra flavor depth
– 2 tablespoons extra virgin olive oil, which I always keep on hand for its fruity notes
– 1 small yellow onion, finely diced for a subtle sweetness
– 2 cloves garlic, minced—fresh is best here
– 1 teaspoon dried oregano, a staple in my herb collection
– 1/2 teaspoon dried thyme, for an earthy aroma
– Zest and juice of 1 large lemon, adding a bright, citrusy kick
– 1/2 cup grated Parmesan cheese, which I recommend for its salty richness
– Salt and black pepper, to season layers as you go
Instructions
1. Preheat your oven to 375°F (190°C) to ensure even cooking from the start.
2. Slice the tops off the bell peppers and remove the seeds and membranes, creating hollow cavities for stuffing.
3. In a medium saucepan, combine the rinsed quinoa and vegetable broth, then bring to a boil over high heat.
4. Reduce the heat to low, cover the saucepan, and simmer the quinoa for 15 minutes, or until all the liquid is absorbed and grains are tender.
5. Heat the olive oil in a large skillet over medium heat until it shimmers lightly.
6. Add the diced onion and sauté for 5–7 minutes, stirring occasionally, until it turns translucent and soft.
7. Stir in the minced garlic and cook for 1 minute more, just until fragrant—be careful not to burn it.
8. Mix in the dried oregano and thyme, toasting them for 30 seconds to release their essential oils.
9. Fluff the cooked quinoa with a fork and transfer it to the skillet, combining it evenly with the onion and herb mixture.
10. Fold in the lemon zest, lemon juice, and grated Parmesan cheese, seasoning with salt and black pepper to taste.
11. Spoon the quinoa filling generously into the prepared bell peppers, packing it down lightly to prevent gaps.
12. Arrange the stuffed peppers upright in a baking dish and bake for 25–30 minutes, until the peppers are tender and slightly charred at the edges.
13. Remove from the oven and let the peppers rest for 5 minutes before serving to allow the flavors to meld. Outstanding in both texture and taste, these peppers offer a delightful contrast between the soft, herb-infused quinoa and the firm, sweet bell pepper shells. For a creative twist, serve them alongside a crisp arugula salad or top with a dollop of Greek yogurt to enhance the creamy, tangy notes.
Spring Vegetable Stir-Fry with Tofu and Ginger Sauce

Brimming with the vibrant colors and crisp textures of the season, this stir-fry celebrates the fleeting beauty of spring produce. Tender-crisp vegetables and golden tofu cubes come together in a glossy, aromatic ginger sauce that sings with freshness. It’s a dish that feels both nourishing and deeply satisfying, perfect for a quick weeknight dinner that doesn’t compromise on elegance.
2
servings25
minutes15
minutesIngredients
– 14 ounces extra-firm tofu, pressed for at least 20 minutes—this step is non-negotiable for achieving that perfect, chewy texture
– 2 tablespoons avocado oil, my high-smoke-point favorite for stir-frying
– 1 cup snap peas, strings removed for a more pleasant bite
– 1 cup asparagus, tough ends snapped off and discarded
– 1 medium carrot, cut into thin matchsticks—I find a julienne peeler makes this task effortless
– 3 cloves garlic, minced; fresh is always best here
– 1 tablespoon freshly grated ginger, I keep a knob in the freezer for easy grating
– 3 tablespoons low-sodium soy sauce
– 1 tablespoon rice vinegar, the unseasoned variety for cleaner acidity
– 1 teaspoon toasted sesame oil, added at the very end to preserve its delicate nuttiness
– 1 teaspoon cornstarch, to give the sauce that lovely cling
– ¼ cup water, to help create the sauce consistency
Instructions
1. Cut the pressed tofu into 1-inch cubes and pat them completely dry with paper towels.
2. Heat 1 tablespoon of avocado oil in a large skillet or wok over medium-high heat until it shimmers, about 1 minute.
3. Add the tofu cubes in a single layer and cook undisturbed for 3–4 minutes, until the bottoms are golden brown and crisp.
4. Flip each tofu piece and cook for another 3–4 minutes until all sides are evenly browned, then transfer to a plate.
5. Add the remaining 1 tablespoon of avocado oil to the same skillet and immediately add the snap peas, asparagus, and carrot.
6. Stir-fry the vegetables for 4–5 minutes, until bright in color and tender-crisp—they should still have a slight crunch.
7. Push the vegetables to one side of the skillet and add the minced garlic and grated ginger to the empty space.
8. Cook the garlic and ginger for 30 seconds until fragrant, being careful not to let them burn.
9. In a small bowl, whisk together the soy sauce, rice vinegar, cornstarch, and water until the cornstarch is fully dissolved.
10. Pour the sauce mixture into the skillet and stir continuously for 1–2 minutes until it thickens and becomes glossy.
11. Return the browned tofu to the skillet and toss gently to coat everything in the sauce.
12. Remove the skillet from heat and drizzle with the toasted sesame oil, giving one final gentle toss to combine.
With its contrasting textures of crisp-tender vegetables and chewy tofu, each bite offers a delightful interplay. The ginger-forward sauce provides a bright, zesty backbone that enhances without overwhelming the delicate spring flavors. Wonderful served over jasmine rice or alongside soba noodles, this dish brings restaurant-quality elegance to your table in mere minutes.
Cucumber and Mint Gazpacho

Fresh from the garden’s bounty comes this elegant chilled soup, where crisp cucumbers mingle with vibrant mint in a symphony of summer flavors. Perfect for warm afternoons or sophisticated starters, this gazpacho offers a refreshing escape from the heat while showcasing seasonal produce at its peak. Its pale green hue and delicate aroma promise both visual appeal and culinary delight.
2
servings15
minutesIngredients
– 3 large English cucumbers, peeled and roughly chopped (I find their thin skins and minimal seeds work best here)
– 1 cup fresh mint leaves, packed (plus extra for garnish—I always grab a generous handful from my herb garden)
– 1/2 cup plain Greek yogurt (full-fat creates the creamiest texture)
– 1/4 cup extra virgin olive oil (my go-to for its fruity notes)
– 2 tablespoons fresh lemon juice (freshly squeezed makes all the difference)
– 1 small garlic clove, minced (just enough for subtle warmth)
– 1 teaspoon fine sea salt (I prefer this over table salt for its clean flavor)
– 1/2 teaspoon freshly ground black pepper
– 1/4 cup cold water (to adjust consistency)
– Ice cubes for serving (optional, but wonderful for extra chill)
Instructions
1. Combine cucumbers, mint leaves, Greek yogurt, olive oil, lemon juice, garlic, salt, and pepper in a blender.
2. Blend on high speed for 45-60 seconds until completely smooth and pale green in color.
3. Check consistency by dipping a spoon into the mixture; if it appears too thick, add cold water 1 tablespoon at a time while blending.
4. Taste the gazpacho and adjust seasoning if needed, remembering flavors will intensify when chilled.
5. Pour the mixture through a fine-mesh strainer into a large bowl to remove any fibrous bits, pressing with a spatula to extract all liquid.
6. Cover the bowl tightly with plastic wrap, ensuring it touches the surface of the gazpacho to prevent oxidation.
7. Refrigerate for exactly 2 hours until thoroughly chilled to 40°F, which allows the flavors to meld perfectly.
8. Ladle the chilled gazpacho into serving bowls just before serving.
9. Drizzle each portion with a thin stream of olive oil and garnish with fresh mint leaves.
10. Serve immediately with ice cubes floating in each bowl if desired for extra refreshment. Marvel at how this silky gazpacho delivers a cool, creamy texture that contrasts beautifully with the bright, herbaceous notes of mint. The subtle garlic warmth and lemon acidity create layers of flavor that dance across the palate, making it perfect for elegant dinner parties or lazy summer lunches. Consider serving in chilled martini glasses for a sophisticated presentation, or pair with grilled shrimp for a more substantial meal.
Zucchini Noodles with Pesto and Cherry Tomatoes
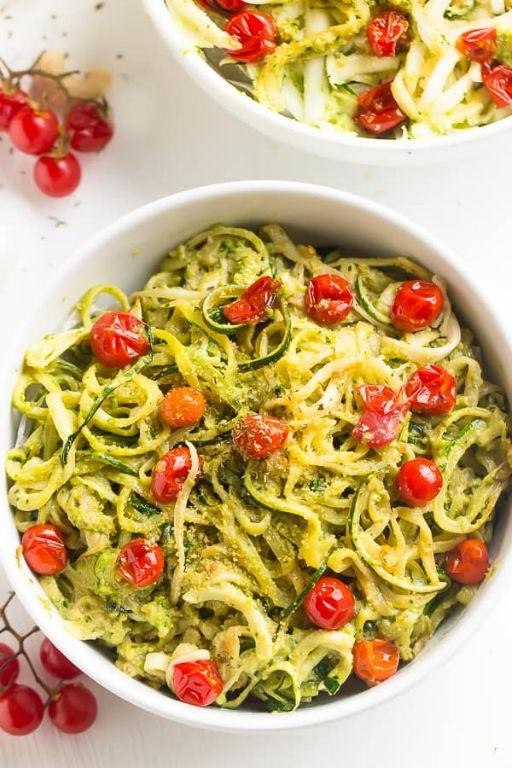
Joyfully simple yet sophisticated, this zucchini noodle dish transforms humble summer vegetables into an elegant meal that celebrates freshness. Just-picked basil and sun-ripened tomatoes mingle with garlic and pine nuts in a vibrant pesto that clings beautifully to delicate zucchini ribbons. Perfect for warm evenings when you crave something light yet deeply satisfying.
2
servings15
minutes7
minutesIngredients
– 2 medium zucchini, spiralized into noodles (I find yellow zucchini adds lovely color variation)
– 2 cups fresh basil leaves, packed (the aromatic scent tells you it’s perfect)
– 1/3 cup extra virgin olive oil, my go-to for its fruity notes
– 1/4 cup pine nuts, lightly toasted for deeper flavor
– 2 garlic cloves, freshly minced (their pungent aroma fills the kitchen)
– 1/2 cup grated Parmesan cheese, the good aged kind that crumbles beautifully
– 1 pint cherry tomatoes, halved (their sweet burst complements the dish)
– 1/2 tsp sea salt, I prefer the flaky variety here
– 1/4 tsp black pepper, freshly ground for maximum fragrance
Instructions
1. Place pine nuts in a dry skillet over medium heat and toast for 3-4 minutes, shaking the pan frequently until golden brown and fragrant.
2. Combine toasted pine nuts, basil leaves, minced garlic, and Parmesan cheese in a food processor.
3. Pulse the mixture 5-6 times until coarsely chopped, being careful not to over-process.
4. With the food processor running on low speed, slowly drizzle in olive oil until the pesto becomes smooth and emulsified.
5. Season the pesto with 1/4 teaspoon salt and 1/8 teaspoon black pepper, then transfer to a small bowl.
6. Heat a large skillet over medium-high heat and add cherry tomatoes cut-side down.
7. Cook tomatoes undisturbed for 2-3 minutes until they develop slight char marks and begin to soften.
8. Add zucchini noodles to the skillet and toss gently with tongs for exactly 1 minute until just warmed through but still crisp.
9. Remove the skillet from heat and immediately fold in the prepared pesto until every strand is coated.
10. Season with remaining salt and pepper, then divide between serving plates.
Fresh from the skillet, this dish offers a delightful contrast between the al dente zucchini noodles and the burst of warm tomatoes. The pesto clings to each ribbon without weighing it down, creating a light yet substantial texture that feels both nourishing and indulgent. For an elegant presentation, garnish with extra basil leaves and serve immediately while the colors remain vibrant and the aromas are at their peak.
Beet and Feta Salad with Toasted Walnuts

Perfectly balancing earthy sweetness with tangy saltiness, this vibrant beet and feta salad brings together roasted roots, creamy cheese, and crunchy walnuts in a symphony of textures. The deep crimson beets create a stunning visual contrast against the snowy feta and golden nuts, making it as beautiful as it is delicious. This elegant yet approachable dish transforms simple ingredients into a sophisticated salad that’s equally suited for weeknight dinners or celebratory gatherings.
3
servings20
minutes65
minutesIngredients
- 3 medium red beets (about 1 pound total) – I always choose beets with smooth, unblemished skins for the sweetest flavor
- 1 tablespoon extra virgin olive oil – my go-to for roasting as it enhances the beets’ natural sweetness
- 1/2 teaspoon kosher salt – I prefer the clean flavor of kosher salt for seasoning vegetables
- 1/4 teaspoon freshly ground black pepper – freshly cracked makes all the difference
- 1/2 cup walnut halves – toasting them first brings out their nutty complexity
- 4 ounces feta cheese – I love using a block rather than crumbles for better texture
- 2 tablespoons fresh lemon juice – always fresh squeezed for the brightest flavor
- 2 tablespoons extra virgin olive oil – for the dressing
- 4 cups mixed baby greens – the tender leaves provide a delicate base
Instructions
- Preheat your oven to 400°F and line a baking sheet with parchment paper.
- Scrub the beets thoroughly under cold running water to remove any dirt, then pat them completely dry with paper towels.
- Place the cleaned beets on the prepared baking sheet and drizzle with 1 tablespoon olive oil, rubbing it evenly over each beet’s surface.
- Sprinkle the oiled beets with kosher salt and freshly ground black pepper, ensuring even coverage.
- Roast the beets in the preheated oven for 45-60 minutes, until they’re tender when pierced with a fork and the skins have slightly wrinkled.
- Remove the roasted beets from the oven and let them cool until they’re comfortable to handle, about 15-20 minutes.
- While the beets cool, spread the walnut halves in a single layer on a dry baking sheet.
- Toast the walnuts in the still-warm oven for 5-7 minutes, watching carefully as they can burn quickly, until they’re fragrant and lightly golden.
- Transfer the toasted walnuts to a cutting board and roughly chop them into smaller pieces.
- Once the beets are cool enough to handle, use your fingers to slip off the skins—they should peel away easily if properly roasted.
- Cut the peeled beets into 1/2-inch cubes, keeping them uniform for even distribution in the salad.
- In a small bowl, whisk together the fresh lemon juice and remaining 2 tablespoons olive oil until emulsified.
- Arrange the mixed baby greens in a large serving bowl as your salad base.
- Scatter the cubed beets evenly over the greens, creating colorful distribution.
- Crumble the feta cheese over the beets and greens, using your fingers for irregular, appealing pieces.
- Sprinkle the chopped toasted walnuts across the salad for crunch.
- Drizzle the lemon-olive oil dressing evenly over the entire salad just before serving.
Unforgettable in both presentation and palate, this salad offers a delightful interplay of creamy feta against the earthy beets and crisp walnuts. The lemon dressing cuts through the richness beautifully, while the tender greens provide a refreshing foundation. Consider serving it alongside grilled chicken or as a stunning centerpiece for vegetarian meals—either way, its vibrant colors and balanced flavors will leave a lasting impression.
Mushroom and Spinach Tart with Whole Grain Crust

Heavenly in its simplicity yet sophisticated in flavor, this mushroom and spinach tart elevates humble ingredients into an elegant centerpiece. The earthy notes of mushrooms meld beautifully with the delicate bitterness of spinach, all cradled by a nutty whole grain crust that adds both texture and depth. Perfect for brunch entertaining or a light supper, this dish brings restaurant-worthy presentation to your home kitchen with surprisingly approachable techniques.
6
portions30
minutes56
minutesIngredients
- 1 ¼ cups whole wheat flour (I find this creates the perfect nutty foundation)
- ½ cup cold unsalted butter, cubed (keeping it chilled ensures flaky layers)
- 3-4 tablespoons ice water (add gradually until the dough just comes together)
- 1 tablespoon extra virgin olive oil (my go-to for sautéing)
- 1 medium yellow onion, thinly sliced (sweet varieties work beautifully here)
- 3 garlic cloves, minced (freshly minced makes all the difference)
- 8 ounces cremini mushrooms, sliced (their meaty texture holds up wonderfully)
- 5 ounces fresh spinach (I prefer the vibrant color of fresh over frozen)
- 2 large eggs, at room temperature (they incorporate more smoothly this way)
- ½ cup heavy cream (for that luxurious, velvety filling)
- ½ teaspoon kosher salt (I always use coarse for better distribution)
- ¼ teaspoon freshly ground black pepper (freshly cracked adds brighter flavor)
- ¼ teaspoon freshly grated nutmeg (just a hint enhances the spinach beautifully)
- ½ cup grated Gruyère cheese (its nutty complexity complements the mushrooms perfectly)
Instructions
- Combine 1 ¼ cups whole wheat flour and ¼ teaspoon salt in a large bowl.
- Add ½ cup cold cubed butter and use a pastry cutter to work it into pea-sized crumbs.
- Drizzle in 3 tablespoons ice water while stirring with a fork until the dough begins to clump.
- Gather the dough into a ball, wrap tightly in plastic, and refrigerate for exactly 30 minutes.
- Preheat your oven to 375°F and lightly grease a 9-inch tart pan.
- Roll the chilled dough into an 11-inch circle on a floured surface.
- Carefully transfer the dough to the prepared tart pan, pressing it gently into the edges.
- Prick the bottom all over with a fork, then line with parchment and fill with pie weights.
- Bake for 15 minutes at 375°F until the edges look set but not browned.
- Remove the parchment and weights, then return to the oven for 5 more minutes.
- Heat 1 tablespoon olive oil in a large skillet over medium heat.
- Sauté 1 sliced onion for 5 minutes until translucent and slightly golden.
- Add 3 minced garlic cloves and cook for 1 minute until fragrant.
- Stir in 8 ounces sliced mushrooms and cook for 8 minutes until they release their liquid and begin to brown.
- Add 5 ounces fresh spinach and cook for 2 minutes until just wilted.
- Transfer the vegetable mixture to a colander and press out any excess liquid.
- Whisk together 2 room temperature eggs, ½ cup heavy cream, ¼ teaspoon salt, ¼ teaspoon pepper, and ¼ teaspoon nutmeg in a medium bowl.
- Spread the vegetable mixture evenly over the pre-baked crust.
- Sprinkle ½ cup grated Gruyère cheese over the vegetables.
- Pour the egg mixture carefully over the filling, ensuring even distribution.
- Bake at 375°F for 25-30 minutes until the filling is set and the top is golden brown.
- Let the tart cool in the pan for 10 minutes before slicing.
Golden and fragrant from the oven, this tart offers a delightful contrast between the crisp whole grain crust and the creamy, savory filling. The nutmeg subtly enhances the earthy mushrooms while the Gruyère provides a sophisticated salty finish. Consider serving warm slices alongside a simple arugula salad dressed with lemon vinaigrette to complement the rich flavors.
Artichoke and Lemon Dip with Crudités

Brimming with sophisticated flavor yet remarkably simple to prepare, this artichoke and lemon dip elevates any gathering from casual to chic. Its creamy texture and bright citrus notes create an elegant centerpiece that pairs beautifully with crisp, colorful crudités. Perfect for entertaining or a refined afternoon treat, this dip captures the essence of modern American entertaining with its balance of richness and freshness.
8
servings15
minutes25
minutesIngredients
– 1 (14-ounce) can artichoke hearts, drained and chopped (I always look for artichokes packed in water for the cleanest flavor)
– 1 cup mayonnaise (Duke’s is my preferred brand for its perfect tanginess)
– 1 cup grated Parmesan cheese (freshly grated melts more smoothly than pre-shredded)
– 2 cloves garlic, minced (I find crushing them first makes mincing much easier)
– 2 tablespoons fresh lemon juice (about 1 medium lemon, Meyer lemons add wonderful sweetness)
– 1 teaspoon lemon zest (use a microplane for the finest zest that disperses evenly)
– 1/2 teaspoon black pepper (freshly cracked adds more aromatic complexity)
– 1/4 teaspoon salt (I prefer sea salt for its clean mineral notes)
– Assorted fresh vegetables for serving (radishes, carrots, and endive make particularly elegant vessels)
Instructions
1. Preheat your oven to 375°F to ensure even baking and proper bubbling.
2. Drain the artichoke hearts thoroughly and pat them dry with paper towels to prevent a watery dip.
3. Chop the artichoke hearts into 1/4-inch pieces for optimal texture distribution.
4. Combine the chopped artichokes, mayonnaise, Parmesan cheese, minced garlic, lemon juice, lemon zest, black pepper, and salt in a medium mixing bowl.
5. Mix all ingredients thoroughly until fully incorporated and no white streaks of mayonnaise remain.
6. Transfer the mixture to a 1-quart baking dish, spreading it evenly with a spatula.
7. Bake for 20-25 minutes until the edges are bubbling and the top develops golden-brown spots.
8. Remove from oven and let rest for 5 minutes to allow the flavors to meld and the dip to thicken slightly.
9. While the dip rests, wash and prepare your crudités, cutting vegetables into uniform sizes for elegant presentation.
The finished dip boasts a luxurious creaminess punctuated by tender artichoke pieces and vibrant lemon notes that cut through the richness beautifully. Serve it warm in the baking dish surrounded by an artful arrangement of colorful vegetables—the contrast between the warm, savory dip and cool, crisp crudités creates a delightful sensory experience. For an extra touch of elegance, garnish with additional lemon zest and a drizzle of olive oil just before serving.
Springtime Minestrone with Cannellini Beans
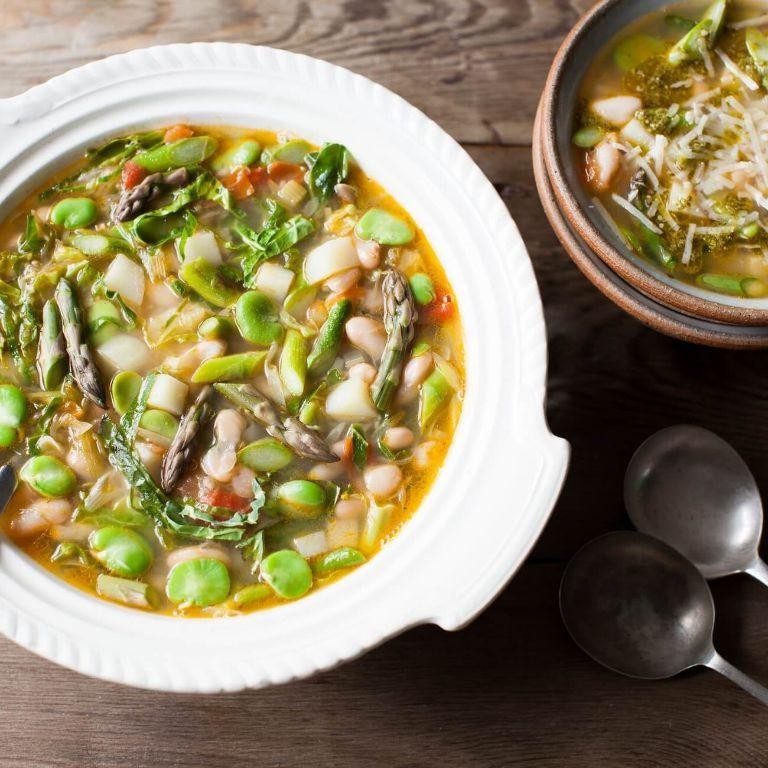
A vibrant celebration of spring’s arrival, this minestrone captures the season’s tender vegetables and fresh herbs in a light, nourishing broth that feels both elegant and comforting. As the days grow longer and warmer, this soup offers a perfect transition from winter’s heartier fare to brighter, garden-inspired flavors. With cannellini beans adding creamy texture and substance, it’s a dish that welcomes the new season with open arms.
2
servings15
minutes31
minutesIngredients
– 2 tablespoons extra virgin olive oil (my go-to for its fruity notes)
– 1 medium yellow onion, finely diced (I find this creates the best flavor base)
– 2 medium carrots, peeled and cut into ½-inch pieces (fresh, crisp carrots work beautifully here)
– 2 celery stalks, sliced ¼-inch thick
– 2 cloves garlic, minced (freshly minced releases the most aroma)
– 6 cups vegetable broth (homemade if you have it, but good quality store-bought works too)
– 1 (15-ounce) can cannellini beans, rinsed and drained (I love their creamy texture)
– 1 medium zucchini, cut into ½-inch cubes
– 1 cup frozen peas (they add such a sweet pop of color)
– ¼ cup chopped fresh parsley (flat-leaf is my preference for its robust flavor)
– 2 tablespoons chopped fresh basil
– Salt and freshly ground black pepper (I always grind my pepper fresh)
Instructions
1. Heat 2 tablespoons extra virgin olive oil in a large Dutch oven or heavy-bottomed pot over medium heat until shimmering, about 2 minutes.
2. Add 1 finely diced yellow onion, 2 chopped carrots, and 2 sliced celery stalks, stirring to coat in the oil.
3. Cook vegetables, stirring occasionally, until onion is translucent and carrots begin to soften, about 8-10 minutes.
4. Add 2 minced garlic cloves and cook until fragrant, about 1 minute, being careful not to burn the garlic.
5. Pour in 6 cups vegetable broth and bring to a gentle boil over high heat.
6. Reduce heat to medium-low and simmer, partially covered, for 15 minutes until vegetables are tender but still firm.
7. Stir in 1 can drained cannellini beans and 1 cubed zucchini, cooking for 5 minutes until zucchini is bright green and slightly softened.
8. Add 1 cup frozen peas and cook for 2 minutes until peas are heated through but still vibrant.
9. Remove from heat and stir in ¼ cup chopped parsley and 2 tablespoons chopped basil.
10. Season with salt and freshly ground black pepper to taste, starting with 1 teaspoon salt and ½ teaspoon pepper.
Remarkably light yet satisfying, this minestrone offers a delicate balance of tender vegetables and creamy beans in a clear, herb-infused broth. The bright green peas and zucchini provide fresh bursts of flavor against the earthy beans, while the fresh herbs lend a garden-fresh finish. For an elegant presentation, serve it in shallow bowls with a drizzle of your best olive oil and crusty bread for dipping.
Fennel and Apple Slaw with Orange Dressing
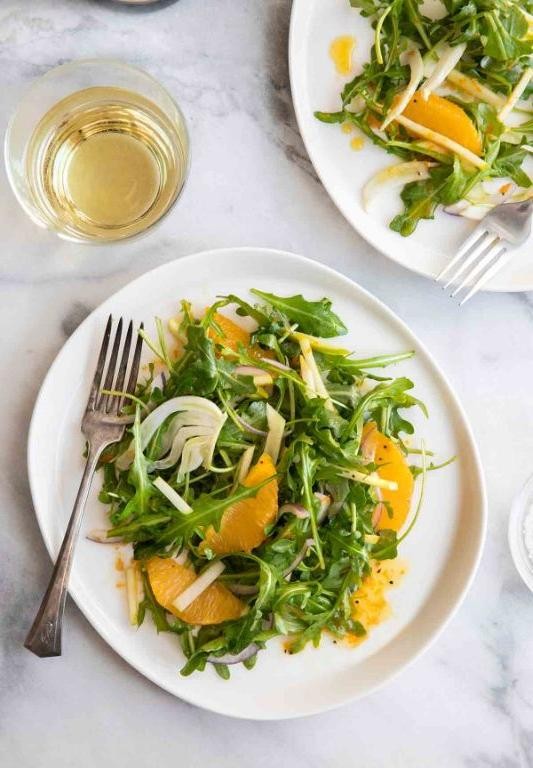
Refreshingly crisp and sophisticated, this vibrant slaw transforms humble ingredients into an elegant side dish that brightens any autumn table. The subtle licorice notes of fresh fennel mingle beautifully with sweet-tart apples, all brought together by a citrusy orange dressing that dances on the palate.
2
servings20
minutesIngredients
- 1 large fennel bulb, thinly sliced (I always save the fronds for garnish—they add such a lovely herbal note)
- 2 crisp apples, julienned (Honeycrisp are my favorite for their perfect balance of sweetness and firm texture)
- 1/4 cup freshly squeezed orange juice (nothing beats the brightness of juice squeezed right before dressing)
- 2 tablespoons extra virgin olive oil (my go-to for dressings, as its fruity notes complement the citrus beautifully)
- 1 tablespoon apple cider vinegar (this adds just the right amount of tang to cut through the sweetness)
- 1 teaspoon honey (local raw honey brings a wonderful floral complexity)
- 1/4 teaspoon sea salt (I prefer fine sea salt for how evenly it distributes)
- 1/8 teaspoon freshly ground black pepper (freshly cracked makes all the difference)
Instructions
- Trim the fennel bulb, removing any tough outer layers and reserving the delicate fronds for later use.
- Using a mandoline or very sharp knife, slice the fennel bulb into paper-thin slices, about 1/8-inch thick.
- Core the apples and cut them into matchstick-sized julienne pieces, working quickly to prevent browning.
- In a small bowl, whisk together the freshly squeezed orange juice, extra virgin olive oil, and apple cider vinegar until fully emulsified.
- Add the honey to the dressing mixture and whisk vigorously for 30 seconds until completely incorporated.
- Season the dressing with sea salt and freshly ground black pepper, whisking again to combine.
- Combine the sliced fennel and julienned apples in a large mixing bowl, tossing gently to distribute evenly.
- Pour the prepared dressing over the fennel and apple mixture, using tongs to coat every piece thoroughly.
- Let the slaw rest at room temperature for exactly 15 minutes to allow the flavors to meld and the vegetables to slightly soften.
- Chop the reserved fennel fronds and sprinkle them over the dressed slaw just before serving.
Light and refreshing, this slaw offers a delightful crunch that gives way to bright citrus notes and subtle sweetness. The textures play beautifully together—crisp apples against tender fennel—creating a symphony of autumn flavors. Lovely alongside roasted poultry or as a bright counterpoint to rich pork dishes, it brings elegance to any meal.
Broccoli and Almond Sauté with Lemon Olive Oil
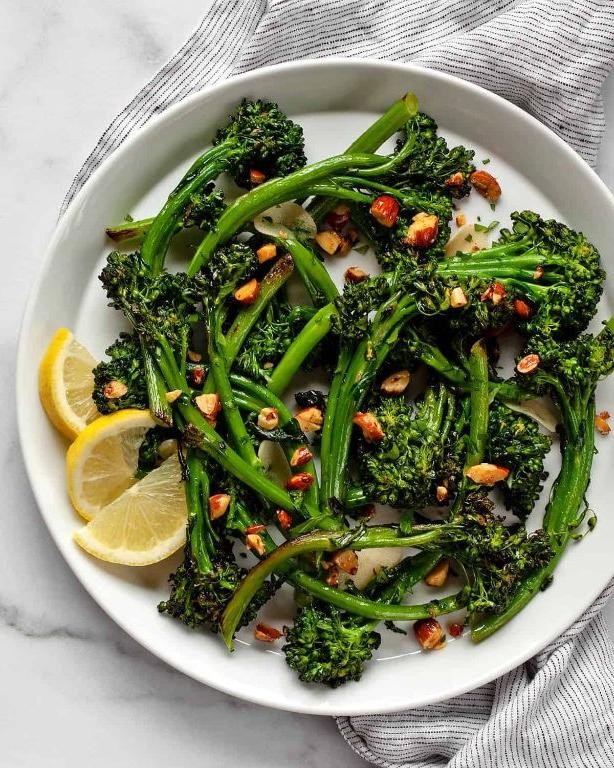
Fragrant and vibrant, this broccoli and almond sauté celebrates the simple elegance of seasonal produce. With crisp florets meeting toasted nuts in a bright lemon olive oil dressing, it transforms humble ingredients into something truly special. This dish offers both visual appeal and satisfying texture in every bite.
3
servings10
minutes12
minutesIngredients
– 1 large head of broccoli, cut into bite-sized florets (I always save the stems for another use)
– 1/2 cup raw almonds, roughly chopped (the crunchier the better)
– 3 tablespoons extra virgin olive oil, my preferred choice for its fruity notes
– 2 tablespoons freshly squeezed lemon juice (never bottled—the brightness makes all the difference)
– 2 cloves garlic, thinly sliced (I find thin slices distribute flavor more evenly)
– 1/4 teaspoon red pepper flakes, for just a hint of warmth
– 1/2 teaspoon sea salt, to enhance all the natural flavors
Instructions
1. Heat a large skillet over medium heat for 2 minutes until evenly warm.
2. Add chopped almonds to the dry skillet and toast for 3-4 minutes, stirring frequently, until golden brown and fragrant—watch closely as they can burn quickly.
3. Transfer toasted almonds to a small bowl and set aside.
4. Return the skillet to medium heat and add 2 tablespoons of olive oil.
5. Add broccoli florets to the skillet and cook for 5 minutes, stirring occasionally, until bright green and slightly tender.
6. Add sliced garlic and red pepper flakes, cooking for 1 minute more until garlic becomes fragrant but not browned.
7. Pour in remaining 1 tablespoon of olive oil and lemon juice, then sprinkle with sea salt.
8. Toss everything together thoroughly and cook for 1 final minute to let flavors meld.
9. Remove from heat and stir in the reserved toasted almonds.
The finished dish presents a beautiful contrast between the tender-crisp broccoli and the crunchy almonds, all brought together by the bright, citrusy olive oil dressing. Try serving it alongside grilled fish or as part of a grain bowl for a complete meal that feels both nourishing and sophisticated.
Leek and Potato Soup with Chive Garnish

Delicately balanced and deeply comforting, this leek and potato soup transforms humble ingredients into an elegant first course or light supper. During autumn’s crisp transition, I find its creamy texture and subtle onion notes particularly soothing. The final flourish of fresh chives adds both visual appeal and a gentle peppery finish.
2
servings20
minutes38
minutesIngredients
- 3 large leeks, white and light green parts only – thoroughly washed to remove any hidden grit
- 2 pounds Yukon Gold potatoes – their buttery texture creates the perfect velvety base
- 4 tablespoons unsalted butter – I always use European-style for its richer flavor
- 4 cups vegetable broth – homemade if you have it, but a good quality store-bought works beautifully
- 1 cup heavy cream – added at the very end for maximum silkiness
- 1/4 cup fresh chives, finely chopped – reserve some for garnish to maintain their vibrant color
- 1 teaspoon kosher salt – adjust later as needed
- 1/2 teaspoon freshly ground black pepper – freshly cracked makes all the difference
Instructions
- Thoroughly wash and slice the leeks lengthwise, then crosswise into 1/4-inch half-moons, ensuring all grit is removed between layers.
- Peel and dice the potatoes into 1/2-inch cubes for even cooking throughout the soup.
- Melt the butter in a large Dutch oven over medium heat until foaming subsides, about 2 minutes.
- Add the prepared leeks and cook, stirring frequently, until completely softened but not browned, approximately 8-10 minutes.
- Tip: Sweating the leeks slowly develops their sweetness without caramelization, creating a more refined flavor profile.
- Add the diced potatoes, vegetable broth, salt, and pepper to the pot.
- Bring the mixture to a gentle boil, then immediately reduce heat to maintain a steady simmer.
- Cover and cook for 20-25 minutes until potatoes are completely tender when pierced with a fork.
- Working in batches, carefully transfer the soup to a blender and puree until perfectly smooth.
- Tip: Leave the blender lid slightly ajar and cover with a towel to allow steam to escape safely during blending.
- Return the pureed soup to the pot and stir in the heavy cream over low heat.
- Warm through gently for 3-4 minutes without boiling to preserve the cream’s delicate texture.
- Stir in half of the chopped chives, reserving the remainder for garnish.
- Tip: Taste and adjust seasoning carefully at this stage, as cold soup will taste less seasoned than warm.
- Ladle the finished soup into warmed bowls and garnish generously with the remaining fresh chives.
Richly velvety with a pale celadon hue, this soup achieves remarkable sophistication through its simplicity. The sweet leeks and earthy potatoes meld into a harmonious blend that feels both rustic and refined. Consider serving it in shallow bowls with crusty artisanal bread for dipping, or as an elegant starter before a roasted chicken dinner.
Conclusion
More than just recipes, this collection celebrates spring’s vibrant flavors with 32 vegetarian dishes perfect for any occasion. We hope these fresh, seasonal ideas inspire your kitchen adventures! Try your favorites and let us know which ones you love in the comments below. Don’t forget to share this roundup on Pinterest so others can enjoy these delightful springtime meals too.


