Ready to transform your weeknight dinners? Nothing beats coming home to the inviting aroma of a meal that’s been simmering all day in your slow cooker. From hearty stews to tender meats, these comforting recipes are perfect for cozy evenings. Dive into our roundup of 25 delicious slow cooker dishes—your ticket to effortless, soul-warming meals the whole family will love.
Hearty Beef Stew with Vegetables
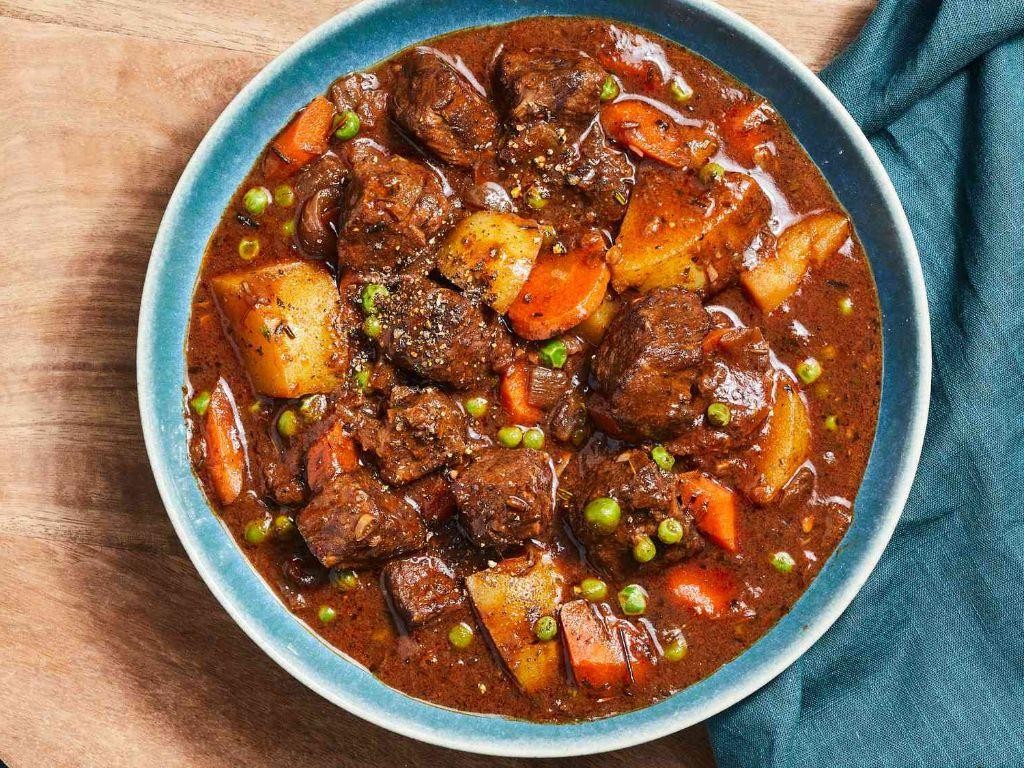
Perfect for chilly evenings, this comforting beef stew transforms simple ingredients into a deeply satisfying meal that fills your kitchen with incredible aromas. Preparing it step-by-step ensures tender meat and perfectly cooked vegetables every single time.
5
servings20
minutes140
minutesIngredients
- 2 pounds well-marbled chuck roast, cut into 1-inch cubes
- 3 tablespoons rich extra virgin olive oil
- 1 large yellow onion, finely diced
- 3 cloves aromatic garlic, minced
- 3 tablespoons all-purpose flour
- 4 cups robust beef broth
- 1 cup full-bodied red wine
- 2 tablespoons tomato paste with concentrated flavor
- 3 large carrots, cut into thick coins
- 3 Yukon Gold potatoes, cubed into 1-inch pieces
- 2 fresh bay leaves
- 1 teaspoon freshly chopped thyme
- 1 teaspoon coarse kosher salt
- ½ teaspoon freshly cracked black pepper
- 1 cup frozen sweet peas
- 2 tablespoons freshly chopped parsley
Instructions
- Pat the beef cubes completely dry using paper towels to ensure proper browning.
- Heat 2 tablespoons of olive oil in a large Dutch oven over medium-high heat until it shimmers.
- Working in two batches, sear the beef cubes for 3-4 minutes per side until deeply browned, transferring to a plate when finished.
- Add the remaining tablespoon of olive oil to the pot and sauté the diced onion for 5 minutes until translucent.
- Stir in the minced garlic and cook for 1 minute until fragrant.
- Sprinkle the flour over the onions and garlic, stirring constantly for 2 minutes to cook out the raw flour taste.
- Slowly pour in the beef broth while scraping the bottom of the pot to release all the browned bits.
- Add the red wine, tomato paste, bay leaves, thyme, salt, and pepper, stirring to combine completely.
- Return the seared beef and any accumulated juices to the pot, bringing the liquid to a gentle boil.
- Reduce heat to low, cover the pot, and simmer for 1 hour and 30 minutes until the beef is fork-tender.
- Add the carrot coins and potato cubes, submerging them completely in the cooking liquid.
- Cover and continue simmering for 45 minutes until the vegetables are tender when pierced with a fork.
- Stir in the frozen peas and cook uncovered for 5 minutes to heat through.
- Remove the pot from heat and discard the bay leaves.
- Stir in the freshly chopped parsley just before serving.
Achieving the perfect stew requires patience, but the reward is fork-tender beef that melts in your mouth alongside vegetables that maintain just enough texture. The rich, wine-infused broth clings beautifully to each component, creating layers of savory depth in every spoonful. For an elevated presentation, serve this stew in shallow bowls over creamy mashed potatoes or with crusty bread for dipping into the luxurious sauce.
Savory Chicken and Dumplings

Zestful comfort awaits with this classic savory chicken and dumplings recipe that transforms simple ingredients into a soul-warming meal. Let’s walk through each step together to create that perfect balance of tender chicken, fluffy dumplings, and rich broth that will have your kitchen smelling absolutely heavenly. This methodical approach ensures even beginner cooks can achieve that coveted homemade texture and depth of flavor.
6
servings20
minutes50
minutesIngredients
– 2 tablespoons rich extra virgin olive oil
– 1 large yellow onion, finely diced
– 3 medium carrots, sliced into ¼-inch rounds
– 2 celery stalks, chopped
– 3 cloves fresh garlic, minced
– 1.5 pounds boneless, skinless chicken thighs
– 6 cups rich chicken broth
– 1 cup all-purpose flour
– 1 teaspoon baking powder
– ½ cup whole milk
– 2 tablespoons fresh parsley, chopped
– 1 teaspoon kosher salt
– ½ teaspoon freshly ground black pepper
Instructions
1. Heat 2 tablespoons of rich extra virgin olive oil in a large Dutch oven over medium heat until shimmering.
2. Add 1 large finely diced yellow onion and cook for 4 minutes until translucent.
3. Stir in 3 medium carrots sliced into ¼-inch rounds and 2 chopped celery stalks, cooking for another 5 minutes until slightly softened.
4. Mix in 3 minced cloves of fresh garlic and cook for 1 minute until fragrant.
5. Place 1.5 pounds of boneless, skinless chicken thighs into the pot, seasoning with 1 teaspoon kosher salt and ½ teaspoon freshly ground black pepper.
6. Pour in 6 cups of rich chicken broth, bringing the mixture to a gentle boil.
7. Reduce heat to low, cover the pot, and simmer for 25 minutes until chicken is fully cooked through.
8. Remove chicken thighs with tongs and shred using two forks.
9. In a medium bowl, whisk together 1 cup all-purpose flour and 1 teaspoon baking powder.
10. Gradually stir in ½ cup whole milk until a soft dough forms.
11. Return shredded chicken to the simmering broth.
12. Drop tablespoon-sized portions of dough into the simmering liquid, spacing them evenly.
13. Cover the pot and cook for 15 minutes without lifting the lid to ensure fluffy dumplings.
14. Uncover and sprinkle with 2 tablespoons of freshly chopped parsley.
15. Let stand for 5 minutes before serving to allow flavors to meld.
Light, pillowy dumplings float in a rich, savory broth that clings perfectly to each spoonful. The tender chicken and vegetables create a satisfying texture contrast that makes this dish feel both comforting and elegant. For a creative twist, serve it in shallow bowls with a crusty baguette for dipping into every last bit of that delicious broth.
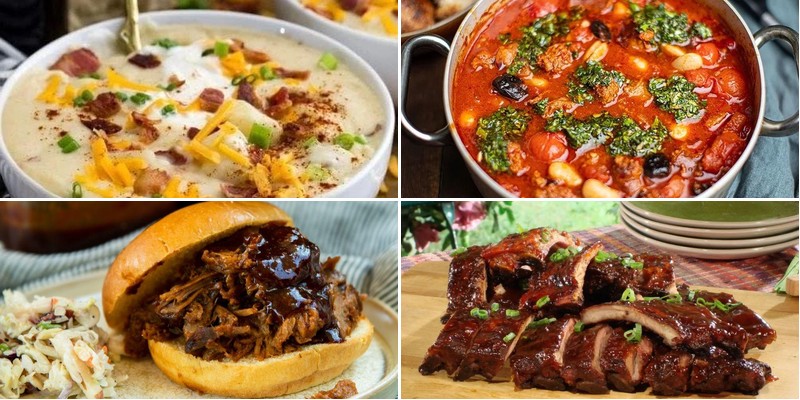
Creamy Potato Soup with Bacon

A comforting bowl of creamy potato soup is the perfect answer to chilly autumn evenings, combining humble ingredients into something truly special. This methodical approach will guide you through creating a velvety soup with crispy bacon accents that will become an instant family favorite.
6
servings15
minutes45
minutesIngredients
– 6 slices thick-cut applewood smoked bacon, chopped
– 1 large yellow onion, finely diced
– 3 cloves fresh garlic, minced
– 6 medium Yukon Gold potatoes, peeled and cubed
– 4 cups rich chicken broth
– 1 cup heavy cream
– 2 tablespoons unsalted butter
– 1 teaspoon kosher salt
– ½ teaspoon freshly ground black pepper
– 2 tablespoons fresh chives, chopped
Instructions
1. Place chopped bacon in a large Dutch oven over medium heat and cook for 8-10 minutes until crispy and browned.
2. Remove bacon with a slotted spoon and drain on paper towels, reserving 2 tablespoons of bacon fat in the pot.
3. Add diced onion to the hot bacon fat and cook for 5-7 minutes until translucent and fragrant.
4. Stir in minced garlic and cook for 1 minute until aromatic but not browned.
5. Add cubed potatoes to the pot and toss to coat in the onion-garlic mixture.
6. Pour in chicken broth, ensuring potatoes are fully submerged, and bring to a gentle boil.
7. Reduce heat to medium-low, cover, and simmer for 20-25 minutes until potatoes are fork-tender.
8. Carefully transfer half the soup to a blender and puree until completely smooth.
9. Return pureed soup to the pot and stir to combine with the remaining chunky potatoes.
10. Stir in heavy cream and butter until fully incorporated and heated through.
11. Season with kosher salt and freshly ground black pepper, adjusting as needed.
12. Ladle soup into bowls and top with crispy bacon pieces and fresh chives.
Enjoy this soup’s luxurious creamy texture that contrasts beautifully with the crispy bacon topping. Each spoonful delivers the earthy comfort of potatoes enhanced by smoky bacon notes, making it perfect served in crusty bread bowls for an extra cozy presentation.
Pulled Pork Sandwiches with Tangy BBQ Sauce

Just imagine tender, slow-cooked pork shoulder falling apart at the touch of a fork, piled high on a soft brioche bun and drenched in a homemade tangy barbecue sauce. Achieving this classic pulled pork sandwich is simpler than you might think when you follow these methodical steps. Let’s walk through the process together from start to finish.
6
sandwiches20
minutes255
minutesIngredients
- 4 lb bone-in pork shoulder roast with generous fat cap
- 2 tbsp coarse kosher salt
- 1 tbsp freshly cracked black pepper
- 1 tbsp smoked paprika with deep red color
- 1 cup ketchup with rich tomato flavor
- ½ cup apple cider vinegar with sharp tang
- ¼ cup dark brown sugar with molasses notes
- 2 tbsp Worcestershire sauce with umami depth
- 1 tbsp Dijon mustard with sharp complexity
- 2 tsp garlic powder with aromatic punch
- 1 tsp onion powder with sweet sharpness
- 6 soft brioche buns with golden crust
- 1 cup crunchy coleslaw mix with crisp texture
Instructions
- Preheat your oven to 300°F using an oven thermometer to verify accuracy.
- Pat the 4 lb bone-in pork shoulder roast completely dry with paper towels to ensure proper browning.
- Combine 2 tbsp coarse kosher salt, 1 tbsp freshly cracked black pepper, and 1 tbsp smoked paprika in a small bowl.
- Rub the spice mixture evenly over all surfaces of the pork shoulder, pressing gently to adhere.
- Place the seasoned pork shoulder fat-side up in a large Dutch oven or roasting pan.
- Cover the pan tightly with aluminum foil or a lid to trap steam and moisture.
- Roast the pork shoulder at 300°F for 4 hours until the internal temperature reaches 195°F on an instant-read thermometer.
- While the pork roasts, combine 1 cup ketchup, ½ cup apple cider vinegar, ¼ cup dark brown sugar, 2 tbsp Worcestershire sauce, 1 tbsp Dijon mustard, 2 tsp garlic powder, and 1 tsp onion powder in a saucepan.
- Simmer the sauce mixture over medium heat for 15 minutes until slightly thickened, stirring frequently to prevent burning.
- Remove the pork from the oven and transfer to a large cutting board, reserving ½ cup of the pan drippings.
- Let the pork rest for 30 minutes until cool enough to handle but still warm.
- Using two forks, shred the pork by pulling against the grain into bite-sized pieces.
- Discard any large pieces of fat and the bone from the shredded pork.
- Mix the shredded pork with the prepared barbecue sauce and reserved pan drippings until thoroughly coated.
- Toast the 6 soft brioche buns in a dry skillet over medium heat for 2 minutes per side until lightly golden.
- Divide the sauced pulled pork evenly among the toasted buns.
- Top each sandwich with 2-3 tablespoons of crunchy coleslaw mix.
A perfectly cooked pulled pork sandwich offers incredible textural contrast between the melt-in-your-mouth pork and crisp coleslaw. The tangy barbecue sauce cuts through the rich pork fat beautifully, creating a balanced flavor profile that keeps you coming back for another bite. For a creative twist, try serving these sandwiches with pickle spears and potato chips for that classic barbecue plate experience.
Slowcooked Chili Con Carne
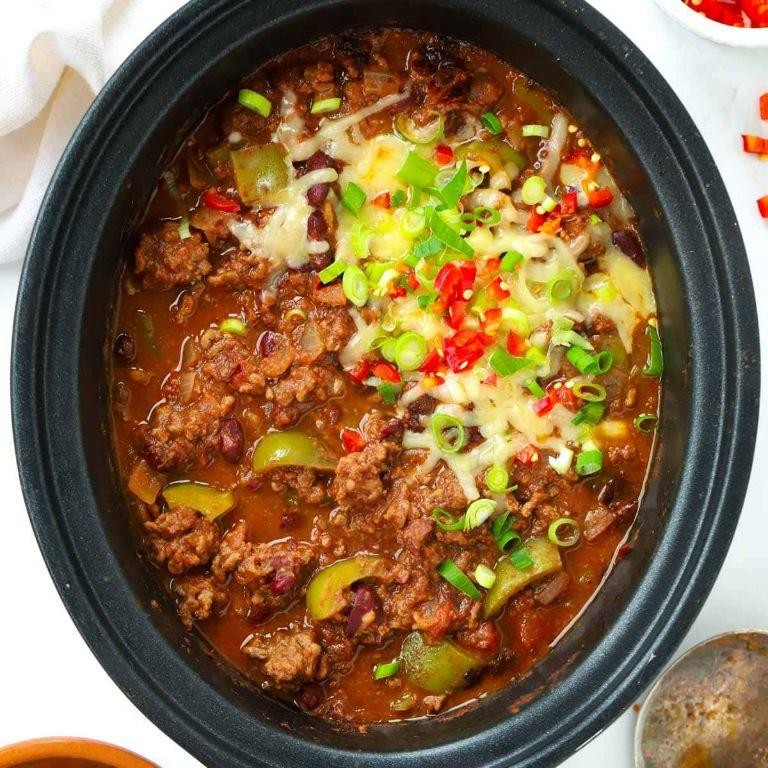
Here’s a comforting slow-cooked chili con carne that builds flavor patiently, layer by layer. Heat 2 tablespoons of rich extra virgin olive oil in a large Dutch oven over medium-high heat until shimmering, then add 2 pounds of coarsely ground beef chuck and cook for 8-10 minutes, breaking it up with a wooden spoon until thoroughly browned and crumbly. Transfer the beef to a plate using a slotted spoon, leaving about 2 tablespoons of rendered fat in the pot. Add 1 large finely diced yellow onion and cook for 5-7 minutes until translucent and fragrant, then stir in 4 minced garlic cloves and cook for 1 minute until aromatic. Sprinkle in 2 tablespoons of bold chili powder, 1 tablespoon of ground cumin, and 1 teaspoon of smoked paprika, toasting the spices for 30 seconds while stirring constantly to deepen their flavor. Return the browned beef to the pot along with any accumulated juices, then pour in 2 cups of robust beef broth, 1 (28-ounce) can of fire-roasted crushed tomatoes, and 1 (15-ounce) can of drained dark red kidney beans. Bring the mixture to a gentle boil, then reduce heat to low, cover, and simmer for 2 hours, stirring occasionally to prevent sticking. Uncover and continue simmering for 30-45 minutes until the chili thickens to a hearty, spoon-coating consistency. Tip: For optimal flavor development, resist the urge to stir too frequently during the final simmer. When the chili is ready, stir in 1 tablespoon of tangy apple cider vinegar to brighten the flavors. With its tender beef melting into a smoky, deeply spiced tomato base and creamy kidney beans adding texture, this chili achieves perfect balance. Warm cornbread makes an ideal companion for soaking up every last bit, or try spooning it over crispy roasted potatoes for a satisfying twist.
Tender Pot Roast with Rich Gravy
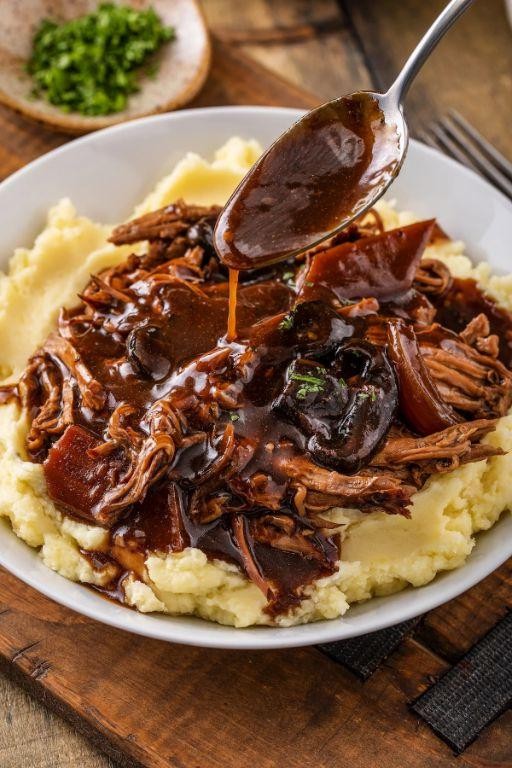
Even the most novice home cooks can master this comforting classic with careful attention to timing and technique. This methodical approach ensures your pot roast emerges fork-tender every single time, surrounded by a deeply flavorful gravy that makes the entire meal. Follow each step precisely for restaurant-quality results right from your own kitchen.
6
portions20
minutes210
minutesIngredients
– 3 pounds well-marbled chuck roast
– 2 tablespoons rich extra virgin olive oil
– 1 large yellow onion, thinly sliced
– 3 cloves fresh garlic, minced
– 4 medium carrots, peeled and cut into 2-inch chunks
– 2 stalks celery, chopped
– 2 cups robust beef broth
– 1 tablespoon Worcestershire sauce
– 1 teaspoon finely ground black pepper
– 1 teaspoon coarse kosher salt
– 2 tablespoons all-purpose flour
– 2 tablespoons softened unsalted butter
Instructions
1. Preheat your oven to 325°F and position a rack in the lower third.
2. Pat the 3-pound chuck roast completely dry with paper towels on all surfaces.
3. Season both sides of the roast evenly with 1 teaspoon kosher salt and 1 teaspoon black pepper.
4. Heat 2 tablespoons olive oil in a large Dutch oven over medium-high heat until shimmering.
5. Sear the roast for 4-5 minutes per side until deeply browned, developing a flavorful crust.
6. Transfer the seared roast to a clean plate, leaving the drippings in the pot.
7. Add the sliced onion to the hot drippings and cook for 3 minutes until translucent.
8. Stir in the minced garlic and cook for 30 seconds until fragrant.
9. Add the carrot chunks and chopped celery, cooking for 2 minutes to soften slightly.
10. Pour in 2 cups beef broth and 1 tablespoon Worcestershire sauce, scraping up all browned bits from the bottom.
11. Return the seared roast to the pot, nestling it among the vegetables.
12. Bring the liquid to a gentle simmer, then immediately cover with a tight-fitting lid.
13. Transfer the covered Dutch oven to the preheated 325°F oven for 3 hours.
14. Remove the pot from the oven and transfer the roast to a cutting board to rest.
15. Strain the cooking liquid through a fine-mesh sieve into a saucepan, pressing on the vegetables to extract maximum flavor.
16. Combine 2 tablespoons flour with 2 tablespoons softened butter in a small bowl to form a smooth paste.
17. Whisk the flour-butter paste into the strained cooking liquid over medium heat.
18. Simmer the gravy for 5-7 minutes, whisking constantly, until thickened to coating consistency.
19. Slice the rested roast against the grain into ½-inch thick portions.
20. Arrange the sliced meat on a platter and ladle the hot gravy over the top.
Here’s why this careful process pays off: the slow roasting breaks down tough connective tissues into silky gelatin, while the flour-butter roux creates a velvety gravy that clings perfectly to each slice. Serve this magnificent roast over creamy mashed potatoes or with crusty bread for sopping up every last drop of that rich, meaty sauce.
Luscious Macaroni and Cheese

Here’s a foolproof method for creating the creamiest, most indulgent macaroni and cheese you’ll ever taste. We’ll build this classic comfort food layer by layer, ensuring every bite is perfectly balanced between silky sauce and tender pasta. Follow each step precisely for restaurant-quality results right from your own kitchen.
6
servings15
minutes40
minutesIngredients
– 1 pound elbow macaroni
– 4 tablespoons unsalted butter
– 1/4 cup all-purpose flour
– 3 cups whole milk
– 2 cups sharp cheddar cheese, freshly grated
– 1 cup Gruyère cheese, freshly grated
– 1/2 teaspoon garlic powder
– 1/2 teaspoon smoked paprika
– 1/2 teaspoon fine sea salt
– 1/4 teaspoon freshly ground black pepper
– 1/4 cup panko breadcrumbs
Instructions
1. Bring a large pot of salted water to a rolling boil over high heat.
2. Add 1 pound elbow macaroni to the boiling water and cook for exactly 8 minutes, stirring occasionally to prevent sticking.
3. Drain the pasta in a colander but do not rinse, as the starch helps the sauce adhere better.
4. Preheat your oven to 375°F and lightly grease a 9×13-inch baking dish.
5. Melt 4 tablespoons unsalted butter in a heavy-bottomed saucepan over medium heat.
6. Whisk in 1/4 cup all-purpose flour and cook for exactly 2 minutes until the mixture turns light golden brown, creating a roux.
7. Gradually pour in 3 cups whole milk while whisking constantly to prevent lumps from forming.
8. Continue cooking and whisking for 5-7 minutes until the sauce thickens enough to coat the back of a spoon.
9. Remove the saucepan from heat and stir in 2 cups sharp cheddar cheese and 1 cup Gruyère cheese until completely melted and smooth.
10. Mix in 1/2 teaspoon garlic powder, 1/2 teaspoon smoked paprika, 1/2 teaspoon fine sea salt, and 1/4 teaspoon freshly ground black pepper.
11. Combine the cheese sauce with the drained pasta in the prepared baking dish, stirring until every piece is coated.
12. Sprinkle 1/4 cup panko breadcrumbs evenly over the top for a crispy crust.
13. Bake at 375°F for 20-25 minutes until the edges are bubbly and the topping is golden brown.
14. Let the macaroni and cheese rest for 5 minutes before serving to allow the sauce to set properly.
Decadently creamy with just the right amount of bite from the al dente pasta, this macaroni and cheese delivers layers of complex flavor from the combination of sharp cheddar and nutty Gruyère. The crispy panko topping provides wonderful textural contrast to the velvety cheese sauce beneath. For an elevated twist, try serving it alongside roasted Brussels sprouts or topping individual portions with crispy bacon bits for added crunch and savory depth.
Vegetarian Lentil Soup

There’s something deeply comforting about a bowl of homemade lentil soup, especially when you can create it with such straightforward, methodical steps. This vegetarian version builds layers of flavor from the ground up, transforming simple ingredients into a nourishing meal that feels both wholesome and satisfying. Let’s walk through each stage together to ensure your soup turns out perfectly every single time.
6
servings15
minutes50
minutesIngredients
– 2 tablespoons rich extra virgin olive oil
– 1 large yellow onion, finely diced
– 2 medium carrots, peeled and chopped into small pieces
– 2 celery stalks, finely sliced
– 3 cloves fresh garlic, minced
– 1 ½ cups brown lentils, rinsed and drained
– 8 cups robust vegetable broth
– 1 (14.5-ounce) can fire-roasted diced tomatoes
– 1 teaspoon fragrant dried thyme
– ½ teaspoon aromatic smoked paprika
– Freshly chopped parsley for garnish
Instructions
1. Heat 2 tablespoons of rich extra virgin olive oil in a large stockpot over medium heat until it shimmers.
2. Add 1 large finely diced yellow onion, 2 chopped medium carrots, and 2 finely sliced celery stalks to the pot.
3. Sauté the vegetables for 8-10 minutes, stirring occasionally, until the onion becomes translucent and the carrots begin to soften.
4. Stir in 3 minced cloves of fresh garlic and cook for 1 minute until fragrant.
5. Add 1 ½ cups rinsed brown lentils to the pot and stir to coat with the oil and vegetables.
6. Pour in 8 cups of robust vegetable broth and 1 can of fire-roasted diced tomatoes with their juices.
7. Stir in 1 teaspoon of fragrant dried thyme and ½ teaspoon of aromatic smoked paprika.
8. Bring the soup to a boil over high heat, then reduce to a gentle simmer.
9. Cover the pot and simmer for 35-40 minutes, until the lentils are tender but not mushy.
10. Taste the soup and adjust seasoning if needed, remembering the broth already contains salt.
11. Ladle the finished soup into bowls and garnish with freshly chopped parsley.
Now you have a velvety, thick soup where the lentils have softened just enough to create a creamy base while still maintaining their shape. Notice how the smoked paprika adds a subtle warmth that complements the earthy lentils and sweet roasted tomatoes. Nothing completes this comforting bowl better than a slice of crusty bread for dipping, or try topping it with a dollop of tangy Greek yogurt for a cool contrast.
Garlic Herb Chicken Thighs
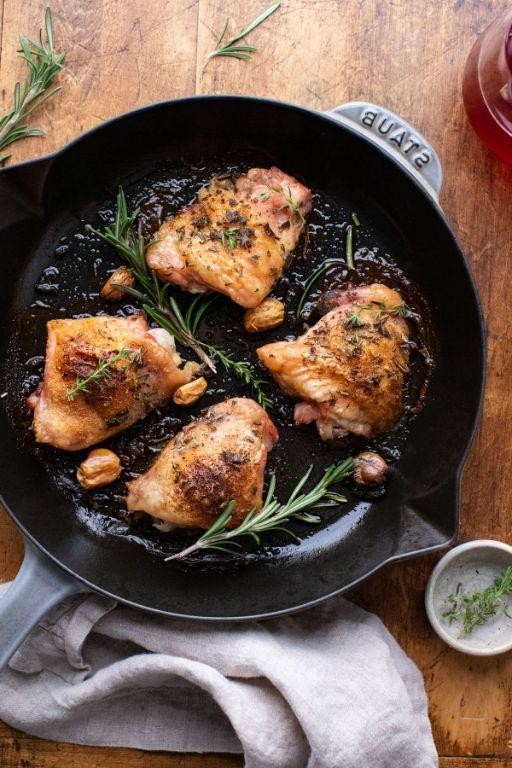
This simple yet flavorful garlic herb chicken thighs recipe transforms basic ingredients into a restaurant-quality meal with minimal effort. The methodical approach ensures perfectly cooked, juicy chicken every time, making it ideal for both weeknight dinners and special occasions. You’ll appreciate how the aromatic herbs and garlic create a golden, crispy exterior while keeping the interior wonderfully moist.
8
portions15
minutes40
minutesIngredients
– 8 bone-in, skin-on chicken thighs
– 3 tablespoons rich extra virgin olive oil
– 6 cloves fresh garlic, minced
– 2 tablespoons chopped fresh rosemary
– 2 tablespoons chopped fresh thyme
– 1 teaspoon coarse kosher salt
– ½ teaspoon freshly ground black pepper
– 1 lemon, cut into wedges
Instructions
1. Preheat your oven to 400°F and position the rack in the center for even heating.
2. Pat the chicken thighs completely dry with paper towels to ensure crispy skin.
3. In a small bowl, combine the rich extra virgin olive oil, minced fresh garlic, chopped fresh rosemary, chopped fresh thyme, coarse kosher salt, and freshly ground black pepper.
4. Rub the herb mixture evenly over all surfaces of the chicken thighs, including under the skin.
5. Arrange the seasoned chicken thighs skin-side up in a single layer in a large oven-safe skillet.
6. Roast the chicken thighs at 400°F for 35-40 minutes until the skin is golden brown and crispy.
7. Check for doneness by inserting a meat thermometer into the thickest part of a thigh; it should read 165°F.
8. Remove the skillet from the oven and let the chicken rest for 5 minutes to redistribute juices.
9. Squeeze fresh lemon wedges over the chicken thighs just before serving.
Keep in mind that the crispy, golden-brown skin gives way to incredibly tender, juicy meat infused with aromatic garlic and herbs. The bright lemon finish cuts through the richness beautifully, making these chicken thighs perfect served over creamy polenta or alongside roasted vegetables for a complete meal that feels both comforting and elegant.
Sweet and Spicy Asian Ribs
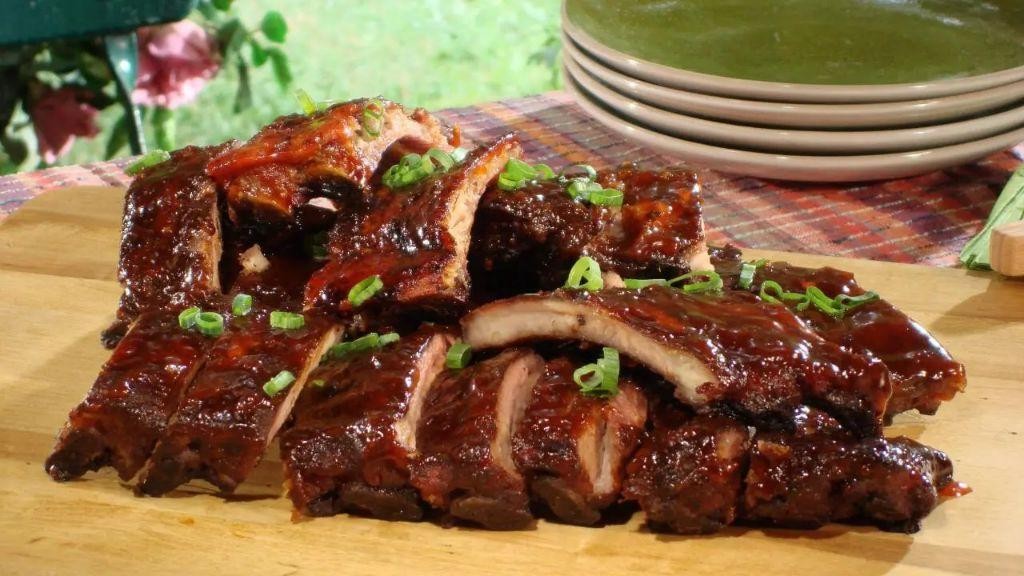
Let’s dive into creating these irresistible sweet and spicy Asian ribs that will have your kitchen smelling like your favorite Asian restaurant. Learning to balance the sweet and heat elements is key to achieving that perfect restaurant-quality flavor at home, so follow each step carefully for the best results.
4
portions15
minutes110
minutesIngredients
– 3 pounds meaty pork ribs
– 1/2 cup rich soy sauce
– 1/4 cup fragrant honey
– 2 tablespoons toasted sesame oil
– 3 cloves freshly minced garlic
– 1 tablespoon finely grated ginger
– 2 teaspoons vibrant red pepper flakes
– 1/4 cup smooth rice vinegar
– 2 tablespoons glossy hoisin sauce
– 1 tablespoon toasted sesame seeds
– 2 thinly sliced green onions
Instructions
1. Preheat your oven to 325°F and line a large baking sheet with aluminum foil for easy cleanup.
2. Pat the 3 pounds of meaty pork ribs completely dry with paper towels to ensure proper browning.
3. In a medium mixing bowl, whisk together 1/2 cup rich soy sauce, 1/4 cup fragrant honey, 2 tablespoons toasted sesame oil, 3 cloves freshly minced garlic, 1 tablespoon finely grated ginger, 2 teaspoons vibrant red pepper flakes, 1/4 cup smooth rice vinegar, and 2 tablespoons glossy hoisin sauce until fully combined.
4. Place the dried ribs on the prepared baking sheet and brush them generously with half of the sauce mixture, making sure to coat all surfaces evenly.
5. Cover the ribs tightly with another layer of foil and bake at 325°F for 1 hour and 30 minutes to tenderize the meat completely.
6. Remove the top foil covering and increase the oven temperature to 400°F.
7. Brush the ribs with the remaining sauce and return them to the oven uncovered for 15-20 minutes until the glaze becomes sticky and caramelized.
8. Check for doneness by inserting a fork between the ribs – it should slide in easily with no resistance.
9. Transfer the ribs to a cutting board and let them rest for 10 minutes to allow the juices to redistribute throughout the meat.
10. Cut the ribs into individual portions and garnish with 1 tablespoon toasted sesame seeds and 2 thinly sliced green onions. The ribs emerge with a beautiful sticky glaze that gives way to incredibly tender meat falling off the bone. That perfect balance of sweet honey and spicy red pepper creates layers of flavor that develop with each bite, making these ribs fantastic served over steamed jasmine rice to soak up every drop of the delicious sauce.
Classic Minestrone Soup

Keeping warm on chilly evenings calls for a comforting bowl of classic minestrone soup, a hearty vegetable-packed dish that’s both nourishing and deeply satisfying. Let’s walk through each step together to build layers of flavor from scratch, ensuring your soup turns out perfectly every time.
5
servings15
minutes41
minutesIngredients
– 2 tablespoons rich extra-virgin olive oil
– 1 medium yellow onion, finely diced
– 2 fresh celery stalks, chopped
– 2 medium carrots, peeled and diced
– 3 cloves garlic, minced
– 1 (14.5-ounce) can diced tomatoes with their juices
– 6 cups robust vegetable broth
– 1 teaspoon dried oregano
– 1 bay leaf
– 1 (15-ounce) can red kidney beans, drained and rinsed
– 1 cup small elbow pasta
– 2 cups fresh spinach leaves
– 1/4 cup freshly grated Parmesan cheese
– 1 teaspoon coarse sea salt
– 1/2 teaspoon freshly cracked black pepper
Instructions
1. Heat 2 tablespoons of rich extra-virgin olive oil in a large stockpot over medium heat for 1 minute.
2. Add 1 finely diced medium yellow onion, 2 chopped fresh celery stalks, and 2 diced medium carrots to the pot.
3. Sauté the vegetables for 8–10 minutes, stirring occasionally, until the onion turns translucent and the carrots begin to soften.
4. Stir in 3 minced cloves of garlic and cook for 1 minute until fragrant.
5. Pour in 1 can of diced tomatoes with their juices and 6 cups of robust vegetable broth.
6. Add 1 teaspoon of dried oregano and 1 bay leaf to the pot.
7. Bring the soup to a boil over high heat, then reduce the heat to low and simmer uncovered for 20 minutes.
8. Stir in 1 drained and rinsed can of red kidney beans and 1 cup of small elbow pasta.
9. Simmer for 10 more minutes, stirring occasionally, until the pasta is al dente.
10. Stir in 2 cups of fresh spinach leaves and cook for 2 minutes until wilted.
11. Remove the pot from the heat and discard the bay leaf.
12. Season the soup with 1 teaspoon of coarse sea salt and 1/2 teaspoon of freshly cracked black pepper.
13. Ladle the soup into bowls and top each serving with 1/4 cup of freshly grated Parmesan cheese.
Each spoonful delivers a satisfying mix of tender vegetables, creamy beans, and al dente pasta in a savory broth. Enjoy it with crusty bread for dipping, or stir in a spoonful of pesto just before serving to add a fresh, herbal note.
Stuffed Bell Peppers with Quinoa
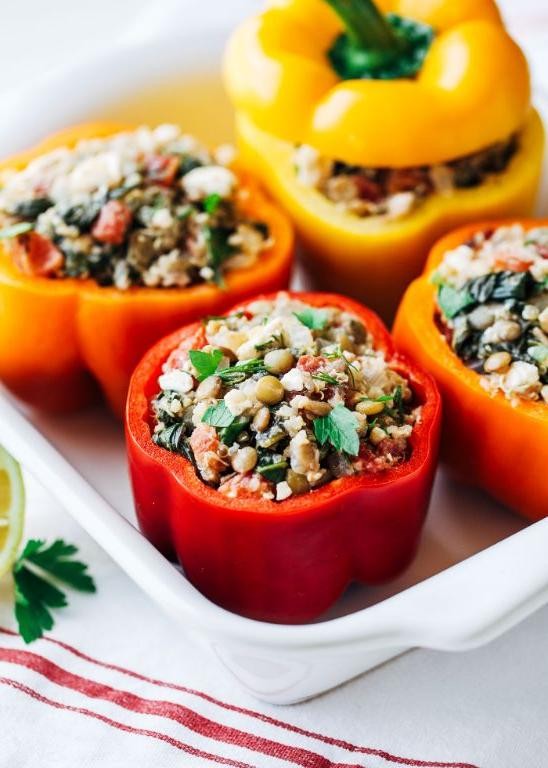
Gently scooping out vibrant bell peppers and filling them with wholesome ingredients transforms simple vegetables into a complete, satisfying meal. Getting these colorful stuffed peppers right requires careful preparation and patient baking, but the reward is worth every minute. Let’s walk through each step together to create perfectly tender peppers with fluffy quinoa filling.
4
servings20
minutes70
minutesIngredients
– 4 large, firm bell peppers in assorted colors
– 1 cup uncooked quinoa, rinsed thoroughly
– 2 cups rich vegetable broth
– 1 tablespoon golden extra virgin olive oil
– 1 medium yellow onion, finely diced
– 3 fresh garlic cloves, minced
– 1 pound lean ground beef
– 1 (14.5-ounce) can fire-roasted diced tomatoes, undrained
– 1 teaspoon aromatic dried oregano
– 1/2 teaspoon smoked paprika
– 1 cup shredded sharp cheddar cheese
– Fresh Italian parsley, chopped
Instructions
1. Preheat your oven to 375°F and lightly grease a 9×13-inch baking dish.
2. Cut the tops off all 4 bell peppers and carefully remove the seeds and white membranes.
3. Bring the vegetable broth to a rolling boil in a medium saucepan.
4. Add the rinsed quinoa, reduce heat to low, cover, and simmer for exactly 15 minutes until all liquid is absorbed.
5. Heat the olive oil in a large skillet over medium heat until shimmering.
6. Sauté the diced onion for 4-5 minutes until translucent and fragrant.
7. Add the minced garlic and cook for 30 seconds until golden and aromatic.
8. Crumble the ground beef into the skillet and cook for 6-8 minutes until no pink remains.
9. Drain any excess grease from the skillet using a slotted spoon.
10. Stir in the cooked quinoa, undrained fire-roasted tomatoes, oregano, and smoked paprika.
11. Simmer the mixture for 3 minutes until well combined and slightly thickened.
12. Spoon the quinoa-beef mixture evenly into the prepared bell pepper cavities.
13. Arrange the stuffed peppers upright in the greased baking dish.
14. Cover tightly with aluminum foil and bake for 30 minutes.
15. Remove the foil and sprinkle the shredded cheddar cheese over each pepper.
16. Return to the oven uncovered for 10-12 minutes until cheese is bubbly and lightly browned.
17. Remove from oven and let rest for 5 minutes before serving.
Just out of the oven, these peppers offer a wonderful contrast between the tender-crisp vegetable walls and the savory, fluffy filling. Juicy tomatoes and aromatic spices meld beautifully with the nutty quinoa and rich beef. Jazz up your presentation by serving each pepper on a bed of fresh greens or alongside a cool dollop of sour cream for extra creaminess.
Spicy Sausage and Bean Stew

There’s nothing quite like a hearty stew to warm you up on chilly evenings, and this spicy sausage and bean version delivers both comfort and flavor in every spoonful. Think of it as a cozy blanket for your taste buds, with just enough kick to keep things interesting. Let me walk you through creating this satisfying one-pot meal from start to finish.
6
servings15
minutes45
minutesIngredients
– 1 tablespoon rich extra virgin olive oil
– 1 pound spicy Italian sausage, casings removed
– 1 large yellow onion, finely diced
– 3 cloves fresh garlic, minced
– 2 stalks crisp celery, chopped
– 2 medium carrots, peeled and sliced
– 1 teaspoon aromatic smoked paprika
– 1/2 teaspoon crushed red pepper flakes
– 4 cups rich chicken broth
– 1 (14.5-ounce) can fire-roasted diced tomatoes
– 2 (15-ounce) cans creamy cannellini beans, drained and rinsed
– 1 bay leaf
– 1/4 cup fresh parsley, chopped
Instructions
1. Heat 1 tablespoon of rich extra virgin olive oil in a large Dutch oven over medium-high heat until shimmering.
2. Add 1 pound of spicy Italian sausage, breaking it into small crumbles with a wooden spoon, and cook for 6-8 minutes until browned and cooked through.
3. Tip: Use a potato masher to break up the sausage evenly for consistent texture.
4. Add 1 large finely diced yellow onion and cook for 4-5 minutes until translucent and fragrant.
5. Stir in 3 cloves of minced fresh garlic and cook for 1 minute until aromatic but not browned.
6. Add 2 chopped stalks of crisp celery and 2 sliced medium carrots, cooking for 5 minutes until slightly softened.
7. Sprinkle in 1 teaspoon of aromatic smoked paprika and 1/2 teaspoon of crushed red pepper flakes, stirring for 30 seconds to toast the spices.
8. Pour in 4 cups of rich chicken broth and 1 can of fire-roasted diced tomatoes, scraping the bottom to release any browned bits.
9. Tip: Deglazing properly ensures you capture all the flavorful fond from the bottom of the pot.
10. Stir in 2 cans of drained and rinsed creamy cannellini beans and add 1 bay leaf.
11. Bring the stew to a boil, then reduce heat to low, cover, and simmer for 25 minutes until the vegetables are tender.
12. Tip: Don’t skip the simmering time—it allows the flavors to meld beautifully.
13. Remove the bay leaf and stir in 1/4 cup of chopped fresh parsley just before serving.
The finished stew boasts a thick, creamy texture from the broken-down beans, with the spicy sausage providing a pleasant heat that builds gradually. Serve it over creamy polenta or with crusty bread for dipping, and watch how the flavors deepen even more the next day.
Zesty Lemon Herb Chicken

Venturing into the world of flavorful chicken dishes becomes remarkably simple with this methodical approach. Let me guide you through creating a bright, herbaceous meal that will fill your kitchen with incredible aromas and deliver perfectly cooked chicken every time.
3
portions15
minutes14
minutesIngredients
– 1.5 pounds boneless, skinless chicken breasts
– 3 tablespoons rich extra virgin olive oil
– 2 tablespoons freshly squeezed lemon juice
– 3 cloves aromatic garlic, minced
– 1 tablespoon finely chopped fresh rosemary
– 1 teaspoon freshly grated lemon zest
– 1/2 teaspoon coarse kosher salt
– 1/4 teaspoon freshly cracked black pepper
Instructions
1. Pat 1.5 pounds boneless, skinless chicken breasts completely dry with paper towels to ensure proper browning.
2. In a medium bowl, whisk together 3 tablespoons rich extra virgin olive oil, 2 tablespoons freshly squeezed lemon juice, 3 cloves aromatic minced garlic, 1 tablespoon finely chopped fresh rosemary, 1 teaspoon freshly grated lemon zest, 1/2 teaspoon coarse kosher salt, and 1/4 teaspoon freshly cracked black pepper.
3. Place the dried chicken breasts in the marinade, turning to coat all surfaces evenly.
4. Cover the bowl with plastic wrap and refrigerate for exactly 30 minutes to allow flavors to penetrate without breaking down the chicken’s texture.
5. Heat a large skillet over medium-high heat until a drop of water sizzles immediately upon contact.
6. Carefully place the marinated chicken breasts in the hot skillet, reserving any remaining marinade in the bowl.
7. Cook the chicken for 6-7 minutes without moving it to develop a golden-brown crust on the first side.
8. Flip the chicken using tongs and cook for another 6-7 minutes until the internal temperature reaches 165°F when tested with an instant-read thermometer.
9. Transfer the cooked chicken to a clean cutting board and let it rest for 5 minutes to allow juices to redistribute evenly throughout the meat.
10. Slice the rested chicken against the grain into 1/2-inch thick pieces for maximum tenderness.
Zesty and vibrant, this chicken boasts a beautifully caramelized exterior that gives way to incredibly juicy, tender meat inside. The bright lemon notes dance perfectly with the earthy rosemary, creating a flavor profile that shines whether served over fluffy quinoa or alongside roasted seasonal vegetables for a complete meal that feels both elegant and approachable.
Honey Glazed Ham

Keeping holiday meals both impressive and approachable starts with mastering the basics, and this honey glazed ham delivers that perfect balance of sweet, savory simplicity that will have your guests asking for seconds while leaving you relaxed in the kitchen. Knowing each step builds confidence, so let’s walk through this methodically from preparation to presentation, ensuring your centerpiece turns out beautifully glazed and juicy every single time. Ready your tools and ingredients—we begin with patience and precision for a result worth celebrating.
1
ham20
minutes120
minutesIngredients
- 1 (8-10 pound) fully cooked bone-in ham
- 1 cup rich, golden honey
- 1/2 cup packed dark brown sugar
- 1/4 cup unsalted butter
- 2 tablespoons Dijon mustard with tangy depth
- 1 teaspoon aromatic ground cloves
- 1/2 teaspoon freshly cracked black pepper
- 1/4 cup warm water
Instructions
- Preheat your oven to 325°F and position a rack in the lower third of the oven.
- Remove all packaging from the fully cooked bone-in ham and place it cut-side down in a roasting pan fitted with a rack. Tip: Using a rack elevates the ham for even heat circulation and prevents the bottom from becoming soggy.
- Score the ham fat in a 1-inch diamond pattern about 1/4-inch deep using a sharp knife.
- Combine the rich, golden honey, packed dark brown sugar, unsalted butter, Dijon mustard with tangy depth, aromatic ground cloves, and freshly cracked black pepper in a small saucepan over medium heat.
- Stir the glaze mixture constantly for 3-4 minutes until the butter melts completely and the sugar dissolves into a smooth, bubbly syrup.
- Brush one-third of the warm glaze evenly over the entire surface of the ham, getting into the scored lines.
- Tent the ham loosely with aluminum foil and place it in the preheated oven.
- Bake the ham for 1 hour and 30 minutes, basting with the remaining glaze every 30 minutes. Tip: Basting regularly builds layers of flavor and creates a glossy, caramelized crust.
- Remove the foil and continue baking for another 20-30 minutes until the internal temperature reaches 140°F when measured with a meat thermometer inserted into the thickest part without touching bone.
- Transfer the ham to a cutting board and let it rest for 15 minutes before slicing. Tip: Resting allows the juices to redistribute, resulting in tender, moist slices rather than a dry ham.
Resist slicing immediately—those 15 minutes of resting transform the texture, yielding ham that’s succulent with a sticky-sweet crust crackling with spice. Repurpose the pan drippings by whisking in 1/4 cup warm water for a quick gravy, or serve thick slices alongside sharp cheddar biscuits to contrast the honeyed richness.
Red Beans and Rice

Developing the perfect pot of Red Beans and Rice requires patience and attention to detail, transforming humble ingredients into a deeply satisfying meal that simmers with tradition and flavor.
6
servings20
minutes155
minutesIngredients
- 1 pound dried small red beans
- 1 large yellow onion, finely diced
- 1 green bell pepper, finely diced
- 3 celery stalks, finely diced
- 4 garlic cloves, minced
- 12 ounces andouille sausage, sliced into ¼-inch rounds
- 2 tablespoons rich extra virgin olive oil
- 6 cups rich chicken broth
- 2 bay leaves
- 1 teaspoon freshly dried thyme
- 1 teaspoon smoked paprika
- ½ teaspoon cayenne pepper
- 2 cups long-grain white rice
- 4 cups water
- 3 scallions, thinly sliced
- Fresh parsley, chopped for garnish
Instructions
- Rinse 1 pound dried small red beans under cold running water in a colander until water runs clear.
- Heat 2 tablespoons rich extra virgin olive oil in a large heavy-bottomed pot over medium heat until shimmering.
- Add 12 ounces sliced andouille sausage and cook for 5 minutes, stirring occasionally, until lightly browned.
- Add 1 finely diced large yellow onion, 1 finely diced green bell pepper, and 3 finely diced celery stalks to the pot.
- Cook vegetable mixture for 8 minutes, stirring frequently, until onions turn translucent and vegetables soften.
- Add 4 minced garlic cloves and cook for 1 minute until fragrant.
- Pour in 6 cups rich chicken broth, scraping the bottom of the pot to release any browned bits.
- Add rinsed red beans, 2 bay leaves, 1 teaspoon freshly dried thyme, 1 teaspoon smoked paprika, and ½ teaspoon cayenne pepper to the pot.
- Bring mixture to a boil over high heat, then reduce heat to low and cover the pot.
- Simmer beans for 2 hours, stirring every 30 minutes to prevent sticking.
- After 2 hours, remove the lid and use a wooden spoon to mash about one-quarter of the beans against the side of the pot to thicken the sauce.
- Continue simmering uncovered for 30 minutes until beans are tender and liquid has reduced to a creamy consistency.
- While beans simmer, rinse 2 cups long-grain white rice under cold water until water runs clear.
- Combine rinsed rice with 4 cups water in a separate saucepan and bring to a boil over high heat.
- Reduce heat to low, cover the saucepan, and cook rice for 18 minutes until tender and water is absorbed.
- Remove rice from heat and let stand covered for 5 minutes before fluffing with a fork.
- Stir 3 thinly sliced scallions into the bean mixture just before serving.
Beans should have a creamy texture with just enough bite, while the rice provides a fluffy contrast. The andouille sausage infuses every bite with smoky depth, balanced by the holy trinity of vegetables. For a creative twist, serve over cornbread or top with a fried egg for extra richness.
Teriyaki Chicken Thighs

A perfectly glazed teriyaki chicken thigh starts with proper preparation and patience, transforming simple ingredients into a restaurant-quality meal right in your own kitchen. Always begin by gathering all your ingredients and equipment—this mise en place approach ensures a smooth cooking process without frantic searching. Arrange your workspace logically with raw ingredients on one side and cooking tools on the other for maximum efficiency.
5
portions15
minutes25
minutesIngredients
– 2 lbs bone-in, skin-on chicken thighs with golden-brown skin
– ½ cup premium Japanese soy sauce
– ¼ cup rich, dark brown sugar
– 2 tbsp freshly grated ginger root
– 3 cloves aromatic garlic, finely minced
– 1 tbsp toasted sesame oil
– 2 tsp cornstarch
– 2 tbsp cold filtered water
– 1 tbsp toasted sesame seeds
– 2 thinly sliced green onions with vibrant green tops
Instructions
1. Pat the chicken thighs completely dry using paper towels to ensure crispy skin.
2. Combine soy sauce, brown sugar, ginger, garlic, and sesame oil in a medium saucepan.
3. Whisk the mixture over medium heat until the sugar fully dissolves, about 2 minutes.
4. Mix cornstarch with cold water in a separate small bowl until no lumps remain.
5. Slowly whisk the cornstarch slurry into the saucepan until thoroughly incorporated.
6. Simmer the sauce for 3-4 minutes until it thickens to a glossy, coating consistency.
7. Preheat a large skillet over medium-high heat until water droplets sizzle upon contact.
8. Place chicken thighs skin-side down in the hot, dry skillet—they should immediately sizzle.
9. Cook undisturbed for 6-8 minutes until the skin develops deep golden-brown coloration.
10. Flip the chicken using tongs and cook for another 5 minutes on the second side.
11. Reduce heat to medium-low and pour the teriyaki sauce over the chicken thighs.
12. Baste the chicken continuously with the sauce for 4-5 minutes until fully glazed.
13. Check internal temperature with a meat thermometer—it should read 165°F at the thickest part.
14. Transfer chicken to a clean plate and let rest for 5 minutes to redistribute juices.
15. Sprinkle with toasted sesame seeds and fresh green onions just before serving. Resting these glazed thighs allows the flavors to meld while the skin maintains its slight crispness against the sticky-sweet sauce. Really, the magic happens in that final basting stage where the sauce reduces to a glossy coating that clings to every nook of the chicken. Consider serving over fluffy jasmine rice to catch every drop of the complex teriyaki glaze, or slice and tuck into warm tortillas for an unexpected fusion twist.
Mediterranean Lamb Shanks
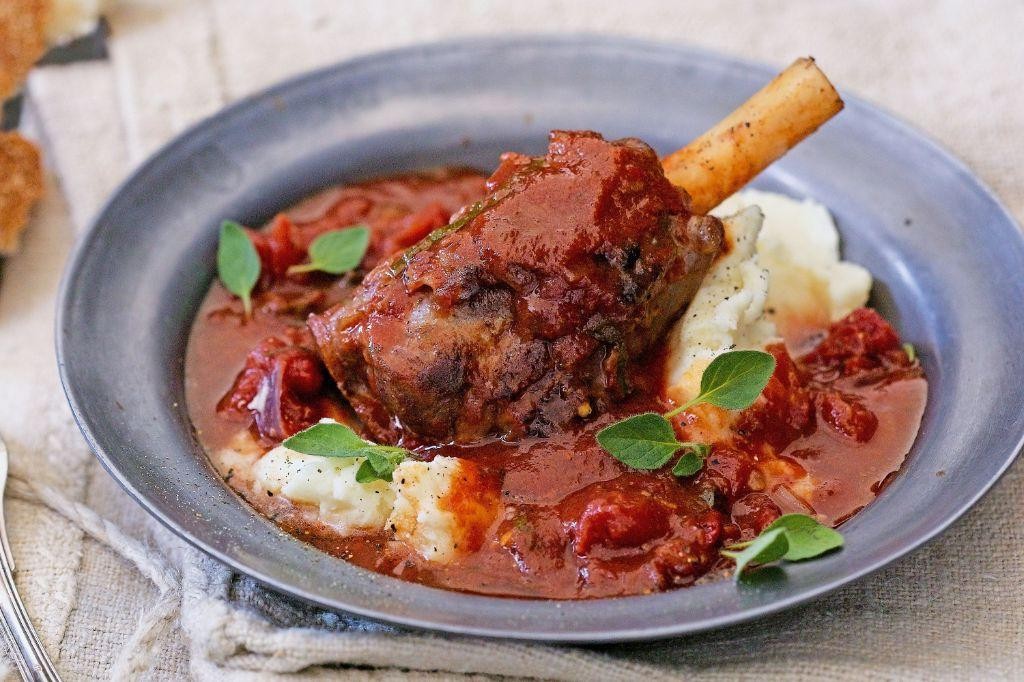
Slow-cooked Mediterranean lamb shanks transform tough cuts into fall-off-the-bone perfection with minimal hands-on effort. Simply season generously, sear until deeply browned, then let your oven do the work while aromatic herbs and vegetables meld into a rich, savory sauce. This method guarantees tender results every time, even for first-time cooks.
4
servings15
minutes195
minutesIngredients
– 4 meaty lamb shanks
– 2 tablespoons rich extra virgin olive oil
– 1 large yellow onion, finely diced
– 4 plump garlic cloves, minced
– 1 cup dry red wine
– 2 cups rich beef stock
– 1 (14.5-ounce) can fire-roasted diced tomatoes
– 2 tablespoons sun-dried tomato paste
– 2 fresh rosemary sprigs
– 4 fresh thyme sprigs
– 1 teaspoon coarse sea salt
– ½ teaspoon freshly cracked black pepper
Instructions
1. Preheat your oven to 325°F.
2. Pat lamb shanks completely dry with paper towels.
3. Rub shanks evenly with coarse sea salt and freshly cracked black pepper.
4. Heat rich extra virgin olive oil in a large Dutch oven over medium-high heat until shimmering.
5. Sear lamb shanks for 4-5 minutes per side until deeply browned on all surfaces.
6. Transfer shanks to a clean plate, reserving drippings in the pot.
7. Add finely diced yellow onion to the hot drippings, sautéing for 5 minutes until translucent.
8. Stir in minced garlic cloves and cook for 1 minute until fragrant.
9. Pour in dry red wine, scraping the bottom to release any browned bits.
10. Simmer wine for 3 minutes until reduced by half.
11. Add rich beef stock, fire-roasted diced tomatoes, and sun-dried tomato paste, stirring to combine.
12. Return lamb shanks to the pot, nestling them into the liquid.
13. Tuck fresh rosemary sprigs and fresh thyme sprigs around the shanks.
14. Cover the Dutch oven tightly and transfer to the preheated oven.
15. Braise for 2.5-3 hours until meat pulls easily from the bone with a fork.
16. Remove herb sprigs before serving.
17. Skim excess fat from the surface of the sauce with a spoon.
18. Serve shanks with sauce spooned over the top.
They emerge incredibly tender, with meat that slides cleanly from the bone at the slightest touch. The slow-braised sauce develops deep umami notes from the wine reduction and tomato paste, balanced by the herbal brightness of rosemary and thyme. Try serving over creamy polenta or rustic mashed potatoes to soak up every drop of the rich cooking liquid.
Conclusion
Overall, these 25 slowcooker recipes make weeknight dinners effortless and delicious. From hearty stews to tender meats, there’s something for every craving. We hope you find new family favorites! Try them out, then leave a comment with your top pick and share this roundup on Pinterest to spread the comfort.