
Perfectly portioned meals just for you—no leftovers, no waste! Whether you’re craving quick dinners, seasonal favorites, or cozy comfort food, these single-serving recipes are designed to make solo dining delicious and effortless. Get ready to treat yourself to meals that are as easy to make as they are satisfying. Dive in and discover your new go-to dishes!
Microwave Mug Pizza

Beyond the constraints of traditional ovens and lengthy prep times emerges a culinary revelation that transforms humble ingredients into comforting perfection in mere minutes. This microwave mug pizza captures the essence of classic Italian flavors through an ingeniously simplified method, offering a sophisticated solution for those moments when time is precious but standards remain uncompromised. With golden, bubbling cheese and a perfectly tender crust, this single-serving delight proves that elegance can indeed be found in the most unexpected places.
1
servings5
minutes2
minutesIngredients
– ¼ cup all-purpose flour, finely sifted
– ¼ teaspoon baking powder, aluminum-free
– ⅛ teaspoon fine sea salt
– 3 tablespoons whole milk, gently warmed
– 1½ teaspoons extra virgin olive oil, rich and golden
– 1 tablespoon robust tomato sauce, slow-simmered
– 3 tablespoons whole milk mozzarella, freshly shredded
– 5 slices delicate pepperoni, artisanal cut
– ½ teaspoon dried oregano, fragrant and aromatic
Instructions
1. Combine ¼ cup finely sifted all-purpose flour, ¼ teaspoon aluminum-free baking powder, and ⅛ teaspoon fine sea salt in a 12-ounce microwave-safe mug, whisking for 15 seconds until fully incorporated.
2. Pour 3 tablespoons gently warmed whole milk and 1½ teaspoons rich golden extra virgin olive oil into the dry ingredients, stirring with a fork for 30 seconds until a smooth, lump-free dough forms.
3. Spread the dough evenly across the bottom of the mug using the back of a spoon, creating a uniform ½-inch thick layer that reaches the mug’s edges.
4. Spoon 1 tablespoon slow-simmered robust tomato sauce over the dough surface, spreading it in circular motions to cover completely while leaving a ¼-inch border.
5. Sprinkle 3 tablespoons freshly shredded whole milk mozzarella evenly over the sauce, ensuring coverage to the edges for optimal melting.
6. Arrange 5 artisanal cut delicate pepperoni slices in a single layer over the cheese, spacing them evenly for consistent flavor distribution.
7. Dust the surface with ½ teaspoon fragrant aromatic dried oregano, gently pressing the herbs into the cheese to release their essential oils.
8. Microwave on high power for 90 seconds exactly, watching for the cheese to become fully melted and bubbly with golden spots.
9. Let rest for 2 minutes to allow the crust to set properly and the cheese to achieve optimal stretchiness.
10. Carefully run a butter knife around the mug’s edges to loosen the pizza before gently tipping it onto a plate.
Zestfully golden with a surprisingly airy crust that yields to the tooth with gentle resistance, this miniature masterpiece delivers concentrated tomato sweetness balanced by the savory punch of quality pepperoni. The melted cheese forms delicate strands with each pull, while the aromatic oregano infuses every bite with Mediterranean warmth—perfect for serving alongside a crisp arugula salad drizzled with lemon vinaigrette or as an elegant appetizer for impromptu gatherings.
Solo Stir-Fry Noodles
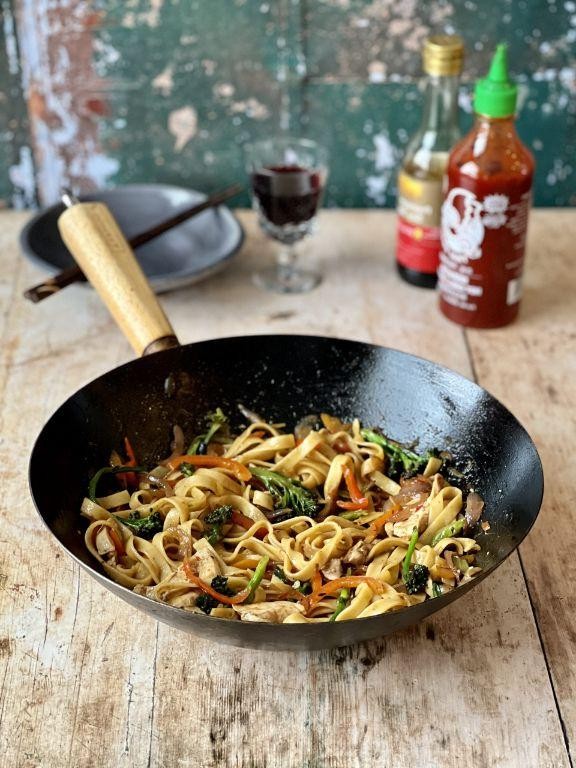
Aromatic and effortlessly sophisticated, these Solo Stir-Fry Noodles transform simple ingredients into a vibrant weeknight masterpiece. An elegant dance of textures and flavors unfolds in mere minutes, offering both culinary satisfaction and visual appeal that belies its simplicity. This single-serving creation proves that dining alone need not compromise on sophistication or flavor complexity.
1
servings10
minutes8
minutesIngredients
- 4 ounces fresh ramen noodles
- 1 tablespoon toasted sesame oil
- 2 cloves garlic, thinly sliced
- 1 teaspoon freshly grated ginger
- 1/4 cup thinly sliced scallions
- 1/2 cup julienned carrots
- 1/2 cup snap peas, trimmed
- 2 tablespoons soy sauce
- 1 teaspoon rice vinegar
- 1 teaspoon honey
- 1 tablespoon vegetable oil
- 1 large egg
- 1 tablespoon toasted sesame seeds
Instructions
- Bring 4 cups of water to a rolling boil in a medium saucepan over high heat.
- Add fresh ramen noodles and cook for precisely 3 minutes until al dente, stirring occasionally to prevent sticking.
- Drain noodles thoroughly and toss immediately with 1 tablespoon toasted sesame oil to prevent clumping.
- Heat 1 tablespoon vegetable oil in a large wok or skillet over medium-high heat until shimmering, about 2 minutes.
- Add thinly sliced garlic and cook for 30 seconds until fragrant but not browned.
- Stir in freshly grated ginger and cook for 15 seconds to release its aromatic oils.
- Add julienned carrots and snap peas, stir-frying for 2 minutes until vegetables are crisp-tender.
- Push vegetables to one side of the wok and crack 1 large egg into the empty space.
- Scramble the egg for 45 seconds until softly set, then incorporate with the vegetables.
- Add the sesame-coated noodles to the wok, tossing to combine all elements.
- Pour 2 tablespoons soy sauce, 1 teaspoon rice vinegar, and 1 teaspoon honey over the noodle mixture.
- Stir-fry continuously for 90 seconds until sauce evenly coats every component.
- Fold in thinly sliced scallions and cook for 30 seconds just to wilt slightly.
- Transfer to a warmed bowl and garnish generously with 1 tablespoon toasted sesame seeds.
Remarkably balanced in texture, these noodles offer the perfect interplay between the chewy pasta and crisp vegetables. The savory depth from the soy sauce harmonizes beautifully with the subtle sweetness of honey and bright acidity of rice vinegar. For an elevated presentation, serve in a shallow ceramic bowl with chopsticks resting alongside, allowing the vibrant colors to shine through.
One-Pan Chicken Parmesan
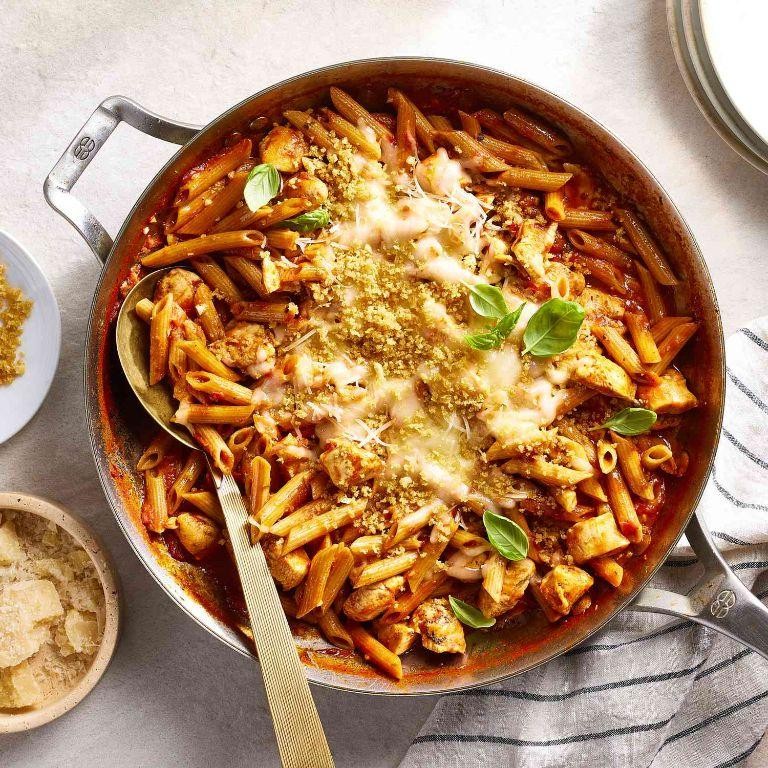
Dazzling in its simplicity yet profound in flavor, this One-Pan Chicken Parmesan transforms humble ingredients into a showstopping meal that marries crispy, golden chicken with vibrant, herb-kissed tomato sauce and molten, stretchy mozzarella. Perfect for both weeknight dinners and elegant gatherings, it delivers restaurant-quality results with minimal cleanup, allowing the harmonious blend of textures and tastes to shine through effortlessly. Each bite offers a symphony of crispiness, tang, and creamy richness that will have everyone reaching for seconds.
5
servings15
minutes28
minutesIngredients
– 4 boneless, skinless chicken breasts, pounded to ½-inch thickness
– 1 cup all-purpose flour, finely sifted
– 2 large farm-fresh eggs, lightly beaten
– 1 cup Italian-seasoned breadcrumbs, golden and aromatic
– ½ cup rich extra virgin olive oil
– 2 cups robust marinara sauce, simmered with herbs
– 8 ounces fresh mozzarella cheese, thinly sliced
– ¼ cup freshly grated Parmesan cheese, sharp and nutty
– 2 tablespoons unsalted butter, cold and cubed
– 1 teaspoon fine sea salt
– ½ teaspoon freshly ground black pepper, aromatic and coarse
Instructions
1. Preheat your oven to 375°F and position a rack in the center for even cooking.
2. Pat the chicken breasts completely dry with paper towels to ensure a crisp crust.
3. Season both sides of the chicken evenly with fine sea salt and freshly ground black pepper.
4. Dredge each chicken breast in the finely sifted all-purpose flour, shaking off any excess.
5. Dip the floured chicken into the lightly beaten farm-fresh eggs, coating thoroughly.
6. Press the chicken into the Italian-seasoned breadcrumbs until fully covered on all sides.
7. Heat the rich extra virgin olive oil in a large oven-safe skillet over medium-high heat until it shimmers, about 350°F.
8. Carefully place the breaded chicken breasts into the hot oil, cooking for 4–5 minutes per side until deeply golden brown and crisp.
9. Remove the skillet from heat and pour the robust marinara sauce around the chicken, not directly on top, to maintain crispiness.
10. Top each chicken breast with slices of fresh mozzarella cheese and a sprinkle of freshly grated Parmesan cheese.
11. Dot the surface with cold, cubed unsalted butter for added richness and browning.
12. Transfer the skillet to the preheated oven and bake for 15–18 minutes, until the cheese is bubbly and lightly browned.
13. Let the dish rest for 5 minutes before serving to allow the juices to redistribute. Ultimate in both comfort and elegance, this dish boasts a crackling exterior that gives way to tender, juicy chicken beneath a blanket of velvety, herbaceous sauce and gloriously stretchy cheese. Serve it over a bed of al dente linguine or alongside a crisp arugula salad to contrast the richness, making each component sing in perfect harmony.
Quick Quinoa Salad Bowl
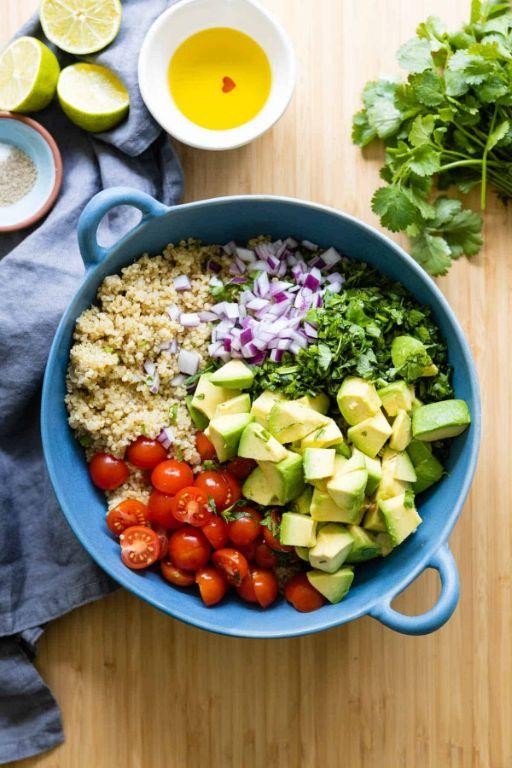
A vibrant symphony of textures and flavors awaits in this sophisticated yet approachable quinoa salad bowl, where nutty grains meet crisp vegetables and a zesty citrus dressing for a meal that nourishes both body and soul. Assembled in mere minutes, this dish transforms simple ingredients into an elegant lunch or light dinner that feels both wholesome and indulgent, perfect for busy weeknights when time is precious but quality remains paramount. Each component contributes its unique character, creating a harmonious balance that delights the palate with every forkful.
3
servings25
minutes15
minutesIngredients
– 1 cup tri-color quinoa
– 2 cups vegetable broth
– 1 large English cucumber, finely diced
– 1 pint cherry tomatoes, halved
– 1/2 red onion, thinly sliced
– 1/4 cup fresh parsley, chopped
– 1/4 cup fresh mint, chopped
– 1/3 cup rich extra virgin olive oil
– 3 tablespoons fresh lemon juice
– 1 teaspoon Dijon mustard
– 1/2 teaspoon flaky sea salt
– 1/4 teaspoon freshly cracked black pepper
Instructions
1. Rinse 1 cup tri-color quinoa under cold running water in a fine-mesh strainer for 1 minute to remove the natural saponin coating that can cause bitterness.
2. Combine the rinsed quinoa and 2 cups vegetable broth in a medium saucepan and bring to a boil over high heat.
3. Reduce heat to low, cover the saucepan, and simmer for 15 minutes until the quinoa has absorbed all the liquid and the grains display tiny white spirals.
4. Remove the cooked quinoa from heat, fluff with a fork, and spread it in a thin layer on a baking sheet to cool completely for 20 minutes, which prevents the vegetables from wilting when mixed.
5. While quinoa cools, whisk together 1/3 cup rich extra virgin olive oil, 3 tablespoons fresh lemon juice, 1 teaspoon Dijon mustard, 1/2 teaspoon flaky sea salt, and 1/4 teaspoon freshly cracked black pepper in a small bowl until emulsified.
6. Dice 1 large English cucumber into 1/4-inch pieces and place in a large mixing bowl.
7. Halve 1 pint cherry tomatoes and add them to the bowl with the cucumber.
8. Thinly slice 1/2 red onion and add to the vegetable mixture.
9. Chop 1/4 cup fresh parsley and 1/4 cup fresh mint, then add to the bowl with the other vegetables.
10. Transfer the cooled quinoa to the vegetable mixture and pour the dressing over everything.
11. Gently toss all ingredients together until evenly coated with the dressing, being careful not to crush the tender vegetables.
Final touches reveal a delightful contrast between the fluffy quinoa and crisp vegetables, with the bright lemon dressing cutting through the earthiness of the grains. For an elegant presentation, serve in shallow bowls garnished with additional fresh herbs, or pack for a sophisticated picnic where the flavors continue to meld and deepen. The salad maintains its perfect texture for hours, making it ideal for preparing ahead when entertaining guests.
Mason Jar Omelette
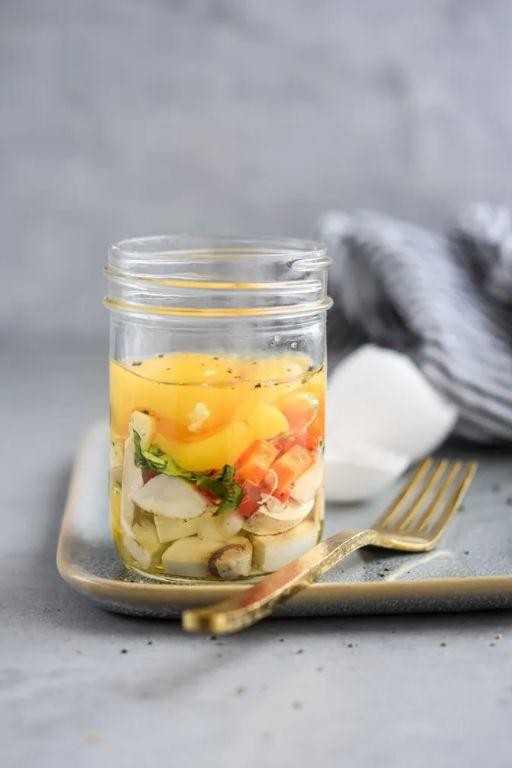
Beyond the morning rush, there exists an elegant solution for those seeking both convenience and culinary sophistication—the Mason Jar Omelette transforms humble ingredients into a portable masterpiece, marrying the comfort of a classic breakfast with contemporary flair. Beautifully layered and effortlessly prepared, this dish promises to elevate your morning routine with its vibrant colors and harmonious flavors, all contained within the charming transparency of a glass jar. Begin your day with this artful creation that proves breakfast can be both practical and profoundly delicious.
1
omelette5
minutes8
minutesIngredients
– 2 large farm-fresh eggs
– 1 tablespoon rich whole milk
– 1 tablespoon finely grated Parmesan cheese
– 1 tablespoon unsalted butter
– ¼ cup finely diced sweet bell peppers
– 2 tablespoons chopped fresh chives
– ¼ teaspoon kosher salt
– ⅛ teaspoon freshly ground black pepper
Instructions
1. Crack 2 large farm-fresh eggs into a medium-sized Mason jar.
2. Add 1 tablespoon rich whole milk to the jar.
3. Sprinkle in ¼ teaspoon kosher salt and ⅛ teaspoon freshly ground black pepper.
4. Secure the lid tightly on the jar and shake vigorously for 30 seconds until the mixture becomes pale yellow and frothy.
5. Stir in 1 tablespoon finely grated Parmesan cheese, ¼ cup finely diced sweet bell peppers, and 2 tablespoons chopped fresh chives with a fork until evenly distributed.
6. Melt 1 tablespoon unsalted butter in a non-stick skillet over medium heat, swirling to coat the surface evenly.
7. Pour the egg mixture into the heated skillet and let it cook undisturbed for 2 minutes until the edges begin to set.
8. Gently lift the edges of the omelette with a spatula and tilt the skillet to allow uncooked egg to flow underneath.
9. Continue cooking for another 2-3 minutes until the surface is mostly set but still slightly glossy.
10. Carefully fold the omelette in half using the spatula and cook for 1 additional minute to ensure the center is fully cooked.
11. Slide the finished omelette onto a plate and let it rest for 1 minute before serving. Pleasantly fluffy and delicately golden, this omelette offers a tender texture that contrasts beautifully with the crisp sweetness of bell peppers and the sharp, savory notes of Parmesan. Present it alongside toasted artisan bread or layer it back into the Mason jar for a picturesque picnic breakfast, where each bite unfolds with herbaceous freshness and rich, comforting warmth.
Creamy Tomato Basil Soup

Unveiling the ultimate comfort in a bowl, this creamy tomato basil soup transforms humble ingredients into pure elegance. Velvety textures and vibrant flavors dance together in perfect harmony, creating a dish that feels both nostalgic and sophisticated. Each spoonful promises warmth and satisfaction, making it the ideal centerpiece for any autumn gathering.
6
servings15
minutes36
minutesIngredients
– 3 tablespoons rich extra-virgin olive oil
– 1 large yellow onion, finely diced
– 3 cloves fresh garlic, minced
– 2 (28-ounce) cans San Marzano tomatoes, whole and peeled
– 1 cup vegetable broth, low-sodium
– 1/2 cup heavy cream
– 1/4 cup fresh basil leaves, chopped
– 1 teaspoon granulated sugar
– 1/2 teaspoon freshly cracked black pepper
– 1/2 teaspoon fine sea salt
Instructions
1. Heat 3 tablespoons of rich extra-virgin olive oil in a large Dutch oven over medium heat until shimmering.
2. Add 1 large finely diced yellow onion and sauté for 8-10 minutes until translucent and fragrant.
3. Stir in 3 minced fresh garlic cloves and cook for 1 minute until aromatic but not browned.
4. Pour in 2 (28-ounce) cans of whole peeled San Marzano tomatoes with their juices, using a wooden spoon to gently crush the tomatoes.
5. Add 1 cup low-sodium vegetable broth, 1 teaspoon granulated sugar, 1/2 teaspoon fine sea salt, and 1/2 teaspoon freshly cracked black pepper.
6. Bring the mixture to a gentle boil, then reduce heat to low and simmer uncovered for 25 minutes, stirring occasionally.
7. Carefully transfer the soup in batches to a blender, filling only halfway, and blend until completely smooth (tip: hold the lid firmly with a towel to prevent steam buildup).
8. Return the blended soup to the Dutch oven and stir in 1/2 cup heavy cream over low heat.
9. Fold in 1/4 cup chopped fresh basil leaves just before serving (tip: reserve a few whole leaves for garnish).
10. Ladle the soup into warm bowls and serve immediately (tip: pre-warming bowls ensures the soup stays hot longer).
The silky texture coats the palate with luxurious richness, while the bright acidity of tomatoes balances perfectly with the creamy undertones. For an elegant presentation, drizzle with a swirl of olive oil and serve alongside crusty artisanal bread for dipping into this velvety masterpiece.
Mini Meatloaf for One
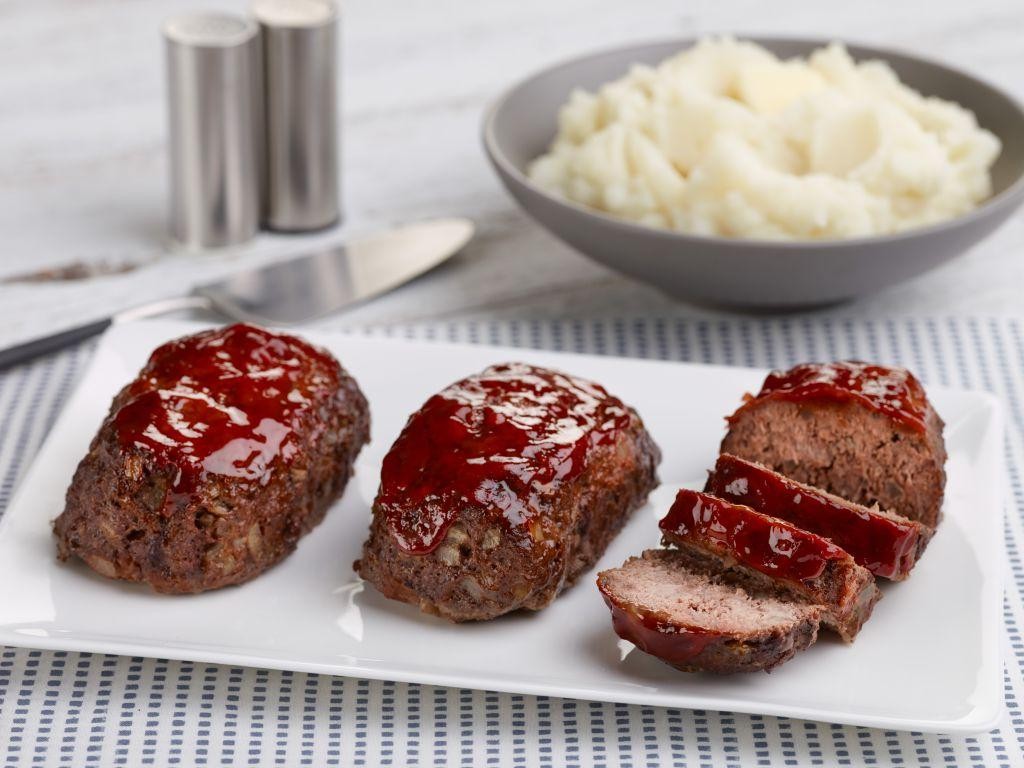
Just when you crave the nostalgic comfort of a classic meatloaf but find yourself dining solo, this perfectly portioned creation offers sophisticated satisfaction without leftovers. Juicy ground beef mingles with aromatic seasonings in a personal-sized masterpiece that bakes to golden perfection while filling your kitchen with the irresistible scent of home. Each bite delivers the familiar warmth of Sunday supper, elegantly scaled for one memorable evening.
3
portions15
minutes30
minutesIngredients
- ½ pound 80/20 ground beef
- ¼ cup finely chopped sweet yellow onion
- ¼ cup panko breadcrumbs with golden texture
- 3 tablespoons rich ketchup with tomato sweetness
- 1 large farm-fresh egg
- 1 tablespoon Worcestershire sauce with complex umami notes
- 1 teaspoon Dijon mustard with sharp tang
- ½ teaspoon garlic powder with aromatic depth
- ½ teaspoon smoked paprika with subtle warmth
- ½ teaspoon kosher salt with clean flavor
- ¼ teaspoon freshly ground black pepper
Instructions
- Preheat your oven to 375°F and lightly grease a standard muffin tin with cooking spray.
- In a medium mixing bowl, combine the ground beef, sweet yellow onion, panko breadcrumbs, 2 tablespoons of ketchup, egg, Worcestershire sauce, Dijon mustard, garlic powder, smoked paprika, kosher salt, and black pepper.
- Gently mix the ingredients with your hands until just combined, being careful not to overwork the meat to maintain tenderness.
- Divide the meat mixture evenly into 3 portions and shape each into a compact oval loaf, placing them in the prepared muffin tin with space between for even cooking.
- Brush the remaining 1 tablespoon of ketchup evenly over the top of each meatloaf to create a glossy glaze.
- Bake for 25-30 minutes at 375°F until the internal temperature reaches 160°F on an instant-read thermometer and the tops are caramelized.
- Allow the meatloaves to rest in the pan for 5 minutes before serving to let the juices redistribute throughout the meat.
Hearty yet refined, these individual meatloaves boast a firm but tender crumb that holds together beautifully when sliced. The smoky paprika and Worcestershire create layers of savory depth that complement the sweet tomato glaze. For an elevated presentation, serve alongside creamy mashed potatoes and sautéed green beans, or slice thinly for an elegant open-faced sandwich with horseradish aioli.
Single Serving Mac and Cheese
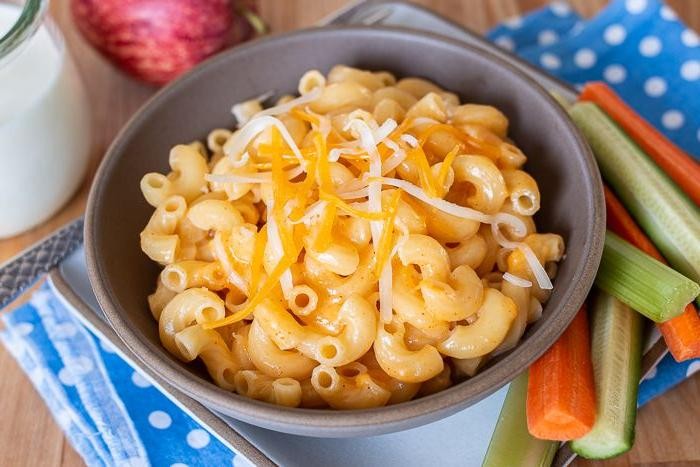
Just when that late-night craving strikes or you need a comforting solo meal, this single-serving mac and cheese delivers pure indulgence in minutes. Juxtaposing creamy sophistication with nostalgic comfort, it transforms simple pantry staples into an elegant personal feast. Crafted with attention to texture and depth, each bite celebrates the timeless appeal of perfectly melted cheese and tender pasta.
1
servings5
minutes12
minutesIngredients
– ½ cup elbow macaroni
– ¾ cup whole milk
– 2 tablespoons unsalted butter
– ¼ cup heavy cream
– ½ cup freshly grated sharp cheddar cheese
– 2 tablespoons finely grated Parmesan cheese
– ⅛ teaspoon freshly grated nutmeg
– ¼ teaspoon Dijon mustard
– Pinch of smoked paprika
– Pinch of kosher salt
Instructions
1. Bring a small saucepan of generously salted water to a rolling boil over high heat.
2. Add the elbow macaroni and cook for exactly 8 minutes, stirring occasionally to prevent sticking.
3. Drain the pasta thoroughly in a fine-mesh strainer, shaking to remove excess water.
4. Return the empty saucepan to medium-low heat and melt the unsalted butter completely.
5. Whisk in the whole milk and heavy cream until the mixture is steaming but not boiling.
6. Gradually sprinkle in the freshly grated sharp cheddar cheese while stirring constantly with a silicone spatula.
7. Continue stirring for 2–3 minutes until the cheese is fully melted and the sauce appears smooth.
8. Stir in the finely grated Parmesan cheese until completely incorporated into the sauce.
9. Add the Dijon mustard, freshly grated nutmeg, smoked paprika, and kosher salt, whisking to combine.
10. Return the drained pasta to the saucepan and toss gently to coat every piece with the cheese sauce.
11. Cook for 1 additional minute over low heat, stirring continuously, until the sauce clings to the pasta.
12. Remove from heat and let rest for 1 minute to allow the sauce to thicken slightly.
13. Transfer immediately to a warmed bowl using a rubber spatula to scrape all sauce from the pan.
Creamy yet distinct, each tender pasta shape wears its glossy cheese cloak with pride. The sharp cheddar provides a bold foundation while the nutmeg whispers warmth beneath the surface. For an elevated twist, crown it with buttery breadcrumbs or serve alongside roasted cherry tomatoes for a burst of acidity.
Individual Chocolate Mug Cake

A sophisticated solution for sudden chocolate cravings, this individual mug cake transforms humble pantry staples into a decadent single-serving dessert in mere minutes. Imagine warm, molten chocolate emanating from your microwave, promising instant gratification with an elegant touch. This recipe elevates the convenience of mug baking to something truly special, perfect for those evenings when only chocolate will do.
1
servings5
minutes2
minutesIngredients
– 1/4 cup premium all-purpose flour
– 2 tablespoons rich Dutch-process cocoa powder
– 2 tablespoons granulated white sugar
– 1/4 teaspoon pure baking powder
– Pinch of fine sea salt
– 3 tablespoons creamy whole milk
– 2 tablespoons high-quality vegetable oil
– 1/2 teaspoon pure vanilla extract
– 2 tablespoons dark chocolate chips
Instructions
1. Select a 12-ounce microwave-safe mug and ensure it’s completely dry.
2. Whisk together 1/4 cup premium all-purpose flour, 2 tablespoons rich Dutch-process cocoa powder, 2 tablespoons granulated white sugar, 1/4 teaspoon pure baking powder, and a pinch of fine sea salt until no lumps remain.
3. Pour 3 tablespoons creamy whole milk into the dry ingredients.
4. Add 2 tablespoons high-quality vegetable oil to the mixture.
5. Incorporate 1/2 teaspoon pure vanilla extract.
6. Stir vigorously with a small whisk for exactly 30 seconds until the batter becomes smooth and glossy.
7. Fold in 2 tablespoons dark chocolate chips until evenly distributed throughout the batter.
8. Microwave on high power for 60-75 seconds, watching for the cake to rise and set while the center remains slightly moist.
9. Carefully remove the mug using oven mitts, as it will be extremely hot.
10. Let the cake rest for 2 minutes before serving to allow the residual heat to finish cooking the center.
Zesty with deep chocolate intensity, this cake boasts a tender crumb surrounding molten chocolate pockets that create delightful textural contrast. The sophisticated bitterness of Dutch-process cocoa balances beautifully with the sweet chocolate chips, making it worthy of serving alongside a scoop of vanilla bean ice cream or garnished with fresh raspberries for an elegant presentation.
Breakfast Smoothie Bowl
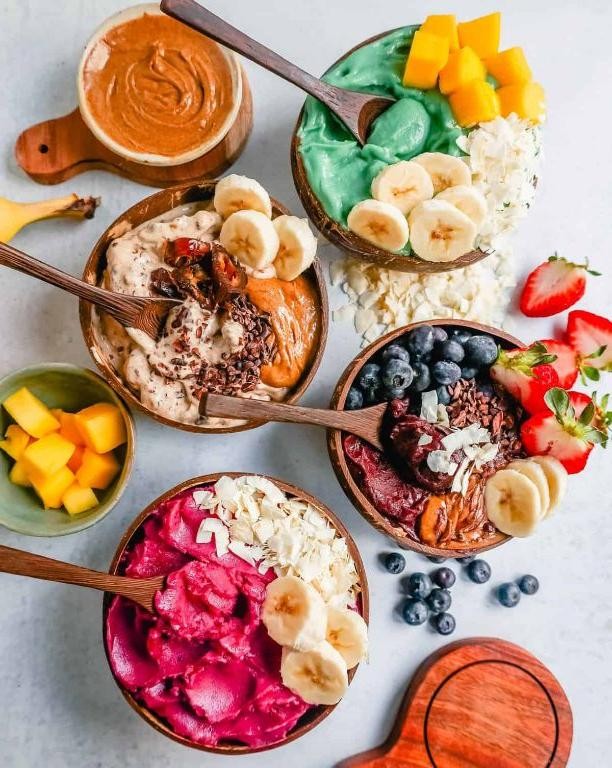
Just as autumn’s crisp mornings begin to settle in, this vibrant breakfast smoothie bowl offers a nourishing start to the day that feels both indulgent and revitalizing. Jewel-toned and luxuriously thick, it transforms simple ingredients into an artful morning ritual worthy of any brunch table. Each spoonful delivers a symphony of textures and flavors that awaken the senses while providing sustained energy.
1
bowl5
minutesIngredients
– 1 cup frozen mixed berries (deep purple and ruby red)
– 1 ripe frozen banana (creamy and sweet)
– 1/2 cup thick Greek yogurt (rich and tangy)
– 1/4 cup unsweetened almond milk (silky and smooth)
– 1 tablespoon pure maple syrup (amber and fragrant)
– 2 tablespoons crunchy granola (toasted and nutty)
– 1 tablespoon chia seeds (tiny and nutrient-dense)
– Fresh mint leaves (bright and aromatic)
Instructions
1. Combine 1 cup frozen mixed berries, 1 ripe frozen banana, 1/2 cup thick Greek yogurt, 1/4 cup unsweetened almond milk, and 1 tablespoon pure maple syrup in a high-speed blender.
2. Blend on high speed for 45-60 seconds until the mixture becomes completely smooth and thick enough to hold its shape when scooped.
3. Pour the vibrant smoothie base into a wide, shallow bowl, using the back of a spoon to create gentle swirls across the surface.
4. Sprinkle 2 tablespoons crunchy granola evenly over one section of the bowl for contrasting texture.
5. Scatter 1 tablespoon chia seeds in a separate section to create visual interest and added nutrition.
6. Arrange several fresh mint leaves artistically around the perimeter as a final garnish.
7. Serve immediately while the smoothie base remains thick and frosty for optimal texture.
A masterpiece of contrasting temperatures emerges with each spoonful—the frozen creaminess of the base giving way to the granola’s satisfying crunch. The tart berries play beautifully against the maple’s subtle sweetness, while the chia seeds add intriguing pops of texture throughout. For an elegant presentation, consider serving in chilled ceramic bowls and topping with edible flowers during summer months.
Baked Avocado and Egg
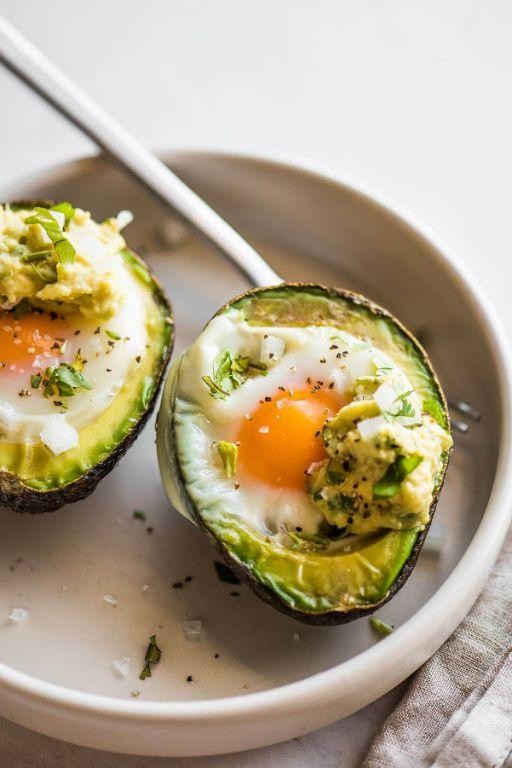
Zestful mornings call for inspired breakfast creations that nourish both body and soul. Baked avocado and egg transforms humble ingredients into an elegant, protein-rich dish that feels simultaneously decadent and wholesome. This simple yet sophisticated preparation showcases nature’s perfect pairing in a warm, comforting presentation that will elevate your morning routine.
5
portions10
minutes18
minutesIngredients
– 2 ripe but firm Hass avocados
– 4 large farm-fresh eggs
– 2 tablespoons rich extra virgin olive oil
– 1 teaspoon flaky sea salt
– ½ teaspoon freshly cracked black pepper
– 2 tablespoons finely chopped fresh chives
– ¼ cup crumbled tangy feta cheese
Instructions
1. Preheat your oven to 400°F and line a baking sheet with parchment paper.
2. Carefully slice both avocados in half lengthwise and remove the pits.
3. Using a spoon, gently scoop out approximately 1 tablespoon of flesh from each avocado half to create a larger cavity for the egg.
4. Brush the cut surfaces of the avocado halves with 1 tablespoon of rich extra virgin olive oil to prevent browning and enhance browning during baking.
5. Arrange the avocado halves cut-side up on the prepared baking sheet, nestling them close together to prevent tipping.
6. Crack one large farm-fresh egg into each avocado cavity, being careful not to break the yolk.
7. Drizzle the remaining tablespoon of rich extra virgin olive oil over the eggs and avocado edges.
8. Season each avocado half evenly with flaky sea salt and freshly cracked black pepper.
9. Bake at 400°F for 15-18 minutes, until the egg whites are fully set but the yolks remain slightly runny.
10. Remove from oven and immediately sprinkle with finely chopped fresh chives and crumbled tangy feta cheese.
11. Let rest for 2 minutes before serving to allow the residual heat to gently melt the cheese. Aromatic and visually stunning, the baked avocado emerges with a warm, buttery texture that contrasts beautifully with the creamy egg yolk and tangy feta. The subtle crunch of flaky salt against the velvety avocado creates a symphony of textures, while the fresh chives provide a bright, herbal finish that cuts through the richness. Serve immediately alongside toasted artisan bread for scooping up every delicious morsel, or garnish with microgreens for an extra touch of elegance.
Savory Oatmeal with Herbs

Consider the humble oatmeal, transformed from breakfast staple into an elegant savory canvas where earthy grains meet aromatic herbs in perfect harmony. This sophisticated preparation elevates simple ingredients into a comforting yet refined dish that bridges the gap between rustic nourishment and culinary artistry. Crafted with intention and care, it offers a warm embrace of flavors that feels both familiar and excitingly new.
1
servings10
minutes25
minutesIngredients
– 1 cup old-fashioned rolled oats
– 2 cups rich chicken broth
– 1 tablespoon high-quality extra virgin olive oil
– 2 cloves fresh garlic, minced
– 1 small shallot, finely diced
– 2 tablespoons freshly chopped parsley
– 1 tablespoon fragrant fresh thyme leaves
– 1/4 cup grated aged Parmesan cheese
– 1 large pasture-raised egg
– 1/2 teaspoon coarse sea salt
– 1/4 teaspoon freshly cracked black pepper
Instructions
1. Heat 1 tablespoon of high-quality extra virgin olive oil in a medium saucepan over medium heat until it shimmers.
2. Add 1 small finely diced shallot and cook for 3 minutes until translucent and fragrant.
3. Stir in 2 cloves of minced fresh garlic and cook for 30 seconds until aromatic but not browned.
4. Pour in 1 cup of old-fashioned rolled oats and toast for 2 minutes, stirring constantly, until they release a nutty fragrance.
5. Add 2 cups of rich chicken broth, 1/2 teaspoon coarse sea salt, and 1/4 teaspoon freshly cracked black pepper to the saucepan.
6. Bring the mixture to a gentle boil, then reduce heat to low and cover with a tight-fitting lid.
7. Simmer for 15 minutes without stirring to allow the oats to absorb the liquid evenly.
8. While the oats cook, fry 1 large pasture-raised egg in a separate non-stick skillet over medium heat for 4 minutes until the white is set but the yolk remains runny.
9. Remove the oatmeal from heat and let it rest, covered, for 2 minutes to complete the absorption process.
10. Gently fold in 2 tablespoons of freshly chopped parsley and 1 tablespoon of fragrant fresh thyme leaves.
11. Stir in 1/4 cup of grated aged Parmesan cheese until fully incorporated and creamy.
12. Transfer the savory oatmeal to a warm serving bowl and top with the fried egg.
Luxuriously creamy with distinct oat texture, this dish offers layers of herbal brightness against the deep umami of Parmesan and rich egg yolk. The gentle heat from the garlic and shallot provides subtle complexity that makes each spoonful more compelling than the last. For an elegant presentation, serve in shallow bowls garnished with additional fresh herbs and a drizzle of olive oil to highlight the dish’s rustic sophistication.
Single Portion Tiramisu

Elegant yet approachable, this single portion tiramisu transforms the classic Italian dessert into an intimate indulgence perfect for solo celebrations or quiet evenings. With layers of coffee-soaked ladyfingers and velvety mascarpone cream, this sophisticated treat delivers restaurant-quality elegance in your own kitchen.
1
portions15
minutesIngredients
– 3 crisp ladyfinger cookies
– ¼ cup strong brewed espresso, cooled to room temperature
– ¼ cup rich mascarpone cheese, at room temperature
– 2 tablespoons granulated sugar
– 1 large farm-fresh egg yolk
– 2 tablespoons heavy whipping cream, chilled
– 1 teaspoon high-quality cocoa powder for dusting
Instructions
1. Separate 1 large farm-fresh egg yolk into a medium mixing bowl, discarding the white or saving for another use.
2. Add 2 tablespoons granulated sugar to the egg yolk and whisk vigorously for 2-3 minutes until the mixture becomes pale yellow and slightly thickened.
3. Gently fold in ¼ cup rich mascarpone cheese that’s at room temperature until fully incorporated and smooth.
4. In a separate chilled bowl, whip 2 tablespoons heavy whipping cream using an electric mixer on medium-high speed for 1-2 minutes until soft peaks form.
5. Carefully fold the whipped cream into the mascarpone mixture until no white streaks remain, being careful not to deflate the airiness.
6. Quickly dip 3 crisp ladyfinger cookies one at a time into ¼ cup strong brewed espresso for 2-3 seconds per side—just enough to moisten without becoming soggy.
7. Arrange the espresso-dipped ladyfingers in a single layer at the bottom of a 6-ounce serving glass or ramekin.
8. Spoon half of the mascarpone cream mixture over the ladyfingers, spreading evenly with the back of a spoon.
9. Repeat with another layer of espresso-dipped ladyfingers and the remaining mascarpone cream.
10. Using a fine-mesh sieve, dust the top generously with 1 teaspoon high-quality cocoa powder in a circular motion for even coverage.
11. Cover tightly with plastic wrap and refrigerate for at least 4 hours, though overnight chilling yields the best texture development. Heavenly in its final form, the tiramisu emerges with cloud-like cream layers that yield to coffee-infused cookies beneath the bittersweet cocoa finish. For an elegant presentation, serve in a clear glass to showcase the beautiful layers, or garnish with chocolate shavings for added texture contrast.
Skillet Shrimp Fajitas
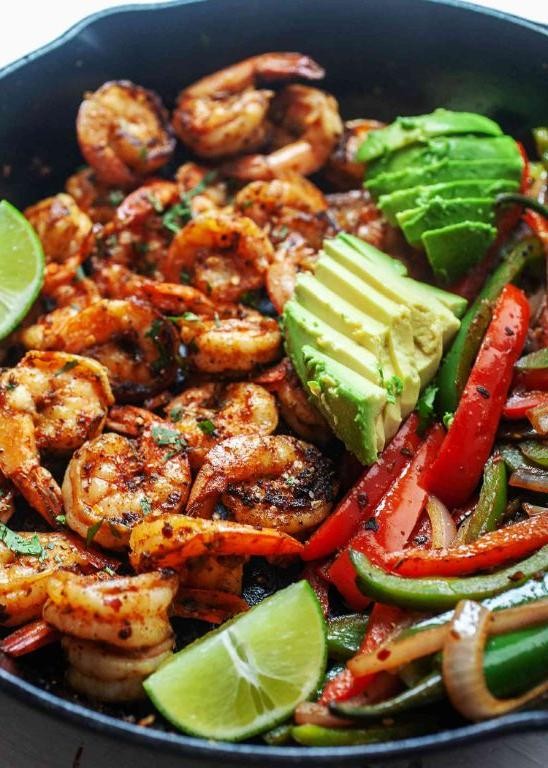
There’s something undeniably magical about the sizzle of shrimp hitting a hot skillet, releasing aromatic steam that carries the promise of a vibrant, satisfying meal. These skillet shrimp fajitas transform humble ingredients into a colorful celebration, where plump seafood meets charred peppers and sweet onions in a symphony of textures and flavors.
5
servings15
minutes13
minutesIngredients
- 1 pound large wild-caught shrimp, peeled and deveined
- 2 tablespoons rich extra virgin olive oil
- 1 large red bell pepper, sliced into thin strips
- 1 large yellow bell pepper, sliced into thin strips
- 1 medium sweet yellow onion, thinly sliced
- 3 cloves fresh garlic, minced
- 2 teaspoons smoked paprika
- 1 teaspoon ground cumin
- 1/2 teaspoon chili powder
- 1/2 teaspoon freshly cracked black pepper
- 1/4 teaspoon coarse sea salt
- 2 tablespoons freshly squeezed lime juice
- 2 tablespoons chopped fresh cilantro
Instructions
- Pat the shrimp completely dry with paper towels to ensure proper searing.
- Heat the olive oil in a large cast-iron skillet over medium-high heat until it shimmers, about 2 minutes.
- Add the bell peppers and onion to the hot skillet, arranging them in a single layer.
- Cook the vegetables undisturbed for 4 minutes to develop a light char on one side.
- Stir the vegetables and continue cooking for another 4 minutes until they are tender-crisp with browned edges.
- Push the vegetables to one side of the skillet to create space for the shrimp.
- Add the shrimp to the empty side of the skillet in a single layer, making sure they don’t overlap.
- Cook the shrimp for 2 minutes until the bottoms turn pink and opaque.
- Flip each shrimp using tongs and cook for 1 more minute until fully opaque and firm.
- Sprinkle the minced garlic, smoked paprika, cumin, chili powder, black pepper, and salt evenly over the entire skillet contents.
- Gently toss everything together until the spices coat the shrimp and vegetables evenly, about 30 seconds.
- Remove the skillet from heat and immediately drizzle with fresh lime juice to brighten the flavors.
- Scatter the chopped cilantro over the fajita mixture just before serving.
Nothing compares to the tender bite of perfectly cooked shrimp against the crisp-tender vegetables, all wrapped in the warmth of smoked paprika and bright lime. For an elegant presentation, serve directly from the skillet at the table with warm tortillas and creamy avocado slices, allowing guests to build their own creations while enjoying the aromatic steam rising from the hot pan.
Cauliflower Rice Stir Fry

Heralding a new era of vegetable-forward cuisine, this cauliflower rice stir-fry transforms humble ingredients into an elegant weeknight masterpiece. With vibrant colors and sophisticated flavors, it proves that healthy eating need not sacrifice refinement or satisfaction. Each bite offers a delightful harmony of textures and aromas that will elevate your dinner routine.
4
servings15
minutes13
minutesIngredients
– 1 large head of fresh cauliflower, broken into florets
– 2 tablespoons rich sesame oil
– 1 medium yellow onion, thinly sliced
– 3 cloves aromatic garlic, minced
– 1 tablespoon freshly grated ginger
– 1 red bell pepper, julienned
– 1 cup crisp snow peas, trimmed
– 2 tablespoons premium soy sauce
– 1 tablespoon smooth rice vinegar
– 1 teaspoon toasted sesame seeds
– 2 thinly sliced green onions
Instructions
1. Place cauliflower florets in a food processor and pulse until they resemble coarse rice grains, being careful not to over-process into mush.
2. Heat sesame oil in a large wok or skillet over medium-high heat until shimmering, about 1 minute.
3. Add sliced yellow onion and cook for 3-4 minutes until translucent and fragrant.
4. Stir in minced garlic and grated ginger, cooking for 30 seconds until aromatic but not browned.
5. Add julienned red bell pepper and snow peas, stir-frying for 2 minutes until vegetables are crisp-tender.
6. Incorporate the cauliflower rice, spreading it evenly across the pan surface.
7. Cook undisturbed for 2 minutes to allow slight caramelization on the bottom layer.
8. Drizzle soy sauce and rice vinegar evenly over the mixture.
9. Toss everything together thoroughly and cook for another 3-4 minutes until cauliflower is tender but still has texture.
10. Remove from heat and garnish with toasted sesame seeds and green onions.
Creating a delightful contrast between the tender cauliflower base and crisp vegetable accents, this stir-fry offers subtle nuttiness from the sesame elements balanced by bright acidity. Consider serving it in lettuce cups for an elegant presentation, or top with a perfectly fried egg to add richness and protein for a complete meal.
Pan-Seared Salmon with Asparagus
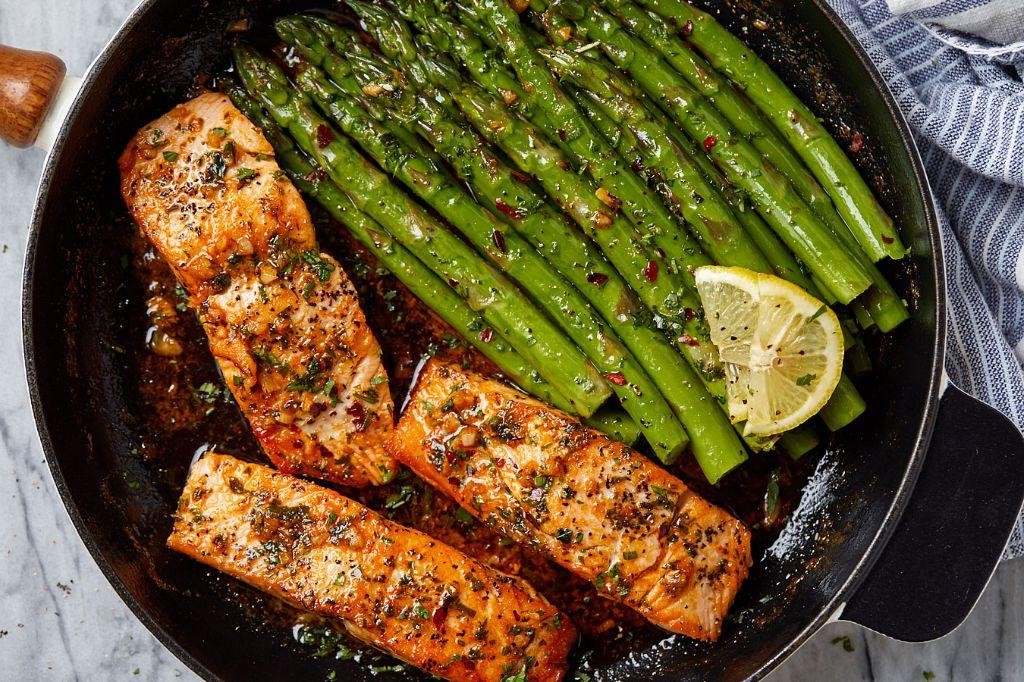
Unveiling the perfect weeknight elegance, this pan-seared salmon with asparagus brings restaurant-quality sophistication to your table in under thirty minutes. The crisp-tender asparagus and flaky, golden-crusted salmon create a harmonious balance of textures and flavors that feels both indulgent and nourishing. With just a handful of quality ingredients, this dish transforms simple components into an impressive culinary statement.
4
servings10
minutes20
minutesIngredients
- 4 (6-ounce) skin-on salmon fillets with firm, vibrant pink flesh
- 1 pound fresh, slender asparagus spears with tight tips
- 3 tablespoons rich extra virgin olive oil
- 2 tablespoons freshly squeezed lemon juice
- 2 cloves aromatic garlic, finely minced
- 1 teaspoon coarse sea salt
- ½ teaspoon freshly cracked black pepper
- 2 tablespoons unsalted butter with high fat content
- 1 tablespoon chopped fresh dill with feathery fronds
Instructions
- Pat the salmon fillets completely dry with paper towels to ensure proper searing.
- Trim the tough woody ends from the asparagus spears by bending each stalk until it snaps naturally.
- Season both sides of the salmon fillets evenly with ½ teaspoon sea salt and ¼ teaspoon black pepper.
- Heat 2 tablespoons olive oil in a large stainless steel skillet over medium-high heat until shimmering but not smoking.
- Place salmon skin-side up in the hot oil and press gently with a spatula for 10 seconds to maximize contact.
- Cook salmon for 4-5 minutes until a deep golden crust forms on the bottom third of the fillet.
- Flip salmon carefully using a thin metal spatula and cook skin-side down for 3-4 minutes until skin crisps.
- Transfer salmon to a warm plate and tent loosely with foil to rest, which allows juices to redistribute evenly.
- Add remaining olive oil to the same skillet and sauté asparagus spears for 5-6 minutes until bright green with slight char marks.
- Add minced garlic to the asparagus and cook for 45 seconds until fragrant but not browned.
- Deglaze the pan with lemon juice, scraping up any browned bits from the salmon for enhanced flavor complexity.
- Swirl in butter until it melts and emulsifies into a glossy sauce, about 30 seconds.
- Return salmon to the skillet and spoon the buttery sauce over each fillet to warm through for 1 minute.
- Sprinkle fresh dill over the dish just before serving to preserve its delicate herbal notes.
When plated, the salmon reveals a crisp exterior giving way to moist, flaky flesh that practically melts on the tongue. The asparagus maintains a satisfying snap while absorbing the bright, buttery sauce infused with garlic and lemon. For an elegant presentation, arrange the spears like rafters beneath the salmon and garnish with extra dill fronds and lemon wedges for squeezing at the table.
Apple Crisp in a Mug
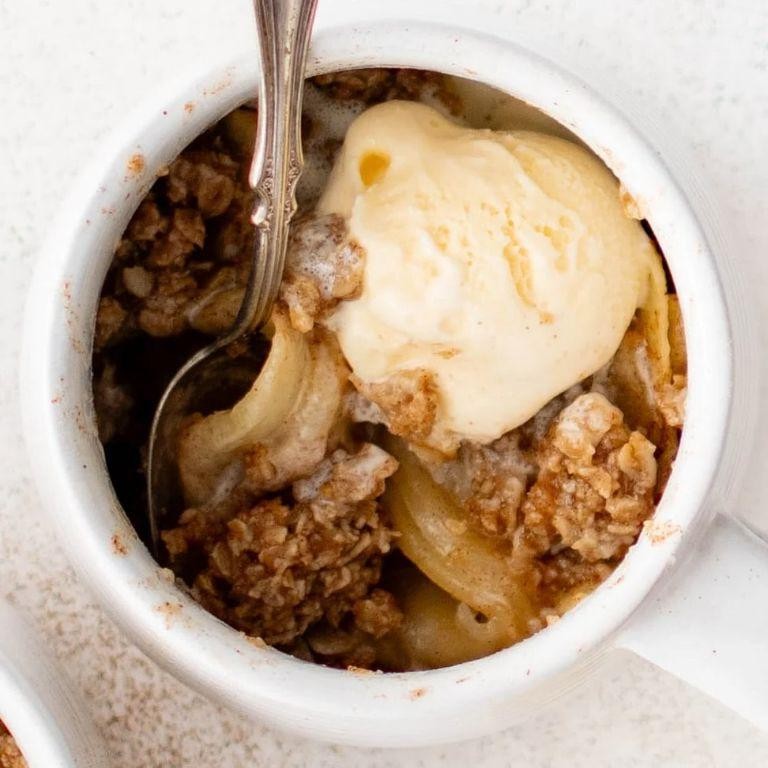
Warm, cinnamon-spiced apples bubbling beneath a buttery oat topping transform the humble microwave into a vessel for instant autumnal comfort. This single-serving dessert captures all the nostalgic charm of traditional apple crisp while delivering restaurant-quality results in mere minutes. Perfect for those evenings when a sweet, satisfying treat is needed without the commitment of baking an entire pan.
1
servings10
minutes2
minutesIngredients
– 1 medium crisp Honeycrisp apple, peeled and diced into ½-inch pieces
– 1 tablespoon rich unsalted butter, melted
– 2 tablespoons light brown sugar, packed
– ¼ teaspoon fragrant ground cinnamon
– ⅛ teaspoon freshly grated nutmeg
– Pinch of fine sea salt
– 3 tablespoons old-fashioned rolled oats
– 1 tablespoon all-purpose flour
– 1 tablespoon cold unsalted butter, cubed
– 1 small scoop of premium vanilla bean ice cream for serving
Instructions
1. Peel one medium Honeycrisp apple using a vegetable peeler, then core it with an apple corer and dice into uniform ½-inch pieces.
2. Combine the diced apple, 1 tablespoon melted unsalted butter, 1 tablespoon packed light brown sugar, ¼ teaspoon ground cinnamon, ⅛ teaspoon freshly grated nutmeg, and a pinch of fine sea salt in a 12-ounce microwave-safe mug.
3. Stir the apple mixture thoroughly with a fork until all pieces are evenly coated with the spiced butter mixture.
4. In a separate small bowl, combine 3 tablespoons old-fashioned rolled oats, 1 tablespoon all-purpose flour, and the remaining 1 tablespoon packed light brown sugar.
5. Add 1 tablespoon cold cubed unsalted butter to the oat mixture and use your fingertips to rub the butter into the dry ingredients until coarse crumbs form.
6. Sprinkle the oat topping evenly over the apple mixture in the mug, pressing down gently to create an even layer.
7. Place the mug in the microwave and cook on high power for 2 minutes and 30 seconds until the apples are tender when pierced with a fork and the topping appears golden.
8. Carefully remove the mug from the microwave using oven mitts, as it will be extremely hot.
9. Let the apple crisp rest for 3 minutes to allow the bubbling juices to thicken slightly and the flavors to meld.
10. Top with one small scoop of premium vanilla bean ice cream just before serving.
Remarkably, the contrast between the tender, cinnamon-laced apples and the crunchy oat topping creates a symphony of textures in every spoonful. The vanilla bean ice cream melts into the warm crisp, creating luxurious creamy rivulets that complement the spiced fruit beautifully. For an elegant presentation, garnish with a delicate dusting of cinnamon or serve alongside a small glass of chilled apple cider.
Conclusion
These single-serving recipes make solo dining a true pleasure, eliminating waste while delivering delicious, perfectly portioned meals. Try these dishes and discover how enjoyable cooking for one can be! Share your favorites in the comments below, and don’t forget to pin this article on Pinterest to save these delightful recipes for later.


