
Monday’s roast chicken doesn’t have to mean boring leftovers! If you’re staring at that container of cooked chicken and wondering what to do next, you’ve come to the right place. We’ve gathered 23 simple, delicious recipes that transform your leftovers into quick dinners, cozy comfort food, and fresh new meals your family will love. Get ready to be inspired—let’s dive in!
Creamy Chicken Alfredo Bake

Remember those cozy nights when you just want something comforting and delicious without spending hours in the kitchen? This creamy chicken Alfredo bake is exactly that kind of meal. You get all the rich, cheesy goodness of classic Alfredo in an easy, bubbly casserole that practically makes itself.
6
servings15
minutes45
minutesIngredients
- 1 lb boneless, skinless chicken breasts, cut into 1-inch pieces (I like to pat them dry first for better browning)
- 12 oz fettuccine pasta (the classic choice, but any pasta shape works)
- 2 cups heavy cream (this gives it that luxurious, restaurant-quality richness)
- 1 cup grated Parmesan cheese, plus extra for topping (freshly grated melts so much better than the pre-shredded kind)
- 1/2 cup unsalted butter (I always use unsalted to control the saltiness)
- 3 garlic cloves, minced (fresh garlic makes all the difference here)
- 1 tsp Italian seasoning
- 1/2 tsp black pepper
- 1/4 tsp salt
- 1 cup shredded mozzarella cheese (for that perfect golden, stretchy top)
Instructions
- Preheat your oven to 375°F and grease a 9×13-inch baking dish with butter or cooking spray.
- Bring a large pot of salted water to a rolling boil over high heat.
- Add the fettuccine to the boiling water and cook for 10 minutes, stirring occasionally to prevent sticking.
- Drain the pasta in a colander, but don’t rinse it—the starch helps the sauce cling better.
- While the pasta cooks, melt the butter in a large skillet over medium heat.
- Add the chicken pieces to the skillet and cook for 6-8 minutes, turning occasionally, until golden brown and cooked through.
- Stir in the minced garlic and cook for 1 minute until fragrant—be careful not to burn it.
- Pour in the heavy cream, then add the Parmesan cheese, Italian seasoning, black pepper, and salt.
- Simmer the sauce for 3-4 minutes, stirring constantly, until it thickens slightly and coats the back of a spoon.
- Combine the drained pasta and sauce in the prepared baking dish, mixing until everything is evenly coated.
- Sprinkle the shredded mozzarella evenly over the top, followed by an extra sprinkle of Parmesan if you like.
- Bake for 20-25 minutes, until the cheese is melted and bubbly with golden spots.
- Let it rest for 5 minutes before serving—this helps the sauce set up perfectly.
What you get is this incredible creamy texture with tender chicken and pasta in every bite. The top gets beautifully golden and slightly crisp, while underneath it’s all saucy comfort. Try serving it with a simple green salad to balance the richness, or scoop it right into bowls for the ultimate cozy dinner.
Spicy Chicken Quesadillas

Ready for a dinner that comes together faster than your takeout order? These spicy chicken quesadillas are my weeknight superhero—packed with flavor, endlessly customizable, and guaranteed to satisfy those cheesy, spicy cravings. You’ll love how the crispy tortilla gives way to that perfectly melted, gooey filling.
4
quesadillas15
minutes20
minutesIngredients
– 1 lb boneless, skinless chicken breasts, sliced thin (this helps them cook faster and stay tender)
– 2 tbsp olive oil (I always use extra virgin for that fruity kick)
– 1 tsp chili powder
– 1/2 tsp cumin
– 1/4 tsp cayenne pepper (adjust this if you’re sensitive to heat—I like it spicy!)
– 1/2 tsp garlic powder
– 1/2 tsp salt
– 4 large flour tortillas (the burrito-sized ones give you more room to stuff)
– 2 cups shredded Monterey Jack cheese (it melts like a dream)
– 1/2 cup diced red bell pepper (for a sweet crunch)
– 1/4 cup chopped fresh cilantro (don’t skip this—it adds such a fresh pop)
– 1/4 cup sliced jalapeños (I keep the seeds for extra heat)
Instructions
1. Pat the chicken breasts dry with paper towels and slice them into 1/4-inch thick strips.
2. In a medium bowl, toss the chicken strips with olive oil, chili powder, cumin, cayenne, garlic powder, and salt until evenly coated.
3. Heat a large skillet over medium-high heat until a drop of water sizzles immediately.
4. Add the seasoned chicken to the hot skillet in a single layer, cooking for 4–5 minutes without moving it to get a good sear.
5. Flip the chicken and cook for another 3–4 minutes until the internal temperature reaches 165°F on an instant-read thermometer.
6. Transfer the cooked chicken to a cutting board and let it rest for 2 minutes before chopping into bite-sized pieces.
7. Wipe the skillet clean with a paper towel and return it to medium heat.
8. Place one tortilla in the skillet and sprinkle 1/2 cup of shredded Monterey Jack cheese evenly over one half of the tortilla.
9. Top the cheese with one-quarter of the chopped chicken, 2 tablespoons of diced red bell pepper, 1 tablespoon of chopped cilantro, and 1 tablespoon of sliced jalapeños.
10. Fold the bare half of the tortilla over the filling, pressing down gently with a spatula.
11. Cook for 2–3 minutes until the bottom is golden brown with crisp spots, then carefully flip.
12. Cook for another 2–3 minutes until the second side is golden and the cheese is fully melted and bubbly.
13. Remove the quesadilla from the skillet and repeat steps 8–12 with the remaining tortillas and fillings.
14. Let each quesadilla rest for 1 minute on a cutting board before slicing into wedges—this helps the cheese set so it doesn’t ooze out.
And just like that, you’ve got a plate of golden, crispy wedges with a kick of heat from the jalapeños and a creamy, cheesy interior. I love serving these with a cool dollop of sour cream or a quick avocado crema to balance the spice—perfect for dipping while you watch the game or unwind after a long day.
Savory Chicken Fried Rice
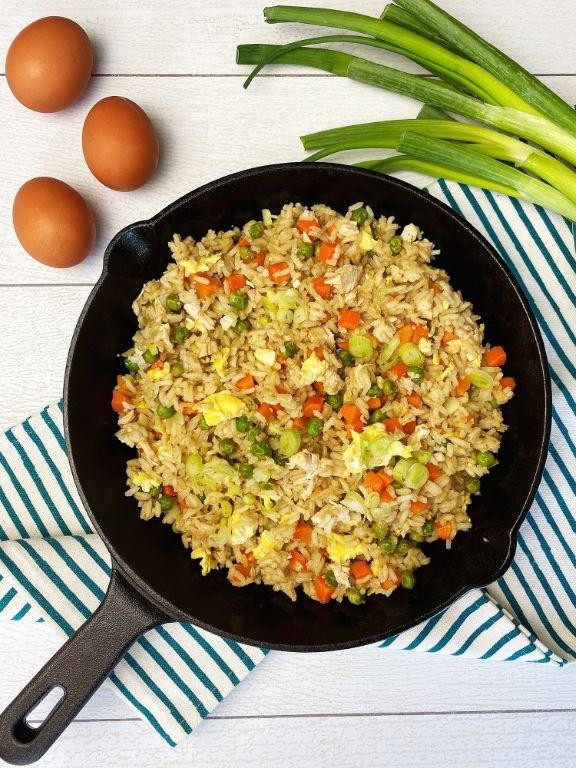
Tired of takeout that never quite hits the spot? This savory chicken fried rice is your new weeknight hero, delivering that perfect wok-kissed flavor right in your own kitchen. You’ll be amazed how simple it is to whip up a restaurant-quality meal that’s way more satisfying than any delivery.
2
servings15
minutes15
minutesIngredients
– 2 cups cold cooked rice (day-old rice works best for that perfect texture)
– 1 lb boneless chicken thighs, cut into bite-sized pieces (thighs stay juicier than breasts)
– 2 large eggs, beaten (I like letting them sit at room temp for 5 minutes first)
– 1 cup frozen peas and carrots mix (no need to thaw – the freezer is your friend)
– 3 tbsp vegetable oil (a neutral oil with high smoke point is key here)
– 3 tbsp soy sauce (I always reach for low-sodium to control the salt)
– 2 cloves garlic, minced (fresh makes all the difference)
– 1 tbsp sesame oil (this is the flavor bomb – don’t skip it!)
– 2 green onions, sliced (save the green parts for garnish)
Instructions
1. Heat 1 tablespoon vegetable oil in a large skillet or wok over medium-high heat until shimmering, about 2 minutes.
2. Add beaten eggs and scramble for 45-60 seconds until just set but still slightly wet, then immediately transfer to a plate.
3. Add remaining 2 tablespoons vegetable oil to the hot skillet and wait 30 seconds until it shimmers again.
4. Add chicken pieces in a single layer and cook undisturbed for 3 minutes to develop a golden sear.
5. Flip chicken and cook for another 2 minutes until no pink remains and internal temperature reaches 165°F.
6. Push chicken to one side of the skillet and add minced garlic to the empty space, cooking for 30 seconds until fragrant.
7. Add frozen peas and carrots directly to the skillet and stir everything together, cooking for 2 minutes until vegetables are heated through.
8. Crumble cold rice into the skillet, breaking up any clumps with your spatula, and stir-fry for 3 minutes until rice is lightly toasted.
9. Return scrambled eggs to the skillet and drizzle soy sauce evenly over everything.
10. Toss continuously for 2 minutes until all ingredients are well combined and rice is evenly coated.
11. Remove skillet from heat and drizzle sesame oil over the fried rice, stirring to incorporate.
12. Stir in sliced green onions and serve immediately.
Just look at that beautiful golden rice with tender chicken pieces peeking through! The sesame oil adds this incredible nutty aroma that fills your kitchen, while the peas and carrots give little bursts of sweetness against the savory soy sauce. Try serving it in bowls with extra green onions sprinkled on top, or pack it for lunch the next day – it reheats surprisingly well.
Hearty Chicken Noodle Soup

Even on the gloomiest fall day, nothing warms you up quite like a bowl of this classic comfort food. You probably have most of these ingredients in your kitchen right now, making it the perfect quick fix when you need something cozy and satisfying. Let’s get that pot simmering and fill your kitchen with the best smells.
4
servings15
minutes35
minutesIngredients
- 1 tbsp extra virgin olive oil (my go-to for that rich, fruity base flavor)
- 1 medium yellow onion, diced (I like to chop this first so it’s ready to go)
- 2 carrots, sliced into thin coins (peel them for a smoother texture, but it’s up to you!)
- 2 celery stalks, chopped (don’t skip these—they add that essential savory depth)
- 2 cloves garlic, minced (fresh is best here for a bright, aromatic punch)
- 6 cups chicken broth (I use low-sodium so I can control the saltiness)
- 1 lb boneless, skinless chicken breasts (thawed if frozen—it cooks more evenly)
- 2 cups wide egg noodles (these hold up beautifully and soak up the broth)
- 1 tsp dried thyme (crush it between your fingers to wake up the oils)
- 1/2 tsp black pepper (freshly ground adds a nice little kick)
- 1/4 cup fresh parsley, chopped (save this for the end—it keeps its vibrant color)
Instructions
- Heat 1 tbsp olive oil in a large stockpot over medium heat for 1–2 minutes until it shimmers.
- Add diced onion, sliced carrots, and chopped celery to the pot.
- Sauté the vegetables for 6–8 minutes, stirring occasionally, until the onion turns translucent and the carrots begin to soften.
- Stir in minced garlic and cook for 1 minute until fragrant—be careful not to burn it.
- Pour in 6 cups chicken broth and add 1 lb chicken breasts.
- Bring the broth to a boil over high heat, then reduce to a simmer.
- Cover the pot and simmer for 15–18 minutes until the chicken is cooked through and reaches 165°F internally.
- Remove the chicken with tongs and place it on a cutting board to cool slightly.
- Add 2 cups egg noodles, 1 tsp dried thyme, and 1/2 tsp black pepper to the simmering broth.
- Cook uncovered for 8–10 minutes, stirring occasionally, until the noodles are tender.
- While the noodles cook, shred the chicken using two forks—it should pull apart easily.
- Return the shredded chicken to the pot and stir to combine.
- Turn off the heat and stir in 1/4 cup fresh parsley.
All those tender noodles and shredded chicken make each spoonful wonderfully hearty. The broth is savory with just a hint of thyme, and the fresh parsley brightens everything up at the end. Try serving it with a crusty baguette for dipping, or add a squeeze of lemon if you want a little zesty twist.
Zesty Chicken Tacos

Brace yourself for the most flavorful Tuesday night upgrade you’ve ever experienced. These zesty chicken tacos come together in under 30 minutes and pack a serious punch that’ll make you forget all about boring dinner routines. You’ll wonder how something so simple can taste so incredibly vibrant and satisfying.
8
tacos15
minutes13
minutesIngredients
– 1 lb boneless, skinless chicken thighs (I find thighs stay juicier than breasts for tacos)
– 2 tbsp olive oil (extra virgin is my kitchen staple)
– 1 lime, juiced (fresh squeezed makes all the difference)
– 2 tsp chili powder
– 1 tsp cumin
– 1/2 tsp garlic powder
– 1/2 tsp onion powder
– 1/4 tsp cayenne pepper (adjust based on your heat tolerance)
– 8 small corn tortillas (I warm mine directly over the gas flame for that authentic char)
– 1 cup shredded purple cabbage
– 1/2 cup chopped cilantro
– 1/4 cup crumbled cotija cheese
Instructions
1. Pat the chicken thighs completely dry with paper towels to ensure proper browning.
2. Combine chili powder, cumin, garlic powder, onion powder, and cayenne pepper in a small bowl.
3. Rub the spice mixture evenly over all sides of the chicken thighs.
4. Heat olive oil in a large skillet over medium-high heat until it shimmers, about 2 minutes.
5. Place chicken in the hot skillet and cook undisturbed for 6 minutes to develop a golden crust.
6. Flip chicken and cook for another 6 minutes until internal temperature reaches 165°F.
7. Transfer chicken to a cutting board and let rest for 5 minutes to redistribute juices.
8. While chicken rests, warm tortillas one at a time in a dry skillet for 30 seconds per side.
9. Shred the rested chicken using two forks, pulling against the grain.
10. Toss shredded chicken with fresh lime juice until evenly coated.
11. Fill each warm tortilla with shredded chicken.
12. Top with purple cabbage, chopped cilantro, and crumbled cotija cheese.
Unbelievably juicy chicken gets balanced by the crisp cabbage and creamy cotija, while that lime finish cuts through everything perfectly. Try serving these with extra lime wedges for squeezing at the table, or pile them high with pickled red onions if you’re feeling fancy.
Cheesy Chicken Enchiladas
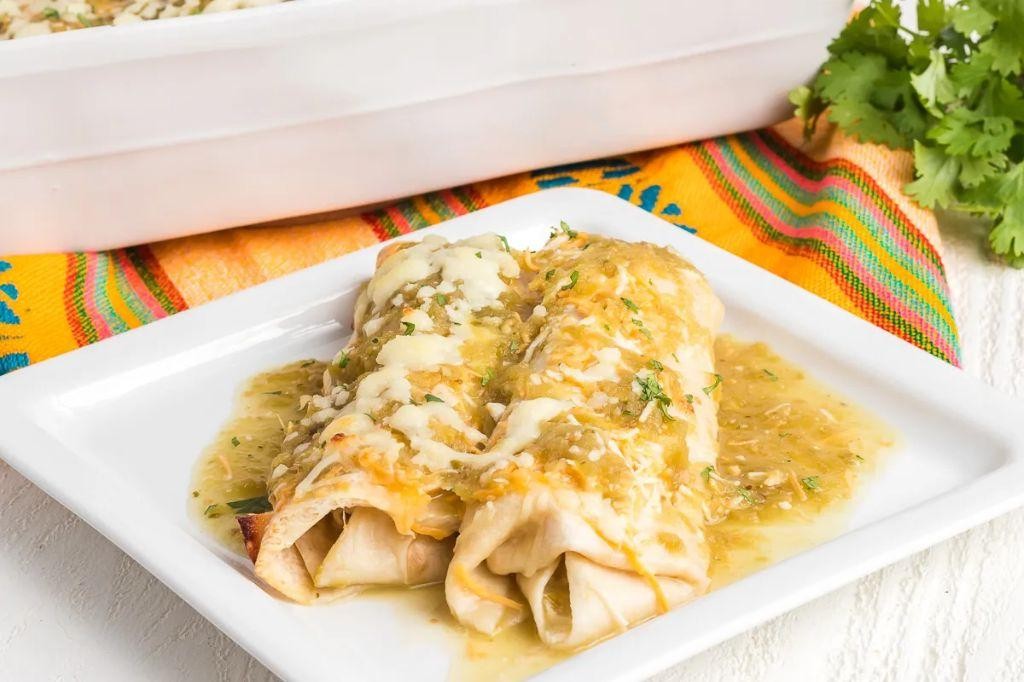
Looking for a cozy dinner that feels like a warm hug? These cheesy chicken enchiladas are my go-to comfort food when I want something satisfying without spending hours in the kitchen. You’re going to love how the melty cheese and tender chicken come together in every bite.
8
enchiladas15
minutes26
minutesIngredients
– 2 cups shredded cooked chicken (I use rotisserie chicken to save time)
– 8 flour tortillas (the medium-sized ones work perfectly)
– 2 cups shredded Monterey Jack cheese (I always grab the pre-shredded kind for convenience)
– 1 can (10 oz) red enchilada sauce (mild or medium – your choice!)
– 1/2 cup diced onion (yellow onions are my favorite for this)
– 1/4 cup chopped fresh cilantro (trust me, fresh makes all the difference)
– 1 tbsp olive oil (extra virgin is what I always have on hand)
– 1 tsp ground cumin (toasted cumin seeds ground fresh if I’m feeling fancy)
– 1/2 tsp garlic powder
– 1/4 tsp black pepper
Instructions
1. Preheat your oven to 375°F and lightly grease a 9×13 inch baking dish with cooking spray.
2. Heat 1 tablespoon of olive oil in a large skillet over medium heat for 1 minute until shimmering.
3. Add 1/2 cup diced onion and cook for 3-4 minutes, stirring occasionally, until softened and translucent.
4. Stir in 2 cups shredded chicken, 1 teaspoon cumin, 1/2 teaspoon garlic powder, and 1/4 teaspoon black pepper, cooking for 2 minutes until fragrant and well combined.
5. Remove the skillet from heat and mix in 1/4 cup chopped cilantro and 1 cup of the shredded cheese until evenly distributed.
6. Warm 8 flour tortillas in the microwave for 20 seconds to make them pliable and prevent cracking.
7. Spoon about 1/3 cup of the chicken mixture onto the center of each tortilla.
8. Roll each tortilla tightly around the filling and place seam-side down in the prepared baking dish.
9. Pour the entire can of enchilada sauce evenly over the rolled tortillas, making sure each one gets coated.
10. Sprinkle the remaining 1 cup of cheese evenly over the top of the enchiladas.
11. Bake at 375°F for 20 minutes until the cheese is completely melted and bubbly with golden spots.
12. Let the enchiladas rest for 5 minutes before serving to allow the filling to set properly.
Absolutely nothing beats pulling these enchiladas from the oven when the cheese is perfectly golden and bubbly. The tortillas become wonderfully tender while holding their shape, and every forkful delivers that amazing contrast of savory chicken and gooey cheese. I love serving these with a crisp green salad or some Mexican rice for the ultimate comfort meal that always disappears fast!
Flavorful Chicken Stir Fry
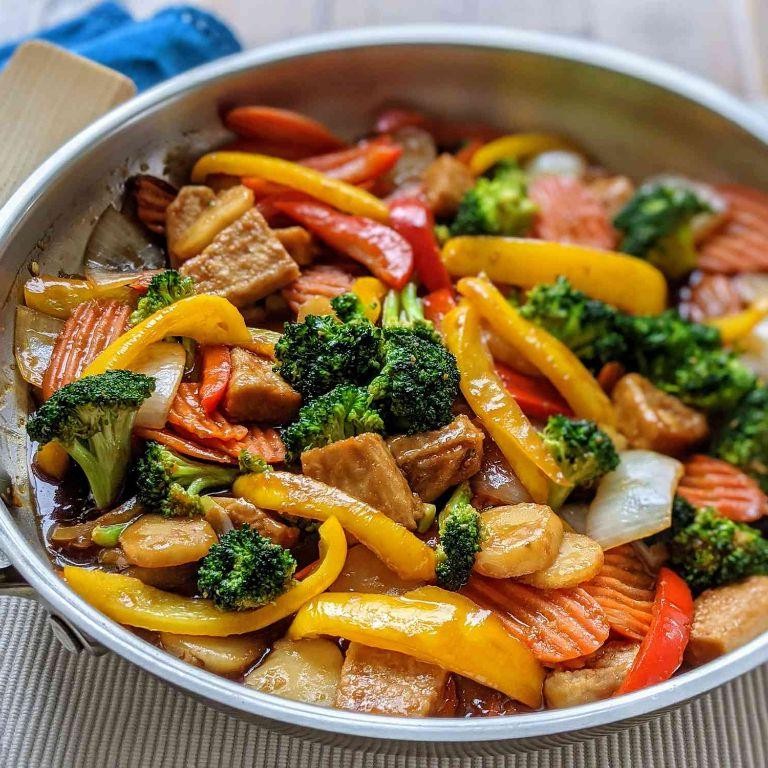
Just when you need a quick, satisfying dinner that feels like a hug in a bowl, this flavorful chicken stir fry comes to the rescue. It’s the kind of meal you can whip up on a busy weeknight when you want something delicious without the fuss. You’ll love how the savory sauce coats every bite of tender chicken and crisp veggies.
2
servings15
minutes20
minutesIngredients
– 1 lb boneless, skinless chicken breasts, sliced thin (I find this cooks faster and stays juicier)
– 2 tbsp vegetable oil (a neutral oil is key here to let the other flavors shine)
– 1 red bell pepper, sliced into strips (the color makes the dish pop!)
– 1 cup broccoli florets (fresh is my go-to for that perfect crunch)
– 3 cloves garlic, minced (don’t be shy—this adds so much depth)
– 1 tbsp fresh ginger, grated (trust me, fresh makes all the difference)
– 1/4 cup low-sodium soy sauce (I prefer low-sodium to control the saltiness)
– 2 tbsp honey (for that sweet balance against the savory)
– 1 tbsp rice vinegar (a splash brightens everything up)
– 1 tsp cornstarch (this helps thicken the sauce beautifully)
– 2 green onions, sliced (for a fresh finish at the end)
Instructions
1. Slice 1 lb of boneless, skinless chicken breasts into thin, even strips, about 1/4-inch thick.
2. In a small bowl, whisk together 1/4 cup low-sodium soy sauce, 2 tbsp honey, 1 tbsp rice vinegar, and 1 tsp cornstarch until smooth. Tip: Whisking the cornstarch separately prevents lumps in the sauce.
3. Heat 2 tbsp vegetable oil in a large skillet or wok over medium-high heat until it shimmers, about 1-2 minutes.
4. Add the sliced chicken to the hot skillet and cook for 5-7 minutes, stirring occasionally, until the chicken is no longer pink and reaches an internal temperature of 165°F.
5. Remove the cooked chicken from the skillet and set it aside on a plate.
6. Add 1 sliced red bell pepper and 1 cup broccoli florets to the same skillet and cook for 4-5 minutes, stirring frequently, until the veggies are tender-crisp.
7. Stir in 3 minced garlic cloves and 1 tbsp grated fresh ginger and cook for 30 seconds until fragrant. Tip: Don’t let the garlic burn—it can turn bitter fast.
8. Pour the prepared sauce into the skillet and bring it to a simmer, stirring constantly.
9. Return the cooked chicken to the skillet and toss everything together to coat in the sauce.
10. Cook for 1-2 minutes, until the sauce thickens and clings to the chicken and veggies. Tip: If the sauce thickens too much, add a splash of water to loosen it.
11. Remove the skillet from the heat and stir in 2 sliced green onions.
Mouthwatering and ready in minutes, this stir fry delivers tender chicken with a glossy, savory-sweet sauce that clings to every crisp veggie. Serve it over steamed rice for a complete meal, or get creative by wrapping it in lettuce cups for a low-carb twist—either way, it’s a crowd-pleaser.
Crispy Chicken Caesar Wraps

Tired of the same old lunch routine? These crispy chicken Caesar wraps are about to become your new favorite grab-and-go meal. They’re packed with crunchy, golden chicken, fresh romaine, and that creamy Caesar dressing we all love—perfect for a quick weeknight dinner or a make-ahead lunch.
3
wraps20
minutes25
minutesIngredients
- 1 lb boneless, skinless chicken breasts, sliced into strips (I find thinner strips crisp up better!)
- 1 cup panko breadcrumbs (they give the chicken that extra crunch)
- 1/2 cup grated Parmesan cheese, plus extra for sprinkling
- 2 large eggs, lightly beaten (room temp helps them coat the chicken evenly)
- 1/3 cup all-purpose flour
- 1 tsp garlic powder
- 1/2 tsp black pepper
- 1/2 tsp salt
- 1/4 cup olive oil (extra virgin is my go-to for frying)
- 4 large flour tortillas (the burrito-sized ones hold everything nicely)
- 2 cups chopped romaine lettuce
- 1/2 cup Caesar dressing (I like the creamy bottled kind for convenience)
- 1/4 cup shaved Parmesan cheese
Instructions
- Preheat your oven to 375°F and line a baking sheet with parchment paper.
- Set up three shallow bowls: place flour in the first, beaten eggs in the second, and mix panko breadcrumbs with 1/2 cup grated Parmesan, garlic powder, salt, and pepper in the third.
- Dredge each chicken strip in flour, shaking off any excess.
- Dip the floured chicken into the beaten eggs, letting any extra drip off.
- Coat the chicken thoroughly in the panko-Parmesan mixture, pressing gently to help it adhere.
- Heat 1/4 cup olive oil in a large skillet over medium-high heat until it shimmers (about 350°F if you have a thermometer).
- Working in batches to avoid crowding, fry chicken strips for 2–3 minutes per side until golden brown and crispy.
- Transfer the fried chicken to the prepared baking sheet and bake for 8–10 minutes until the internal temperature reaches 165°F.
- Warm the tortillas in a dry skillet for 20–30 seconds per side or until pliable.
- Spread 2 tablespoons of Caesar dressing evenly over each tortilla.
- Layer 1/2 cup chopped romaine lettuce down the center of each tortilla.
- Top the lettuce with 3–4 crispy chicken strips per wrap.
- Sprinkle with shaved Parmesan cheese.
- Fold the bottom edge of the tortilla up over the filling, then fold in the sides and roll tightly away from you to form a secure wrap.
Seriously, the contrast between the warm, crunchy chicken and the cool, crisp lettuce is just perfection. I love slicing these in half diagonally to show off all the layers, and they’re sturdy enough to pack for lunch without getting soggy.
Tangy Buffalo Chicken Pizza

Sometimes you just need that perfect balance of spicy, tangy, and cheesy all in one bite—this buffalo chicken pizza totally hits the spot. It’s way easier to make than you might think, and it’s always a crowd-pleaser for game day or a cozy Friday night in. You’ll love how the flavors come together on that crispy crust.
8
pieces15
minutes14
minutesIngredients
- 1 pound pizza dough (I like to let mine sit out for 30 minutes to make stretching easier)
- 1/2 cup buffalo sauce (Frank’s RedHot is my favorite for that classic tang)
- 2 cups shredded cooked chicken (rotisserie chicken works great here—so convenient!)
- 1 1/2 cups shredded mozzarella cheese (I always grab the low-moisture kind for better melt)
- 1/2 cup crumbled blue cheese (don’t skip this—it adds that sharp, creamy kick)
- 1/4 cup ranch dressing (for drizzling at the end—homemade or store-bought both work)
- 2 tablespoons unsalted butter, melted (I use this to brush the crust for extra golden color)
Instructions
- Preheat your oven to 475°F and place a pizza stone or baking sheet inside to heat up.
- Stretch the pizza dough on a floured surface into a 12-inch round. Tip: If the dough springs back, let it rest for 5 minutes before trying again.
- Transfer the dough to a piece of parchment paper.
- Brush the outer edge of the dough with the melted butter.
- Spread the buffalo sauce evenly over the dough, leaving a 1-inch border.
- Sprinkle the shredded chicken evenly over the sauce.
- Top with the shredded mozzarella cheese.
- Scatter the crumbled blue cheese over the mozzarella.
- Carefully slide the parchment with the pizza onto the hot stone or baking sheet.
- Bake for 12–14 minutes, until the crust is golden and the cheese is bubbly and lightly browned. Tip: Rotate the pizza halfway through for even cooking.
- Remove the pizza from the oven and let it rest for 2 minutes. Tip: This helps the cheese set so it doesn’t slide off when you slice it.
- Drizzle the ranch dressing over the top.
- Slice into 8 pieces and serve immediately.
A crispy, chewy crust holds up all that saucy, spicy chicken and gooey cheese beautifully. The blue cheese adds a sharp contrast to the tangy buffalo flavor, while the cool ranch drizzle ties it all together. Try serving it with extra buffalo sauce for dipping and a side of celery sticks—it’s a full-on flavor experience!
Comforting Chicken Pot Pie
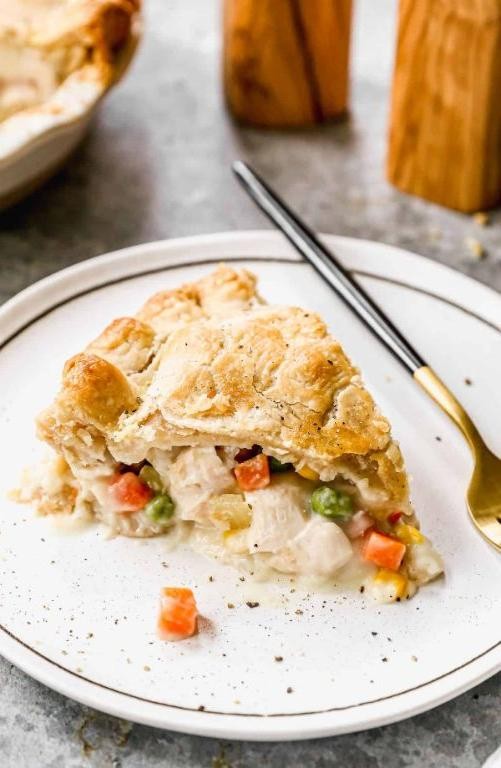
Mmm, there’s nothing quite like the warm, savory embrace of a homemade chicken pot pie on a chilly evening. You know that feeling when you take that first flaky, buttery bite and everything just feels right in the world? This version is my absolute go-to for cozy comfort that never disappoints.
6
portions20
minutes55
minutesIngredients
– 2 cups cooked shredded chicken (I love using rotisserie chicken for extra flavor)
– 1 cup frozen mixed vegetables (peas and carrots are my favorite combo)
– 1/2 cup diced yellow onion (sweet yellow onions work best here)
– 1/3 cup unsalted butter (I always use cold butter for the crust)
– 1/4 cup all-purpose flour
– 1 3/4 cups chicken broth
– 1/2 cup heavy cream (this makes it extra rich and creamy)
– 1 refrigerated pie crust (the store-bought kind works perfectly)
– 1 tsp dried thyme
– 1/2 tsp black pepper
– 1/2 tsp salt
Instructions
1. Preheat your oven to 375°F and place a rack in the center position.
2. Melt the butter in a large skillet over medium heat until it bubbles slightly.
3. Add the diced onion and cook for 4-5 minutes until translucent and fragrant.
4. Sprinkle the flour over the onions and butter, stirring constantly for 2 minutes to cook out the raw flour taste.
5. Slowly pour in the chicken broth while whisking continuously to prevent lumps.
6. Add the heavy cream and bring the mixture to a gentle simmer.
7. Stir in the shredded chicken, frozen vegetables, thyme, salt, and pepper.
8. Cook for 5-7 minutes until the filling thickens enough to coat the back of a spoon.
9. Transfer the filling to a 9-inch pie dish and let it cool for 10 minutes.
10. Unroll the refrigerated pie crust and carefully place it over the filling.
11. Crimp the edges of the crust against the pie dish rim with your fingers.
12. Cut 4 small slits in the top crust to allow steam to escape during baking.
13. Bake for 35-40 minutes until the crust is golden brown and the filling is bubbling.
14. Let the pot pie rest for 15 minutes before serving to allow the filling to set.
Heavenly flaky crust gives way to that creamy, savory filling that just warms you from the inside out. The tender chicken and vegetables create the perfect texture contrast against the buttery pastry. Try serving it with a simple green salad to cut through the richness—it’s comfort food perfection that always hits the spot.
Herbed Chicken and Veggie Skillet
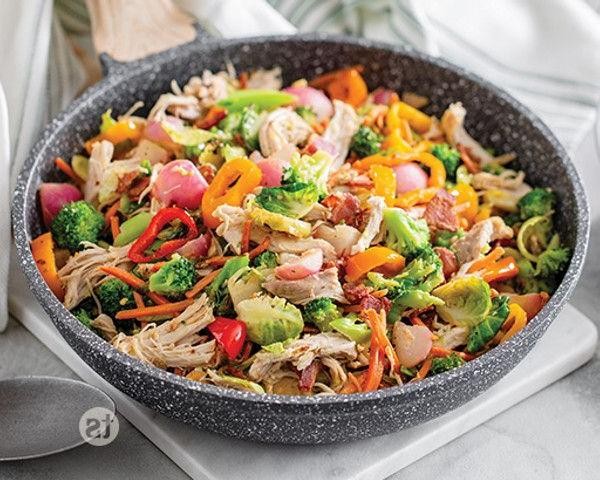
This herbed chicken and veggie skillet is exactly what you need when you want something delicious without spending hours in the kitchen. You’ll love how the herbs create this amazing aroma that fills your whole kitchen while everything cooks together in one pan. It’s become my go-to weeknight dinner because it’s so simple yet feels special every time.
5
servings15
minutes32
minutesIngredients
– 1.5 lbs boneless, skinless chicken thighs (I find thighs stay juicier than breasts)
– 2 tbsp extra virgin olive oil (my go-to for that fruity flavor)
– 1 tsp kosher salt (I prefer the larger crystals for better seasoning control)
– 1/2 tsp black pepper, freshly ground if you can
– 2 tsp Italian seasoning blend (the one with oregano, basil, and thyme works perfectly)
– 1 large yellow onion, diced (sweet onions are my favorite here)
– 3 cloves garlic, minced (fresh garlic makes all the difference)
– 2 medium zucchini, sliced into half-moons
– 1 red bell pepper, chopped (I love the color and sweetness it adds)
– 1/4 cup chicken broth
– 1 tbsp fresh parsley, chopped (for that bright finish at the end)
Instructions
1. Pat the chicken thighs completely dry with paper towels—this helps them get that beautiful golden sear instead of steaming.
2. Season both sides of the chicken evenly with salt, pepper, and Italian seasoning.
3. Heat olive oil in a large skillet over medium-high heat until it shimmers, about 2 minutes.
4. Place chicken thighs in the hot skillet and cook undisturbed for 6 minutes until deeply golden brown.
5. Flip the chicken and cook for another 5 minutes until the other side is browned.
6. Transfer chicken to a clean plate—it won’t be fully cooked through yet, which is perfect.
7. Add diced onion to the same skillet and cook for 3 minutes until slightly softened.
8. Stir in minced garlic and cook for exactly 1 minute until fragrant but not browned.
9. Add zucchini and bell pepper to the skillet, stirring to combine with the onions.
10. Cook vegetables for 5 minutes, stirring occasionally, until they begin to soften but still have some crunch.
11. Pour chicken broth into the skillet, scraping up all those delicious browned bits from the bottom.
12. Return chicken thighs to the skillet, nestling them among the vegetables.
13. Reduce heat to medium-low, cover the skillet, and simmer for 12 minutes until chicken reaches 165°F internally.
14. Remove from heat and sprinkle with fresh parsley just before serving.
Nothing beats the way the tender chicken soaks up all those herb-infused juices while the vegetables keep just enough bite. I love serving this straight from the skillet with crusty bread to mop up every last bit of the delicious pan sauce, or you could spoon it over creamy polenta for the ultimate comfort meal.
Quick Chicken Salad with Avocado
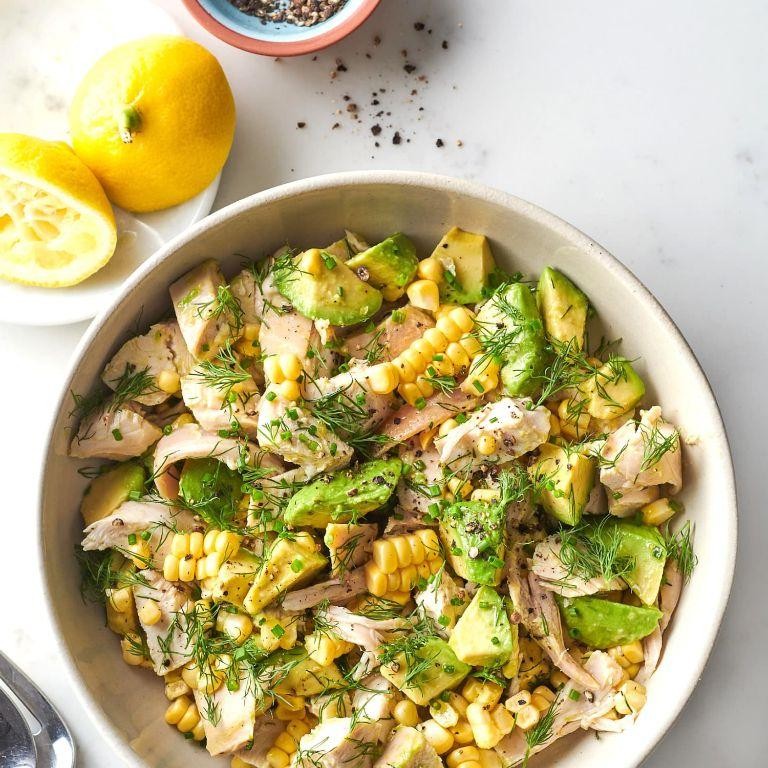
Very few lunches come together as quickly and satisfyingly as this chicken salad. You’ll love how the creamy avocado replaces most of the mayo for a fresher twist. It’s perfect for those busy days when you want something delicious without the fuss.
3
servings15
minutesIngredients
– 2 cups cooked chicken, shredded (I like using rotisserie chicken to save time)
– 1 large avocado, perfectly ripe (it should yield slightly to gentle pressure)
– 1/4 cup plain Greek yogurt (I prefer full-fat for extra creaminess)
– 2 tbsp fresh lime juice (about 1 juicy lime)
– 1/4 cup red onion, finely diced (soak in cold water for 5 minutes if you want milder flavor)
– 1/4 cup celery, chopped (the crunch is essential!)
– 2 tbsp fresh cilantro, chopped (flat-leaf parsley works too if you’re not a cilantro fan)
– 1/2 tsp salt
– 1/4 tsp black pepper, freshly ground
Instructions
1. Place the shredded chicken in a large mixing bowl.
2. Cut the avocado in half, remove the pit, and scoop the flesh into the bowl with the chicken.
3. Add the Greek yogurt and lime juice to the bowl.
4. Mash the avocado mixture with a fork until it reaches your desired consistency—I like it slightly chunky.
5. Stir in the diced red onion, chopped celery, and fresh cilantro until well combined.
6. Season with salt and freshly ground black pepper, mixing thoroughly to distribute the flavors evenly.
7. Taste and adjust seasoning if needed, remembering the flavors will meld as it sits.
8. Cover the bowl with plastic wrap and refrigerate for at least 15 minutes to allow the flavors to develop.
Kind of magical how simple ingredients create such a satisfying meal, right? The texture is wonderfully creamy with little bursts of crunch from the celery and onion. Serve it stuffed in pita pockets, over crisp lettuce leaves, or with your favorite crackers for an easy lunch that feels special.
Conclusion
You’ve now got 23 delicious ways to transform leftover chicken into exciting new meals! From quick dinners to creative lunches, these recipes make the most of what you already have. We’d love to hear which recipes become your family favorites—drop a comment below and don’t forget to pin this article to your Pinterest boards for easy reference!


