
Welcome to the wonderful world of Chinese cooking! If you’ve ever craved those takeout flavors but felt intimidated by complex techniques, you’re in the right place. We’ve gathered 19 beginner-friendly recipes that deliver authentic taste with simple ingredients and clear instructions. From quick stir-fries to comforting noodle dishes, you’ll discover how easy it is to create delicious Chinese meals right in your own kitchen. Let’s get cooking!
Quick and Easy Kung Pao Chicken
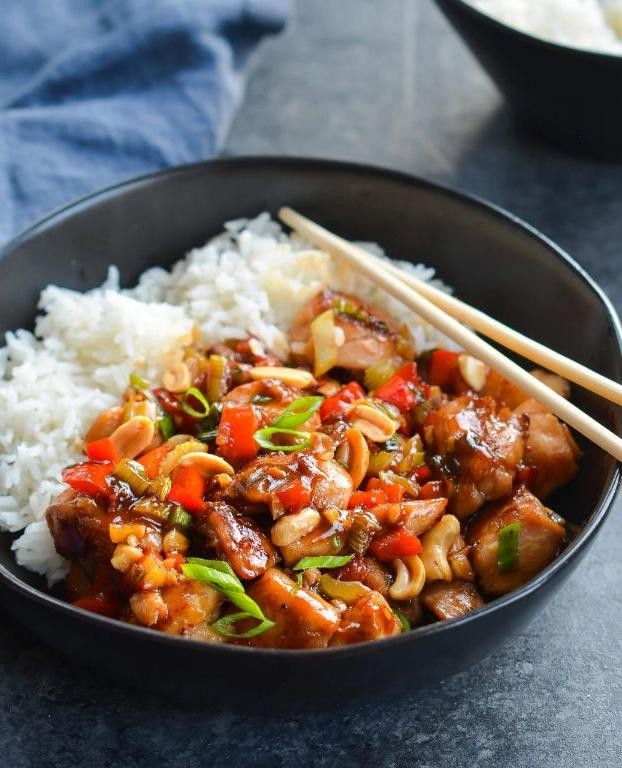
Viral-worthy Kung Pao Chicken coming at you! This lightning-fast version delivers that addictive sweet-spicy-savory combo in under 20 minutes. Get ready to ditch takeout forever.
5
servings10
minutes9
minutesIngredients
– 1 pound of chicken breast, cut into bite-sized pieces
– 2 tablespoons of vegetable oil
– A big handful of dry roasted peanuts
– 4-5 dried red chilies, snipped in half
– 3 cloves of garlic, minced up
– A 1-inch piece of fresh ginger, grated
– 2 chopped green onions
– For the sauce: a quarter cup of low-sodium soy sauce, 2 tablespoons of rice vinegar, 1 tablespoon of hoisin sauce, 1 tablespoon of brown sugar, and 1 teaspoon of cornstarch mixed with a splash of water
Instructions
1. Whisk together the soy sauce, rice vinegar, hoisin sauce, brown sugar, and cornstarch slurry in a small bowl until the sugar dissolves completely.
2. Heat the vegetable oil in a large skillet or wok over medium-high heat until it shimmers, about 1 minute.
3. Add the chicken pieces to the hot oil in a single layer and cook undisturbed for 2 minutes to get a golden sear.
4. Flip the chicken and continue cooking for another 3 minutes until it’s opaque and firm to the touch.
5. Push the chicken to one side of the skillet and add the dried chilies, garlic, and ginger to the empty space.
6. Toast the aromatics for 30 seconds until incredibly fragrant but not browned.
7. Pour the prepared sauce into the center of the skillet—it should sizzle immediately upon contact.
8. Stir everything together continuously for 1-2 minutes until the sauce thickens and coats the chicken glossy.
9. Turn off the heat and stir in the peanuts and green onions just until combined.
10. Let the dish rest for 1 minute off the heat so the peanuts stay crunchy and the green onions stay bright.
Dive into that perfect contrast of tender chicken against crunchy peanuts, all wrapped in a sticky, punchy sauce that tingles with heat. Serve it over fluffy rice to soak up every last drop, or stuff it into lettuce cups for a low-carb crunch that’s seriously addictive.
Classic Sweet and Sour Pork
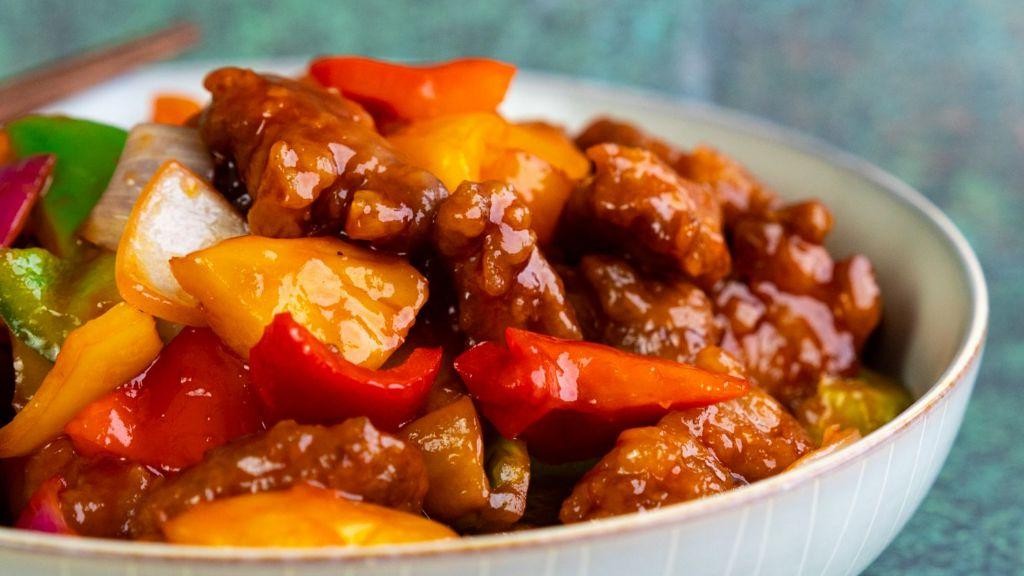
Satisfy those takeout cravings without leaving your kitchen—this sweet and sour pork delivers crispy bites coated in that iconic tangy glaze we all love. Skip the delivery fee and whip up this restaurant favorite in under 30 minutes flat.
4
servings15
minutes20
minutesIngredients
– 1 pound of pork shoulder, cut into 1-inch cubes
– ½ cup of cornstarch
– 2 large eggs, beaten
– A generous glug of vegetable oil for frying
– 1 red bell pepper, chopped into chunks
– 1 green bell pepper, chopped into chunks
– 1 small onion, sliced
– ½ cup of pineapple chunks (canned works great!)
– ¼ cup of ketchup
– 2 tablespoons of rice vinegar
– 2 tablespoons of soy sauce
– 3 tablespoons of brown sugar
– A splash of water
– A pinch of salt and black pepper
Instructions
1. Pat the pork cubes completely dry with paper towels—this helps the coating stick better.
2. Season the pork with a pinch of salt and black pepper.
3. Dredge each pork cube in the cornstarch, shaking off any excess.
4. Dip the coated pork into the beaten eggs, ensuring each piece is fully covered.
5. Heat a generous glug of vegetable oil in a large skillet over medium-high heat until it reaches 350°F.
6. Carefully add the pork in a single layer, frying for 4–5 minutes until golden brown and crispy.
7. Flip the pork and fry for another 4–5 minutes until cooked through.
8. Remove the pork with a slotted spoon and drain on a paper towel-lined plate.
9. In the same skillet, sauté the chopped red and green bell peppers with the sliced onion for 3–4 minutes until slightly softened.
10. Add the pineapple chunks and cook for 1 more minute.
11. In a small bowl, whisk together the ketchup, rice vinegar, soy sauce, brown sugar, and a splash of water.
12. Pour the sauce mixture into the skillet with the vegetables.
13. Bring the sauce to a simmer over medium heat, stirring constantly for 2–3 minutes until it thickens slightly.
14. Return the fried pork to the skillet, tossing gently to coat evenly in the sauce.
15. Cook for 1 final minute to heat the pork through.
Who needs takeout when you’ve got this crispy, saucy masterpiece? The pork stays wonderfully crunchy under that glossy, sweet-tangy glaze—serve it over fluffy rice or stuff it into lettuce cups for a fresh twist.
Flavorful Beef and Broccoli Stir-Fry
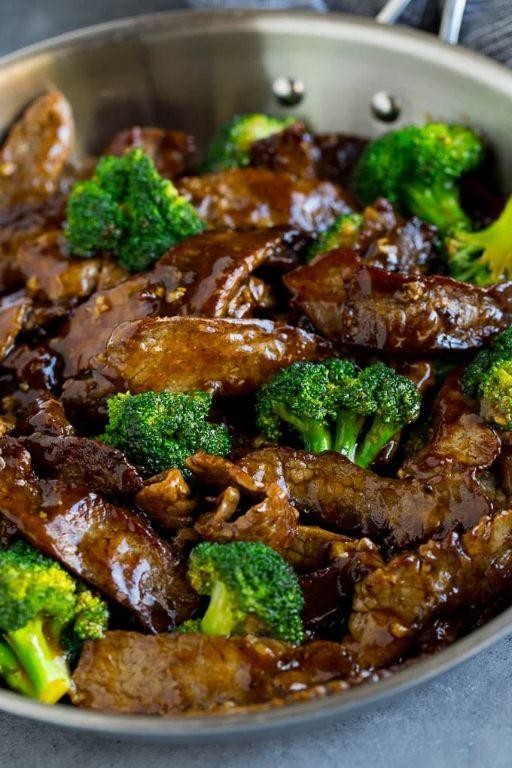
Unlock restaurant-quality stir-fry magic in your own kitchen tonight. Grab your wok and transform simple ingredients into that saucy, savory beef and broccoli you crave. This version delivers maximum flavor with minimal fuss.
3
servings15
minutes8
minutesIngredients
- 1 pound of flank steak, sliced super thin against the grain
- a big head of broccoli, cut into bite-sized florets
- 3 cloves of garlic, minced up nice and fine
- a thumb of fresh ginger, grated
- 1/3 cup of low-sodium soy sauce
- 2 tablespoons of oyster sauce
- a tablespoon of brown sugar
- 2 teaspoons of cornstarch
- a couple of tablespoons of vegetable oil
- a splash of toasted sesame oil
- 1/2 cup of water or beef broth
Instructions
- Whisk together soy sauce, oyster sauce, brown sugar, cornstarch, and 1/2 cup water in a small bowl until the cornstarch fully dissolves.
- Pat your thinly sliced flank steak completely dry with paper towels. Tip: Dry meat sears better and gets that perfect crisp edge.
- Heat 1 tablespoon of vegetable oil in a large wok or skillet over high heat until it shimmers, about 1 minute.
- Add the beef in a single layer and sear undisturbed for 90 seconds to develop a brown crust.
- Flip the beef and cook for another 60 seconds until no longer pink, then transfer to a clean plate.
- Reduce heat to medium-high and add remaining 1 tablespoon vegetable oil to the same wok.
- Toss in broccoli florets and stir-fry for 3 minutes until bright green and slightly tender.
- Add minced garlic and grated ginger, stir-frying for 30 seconds until fragrant. Tip: Don’t let the garlic burn or it’ll turn bitter.
- Pour the prepared sauce into the wok, stirring constantly as it thickens and bubbles, about 1 minute.
- Return the cooked beef and any accumulated juices to the wok, tossing to coat everything in the glossy sauce.
- Drizzle with a splash of toasted sesame oil and remove from heat immediately. Tip: Adding sesame oil at the end preserves its delicate nutty flavor.
Notice how the tender beef slices cling to that glossy, savory sauce while the broccoli stays crisp-tender. Serve it over steamed jasmine rice or get creative by stuffing the stir-fry into warm flour tortillas for an unexpected fusion twist.
Effortless Egg Fried Rice

Nailing restaurant-quality fried rice at home just got easier. This lightning-fast version delivers fluffy grains and savory satisfaction in under 15 minutes—perfect for using up leftover rice and whatever veggies are hanging in your fridge.
2
servings5
minutes6
minutesIngredients
– 3 cups of day-old cooked rice (cold from the fridge works best!)
– 2 large eggs
– A splash of vegetable oil (about 2 tablespoons)
– A couple of chopped green onions
– 2 cloves of minced garlic
– A generous glug of soy sauce (around 2 tablespoons)
– A pinch of salt
Instructions
1. Heat a large skillet or wok over medium-high heat until a drop of water sizzles immediately.
2. Pour in vegetable oil and swirl to coat the entire surface evenly.
3. Crack both eggs directly into the hot oil and immediately scramble them with a spatula for about 30 seconds until softly set but still slightly runny.
4. Add the cold day-old rice to the skillet, breaking up any clumps with your spatula.
5. Stir-fry the rice and eggs together for 2 minutes, pressing the rice against the hot surface to create slight crispiness.
6. Toss in minced garlic and chopped green onions (reserving some green tops for garnish), cooking for 1 minute until fragrant.
7. Drizzle soy sauce evenly over the rice mixture, stirring continuously to distribute the seasoning.
8. Continue cooking for another 2 minutes until all liquid is absorbed and rice grains are separate.
9. Season with a pinch of salt, then taste and adjust if needed.
10. Remove from heat and transfer to serving bowls immediately.
Yield perfectly fluffy grains with crispy edges and savory soy flavor throughout. Try topping with a fried egg for extra richness or mixing in leftover roasted vegetables for a heartier meal—this versatile base adapts to whatever you have on hand.
Simple Hot and Sour Soup

Y’all craving that takeout magic but want it faster than delivery? This hot and sour soup brings the heat and tang in under 30 minutes. Skip the wait and dive into this flavor-packed bowl that’s better than any restaurant version.
4
servings10
minutes15
minutesIngredients
– 6 cups of chicken broth
– 8 ounces of sliced mushrooms
– 1/2 cup of bamboo shoots
– 1/4 cup of rice vinegar
– 3 tablespoons of soy sauce
– 2 tablespoons of cornstarch
– 2 beaten eggs
– 1 teaspoon of white pepper
– 1/2 teaspoon of sesame oil
– A couple of chopped green onions
Instructions
1. Pour 6 cups of chicken broth into a large pot and bring to a boil over high heat.
2. Add 8 ounces of sliced mushrooms and 1/2 cup of bamboo shoots, then reduce heat to medium and simmer for 5 minutes.
3. Whisk 2 tablespoons of cornstarch with 3 tablespoons of cold water in a small bowl until smooth.
4. Stir the cornstarch slurry into the simmering broth to thicken it immediately.
5. Pour in 1/4 cup of rice vinegar and 3 tablespoons of soy sauce, stirring to combine.
6. Add 1 teaspoon of white pepper and simmer for another 2 minutes to blend flavors.
7. Slowly drizzle 2 beaten eggs into the soup while stirring in one direction to create ribbons.
8. Remove the pot from heat and stir in 1/2 teaspoon of sesame oil.
9. Ladle the soup into bowls and top with a couple of chopped green onions.
That silky broth clings to every spoonful with tender mushrooms and crunchy bamboo shoots. The peppery heat builds slowly while the vinegar keeps it bright and balanced. Try topping it with crispy fried shallots for extra crunch or swirling in chili oil for serious spice lovers.
Savory Steamed Ginger Fish
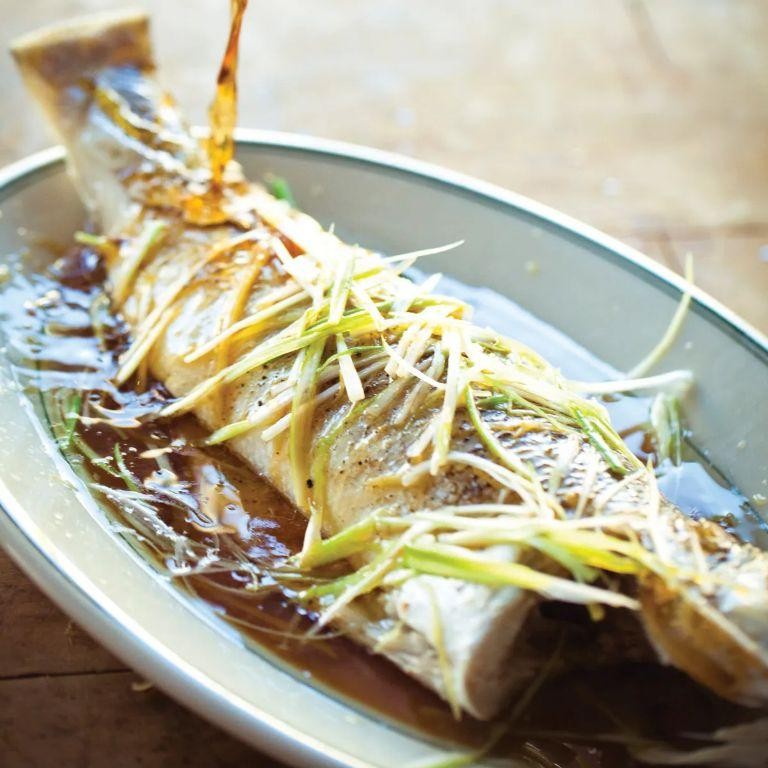
Searched for a restaurant-worthy fish dish you can nail at home? Stop scrolling. This steamed ginger fish delivers insane flavor with minimal effort—your weeknight dinner game just leveled up.
2
servings10
minutes10
minutesIngredients
– 1½ lb white fish fillets (like cod or tilapia)
– a 2-inch knob of fresh ginger
– 3 cloves of garlic
– 2 green onions
– 2 tbsp soy sauce
– 1 tbsp sesame oil
– a splash of rice vinegar
– a pinch of red pepper flakes
Instructions
1. Peel the 2-inch ginger knob and slice it into thin matchsticks.
2. Mince the 3 garlic cloves finely.
3. Slice the 2 green onions, separating white bottoms from green tops.
4. Place the 1½ lb fish fillets on a heatproof plate that fits inside your steamer.
5. Scatter the ginger matchsticks, minced garlic, and white parts of green onions over the fish.
6. Drizzle 2 tbsp soy sauce and 1 tbsp sesame oil evenly over the fillets.
7. Add a splash of rice vinegar and a pinch of red pepper flakes across the top.
8. Bring 1 inch of water to a boil in your steamer pot over high heat.
9. Carefully set the plate in the steamer, cover, and steam for 8-10 minutes (fish should flake easily with a fork).
10. Check at 8 minutes—if center is still translucent, steam 2 more minutes.
11. Remove plate using oven mitts (tip: tilt plate to drain excess liquid for more intense flavor).
12. Garnish with reserved green onion tops.
Ethereal steamed fish falls apart at the touch of your fork, soaked in that gingery, savory sauce. The texture stays miraculously moist while the garlic and pepper flakes add subtle heat. Serve it over jasmine rice to catch every drop of that incredible broth, or stuff into lettuce cups for a light, fresh twist.
Basic Vegetable Chow Mein

Veggie-packed, saucy, and ready in under 20 minutes—this basic vegetable chow mein is your new weeknight hero. Grab those noodles and let’s get wok-ing!
3
servings10
minutes9
minutesIngredients
– 8 oz of dried chow mein noodles
– 2 tablespoons of vegetable oil
– 3 cloves of garlic, minced
– 1 tablespoon of fresh ginger, grated
– 1 cup of thinly sliced carrots
– 1 cup of sliced bell peppers
– 2 cups of shredded cabbage
– 3 tablespoons of soy sauce
– 1 tablespoon of oyster sauce
– 1 teaspoon of sesame oil
– A splash of water
– 2 sliced green onions for garnish
Instructions
1. Cook the chow mein noodles according to package directions until al dente, then drain thoroughly. Tip: Rinse briefly with cold water to prevent sticking.
2. Heat vegetable oil in a large wok or skillet over medium-high heat until shimmering, about 1 minute.
3. Add minced garlic and grated ginger, stir-frying for 30 seconds until fragrant but not browned.
4. Toss in sliced carrots and bell peppers, stir-frying for 3 minutes until slightly softened.
5. Add shredded cabbage and continue stir-frying for another 2 minutes until wilted.
6. Push vegetables to one side of the wok and pour soy sauce, oyster sauce, and sesame oil into the empty space.
7. Let the sauces bubble for 15 seconds before mixing everything together. Tip: This quick caramelization deepens the flavor.
8. Add the drained noodles and a splash of water to the wok, tossing continuously for 2 minutes until evenly coated and heated through. Tip: Use tongs for easy mixing.
9. Remove from heat and garnish with sliced green onions.
Keep it fresh by serving immediately—the noodles stay springy, the veggies crisp-tender, and that savory sauce clings to every strand. Try topping with a fried egg or chili crunch for extra flair!
Tangy Lemon Chicken

Ready to upgrade your chicken game? This zesty lemon chicken brings serious flavor with minimal effort. Get ready for that perfect tangy-savory combo that’ll have everyone asking for seconds.
2
servings10
minutes30
minutesIngredients
– 2 boneless, skinless chicken breasts
– 2 juicy lemons
– 3 cloves of garlic, minced
– A generous glug of olive oil (about 2 tablespoons)
– A couple of tablespoons of honey
– A splash of chicken broth (about 1/4 cup)
– A pinch of salt and a few cracks of black pepper
– A small handful of fresh parsley, chopped
Instructions
1. Preheat your oven to 375°F and grab a baking dish.
2. Pat the chicken breasts completely dry with paper towels—this helps them get that golden sear.
3. Season both sides of the chicken generously with salt and pepper.
4. Heat 1 tablespoon of olive oil in a large skillet over medium-high heat until it shimmers.
5. Place the chicken in the hot skillet and sear for 3-4 minutes per side until you get a deep golden-brown crust.
6. Transfer the seared chicken to your baking dish.
7. In the same skillet, add the remaining olive oil and minced garlic, cooking for just 30 seconds until fragrant.
8. Squeeze the juice from both lemons directly into the skillet.
9. Add the honey and chicken broth, stirring to combine everything.
10. Let the sauce simmer for 2 minutes until it slightly thickens.
11. Pour the hot lemon sauce evenly over the chicken in the baking dish.
12. Bake for 18-20 minutes until the chicken reaches 165°F internally when checked with a meat thermometer.
13. Remove from oven and let the chicken rest for 5 minutes—this keeps all those juices locked in.
14. Sprinkle with fresh chopped parsley right before serving.
15. Spoon the remaining pan sauce over the chicken.
Amazingly tender chicken with that perfect zing from fresh lemon. The honey balances the tartness while the garlic adds savory depth. Serve it over fluffy rice to soak up every drop of that incredible sauce, or slice it thin for next-level chicken sandwiches.
Tender Mapo Tofu

Spice up your dinner routine with this fiery, comforting tofu dish that’s faster than takeout. Sear silken tofu in a savory, numbing sauce that clings to every bite—perfect for shaking up your weeknight menu.
2
servings10
minutes7
minutesIngredients
– 1 block of soft or silken tofu (about 14 oz)
– 2 tablespoons of vegetable oil
– 3 cloves of garlic, minced
– 1 tablespoon of fresh ginger, grated
– 2 tablespoons of doubanjiang (fermented broad bean paste)
– 1 teaspoon of Sichuan peppercorns, crushed
– a splash of soy sauce (about 1 tablespoon)
– a couple of green onions, sliced
– 1 teaspoon of cornstarch mixed with 2 tablespoons of water
– ½ cup of vegetable or chicken broth
Instructions
1. Cut the tofu into 1-inch cubes and set them aside on a paper towel to drain excess moisture—this helps the tofu hold its shape during cooking. 2. Heat 2 tablespoons of vegetable oil in a large skillet or wok over medium-high heat until it shimmers, about 1 minute. 3. Add the minced garlic and grated ginger to the hot oil, stirring constantly for 30 seconds until fragrant to avoid burning. 4. Stir in 2 tablespoons of doubanjiang and 1 teaspoon of crushed Sichuan peppercorns, cooking for another 30 seconds to release their oils and deepen the flavor. 5. Pour in ½ cup of broth and 1 tablespoon of soy sauce, bringing the mixture to a gentle boil. 6. Gently slide in the tofu cubes, simmering for 3–4 minutes until the sauce starts to bubble around the edges. 7. Stir the cornstarch-water mixture and drizzle it into the skillet, cooking for 1–2 minutes until the sauce thickens and coats the tofu evenly—don’t over-stir to keep the tofu intact. 8. Turn off the heat and fold in the sliced green onions just before serving to keep them crisp and vibrant. This dish delivers a silky, melt-in-your-mouth texture with a bold, numbing heat that tingles on the tongue. Try it over steamed rice or with a side of crunchy cucumber salad to balance the spice.
Crispy Spring Rolls

Tired of boring appetizers? These crispy spring rolls will absolutely transform your snack game. Get ready to crunch your way to flavor town with this foolproof recipe.
3
rolls20
minutes12
minutesIngredients
– A couple of spring roll wrappers
– About 2 cups of shredded cabbage
– 1 cup of shredded carrots
– Half a cup of chopped mushrooms
– 2 minced garlic cloves
– A tablespoon of soy sauce
– A splash of sesame oil
– A couple of cups of vegetable oil for frying
– A small bowl of water for sealing
Instructions
1. Heat 1 tablespoon of vegetable oil in a large pan over medium-high heat until shimmering.
2. Add minced garlic and sauté for exactly 30 seconds until fragrant but not browned.
3. Toss in shredded cabbage, carrots, and chopped mushrooms, stirring constantly for 3-4 minutes until vegetables are slightly softened.
4. Pour in soy sauce and sesame oil, mixing thoroughly for 1 minute until evenly distributed.
5. Transfer the filling to a bowl and let it cool completely to room temperature, about 15 minutes. (Tip: Spread it on a baking sheet to speed up cooling.)
6. Place one spring roll wrapper on a clean surface with a corner pointing toward you.
7. Spoon 2 tablespoons of filling onto the bottom third of the wrapper, shaping it into a tight log.
8. Fold the bottom corner over the filling, then fold in the sides tightly.
9. Dip your finger in water and moisten the top edges of the wrapper.
10. Roll upward firmly but gently to seal completely, ensuring no air pockets remain. (Tip: Don’t overfill or the wrapper may tear during frying.)
11. Repeat with remaining wrappers and filling, keeping finished rolls covered with a damp cloth.
12. Heat 2 cups of vegetable oil in a deep pot to 350°F, using a thermometer for accuracy.
13. Carefully place 3-4 spring rolls into the hot oil using tongs, not overcrowding the pot.
14. Fry for 2-3 minutes, turning occasionally, until golden brown and crispy on all sides.
15. Remove with a slotted spoon and drain on a wire rack over paper towels. (Tip: The wire rack keeps them crispy instead of getting soggy.)
16. Let cool for 2 minutes before serving.
Dive into that satisfying crunch revealing the savory vegetable filling inside. Serve them immediately with sweet chili sauce for dipping, or get creative by slicing them into bite-sized pieces for salad toppers. These golden rolls deliver that perfect balance of crispy wrapper and tender filling in every single bite.
Fragrant Garlic Shrimp
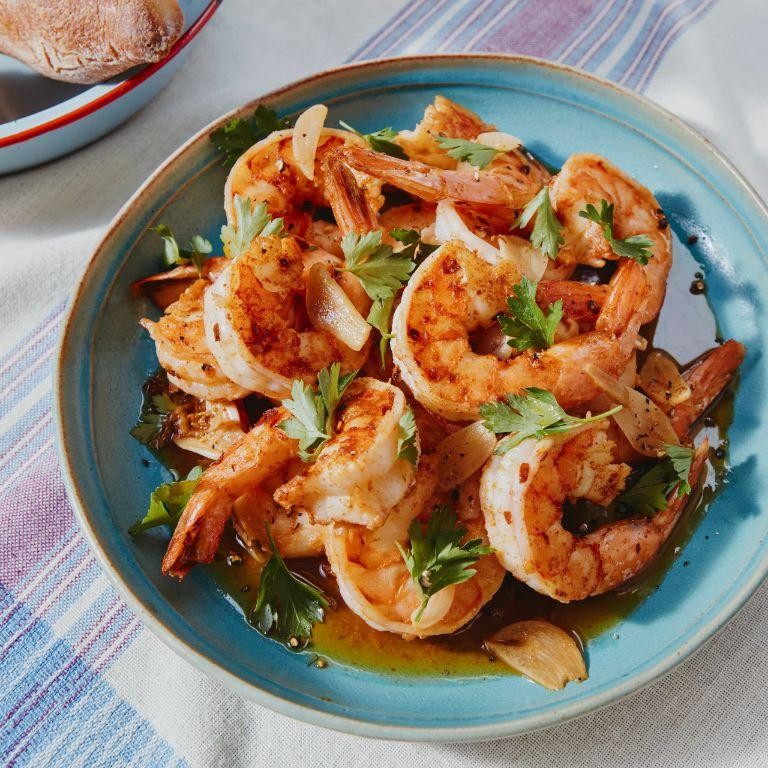
Let’s get straight to it—this garlic shrimp recipe delivers restaurant-quality flavor in under 15 minutes. Load up on crusty bread because you’ll want to soak up every last drop of that fragrant, buttery sauce. Seriously, your kitchen will smell incredible.
2
servings5
minutes5
minutesIngredients
– A pound of large raw shrimp, peeled and deveined
– 6 fat garlic cloves, thinly sliced
– A big knob of butter (about 4 tablespoons)
– A generous glug of olive oil (2 tablespoons)
– A couple of fresh lemons
– A handful of fresh parsley, chopped
– A good pinch of red pepper flakes
– Salt and freshly ground black pepper
Instructions
1. Pat your shrimp completely dry with paper towels—this ensures they get a beautiful sear instead of steaming.
2. Season shrimp generously with salt and black pepper on both sides.
3. Heat olive oil in a large skillet over medium-high heat until it shimmers.
4. Add shrimp in a single layer and cook for exactly 90 seconds per side until pink and slightly curled.
5. Transfer shrimp to a clean plate immediately to prevent overcooking.
6. Reduce heat to medium-low and melt butter in the same skillet.
7. Add sliced garlic and red pepper flakes, cooking for 60 seconds until fragrant but not browned.
8. Squeeze in juice from one lemon, scraping up any browned bits from the pan bottom.
9. Return shrimp to the skillet and toss to coat in the garlic butter sauce.
10. Remove from heat and stir in chopped parsley.
11. Serve immediately with lemon wedges from the remaining lemon.
Velvety shrimp swim in an intensely garlicky, buttery sauce with just enough heat from the pepper flakes. The texture is perfectly firm yet tender—never rubbery. Try serving over creamy polenta or tossing with fresh pasta to make it a complete meal.
Spicy Szechuan Noodles
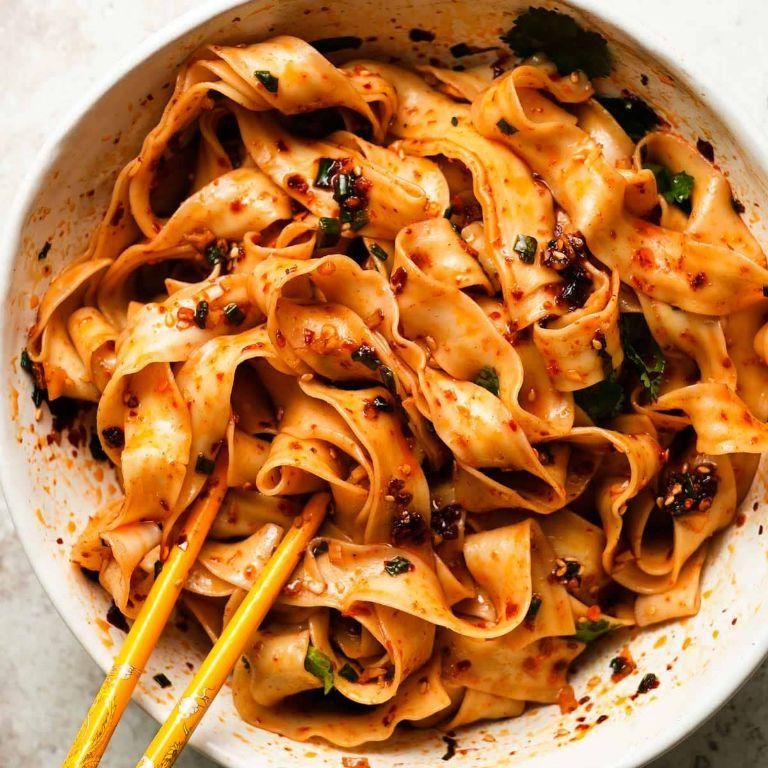
Hear that sizzle? These Spicy Szechuan Noodles are about to blow your mind. Grab your chopsticks and get ready for that addictive, tongue-tingling heat that’ll have you craving more after just one bite.
2
servings10
minutes10
minutesIngredients
– 8 ounces of dried wheat noodles
– 2 tablespoons of Szechuan peppercorns
– 3 cloves of garlic, minced
– 1 tablespoon of fresh ginger, grated
– 2 tablespoons of chili oil
– 1 tablespoon of soy sauce
– 1 teaspoon of rice vinegar
– A pinch of sugar
– 2 green onions, sliced
– A handful of roasted peanuts, crushed
Instructions
1. Bring 4 cups of water to a rolling boil in a medium pot over high heat.
2. Add the dried wheat noodles and cook for exactly 6 minutes, stirring occasionally to prevent sticking.
3. Drain the noodles in a colander and rinse under cold running water for 30 seconds to stop the cooking process.
4. Toast the Szechuan peppercorns in a dry skillet over medium heat for 2 minutes until fragrant, then crush them coarsely with a mortar and pestle.
5. Heat the chili oil in a large wok or skillet over medium-high heat until it shimmers, about 1 minute.
6. Add the minced garlic and grated ginger, stirring constantly for 45 seconds until golden but not browned.
7. Pour in the soy sauce, rice vinegar, and pinch of sugar, stirring to combine into a glossy sauce.
8. Tip: For maximum flavor, let the sauce bubble for 30 seconds to slightly reduce and thicken.
9. Add the cooked noodles to the wok, tossing vigorously with tongs until every strand is coated in the spicy sauce.
10. Tip: If the noodles seem dry, splash in 1 tablespoon of warm water to loosen the sauce.
11. Remove from heat and immediately sprinkle with crushed Szechuan peppercorns, sliced green onions, and crushed peanuts.
12. Tip: Let the noodles sit for 2 minutes before serving to allow the flavors to meld together.
Feel that signature numbing tingle? That’s the Szechuan peppercorns working their magic against the fiery chili oil. The chewy noodles cling perfectly to that glossy sauce, while the crunchy peanuts add welcome texture. Try serving these cold the next day for an entirely different (but equally addictive) experience.
Conclusion
Gathering these 19 simple Chinese recipes opens up a world of delicious homemade meals perfect for beginners. We hope you feel inspired to try these dishes in your own kitchen! Share which recipes become your favorites in the comments below, and don’t forget to pin this article on Pinterest to save these tasty ideas for later cooking adventures.