
Ever feel intimidated by bread baking? Don’t be! We’ve gathered 30 delightful, simple recipes that prove homemade bread is easier and more rewarding than you think. From quick no-knead loaves to fluffy dinner rolls, this roundup is packed with comforting classics perfect for any home cook. Get ready to fill your kitchen with the irresistible aroma of fresh bread—let’s start baking!
Classic White Sandwich Bread

Craving that perfect, fluffy homemade bread? You know, the kind that makes your kitchen smell amazing and gives you that satisfyingly soft slice for sandwiches or toast. Let’s bake some classic white sandwich bread together—it’s easier than you think and so worth it!
Serving: 1 loaf | Pre Time: 20 minutes | Cooking Time: 30 minutes
Ingredients
– 3 cups of all-purpose flour, plus a little extra for dusting
– 1 cup of warm water (around 110°F—think bathwater warm)
– 2 tablespoons of granulated sugar
– 2 tablespoons of unsalted butter, softened
– 1 teaspoon of active dry yeast
– 1 teaspoon of salt
– A splash of vegetable oil for greasing
Instructions
1. In a large bowl, combine the warm water, sugar, and yeast. Let it sit for 5 minutes until it gets foamy—this means your yeast is alive and ready!
2. Add the flour, salt, and softened butter to the yeast mixture. Mix everything together with a spoon until a shaggy dough forms.
3. Turn the dough out onto a lightly floured surface. Knead it for about 8-10 minutes until it’s smooth and elastic—if it sticks to your hands, just dust with a bit more flour.
4. Lightly grease a clean bowl with vegetable oil. Place the dough in the bowl, turning it to coat with oil. Cover it with a damp towel and let it rise in a warm spot for 1 hour, or until it doubles in size.
5. Punch down the dough to release air bubbles. Shape it into a loaf and place it in a greased 9×5-inch loaf pan. Cover again and let it rise for another 30 minutes.
6. Preheat your oven to 375°F. Bake the bread for 25-30 minutes, until the top is golden brown and it sounds hollow when tapped.
7. Remove the bread from the pan and let it cool completely on a wire rack before slicing—this keeps it from getting gummy inside.
This bread comes out with a tender crumb and a subtly sweet flavor that’s perfect for everyday use. Try toasting it with a smear of butter and jam, or use it for your favorite sandwich—it holds up beautifully without falling apart!
Easy No-Knead Artisan Bread
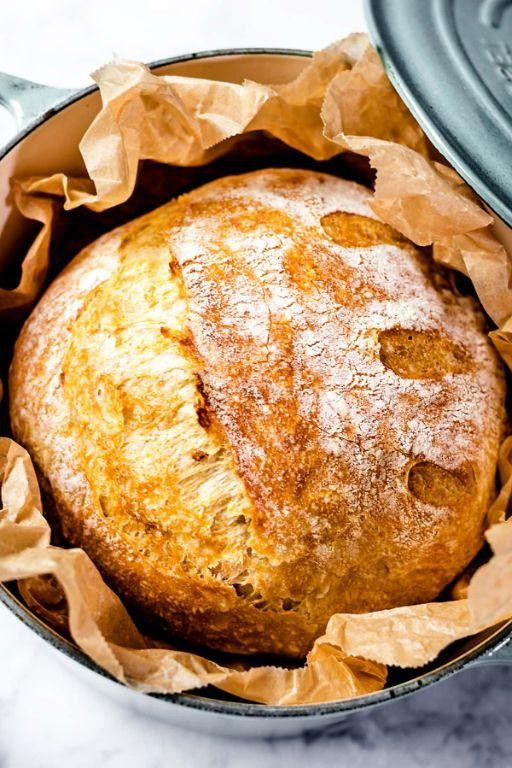
Haven’t you ever wished you could make bakery-quality bread without all the fuss? This easy no-knead artisan bread is your answer. You just mix a few simple ingredients, let time do the work, and end up with a gorgeous, crusty loaf that’ll make your kitchen smell amazing.
Serving: 1 loaf | Pre Time: 18 hours | Cooking Time: 45 minutes
Ingredients
– 3 cups of all-purpose flour, plus a little extra for dusting
– 1 1/2 teaspoons of salt
– 1/4 teaspoon of instant yeast (that tiny packet is perfect)
– 1 1/2 cups of lukewarm water (think baby-bottle warm, not hot)
Instructions
1. In a large mixing bowl, whisk together the 3 cups of flour, 1 1/2 teaspoons of salt, and 1/4 teaspoon of instant yeast until everything is evenly combined.
2. Pour in the 1 1/2 cups of lukewarm water and stir with a wooden spoon or spatula until no dry flour remains and a shaggy, sticky dough forms. Tip: Don’t worry about over-mixing—this dough doesn’t need kneading!
3. Cover the bowl tightly with plastic wrap or a lid and let it sit at room temperature for 12 to 18 hours. The dough will rise, bubble, and look beautifully irregular.
4. Lightly flour a work surface and your hands. Gently scrape the dough out of the bowl onto the floured surface—it will be loose and sticky.
5. With floured hands, fold the dough over onto itself a couple of times to form a rough ball. This takes about 30 seconds. Tip: A bench scraper is super helpful here if the dough sticks.
6. Generously dust a clean kitchen towel (not terry cloth) with flour and place the dough ball seam-side down on it. Sprinkle a little more flour on top.
7. Fold the towel over the dough to cover it loosely and let it rest for 1 to 2 hours. It should puff up noticeably but not double.
8. About 30 minutes before baking, place a Dutch oven (with its lid on) in your oven and preheat to 450°F. Tip: The preheated pot creates steam for that perfect crust!
9. Carefully remove the hot Dutch oven from the oven. Take off the lid and gently turn the dough into the pot so the seam side is up. It’s okay if it’s messy.
10. Put the lid back on and bake for 30 minutes at 450°F.
11. Remove the lid and continue baking for another 15 minutes, or until the loaf is deeply golden brown and sounds hollow when tapped on the bottom.
12. Transfer the bread to a wire rack and let it cool completely before slicing, about 1 hour.
That crackly crust gives way to a soft, chewy interior with big, irregular holes. Tear off a warm piece and slather it with good butter, or use thick slices to make the ultimate grilled cheese sandwich.
Simple Whole Wheat Bread Loaf
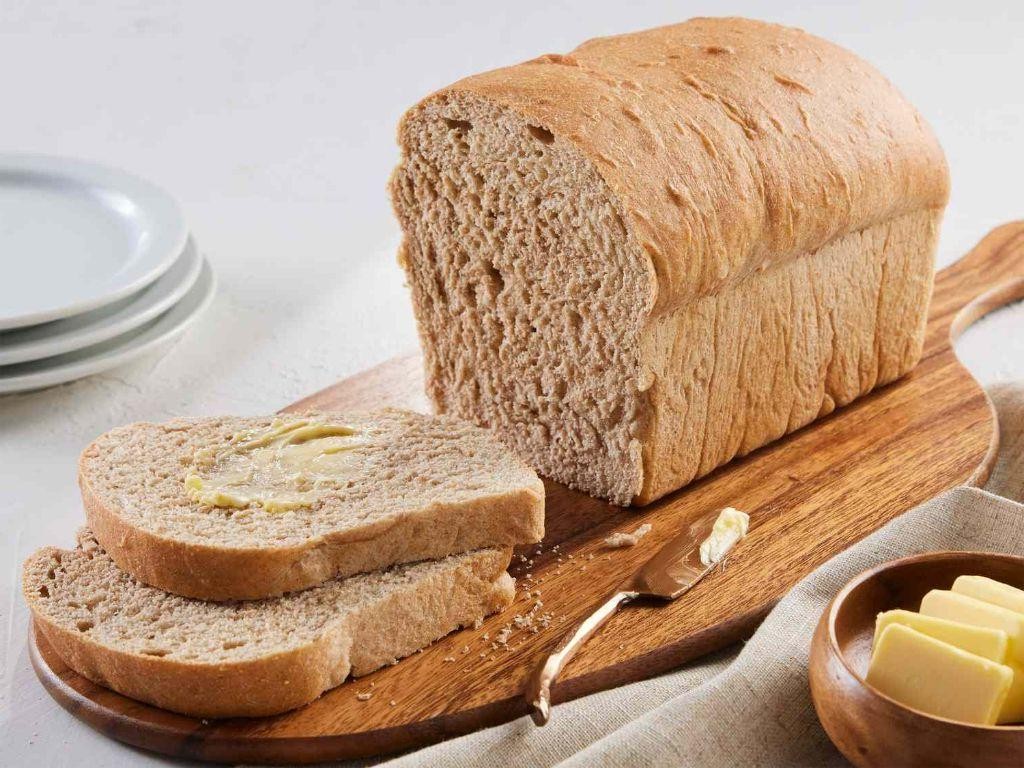
Haven’t we all dreamed of pulling a warm, homemade loaf of bread from the oven? This simple whole wheat bread is your ticket to that cozy feeling, and it’s way easier than you might think. You’ll love the nutty flavor and how your kitchen smells while it bakes.
Serving: 1 loaf | Pre Time: 20 minutes | Cooking Time: 35 minutes
Ingredients
– A couple of cups of whole wheat flour
– A cup of warm water (around 110°F)
– A tablespoon of honey
– A packet (or 2 1/4 teaspoons) of active dry yeast
– A teaspoon of salt
– A splash of olive oil
Instructions
1. In a large bowl, whisk together the warm water, honey, and yeast. Let it sit for about 5 minutes until it gets foamy—this means your yeast is alive and ready!
2. Stir in the whole wheat flour and salt until a shaggy dough forms.
3. Turn the dough out onto a lightly floured surface and knead for 8–10 minutes until it’s smooth and elastic. Tip: If the dough feels too sticky, add a little more flour, a tablespoon at a time.
4. Place the dough in a bowl greased with the olive oil, turning to coat. Cover with a damp towel and let it rise in a warm spot for 1 hour, or until doubled in size.
5. Punch down the dough to release air bubbles, then shape it into a loaf and place it in a greased 9×5-inch loaf pan.
6. Cover the pan and let the dough rise again for 30–45 minutes until it puffs up just above the rim.
7. While it rises, preheat your oven to 375°F.
8. Bake the loaf for 35 minutes, or until the top is golden brown and it sounds hollow when tapped. Tip: For a softer crust, brush the top with a little olive oil right after baking.
9. Let the bread cool in the pan for 10 minutes, then transfer it to a wire rack to cool completely. Tip: Resist cutting into it while hot—it’ll slice much better once cooled!
Fresh from the oven, this bread has a tender crumb and a subtly sweet, nutty taste. It’s perfect toasted with butter for breakfast or used for hearty sandwiches. Try it with avocado and a sprinkle of sea salt for a quick, delicious snack.
Quick Soda Bread
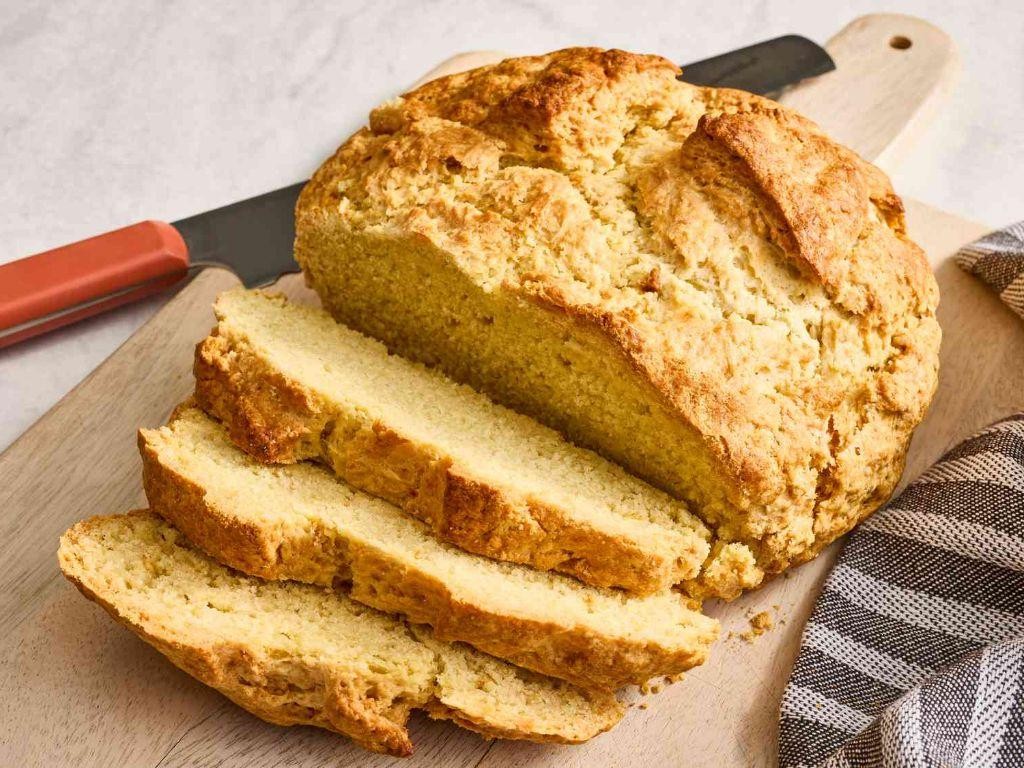
Sometimes you just need bread, but who has time for yeast and all that waiting? This quick soda bread comes together in minutes and bakes up golden and delicious—perfect for when that carb craving hits hard. You’ll love how simple it is to whip up with pantry staples.
Serving: 8 | Pre Time: 10 minutes | Cooking Time: 45 minutes
Ingredients
– 3 cups of all-purpose flour, plus a little extra for dusting
– 1 tablespoon of baking soda
– 1 teaspoon of salt
– About 1½ cups of buttermilk (you might need a splash more)
– 2 tablespoons of melted butter
Instructions
1. Preheat your oven to 375°F and line a baking sheet with parchment paper.
2. In a large bowl, whisk together the 3 cups of flour, 1 tablespoon of baking soda, and 1 teaspoon of salt until everything is evenly combined.
3. Make a well in the center of the dry ingredients and pour in the 1½ cups of buttermilk and 2 tablespoons of melted butter.
4. Use a fork or your hands to gently mix until a shaggy dough forms, being careful not to overwork it—this keeps the bread tender. Tip: If the dough feels too dry, add another splash of buttermilk, a tablespoon at a time, until it just comes together.
5. Turn the dough out onto a lightly floured surface and shape it into a rough ball, about 6 inches in diameter.
6. Place the dough ball on the prepared baking sheet and use a sharp knife to score a deep “X” on top, about ½ inch deep—this helps it bake evenly and gives it that classic soda bread look.
7. Bake in the preheated oven for 45 minutes, or until the crust is golden brown and the bottom sounds hollow when tapped. Tip: Check it at 40 minutes; if it’s browning too fast, you can loosely tent it with foil.
8. Remove the bread from the oven and let it cool on a wire rack for at least 15 minutes before slicing. Tip: Resist cutting into it right away, as it continues to set up as it cools, giving you cleaner slices.
This bread bakes up with a craggy, rustic crust and a soft, slightly tangy interior thanks to the buttermilk. It’s fantastic warm with a smear of butter and jam, or try toasting thick slices the next day for breakfast—the edges get wonderfully crisp.
Basic Sweet Milk Bread
Sometimes you just need a simple, soft loaf of bread to make your kitchen smell amazing and your toast extra special. This basic sweet milk bread is that cozy staple—it’s tender, slightly sweet, and perfect for sandwiches, French toast, or just slathering with butter.
Serving: 1 loaf | Pre Time: 20 minutes | Cooking Time: 30 minutes
Ingredients
– 3 cups of all-purpose flour, plus a little extra for dusting
– 1 cup of whole milk, warmed up just until it feels cozy to the touch (about 110°F)
– ¼ cup of granulated sugar
– 3 tablespoons of unsalted butter, softened
– 1 large egg
– 2¼ teaspoons of active dry yeast (that’s one of those little packets)
– 1 teaspoon of salt
– A splash of vegetable oil for greasing the bowl
Instructions
1. In a small bowl, combine the warmed milk, sugar, and yeast. Let it sit for about 5 minutes until it gets foamy—this means your yeast is awake and ready to go!
2. In a large mixing bowl, whisk together the flour and salt.
3. Add the yeast mixture, softened butter, and egg to the flour. Stir everything with a wooden spoon until a shaggy dough forms.
4. Turn the dough out onto a lightly floured surface. Knead it by hand for 8–10 minutes until it becomes smooth and elastic. If it sticks, sprinkle on just a bit more flour, but go easy—too much can make the bread dense.
5. Lightly grease a clean bowl with vegetable oil. Place the dough in the bowl, turning it once to coat it in oil. Cover the bowl with a damp kitchen towel.
6. Let the dough rise in a warm spot for 1–1½ hours, or until it doubles in size. To test, gently poke it—if the indentation stays, it’s ready.
7. Punch down the dough to release the air. Shape it into a loaf by rolling it into a rectangle, then tightly rolling it up from the short end. Pinch the seam to seal.
8. Place the loaf seam-side down in a greased 9×5-inch loaf pan. Cover it again with the towel and let it rise for another 45–60 minutes until it puffs up just above the pan’s rim.
9. While the dough rises, preheat your oven to 350°F. Once ready, bake the bread for 25–30 minutes until the top is golden brown and it sounds hollow when tapped.
10. Immediately remove the bread from the pan and let it cool completely on a wire rack before slicing—this keeps it from getting gummy inside.
Made with love, this bread has a soft, pillowy crumb and a hint of sweetness that’s just right. It’s fantastic toasted with jam for breakfast or used for a killer grilled cheese sandwich. Enjoy it fresh, or wrap it up—it’ll stay tender for days!
Homemade Honey Oat Bread
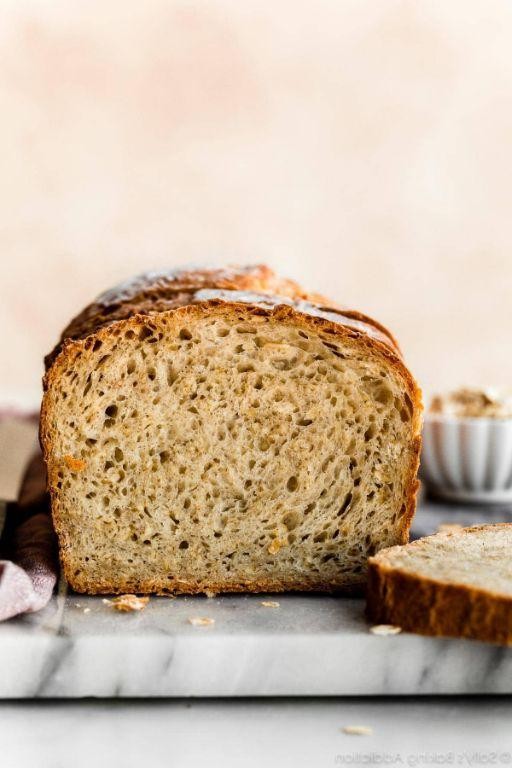
There’s nothing quite like the smell of fresh bread filling your kitchen, and this honey oat loaf is one of those simple, satisfying projects you can tackle on a lazy weekend. You get a tender crumb with a hint of sweetness and a lovely, hearty texture from the oats—perfect for toast, sandwiches, or just tearing off a warm piece straight from the loaf.
Serving: 1 loaf | Pre Time: 20 minutes | Cooking Time: 35 minutes
Ingredients
– 1 cup of old-fashioned rolled oats
– 1 ½ cups of warm water (around 110°F)
– ¼ cup of honey
– 2 tablespoons of unsalted butter, melted
– 1 teaspoon of salt
– 1 packet (or 2 ¼ teaspoons) of active dry yeast
– 3 to 3 ½ cups of all-purpose flour, plus a little extra for dusting
– A splash of milk for brushing
Instructions
1. In a large bowl, stir together the warm water, honey, and yeast. Let it sit for about 5 minutes until it gets foamy—this means your yeast is active and ready to go.
2. Mix in the melted butter, salt, and rolled oats until everything is well combined.
3. Gradually add the flour, starting with 3 cups, stirring with a wooden spoon until a shaggy dough forms.
4. Turn the dough out onto a lightly floured surface and knead for 8-10 minutes, adding more flour a tablespoon at a time if it feels too sticky. You’ll know it’s ready when it’s smooth and elastic.
5. Place the dough in a lightly oiled bowl, cover it with a clean kitchen towel, and let it rise in a warm spot for 1 hour, or until it doubles in size.
6. Punch down the dough to release any air bubbles, then shape it into a loaf and place it in a greased 9×5-inch loaf pan.
7. Cover the pan with the towel again and let it rise for another 30-45 minutes until it puffs up just above the rim of the pan.
8. Preheat your oven to 350°F. Brush the top of the loaf lightly with milk for a golden crust.
9. Bake for 35-40 minutes, until the top is deep golden brown and the loaf sounds hollow when tapped on the bottom.
10. Let the bread cool in the pan for 10 minutes, then transfer it to a wire rack to cool completely before slicing.
Just out of the oven, this bread has a soft, slightly chewy crumb with subtle sweetness from the honey and a nutty oat flavor. It makes incredible toast with a smear of butter or jam, or try it for a next-level turkey sandwich—the oats add a wholesome texture that’s totally irresistible.
Rustic Sourdough Starter Bread
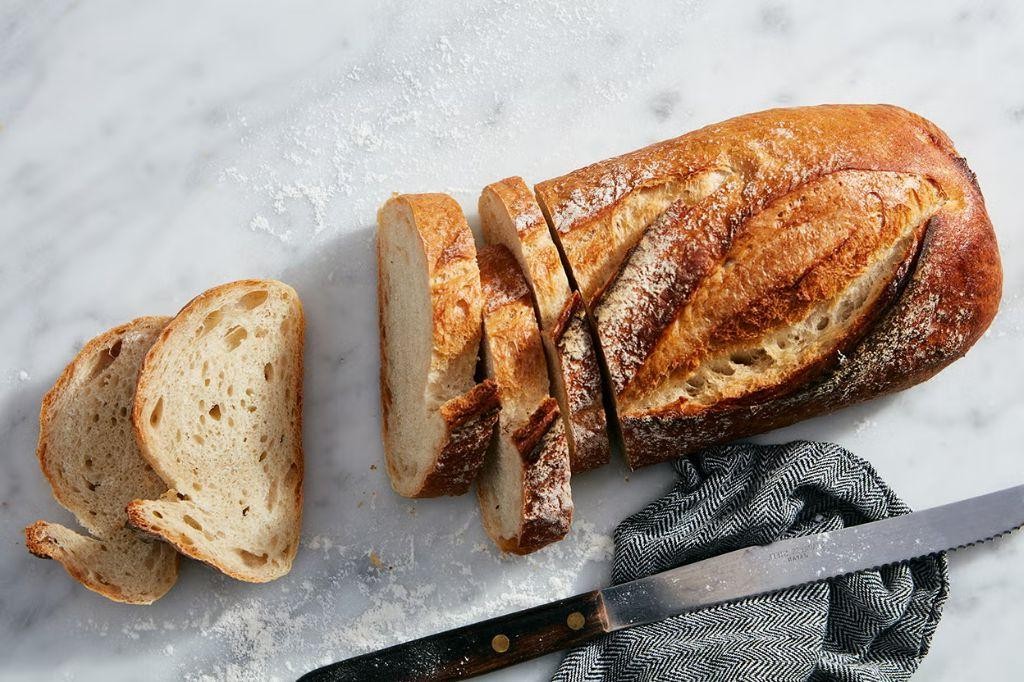
Fancy making bread that tastes like it came from a cozy bakery? This rustic sourdough starter bread is surprisingly simple—just a few ingredients and some patience. You’ll love the chewy texture and tangy flavor that only a real starter can give.
Serving: 1 loaf | Pre Time: 12 hours | Cooking Time: 45 minutes
Ingredients
– 1 cup of bubbly sourdough starter (fed and active)
– 3 ½ cups of bread flour
– 1 ½ cups of lukewarm water (around 85°F)
– 2 teaspoons of fine sea salt
– A splash of olive oil for greasing
Instructions
1. In a large bowl, mix 1 cup of bubbly sourdough starter with 1 ½ cups of lukewarm water until combined.
2. Add 3 ½ cups of bread flour and 2 teaspoons of fine sea salt, stirring with a wooden spoon until a shaggy dough forms.
3. Cover the bowl with a damp kitchen towel and let it rest at room temperature for 30 minutes—this helps the gluten develop.
4. After resting, stretch and fold the dough in the bowl: grab one edge, pull it up, and fold it over the center, repeating around the bowl 4-5 times.
5. Cover the bowl again and let the dough rise at room temperature for 8-12 hours, until it has doubled in size and looks bubbly.
6. Tip: If your kitchen is cool, place the bowl in a slightly warm spot (like near the oven) to help the rise.
7. Lightly flour a work surface and turn the dough out onto it. Gently shape it into a round loaf by folding the edges toward the center.
8. Place the shaped dough seam-side up in a floured proofing basket or bowl lined with a floured kitchen towel.
9. Cover and let it proof at room temperature for 1-2 hours, until it springs back slowly when poked.
10. Tip: For a crispier crust, refrigerate the shaped dough overnight—this adds flavor and makes scoring easier.
11. Preheat your oven to 450°F with a Dutch oven inside for at least 30 minutes to get it piping hot.
12. Carefully remove the hot Dutch oven, place the dough inside seam-side down, and score the top with a sharp knife or razor blade.
13. Cover with the lid and bake at 450°F for 30 minutes to trap steam and create a good rise.
14. Remove the lid, reduce the oven temperature to 425°F, and bake for another 15 minutes until the crust is deep golden brown.
15. Tip: Check for doneness by tapping the bottom—it should sound hollow when fully baked.
16. Let the bread cool completely on a wire rack for at least 2 hours before slicing to avoid a gummy texture.
Perfectly baked, this bread has a crackly crust and an airy, chewy crumb with a subtle tang. Slice it thick for avocado toast or tear off chunks to dip in olive oil—it’s hearty enough to stand up to soups or simply enjoy with a smear of butter.
Rapid Rise Focaccia Bread

Fancy some fresh-baked bread without the all-day commitment? This rapid rise focaccia is your new best friend—it’s fluffy, flavorful, and ready in a flash. You’ll love how simple it is to whip up for a weeknight dinner or last-minute guests.
Serving: 8 | Pre Time: 15 minutes | Cooking Time: 20 minutes
Ingredients
– 3 cups of all-purpose flour
– 1 packet (about 2¼ teaspoons) of rapid-rise yeast
– 1¼ cups of warm water (around 110°F—think bathwater warm)
– 2 tablespoons of olive oil, plus a little extra for drizzling
– 1 teaspoon of salt
– A couple of sprigs of fresh rosemary, chopped
– A sprinkle of flaky sea salt for topping
Instructions
1. In a large bowl, whisk together the flour, rapid-rise yeast, and salt until combined.
2. Pour in the warm water and 2 tablespoons of olive oil, then stir with a wooden spoon until a shaggy dough forms.
3. Tip: If the dough feels too sticky, add a tablespoon more flour; if it’s too dry, add a splash of water.
4. Turn the dough out onto a lightly floured surface and knead for about 5 minutes until smooth and elastic.
5. Lightly oil a 9×13-inch baking pan with olive oil, then press the dough evenly into the pan with your fingertips.
6. Cover the pan loosely with a clean kitchen towel and let it rise in a warm spot for 30 minutes—it should puff up nicely.
7. Tip: For a faster rise, place the pan in a turned-off oven with the light on.
8. Preheat your oven to 425°F while the dough rises.
9. Once risen, use your fingers to dimple the dough all over, creating little pockets.
10. Drizzle the top generously with olive oil, then sprinkle with the chopped rosemary and flaky sea salt.
11. Bake in the preheated oven for 18–20 minutes, until golden brown on top.
12. Tip: Check for doneness by tapping the top—it should sound hollow when ready.
13. Let the focaccia cool in the pan for 5 minutes before slicing.
Luxuriously soft with a crisp, golden crust, this focaccia is infused with the earthy aroma of rosemary. Tear it into chunks for dipping in olive oil, or use it as a base for sandwiches—it’s so versatile, you’ll want to make it weekly!
Simple Baguette Recipe

Diving into homemade bread doesn’t have to be intimidating. You can whip up a classic French baguette with just a few pantry staples, and the smell alone is worth the effort. Let’s get that crust crackling.
Serving: 2 loaves | Pre Time: 90 minutes | Cooking Time: 25 minutes
Ingredients
- 4 cups of all-purpose flour, plus a little extra for dusting
- 1 ½ cups of warm water (around 110°F)
- 2 teaspoons of active dry yeast
- 2 teaspoons of salt
- 1 teaspoon of sugar
- a splash of olive oil for the bowl
Instructions
- In a large bowl, combine the warm water, yeast, and sugar, and let it sit for 5 minutes until it gets foamy.
- Stir in the flour and salt until a shaggy dough forms. Tip: If it feels too sticky, add a tablespoon more flour, but don’t overdo it—a slightly sticky dough is good here.
- Turn the dough onto a lightly floured surface and knead for 8-10 minutes until it’s smooth and elastic.
- Place the dough in a bowl lightly coated with olive oil, cover it with a damp kitchen towel, and let it rise in a warm spot for 1 hour, or until doubled in size.
- Punch down the dough and divide it into two equal pieces.
- Roll each piece into a long, thin log about 16 inches long, tapering the ends slightly.
- Place the loaves on a baking sheet lined with parchment paper, cover with the towel again, and let them proof for 30 minutes. Tip: For a crispier crust, place a pan of water in the bottom of your oven during preheating to create steam.
- Preheat your oven to 450°F.
- Use a sharp knife to make 3-4 diagonal slashes about ¼ inch deep on top of each loaf.
- Bake for 20-25 minutes until the baguettes are golden brown and sound hollow when tapped on the bottom. Tip: Check at 20 minutes—if they’re browning too fast, tent them loosely with foil.
- Transfer the loaves to a wire rack to cool completely before slicing.
Zesty and aromatic, this baguette boasts a crackly crust that gives way to a soft, airy interior with a subtle tang. Tear it warm with a smear of butter, or slice it thin for crostini topped with tomatoes and basil. It’s perfect for sopping up soups or simply enjoying on its own.
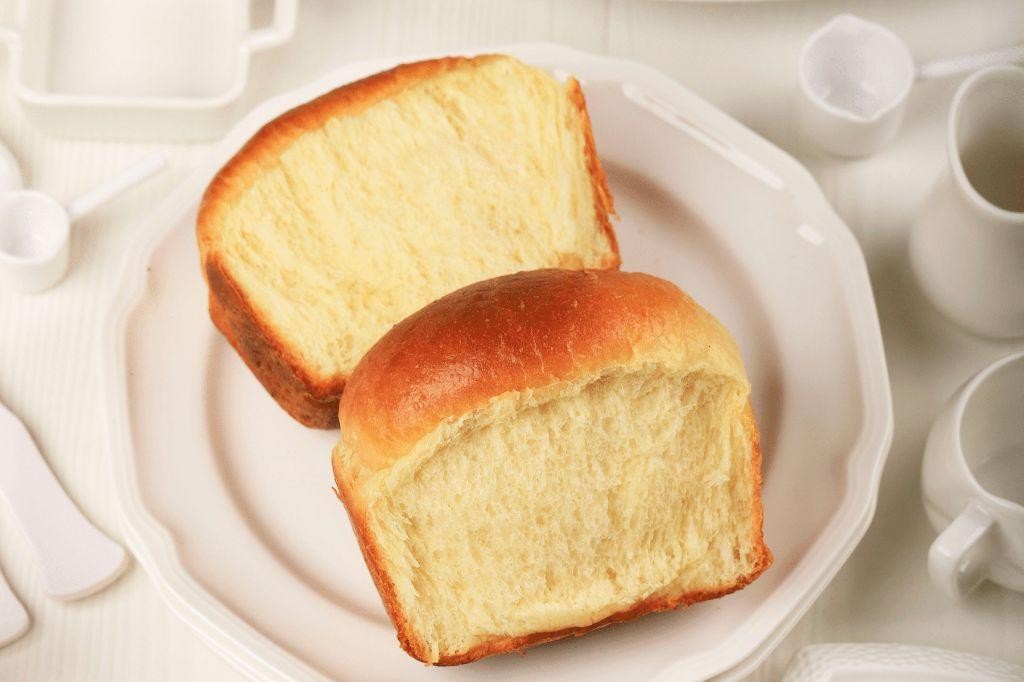
Fluffy Brioche Bread
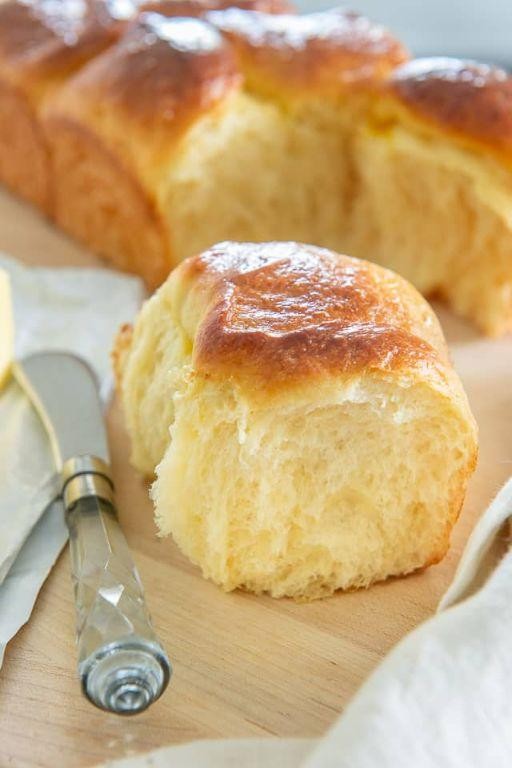
Ever had that moment when you walk past a bakery and the smell of freshly baked bread stops you in your tracks? That’s what this fluffy brioche recipe delivers—a buttery, cloud-like loaf you can make right at home. It’s easier than you might think, and the results are absolutely worth it.
Serving: 1 loaf | Pre Time: 20 minutes | Cooking Time: 30 minutes
Ingredients
– 3 cups of all-purpose flour
– A couple of large eggs
– 1/2 cup of whole milk, warmed to about 110°F
– 1/4 cup of granulated sugar
– 1 tablespoon of active dry yeast
– A generous 1/2 cup of unsalted butter, softened
– A pinch of salt
– A splash of vanilla extract
Instructions
1. In a large bowl, combine the warmed milk, sugar, and yeast, then let it sit for 5 minutes until frothy.
2. Add the eggs, vanilla extract, and salt to the yeast mixture, whisking until smooth.
3. Gradually mix in the flour until a shaggy dough forms.
4. Knead the dough on a floured surface for 8-10 minutes until it becomes smooth and elastic.
5. Incorporate the softened butter into the dough, a few tablespoons at a time, kneading until fully absorbed and the dough is glossy.
6. Place the dough in a greased bowl, cover it with a damp towel, and let it rise in a warm spot for 1-2 hours until doubled in size.
7. Punch down the dough to release air bubbles, then shape it into a loaf and place it in a greased 9×5-inch loaf pan.
8. Cover the pan and let the dough rise again for 45-60 minutes until it puffs up just above the rim.
9. Preheat your oven to 350°F.
10. Bake the loaf for 25-30 minutes, until the top is golden brown and sounds hollow when tapped.
11. Let the bread cool in the pan for 10 minutes, then transfer it to a wire rack to cool completely.
Oh, the magic happens as it cools—this brioche turns into a tender, buttery masterpiece with a soft crumb that’s perfect for French toast or simply slathered with jam. Enjoy it fresh, and watch it disappear fast!
Basic Flatbread Recipe

Baking your own flatbread is easier than you think, and it makes your kitchen smell amazing. You’ll be surprised how simple it is to whip up this versatile bread that’s perfect for wraps, dipping, or just eating warm from the pan.
Serving: 4 | Pre Time: 15 minutes | Cooking Time: 15 minutes
Ingredients
– A couple of cups of all-purpose flour
– A cup of warm water
– A tablespoon of olive oil
– A teaspoon of salt
– A splash of honey
Instructions
1. Grab a large mixing bowl and combine your couple of cups of all-purpose flour and your teaspoon of salt.
2. Make a well in the center of your flour mixture and pour in your cup of warm water, your tablespoon of olive oil, and your splash of honey.
3. Use a fork to slowly mix the wet ingredients into the dry ingredients until a shaggy dough forms. (Tip: The water should be warm to the touch, about 110°F, to help activate the gluten.)
4. Turn the dough out onto a lightly floured surface and knead it by hand for about 5-7 minutes until it becomes smooth and elastic. (Tip: If the dough feels too sticky, add a little more flour, one tablespoon at a time.)
5. Place the kneaded dough back in the bowl, cover it with a damp kitchen towel, and let it rest for 10 minutes at room temperature.
6. Divide the rested dough into 4 equal-sized balls.
7. On your floured surface, use a rolling pin to roll each ball into a thin, roughly 8-inch circle. (Tip: Don’t worry about perfect circles—rustic shapes have more character!)
8. Heat a large, dry skillet or griddle over medium-high heat until a drop of water sizzles and evaporates immediately.
9. Carefully place one rolled-out dough circle onto the hot skillet and cook it for about 1-2 minutes until you see bubbles form on the surface and the bottom has golden brown spots.
10. Flip the flatbread with tongs and cook the other side for another 1-2 minutes until it’s puffed and has more golden spots.
11. Transfer the cooked flatbread to a plate and cover it loosely with a towel to keep it warm and soft while you repeat steps 9-10 with the remaining dough balls.
Zesty and warm, these flatbreads have a wonderfully chewy texture with a hint of sweetness from the honey. Tear them apart for dipping in hummus or use them as a base for your favorite toppings like grilled chicken and tzatziki.
Easiest Pretzel Bread

Baking doesn’t have to be complicated, and this pretzel bread proves it. You’ll love how simple it is to make soft, chewy pretzel bread right at home—perfect for sandwiches or just tearing apart warm from the oven.
Serving: 8 | Pre Time: 15 minutes | Cooking Time: 20 minutes
Ingredients
– 2 cups of warm water (around 110°F)
– A packet of active dry yeast
– A tablespoon of sugar
– 4 ½ cups of all-purpose flour, plus a little extra for dusting
– 2 teaspoons of salt
– ¼ cup of baking soda
– A large egg, beaten with a splash of water for that egg wash
– A couple of tablespoons of coarse salt for sprinkling
Instructions
1. In a large bowl, combine the warm water, yeast, and sugar, and let it sit for 5 minutes until it gets foamy—this means your yeast is active and ready to go.
2. Stir in the flour and salt until a shaggy dough forms, then knead it on a floured surface for about 8 minutes until it’s smooth and elastic.
3. Place the dough in a greased bowl, cover it with a damp towel, and let it rise in a warm spot for 1 hour until it doubles in size.
4. Punch down the dough and divide it into 8 equal pieces, rolling each into a ball and placing them on a parchment-lined baking sheet.
5. Cover the dough balls with the towel again and let them rest for 15 minutes to puff up slightly.
6. Preheat your oven to 425°F and bring a large pot of water to a boil, then carefully stir in the baking soda—it’ll fizz a bit, so be cautious.
7. Boil each dough ball for 30 seconds, flipping once, to give it that classic pretzel crust, then transfer them back to the baking sheet using a slotted spoon.
8. Brush each boiled dough ball with the egg wash and sprinkle generously with coarse salt for that signature salty crunch.
9. Bake in the preheated oven for 15–20 minutes until the bread is deep golden brown and sounds hollow when tapped on the bottom.
10. Let the pretzel bread cool on a wire rack for at least 10 minutes before serving—it’s worth the wait to avoid a gummy texture.
Soft and chewy on the inside with a slightly crisp, salty crust, this bread is a total crowd-pleaser. Serve it warm with mustard for dipping, or slice it up for the ultimate turkey sandwich—it’ll make any meal feel special.
Conclusion
Savor the joy of baking with these 30 simple bread recipes—each one a delicious way to fill your home with warmth and flavor. We hope you find a new favorite to try! Don’t forget to leave a comment telling us which recipe you loved most and share this roundup on Pinterest to spread the baking love.