Eager to cast a spell on your Halloween dinner plans? We’ve conjured up 34 spooktacular savory recipes that transform everyday ingredients into ghoulishly delicious creations. From creepy-crawly appetizers to monstrous main courses, these easy-to-make dishes will bewitch your taste buds and delight your Halloween guests. Get ready to cook up some magic—your cauldron (and kitchen) awaits!
Pumpkin and Black Bean Quesadillas

Melt into fall with these pumpkin and black bean quesadillas that’ll have your taste buds doing the cha-cha. Grab that can of pumpkin puree hiding in your pantry and let’s transform Tuesday dinner into a flavor fiesta. These crispy pockets pack protein punch and cozy spice in every single bite.
5
quesadillas10
minutes20
minutesIngredients
– 1 (15 oz) can pumpkin puree (not pie filling—trust me on this)
– 1 (15 oz) can black beans, rinsed and drained (I give them a good shake in the colander)
– 8 medium flour tortillas (the burrito-sized ones work perfectly)
– 1 cup shredded Monterey Jack cheese (I always grab the pre-shredded for speed)
– 2 tbsp olive oil (extra virgin is my kitchen staple)
– 1 tsp chili powder
– 1/2 tsp cumin
– 1/4 tsp garlic powder
– 1/4 tsp salt
Instructions
1. Place the pumpkin puree, black beans, chili powder, cumin, garlic powder, and salt in a medium bowl.
2. Mix all ingredients thoroughly until fully combined and no spice streaks remain.
3. Lay 4 tortillas flat on your clean work surface.
4. Spread 1/4 cup of the pumpkin-bean mixture evenly over one half of each tortilla, leaving a 1/2-inch border around the edge.
5. Sprinkle 1/4 cup shredded Monterey Jack cheese over the pumpkin mixture on each tortilla.
6. Fold the empty half of each tortilla over the filling to create a half-moon shape.
7. Heat 1/2 tablespoon olive oil in a large skillet over medium heat for 1 minute until shimmering.
8. Place 1 assembled quesadilla in the hot skillet.
9. Cook for 2-3 minutes until the bottom tortilla develops golden brown spots and becomes crisp.
10. Flip the quesadilla carefully using a spatula.
11. Cook for another 2-3 minutes until the second side is equally golden and crisp.
12. Transfer the cooked quesadilla to a cutting board.
13. Repeat steps 7-12 with remaining oil and quesadillas, wiping the skillet clean between batches if needed.
14. Let quesadillas rest for 1 minute before slicing to prevent filling spillage.
15. Cut each quesadilla into 3 wedges using a sharp knife or pizza cutter.
These quesadillas deliver that satisfying crunch giving way to creamy, spiced filling. The pumpkin brings subtle sweetness that plays beautifully against the earthy black beans and melted cheese. Try serving them with a quick lime crema or dunking wedges in your favorite salsa for extra zing.
Witch’s Brew Stew with Creepy Crawlers

Tired of basic Halloween recipes? This witch’s brew stew transforms simple ingredients into a spooky masterpiece that bubbles with flavor. Grab your cauldron and let’s conjure up some magic.
4
servings15
minutes70
minutesIngredients
– 2 tbsp olive oil (extra virgin is my go-to for richer flavor)
– 1 lb beef stew meat, cubed (I prefer 1-inch pieces for even cooking)
– 1 large onion, diced
– 3 garlic cloves, minced (freshly minced releases the best aroma)
– 4 cups beef broth
– 2 large potatoes, cubed (leave skins on for rustic texture)
– 2 carrots, sliced into coins
– 1 cup frozen corn
– 1 tsp smoked paprika
– 1/2 tsp black pepper
– 1/4 cup all-purpose flour
– 8 oz spaghetti, broken into 2-inch pieces (these become our “creepy crawlers”)
Instructions
1. Heat olive oil in a large pot over medium-high heat until shimmering.
2. Add beef cubes and sear for 3-4 minutes until browned on all sides.
3. Stir in diced onion and cook for 2 minutes until translucent.
4. Add minced garlic and cook for 30 seconds until fragrant.
5. Sprinkle flour over the mixture and stir continuously for 1 minute to coat.
6. Pour in beef broth while scraping the bottom of the pot to lift browned bits.
7. Add potatoes, carrots, smoked paprika, and black pepper.
8. Bring to a boil, then reduce heat to low and simmer covered for 45 minutes.
9. Check that potatoes are fork-tender before proceeding.
10. Stir in frozen corn and cook for 5 minutes.
11. Add broken spaghetti pieces and simmer for 8-10 minutes until al dente.
12. Remove from heat and let stand for 5 minutes to thicken.
When you break that spaghetti, watch it curl into perfect creepy crawlers as it cooks. What makes this stew magical is how the tender beef melts against the al dente pasta “worms” while the smoky paprika gives it that cauldron-brewed depth. Serve it in hollowed-out pumpkin bowls for maximum Halloween drama.
Ghoulish Guacamole with Ghostly Chips
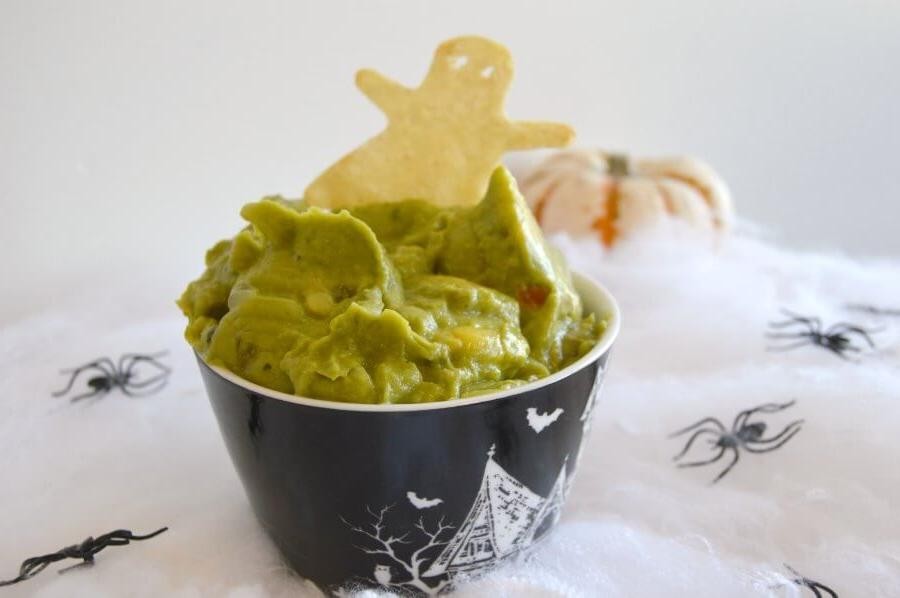
Mashing avocados just got spooky—this ghoulish guacamole brings Halloween vibes to your snack table. Whip up creamy dip with ghostly tortilla chips for a party hit that disappears fast. Get ready for bold flavors and creepy-good fun in minutes.
2
servings15
minutes10
minutesIngredients
– 3 ripe Hass avocados (look for slightly soft skin—they mash perfectly)
– 1 lime (freshly squeezed juice makes all the difference)
– 1/4 cup finely diced red onion (I like the sharp bite)
– 1/4 cup chopped cilantro (stems included for extra flavor)
– 1 jalapeño, minced (remove seeds if you prefer mild heat)
– 1/2 tsp kosher salt (I always use coarse salt for better distribution)
– 4 large flour tortillas (the thicker ones hold their shape when baked)
– 2 tbsp olive oil (extra virgin gives the chips a golden crisp)
– Ghost-shaped cookie cutter (a 3-inch cutter works best for dipping)
Instructions
1. Preheat your oven to 375°F and line a baking sheet with parchment paper.
2. Place flour tortillas on a cutting board and press ghost-shaped cookie cutter firmly through each tortilla.
3. Arrange ghost tortilla shapes in a single layer on the prepared baking sheet.
4. Brush both sides of each ghost tortilla lightly with olive oil using a pastry brush.
5. Bake for 8-10 minutes until edges turn golden brown and chips become crisp.
6. Remove ghost chips from oven and let cool completely on a wire rack—they’ll crisp up further as they cool.
7. Cut ripe Hass avocados in half, remove pits, and scoop flesh into a medium bowl.
8. Mash avocados with a fork until mostly smooth but with some small chunks remaining for texture.
9. Roll lime firmly on the countertop before cutting to maximize juice yield.
10. Squeeze lime juice directly over mashed avocados and stir immediately to prevent browning.
11. Add finely diced red onion, chopped cilantro, minced jalapeño, and kosher salt to the bowl.
12. Fold all ingredients together gently until just combined—overmixing makes guacamole watery.
13. Taste and adjust salt if needed, but avoid stirring excessively after this point.
14. Transfer guacamole to a serving bowl and serve immediately with ghostly tortilla chips. Oozing with creamy texture and zesty lime kick, this guacamole pairs perfectly with the crispy ghost chips. The slight heat from jalapeño balances the rich avocado, making it impossible to stop at one scoop. Serve it in a carved pumpkin bowl for an extra festive touch that’ll haunt your taste buds.
Mummified Meatball Wraps

Oozing with savory goodness, these Mummified Meatball Wraps will haunt your taste buds in the best way possible. Wrap crescent dough around juicy meatballs and melty cheese for a handheld horror show that disappears faster than a ghost. Perfect for Halloween parties or when you crave something spooky-delicious without the fuss.
16
rolls15
minutes20
minutesIngredients
– 1 lb ground beef (I like 80/20 for maximum juiciness)
– 1 tube crescent dough (the seamless sheet version works best for wrapping)
– 1 cup shredded mozzarella cheese (freshly shredded melts smoother than pre-shredded)
– 1/4 cup breadcrumbs (panko gives that perfect crunch)
– 1 large egg (room temp helps everything bind better)
– 2 tbsp olive oil (extra virgin is my go-to for richer flavor)
– 1 tsp garlic powder (double it if you’re a garlic fiend like me)
– 1/2 tsp salt (I use kosher for more controlled seasoning)
– 1/4 tsp black pepper (freshly cracked makes all the difference)
Instructions
1. Preheat your oven to 375°F and line a baking sheet with parchment paper.
2. In a large bowl, combine ground beef, breadcrumbs, egg, garlic powder, salt, and pepper.
3. Mix with your hands until just combined—overmixing makes tough meatballs.
4. Roll the mixture into 16 equal-sized meatballs, about 1-inch diameter each.
5. Heat olive oil in a large skillet over medium-high heat until shimmering.
6. Brown meatballs for 2-3 minutes per side until golden but not cooked through.
7. Unroll crescent dough and cut into 16 thin strips, about 1-inch wide each.
8. Wrap one dough strip around each meatball in a crisscross pattern, leaving gaps to resemble mummy bandages.
9. Place wrapped meatballs on the prepared baking sheet, spacing them 1 inch apart.
10. Press a small pinch of mozzarella cheese into the visible gaps between dough strips.
11. Bake for 12-15 minutes until dough is golden brown and meatballs reach 165°F internally.
12. Let rest for 5 minutes before serving—this allows the cheese to set perfectly.
Ridiculously satisfying with crispy dough giving way to juicy meatball centers. The melted mozzarella creates gooey pockets that contrast beautifully with the savory beef. Serve these with marinara dipping sauce for extra drama, or pack them cold for a spooky lunchbox surprise.
Zombie Brain Deviled Eggs

Killer Halloween appetizer alert! These Zombie Brain Deviled Eggs will steal the spotlight at any spooky gathering. They’re creepy, creamy, and ridiculously easy to make—perfect for freaking out your friends while satisfying their snack cravings.
12
portions20
minutes12
minutesIngredients
- 6 large eggs (I prefer room temp eggs here—they peel way easier!)
- 1/4 cup mayonnaise (full-fat for that ultra-creamy texture)
- 1 tbsp Dijon mustard (adds a nice tangy kick)
- 1 tsp white vinegar (my secret for balancing richness)
- 1/4 tsp paprika (for a smoky finish)
- Green food coloring (just a few drops to create that eerie brain vibe)
- Black olives (pitted, for gory “eyeball” garnishes)
Instructions
- Place 6 room-temperature eggs in a single layer in a saucepan and cover with cold water by 1 inch.
- Bring the water to a rolling boil over high heat, then immediately remove the pan from heat and cover it tightly.
- Let the eggs sit in the hot water for exactly 12 minutes for perfectly set yolks without gray rings.
- Transfer the eggs to an ice bath and let them cool completely for 10 minutes to stop the cooking process.
- Gently tap each egg on the counter and roll it between your palms to loosen the shell before peeling under cool running water.
- Slice each peeled egg in half lengthwise and carefully pop out the yolks into a medium bowl.
- Arrange the empty egg white halves on a serving plate with the cut sides facing up.
- Mash the egg yolks with a fork until they form fine crumbs with no large chunks.
- Add 1/4 cup mayonnaise, 1 tbsp Dijon mustard, 1 tsp white vinegar, and 1/4 tsp paprika to the yolks.
- Stir the mixture vigorously until completely smooth and well combined.
- Add 3-4 drops of green food coloring and mix until the filling is evenly tinted with a pale zombie-green hue.
- Spoon the green filling into a piping bag fitted with a small round tip, or use a zip-top bag with one corner snipped off.
- Pipe the filling into each egg white half in a squiggly, brain-like pattern, starting from the center and working outward.
- Slice black olives into small rounds and place one piece in the center of each “brain” to create a creepy eyeball effect.
Lightly chilling these before serving makes the texture extra firm and satisfying. The creamy, tangy filling contrasts beautifully with the smooth egg whites, while the paprika adds a subtle smoky warmth. Serve them on a slate board with dry ice for a foggy graveyard effect, or nestle them in a bed of shredded purple cabbage for a dramatic, eerie presentation that’s sure to impress.
Swamp Monster Zucchini Fritters

Brace your taste buds for the swampiest snack of the season. These zucchini fritters transform garden glut into crispy, savory perfection. Forget boring veggie sides—this is monster-level flavor in every bite.
3
portions15
minutes20
minutesIngredients
– 2 medium zucchinis, grated (squeeze out that excess moisture!)
– 1/2 cup all-purpose flour (I always sift mine for fluffier fritters)
– 1/4 cup grated Parmesan cheese (the good stuff, not the shaky can)
– 1 large egg, room temp (trust me, it binds better)
– 2 cloves garlic, minced (fresh only—jarred garlic is a crime here)
– 2 tbsp olive oil for frying (extra virgin is my go-to for that fruity kick)
– 1/2 tsp salt (I use fine sea salt for even distribution)
– 1/4 tsp black pepper, freshly ground
Instructions
1. Grate 2 medium zucchinis using the large holes of a box grater.
2. Place grated zucchini in a clean kitchen towel and squeeze firmly over the sink until no more liquid drips out.
3. Transfer dried zucchini to a medium mixing bowl.
4. Add 1/2 cup all-purpose flour, 1/4 cup grated Parmesan, 1 large egg, 2 minced garlic cloves, 1/2 tsp salt, and 1/4 tsp black pepper to the bowl.
5. Mix all ingredients with a fork until just combined—don’t overmix or your fritters will be tough.
6. Heat 2 tbsp olive oil in a large skillet over medium heat until shimmering (about 350°F if you have a thermometer).
7. Drop heaping tablespoons of the zucchini mixture into the hot oil, gently flattening each with the back of your spoon.
8. Fry for 3-4 minutes until edges are golden brown and crispy.
9. Flip each fritter carefully using a thin spatula.
10. Cook another 2-3 minutes until both sides are deeply golden and crisp.
11. Transfer cooked fritters to a paper towel-lined plate to drain excess oil.
12. Repeat with remaining batter, adding more oil if needed between batches. Expect crispy edges with tender centers packed with garlicky zucchini flavor. Elevate them with a dollop of cool Greek yogurt or stack them high for the ultimate veggie burger situation.
Eyeball Stuffed Mushrooms

Ready to freak out your foodie friends? These eyeball stuffed mushrooms are the ultimate creepy-cute appetizer that’ll disappear faster than a ghost. Rethink your party platter with this spooky twist on a classic—guaranteed to be the most talked-about dish at any Halloween gathering.
16
portions15
minutes25
minutesIngredients
– 16 large white mushrooms—pick ones with deep caps for maximum eyeball effect
– 2 tbsp extra virgin olive oil—my go-to for that rich, fruity base
– 8 oz cream cheese, softened to room temp for easy mixing
– 1/2 cup grated Parmesan cheese—the real stuff, not the shaky can
– 2 cloves garlic, minced fine—fresh only, no jarred nonsense
– 1/4 tsp black pepper, freshly ground for that sharp kick
– 16 large pitted black olives—get the jumbo ones for dramatic pupils
– 1 slice provolone cheese, cut into 1-inch circles—this makes the whites of the eyes pop
Instructions
1. Preheat your oven to 375°F and line a baking sheet with parchment paper.
2. Remove stems from all mushrooms and place caps hollow-side up on the baking sheet.
3. Brush each mushroom cap inside and out with olive oil using a pastry brush.
4. Bake mushroom caps for 10 minutes until they release liquid and soften slightly.
5. While mushrooms bake, combine cream cheese, Parmesan, garlic, and black pepper in a medium bowl.
6. Mix filling with a spatula until completely smooth and well-combined.
7. Remove mushrooms from oven and carefully drain any accumulated liquid from the caps.
8. Spoon cream cheese mixture into each mushroom cap, filling just to the rim.
9. Place one provolone circle on top of each filled mushroom as the eye white.
10. Press one black olive into the center of each provolone circle to create the pupil.
11. Return mushrooms to oven and bake for 15 minutes until filling is bubbly and golden.
12. Let cool for 5 minutes before serving—they’re molten hot straight from the oven. Perfect party trick—the creamy, garlicky filling contrasts with the meaty mushroom base while those olive pupils stare right back at you. Pile them on a black platter with dry ice for extra drama or serve alongside bloody marinara dip for the full haunted house experience.
Bat Wing Hummus Platter

Elevate your Halloween spread with this dramatic bat wing hummus platter that’s surprisingly simple to create. Everyone will be grabbing their phones before they grab a chip. This edible centerpiece brings the spooky vibes without sacrificing flavor.
4
servings15
minutes5
minutesIngredients
– 2 cups canned chickpeas (I always save the aquafaba for vegan baking)
– 1/4 cup tahini paste (the good stuff from the Middle Eastern market makes all the difference)
– 3 tbsp fresh lemon juice (squeezed right before using for maximum zing)
– 2 garlic cloves (I roast mine first to mellow that sharp bite)
– 1/4 cup extra virgin olive oil (my go-to for that fruity finish)
– 1/2 tsp smoked paprika (for that hauntingly good color)
– 4 large black olives (pitted – the meatier, the better for carving)
– 1 large pita bread (fresh from the bakery section, never the packaged stuff)
Instructions
1. Drain 2 cups canned chickpeas, reserving 1/4 cup of the liquid (aquafaba) for later use.
2. Combine chickpeas, 1/4 cup tahini paste, 3 tbsp fresh lemon juice, and 2 roasted garlic cloves in a food processor.
3. Pulse the mixture for 30 seconds until roughly combined, then scrape down the sides with a spatula.
4. With the processor running on low, slowly drizzle in 1/4 cup extra virgin olive oil over 45 seconds.
5. Add the reserved aquafaba and process on high for 2 full minutes until completely smooth.
6. Transfer the hummus to a shallow serving bowl and use the back of a spoon to create swooping patterns.
7. Cut 1 large pita bread into bat wing shapes using kitchen shears – make them asymmetrical for a more organic look.
8. Toast the pita bat wings at 400°F for 4-5 minutes until crisp but not browned.
9. Arrange the toasted bat wings around the edge of the hummus bowl, overlapping slightly.
10. Cut 4 large black olives in half lengthwise and place them at the base of each bat wing to create “body” sections.
11. Sprinkle 1/2 tsp smoked paprika over the hummus surface using a fine mesh strainer for even distribution.
Perfectly creamy hummus gets an eerie makeover with those crispy pita wings. The smoked paprika adds just enough smoky depth to balance the bright lemon. Serve this as the centerpiece of your Halloween spread and watch it disappear faster than ghosts at sunrise.
Frankenstein’s Monster Burgers

Zombie-level hunger? These Frankenstein’s Monster Burgers will resurrect your dinner game. We’re stitching together bold flavors and juicy textures that’ll make your taste buds scream—in the best way possible.
2
sandwiches10
minutes10
minutesIngredients
- 1 lb ground beef (80/20 blend for maximum juiciness)
- 1 large egg, room temp—it binds everything perfectly
- ½ cup breadcrumbs (I always use panko for that extra crunch)
- 2 tbsp Worcestershire sauce (the secret umami booster)
- 1 tsp garlic powder (fresh minced works too if you’re feeling fancy)
- 4 burger buns, lightly toasted—trust me, it makes all the difference
- 4 slices cheddar cheese (sharp cheddar is my go-to for that melty pull)
Instructions
- Preheat your grill or skillet to medium-high heat (400°F if using a grill).
- In a large bowl, combine 1 lb ground beef, 1 large egg, ½ cup breadcrumbs, 2 tbsp Worcestershire sauce, and 1 tsp garlic powder.
- Gently mix with your hands until just combined—overmixing makes tough burgers.
- Divide the mixture into 4 equal portions and shape into ¾-inch thick patties.
- Use your thumb to make a shallow indent in the center of each patty to prevent bulging.
- Place patties on the hot grill or skillet and cook for 4-5 minutes without moving them.
- Flip the burgers and immediately top each with 1 slice cheddar cheese.
- Cook for another 4-5 minutes until internal temperature reaches 160°F.
- While burgers cook, lightly toast 4 burger buns until golden edges appear.
- Remove burgers from heat and let rest for 2 minutes—this keeps the juices locked in.
- Assemble burgers on toasted buns and serve immediately.
Fiery, melty, and utterly unstoppable—these burgers deliver a crackly sear outside and a juicy, cheese-stuffed center. Serve them with crispy sweet potato fries or pile high with onion rings for that full monster mash experience.
Skeleton Rib Cage Ribs

Nailed it—these skeleton rib cage ribs are the spookiest, most delicious centerpiece your Halloween table will ever see. Get ready to carve up some serious flavor that’ll have everyone snapping pics before they devour every meaty bone.
2
racks15
minutes205
minutesIngredients
– 2 racks pork spare ribs (I always pick meaty ones with good marbling)
– 1/2 cup brown sugar (pack it tight for that caramelized crust)
– 1/4 cup smoked paprika (this is my secret for deep, smoky flavor)
– 2 tbsp garlic powder (don’t skimp—it builds that savory base)
– 1 tbsp black pepper (freshly ground gives the best bite)
– 1 tbsp salt (I use coarse kosher for even seasoning)
– 1 cup apple cider vinegar (trust me, it tenderizes like magic)
– 1/2 cup ketchup (the classic sweet-tangy backbone)
Instructions
1. Preheat your oven to 275°F—low and slow is key for fall-off-the-bone ribs.
2. Pat the pork spare ribs completely dry with paper towels to help the rub stick.
3. Mix brown sugar, smoked paprika, garlic powder, black pepper, and salt in a bowl.
4. Rub the seasoning blend evenly over both sides of the ribs, pressing firmly to adhere.
5. Place the ribs bone-side down on a foil-lined baking sheet.
6. Tightly cover the ribs with another layer of foil to lock in steam and tenderness.
7. Bake at 275°F for 3 hours until the meat is tender but not falling apart.
8. Carefully remove the top foil—watch for hot steam escaping.
9. Whisk apple cider vinegar and ketchup in a small bowl to make the glaze.
10. Brush half of the glaze evenly over the top of the ribs.
11. Increase oven temperature to 400°F for a caramelized finish.
12. Return the ribs to the oven, uncovered, for 15 minutes until the glaze is sticky.
13. Brush the remaining glaze over the ribs and bake another 10 minutes.
14. Let the ribs rest for 10 minutes before slicing—this keeps them juicy.
15. Slice between the bones to create individual “rib cage” portions.
Serve these sticky, smoky ribs with extra napkins—the caramelized crust gives way to impossibly tender meat that pulls clean from the bone. Stack them on a platter to highlight that skeleton shape, or pair with crisp apple slaw to cut through the richness.
Creepy Cauldron Chili

A cauldron bubbling with deep, smoky chili that’ll cast a spell on your taste buds. This isn’t your average chili—it’s a potion of bold flavors perfect for chilly nights. Get ready to stir up some magic in under an hour.
5
servings15
minutes45
minutesIngredients
- 1 lb ground beef (I like 80/20 for maximum flavor)
- 1 yellow onion, diced (my secret for sweet depth)
- 2 cloves garlic, minced (fresh only—none of that jarred stuff)
- 1 tbsp olive oil (extra virgin is my kitchen staple)
- 1 15-oz can kidney beans, drained (rinsing reduces sodium)
- 1 15-oz can diced tomatoes (fire-roasted add smoky notes)
- 2 tbsp chili powder (adjust if you’re heat-sensitive)
- 1 tsp cumin (toasted whole seeds ground fresh if you’re fancy)
- 4 cups beef broth (low-sodium lets you control salt)
- 1 tsp salt (I use kosher for even distribution)
- 1/2 tsp black pepper (freshly cracked, always)
Instructions
- Heat olive oil in a large pot over medium-high heat until it shimmers.
- Add diced onion and cook for 5 minutes, stirring occasionally, until translucent.
- Add ground beef, breaking it up with a wooden spoon, and cook for 6–8 minutes until no pink remains.
- Stir in minced garlic and cook for 1 minute until fragrant—don’t let it burn.
- Sprinkle chili powder, cumin, salt, and black pepper over the meat mixture, stirring for 30 seconds to toast the spices.
- Pour in beef broth, scraping the bottom of the pot to lift any browned bits.
- Add diced tomatoes and kidney beans, stirring to combine.
- Bring the chili to a boil, then reduce heat to low and simmer uncovered for 30 minutes.
- Check consistency after 20 minutes—if it’s too thin, simmer 5–10 minutes longer.
- Ladle into bowls and serve hot.
Keep it simmering low and slow to let the flavors meld into a rich, thick potion. The beans add creaminess against the spicy kick, while the tomatoes bring a tangy balance. Serve it with crusty bread for dipping or top with shredded cheese for extra decadence.
Spine-Chilling Stuffed Peppers

Perfect for when you want dinner to do the screaming for you. These peppers pack serious heat and flavor that’ll haunt your taste buds in the best way possible. Get ready to make your kitchen the spookiest spot in the house.
3
portions15
minutes55
minutesIngredients
- 4 large bell peppers – I go for the red ones since they’re sweeter and hold their shape better
- 1 lb ground beef – 80/20 blend gives you that perfect juicy texture
- 1 cup cooked rice – day-old rice works magic here, trust me
- 1 onion, diced – yellow onion brings that classic savory base
- 2 cloves garlic, minced – fresh is always better than jarred in my book
- 1 cup shredded cheddar cheese – sharp cheddar melts into gooey perfection
- 1 can (15 oz) tomato sauce – the simple no-salt-added kind lets you control the seasoning
- 2 tbsp olive oil – extra virgin is my kitchen workhorse
- 1 tsp chili powder – this is where the “spine-chilling” comes from
- 1/2 tsp cumin – toasty warmth that balances the heat
- Salt and pepper – season generously, people always underseason
Instructions
- Preheat your oven to 375°F – this gives the peppers time to soften while the filling cooks through perfectly.
- Slice the tops off all 4 bell peppers and remove the seeds and membranes.
- Place peppers cut-side up in a baking dish that fits them snugly.
- Heat 2 tablespoons olive oil in a large skillet over medium-high heat until shimmering.
- Add diced onion and cook for 4-5 minutes until translucent and slightly golden at the edges.
- Add minced garlic and cook for 1 minute until fragrant – don’t let it burn or it’ll turn bitter.
- Add ground beef, breaking it up with a wooden spoon, and cook for 6-7 minutes until no pink remains.
- Drain any excess grease from the skillet – this prevents greasy peppers.
- Stir in cooked rice, tomato sauce, chili powder, cumin, 1 teaspoon salt, and 1/2 teaspoon black pepper.
- Simmer the mixture for 3 minutes until everything is well combined and heated through.
- Spoon the beef and rice mixture evenly into each prepared bell pepper, packing it down slightly.
- Top each stuffed pepper with shredded cheddar cheese, covering the filling completely.
- Pour 1/2 cup water into the bottom of the baking dish around the peppers – this creates steam to help them cook evenly.
- Cover the dish tightly with aluminum foil and bake for 25 minutes.
- Remove the foil and bake for another 10-15 minutes until cheese is bubbly and slightly browned.
- Let peppers rest for 5 minutes before serving – this allows the filling to set for cleaner slicing.
Get ready for that satisfying crunch giving way to the spiced beef and rice mixture that’s somehow both creamy and textured. The melted cheese forms this glorious cap that pulls away in strings with every bite. Serve these bad boys with a dollop of cool sour cream to tame the heat, or go full haunting and drizzle with hot sauce for maximum scream factor.
Ghostly Cheese and Chive Scones

Ditch the boring breakfast routine—these ghostly scones will haunt your taste buds in the best way. Get ready for cheesy, herby perfection that comes together in minutes and disappears even faster.
8
portions15
minutes18
minutesIngredients
– 2 cups all-purpose flour (I always spoon and level for accuracy)
– 1 tablespoon baking powder (make sure it’s fresh for maximum rise)
– 1 teaspoon salt
– ½ cup cold unsalted butter, cubed (keep it icy cold for flaky layers)
– 1 cup shredded sharp cheddar cheese (I prefer extra sharp for bold flavor)
– ¼ cup chopped fresh chives (fresh makes all the difference here)
– ¾ cup cold whole milk (the fat content creates tender scones)
– 1 large egg, beaten (room temp helps it incorporate smoothly)
Instructions
1. Preheat your oven to 400°F and line a baking sheet with parchment paper.
2. Whisk together flour, baking powder, and salt in a large bowl.
3. Cut cold butter cubes into the flour mixture using a pastry cutter until pea-sized crumbs form.
4. Stir in shredded cheddar cheese and chopped fresh chives until evenly distributed.
5. Pour in cold milk and mix gently with a fork until just combined—don’t overmix.
6. Tip: Handle the dough as little as possible to prevent tough scones.
7. Turn dough onto a lightly floured surface and pat into a 1-inch thick circle.
8. Cut dough into 8 wedges using a sharp knife or bench scraper.
9. Tip: For cleaner cuts, chill the dough circle for 10 minutes before slicing.
10. Arrange wedges 2 inches apart on the prepared baking sheet.
11. Brush the tops with beaten egg using a pastry brush for golden finish.
12. Bake at 400°F for 15-18 minutes until tops are golden and edges are lightly browned.
13. Tip: Check at 15 minutes—a toothpick should come out clean when inserted.
14. Transfer scones to a wire rack and cool for 5 minutes before serving.
Keep these warm from the oven for maximum cheese pull and flaky texture. The sharp cheddar and fresh chives create a savory punch that pairs perfectly with tomato soup or stands alone as the ultimate snack. Try splitting one and toasting it the next day—the ghostly goodness haunts your kitchen for days.
Conclusion
You’ve just discovered 34 frightfully delicious Halloween recipes that will transform your spooky celebrations. From creepy appetizers to haunting main dishes, these creative savory treats are sure to bewitch your taste buds and impress your guests. Don’t be afraid to dive in – try your favorites, leave a comment sharing which recipes cast a spell on you, and pin this article to your Halloween boards for easy reference next year!


