
Mmm, can you smell that? The warm, savory aroma of freshly baked treats is calling your name! Whether you’re craving cheesy breads, flaky pastries, or hearty dinner pies, we’ve gathered 29 irresistible recipes that turn simple ingredients into extraordinary comfort food. Get ready to preheat your oven and discover your new favorite savory bake—each one promises to deliver big flavor and even bigger smiles.
Spinach and Feta Stuffed Puff Pastry

Dusk settles outside my kitchen window as I unfold the layers of this simple yet profound recipe, finding comfort in the way humble ingredients transform into something extraordinary when given time and gentle attention. There’s something quietly satisfying about working with puff pastry—its delicate, flaky layers holding promises of warmth and nourishment within.
3
portions20
minutes30
minutesIngredients
– 1 package (17.3 oz) frozen all-butter puff pastry, thawed
– 10 oz fresh spinach leaves, thoroughly washed and dried
– 8 oz high-quality feta cheese, crumbled
– 1/2 cup whole-milk ricotta cheese
– 1/4 cup finely grated Parmigiano-Reggiano
– 1 large pasture-raised egg, lightly beaten
– 2 tbsp extra virgin olive oil
– 3 cloves garlic, minced
– 1/4 tsp freshly grated nutmeg
– 1/2 tsp freshly cracked black pepper
– 1/4 tsp fine sea salt
– 1 tbsp whole milk, for brushing
Instructions
1. Preheat your oven to 400°F and line a baking sheet with parchment paper.
2. Heat olive oil in a large skillet over medium heat until shimmering.
3. Add minced garlic and cook for 45 seconds until fragrant but not browned.
4. Add spinach in batches, wilting each addition before adding more, about 3-4 minutes total.
5. Transfer cooked spinach to a fine-mesh strainer and press firmly with a spatula to remove excess liquid—this prevents a soggy pastry.
6. In a medium bowl, combine crumbled feta, ricotta, Parmigiano-Reggiano, nutmeg, pepper, and salt.
7. Add the drained spinach to the cheese mixture and fold gently until evenly incorporated.
8. Unfold one sheet of puff pastry onto the prepared baking sheet.
9. Spoon the spinach-feta mixture onto the center of the pastry, leaving a 1-inch border on all sides.
10. Brush the exposed pastry edges with the beaten egg wash.
11. Carefully place the second pastry sheet over the filling, aligning the edges.
12. Press the edges firmly together with your fingers, then crimp with a fork to seal completely.
13. Brush the entire surface with whole milk for golden browning.
14. Use a sharp paring knife to score the top with diagonal lines, creating a decorative pattern without cutting through to the filling.
15. Bake for 22-25 minutes until the pastry is deeply golden and puffed.
16. Transfer to a wire rack and let rest for 8-10 minutes before slicing—this allows the filling to set properly.
Slicing reveals the beautiful contrast between the shatteringly crisp exterior and the creamy, savory filling within. The feta provides salty brightness against the earthy spinach, while the nutmeg adds a whisper of warmth that makes this feel like a hug in pastry form. Serve warm with a simple arugula salad dressed in lemon vinaigrette, or pack slices for a sophisticated picnic where the flaky layers will still impress hours later.
Savory Cheddar and Chive Scones

A quiet afternoon finds me craving something substantial yet comforting, the kind of bake that fills the kitchen with a warm, savory aroma and satisfies with every tender, flaky bite. These scones, studded with sharp cheddar and fresh chives, are just that—a humble treat that feels like a gentle embrace.
8
scones15
minutes20
minutesIngredients
– 2 cups all-purpose flour
– 1 tablespoon baking powder
– 1/2 teaspoon fine sea salt
– 1/4 teaspoon freshly ground black pepper
– 1/2 cup cold European-style cultured butter, cubed
– 1 cup aged sharp white cheddar cheese, grated
– 1/4 cup fresh chives, finely minced
– 2/3 cup whole buttermilk, chilled
– 1 large pasture-raised egg, lightly beaten
– 1 tablespoon heavy cream, for brushing
Instructions
1. Preheat your oven to 400°F and line a baking sheet with parchment paper.
2. In a large mixing bowl, whisk together the all-purpose flour, baking powder, fine sea salt, and freshly ground black pepper until fully combined.
3. Add the cold European-style cultured butter cubes to the dry ingredients and use a pastry cutter or your fingertips to work the butter into pea-sized crumbs, being careful not to overwork the mixture to ensure a flaky texture.
4. Gently fold in the grated aged sharp white cheddar cheese and finely minced fresh chives until evenly distributed.
5. Create a well in the center of the mixture and pour in the chilled whole buttermilk, then use a fork to stir just until a shaggy dough forms and no dry flour remains.
6. Turn the dough out onto a lightly floured surface and gently pat it into a 1-inch thick circle, handling it as little as possible to keep the butter cold for optimal rise.
7. Use a sharp, floured 2.5-inch round cutter to cut out scones, pressing straight down without twisting to help them rise evenly, and place them 2 inches apart on the prepared baking sheet.
8. Gather any dough scraps, gently pat them together, and cut additional scones until all dough is used.
9. Brush the tops of each scone lightly with the heavy cream using a pastry brush for a golden, crisp crust.
10. Bake for 18–22 minutes, or until the scones are puffed, golden brown on top, and sound hollow when tapped on the bottom.
11. Transfer the scones to a wire rack and let them cool for 10 minutes before serving to allow the structure to set. Heavily layered and subtly tangy, these scones break apart with a tender crumb that gives way to pockets of melted cheddar and the fresh, oniony punch of chives. Serve them warm alongside a bowl of roasted tomato soup for dipping, or split and slathered with herb-infused butter for a simple, satisfying snack.
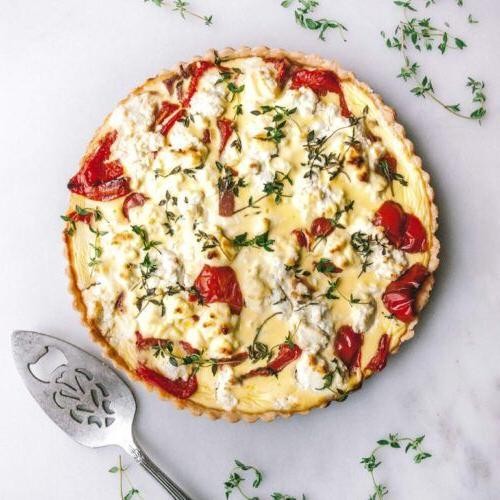
Tomato and Basil Quiche

Folding the delicate pastry into the pan this morning, I remembered how these quiet kitchen moments feel like meditation—the rhythmic motions, the anticipation of something beautiful emerging from simple ingredients. This tomato and basil quiche captures that peaceful transformation, where humble components become something greater through patience and care. Let’s create this golden-crusted treasure together, slice by careful slice.
6
servings25
minutes70
minutesIngredients
– 1 9-inch deep-dish pie crust, chilled
– 1 tablespoon extra virgin olive oil
– 1 medium yellow onion, thinly sliced
– 3 cloves garlic, minced
– 4 large pasture-raised eggs, lightly beaten
– 1 cup heavy cream
– 1/2 cup whole milk
– 1 teaspoon fine sea salt
– 1/2 teaspoon freshly ground black pepper
– 1/4 teaspoon freshly grated nutmeg
– 1 cup Gruyère cheese, freshly grated
– 2 medium heirloom tomatoes, sliced 1/4-inch thick
– 1/4 cup fresh basil leaves, chiffonade
Instructions
1. Preheat your oven to 375°F and position the rack in the center.
2. Place the chilled pie crust in a 9-inch deep-dish pie plate, pressing gently against the sides and bottom.
3. Line the crust with parchment paper and fill with pie weights or dried beans.
4. Blind bake the crust for 15 minutes until the edges just begin to firm.
5. Carefully remove the parchment and weights, then return the crust to the oven for 5 more minutes until pale golden.
6. Heat olive oil in a skillet over medium heat until shimmering.
7. Add the sliced onion and cook for 8-10 minutes, stirring occasionally, until translucent and lightly caramelized.
8. Add the minced garlic and cook for 1 minute until fragrant but not browned.
9. In a large mixing bowl, whisk together the beaten eggs, heavy cream, and whole milk until fully incorporated.
10. Whisk in the sea salt, black pepper, and freshly grated nutmeg until evenly distributed.
11. Sprinkle half of the grated Gruyère cheese evenly across the bottom of the pre-baked crust.
12. Scatter the caramelized onion and garlic mixture over the cheese layer.
13. Arrange the tomato slices in a single, slightly overlapping layer across the filling.
14. Slowly pour the egg mixture over the tomatoes, ensuring even distribution.
15. Sprinkle the remaining Gruyère cheese evenly over the surface.
16. Bake at 375°F for 35-40 minutes until the center is set and the top is golden brown.
17. Remove from oven and let rest for 15 minutes to allow the custard to firm.
18. Garnish with fresh basil chiffonade just before serving.
Layers of flavor unfold with each bite—the flaky crust giving way to creamy custard punctuated by sweet tomatoes and aromatic basil. The Gruyère adds a subtle nuttiness that complements the caramelized onions beautifully. Serve warm with a simple green salad for lunch, or at room temperature for a elegant picnic centerpiece that tastes like summer captured in a pastry shell.
Roasted Red Pepper and Goat Cheese Galette
Just thinking about how some of the coziest meals come from the simplest ingredients, folded together with patience and care. This rustic galette feels like autumn captured in pastry, with roasted peppers and creamy cheese creating something quietly spectacular. There’s something deeply comforting about the way the flaky crust cradles the vibrant filling, making ordinary moments feel special.
3
portions30
minutes35
minutesIngredients
– 1 ¼ cups all-purpose flour
– ½ teaspoon fine sea salt
– 8 tablespoons European-style unsalted butter, chilled and cubed
– 3-4 tablespoons ice water
– 3 large red bell peppers, roasted and sliced
– 4 ounces fresh goat cheese, crumbled
– 2 tablespoons extra virgin olive oil
– 1 large pasture-raised egg, lightly beaten
– 1 tablespoon heavy cream
– ½ teaspoon freshly cracked black pepper
– ¼ teaspoon smoked paprika
Instructions
1. Combine 1 ¼ cups all-purpose flour and ½ teaspoon fine sea salt in a large mixing bowl.
2. Add 8 tablespoons chilled, cubed European-style unsalted butter to the flour mixture.
3. Use your fingertips to work the butter into the flour until pea-sized crumbs form, about 2-3 minutes.
4. Drizzle 3 tablespoons ice water over the mixture while tossing with a fork.
5. Gently press the dough together, adding remaining ice water if needed until it just holds together.
6. Form the dough into a disk, wrap tightly in plastic wrap, and refrigerate for 1 hour.
7. Preheat your oven to 400°F and line a baking sheet with parchment paper.
8. Roll the chilled dough into a 12-inch circle on a lightly floured surface.
9. Arrange 3 roasted and sliced red bell peppers in the center, leaving a 2-inch border.
10. Sprinkle 4 ounces crumbled fresh goat cheese evenly over the peppers.
11. Drizzle 2 tablespoons extra virgin olive oil over the filling.
12. Season with ½ teaspoon freshly cracked black pepper and ¼ teaspoon smoked paprika.
13. Fold the edges of the dough over the filling, pleating as you go around the circle.
14. Whisk together 1 lightly beaten pasture-raised egg and 1 tablespoon heavy cream.
15. Brush the egg wash generously over the exposed crust.
16. Bake at 400°F for 30-35 minutes until the crust is golden brown and flaky.
17. Transfer to a wire rack and let cool for 15 minutes before slicing.
The flaky, buttery crust shatters beautifully against the creamy, tangy goat cheese, while the sweet roasted peppers provide pockets of smoky depth. Serve warm slices alongside a simple arugula salad dressed with lemon vinaigrette, or enjoy as is with a glass of crisp rosé for the perfect autumn evening.
Herbed Zucchini Muffins

Evenings like this, when the light slants golden through the kitchen window, I find myself reaching for the familiar comfort of a wooden spoon and a simple bowl. There’s a quiet magic in transforming the humble summer squash into something warm and fragrant, a small act of preservation against the coming chill.
12
muffins15
minutes23
minutesIngredients
– 2 cups finely grated zucchini, moisture gently pressed out
– 1 ¾ cups all-purpose flour
– ½ cup granulated cane sugar
– ⅓ cup cold-pressed extra virgin olive oil
– 2 pasture-raised eggs, lightly beaten
– ¼ cup whole milk Greek yogurt
– 1 ½ teaspoons baking powder
– ½ teaspoon baking soda
– 1 teaspoon fine sea salt
– 1 tablespoon fresh thyme leaves, finely minced
– 2 teaspoons fresh rosemary, finely minced
– 1 teaspoon fresh oregano, finely minced
– ½ teaspoon freshly grated nutmeg
Instructions
1. Preheat your oven to 375°F (190°C) and line a 12-cup muffin tin with parchment liners.
2. In a large mixing bowl, whisk together the all-purpose flour, granulated cane sugar, baking powder, baking soda, and fine sea salt until thoroughly combined.
3. In a separate medium bowl, combine the cold-pressed extra virgin olive oil, lightly beaten pasture-raised eggs, and whole milk Greek yogurt, whisking until the mixture is smooth and emulsified.
4. Gently fold the wet ingredients into the dry ingredients using a rubber spatula until just combined; a few streaks of flour are acceptable to prevent overmixing.
5. Add the finely grated zucchini, fresh thyme leaves, fresh rosemary, fresh oregano, and freshly grated nutmeg to the batter, folding gently until evenly distributed.
6. Divide the batter equally among the 12 prepared muffin cups, filling each about three-quarters full to allow for proper rising.
7. Place the muffin tin in the center of the preheated oven and bake for 20-23 minutes, or until the tops spring back lightly when pressed and a cake tester inserted into the center comes out clean.
8. Transfer the muffin tin to a wire cooling rack and let the muffins rest in the pan for exactly 5 minutes to set their structure.
9. Carefully remove the muffins from the tin and place them directly on the wire rack to cool completely, which prevents the bottoms from becoming soggy.
Kindly rustic and tender, these muffins carry the subtle earthiness of herbs melded with the gentle sweetness of zucchini. Their moist crumb makes them perfect for a quiet breakfast with honey butter, or sliced and lightly toasted to accompany a sharp, aged cheddar.
Bacon and Cheddar Cornbread

Nostalgia settles in the kitchen this evening, the golden hour light casting long shadows across the counter as I prepare to bake. This cornbread, studded with savory treasures, feels like a warm embrace from simpler times, a recipe that whispers of autumn gatherings and shared meals. It’s a humble dish, yet each bite carries the comfort of home and hearth, a quiet celebration on a cool afternoon.
8
servings15
minutes35
minutesIngredients
– 1 ½ cups stone-ground yellow cornmeal
– ½ cup all-purpose flour
– 1 tablespoon baking powder
– 1 teaspoon fine sea salt
– 2 pasture-raised eggs, lightly beaten
– 1 cup whole buttermilk
– ¼ cup clarified butter, melted and cooled slightly
– 2 tablespoons raw honey
– 6 slices thick-cut applewood-smoked bacon, cooked until crisp and crumbled
– 1 cup sharp white cheddar cheese, grated
Instructions
1. Preheat your oven to 400°F and position a rack in the center.
2. Generously grease a 9-inch cast-iron skillet with clarified butter and place it in the oven to heat for 10 minutes.
3. In a large mixing bowl, whisk together the stone-ground yellow cornmeal, all-purpose flour, baking powder, and fine sea salt until fully incorporated.
4. In a separate bowl, combine the lightly beaten pasture-raised eggs, whole buttermilk, melted clarified butter, and raw honey, whisking until the mixture is smooth and emulsified.
5. Pour the wet ingredients into the dry ingredients and fold gently with a spatula until just combined, being careful not to overmix.
6. Gently fold in the crumbled applewood-smoked bacon and grated sharp white cheddar cheese until evenly distributed throughout the batter.
7. Carefully remove the hot skillet from the oven and immediately pour in the batter, spreading it evenly with the spatula.
8. Return the skillet to the oven and bake for 20–25 minutes, or until the top is golden brown and a toothpick inserted into the center comes out clean.
9. Transfer the cornbread to a wire rack and let it cool in the skillet for 10 minutes before slicing.
Velvety crumb gives way to pockets of smoky bacon and molten cheddar, creating a symphony of textures in each slice. Serve it warm, perhaps drizzled with a touch of honey butter or alongside a bowl of spicy chili, where its savory richness can truly shine. This cornbread doesn’t just fill the kitchen with aroma—it fills the heart with quiet contentment.
Mushroom and Gruyere Tart
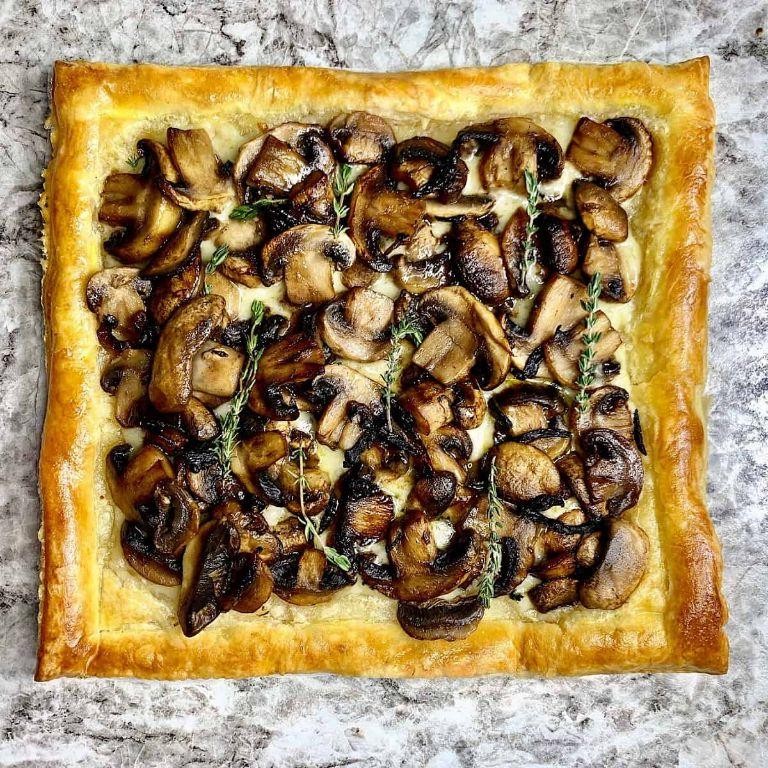
Often, as autumn settles in, I find myself drawn to simple, earthy dishes that fill the kitchen with warmth and comfort. On days like today, when the light fades early, there’s something deeply satisfying about preparing a mushroom and Gruyère tart—a humble yet elegant creation that feels like a quiet celebration of the season. The process itself becomes a form of meditation, each step a gentle rhythm that slows the rush of the day.
4
portions20
minutes50
minutesIngredients
– 1 sheet frozen all-butter puff pastry, thawed
– 2 tablespoons clarified butter
– 1 pound mixed wild mushrooms (such as cremini, shiitake, and oyster), thinly sliced
– 1 large shallot, finely minced
– 2 cloves garlic, finely grated
– 1/4 cup dry white wine
– 1/2 cup heavy cream
– 1 teaspoon fresh thyme leaves, finely chopped
– 1/4 teaspoon freshly grated nutmeg
– 1 cup Gruyère cheese, freshly grated
– 1 large pasture-raised egg, lightly beaten
– 1 tablespoon coarse sea salt
– Freshly cracked black pepper
Instructions
1. Preheat the oven to 400°F and line a baking sheet with parchment paper.
2. Roll the thawed puff pastry sheet into a 10×14-inch rectangle on a lightly floured surface, then transfer it to the prepared baking sheet.
3. Use a sharp knife to score a 1-inch border around the edges of the pastry, being careful not to cut all the way through.
4. Prick the center of the pastry all over with a fork to prevent excessive rising.
5. Brush the scored border lightly with the beaten egg using a pastry brush.
6. Bake the pastry for 12 minutes, or until the border is puffed and lightly golden.
7. While the pastry bakes, heat the clarified butter in a large skillet over medium-high heat until shimmering.
8. Add the sliced mushrooms and cook for 8-10 minutes, stirring occasionally, until they release their liquid and develop a deep golden-brown color.
9. Stir in the minced shallot and cook for 2-3 minutes, until translucent and fragrant.
10. Add the grated garlic and cook for 30 seconds, just until its aroma is released.
11. Pour in the white wine and simmer for 2 minutes, scraping any browned bits from the bottom of the skillet.
12. Reduce the heat to low and stir in the heavy cream, thyme, and nutmeg.
13. Simmer the mixture for 3-4 minutes, until the cream has thickened slightly and coats the mushrooms.
14. Remove the skillet from the heat and fold in half of the grated Gruyère until just incorporated.
15. Spread the mushroom mixture evenly within the scored border of the pre-baked pastry.
16. Sprinkle the remaining Gruyère over the mushroom filling.
17. Bake the tart for 18-20 minutes, until the cheese is bubbly and the crust is deeply golden.
18. Remove the tart from the oven and let it rest for 5 minutes on a wire rack.
19. Garnish with coarse sea salt and freshly cracked black pepper before serving.
What emerges from the oven is a study in contrasts—the flaky, buttery crust giving way to a rich, earthy filling where the nutty Gruyère melts into the cream-kissed mushrooms. I love serving warm slices alongside a simple arugula salad dressed with lemon vinaigrette, the peppery greens cutting through the tart’s decadence. For an autumnal twist, try drizzling each portion with a thread of truffle oil just before serving, its aroma deepening the woodsy notes.
Caramelized Onion and Olive Focaccia
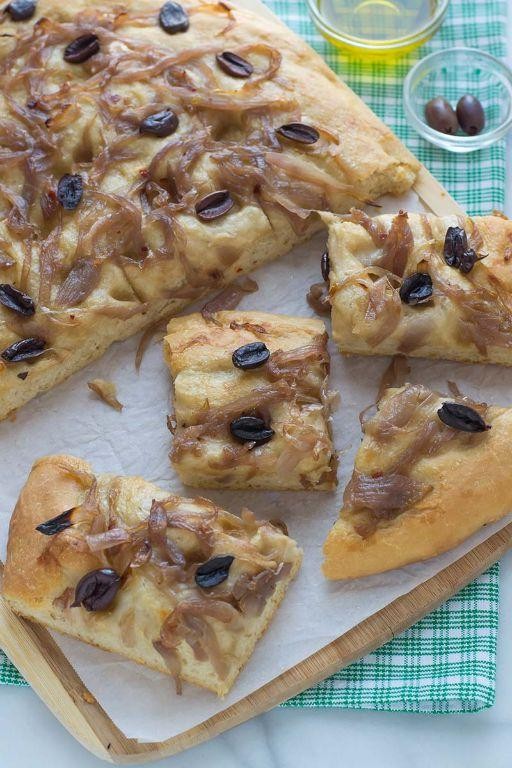
Remembering how the afternoon light used to fall across my grandmother’s kitchen table, I find myself drawn to recipes that unfold slowly, that ask for patience and reward it with depth. This focaccia, with its sweetly caramelized onions and briny olives, is one such recipe—a quiet meditation in bread-making that fills the house with the kind of warmth that lingers long after the last slice is gone.
1
focaccia45
minutes52
minutesIngredients
- 3 ½ cups bread flour, sifted
- 1 ¼ cups warm water (110°F)
- 2 ¼ teaspoons active dry yeast
- 2 tablespoons extra-virgin olive oil, plus more for drizzling
- 1 ½ teaspoons fine sea salt
- 2 large yellow onions, thinly sliced
- 1 tablespoon unsalted butter
- ½ cup Kalamata olives, pitted and roughly chopped
- 1 tablespoon fresh rosemary leaves, finely minced
- Flaky sea salt, for finishing
Instructions
- In the bowl of a stand mixer fitted with a dough hook, combine the warm water and yeast, allowing it to proof for 5 minutes until foamy.
- Add the bread flour, 2 tablespoons of olive oil, and fine sea salt to the yeast mixture.
- Mix on low speed for 2 minutes until a shaggy dough forms, then increase to medium speed and knead for 6 minutes until the dough is smooth and elastic.
- Transfer the dough to a lightly oiled bowl, cover with a damp kitchen towel, and let rise in a warm place for 1 hour or until doubled in size.
- While the dough rises, melt the unsalted butter in a large skillet over medium-low heat.
- Add the thinly sliced onions and cook, stirring occasionally, for 25–30 minutes until deeply golden and caramelized. Tip: Resist the urge to increase the heat—slow caramelization develops complex sweetness without bitterness.
- Lightly oil a 9×13-inch baking pan and press the risen dough evenly into the pan with your fingertips.
- Dimple the dough deeply with your fingers, creating pockets for the toppings.
- Scatter the caramelized onions, chopped Kalamata olives, and minced rosemary evenly over the dough.
- Drizzle generously with additional olive oil and sprinkle with flaky sea salt.
- Cover the pan and let the focaccia proof for 20 minutes while preheating the oven to 425°F.
- Bake for 18–22 minutes until the crust is golden brown and the bottom sounds hollow when tapped. Tip: For an extra-crisp crust, place a baking sheet on the lower oven rack during preheating and spritz the focaccia with water before baking.
- Transfer the focaccia to a wire rack and let cool for 10 minutes before slicing. Tip: Cooling briefly allows the crumb to set, making cleaner slices.
Nothing compares to the contrast of this focaccia’s crisp, olive oil-glazed crust against its tender, airy interior. The sweet intensity of slowly cooked onions plays beautifully against the salty punch of olives and earthy rosemary. Try tearing warm pieces to serve alongside a sharp goat cheese or using thicker slices as a base for open-faced sandwiches with roasted vegetables and arugula.
Savory Prosciutto and Asiago Palmiers
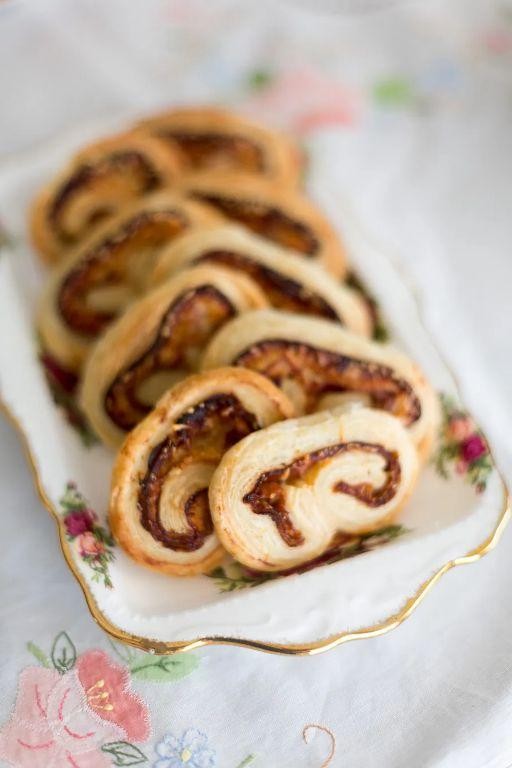
A quiet afternoon finds me in the kitchen, the golden light of October spilling across the counter as I unfold the simple magic of puff pastry, a gentle ritual that transforms humble ingredients into something truly special. These palmiers, with their delicate layers and savory filling, feel like a whispered secret between the oven and me, a small moment of creation to be shared with quiet company or savored alone.
16
palmiers25
minutes22
minutesIngredients
- 1 sheet (approximately 9×9 inches) frozen all-butter puff pastry, thawed according to package instructions
- 2 ounces thinly sliced prosciutto di Parma, finely chopped
- 1/2 cup freshly grated Asiago cheese, medium-aged
- 1 tablespoon Dijon mustard
- 1 large pasture-raised egg, lightly beaten
- 1 tablespoon whole milk
- 1/4 teaspoon freshly cracked black pepper
- 1/8 teaspoon freshly grated nutmeg
Instructions
- Preheat your oven to 400°F (204°C) and line a standard baking sheet with parchment paper.
- Unfold the thawed puff pastry sheet onto a lightly floured surface, rolling it gently with a rolling pin to smooth any creases and create an even 10×12-inch rectangle.
- Spread the Dijon mustard evenly over the entire surface of the pastry using a small offset spatula or the back of a spoon, leaving a 1/2-inch border along all edges.
- Sprinkle the finely chopped prosciutto evenly over the mustard-coated pastry, followed by the grated Asiago cheese, ensuring both ingredients are distributed uniformly.
- Season the entire surface with the freshly cracked black pepper and freshly grated nutmeg.
- Fold the two shorter ends of the rectangle inward toward the center until they meet, pressing gently to adhere the layers.
- Fold the same folded ends toward the center once more, creating a tight, compact log with four layers of pastry on each side.
- Wrap the log securely in plastic wrap and chill in the refrigerator for 30 minutes to firm the pastry, which prevents spreading and ensures clean slices.
- Remove the chilled log from the refrigerator and unwrap it carefully.
- Using a sharp serrated knife, slice the log crosswise into 1/2-inch thick pieces, wiping the blade clean between cuts for neat edges.
- Arrange the slices cut-side down on the prepared baking sheet, spacing them 1 inch apart to allow for expansion.
- Whisk together the lightly beaten egg and whole milk in a small bowl to create an egg wash.
- Brush the tops of each palmier lightly with the egg wash using a pastry brush, avoiding pooling along the edges for even browning.
- Bake in the preheated oven for 18–22 minutes, rotating the pan halfway through, until the palmiers are deeply golden brown and puffed.
- Transfer the baked palmiers to a wire cooling rack and allow them to cool for 10 minutes before serving.
Buttery and crisp, these palmiers offer a satisfying shatter with each bite, revealing tender, savory layers within. The saltiness of the prosciutto mellows into the nutty, slightly sharp Asiago, creating a sophisticated balance that pairs beautifully with a crisp white wine or a simple arugula salad. For an elegant twist, serve them warm alongside a dollop of fig jam, whose sweetness contrasts delightfully with the savory notes.
Mediterranean Vegetable Flatbread

Cradling a warm plate as evening light spills across the kitchen counter, I find myself returning to this simple flatbread—a canvas where humble vegetables transform into something quietly spectacular. There’s a gentle magic in layering colors and textures, each slice telling a story of sun-drenched gardens and patient hands.
4
servings45
minutes14
minutesIngredients
- 1 pound store-bought pizza dough, rested at room temperature
- 2 tablespoons extra-virgin olive oil, divided
- 1 small eggplant, sliced into ¼-inch rounds
- 1 medium zucchini, sliced into ¼-inch coins
- 1 red bell pepper, julienned
- ½ red onion, thinly sliced
- 3 ounces crumbled feta cheese
- 2 tablespoons chopped fresh oregano
- 1 teaspoon flaky sea salt
- ½ teaspoon freshly cracked black pepper
Instructions
- Preheat your oven to 475°F and place a pizza stone or baking sheet inside to heat for 30 minutes.
- Arrange eggplant rounds in a single layer on a wire rack set over a baking sheet.
- Sprinkle eggplant liberally with kosher salt and let rest for 20 minutes to draw out bitterness.
- Pat eggplant dry thoroughly with paper towels to remove excess moisture.
- On a lightly floured surface, stretch pizza dough into a 12-inch oval using your knuckles.
- Brush dough surface with 1 tablespoon olive oil, leaving a ½-inch border uncovered.
- Layer eggplant, zucchini, bell pepper, and red onion in overlapping concentric circles.
- Scatter crumbled feta evenly across the vegetable arrangement.
- Slide flatbread onto preheated pizza stone using a floured pizza peel or inverted baking sheet.
- Bake for 12-14 minutes until crust is golden and vegetables begin to caramelize at the edges.
- Remove from oven and immediately drizzle with remaining tablespoon of olive oil.
- Sprinkle with fresh oregano, flaky sea salt, and cracked black pepper.
- Let rest for 3 minutes before slicing to allow flavors to meld.
Zest from the oregano brightens each bite, while the feta’s saline sharpness cuts through the roasted vegetables’ natural sweetness. Consider serving it torn into rustic pieces alongside a drizzle of honey for contrast, or top with microgreens for an extra layer of freshness that plays beautifully against the warm, yielding crust.
Cheese and Herb Swirl Bread
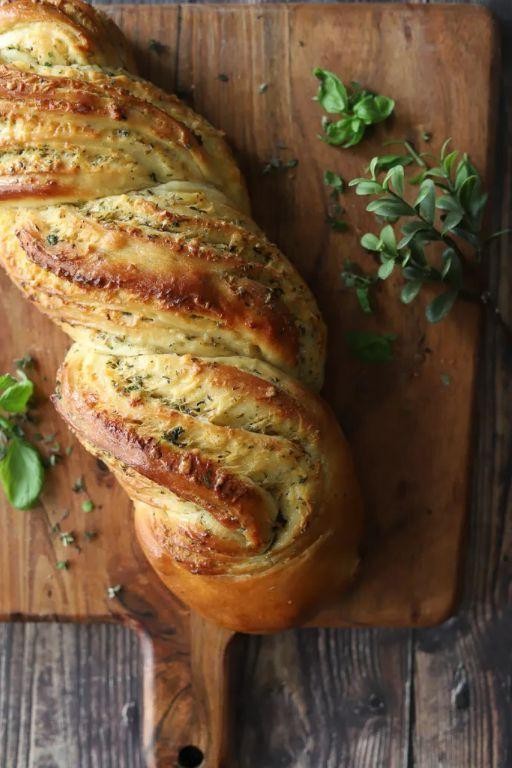
Sometimes, the simplest moments in the kitchen are the ones that linger longest in memory, like the quiet rhythm of rolling out dough on a flour-dusted counter, the earthy scent of fresh herbs filling the air as you prepare this Cheese and Herb Swirl Bread. It’s a humble loaf, really, but one that carries the warmth of patience and the gentle promise of comfort with every slice.
1
loaf40
minutes35
minutesIngredients
– 3 ½ cups high-protein bread flour, sifted
– 1 ¼ cups warm whole milk (110°F)
– 2 ¼ tsp active dry yeast
– 1 tbsp granulated sugar
– 1 ½ tsp fine sea salt
– 1 large pasture-raised egg, lightly beaten
– ¼ cup European-style unsalted butter, softened
– 1 cup sharp aged white cheddar, finely grated
– ½ cup freshly grated Parmigiano-Reggiano
– ¼ cup fresh Italian parsley, finely minced
– 2 tbsp fresh chives, thinly sliced
– 1 tbsp fresh thyme leaves
– 1 egg yolk mixed with 1 tbsp heavy cream (for egg wash)
– Coarse sea salt, for finishing
Instructions
1. In the bowl of a stand mixer fitted with a dough hook, combine the warm whole milk, active dry yeast, and granulated sugar; let stand for 8 minutes until foamy. 2. Add the sifted high-protein bread flour, fine sea salt, lightly beaten pasture-raised egg, and softened European-style unsalted butter. 3. Mix on low speed for 3 minutes until a shaggy dough forms, then increase to medium speed and knead for 7 minutes until the dough is smooth, elastic, and pulls cleanly from the bowl’s sides. 4. Transfer the dough to a lightly oiled bowl, cover with a damp kitchen towel, and let rise in a warm place for 1 hour 15 minutes, or until doubled in size. 5. On a lightly floured surface, roll the dough into a 12×16-inch rectangle, about ¼-inch thick. 6. Evenly sprinkle the finely grated sharp aged white cheddar, freshly grated Parmigiano-Reggiano, finely minced fresh Italian parsley, thinly sliced fresh chives, and fresh thyme leaves over the entire surface. 7. Starting from one long edge, tightly roll the dough into a log, pinching the seam firmly to seal. 8. Place the log seam-side down in a greased 9×5-inch loaf pan, cover loosely with plastic wrap, and let rise for 45 minutes until the dough crests just above the pan’s rim. 9. Preheat the oven to 375°F and brush the loaf evenly with the egg yolk and heavy cream mixture. 10. Sprinkle the top with coarse sea salt and bake for 32–35 minutes, until the internal temperature reaches 190°F and the crust is deeply golden. 11. Let the loaf cool in the pan for 10 minutes, then transfer to a wire rack to cool completely. Velvety and tender, the bread pulls apart in soft, spiraled layers, each bite releasing the nutty richness of aged cheeses and the bright, earthy notes of fresh herbs. Serve it warm, slathered with cultured butter, or alongside a robust tomato soup for a simple, soul-satisfying meal.
Garlic and Rosemary Breadsticks
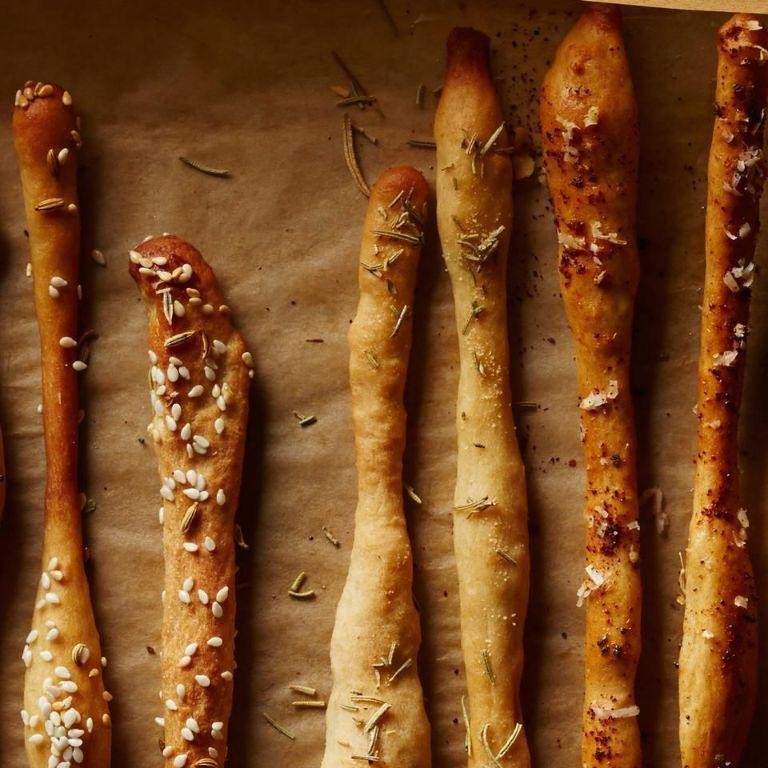
Just yesterday, as the afternoon light softened across my kitchen counter, I found myself craving the simple comfort of freshly baked breadsticks—the kind that fill your home with the earthy scent of rosemary and the warm promise of garlic. Journaling this recipe feels like preserving a quiet moment of culinary meditation, where each step unfolds with gentle intention and the ingredients speak in hushed, aromatic whispers.
12
portions35
minutes15
minutesIngredients
– 3 ½ cups high-protein bread flour
– 1 ½ cups warm filtered water (110°F)
– 2 ¼ teaspoons active dry yeast
– 2 tablespoons extra-virgin olive oil
– 4 cloves fresh garlic, finely minced
– 2 tablespoons fresh rosemary leaves, finely chopped
– 1 ½ teaspoons fine sea salt
– 1 large pasture-raised egg, lightly beaten
– 2 tablespoons clarified butter, melted
Instructions
1. In a large mixing bowl, combine the warm filtered water (110°F) with the active dry yeast and allow it to proof for 5 minutes until foamy.
2. Add the high-protein bread flour, extra-virgin olive oil, finely minced garlic, finely chopped rosemary, and fine sea salt to the yeast mixture.
3. Stir the ingredients with a wooden spoon until a shaggy dough forms, then knead by hand on a floured surface for 8–10 minutes until smooth and elastic.
4. Place the dough in a lightly oiled bowl, cover with a damp cloth, and let it rise in a warm spot for 1 hour or until doubled in size.
5. Punch down the dough gently to release air bubbles, then divide it into 12 equal portions using a bench scraper.
6. Roll each portion into a 6-inch rope shape on a clean surface, ensuring even thickness for consistent baking.
7. Arrange the shaped breadsticks on a parchment-lined baking sheet, spacing them 1 inch apart to allow for expansion.
8. Brush each breadstick lightly with the beaten pasture-raised egg using a pastry brush for a glossy finish.
9. Let the breadsticks proof uncovered for 20 minutes until slightly puffed.
10. Preheat the oven to 400°F and bake the breadsticks for 12–15 minutes until golden brown and hollow-sounding when tapped.
11. Remove the breadsticks from the oven and immediately brush them with melted clarified butter for added richness and sheen.
12. Transfer the breadsticks to a wire rack to cool for 5 minutes before serving. Each bite reveals a crisp exterior that gives way to a tender, airy crumb, infused with the robust fragrance of garlic and the pine-like sharpness of rosemary. Enjoy them warm alongside a bowl of roasted tomato soup or simply torn apart and dipped in high-quality olive oil for a rustic, satisfying treat.
Ham and Swiss Biscuit Cups

Cradling a warm mug this quiet afternoon, I find myself thinking about those simple, comforting dishes that feel like a gentle embrace after a long day—the kind you can pull together with what’s already in your refrigerator, transforming humble ingredients into something quietly special.
12
portions15
minutes22
minutesIngredients
– 1 can (16.3 oz) refrigerated buttermilk biscuit dough
– 8 oz Black Forest ham, finely diced
– 1 cup shredded Swiss cheese, Gruyère preferred
– 3 pasture-raised eggs, lightly beaten
– 1/2 cup heavy cream
– 1/4 cup finely minced yellow onion
– 1 tbsp Dijon mustard
– 1/2 tsp freshly ground black pepper
– 1/4 tsp freshly grated nutmeg
– 2 tbsp unsalted butter, melted
– 1 tbsp fresh chives, finely minced
Instructions
1. Preheat your oven to 375°F (190°C) and generously grease 12 standard muffin tin cups with melted butter, ensuring even coverage to prevent sticking.
2. Separate the refrigerated buttermilk biscuit dough into 8 individual biscuits, then gently press and stretch each biscuit into a 4-inch round, taking care not to tear the dough.
3. Carefully line each prepared muffin cup with a stretched biscuit round, pressing firmly into the bottom and up the sides to form a uniform cup shape.
4. In a medium mixing bowl, whisk together the lightly beaten pasture-raised eggs, heavy cream, and Dijon mustard until fully emulsified and pale yellow in color.
5. Fold the finely diced Black Forest ham, shredded Swiss cheese, finely minced yellow onion, freshly ground black pepper, and freshly grated nutmeg into the egg mixture until evenly distributed.
6. Divide the ham and cheese filling equally among the biscuit-lined muffin cups, filling each approximately three-quarters full to allow for expansion during baking.
7. Place the muffin tin on the center rack of the preheated oven and bake for 18-22 minutes, or until the biscuit edges are deep golden brown and the filling is set with no liquid jiggle when gently shaken.
8. Remove the muffin tin from the oven and let the biscuit cups rest in the pan for 5 minutes to allow the filling to fully set before attempting removal.
9. Using a small offset spatula or butter knife, gently loosen the edges of each biscuit cup from the muffin tin and transfer them to a wire cooling rack.
10. Sprinkle the freshly minced chives over the warm biscuit cups just before serving. A final drizzle of melted butter over the golden biscuit tops creates an irresistible sheen and enhances flakiness. At their peak, these little cups offer flaky, buttery layers that give way to a savory, custard-like interior where the smoky ham and nutty Swiss cheese meld beautifully. Consider serving them alongside a simple arugula salad dressed with lemon vinaigrette, or for a cozy breakfast, pair with roasted cherry tomatoes still warm from the oven.
Smoked Salmon and Dill Savory Tart

Evenings like this call for something that feels both comforting and elegant, a dish that bridges the quiet solitude of the kitchen with the simple pleasure of a meal made with care. This savory tart, with its flaky crust and delicate filling, is just that—a gentle project for a slow afternoon, yielding something truly special.
6
portions30
minutes55
minutesIngredients
- 1 ¼ cups all-purpose flour, sifted
- ½ cup European-style unsalted butter, chilled and cubed
- 3-4 tbsp ice water
- 4 oz cold-smoked wild salmon, thinly sliced
- 3 pasture-raised eggs, lightly beaten
- ¾ cup crème fraîche
- 2 tbsp fresh dill fronds, finely chopped
- 1 small shallot, minced
- ½ tsp fine sea salt
- ¼ tsp white pepper, freshly ground
- 1 tbsp clarified butter, for brushing
Instructions
- Combine the sifted all-purpose flour and chilled, cubed European-style unsalted butter in a large mixing bowl.
- Use your fingertips to work the butter into the flour until the mixture resembles coarse meal with some pea-sized butter pieces remaining.
- Drizzle in 3 tablespoons of ice water, mixing gently with a fork until the dough just begins to come together; if needed, add the remaining tablespoon of ice water.
- Turn the dough out onto a lightly floured surface and gently knead it into a cohesive ball, being careful not to overwork it.
- Flatten the dough into a disc, wrap it tightly in plastic wrap, and refrigerate for exactly 1 hour to allow the gluten to relax.
- Preheat your oven to 375°F and place a baking sheet on the center rack to heat.
- Roll the chilled dough out on a floured surface to a 12-inch circle, about ⅛-inch thick.
- Carefully transfer the dough to a 9-inch tart pan with a removable bottom, gently pressing it into the edges and trimming any excess.
- Prick the bottom of the crust all over with a fork, then line it with parchment paper and fill with pie weights or dried beans.
- Place the tart pan on the preheated baking sheet and blind bake for 15 minutes, until the edges are lightly golden.
- Remove the parchment and weights, then brush the entire crust with 1 tablespoon of clarified butter to create a moisture barrier.
- Return the crust to the oven and bake for another 5 minutes, until the bottom appears dry and set.
- In a medium bowl, whisk together the lightly beaten pasture-raised eggs, crème fraîche, minced shallot, finely chopped fresh dill fronds, fine sea salt, and freshly ground white pepper until smooth.
- Arrange the thinly sliced cold-smoked wild salmon in a single layer over the bottom of the pre-baked tart crust.
- Pour the egg and crème fraîche mixture evenly over the salmon, ensuring it spreads to the edges.
- Bake the tart on the center rack for 25-30 minutes, until the filling is fully set and the top is lightly golden with no jiggle in the center.
- Transfer the tart to a wire rack and allow it to cool for at least 15 minutes before slicing.
Keeping the tart whole until it has cooled slightly ensures cleaner slices and allows the flavors to settle. The final texture is wonderfully contrasting—a crisp, buttery crust giving way to a creamy, delicate filling punctuated by the silky salmon and bright dill. For a lovely presentation, serve it at room temperature with a simple arugula salad dressed in lemon vinaigrette, letting the tart’s elegance shine through in every quiet bite.
Conclusion
Perfect for any occasion, these 29 savory baking recipes offer endless inspiration for flavorful homemade treats. We hope you discover new favorites to share with family and friends! Don’t forget to leave a comment telling us which recipe you loved most and pin this article on Pinterest to save for your next baking adventure.


