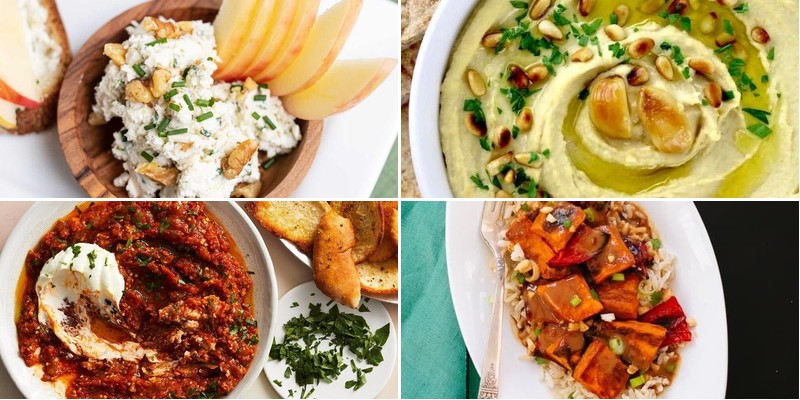
Delicious sandwiches start with incredible spreads! Whether you’re tired of the same old mayo or looking to elevate your lunch game, these creative spreads will transform your bread into something extraordinary. From zesty herb blends to creamy global-inspired concoctions, we’ve gathered 20 mouthwatering recipes that are simple to make and packed with flavor. Get ready to discover your new favorite sandwich companion—let’s dive in!
Creamy Avocado and Garlic Spread
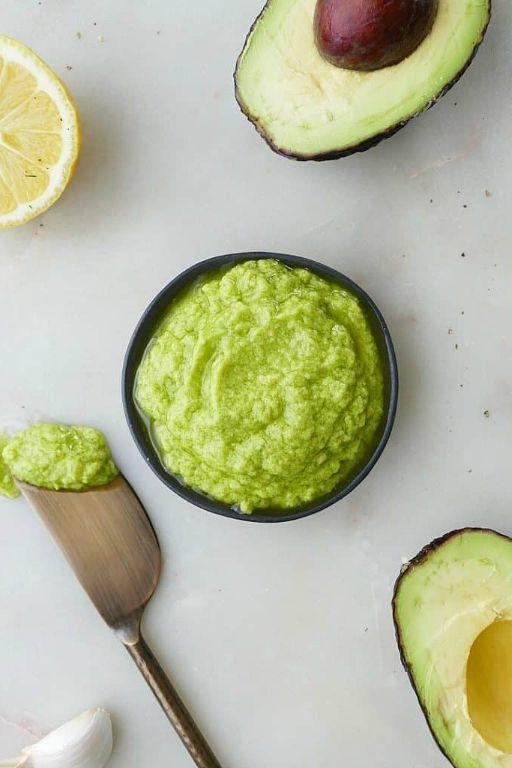
OBSESSED with this creamy avocado and garlic spread that transforms basic snacks into flavor explosions. Grab your food processor—this takes just 5 minutes to whip up. Seriously, it’s the easiest upgrade your crackers, toast, or veggie sticks will ever get.
2
servings5
minutesIngredients
- 2 large ripe avocados (they should give slightly when pressed—no rock-hard ones!)
- 3 cloves fresh garlic (I always use fresh, not jarred—it makes all the difference)
- 1/4 cup plain Greek yogurt (full-fat gives the creamiest texture)
- 2 tbsp fresh lime juice (about 1 juicy lime—bottled just doesn’t hit the same)
- 1/4 cup extra virgin olive oil (my go-to for that fruity, rich flavor)
- 1/2 tsp kosher salt (I prefer this over table salt for better distribution)
- 1/4 tsp freshly cracked black pepper
- 2 tbsp chopped fresh cilantro (optional, but adds such a bright, herby kick)
Instructions
- Cut the avocados in half, remove the pits, and scoop the flesh directly into your food processor bowl.
- Peel the garlic cloves and add them whole to the processor—no need to mince first.
- Measure and add the Greek yogurt, lime juice, olive oil, kosher salt, and black pepper.
- Secure the lid tightly and pulse 5-6 times until the ingredients are just combined but still slightly chunky.
- Scrape down the sides with a spatula to ensure everything is evenly incorporated.
- Process on high speed for 30-45 seconds until completely smooth and creamy.
- Taste and adjust seasoning if needed—sometimes I add an extra pinch of salt at this stage.
- If using cilantro, stir it in by hand now to keep those fresh green flecks intact.
- Transfer the spread to an airtight container and press plastic wrap directly onto the surface.
- Refrigerate for at least 30 minutes to let the flavors meld and the spread firm up slightly.
YOUR spread will be luxuriously smooth with a bold garlic punch that mellows as it chills. The avocado keeps it rich without feeling heavy, while the lime adds just enough zing to cut through the creaminess. Try it smeared on crusty bread with sliced radishes, or as a surprise layer in your next turkey sandwich—it’s seriously versatile.
Spicy Chickpea and Sriracha Spread
Unleash your inner flavor rebel with this fiery chickpea spread that’s about to become your new obsession. Seriously, this stuff slaps so hard you’ll want to put it on everything from morning toast to midnight crackers. The sriracha kick will wake up your taste buds better than your third cup of coffee.
4
servings15
minutesIngredients
- 1 (15 oz) can chickpeas, drained and rinsed (I always give them an extra rinse to reduce that canned flavor)
- 3 tbsp tahini (the good quality stuff makes all the difference here)
- 2 tbsp sriracha (go for the classic rooster bottle – it’s the perfect heat level)
- 2 tbsp fresh lemon juice (squeezed right before using for maximum brightness)
- 1 tbsp extra virgin olive oil (my go-to for that fruity finish)
- 1 small garlic clove, minced (fresh only – powdered garlic just won’t cut it)
- 1/4 tsp salt (I prefer fine sea salt for even distribution)
- 2 tbsp cold water (straight from the fridge for that perfect creamy texture)
Instructions
- Combine chickpeas, tahini, sriracha, lemon juice, olive oil, garlic, and salt in a food processor.
- Pulse the mixture 10 times to break down the chickpeas before continuous blending.
- Process on high speed for 45 seconds until the ingredients start coming together.
- Scrape down the sides of the food processor bowl with a spatula to ensure even blending.
- With the processor running on medium speed, slowly drizzle in the cold water through the feed tube.
- Continue processing for another 60 seconds until the spread becomes completely smooth and creamy.
- Transfer the spread to an airtight container using a rubber spatula to get every last bit.
- Refrigerate the spread for at least 30 minutes to allow the flavors to meld together.
That creamy, slightly chunky texture makes this spread absolutely perfect for dipping. The garlic and lemon cut through the sriracha heat in the most addictive way possible. Try spreading it thick on toasted sourdough with sliced avocado for the ultimate breakfast upgrade.
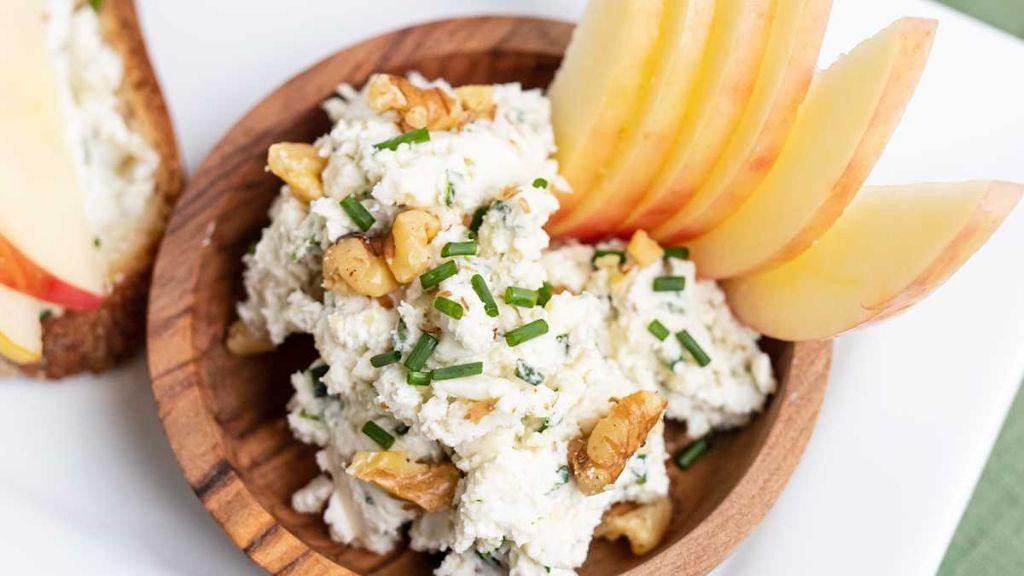
Herbed Ricotta and Lemon Zest Spread
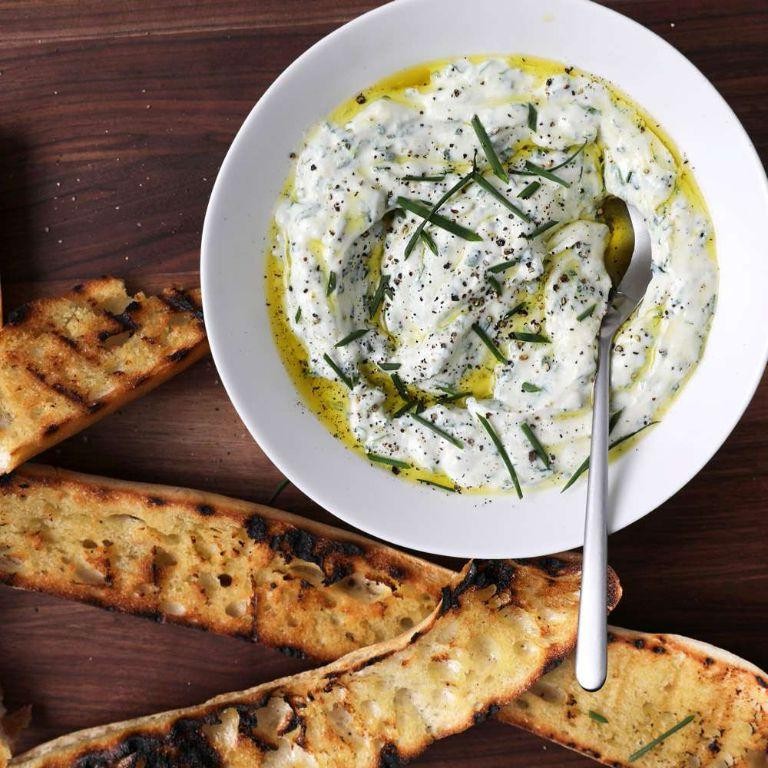
Ready to upgrade your snack game? This herbed ricotta and lemon zest spread transforms basic ingredients into something magical. Whip it up in minutes for instant party-worthy vibes.
5
servings20
minutesIngredients
– 2 cups whole milk ricotta (I always drain excess liquid first for creamier texture)
– 1/4 cup extra virgin olive oil (my go-to for that fruity finish)
– 2 tbsp fresh lemon juice (freshly squeezed makes all the difference)
– 1 tsp finely grated lemon zest (microplane is perfect for this)
– 1/4 cup chopped fresh basil (tear instead of chop to prevent bruising)
– 2 tbsp chopped fresh parsley (flat-leaf gives better flavor)
– 1 small garlic clove, minced (fresh only—no jarred stuff)
– 1/2 tsp kosher salt (I prefer Diamond Crystal for better control)
– 1/4 tsp freshly ground black pepper (freshly cracked always)
Instructions
1. Place ricotta in a fine-mesh strainer over a bowl and let drain for 15 minutes to remove excess moisture.
2. Transfer drained ricotta to a medium mixing bowl.
3. Add olive oil and whisk vigorously for 1 minute until smooth and creamy.
4. Stir in lemon juice and lemon zest until fully incorporated.
5. Fold in chopped basil and parsley gently to maintain their fresh color.
6. Mix in minced garlic, distributing it evenly throughout the spread.
7. Season with kosher salt and black pepper, tasting and adjusting if needed.
8. Cover the bowl with plastic wrap and refrigerate for at least 30 minutes to let flavors meld.
Now you’ve got the creamiest, brightest spread that’s perfect on crusty bread or as a veggie dip. Nothing beats that fresh herb and lemon combo cutting through the rich ricotta. Try it slathered on grilled chicken or as a surprise filling in stuffed mushrooms.
Sun-Dried Tomato and Basil Pesto Spread
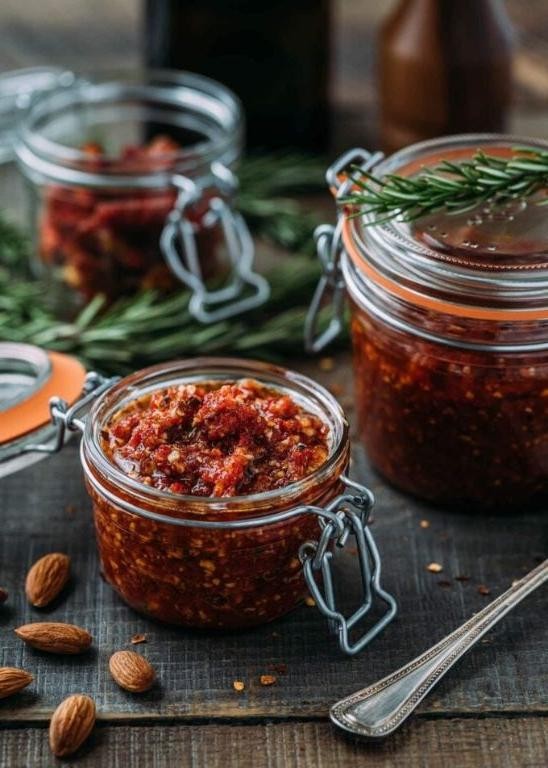
A sun-dried tomato and basil pesto spread that’ll make your taste buds dance. Grab your food processor and let’s create this vibrant, flavor-packed condiment that transforms everything it touches. Seriously, you’ll want to put this on everything from sandwiches to grilled chicken.
8
servings15
minutes7
minutesIngredients
– 1 cup sun-dried tomatoes in oil (drained, but save that flavorful oil!)
– 2 cups fresh basil leaves (pack them in tight for maximum herbaceous goodness)
– 1/2 cup grated Parmesan cheese (the good stuff, not the green can)
– 1/3 cup pine nuts (toasted first for that nutty depth)
– 3 garlic cloves (fresh only—no jarred garlic allowed)
– 1/2 cup extra virgin olive oil (my go-to for that fruity finish)
– 1/4 tsp red pepper flakes (optional, but adds a nice kick)
– 1/2 tsp sea salt (I prefer coarse for better texture)
Instructions
1. Preheat your oven to 350°F and spread pine nuts on a baking sheet.
2. Toast pine nuts for 5-7 minutes until golden brown and fragrant, watching carefully to prevent burning.
3. Drain sun-dried tomatoes, reserving 2 tablespoons of the oil for later use.
4. Combine toasted pine nuts, basil leaves, Parmesan cheese, and garlic cloves in your food processor.
5. Pulse the mixture 8-10 times until coarsely chopped, scraping down the sides once halfway through.
6. Add the drained sun-dried tomatoes, reserved tomato oil, and sea salt to the processor.
7. Process on high speed for 30 seconds while slowly drizzling in the olive oil through the feed tube.
8. Scrape down the sides thoroughly to incorporate any stubborn ingredients.
9. Process for another 15-20 seconds until the spread reaches your desired consistency.
10. Transfer to an airtight container and refrigerate for at least 1 hour to let flavors meld.
Just made this yesterday and it’s already my new obsession. The texture is beautifully coarse yet spreadable, with that intense tomato-basil punch that lingers. Try it slathered on crusty bread or stirred into pasta for an instant upgrade—trust me, you’ll be making double batches once you taste it.
Smoky Eggplant and Roasted Red Pepper Spread

Huddle up, flavor lovers! This smoky eggplant and roasted red pepper spread will transform your snack game forever. Grab those veggies and let’s get charring—your crackers are waiting.
5
servings20
minutes40
minutesIngredients
– 2 large eggplants (I look for ones that feel heavy for their size)
– 2 red bell peppers (the ones with deep color work best)
– 3 garlic cloves (fresh and firm, please!)
– ¼ cup extra virgin olive oil (my go-to for that fruity finish)
– 2 tbsp lemon juice (freshly squeezed makes all the difference)
– 1 tsp smoked paprika (this is where the magic happens)
– ½ tsp salt (I use fine sea salt for even distribution)
– ¼ tsp black pepper (freshly cracked if you have it)
Instructions
1. Preheat your oven to 425°F and line a baking sheet with parchment paper.
2. Pierce the eggplants several times with a fork to prevent bursting.
3. Cut the red peppers in half and remove all seeds and stems.
4. Place whole eggplants and pepper halves cut-side down on the baking sheet.
5. Roast for 40 minutes until the eggplant skin is charred and peppers are blistered.
6. Transfer the hot vegetables to a bowl and cover tightly with plastic wrap.
7. Let steam for 15 minutes—this makes peeling effortless.
8. Peel all the charred skin from both the eggplant and peppers.
9. Roughly chop the roasted vegetables and place in a food processor.
10. Add the garlic cloves, olive oil, lemon juice, smoked paprika, salt, and black pepper.
11. Pulse 8-10 times until the mixture is combined but still slightly chunky.
12. Taste and adjust seasoning if needed, remembering flavors will deepen as it chills.
Dive into this creamy yet textured spread that balances smoky depth with bright acidity. The charred eggplant melts into the sweet peppers while smoked paprika adds that campfire vibe. Try it slathered on crusty bread or as a vibrant veggie dip—it even makes grilled chicken sandwiches next-level delicious.
Classic Tuna Salad Spread with a Twist
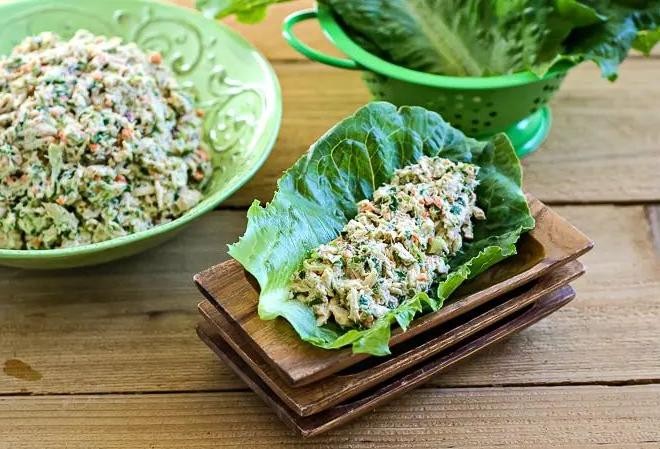
Pivot from boring tuna salad forever! This creamy, crunchy upgrade transforms lunchbox basics into something seriously crave-worthy. Get ready to smash your meal prep game.
3
servings15
minutesIngredients
– 2 (5-ounce) cans solid white tuna in water, drained well (I squeeze out excess liquid with my hands for maximum flavor absorption)
– 1/2 cup mayonnaise (Duke’s is my Southern secret for the creamiest texture)
– 1/4 cup finely diced red onion (soak in ice water for 5 minutes first to mellow the bite)
– 1/4 cup chopped dill pickles (the briny juice adds the perfect tang)
– 2 tablespoons pickle juice from the jar (don’t skip this flavor booster!)
– 1 tablespoon Dijon mustard (I prefer the grainy kind for subtle texture)
– 1/2 teaspoon garlic powder
– 1/4 teaspoon black pepper
– 1/4 teaspoon smoked paprika
Instructions
1. Drain both cans of tuna thoroughly, then use your hands to squeeze out any remaining water over the sink.
2. Transfer the drained tuna to a medium mixing bowl and flake it apart with a fork until no large chunks remain.
3. Add mayonnaise, Dijon mustard, pickle juice, garlic powder, black pepper, and smoked paprika to the bowl.
4. Stir all ingredients together with a rubber spatula until fully combined and creamy.
5. Fold in the diced red onion and chopped dill pickles until evenly distributed throughout the mixture.
6. Taste the mixture and adjust seasoning if needed, adding more pickle juice for tanginess or pepper for heat.
7. Cover the bowl tightly with plastic wrap and refrigerate for at least 30 minutes to allow flavors to meld.
Keep this spread chilled until serving—the flavors intensify beautifully when cold. That creamy texture with pops of pickle crunch makes it perfect for stuffing tomatoes, spreading on croissants, or scooping with ridged potato chips for maximum crunch factor.
Lemony Artichoke and Spinach Spread

Grab your food processor because this lemony artichoke and spinach spread is about to become your new obsession. Get ready to wow at parties or just treat yourself—it’s creamy, zesty, and ridiculously easy to whip up in minutes.
4
servings10
minutes20
minutesIngredients
– 1 (14 oz) can artichoke hearts, drained (I always squeeze out excess water for a thicker spread)
– 2 cups fresh spinach, packed (baby spinach works best for tenderness)
– 1/2 cup mayonnaise (use full-fat for maximum creaminess)
– 1/4 cup grated Parmesan cheese (freshly grated melts smoother)
– 2 cloves garlic, minced (roast them first if you want a milder kick)
– 2 tbsp lemon juice (freshly squeezed brightens everything up)
– 1 tbsp extra virgin olive oil (my go-to for richness)
– 1/2 tsp salt (adjust if your artichokes are already salted)
– 1/4 tsp black pepper (freshly cracked adds a nice bite)
Instructions
1. Preheat your oven to 375°F to toast the spread later for a golden top.
2. Roughly chop the drained artichoke hearts into smaller pieces for even blending.
3. Heat 1 tbsp olive oil in a skillet over medium heat until it shimmers.
4. Add the minced garlic and sauté for 1 minute until fragrant but not browned.
5. Toss in the fresh spinach and cook for 2–3 minutes, stirring constantly, until wilted and dark green.
6. Transfer the spinach and garlic mixture to a food processor.
7. Add the chopped artichoke hearts, mayonnaise, Parmesan cheese, lemon juice, salt, and black pepper.
8. Pulse the mixture 5–7 times until combined but still slightly chunky for texture.
9. Scrape down the sides of the processor with a spatula to ensure everything is mixed evenly.
10. Spoon the spread into an oven-safe dish and spread it into an even layer.
11. Bake at 375°F for 15–18 minutes until the edges are bubbly and the top is lightly golden.
12. Let it cool for 5 minutes before serving to allow the flavors to meld.
The spread is creamy with pops of artichoke, bright from the lemon, and savory from the Parmesan. Serve it warm with crispy pita chips or slather it on sandwiches for an instant upgrade—it’s so versatile, you’ll want to make a double batch.
Roasted Beet and Goat Cheese Spread
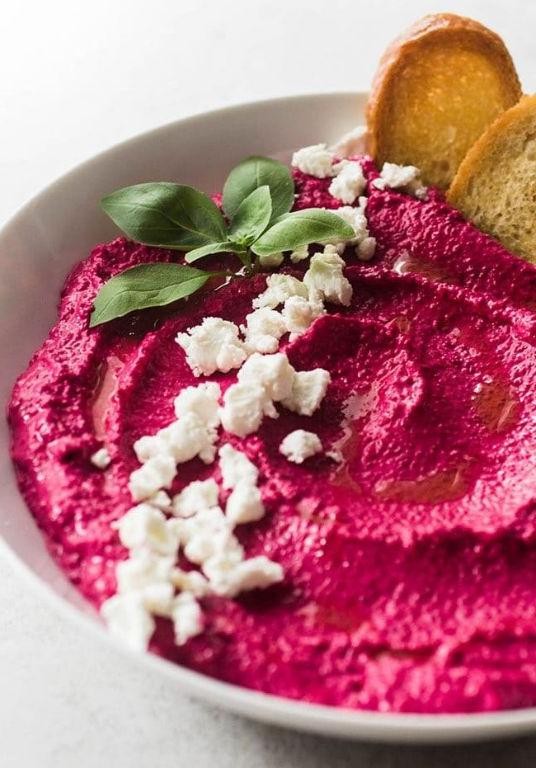
Unleash your inner gourmet with this vibrant roasted beet and goat cheese spread that’s about to become your new party staple. Transform humble beets into a creamy, dreamy dip that looks as stunning as it tastes. Seriously, your charcuterie board just leveled up.
8
servings25
minutes60
minutesIngredients
- 3 medium red beets (about 1 pound total) – I always pick ones that feel firm and heavy for their size
- 8 ounces creamy goat cheese at room temperature – let it sit out for 30 minutes so it blends smoothly
- 2 tablespoons extra virgin olive oil – my go-to for roasting because it adds fruity notes
- 1 tablespoon fresh lemon juice – freshly squeezed makes all the difference
- 2 cloves garlic, minced – I press mine for maximum flavor distribution
- 1/4 cup toasted walnuts, chopped – toast them yourself for that nutty crunch
- 1 teaspoon fresh thyme leaves – strip them from the stems right before using
- 1/2 teaspoon sea salt – I prefer flaky Maldon salt for texture
- 1/4 teaspoon black pepper – freshly cracked, always
Instructions
- Preheat your oven to 400°F and line a baking sheet with parchment paper.
- Scrub the beets thoroughly under running water to remove any dirt.
- Trim the beet tops, leaving about 1 inch of stem attached to prevent bleeding.
- Rub each beet with 1 tablespoon of olive oil until completely coated.
- Wrap each beet individually in aluminum foil, creating tight packets.
- Place the foil packets on the prepared baking sheet.
- Roast the beets for 45-60 minutes until a knife slides through the center easily.
- Remove the beets from the oven and let them cool in their foil packets for 15 minutes.
- Unwrap the beets and use paper towels to rub off the skins while still warm.
- Chop the peeled beets into 1-inch chunks for easier blending.
- Combine the roasted beets, goat cheese, remaining olive oil, lemon juice, and minced garlic in a food processor.
- Pulse the mixture 8-10 times until smooth but still slightly textured.
- Add the sea salt and black pepper to the food processor.
- Pulse 2-3 more times to incorporate the seasonings evenly.
- Transfer the spread to a serving bowl using a rubber spatula.
- Fold in the toasted walnuts and fresh thyme leaves by hand to maintain crunch.
- Cover the bowl with plastic wrap and refrigerate for at least 30 minutes to let flavors meld.
Just wait until you taste that creamy texture with earthy sweetness from the roasted beets. The tangy goat cheese balances perfectly with the nutty crunch of walnuts. Try spreading it on crostini with a drizzle of honey, or use it as a vibrant sandwich spread that turns lunch into something special.
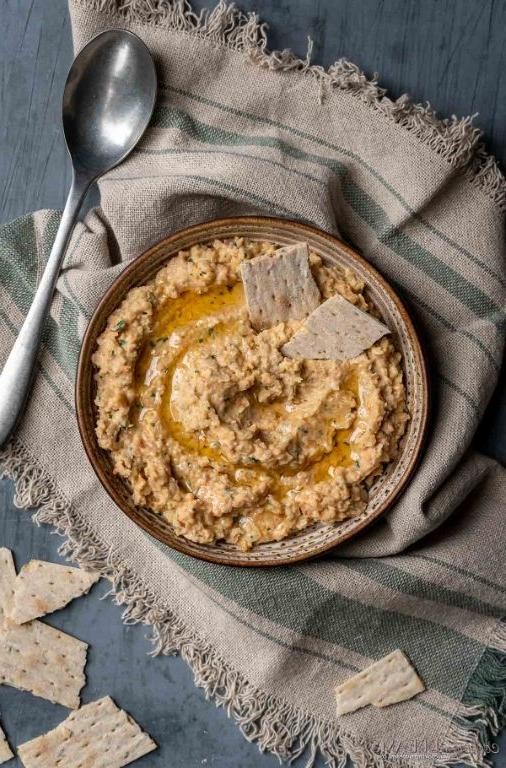
Hummus with Roasted Garlic and Pine Nuts
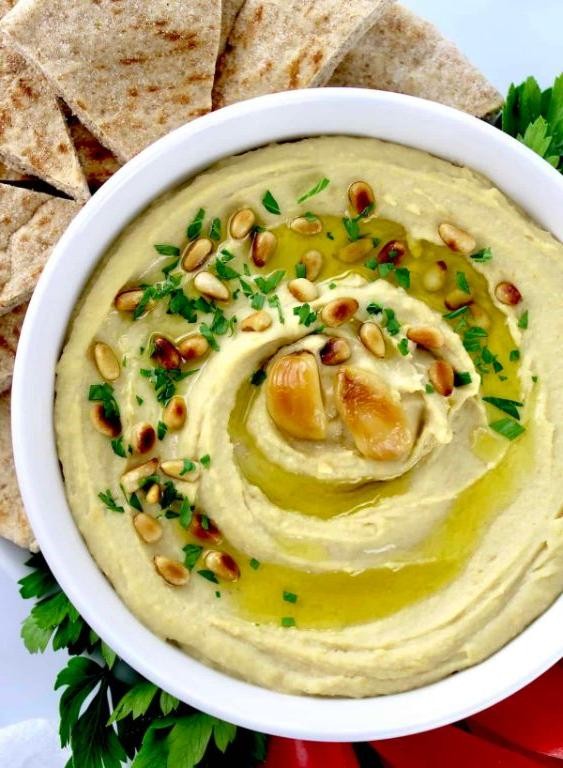
Transform your snack game with this creamy, nutty hummus that’s about to become your new obsession. This roasted garlic version brings serious flavor depth that store-bought versions can’t touch. Trust me, once you try this, there’s no going back to basic hummus.
2
servings15
minutes40
minutesIngredients
- 2 whole garlic heads – roasting transforms them into sweet, mellow perfection
- 1 (15 oz) can chickpeas – I always keep the aquafaba for extra creaminess
- 1/4 cup tahini – go for the good stuff with visible oil separation
- 3 tbsp fresh lemon juice – about 1 large lemon, freshly squeezed makes all the difference
- 1/4 cup extra virgin olive oil – plus extra for drizzling, this is where quality matters
- 1/4 cup pine nuts – lightly toasted for maximum crunch factor
- 1 tsp kosher salt – I prefer this over table salt for better texture control
- 1/2 tsp cumin – just enough to enhance without overpowering
- 3-4 ice cubes – my secret weapon for ultra-creamy texture
Instructions
- Preheat your oven to 400°F and line a small baking sheet with parchment paper.
- Slice the top 1/4 inch off both garlic heads to expose the cloves.
- Drizzle 1 tablespoon olive oil over the cut surfaces of the garlic heads.
- Wrap each garlic head tightly in aluminum foil, creating sealed packets.
- Roast the garlic packets for 40 minutes until the cloves are golden brown and soft when pressed.
- While garlic roasts, spread pine nuts on a dry skillet over medium heat.
- Toast pine nuts for 3-4 minutes, shaking the pan frequently, until lightly golden and fragrant.
- Remove pine nuts immediately from the hot pan to prevent burning.
- Drain chickpeas, reserving 1/4 cup of the aquafaba liquid for later use.
- Once garlic is cool enough to handle, squeeze the softened cloves from their skins into your food processor.
- Add drained chickpeas, tahini, lemon juice, remaining olive oil, salt, and cumin to the processor.
- Process for 1 minute until the mixture starts to come together but still appears grainy.
- With the processor running, slowly stream in the reserved aquafaba through the feed tube.
- Add ice cubes one at a time while processing – this is my pro tip for achieving restaurant-quality creaminess.
- Continue processing for 2-3 minutes until the hummus is completely smooth and whipped.
- Transfer hummus to a serving bowl and use the back of a spoon to create swirls on the surface.
- Drizzle with additional olive oil and sprinkle toasted pine nuts over the top.
Keep this hummus chilled until serving – the flavors develop beautifully as it rests. You’ll notice the roasted garlic creates this incredible caramelized sweetness that balances perfectly with the nutty tahini. Try spreading it thick on warm pita or using it as a vibrant base for grain bowls – the creamy texture holds up beautifully against crunchy vegetables.
Savory Walnut and Blue Cheese Spread
Fancy a spread that’ll wow your crew in minutes? Forget complicated apps—this savory walnut and blue cheese number is your new go-to. Bold flavors, creamy texture, zero fuss.
5
servings10
minutes10
minutesIngredients
– 1 cup raw walnuts (toasting unlocks their nutty magic)
– 4 oz high-quality blue cheese, crumbled (I love a bold, creamy variety like Maytag)
– 1/2 cup full-fat Greek yogurt (room temp blends smoother)
– 2 tbsp extra virgin olive oil (my go-to for richness)
– 1 small garlic clove, minced (fresh only—skip the jarred stuff)
– 1 tbsp fresh lemon juice (brightens everything up)
– 1/4 tsp freshly cracked black pepper (adds a subtle kick)
Instructions
1. Preheat your oven to 350°F.
2. Spread the walnuts in a single layer on a baking sheet.
3. Toast the walnuts for 8–10 minutes, until fragrant and lightly golden.
4. Let the walnuts cool completely—this prevents a greasy texture.
5. Combine the cooled walnuts, crumbled blue cheese, Greek yogurt, olive oil, minced garlic, lemon juice, and black pepper in a food processor.
6. Pulse the mixture 5–7 times, scraping down the sides once, until it’s creamy but still slightly textured.
7. Taste and adjust seasoning if needed, but avoid over-blending.
8. Transfer the spread to a serving bowl.
Notably creamy with a tangy punch from the blue cheese, this spread holds its shape beautifully on crackers or crostini. Try it smeared on apple slices for a sweet-savory twist—it’s a game-changer.
Zesty Black Bean and Lime Spread
Zesty black bean and lime spread is about to become your new obsession—creamy, tangy, and ridiculously easy to whip up in minutes. Grab your food processor and let’s make magic happen.
2
servings10
minutesIngredients
– 2 (15 oz) cans black beans, rinsed well (I always give them an extra rinse to remove that canned liquid)
– 3 tbsp fresh lime juice, squeezed from about 2 juicy limes (bottled just doesn’t hit the same)
– 1/4 cup extra virgin olive oil, my go-to for that smooth richness
– 1 tsp ground cumin, toasted lightly in a dry pan first for maximum aroma
– 1/2 tsp chili powder, the kind with a little kick
– 1/4 cup fresh cilantro leaves, packed (skip if you’re one of those cilantro-haters)
– 1/2 tsp fine sea salt, because it dissolves better than kosher here
– 1 small garlic clove, minced (fresh only—no jarred stuff)
Instructions
1. Rinse both cans of black beans under cold water in a colander until the water runs clear.
2. Add the rinsed black beans, fresh lime juice, extra virgin olive oil, toasted cumin, chili powder, cilantro leaves, fine sea salt, and minced garlic to your food processor bowl.
3. Secure the lid tightly on the food processor.
4. Pulse the mixture 5 times to break down the beans roughly.
5. Scrape down the sides of the bowl with a spatula to ensure even blending.
6. Process continuously on high speed for 60 seconds until completely smooth and creamy.
7. Stop the processor and taste the spread—adjust salt only if needed, but the measurements are spot-on.
8. Transfer the spread to an airtight container using a rubber spatula.
9. Refrigerate the spread for at least 30 minutes to let the flavors meld and thicken slightly. Buttery smooth with a bright lime kick, this spread clings perfectly to crackers or toasted baguette slices. Try it smeared on fish tacos or as a vibrant veggie dip—it’s seriously versatile.
Tangy Yogurt and Cucumber Spread
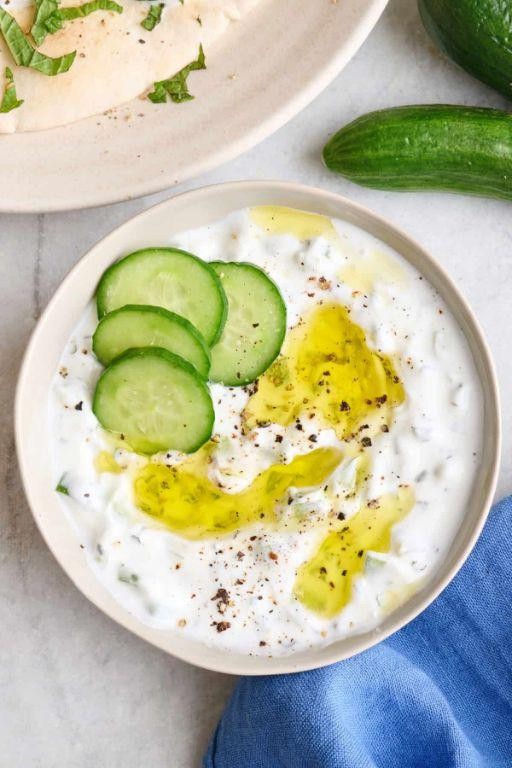
Rethink your dip game with this lightning-fast yogurt spread. Grab cucumbers and transform your snack routine in under 10 minutes flat—your chips will thank you.
2
servings10
minutesIngredients
– 2 cups plain Greek yogurt (I always use full-fat for creamier texture)
– 1 medium cucumber, grated (leave the skin on for extra crunch)
– 2 tablespoons fresh dill, finely chopped (trust me, fresh makes all the difference)
– 1 tablespoon lemon juice (freshly squeezed, never bottled)
– 1 teaspoon garlic powder (adjust if you’re garlic-obsessed like me)
– ½ teaspoon salt (I use fine sea salt for even distribution)
– ¼ teaspoon black pepper (freshly cracked if you have it)
Instructions
1. Place a fine-mesh strainer over a bowl and line it with cheesecloth or paper towels.
2. Grate the entire cucumber using the large holes of a box grater directly into the strainer.
3. Sprinkle ¼ teaspoon salt over the grated cucumber and gently toss with your hands.
4. Let the cucumber drain for 5 minutes while you prepare other ingredients—this prevents watery dip.
5. Squeeze the grated cucumber firmly in your hands over the sink to remove excess liquid.
6. Combine the drained cucumber and Greek yogurt in a medium mixing bowl.
7. Add the chopped dill, lemon juice, garlic powder, remaining salt, and black pepper.
8. Stir all ingredients vigorously with a spatula for 30 seconds until fully incorporated.
9. Taste the mixture and adjust seasoning immediately if needed—flavors meld quickly.
10. Cover the bowl tightly with plastic wrap and refrigerate for at least 15 minutes before serving. Fantastic creamy texture with bright cucumber crunch makes this irresistible. Spread it on pita chips, dollop over grilled chicken, or stuff into pita pockets for lunch—the tangy garlic kick elevates everything it touches.
Sweet and Spicy Thai Peanut Spread
Let’s transform your snack game with this addictive Thai peanut spread. Load up rice crackers or slather it on toast for that perfect sweet-heat combo everyone craves.
1
spread15
minutesIngredients
- 1 cup creamy peanut butter (I always use the natural kind—the oil separation makes it creamier)
- 2 tbsp soy sauce (low-sodium is my preference to control saltiness)
- 1 tbsp rice vinegar (this tangy kick balances everything perfectly)
- 2 tbsp honey (local raw honey adds the best floral notes)
- 1 tsp sriracha (double this if you’re feeling brave like I usually do)
- 1 garlic clove, minced (fresh only—jarred garlic just doesn’t hit the same)
- 2 tbsp warm water (this is the secret to getting that perfect spreadable consistency)
- 1 tbsp lime juice (freshly squeezed makes all the difference)
Instructions
- Measure 1 cup creamy peanut butter into a medium mixing bowl.
- Add 2 tbsp soy sauce directly to the peanut butter.
- Pour in 1 tbsp rice vinegar and stir to combine—the mixture will thicken slightly.
- Drizzle 2 tbsp honey into the bowl while continuously stirring.
- Squeeze 1 tsp sriracha into the mixture for that signature heat.
- Mince 1 garlic clove finely and incorporate it thoroughly.
- Slowly add 2 tbsp warm water while whisking vigorously to prevent clumping.
- Finally, stir in 1 tbsp fresh lime juice until completely smooth.
- Let the spread rest for 10 minutes at room temperature—this allows the flavors to meld perfectly.
Seriously creamy with just the right kick of heat that builds slowly. Spread it thick on celery sticks for crunch or thin it with more warm water for an incredible salad dressing that’ll make any bowl Instagram-worthy.
Cream Cheese with Herbs and Capers Spread
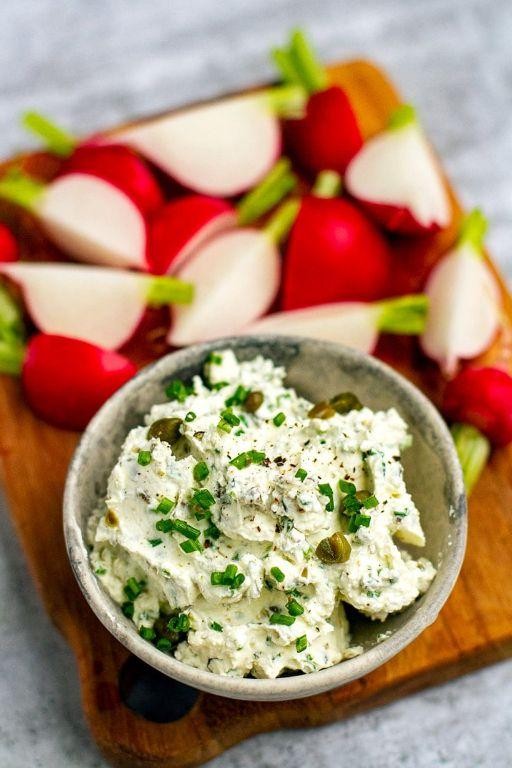
Elevate your snack game instantly with this creamy, tangy spread that transforms basic crackers into gourmet bites. Whip it up in five minutes flat—perfect for last-minute guests or spontaneous cravings. Trust me, this will become your go-to party trick.
5
servings35
minutesIngredients
- 8 oz cream cheese (I always use full-fat Philadelphia for maximum creaminess)
- 2 tbsp fresh dill, finely chopped (don’t even think about dried—fresh makes all the difference)
- 1 tbsp capers, drained and roughly chopped (these little salty gems are the flavor bomb)
- 1 tbsp fresh chives, thinly sliced (from my windowsill herb garden)
- 1 tsp lemon zest (use a microplane for fluffy, fragrant zest)
- 1/2 tsp freshly ground black pepper (freshly cracked gives that aromatic kick)
- 1/4 tsp garlic powder (my secret for balanced flavor without raw garlic bite)
- 2 tbsp whole milk (room temp helps everything blend smoothly)
Instructions
- Place 8 oz cream cheese in a medium mixing bowl and let it sit at room temperature for 30 minutes until soft to the touch.
- Add 2 tbsp fresh dill, 1 tbsp capers, 1 tbsp fresh chives, 1 tsp lemon zest, 1/2 tsp black pepper, and 1/4 tsp garlic powder to the bowl.
- Pour in 2 tbsp whole milk to help create a spreadable consistency.
- Use a rubber spatula to vigorously mix all ingredients for 2-3 minutes until completely smooth and evenly combined.
- Scrape down the sides of the bowl with your spatula to incorporate any stray ingredients.
- Transfer the mixture to a serving dish and smooth the surface with the back of a spoon.
- Cover the dish tightly with plastic wrap and refrigerate for at least 1 hour to allow flavors to meld.
After chilling, you’ll get this beautifully creamy texture with little pops of briny capers throughout. The fresh herbs create this bright, garden-fresh flavor that pairs perfectly with everything from bagel chips to cucumber slices. For a next-level move, stuff it into cherry tomatoes or spread it on grilled chicken—it transforms simple ingredients into something special.
Conclusion
Whether you’re looking to elevate your lunch game or discover new flavor combinations, these 20 delicious sandwich spread recipes offer endless inspiration for your kitchen. We hope you find a new favorite to try today—don’t forget to leave a comment sharing which recipe you loved most and pin this article to your Pinterest boards for easy reference!


