Welcome to a world of flavor without the salt shaker! Whether you’re managing dietary needs or simply exploring healthier options, these 33 delicious salt-free recipes prove that vibrant, satisfying meals are absolutely achievable. From quick weeknight dinners to comforting classics, get ready to discover a treasure trove of ideas that will make healthy eating feel like a true delight.
Herb-Roasted Chicken with Lemon and Garlic

Keeping my kitchen cozy on crisp autumn evenings always calls for a comforting roast chicken, and this herb-roasted version with lemon and garlic has become my go-to for its simplicity and incredible aroma that fills the whole house. I love how the lemon brightens up the rich herbs, making it feel both hearty and fresh—perfect for a Sunday dinner that leaves everyone asking for seconds.
3
servings15
minutes80
minutesIngredients
For the chicken and seasoning:
– 1 whole chicken (4-5 lbs)
– 2 tbsp olive oil
– 1 tsp salt
– 1/2 tsp black pepper
– 1 tbsp fresh rosemary, chopped
– 1 tbsp fresh thyme, chopped
For the cavity and roasting:
– 1 lemon, halved
– 4 garlic cloves, peeled
– 1/2 cup chicken broth
Instructions
1. Preheat your oven to 425°F.
2. Pat the chicken dry with paper towels inside and out.
3. Rub the chicken all over with olive oil.
4. Season the chicken evenly with salt, black pepper, rosemary, and thyme.
5. Stuff the chicken cavity with the halved lemon and garlic cloves.
6. Place the chicken breast-side up in a roasting pan.
7. Pour the chicken broth into the bottom of the pan.
8. Roast the chicken for 20 minutes at 425°F.
9. Reduce the oven temperature to 375°F.
10. Continue roasting for 50-60 minutes, until the internal temperature reaches 165°F when measured with a meat thermometer in the thickest part of the thigh.
11. Let the chicken rest for 15 minutes before carving.
Serving this chicken reveals juicy, tender meat with crispy golden skin that crackles with each bite. The lemon and garlic infuse every morsel with a bright, aromatic quality that pairs beautifully with roasted vegetables or over a bed of creamy polenta for a complete comfort meal.
Spicy Lentil Soup with Tomato and Coconut

Yesterday’s chilly autumn weather had me craving something warm and comforting, so I pulled out my favorite soup pot and decided to make this spicy lentil soup that always reminds me of my grandmother’s kitchen—she believed every good soup should have a story and a little kick.
5
servings15
minutes38
minutesIngredients
- For the base:
- 1 tbsp olive oil
- 1 medium yellow onion, diced
- 2 cloves garlic, minced
- 1 tbsp fresh ginger, grated
- For the soup:
- 1 cup brown lentils, rinsed
- 1 (14.5 oz) can diced tomatoes
- 1 (13.5 oz) can coconut milk
- 4 cups vegetable broth
- 1 tsp ground cumin
- 1/2 tsp red pepper flakes
- 1/2 tsp salt
- For garnish:
- 2 tbsp fresh cilantro, chopped
- 1 lime, cut into wedges
Instructions
- Heat 1 tbsp olive oil in a large pot over medium heat for 2 minutes until shimmering.
- Add 1 diced yellow onion and cook for 5 minutes, stirring occasionally, until translucent.
- Stir in 2 minced garlic cloves and 1 tbsp grated ginger, cooking for 1 minute until fragrant.
- Add 1 cup rinsed brown lentils, 1 can diced tomatoes, 1 can coconut milk, 4 cups vegetable broth, 1 tsp ground cumin, 1/2 tsp red pepper flakes, and 1/2 tsp salt to the pot.
- Bring the mixture to a boil over high heat, then reduce heat to low and cover the pot.
- Simmer for 30 minutes, stirring every 10 minutes to prevent sticking.
- Check that lentils are tender by pressing one between your fingers—they should mash easily.
- Remove the pot from heat and let sit uncovered for 5 minutes to thicken slightly.
- Ladle the soup into bowls and top each with 2 tbsp chopped fresh cilantro.
- Serve immediately with 1 lime wedge per bowl for squeezing over the soup.
Hearty and creamy with a subtle heat that builds with each spoonful, this soup’s texture is wonderfully thick thanks to the lentils breaking down just enough. I love serving it with crusty bread for dipping, or for a fun twist, try it over cooked quinoa to make it even more filling—the coconut milk adds a richness that balances the spices perfectly.
No-Salt-Added Vegetable Stir-Fry with Tofu
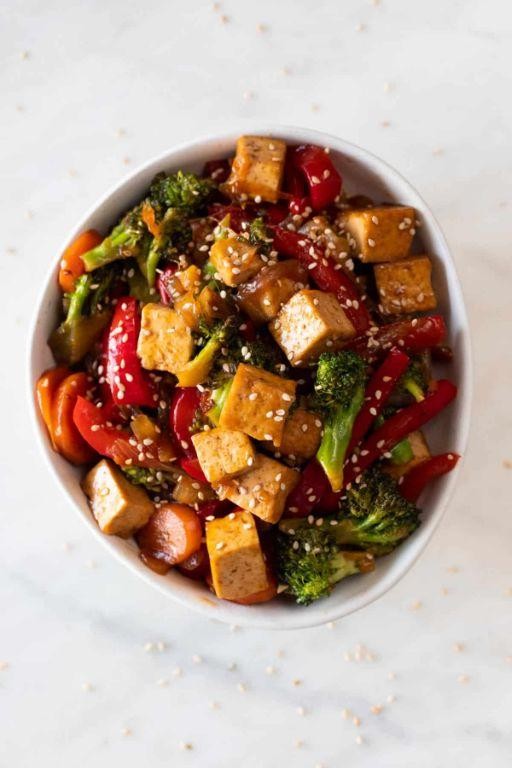
Perfect for those evenings when I want something nourishing but don’t feel like spending hours in the kitchen, this no-salt-added vegetable stir-fry has become my go-to weeknight dinner. I started making it after my doctor suggested cutting back on sodium, and honestly, I don’t miss the salt one bit thanks to all the aromatic flavors. It’s the kind of meal that makes you feel good from the inside out.
3
servings20
minutes15
minutesIngredients
- For the tofu:
- 1 (14 oz) block extra-firm tofu
- 2 tbsp cornstarch
- 2 tbsp avocado oil
- For the vegetables:
- 1 tbsp avocado oil
- 2 cloves garlic, minced
- 1 tbsp fresh ginger, grated
- 1 red bell pepper, sliced into ¼-inch strips
- 2 cups broccoli florets
- 1 large carrot, julienned
- For the sauce:
- 3 tbsp low-sodium soy sauce
- 1 tbsp rice vinegar
- 1 tsp sesame oil
- ½ tsp black pepper
- ¼ tsp red pepper flakes
Instructions
- Press the tofu block between paper towels with a heavy pan on top for 15 minutes to remove excess water.
- Cut the pressed tofu into ¾-inch cubes and toss with 2 tbsp cornstarch until evenly coated.
- Heat 2 tbsp avocado oil in a large skillet over medium-high heat until shimmering, about 2 minutes.
- Add tofu cubes in a single layer and cook for 4-5 minutes per side until golden brown and crispy.
- Transfer tofu to a plate and reduce heat to medium.
- Add 1 tbsp avocado oil to the same skillet and heat for 30 seconds.
- Sauté minced garlic and grated ginger for 1 minute until fragrant but not browned.
- Add sliced bell pepper and broccoli florets, stirring constantly for 3 minutes until brightened in color.
- Add julienned carrot and cook for another 2 minutes until vegetables are tender-crisp.
- Whisk together 3 tbsp low-sodium soy sauce, 1 tbsp rice vinegar, 1 tsp sesame oil, ½ tsp black pepper, and ¼ tsp red pepper flakes in a small bowl.
- Return tofu to the skillet with vegetables.
- Pour sauce mixture over everything and toss to coat evenly.
- Cook for 1 final minute, stirring constantly, until sauce lightly thickens and coats all ingredients.
The crispy tofu provides a wonderful contrast to the tender-crisp vegetables, while the ginger and garlic create layers of flavor that make you forget there’s no added salt. I love serving this over cauliflower rice for a low-carb option, or sometimes I’ll wrap it in lettuce cups for a fresh, crunchy alternative.
Baked Lemon Garlic Herb Salmon

Zesty and vibrant, this baked lemon garlic herb salmon has become my go-to weeknight dinner that feels fancy without the fuss. I first discovered this recipe when trying to impress some friends for dinner, and now it’s in my regular rotation—my husband even requests it every Friday! There’s something magical about how the lemon brightens up the rich salmon while the herbs make your kitchen smell incredible.
4
servings10
minutes15
minutesIngredients
For the salmon base:
– 4 (6-ounce) salmon fillets, skin-on
– 2 tablespoons olive oil
– 1 teaspoon salt
– ½ teaspoon black pepper
For the lemon garlic herb topping:
– 3 cloves garlic, minced
– 2 tablespoons fresh lemon juice
– 1 tablespoon lemon zest
– 2 tablespoons chopped fresh parsley
– 1 tablespoon chopped fresh dill
– 1 teaspoon dried oregano
Instructions
1. Preheat your oven to 400°F and line a baking sheet with parchment paper.
2. Pat the salmon fillets completely dry with paper towels to ensure crispy skin.
3. Brush both sides of each salmon fillet evenly with olive oil using a pastry brush.
4. Season the top of each fillet with salt and black pepper.
5. In a small bowl, combine minced garlic, lemon juice, lemon zest, parsley, dill, and oregano.
6. Spoon the lemon garlic herb mixture evenly over the top of each salmon fillet, pressing gently to adhere.
7. Place the baking sheet in the preheated oven and bake for 12-15 minutes until the salmon flakes easily with a fork but remains moist.
8. Check for doneness by inserting a fork into the thickest part—the flesh should be opaque and separate easily.
9. Remove from oven and let rest for 3 minutes before serving to allow juices to redistribute.
10. Transfer the salmon to serving plates using a thin spatula to keep the herb crust intact.
Yielding perfectly flaky fish every time, this salmon develops a beautiful golden crust while staying incredibly moist inside. The garlic and herbs create an aromatic punch that pairs wonderfully with the bright lemon notes. I love serving it over a bed of quinoa with roasted asparagus for a complete meal that always earns compliments!
Creamy Avocado Pasta with Cherry Tomatoes
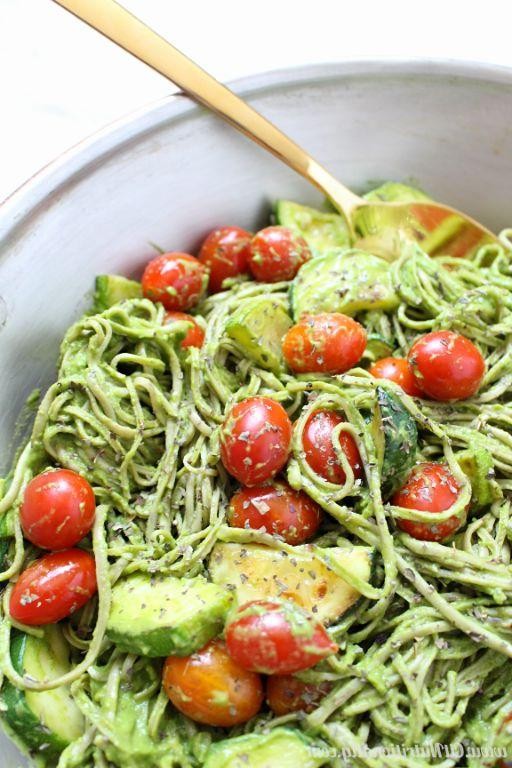
Whenever I’m craving something creamy but want to keep it light, this avocado pasta is my absolute go-to. I actually stumbled upon this recipe during a busy week when my basil plant was overflowing, and now it’s become my favorite 20-minute dinner solution that always impresses guests.
2
servings10
minutes11
minutesIngredients
For the pasta:
– 8 oz spaghetti
– 1 tsp salt
– 8 cups water
For the sauce:
– 2 ripe avocados
– 1/2 cup fresh basil leaves
– 2 cloves garlic
– 3 tbsp olive oil
– 2 tbsp lemon juice
– 1/4 tsp black pepper
– 1/4 tsp salt
For finishing:
– 1 cup cherry tomatoes
– 1/4 cup grated Parmesan cheese
Instructions
1. Bring 8 cups of water to a rolling boil in a large pot over high heat.
2. Add 1 teaspoon of salt to the boiling water.
3. Add 8 ounces of spaghetti and cook for 9-11 minutes until al dente (check package directions for exact time).
4. While pasta cooks, halve 1 cup of cherry tomatoes and set aside.
5. Cut 2 ripe avocados in half, remove pits, and scoop flesh into a food processor.
6. Add 1/2 cup fresh basil leaves, 2 garlic cloves, 3 tablespoons olive oil, 2 tablespoons lemon juice, 1/4 teaspoon black pepper, and 1/4 teaspoon salt to the food processor.
7. Blend the sauce ingredients for 45-60 seconds until completely smooth and creamy.
8. Drain the cooked pasta, reserving 1/2 cup of pasta water.
9. Return the drained pasta to the warm pot off the heat.
10. Pour the avocado sauce over the hot pasta.
11. Add 2 tablespoons of reserved pasta water and toss vigorously to coat every strand.
12. Gently fold in the halved cherry tomatoes.
13. Sprinkle with 1/4 cup grated Parmesan cheese and serve immediately.
Last night I served this over grilled chicken for my protein-loving husband, and the creamy sauce clung beautifully to both the pasta and chicken. The cool, rich avocado contrasts wonderfully with the warm pasta, while the cherry tomatoes burst with bright acidity that cuts through the richness perfectly.
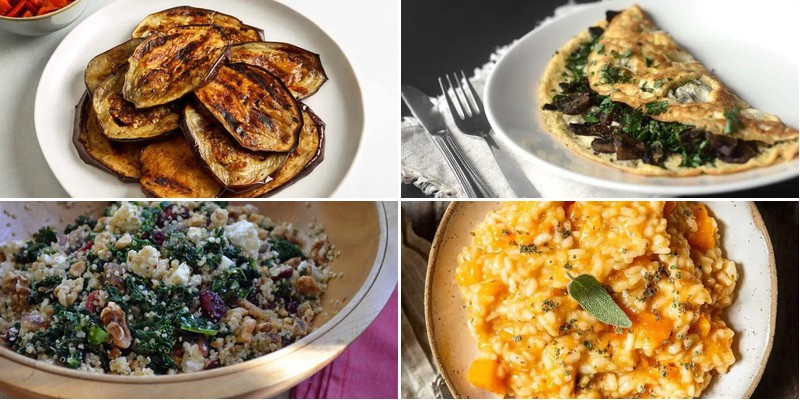
Savory Quinoa Salad with Kale and Cranberries
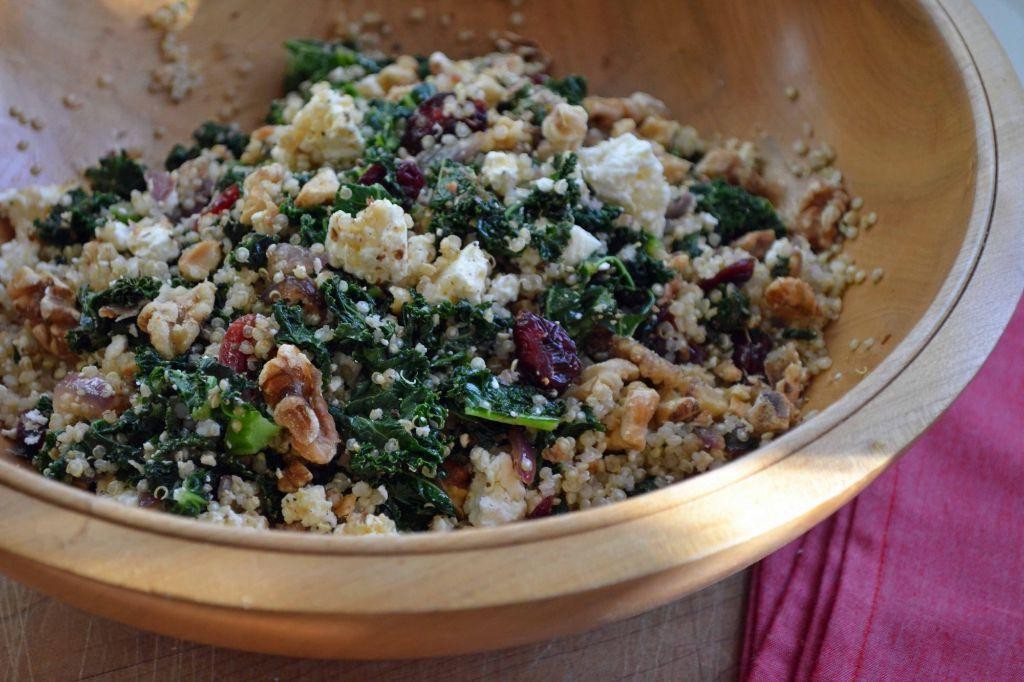
Yesterday, I found myself staring at my pantry, wondering what to make with that bag of quinoa that’s been sitting there for weeks. This savory quinoa salad with kale and cranberries was born from that moment of kitchen inspiration, and it’s become my new go-to for quick, healthy lunches that actually keep me full until dinner. I love how the colors pop against my favorite wooden bowl—it just makes eating healthy feel more special.
5
servings15
minutes20
minutesIngredients
– For the quinoa: 1 cup quinoa, 2 cups water, 1/2 tsp salt
– For the salad base: 4 cups chopped kale, 1/2 cup dried cranberries, 1/4 cup chopped red onion
– For the dressing: 3 tbsp olive oil, 2 tbsp lemon juice, 1 tsp honey, 1/4 tsp black pepper
Instructions
1. Rinse 1 cup quinoa under cold water in a fine-mesh strainer for 1 minute to remove the natural bitter coating.
2. Combine rinsed quinoa, 2 cups water, and 1/2 tsp salt in a medium saucepan.
3. Bring quinoa mixture to a boil over high heat, then immediately reduce heat to low and cover the pan.
4. Simmer quinoa for 15 minutes until all water is absorbed and grains are translucent with little white rings.
5. Remove quinoa from heat and let it stand covered for 5 minutes to finish steaming.
6. Fluff cooked quinoa with a fork and spread it on a baking sheet to cool completely for 20 minutes.
7. While quinoa cools, massage 4 cups chopped kale with your hands for 2 minutes until leaves darken and soften slightly.
8. Whisk together 3 tbsp olive oil, 2 tbsp lemon juice, 1 tsp honey, and 1/4 tsp black pepper in a small bowl until emulsified.
9. Combine cooled quinoa, massaged kale, 1/2 cup dried cranberries, and 1/4 cup chopped red onion in a large mixing bowl.
10. Pour dressing over salad mixture and toss thoroughly until everything is evenly coated.
11. Let salad rest for 10 minutes before serving to allow flavors to meld together.
This salad has the most satisfying texture—the quinoa stays pleasantly chewy while the kale provides a sturdy crunch that holds up beautifully even after a day in the fridge. The sweet-tart cranberries create little bursts of flavor against the earthy quinoa, making each bite more interesting than the last. Try serving it alongside grilled chicken or stuffing it into pita pockets for an easy lunch that feels anything but ordinary.
Zucchini and Sweet Potato Fritters

Yesterday, I found myself staring at a mountain of zucchini from my garden and some sweet potatoes that needed using up—sound familiar? That’s when I remembered my grandma’s brilliant trick of turning surplus veggies into crispy, golden fritters that somehow make everyone at the table feel like they’re getting away with eating something indulgent when it’s actually packed with goodness.
8
portions20
minutes24
minutesIngredients
For the fritter mixture:
– 2 medium zucchinis, grated (about 2 cups)
– 1 large sweet potato, peeled and grated (about 1.5 cups)
– 1/2 teaspoon salt
– 1/4 cup all-purpose flour
– 1 large egg
– 2 tablespoons chopped fresh parsley
– 1/2 teaspoon garlic powder
– 1/4 teaspoon black pepper
For cooking:
– 1/4 cup olive oil
Instructions
1. Place grated zucchini and sweet potato in a colander and sprinkle with 1/2 teaspoon salt.
2. Let the vegetables sit for 10 minutes to draw out excess moisture—this prevents soggy fritters.
3. Squeeze the grated vegetables firmly with your hands over the sink to remove as much liquid as possible.
4. Transfer the dried vegetables to a large mixing bowl.
5. Add 1/4 cup all-purpose flour, 1 large egg, 2 tablespoons chopped fresh parsley, 1/2 teaspoon garlic powder, and 1/4 teaspoon black pepper to the bowl.
6. Mix everything together until well combined—the mixture should hold together when pressed.
7. Heat 1/4 cup olive oil in a large skillet over medium heat until shimmering (about 350°F).
8. Scoop 1/4 cup portions of the mixture and gently press into 1/2-inch thick patties.
9. Carefully place 3-4 patties in the hot oil, being careful not to overcrowd the pan.
10. Cook for 3-4 minutes until the bottoms are golden brown and crispy.
11. Flip the fritters using a spatula and cook for another 3-4 minutes until both sides are golden brown.
12. Transfer cooked fritters to a paper towel-lined plate to drain excess oil.
13. Repeat with remaining mixture, adding more oil if needed.
Absolutely magical how these humble vegetables transform into something so satisfying! The crispy edges give way to a tender interior with subtle sweetness from the potatoes, while the zucchini keeps everything light. I love serving these stacked high with a dollop of Greek yogurt or alongside a simple green salad for the perfect meatless Monday dinner that even vegetable-skeptics can’t resist.
Mediterranean Chickpea and Carrot Stew

Sometimes the best meals come from cleaning out the vegetable drawer, and this Mediterranean chickpea and carrot stew was born from exactly that situation. I had carrots that needed using, a can of chickpeas staring at me, and a craving for something warm and comforting without spending hours in the kitchen.
3
servings15
minutes35
minutesIngredients
- For sautéing: 2 tbsp olive oil, 1 medium yellow onion (diced), 3 cloves garlic (minced)
- For the stew base: 4 medium carrots (peeled and sliced into ½-inch rounds), 1 (15-ounce) can chickpeas (rinsed and drained), 1 (14.5-ounce) can diced tomatoes, 4 cups vegetable broth, 1 tsp dried oregano, ½ tsp ground cumin, ¼ tsp red pepper flakes
- For finishing: 2 tbsp fresh lemon juice, ¼ cup chopped fresh parsley, salt to taste
Instructions
- Heat 2 tbsp olive oil in a large pot over medium heat until shimmering, about 1 minute.
- Add 1 diced onion and cook, stirring occasionally, until softened and translucent, about 5-7 minutes.
- Stir in 3 minced garlic cloves and cook until fragrant, about 30 seconds—be careful not to burn it.
- Add 4 sliced carrots and cook for 2 minutes to slightly soften them.
- Pour in 1 can diced tomatoes with their juices, scraping any browned bits from the bottom of the pot for extra flavor.
- Add 1 can rinsed chickpeas, 4 cups vegetable broth, 1 tsp oregano, ½ tsp cumin, and ¼ tsp red pepper flakes.
- Bring the stew to a boil, then reduce heat to low and simmer uncovered for 25 minutes until carrots are fork-tender.
- Stir in 2 tbsp lemon juice and ¼ cup chopped parsley just before serving.
- Season with salt until the flavors pop, starting with ½ tsp and adjusting as needed.
Using this stew as a base for grain bowls with quinoa makes it even more satisfying, and the carrots become meltingly tender while the chickpeas hold their shape perfectly. You’ll love how the lemon brightens everything up at the end—it’s my favorite trick for making vegetarian dishes sing.
No-Salt-Added Butternut Squash Risotto
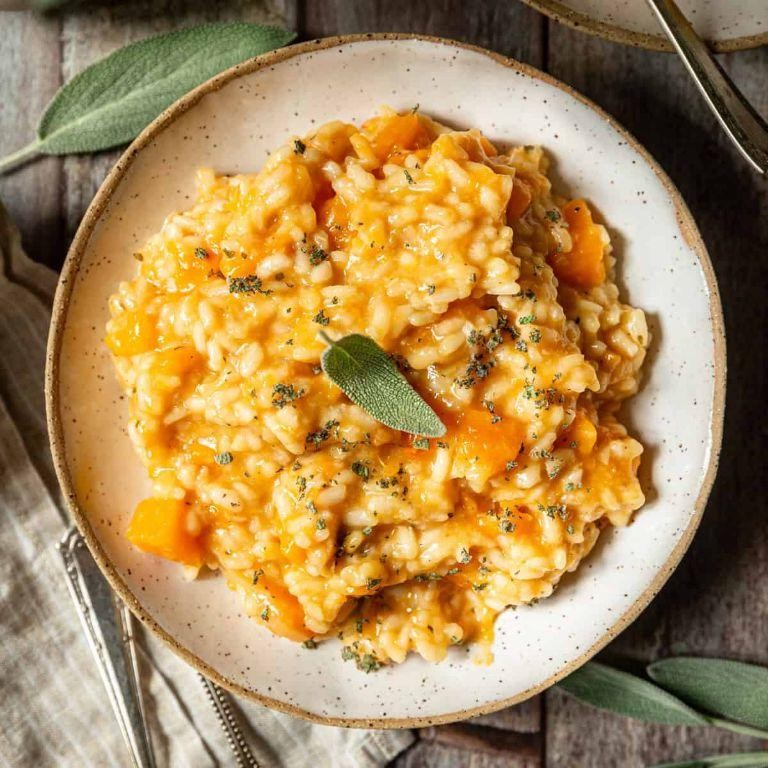
Oof, I know what you’re thinking—risotto without salt? But trust me, this no-salt-added butternut squash risotto is so naturally sweet and creamy, you won’t miss it one bit. I first made this for my friend who’s watching her sodium intake, and now it’s become my go-to cozy fall dinner that even my salt-loving husband requests regularly.
4
servings15
minutes52
minutesIngredients
For the roasted squash
– 1 medium butternut squash, peeled and cubed (about 4 cups)
– 2 tablespoons olive oil
– 1 teaspoon ground cinnamon
– 1/2 teaspoon ground nutmeg
For the risotto base
– 1 tablespoon olive oil
– 1 small yellow onion, finely diced
– 2 cloves garlic, minced
– 1 1/2 cups Arborio rice
– 1/2 cup dry white wine
– 6 cups low-sodium vegetable broth, warmed to 180°F
– 1/2 cup grated Parmesan cheese
– 2 tablespoons unsalted butter
– 1/4 teaspoon black pepper
Instructions
1. Preheat your oven to 400°F and line a baking sheet with parchment paper.
2. Toss the cubed butternut squash with 2 tablespoons olive oil, cinnamon, and nutmeg until evenly coated.
3. Spread the squash in a single layer on the prepared baking sheet and roast for 25 minutes, or until tender and lightly browned at the edges.
4. While the squash roasts, heat 1 tablespoon olive oil in a large, heavy-bottomed pot over medium heat.
5. Add the diced onion and cook for 5 minutes, stirring occasionally, until translucent but not browned.
6. Stir in the minced garlic and cook for 1 minute until fragrant.
7. Add the Arborio rice to the pot and toast for 2 minutes, stirring constantly, until the grains look slightly translucent around the edges.
8. Pour in the white wine and cook while stirring until the liquid is fully absorbed, about 2 minutes.
9. Add 1 cup of the warm vegetable broth to the rice and stir continuously until the liquid is nearly absorbed.
10. Continue adding broth 1 cup at a time, stirring constantly and waiting until each addition is absorbed before adding the next—this should take about 25 minutes total.
11. When the rice is creamy but still al dente, gently fold in the roasted butternut squash, Parmesan cheese, butter, and black pepper.
12. Remove from heat and let rest for 2 minutes before serving. Look at that gorgeous orange color and creamy texture—this risotto proves that when you start with sweet, roasted squash and quality Parmesan, you don’t need salt to create something truly special. I love serving it topped with extra black pepper and a sprinkle of fresh thyme for an elegant presentation that always impresses dinner guests.
Herbed Mushroom and Spinach Omelette

Finally, after years of experimenting with breakfast options, I’ve perfected my go-to weekend omelette that never fails to impress. There’s something magical about the way earthy mushrooms mingle with fresh herbs that makes this feel like a restaurant-quality dish made right in my own kitchen. I actually started making this version after my herb garden went wild with thyme and parsley last summer—now it’s become our family’s favorite lazy Sunday tradition.
1
servings10
minutes15
minutesIngredients
For the Filling:
- 1 tablespoon olive oil
- 8 ounces cremini mushrooms, sliced
- 2 cups fresh spinach
- 2 cloves garlic, minced
- 1 tablespoon fresh thyme leaves
- 2 tablespoons chopped fresh parsley
- 1/4 teaspoon salt
- 1/8 teaspoon black pepper
For the Omelette:
- 3 large eggs
- 1 tablespoon water
- 1/4 teaspoon salt
- 1 tablespoon unsalted butter
- 1/4 cup shredded Gruyère cheese
Instructions
- Heat 1 tablespoon olive oil in a 10-inch non-stick skillet over medium heat until shimmering.
- Add 8 ounces sliced cremini mushrooms and cook for 6-8 minutes until golden brown and moisture has evaporated.
- Add 2 minced garlic cloves and cook for 30 seconds until fragrant.
- Stir in 2 cups fresh spinach and cook for 1-2 minutes until just wilted.
- Mix in 1 tablespoon fresh thyme, 2 tablespoons chopped parsley, 1/4 teaspoon salt, and 1/8 teaspoon black pepper.
- Transfer the mushroom-spinach mixture to a plate and wipe the skillet clean.
- Whisk 3 large eggs with 1 tablespoon water and 1/4 teaspoon salt until frothy and well combined.
- Melt 1 tablespoon unsalted butter in the same skillet over medium-low heat until foamy but not brown.
- Pour the egg mixture into the skillet and let it set for 30 seconds without stirring.
- Gently lift the edges of the omelette with a spatula and tilt the pan to let uncooked egg flow underneath.
- Cook for 2-3 minutes until the top is nearly set but still slightly moist.
- Sprinkle 1/4 cup shredded Gruyère cheese over one half of the omelette.
- Spoon the mushroom-spinach filling over the cheese.
- Carefully fold the empty half of the omelette over the filling using your spatula.
- Cook for 1 more minute to melt the cheese and warm the filling through.
- Slide the finished omelette onto a plate. Really, the beauty of this omelette lies in that perfect golden-brown exterior giving way to the creamy, cheesy interior packed with savory mushrooms and fresh herbs. I love serving it with a side of toasted sourdough to soak up any extra filling that might escape, and sometimes I’ll even add a dollop of crème fraîche on top for extra richness that contrasts beautifully with the earthy mushrooms.
Grilled Eggplant with Balsamic Glaze
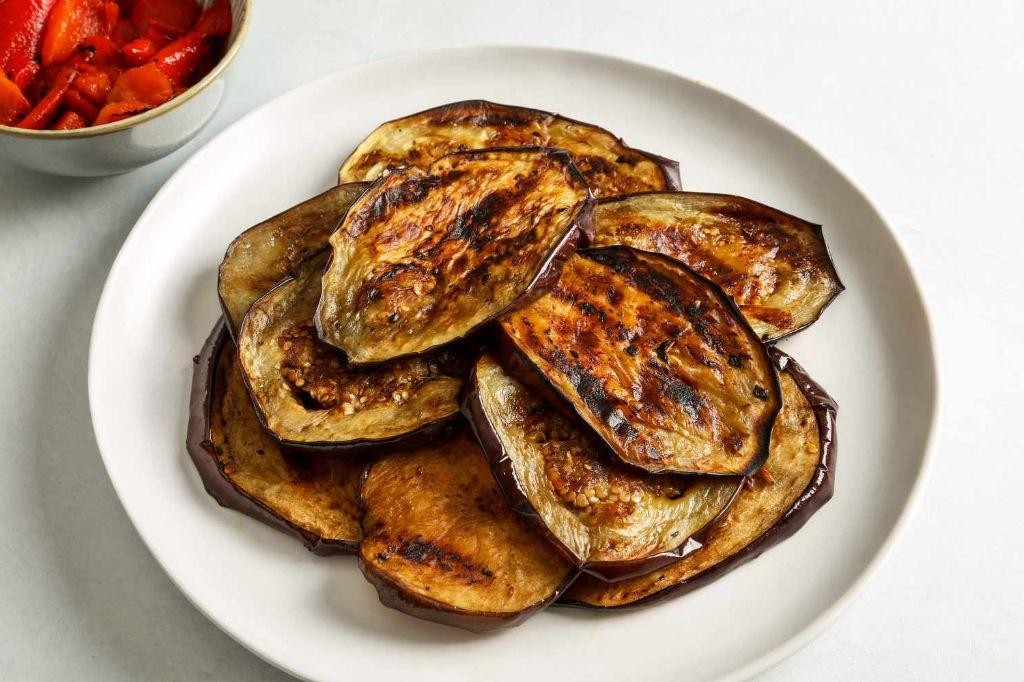
Last summer, I discovered this grilled eggplant recipe during a backyard barbecue mishap when I ran out of zucchini. Now it’s my go-to side dish for any grill session – even my eggplant-skeptic husband asks for seconds! The balsamic glaze caramelizes into this sweet-tangy magic that transforms humble eggplant into something truly special.
5
servings15
minutes25
minutesIngredients
For the eggplant:
– 2 medium eggplants, sliced into 1/2-inch rounds
– 3 tablespoons olive oil
– 1 teaspoon kosher salt
– 1/2 teaspoon black pepper
For the glaze:
– 1/2 cup balsamic vinegar
– 2 tablespoons honey
– 1 garlic clove, minced
Instructions
1. Preheat your grill to medium-high heat (400°F) and brush the grates with oil.
2. Arrange eggplant slices in a single layer on a baking sheet.
3. Brush both sides of each eggplant slice with olive oil using a pastry brush.
4. Sprinkle salt and pepper evenly over both sides of the eggplant slices.
5. Place eggplant slices directly on the preheated grill grates.
6. Grill for 5-7 minutes until grill marks appear and the bottom is golden brown.
7. Flip each eggplant slice using tongs.
8. Grill for another 5-7 minutes until tender when pierced with a fork.
9. While eggplant grills, combine balsamic vinegar, honey, and minced garlic in a small saucepan.
10. Bring the glaze mixture to a boil over medium heat.
11. Reduce heat to low and simmer for 8-10 minutes until the glaze thickens enough to coat the back of a spoon.
12. Remove the grilled eggplant from the grill and arrange on a serving platter.
13. Drizzle the warm balsamic glaze over the grilled eggplant slices using a spoon.
You’ll love how the creamy eggplant flesh contrasts with the crispy grilled edges, while the sweet-tangy glaze adds depth that makes this feel far fancier than the simple ingredients suggest. Yesterday I served these over creamy polenta for a meatless main that had everyone asking for the recipe!
Garlic and Herb Mashed Cauliflower

Remember that time I tried to convince my potato-loving family that mashed cauliflower could be just as comforting? I’ll admit I was skeptical too, but this garlic and herb version completely won us over—it’s become our new go-to side that even the kids request now.
3
servings15
minutes15
minutesIngredients
For the cauliflower base:
– 1 large head cauliflower, cut into florets (about 6 cups)
– 4 cloves garlic, peeled
– 1/2 cup vegetable broth
For finishing:
– 1/4 cup heavy cream, warmed
– 3 tablespoons unsalted butter
– 1/4 cup grated Parmesan cheese
– 1 tablespoon fresh chopped parsley
– 1 teaspoon fresh chopped thyme
– 1/2 teaspoon salt
– 1/4 teaspoon black pepper
Instructions
1. Place cauliflower florets and peeled garlic cloves in a large saucepan.
2. Pour 1/2 cup vegetable broth over the cauliflower.
3. Cover the saucepan and steam over medium heat for 12-15 minutes until cauliflower is fork-tender.
4. Drain any excess liquid from the saucepan completely.
5. Transfer the cooked cauliflower and garlic to a food processor.
6. Pulse 5-6 times until the mixture resembles coarse crumbs.
7. Add 1/4 cup warmed heavy cream and 3 tablespoons unsalted butter to the food processor.
8. Process on high speed for 1 minute until smooth and creamy.
9. Add 1/4 cup grated Parmesan cheese, 1 tablespoon fresh chopped parsley, and 1 teaspoon fresh chopped thyme.
10. Sprinkle in 1/2 teaspoon salt and 1/4 teaspoon black pepper.
11. Process for another 30 seconds until all ingredients are fully incorporated and the mixture is fluffy.
Extra creamy and surprisingly rich, this mashed cauliflower has a velvety texture that holds its shape beautifully. The garlic and herb combination creates such depth of flavor that we often serve it topped with crispy fried shallots or as a bed for roasted chicken—it’s versatile enough to become your new comfort food staple.
Tropical Fruit and Berry Smoothie

Last summer, I discovered this tropical fruit and berry smoothie during a beach vacation in Florida, and it’s become my go-to breakfast ever since. There’s something magical about blending frozen fruits that instantly transports me back to those warm mornings by the ocean.
2
glasses5
minutesIngredients
- For the smoothie base:
- 1 cup frozen mango chunks
- 1 cup frozen mixed berries (strawberries, blueberries, raspberries)
- 1 ripe banana
- 1 cup unsweetened almond milk
- 1/2 cup plain Greek yogurt
- For flavor enhancement:
- 1 tbsp honey
- 1 tsp fresh lime juice
Instructions
- Measure 1 cup frozen mango chunks and add them to your blender pitcher.
- Add 1 cup frozen mixed berries directly from the freezer to prevent thawing.
- Peel one ripe banana and break it into chunks before adding to the blender.
- Pour 1 cup unsweetened almond milk over the frozen fruits.
- Scoop 1/2 cup plain Greek yogurt into the blender for creaminess.
- Drizzle 1 tablespoon honey over the ingredients for natural sweetness.
- Squeeze 1 teaspoon fresh lime juice directly into the blender.
- Secure the blender lid tightly and blend on high speed for 45-60 seconds until completely smooth.
- Stop blending when no fruit chunks remain and the texture appears uniform.
- Pour the smoothie immediately into two 16-ounce glasses.
Nothing beats the creamy, frosty texture that comes from using frozen fruits straight from the freezer. The tropical mango perfectly balances the tart berries, while the hint of lime adds just enough zing to wake up your taste buds. I love serving these in chilled mason jars with colorful paper straws for that extra vacation vibe, even on busy weekday mornings.
Conclusion
You now have 33 delicious salt-free recipes to support your healthy eating journey! We hope these flavorful dishes inspire you to create nourishing meals your whole family will love. Try a few recipes this week and let us know which ones become your favorites in the comments below. Don’t forget to share this helpful roundup on Pinterest so others can discover these tasty salt-free options too!


