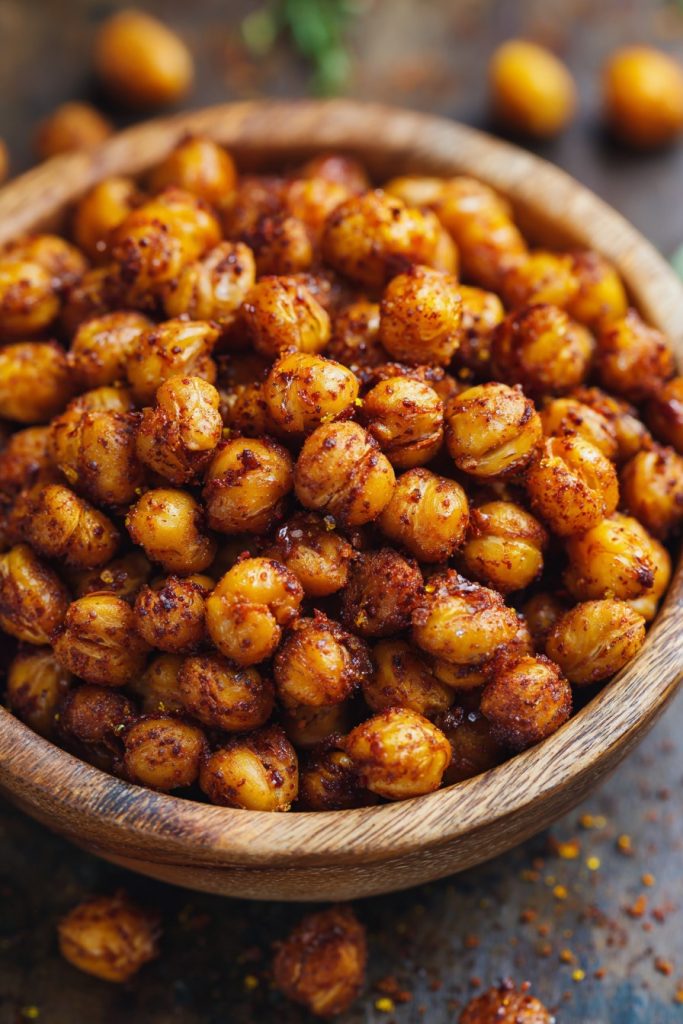
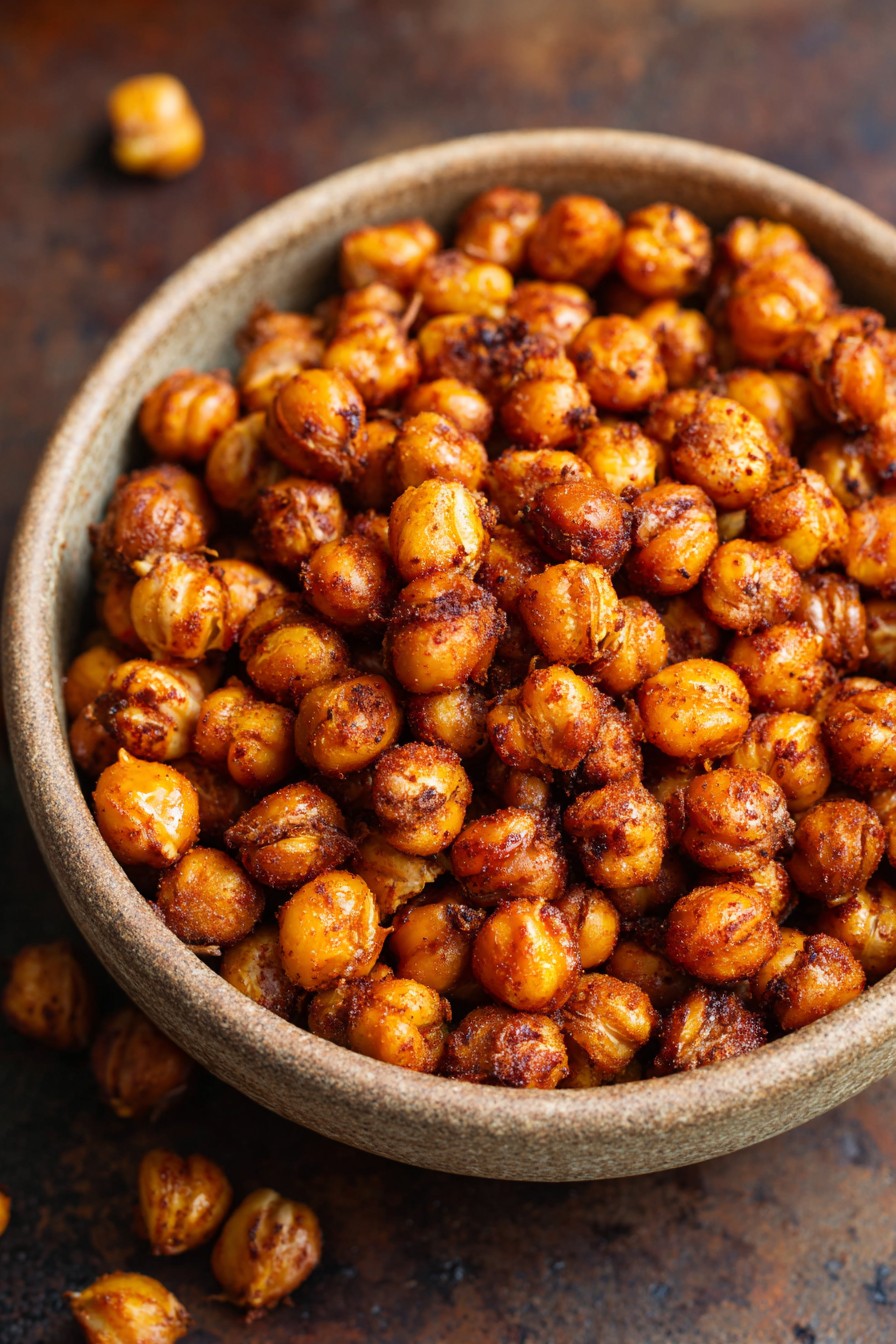
Craving that perfect crunchy snack that won’t sabotage your health goals? Chickpeas transform into golden, crispy perfection in your oven, creating a snack so addictive you’ll forget potato chips ever existed. This magical transformation from humble legumes to flavor-packed crunch bombs will revolutionize your snack game forever.
Why This Recipe Works
- The secret lies in the double-drying technique that ensures every single chickpea achieves maximum crispiness without any sogginess, creating that satisfying crunch you crave in every single bite
- Our carefully calibrated temperature and timing create the perfect environment for chickpeas to transform from soft legumes into crispy, golden nuggets of pure snacking bliss that will make your taste buds dance with joy
- The customizable spice blend approach means you can create endless flavor variations, from smoky barbecue to zesty lemon pepper, ensuring you never get bored with this healthy snack alternative
- Unlike store-bought versions, you control the oil and salt content, making this the ultimate guilt-free snack that satisfies your crunch cravings while nourishing your body with plant-based protein and fiber
- The dramatic texture transformation creates snack magic that will have your family and friends begging for your secret recipe and wondering how simple chickpeas became so incredibly irresistible
Ingredients
- 2 (15-ounce) cans chickpeas, thoroughly drained and patted completely dry with paper towels
- 2 tablespoons extra virgin olive oil, the good stuff that brings out incredible flavor
- 1 teaspoon garlic powder for that savory kick you can’t resist
- 1 teaspoon smoked paprika that creates magical smoky undertones
- ½ teaspoon cumin that adds warm, earthy complexity to every bite
- ¾ teaspoon sea salt, the perfect amount to make those flavors pop
- ¼ teaspoon black pepper, freshly ground for maximum aromatic impact
- Optional: ¼ teaspoon cayenne pepper for those who dare to add some fiery excitement
Equipment Needed
- Large rimmed baking sheet
- Parchment paper or silicone baking mat
- Large mixing bowl
- Paper towels
- Measuring spoons
- Oven mitts
- Cooling rack
Instructions
Prepare Your Chickpeas for Transformation
Begin by draining both cans of chickpeas into a colander, then give them a quick rinse under cold running water to remove any excess sodium from the canning liquid. This crucial step ensures your final product won’t be overly salty. Now comes the secret to ultimate crispiness: spread the rinsed chickpeas across a thick layer of paper towels and gently roll them around while applying light pressure. You’ll notice the thin skins starting to loosen and separate – this is exactly what you want! Take an extra minute to peel off as many of these translucent skins as possible, though don’t worry about getting every single one. The skins contain moisture that can prevent proper crisping, so removing them helps create that perfect crunchy texture. Transfer your prepared chickpeas to a clean, dry kitchen towel and pat them thoroughly until they feel completely dry to the touch. This double-drying technique is your golden ticket to snack perfection.
Create Your Flavor Explosion Coating
Arrange for Perfect Oven Roasting
Preheat your oven to a precise 400°F – this specific temperature creates the ideal environment for chickpeas to crisp up without burning. While the oven heats, line your large rimmed baking sheet with parchment paper or a silicone baking mat, which prevents sticking and makes cleanup incredibly easy. Now, pour your spice-coated chickpeas onto the prepared baking sheet and spread them into a single, even layer with plenty of space between each chickpea. This spacing is absolutely critical because overcrowding creates steam that will make your chickpeas soft rather than crispy. You want each chickpea to have its own personal space to roast properly. If your baking sheet seems too crowded, use two sheets rather than compromising on that essential air circulation. Arrange them so they’re not touching each other, almost like little individual soldiers ready for their transformation in the heat. This careful arrangement ensures hot air can circulate around every single chickpea for uniform cooking and maximum crispiness.
The Roasting Process That Creates Magic
Place your perfectly arranged baking sheet on the center rack of your preheated 400°F oven and set your timer for 20 minutes. At the 20-minute mark, you’ll remove the baking sheet and give the chickpeas a good shake or stir them with a spatula. This redistribution ensures even browning and prevents any spots from burning. Return the baking sheet to the oven and continue roasting for another 15-20 minutes, but now you need to watch them like a hawk! During these final minutes, the chickpeas will transform from simply cooked to gloriously crispy. You’re looking for a deep golden brown color and you should hear a distinctive hollow sound when you shake the pan. The chickpeas will feel light and hard when properly done. If they still feel soft or look pale, give them another 5 minutes, but check every 2 minutes thereafter because they can go from perfect to burnt surprisingly quickly.
The Crucial Cooling That Locks In Perfection
Once your chickpeas have achieved that perfect golden brown color and satisfyingly crispy texture, remove them from the oven and immediately transfer them to a cooling rack. Do NOT leave them on the hot baking sheet, as the residual heat will continue cooking them and potentially burn your beautiful creation. Let them cool completely on the rack for at least 20-30 minutes – this waiting period is absolute torture but completely necessary. As they cool, you’ll actually hear them getting crisper, almost like tiny rice cereal snaps. This cooling process allows the starches to set properly and creates that final, satisfying crunch. Resist every urge to taste them while warm, as they won’t have reached their ultimate crispy potential. Once completely cooled, taste one and prepare to have your mind blown by the incredible texture and flavor you’ve created. Store any leftovers in an airtight container, though we doubt there will be any!
Tips and Tricks
For chickpeas that maintain their crunch for days, make sure they’re completely cooled before storing them in an airtight container with a small packet of silica gel or a few grains of uncooked rice to absorb any residual moisture. If you notice your chickpeas losing their crispness after storage, you can easily revive them by spreading them on a baking sheet and heating them in a 350°F oven for 5-7 minutes until they’re crispy again. When selecting chickpeas at the store, opt for low-sodium or no-salt-added varieties if possible, as this gives you complete control over the final saltiness of your snack. For an extra flavor boost, consider toasting your spices in a dry skillet for 1-2 minutes before mixing them with the oil – this simple step intensifies their aromatic qualities and creates deeper, more complex flavors. If you’re batch-cooking for meal prep, consider making multiple seasoning varieties by dividing your chickpeas and seasonings into separate bowls before roasting – this way you can have smoky, spicy, and herbaceous options all ready to go. For those who prefer oil-free versions, you can achieve decent results by using aquafaba (the liquid from the chickpea can) as a binding agent for the spices, though the texture will be slightly less crispy. When patting dry your chickpeas, don’t be afraid to really press down firmly with those paper towels – the more moisture you remove at this stage, the crispier your final product will be. If you’re using dried chickpeas instead of canned, make sure to soak them overnight and cook until tender before proceeding with the recipe, as raw dried chickpeas won’t roast properly. For ultimate convenience, you can mix the dry spices ahead of time and store them in a small jar, so when snack cravings hit, you’re just minutes away from roasted chickpea perfection. Always taste your spice mixture before adding it to the chickpeas and adjust according to your preferences – everyone’s salt and spice tolerance is different, so make it perfect for YOUR palate.
Recipe Variations
- For a sweet and spicy sensation that will blow your mind, replace the savory spices with 1 tablespoon of maple syrup, 1 teaspoon of cinnamon, ¼ teaspoon of nutmeg, and a pinch of cayenne pepper. The maple syrup creates a beautiful caramelized coating that hardens into the most incredible sweet crunch, while the cayenne provides a surprising heat that keeps you coming back for more. This variation is perfect for those who want to satisfy both sweet and savory cravings simultaneously.
- Transform your chickpeas into ranch-flavored heaven by using 2 tablespoons of dry ranch seasoning mix instead of the listed spices. The buttermilk powder in the ranch mix creates an incredible savory coating that tastes just like your favorite chip flavor but with all the health benefits of chickpeas. For extra herbaceous notes, add 1 teaspoon of dried dill and ½ teaspoon of onion powder to amplify that classic ranch flavor profile everyone loves.
- Create a sophisticated Parmesan garlic version by combining 3 tablespoons of nutritional yeast (for cheesy flavor), 1 tablespoon of garlic powder, 1 teaspoon of onion powder, and ½ teaspoon of Italian seasoning. The nutritional yeast mimics that savory, cheesy quality while keeping the recipe vegan-friendly. For non-vegans, you can sprinkle with 2 tablespoons of grated Parmesan during the last 5 minutes of roasting for an authentic cheesy crunch that will disappear within minutes.
- For a bold barbecue experience that rivals any potato chip, mix 1 tablespoon of brown sugar, 2 teaspoons of smoked paprika, 1 teaspoon of garlic powder, 1 teaspoon of onion powder, ½ teaspoon of chili powder, and ¼ teaspoon of cumin. The brown sugar caramelizes beautifully in the oven, creating that classic barbecue chip sweetness balanced by smoky, spicy undertones. This variation is guaranteed to satisfy even the most dedicated barbecue chip enthusiasts.
- Embrace Mediterranean flavors with a blend of 2 teaspoons of dried oregano, 1 teaspoon of lemon zest, 1 teaspoon of garlic powder, ½ teaspoon of sumac (if available), and ¼ teaspoon of black pepper. The lemon zest adds bright, fresh notes that cut through the richness of the olive oil, while the sumac provides tangy complexity that makes these chickpeas taste like they came straight from a Greek taverna.
Frequently Asked Questions
Why aren’t my roasted chickpeas getting crispy?
The most common reason for soggy chickpeas is insufficient drying before roasting. Moisture is the enemy of crispiness, so you must be absolutely thorough when patting them dry with paper towels. Another culprit could be overcrowding on the baking sheet – if the chickpeas are too close together, they steam rather than roast. Make sure they’re in a single layer with space between each one. Oven temperature accuracy matters tremendously – if your oven runs cool, the chickpeas might dry out without crisping properly. Consider using an oven thermometer to verify your temperature is actually 400°F. The roasting time might need adjustment based on your specific oven and chickpea size, so don’t be afraid to extend the cooking time in 5-minute increments if they’re not crispy enough.
Can I use dried chickpeas instead of canned?
Absolutely, but they require significant advance preparation. You’ll need to soak 1 cup of dried chickpeas in plenty of water for at least 8 hours or overnight, then drain and rinse them. Transfer the soaked chickpeas to a pot, cover with fresh water by several inches, and simmer for 45-60 minutes until tender but not mushy. Drain thoroughly and proceed with the drying and seasoning steps as directed. Using dried chickpeas gives you more control over texture and sodium content, but requires substantial planning ahead. The cooking liquid from dried chickpeas (not canned) can be used as aquafaba in other recipes, making this approach more versatile if you enjoy plant-based cooking.
How long do roasted chickpeas stay fresh?
Properly stored in an airtight container at room temperature, your roasted chickpeas will maintain their optimal crispiness for about 3-4 days. The key is ensuring they’re completely cooled before storing and including a moisture-absorbing agent like a few grains of rice or a silica packet. If they start to lose their crunch, you can easily refresh them by spreading on a baking sheet and heating in a 350°F oven for 5-7 minutes. For longer storage, you can freeze them in a single layer on a baking sheet before transferring to a freezer bag, where they’ll keep for up to 2 months. However, the texture may be slightly compromised after freezing and thawing.
Are roasted chickpeas actually healthy?
Roasted chickpeas are nutritional powerhouses that provide substantial health benefits when prepared properly. They’re packed with plant-based protein (about 7 grams per 1/2 cup serving), dietary fiber that supports digestive health, and essential minerals like iron, magnesium, and zinc. The roasting process preserves most nutrients while creating that satisfying crunch we crave. Compared to traditional snack foods like potato chips, roasted chickpeas offer significantly more protein and fiber with less fat and calories. However, the health factor depends on your preparation – using minimal oil and watching sodium content keeps them truly healthy. They have a relatively low glycemic index, making them suitable for blood sugar management, and the fiber content promotes satiety, helping with weight management.
Can I make these in an air fryer instead?
Air fryers create fantastic roasted chickpeas with even faster results! Prepare your chickpeas exactly as directed with the drying and seasoning steps, then transfer them to your air fryer basket in a single layer. Cook at 380°F for 12-15 minutes, shaking the basket every 5 minutes to ensure even cooking. The circulating hot air in air fryers creates exceptionally crispy results, often with slightly less oil needed. However, you must watch them carefully during the last few minutes as they can burn quickly in the intense air fryer environment. The cooking time may vary based on your specific air fryer model and the quantity of chickpeas, so check frequently after the 10-minute mark. Many people prefer air fryer chickpeas because they often achieve superior crispiness in less time.
Summary
Transform simple chickpeas into irresistibly crispy, flavor-packed snacks using our proven roasting technique. This healthy alternative to processed snacks delivers satisfying crunch with customizable seasonings that will become your new addiction. Perfect for meal prep, parties, or everyday munching, these golden gems prove healthy eating can be absolutely delicious.
Crispy Roasted Chickpeas
4
servings10
minutes35
minutesIngredients
Instructions
- 1 Preheat oven to 400°F and line a baking sheet with parchment paper
- 2 Drain, rinse, and thoroughly dry chickpeas with paper towels, removing loose skins
- 3 In a large bowl, mix oil and all spices until well combined
- 4 Toss chickpeas in spice mixture until evenly coated
- 5 Spread in a single layer on prepared baking sheet
- 6 Roast for 20 minutes, shake pan, then roast 15-20 more minutes until golden and crispy
- 7 Cool completely on a wire rack before serving