Oh, there’s something truly magical about this ricotta cake that takes me right back to my grandmother’s farmhouse kitchen. The way the sunlight would stream through her checkered curtains while this beauty baked in the old cast-iron oven created memories that still warm my heart decades later. This isn’t just any cake—it’s a legacy of love, perfected through generations of Sunday gatherings and holiday celebrations.
Why This Recipe Works
- The combination of whole milk ricotta and cream cheese creates an incredibly moist, tender crumb that simply melts in your mouth, reminiscent of the rich dairy from our family’s farm cows.
- Using both vanilla extract and fresh lemon zest provides a beautiful balance of warm, comforting flavors with just the right touch of bright citrus that cuts through the richness perfectly.
- The slow, gentle baking process allows the cake to develop that gorgeous golden-brown crust while maintaining a cloud-like texture inside that feels like a warm hug from generations past.
- Simple pantry ingredients come together in a way that feels both elegant and humble, creating a dessert that’s equally at home on a holiday table or a casual Tuesday afternoon.
- The cake improves with time, developing deeper flavors as it rests, making it perfect for making ahead when you know company’s coming down the old country road.
Ingredients
- 2 cups whole milk ricotta cheese, drained overnight
- 8 ounces full-fat cream cheese, softened at room temperature
- 1 ½ cups granulated sugar
- 4 large eggs, at room temperature
- 1 cup all-purpose flour, spooned and leveled
- ½ cup unsalted butter, melted and cooled slightly
- 2 teaspoons pure vanilla extract
- 1 tablespoon fresh lemon zest (from about 2 medium lemons)
- 2 teaspoons baking powder
- ½ teaspoon fine sea salt
- Powdered sugar for dusting (optional)
Equipment Needed
- 9-inch springform pan
- Stand mixer or electric hand mixer
- Large mixing bowls
- Fine-mesh sieve
- Rubber spatula
- Measuring cups and spoons
- Microplane or zester
- Wire cooling rack
- Parchment paper
Instructions

Preparing Your Pan and Ingredients
Before we begin mixing, let’s set ourselves up for success by preparing our baking vessel and ensuring our ingredients are perfectly ready. Take your 9-inch springform pan and generously butter the bottom and sides, then line the bottom with a round of parchment paper cut to fit snugly. This extra step ensures your beautiful cake will release cleanly without sticking, preserving that gorgeous golden crust. Now, make sure your ricotta has been draining in a fine-mesh sieve over a bowl in the refrigerator overnight—this removes excess moisture and gives us that dense, creamy texture we’re after. Your cream cheese and eggs should be sitting comfortably at room temperature for about an hour, which helps everything incorporate smoothly without overmixing. There’s something wonderfully therapeutic about these preparatory steps, much like how Grandma would hum old hymns while getting her baking station ready for the day’s work.
Combining the Wet Ingredients
Now we’ll create the heart of our cake—the rich, creamy base that gives this dessert its signature texture. In the bowl of your stand mixer fitted with the paddle attachment, combine the drained ricotta and softened cream cheese, beating them together on medium speed for about 2-3 minutes until perfectly smooth and no lumps remain. Gradually add the granulated sugar while the mixer runs, continuing to beat for another 3-4 minutes until the mixture becomes noticeably lighter in color and fluffy in texture. Add the eggs one at a time, making sure each egg is fully incorporated before adding the next, and scraping down the sides of the bowl with a rubber spatula between additions. Finally, mix in the melted butter, vanilla extract, and fresh lemon zest until everything is beautifully combined. The aroma of lemon and vanilla already filling your kitchen will transport you straight to those cherished childhood memories of baking days gone by.
Incorporating the Dry Ingredients
It’s time to gently bring our dry and wet ingredients together with the care and attention they deserve. In a separate medium bowl, whisk together the all-purpose flour, baking powder, and sea salt until they’re thoroughly combined and aerated—this ensures our leavening agents distribute evenly throughout the batter. With your mixer on the lowest speed, gradually add the dry ingredients to the wet mixture in three additions, mixing only until the flour disappears after each addition. Be careful not to overmix at this stage, as we want to maintain that tender texture we’re working so hard to achieve. Use a rubber spatula to give the batter one final fold, making sure to incorporate any stubborn bits at the bottom of the bowl. The batter should be thick but pourable, with a beautiful pale yellow hue from the lemon zest and a heavenly aroma that promises wonderful things to come.
Baking to Perfection
Now we’ll bake our creation with the patience and care that good things deserve. Pour the completed batter into your prepared springform pan and use an offset spatula to smooth the top into an even layer. Place the pan in the center rack of your preheated 325°F oven and bake for 60-75 minutes. You’ll know it’s done when the edges are deeply golden brown and pulling away slightly from the sides of the pan, and a toothpick inserted into the center comes out clean or with just a few moist crumbs attached. The top should spring back lightly when touched, and the most wonderful aroma will have filled your entire home. Remember that baking times can vary depending on your oven and climate, so trust your senses—they’re often more reliable than any timer.
Cooling and Serving
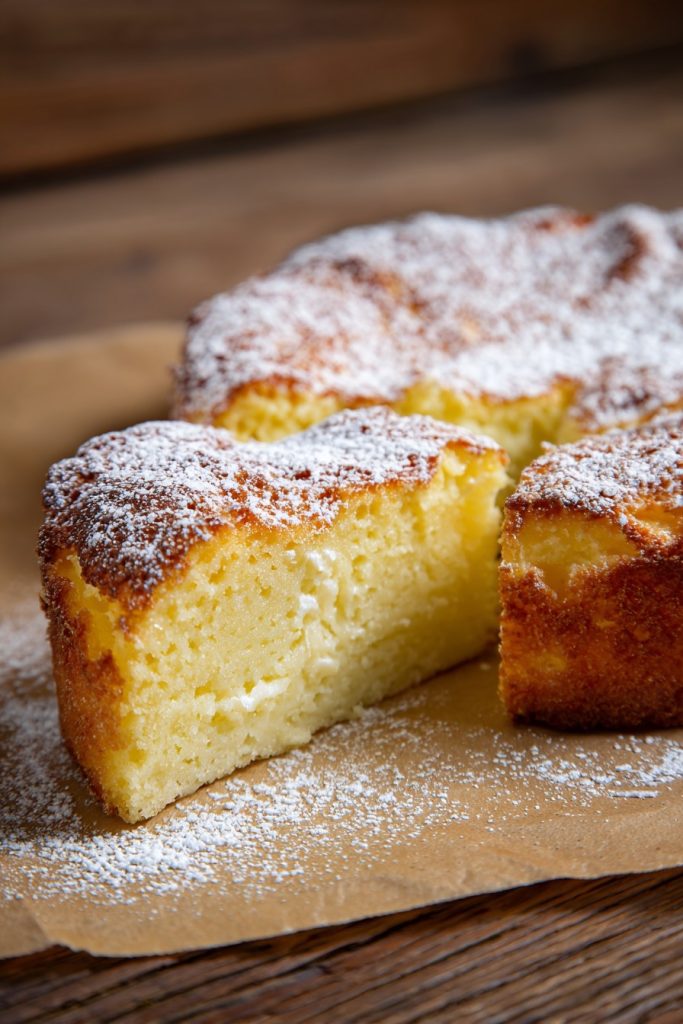
The final, most crucial step requires the patience our grandmothers always preached about. Remove the cake from the oven and place the entire springform pan on a wire cooling rack, allowing it to cool completely in the pan for at least 2 hours—this gradual cooling prevents the cake from collapsing or cracking. Once completely cool, carefully run a thin knife around the edge of the cake to loosen it from the pan sides before releasing the springform mechanism. If you’re feeling fancy, you can dust the top with a light snowfall of powdered sugar just before serving. This cake actually improves in flavor and texture if allowed to rest overnight, wrapped tightly and stored at room temperature. Serve it in generous slices, perhaps with a dollop of freshly whipped cream or some seasonal berries, and watch as it becomes an instant family favorite, just as it has been in our family for generations.
Tips and Tricks
If you want to take your ricotta cake from wonderful to absolutely extraordinary, here are some time-tested tips gathered from years of family baking. First, consider sourcing your ricotta from a local Italian market or making your own—the difference in texture and flavor compared to mass-produced varieties is truly remarkable. Homemade ricotta has a cleaner, fresher taste and creamier consistency that elevates the entire cake. When zesting your lemons, be sure to only remove the bright yellow outer layer, avoiding the bitter white pith beneath—this ensures you get all the beautiful citrus oil without any unpleasant bitterness. If you don’t have a microplane, the fine side of a box grater works beautifully, just work over a piece of parchment paper to catch every precious bit of zest.
For those living in humid climates, you might find your cake takes slightly longer to bake, so don’t be alarmed if you need to add an extra 5-10 minutes to the baking time. The key is watching for those visual cues rather than relying solely on the timer. If you notice the top browning too quickly while the center still needs more time, simply tent the cake loosely with aluminum foil to prevent over-browning. When testing for doneness, use a thin wooden skewer rather than a toothpick—it gives you a better sense of the cake’s texture throughout. The skewer should come out clean, but if you see a few moist crumbs clinging to it, that’s actually perfect as the residual heat will continue cooking the cake slightly as it cools.
Storage is another area where a little knowledge goes a long way. This cake keeps beautifully at room temperature, tightly wrapped, for up to 3 days, and actually develops more complex flavors as it rests. For longer storage, you can freeze individual slices wrapped in plastic wrap and then aluminum foil for up to 3 months—just thaw overnight in the refrigerator and bring to room temperature before serving. If you’re serving this for a special occasion, consider making it two days ahead—the flavor and texture will be at their absolute peak. And don’t discard any leftovers—stale ricotta cake makes incredible French toast or bread pudding, continuing the tradition of waste-not-want-not that our grandmothers lived by.
Recipe Variations
- For a delightful citrus twist, replace the lemon zest with orange zest and add 1/4 cup of fresh orange juice to the batter, reducing the vanilla extract to 1 teaspoon. The resulting cake has a brighter, sunnier flavor profile that’s perfect for spring gatherings or bridal showers. You could even add a tablespoon of Grand Marnier or Cointreau to the batter for an elegant adult variation that would make any occasion feel special.
- Chocolate lovers can transform this into a marbled masterpiece by dividing the batter in half and folding 1/4 cup of sifted cocoa powder and an additional 2 tablespoons of sugar into one portion. Alternate spoonfuls of plain and chocolate batter in the pan, then use a knife to gently swirl them together before baking. The contrast between the creamy ricotta base and rich chocolate creates a stunning visual effect and satisfies multiple dessert preferences in one beautiful cake.
- Create a seasonal fruit variation by arranging 2 cups of sliced seasonal fruit—such as peaches in summer, pears in autumn, or apples in winter—over the bottom of your prepared pan before pouring in the batter. The fruit caramelizes beautifully during baking and creates a natural sauce at the bottom that becomes the top when you invert the cooled cake. Serve this version warm with a scoop of vanilla ice cream for the ultimate comfort dessert that celebrates whatever bounty nature provides.
- For a sophisticated nutty variation, toast 1 cup of chopped almonds or pistachios until fragrant and golden, then fold them into the batter along with 1/2 teaspoon of almond extract to complement the vanilla. The nuts add wonderful texture and depth of flavor, creating a cake that’s substantial enough to serve as a coffee cake for morning gatherings or an elegant dessert for dinner parties. The toasting step is crucial—it releases the oils and intensifies the nutty flavor dramatically.
Frequently Asked Questions
Can I use low-fat ricotta and cream cheese in this recipe?
While you technically can substitute low-fat versions, I strongly recommend sticking with full-fat dairy for this particular recipe. The higher fat content in whole milk ricotta and full-fat cream cheese contributes significantly to the cake’s moist, tender texture and rich flavor that makes it so special. Low-fat alternatives often contain more water and stabilizers, which can result in a drier, less flavorful cake with a compromised texture. If dietary concerns are important, you might consider simply enjoying a smaller portion of the real deal rather than compromising on quality—this cake is meant to be a occasional treat made with the best ingredients available, much like our grandmothers would have prepared it for special occasions.
Why did my cake crack on top during baking?
A slight crack on top is actually quite common with ricotta cakes and is often considered part of their rustic charm, much like the beautiful imperfections in handmade pottery. However, if you’re experiencing significant cracking, it’s usually due to the oven temperature being too high, causing the cake to rise too quickly before the structure has set properly. Make sure your oven is properly calibrated—many home ovens run hot, so using an oven thermometer can help ensure accuracy. Also, avoid opening the oven door during the first 45 minutes of baking, as the sudden temperature change can cause the cake to fall and then crack as it continues baking. Remember, a perfect cake doesn’t necessarily mean a flawless one—sometimes those little imperfections tell the best stories.
Can I make this recipe gluten-free?
Absolutely! This cake adapts beautifully to gluten-free needs while maintaining its wonderful texture. Simply replace the all-purpose flour with an equal amount of a high-quality gluten-free flour blend that contains xanthan gum. I’ve had particular success with blends that include rice flour, tapioca starch, and potato starch. The ricotta and cream cheese provide enough structure that you likely won’t notice much difference in the final product. You might need to bake the cake for 5-10 minutes longer, as gluten-free flours often absorb moisture differently. Test for doneness using the same visual and tactile cues, and let it cool completely before slicing to allow the structure to set properly. This adaptation means everyone can enjoy this family treasure, regardless of dietary restrictions.
How do I know when the cake is perfectly baked?
Determining the perfect bake requires engaging all your senses, much like our grandmothers did before digital thermometers became commonplace. Visually, the edges should be golden brown and pulling away slightly from the sides of the pan, while the center should be set but still have a slight jiggle when you gently shake the pan. The top should be evenly colored and spring back lightly when touched. For the most reliable test, insert a thin wooden skewer into the center—it should come out clean or with a few moist crumbs clinging to it, but no wet batter. The cake will also emit a wonderfully fragrant aroma that fills your kitchen when it’s nearly done. Remember that residual heat will continue cooking the cake slightly as it cools, so it’s better to slightly underbake than overbake.
Can I prepare this cake in advance for a special occasion?
This cake actually improves when made ahead, making it perfect for stress-free entertaining. The flavors meld and deepen beautifully overnight, and the texture becomes even more moist and tender. You can bake it up to two days in advance—just let it cool completely, then wrap it tightly in plastic wrap and store at room temperature. For longer storage, you can freeze the completely cooled cake for up to three months. If serving for a special event, I recommend baking it the day before, then adding the powdered sugar dusting just before serving to ensure it looks fresh and beautiful. This make-ahead quality is part of what made this recipe such a family favorite—Grandma could bake it on Saturday for Sunday visitors without any last-minute fuss.
Summary
This rustic ricotta cake embodies generations of family tradition, combining simple ingredients into something truly extraordinary. With its moist, tender crumb and balanced flavors, it serves as both comfort food and celebration dessert, creating new memories while honoring old ones with every slice shared around the table.
Grandma's Rustic Ricotta Cake
6
servings25
minutes70
minutesIngredients
Instructions
- 1 Preheat oven to 325°F. Generously butter a 9-inch springform pan and line the bottom with parchment paper.
- 2 In a stand mixer, beat ricotta and cream cheese until smooth. Gradually add sugar and beat until fluffy.
- 3 Add eggs one at a time, mixing well after each addition. Mix in melted butter, vanilla, and lemon zest.
- 4 In separate bowl, whisk flour, baking powder, and salt. Gradually mix into wet ingredients until just combined.
- 5 Pour batter into prepared pan and bake 60-75 minutes until golden and set in center.
- 6 Cool completely in pan on wire rack before removing. Dust with powdered sugar before serving if desired.