Spooky season is here, and what better way to celebrate than with some frightfully fun treats? We’ve rounded up 30 creative Rice Krispie Halloween ideas that are perfect for parties, school events, or just some festive family fun. From creepy crawlies to ghoulish delights, these easy recipes will bring some sweet magic to your Halloween celebrations. Get ready to be inspired!
Spooky Ghost Rice Krispie Treats

Frightfully fun and fabulously simple, these Spooky Ghost Rice Krispie Treats are the perfect way to haunt your Halloween party with deliciousness. They’re so easy, even a ghost could make them (if ghosts had opposable thumbs, that is). Get ready to spook your taste buds with these marshmallow-y delights!
12
portions15
minutes10
minutesIngredients
– 6 cups of crispy rice cereal (the ghostly foundation)
– A 10-ounce bag of marshmallows (the sticky white stuff)
– 3 tablespoons of butter (for that rich ghostly glow)
– A pinch of salt (just to keep things interesting)
– A splash of vanilla extract (the secret ghost whisperer)
– Some chocolate chips for the eyes (because ghosts need to see where they’re floating)
Instructions
1. Grease a 9×13 inch baking pan with butter or cooking spray to prevent ghostly sticking.
2. Melt 3 tablespoons of butter in a large pot over medium-low heat, swirling occasionally until completely liquid.
3. Tip: Use a heavy-bottomed pot to prevent scorching – burnt marshmallows are scarier than any ghost!
4. Add the entire 10-ounce bag of marshmallows to the melted butter and stir constantly with a wooden spoon.
5. Continue stirring until the marshmallows are completely melted and smooth, about 3-4 minutes.
6. Remove the pot from heat and immediately stir in a pinch of salt and a splash of vanilla extract.
7. Tip: Working quickly while the mixture is warm ensures everything combines evenly.
8. Pour in 6 cups of crispy rice cereal and gently fold until every piece is coated in marshmallow.
9. Transfer the mixture to your prepared pan and press evenly with buttered hands or a greased spatula.
10. Tip: Lightly grease your hands to prevent sticking – nobody wants ghost hands!
11. Let the treats cool completely at room temperature for at least 1 hour until firm.
12. Cut into ghost shapes using a ghost-shaped cookie cutter or carefully with a knife.
13. Melt chocolate chips in the microwave in 30-second intervals, stirring between each.
14. Use the melted chocolate to pipe two small eyes onto each ghost treat.
15. Allow the chocolate eyes to set completely before serving, about 15 minutes.
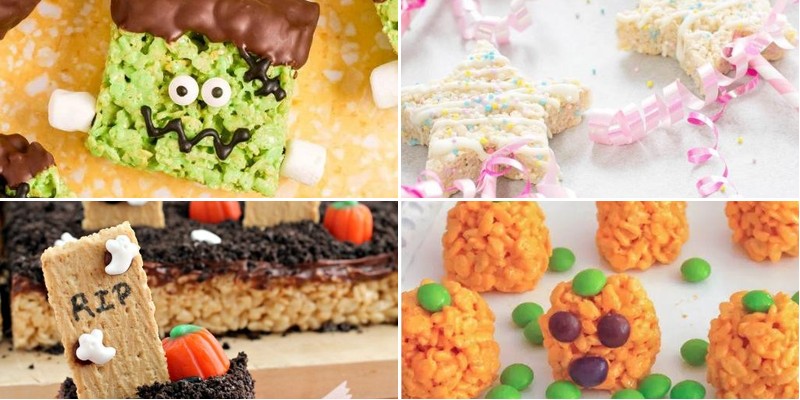
How delightfully spooky these turned out! The crispy texture gives way to that classic chewy marshmallow goodness, while the chocolate eyes add just enough sweetness to balance the ghostly white treats. Try serving them peeking out from behind graveyard-themed decorations or floating on a plate of crushed Oreo “dirt” for maximum Halloween effect.
Witch’s Brew Cauldron Krispie Bites

Gather ’round, cauldron enthusiasts! These Witch’s Brew Cauldron Krispie Bites are the perfect potion for anyone who wants their treats to cast a delicious spell. They’re ridiculously easy to whip up and guaranteed to vanish faster than a ghost in a haunted house.
24
bites15
minutes10
minutesIngredients
– 6 cups of crispy rice cereal
– A 10-ounce bag of marshmallows
– 3 tablespoons of butter
– A couple of drops of green food coloring
– A splash of vanilla extract
– A pinch of salt
Instructions
1. Melt 3 tablespoons of butter in a large pot over low heat.
2. Add the entire 10-ounce bag of marshmallows and stir continuously until completely melted and smooth.
3. Stir in a couple of drops of green food coloring until the mixture is evenly tinted like a magical potion.
4. Remove the pot from heat and immediately stir in a splash of vanilla extract and a pinch of salt.
5. Quickly add 6 cups of crispy rice cereal and fold until every piece is coated in the marshmallow mixture.
6. Lightly grease your hands with butter or cooking spray to prevent sticking.
7. Press the mixture firmly into a greased 9×13-inch baking dish using your hands or a greased spatula.
8. Let the mixture cool completely at room temperature for about 1 hour until firm to the touch.
9. Cut into 1-inch squares using a sharp knife wiped clean between cuts for neat edges.
Keep these bites bewitchingly chewy by pressing the mixture firmly into the pan—don’t be shy! Knife trick: Wipe the blade between cuts for cauldron-worthy clean edges. Storage secret: Layer them between parchment paper in an airtight container to prevent magical stickiness. Known for their perfect crackle and marshmallow sweetness, these emerald delights disappear faster than a spell at midnight. Try stacking them into a mini cauldron centerpiece or tucking them into Halloween treat bags for maximum magical impact.
Pumpkin Patch Rice Krispie Bars

Brace yourselves, fall fanatics—we’re about to turn your favorite childhood treat into a pumpkin-spiced masterpiece that’ll have you skipping the pumpkin patch and heading straight to the kitchen. These bars are so delightfully autumnal, you’ll want to cozy up with a slice and a blanket, no hayride required. They’re the perfect mash-up of nostalgia and seasonal flair, guaranteed to make your taste buds do a happy dance.
12
bars15
minutes10
minutesIngredients
– 6 cups of crispy rice cereal (the star of the show!)
– A 10-ounce bag of marshmallows (go for the mini ones—they melt like a dream)
– 3 tablespoons of unsalted butter (because everything’s better with butter)
– A generous ½ cup of pumpkin puree (not pie filling—let’s keep it pure!)
– A cozy 1 teaspoon of pumpkin pie spice (for that warm, hug-in-a-bite feeling)
– A pinch of salt (to balance the sweetness)
– A splash of vanilla extract (because vanilla makes everything fancy)
Instructions
1. Grease a 9×13-inch baking dish with butter or cooking spray to prevent sticking—trust me, you don’t want to wrestle these bars out later.
2. Melt the 3 tablespoons of unsalted butter in a large pot over medium heat, swirling occasionally until it’s fully liquid and slightly bubbly.
3. Tip: Use a heavy-bottomed pot to avoid scorching the marshmallows—no one likes a burnt sugar situation.
4. Add the entire 10-ounce bag of marshmallows to the melted butter, stirring constantly with a spatula until they’re completely smooth and gooey, about 3–4 minutes.
5. Stir in the ½ cup of pumpkin puree, 1 teaspoon of pumpkin pie spice, pinch of salt, and splash of vanilla extract until everything is well combined and fragrant.
6. Remove the pot from the heat immediately to avoid overcooking the mixture.
7. Tip: Work quickly here—the marshmallow mix sets fast, so have your cereal ready to go!
8. Pour the 6 cups of crispy rice cereal into the pot and fold gently until every piece is coated in the pumpkin-marshmallow goodness.
9. Transfer the mixture to the prepared baking dish, pressing it down evenly with a spatula or your hands (lightly greased to prevent sticking).
10. Tip: Press firmly but gently for bars that hold their shape without becoming too dense.
11. Let the bars cool at room temperature for at least 1 hour, or until they’re firm to the touch and no longer sticky.
12. Slice into squares using a sharp knife, wiping it clean between cuts for neat edges.
Oh, the joy of biting into these—they’re chewy with a subtle crunch, and the pumpkin spice weaves through like a cozy scarf on a crisp day. Serve them stacked high on a platter with a dusting of cinnamon, or crumble over vanilla ice cream for an instant dessert upgrade that screams autumn elegance.
Monster Eye Ball Krispie Pops
Look, we’ve all been there—staring into the pantry abyss, willing something spook-tacular to materialize for Halloween. These Monster Eye Ball Krispie Pops are your edible answer, turning classic rice cereal treats into gloriously ghoulish eyeballs that stare back before you devour them.
12
pops30
minutes10
minutesIngredients
- A half stick of butter (that’s 4 tablespoons, for the precise pals)
- A 10-ounce bag of marshmallows (the regular, puffy kind)
- 6 cups of crispy rice cereal
- A couple of drops of green food coloring
- A bag of white candy melts
- A handful of red candy-coated chocolates (like M&Ms)
- A small tube of black decorating gel
- 12 lollipop sticks
Instructions
- Line a 9×13-inch baking pan with parchment paper and lightly grease it with butter or non-stick spray.
- Melt 4 tablespoons of butter in a large pot over medium-low heat, swirling occasionally until fully liquid and just starting to bubble.
- Tip: Use a heavy-bottomed pot to prevent scorching the marshmallows later.
- Pour in the entire 10-ounce bag of marshmallows and stir continuously with a rubber spatula until completely melted and smooth, about 4-5 minutes.
- Remove the pot from the heat and quickly stir in 2-3 drops of green food coloring until the mixture is evenly tinted a creepy shade.
- Immediately add all 6 cups of crispy rice cereal and fold gently until every piece is coated in the green marshmallow goo.
- Transfer the cereal mixture to the prepared pan and press it into an even layer using lightly greased hands or a sheet of parchment.
- Let the pan cool at room temperature for 30 minutes until firm enough to handle.
- Use a 2-inch round cookie cutter to cut out 12 circles from the cooled cereal slab.
- Tip: Dip the cutter in warm water between cuts to prevent sticking and get cleaner edges.
- Gently insert a lollipop stick halfway into each cereal round.
- Melt the white candy melts according to package directions, usually in 30-second intervals in the microwave, stirring until smooth.
- Dip each cereal pop fully into the melted candy, twisting to coat evenly, and let excess drip off.
- Stand the pops upright in a styrofoam block or cup to set for 15 minutes.
- Place one red candy-coated chocolate in the center of each pop as the “iris.”
- Tip: Press gently so it adheres to the candy coating without cracking it.
- Use the black decorating gel to draw a pupil in the center of each red candy and add squiggly red veins radiating outward.
- Allow the pops to set completely at room temperature for another 20 minutes before serving.
And just like that, you’ve created a squad of edible eyeballs. The crisp cereal center gives a satisfying crunch against the smooth candy shell, while the marshmallow sweetness is perfectly balanced by that faint buttery richness. Arrange them peeking out of a bowl of “brain” spaghetti or propped in a vase for a centerpiece that’s almost too creepy to eat—almost.
Haunted House Krispie Squares
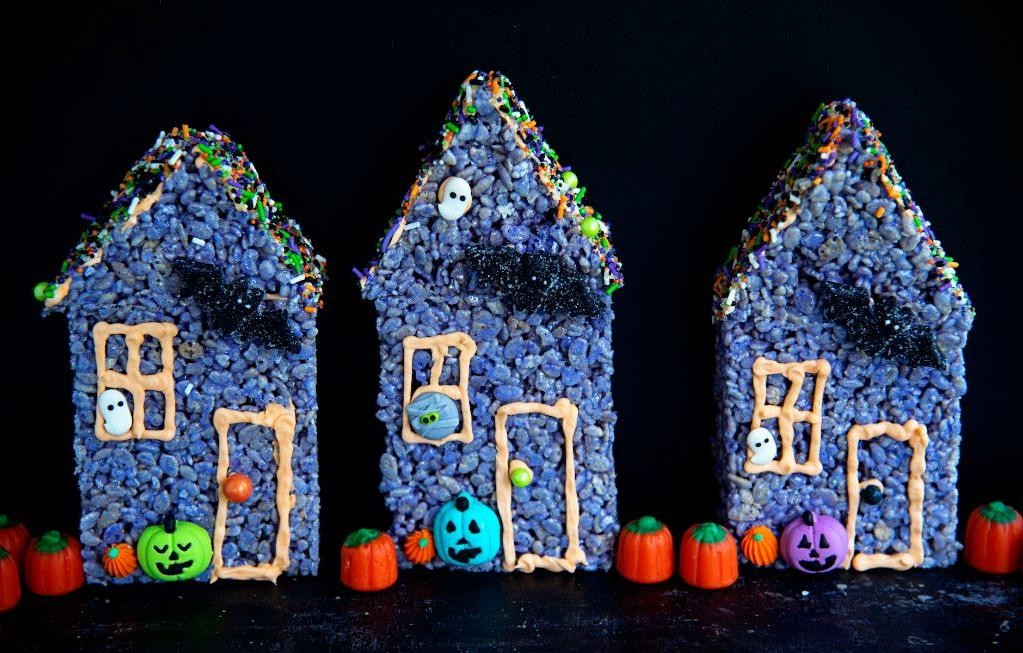
Very few treats capture the spooky season spirit quite like these haunted house krispie squares—they’re the perfect blend of childhood nostalgia and grown-up Halloween mischief, guaranteed to disappear faster than a ghost in your living room. With just a handful of pantry staples and a dash of creativity, you’ll have a batch of these delightfully eerie treats ready to haunt your dessert table in no time. Consider this your official invitation to embrace the crispy, chocolatey chaos that awaits!
16
squares15
minutes10
minutesIngredients
– 6 cups of crispy rice cereal (the kind that goes snap, crackle, pop!)
– A 10-ounce bag of marshmallows (the fluffy white ones, not the peeps)
– 3 tablespoons of unsalted butter (because everything’s better with butter)
– A generous pinch of salt (to balance all that sweetness)
– 1 cup of semi-sweet chocolate chips (for that haunted house roof)
– A couple of candy eyes (the googly kind that stare into your soul)
Instructions
1. Line an 8×8-inch baking pan with parchment paper, letting the edges hang over for easy removal later.
2. Melt the 3 tablespoons of unsalted butter in a large pot over medium-low heat, swirling occasionally until completely liquid and bubbly.
3. Tip: Use a pot that’s bigger than you think you need—this gives you room to stir without cereal flying everywhere.
4. Add the entire 10-ounce bag of marshmallows and the generous pinch of salt to the melted butter, stirring constantly with a silicone spatula until the marshmallows are completely melted and smooth, about 4-5 minutes.
5. Remove the pot from the heat immediately once the marshmallows are melted to prevent scorching.
6. Quickly fold in the 6 cups of crispy rice cereal until every piece is evenly coated in the marshmallow mixture.
7. Tip: Work fast here—the marshmallow mixture starts to set quickly, and you want everything well combined before it stiffens up.
8. Transfer the cereal mixture to your prepared pan, pressing it into an even layer with lightly buttered hands or a piece of parchment paper.
9. Let the squares cool at room temperature for exactly 30 minutes until firm to the touch.
10. Melt the 1 cup of semi-sweet chocolate chips in a microwave-safe bowl in 30-second intervals, stirring between each, until smooth and drippy.
11. Drizzle the melted chocolate over the cooled squares in zigzag lines to create a “haunted house roof” effect.
12. Immediately press the candy eyes onto the chocolate drizzle before it sets to create spooky faces.
13. Tip: If your chocolate starts to thicken, pop it back in the microwave for 10 seconds to keep it drizzle-ready.
14. Allow the chocolate to set completely, about 20 minutes at room temperature, before cutting into squares.
15. Use a sharp knife to cut into 16 squares, wiping the blade clean between cuts for neat edges.
Oh, the glorious crunch! These squares deliver that perfect crispy-chewy texture with pockets of melted chocolate that make each bite dangerously addictive. Serve them stacked like a miniature haunted neighborhood or tucked into lunchboxes for a mid-day fright—either way, they’re bound to become your new Halloween tradition.
Mummy-Wrapped Rice Krispie Sticks

Ugh, have you ever stared at your pantry and thought, “I could make something spooktacular if only I had the energy for complicated baking?” Well, ghost your worries, because these Mummy-Wrapped Rice Krispie Sticks are the easiest, most adorable Halloween treat that will have everyone screaming for seconds. They’re so simple, even a zombie could make them after a long night of haunting.
12
sticks30
minutes5
minutesIngredients
– A whole box of crispy rice cereal
– A big ol’ bag of mini marshmallows (about 10 ounces)
– A generous 3 tablespoons of unsalted butter
– A couple of cups of white melting chocolate wafers
– A splash of vegetable oil
– A handful of candy eyeballs for that spooky stare
Instructions
1. Line a 9×13-inch baking pan with parchment paper and give it a light spritz of cooking spray.
2. Melt the 3 tablespoons of unsalted butter in a large pot over low heat.
3. Tip: Use low heat to prevent the marshmallows from scorching and turning your treats into little ghosts of failures past.
4. Pour in the entire 10-ounce bag of mini marshmallows and stir constantly until they’re completely melted and smooth.
5. Remove the pot from the heat and immediately add the whole box of crispy rice cereal, stirring until every piece is thoroughly coated in the marshmallow mixture.
6. Firmly press the cereal mixture into your prepared pan in an even layer, using a piece of parchment paper to press down so it doesn’t stick to your hands.
7. Let the pan sit at room temperature for at least 1 hour, or until the treats are completely cool and firm to the touch.
8. Lift the entire slab out of the pan using the parchment paper and cut it into 12 rectangular sticks, each about 1-inch wide.
9. Tip: For clean cuts, wipe your knife with a damp cloth between slices to prevent sticky drag.
10. Melt the 2 cups of white chocolate wafers with 1 teaspoon of vegetable oil in a microwave-safe bowl, heating in 30-second intervals and stirring until smooth.
11. Dip the top half of each cereal stick into the melted white chocolate, letting the excess drip back into the bowl.
12. Place the dipped sticks on a fresh parchment-lined baking sheet.
13. While the chocolate is still wet, use a toothpick to drag thin, wavy lines of chocolate across the stick to create the mummy’s bandage effect, leaving a small gap near the top for the eyes.
14. Immediately press 2 candy eyeballs into the exposed gap on each stick before the chocolate sets.
15. Tip: Work on one stick at a time for the bandages, as the chocolate sets quickly and you want those wrappings to look authentically unraveled.
16. Let the finished mummy sticks set at room temperature for about 30 minutes, or until the chocolate is completely firm. Vividly fun and fabulously creepy, these treats deliver that classic crispy crunch wrapped in a sweet, vanilla-kissed chocolate shell. The candy eyes add a playful gawk that’s perfect for peeking out from a Halloween party platter, or simply stack them like little edible lumber for a seriously spooky snack attack.
Jack-o’-Lantern Krispie Faces

Spooky season has officially arrived, and what better way to celebrate than with edible jack-o’-lanterns that won’t leave your hands sticky with pumpkin guts? Seriously, these crispy, grinning faces are the perfect blend of adorable and delicious, guaranteed to vanish faster than a ghost in your haunted hallway.
12
portions15
minutes10
minutesIngredients
– 6 cups of crispy rice cereal
– A 10-ounce bag of marshmallows
– 3 tablespoons of butter
– A splash of vanilla extract
– A pinch of salt
– A couple of drops of orange gel food coloring
– A handful of chocolate chips for the spooky faces
Instructions
1. Melt 3 tablespoons of butter in a large pot over low heat.
2. Add the entire 10-ounce bag of marshmallows to the melted butter and stir continuously until completely smooth and melted, which should take about 5-7 minutes. (Tip: Keep the heat low to prevent the marshmallows from scorching and becoming tough.)
3. Stir in a splash of vanilla extract and a pinch of salt until fully combined.
4. Add a couple of drops of orange gel food coloring and mix vigorously until the color is evenly distributed with no white streaks.
5. Immediately pour in 6 cups of crispy rice cereal and fold gently until every piece is coated in the orange marshmallow mixture.
6. Lightly grease your hands with butter or cooking spray to prevent sticking, then scoop about 1/3 cup of the mixture and press it firmly into a pumpkin-shaped cookie cutter placed on a parchment-lined baking sheet. (Tip: Press the mixture firmly into the corners of the cutter to create sharp, defined pumpkin shapes.)
7. Carefully remove the cookie cutter and repeat with the remaining mixture, spacing the shapes about 1 inch apart on the baking sheet.
8. Press chocolate chips into each pumpkin shape to create jack-o’-lantern faces—triangles for eyes and a jagged mouth work great!
9. Let the treats set at room temperature for at least 30 minutes until firm to the touch. (Tip: For faster setting, pop the tray in the fridge for 10-15 minutes, but don’t leave them too long or they might become overly hard.)
Keep these grinning goodies on a platter at your next Halloween bash—their crisp, sweet crunch and playful chocolate accents make them impossible to resist. They’re so fun and festive, even the pickiest little goblins will be begging for more!
Black Cat Rice Krispie Treats
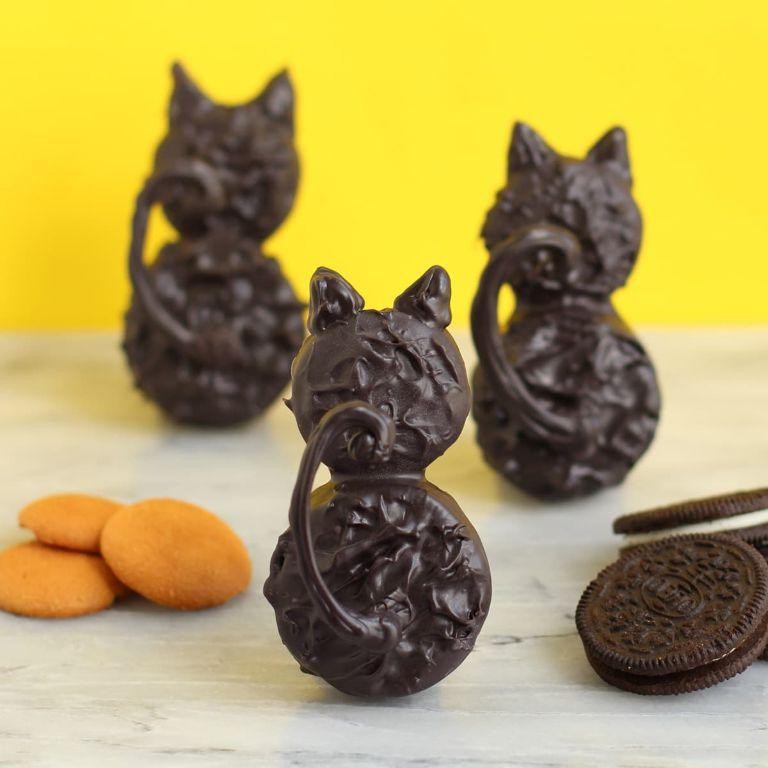
Trick-or-treat yourself to these spooktacular Black Cat Rice Krispie Treats—they’re so easy, even a ghost could make them, and so delicious, they’ll vanish faster than a vampire at sunrise! These no-bake cuties combine that classic crispy crunch with a bewitching chocolate twist, perfect for Halloween parties or just summoning your inner witch any day of the week. Get ready to stir up some fun—no cauldron required!
16
portions15
minutes10
minutesIngredients
– A generous 6 cups of crispy rice cereal (the star of the show!)
– A 10-ounce bag of marshmallows (go for the mini ones—they melt like a dream)
– A solid 3 tablespoons of unsalted butter (because everything’s better with butter)
– A couple of pinches of salt to balance the sweetness
– A splash of vanilla extract for that cozy, aromatic kick
– A handful of chocolate chips (melted for dipping and decorating)
– Optional: candy eyes for that adorable feline stare
Instructions
1. Line an 8×8-inch baking pan with parchment paper and lightly grease it with butter or non-stick spray to prevent sticking.
2. Melt the 3 tablespoons of unsalted butter in a large pot over low heat, stirring constantly until fully liquid and bubbly.
3. Tip: Keep the heat low to avoid browning the butter—it should just melt smoothly without sizzling too much.
4. Add the entire 10-ounce bag of marshmallows to the melted butter, stirring continuously until they’re completely melted and the mixture is smooth, which takes about 5-7 minutes.
5. Tip: Stir in a figure-eight motion to evenly distribute the heat and prevent the marshmallows from scorching on the bottom.
6. Remove the pot from the heat and immediately stir in the splash of vanilla extract and couple of pinches of salt until well combined.
7. Quickly pour in the generous 6 cups of crispy rice cereal, folding gently with a spatula until every piece is evenly coated in the marshmallow mixture.
8. Transfer the mixture to the prepared baking pan, pressing it down firmly and evenly with greased hands or a spatula.
9. Tip: Press down firmly but gently to compact the treats without squishing the cereal—this ensures they hold their shape when cut.
10. Let the pan cool at room temperature for at least 1 hour, or until the treats are firm to the touch and no longer sticky.
11. Melt the handful of chocolate chips in a microwave-safe bowl in 30-second intervals, stirring between each, until smooth and drippy.
12. Cut the cooled Rice Krispie slab into squares or use a cat-shaped cookie cutter for fun shapes.
13. Dip the top of each treat into the melted chocolate, then immediately add candy eyes if using to create the black cat faces.
14. Allow the chocolate to set completely at room temperature, about 15-20 minutes, before serving.
Zesty and whimsical, these treats boast a satisfying crunch with a gooey center and a hint of vanilla that’ll have you purring with delight. Serve them stacked like a tower at a Halloween bash or tucked into lunchboxes for a fang-tastic surprise—either way, they’re sure to cast a delicious spell on everyone!
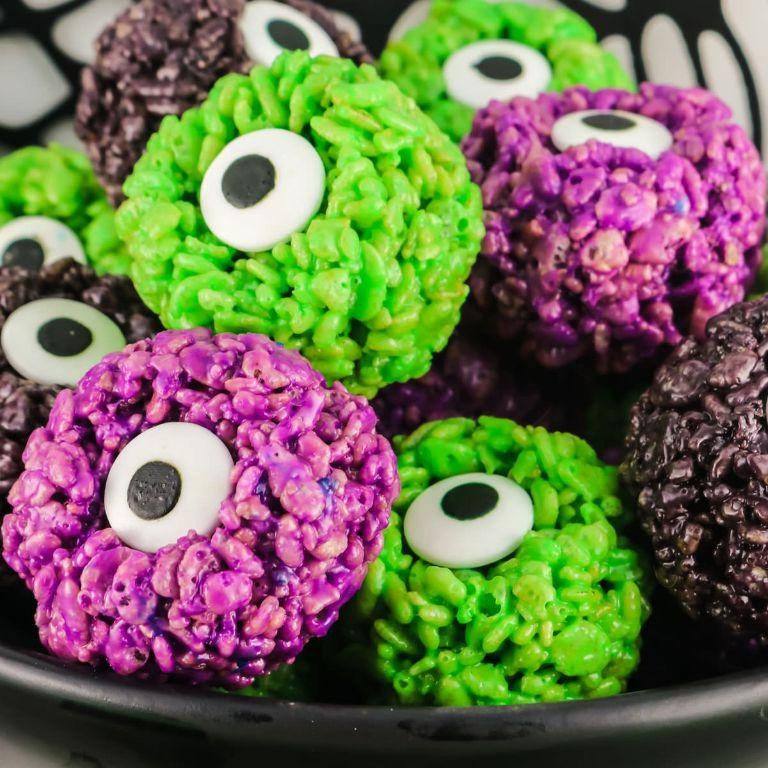
Zombie Brain Krispie Clusters

Who says Halloween treats can’t be both creepy and crave-worthy? Welcome to the spookiest snack that’ll have your taste buds screaming for more—these Zombie Brain Krispie Clusters are the perfect blend of gooey, crunchy, and downright delicious. Whip up a batch before the monsters come knocking!
12
clusters15
minutes10
minutesIngredients
– 3 cups of crispy rice cereal
– A generous 10 oz bag of marshmallows
– A couple of tablespoons of butter
– A splash of green food coloring
– A handful of white chocolate chips for that eerie drizzle
Instructions
1. Line a baking sheet with parchment paper and set it aside.
2. Melt the butter in a large saucepan over low heat, swirling until fully liquid.
3. Tip: Keep the heat low to avoid browning the butter, which can alter the flavor.
4. Add the marshmallows to the melted butter, stirring constantly until completely smooth and gooey.
5. Stir in the green food coloring until the mixture is uniformly spooky green.
6. Remove the saucepan from the heat immediately to prevent scorching.
7. Quickly fold in the crispy rice cereal until every piece is coated in the green marshmallow mixture.
8. Scoop tablespoon-sized portions of the mixture onto the prepared baking sheet, shaping each into a rough, brain-like cluster with your fingers.
9. Tip: Lightly grease your hands with butter to prevent sticking while shaping.
10. Let the clusters cool at room temperature for at least 30 minutes until firm.
11. Melt the white chocolate chips in a microwave-safe bowl in 20-second intervals, stirring between each, until smooth.
12. Drizzle the melted white chocolate over the cooled clusters in squiggly lines to mimic zombie brain veins.
13. Tip: Use a fork for finer drizzling control to achieve that authentic, gruesome look.
14. Allow the chocolate to set completely, about 15 minutes, before serving.
These clusters deliver a satisfying crunch with a sweet, marshmallow-y center that’s eerily addictive. The green hue and white chocolate veins make them a standout at any Halloween party—try stacking them on a platter with plastic spiders for extra fright night flair!
Vampire Bite Krispie Snacks

Eerie how something so delightfully creepy can be this ridiculously easy to whip up, right? These Vampire Bite Krispie Snacks are the perfect blend of spooky and sweet, guaranteed to make your Halloween spread the talk of the ghost town without requiring any magical potions or complicated spells.
24
squares15
minutes7
minutesIngredients
– 6 cups of crispy rice cereal
– A 10-ounce bag of marshmallows
– 3 tablespoons of unsalted butter
– A generous splash of red food coloring
– A couple of slivered almonds
Instructions
1. Line a 9×13-inch baking pan with parchment paper and lightly grease it with butter or cooking spray.
2. Melt 3 tablespoons of unsalted butter in a large pot over medium-low heat.
3. Tip: Keep the heat low to prevent the butter from browning, which can alter the flavor.
4. Add the entire 10-ounce bag of marshmallows to the melted butter.
5. Stir continuously with a spatula until the marshmallows are completely melted and smooth, about 5-7 minutes.
6. Remove the pot from the heat immediately once melted to avoid scorching.
7. Stir in a generous splash of red food coloring until the mixture is uniformly blood-red.
8. Tip: Use gel food coloring for a more vibrant color without thinning the mixture.
9. Quickly fold in 6 cups of crispy rice cereal until every piece is coated in the red marshmallow mixture.
10. Transfer the mixture to the prepared baking pan.
11. Use a buttered spatula to press the mixture evenly into the pan.
12. Tip: Lightly butter your hands to press the mixture down without sticking.
13. Let the treats cool at room temperature for at least 1 hour until firm.
14. Cut into 2-inch squares using a sharp knife.
15. Press two slivered almonds into the top of each square to resemble fangs.
16. Ready to serve immediately or store in an airtight container.
Remarkably, these treats deliver that classic crispy, chewy texture with a playful bloody hue. The buttery marshmallow base pairs perfectly with the subtle crunch of almonds, creating a fang-tastic bite that’s both visually striking and delicious. For an extra eerie touch, arrange them on a dark platter with fake cobwebs or serve alongside a bowl of “eyeball” grapes for a full monster mash snack table.
Spider Web Krispie Slices
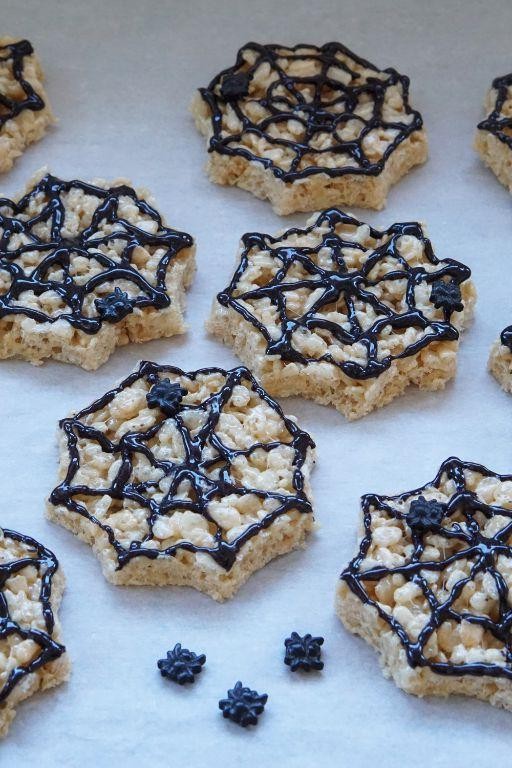
Who says Halloween treats need to be complicated? These Spider Web Krispie Slices are the perfect blend of spooky and simple, combining the nostalgic crunch of rice cereal with a web of chocolate magic that’ll have both kids and adults sneaking extra pieces. Whip these up in under 30 minutes for a festive treat that’s eerily easy and delightfully delicious.
12
bars15
minutes10
minutesIngredients
– 6 cups of crispy rice cereal (the kind that goes snap, crackle, pop!)
– A 10-ounce bag of marshmallows (the sticky, sweet glue that holds it all together)
– 3 tablespoons of unsalted butter (for that rich, melty goodness)
– A pinch of salt (to balance the sweetness)
– 1/2 cup of semi-sweet chocolate chips (for drizzling your spooky webs)
– 1 teaspoon of coconut oil (to keep the chocolate smooth and drizzle-friendly)
Instructions
1. Line an 8×8-inch baking pan with parchment paper, letting the edges hang over for easy removal later.
2. Melt the 3 tablespoons of unsalted butter in a large pot over low heat, stirring constantly with a wooden spoon until fully liquid.
3. Tip: Keep the heat low to prevent the butter from browning, which can alter the flavor.
4. Add the 10-ounce bag of marshmallows and a pinch of salt to the melted butter, stirring continuously until the marshmallows are completely smooth and no lumps remain.
5. Remove the pot from the heat immediately to avoid overcooking the marshmallow mixture.
6. Quickly fold in the 6 cups of crispy rice cereal until every piece is evenly coated in the marshmallow goo.
7. Tip: Work fast while the mixture is warm to prevent it from setting and becoming difficult to spread.
8. Transfer the cereal mixture to the prepared pan, pressing it down firmly and evenly with greased hands or a spatula.
9. Let the pan cool at room temperature for about 15 minutes until the base is set but still slightly warm.
10. In a microwave-safe bowl, combine the 1/2 cup of semi-sweet chocolate chips and 1 teaspoon of coconut oil.
11. Microwave the mixture in 30-second intervals, stirring after each, until the chocolate is fully melted and glossy.
12. Tip: Stirring between intervals prevents the chocolate from seizing and ensures a smooth consistency for drizzling.
13. Transfer the melted chocolate to a piping bag or a zip-top bag with a tiny corner snipped off.
14. Drizzle the chocolate over the cooled cereal base in a spiral pattern, starting from the center and working outward.
15. Use a toothpick to drag lines from the center to the edges, creating a spider web effect.
16. Allow the chocolate to set completely at room temperature for about 10 minutes.
17. Lift the slab out of the pan using the parchment paper overhang and slice it into 12 even bars with a sharp knife.
So, what’s the verdict? These slices deliver a satisfying crunch from the cereal, a chewy sweetness from the marshmallows, and a rich chocolate web that ties it all together. Serve them stacked on a platter with plastic spider decorations for a creepy-crawly centerpiece, or pack them in lunchboxes for a festive surprise that’s sure to web its way into your Halloween traditions.
Frankenstein’s Rice Krispie Heads
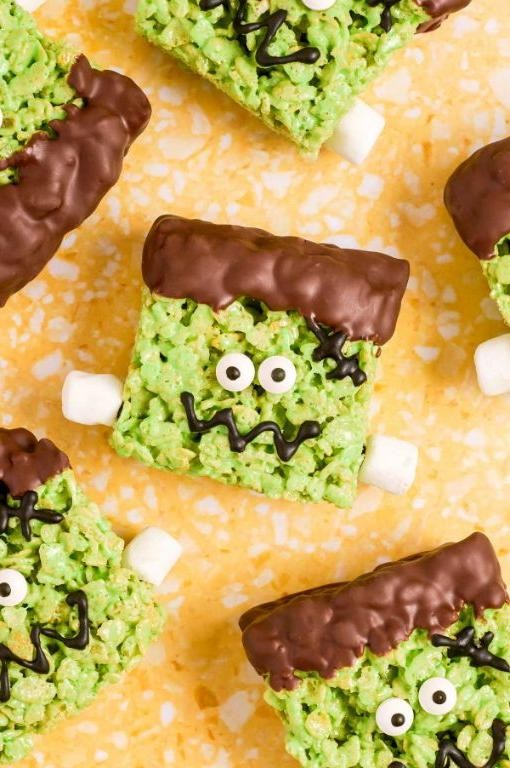
Yikes, it’s that spooky season again when your kitchen transforms into a mad scientist’s lab! These Frankenstein’s Rice Krispie Heads are the perfect monstrous treat to freak out your friends and family—no lightning bolts or creepy castles required, just marshmallows and a whole lot of personality.
12
portions15
minutes10
minutesIngredients
– 6 cups of crispy rice cereal
– A big bag of marshmallows (about 10 ounces)
– 3 tablespoons of butter
– A splash of vanilla extract
– Green food coloring (just a few drops to make it properly ghoulish)
– A couple of chocolate chips for those dramatic monster eyes
– Some black decorating gel to stitch up your creation
Instructions
1. Melt 3 tablespoons of butter in a large pot over low heat until it’s completely liquid and bubbling slightly.
2. Tip: Use a non-stick pot to make cleanup a breeze—no one wants to scrub marshmallow glue!
3. Add the entire bag of marshmallows to the melted butter, stirring constantly with a spatula until they’re smooth and fully melted, about 5-7 minutes.
4. Stir in a splash of vanilla extract and a few drops of green food coloring until the mixture is evenly tinted like Frankenstein’s skin.
5. Remove the pot from the heat and quickly fold in 6 cups of crispy rice cereal until every piece is coated in the green marshmallow goo.
6. Tip: Work fast here so the mixture doesn’t set up before you shape it!
7. Lightly grease your hands with butter or cooking spray, then grab handfuls of the mixture and mold them into rough head shapes about the size of your palm.
8. Press two chocolate chips into each head for eyes while the mixture is still warm and pliable.
9. Use black decorating gel to draw zigzag “stitches” across the forehead and cheeks for that classic mad scientist look.
10. Tip: Let them cool completely on a parchment-lined tray for about 30 minutes to firm up—patience makes for less monstrous messes!
11. Once set, your creepy creations are ready to serve or store in an airtight container.
Each bite delivers that classic crispy crunch with a sweet, vanilla-kissed marshmallow chew, all wrapped up in a ghoulish green package. They’re delightfully eerie for Halloween parties or just to spook your snack time—try stacking them like a mini monster army for maximum dramatic effect!
Skeleton Bone Krispie Logs

Ready to get spooky in the kitchen? These Skeleton Bone Krispie Logs are the perfect blend of creepy and delicious—they’re so easy, even a ghost could whip them up, and they’ll vanish faster than a phantom at a party!
12
logs15
minutes10
minutesIngredients
– 6 cups of crispy rice cereal
– A 10-ounce bag of marshmallows
– 3 tablespoons of unsalted butter
– A pinch of salt
– A splash of vanilla extract
– 1 cup of white chocolate chips
– A couple of black decorating gel tubes
Instructions
1. Grease a 9×13-inch baking pan lightly with butter or cooking spray to prevent sticking.
2. Melt the 3 tablespoons of unsalted butter in a large pot over low heat, stirring constantly to avoid browning.
3. Tip: Use a heavy-bottomed pot to distribute heat evenly and prevent scorching.
4. Add the entire 10-ounce bag of marshmallows to the melted butter, stirring continuously until completely smooth and melted.
5. Stir in a pinch of salt and a splash of vanilla extract for enhanced flavor.
6. Remove the pot from heat and quickly fold in the 6 cups of crispy rice cereal until evenly coated.
7. Tip: Work swiftly while the mixture is warm to avoid it setting too hard.
8. Press the mixture firmly into the prepared baking pan using a buttered spatula or your hands to create an even layer.
9. Let the mixture cool at room temperature for about 30 minutes until firm to the touch.
10. Cut the cooled mixture into 12 rectangular logs, each about 1-inch wide and 4-inches long, to resemble bones.
11. Melt the 1 cup of white chocolate chips in a microwave-safe bowl in 30-second intervals, stirring between each, until smooth.
12. Dip each log halfway into the melted white chocolate, allowing excess to drip off.
13. Place the dipped logs on a parchment-lined baking sheet.
14. Tip: For a neater look, use a fork to drizzle any remaining chocolate over the logs.
15. Use the black decorating gel to draw skeleton joint lines and details on the white chocolate coating.
16. Let the logs set at room temperature for about 1 hour until the chocolate hardens completely.
Heavenly crisp and sweet, these logs boast a satisfying crunch with a creamy white chocolate shell. Serve them stacked like a bony pile at your Halloween bash or as a playful centerpiece that’s almost too cute to eat—almost!
Graveyard Rice Krispie Marshmallow Bars

Brace yourself for a treat that’s to die for – these spooky Graveyard Rice Krispie Marshmallow Bars are the perfect blend of creepy and delicious, guaranteed to make your Halloween party the talk of the neighborhood. Imagine sinking your teeth into a crispy, gooey bar topped with chocolate tombstone decorations that’ll have both kids and adults screaming for seconds. They’re ridiculously easy to whip up, requiring zero baking skills and just a bit of playful creativity to transform your kitchen into a haunted bakery.
12
bars15
minutes10
minutesIngredients
– 6 cups of crispy rice cereal (the star of the show!)
– A 10-ounce bag of mini marshmallows (for that perfect gooey pull)
– 3 tablespoons of unsalted butter (because everything’s better with butter)
– A pinch of salt (to balance the sweetness)
– A splash of vanilla extract (for a hint of warmth)
– A couple of chocolate bars or chocolate candy pieces (for crafting tombstones)
Instructions
1. Melt 3 tablespoons of unsalted butter in a large pot over low heat, stirring constantly with a wooden spoon until fully liquid and bubbly, about 2–3 minutes. Tip: Keep the heat low to avoid browning the butter, which can alter the flavor.
2. Add the entire 10-ounce bag of mini marshmallows to the melted butter, stirring continuously until the marshmallows are completely melted and the mixture is smooth, which should take 4–5 minutes.
3. Remove the pot from the heat and immediately stir in a splash of vanilla extract and a pinch of salt until fully incorporated.
4. Pour 6 cups of crispy rice cereal into the marshmallow mixture, folding gently with a spatula until every piece is evenly coated and no dry spots remain.
5. Press the mixture firmly into a greased 9×13-inch baking dish using a piece of parchment paper or greased hands to prevent sticking, ensuring an even layer about 1 inch thick.
6. Let the bars cool at room temperature for at least 1 hour, or until they are firm to the touch and hold their shape when cut. Tip: For quicker setting, pop them in the fridge for 20–30 minutes, but don’t let them get too cold or they’ll lose their chewiness.
7. While the bars cool, melt the chocolate bars in a microwave-safe bowl in 30-second intervals, stirring between each, until smooth and drippy.
8. Use a spoon or piping bag to drizzle the melted chocolate over the cooled bars in tombstone shapes, then allow the chocolate to set completely, about 15–20 minutes. Tip: If the chocolate hardens too quickly, gently reheat it for 10 seconds and stir to restore a pourable consistency.
9. Cut the bars into 12–15 rectangles using a sharp knife wiped clean between cuts for neat edges.
Venture into a world where crunchy cereal meets pillowy marshmallow, creating a texture that’s both satisfyingly crisp and delightfully chewy. The subtle vanilla and salt cut through the sweetness, making these bars dangerously addictive—serve them on a platter lined with crushed Oreo “dirt” for an extra eerie touch that’ll have guests digging in with glee.
Creepy Crawly Krispie Critters
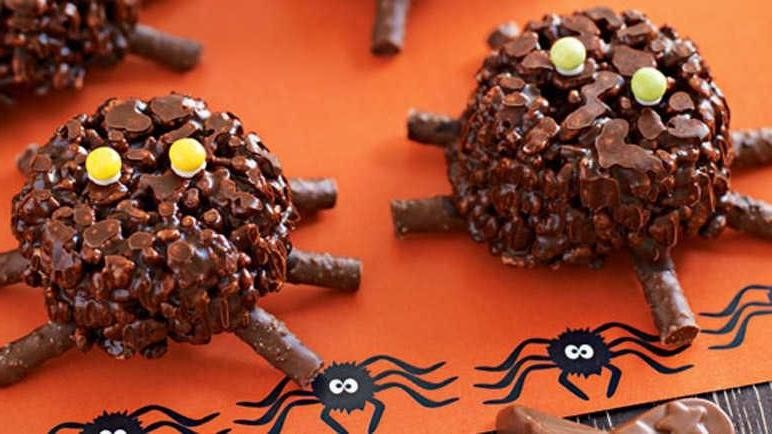
Spiders, centipedes, and other multi-legged mischief-makers are crawling into your kitchen today—but don’t panic! These creepy-crawly krispie critters are the spookiest, crunchiest, and most ridiculously fun treats to whip up when you’re craving a little edible adventure. Perfect for Halloween parties or just freaking out your friends (in the best way possible), they’re guaranteed to bring giggles and gobbles in equal measure.
24
critters15
minutes10
minutesIngredients
– 6 cups of crispy rice cereal
– A big ol’ 10-ounce bag of marshmallows
– A generous 3 tablespoons of butter
– A splash of vanilla extract
– A couple of drops of green food coloring
– A handful of candy eyes and black licorice laces for decorating
Instructions
1. Melt the 3 tablespoons of butter in a large pot over low heat, stirring constantly with a wooden spoon until it’s fully liquid and bubbly.
2. Tip in the entire 10-ounce bag of marshmallows and keep stirring over low heat until they’re completely melted and smooth—no lumps allowed!
3. Stir in a splash of vanilla extract and a couple of drops of green food coloring until the mixture is evenly tinted a creepy shade of green.
4. Remove the pot from the heat and immediately fold in the 6 cups of crispy rice cereal, making sure every piece is coated in the sticky marshmallow goo.
5. Let the mixture cool just enough to handle—about 2 minutes—so you don’t burn your fingers but it’s still pliable.
6. With lightly buttered hands, shape tablespoon-sized portions into oval bodies for your critters, pressing firmly so they hold their shape.
7. Poke 8 short pieces of black licorice lace into each side of the oval to create wiggly legs, arranging them so they look like they’re ready to skitter away.
8. Press 2 candy eyes onto the front of each critter, using a dab of extra marshmallow mixture if needed to make them stick.
9. Let your finished creepy crawlies set at room temperature for 20–30 minutes until firm and no longer sticky to the touch. Lightly crispy on the outside with a chewy, marshmallow-y heart, these krispie critters deliver a sweet vanilla flavor that’s perfectly balanced by the playful crunch. Serve them crawling across a platter of crushed Oreo “dirt” for a haunted garden effect, or tuck them into lunchboxes for a surprise that’s more fun than frightening.
Eyeball Krispie Marshmallow Pops

Who says Halloween treats need to be complicated? These Eyeball Krispie Marshmallow Pops are the perfect blend of spooky and simple, guaranteed to make both kids and adults do a double-take (and then immediately ask for one). With just a few pantry staples and a dash of creativity, you’ll have a batch of googly-eyed goodies ready to haunt your dessert table in no time.
12
pops25
minutes10
minutesIngredients
– 6 cups of crispy rice cereal (the kind that goes *snap, crackle, pop*)
– A 10-ounce bag of mini marshmallows (the sticky, sweet glue that holds it all together)
– 3 tablespoons of unsalted butter (because everything’s better with butter)
– A pinch of salt (to balance out the sweetness)
– Lollipop sticks (for easy grabbing)
– White candy melts (for that eerie eyeball base)
– A couple of milk chocolate chips (pupils, anyone?)
– A splash of red decorating gel (for those creepy bloodshot veins)
Instructions
1. Line a baking sheet with parchment paper and set it aside.
2. Melt the 3 tablespoons of unsalted butter in a large pot over low heat, stirring constantly with a wooden spoon until fully liquid.
3. Tip: Keep the heat low to avoid browning the butter, which can alter the flavor.
4. Add the entire 10-ounce bag of mini marshmallows and the pinch of salt to the melted butter, stirring continuously until the marshmallows are completely melted and the mixture is smooth.
5. Tip: Work quickly once the marshmallows melt, as the mixture will start to set fast.
6. Remove the pot from the heat and immediately fold in the 6 cups of crispy rice cereal until every piece is evenly coated in the marshmallow mixture.
7. Let the mixture cool for 2–3 minutes until it’s safe to handle but still pliable.
8. Scoop about 1/4 cup of the mixture and firmly press it around one end of a lollipop stick, shaping it into a round ball. Repeat until all the mixture is used, placing each pop on the prepared baking sheet.
9. Chill the pops in the refrigerator for 15 minutes to firm up.
10. Melt the white candy melts according to package directions, usually in 30-second intervals in the microwave, stirring between each until smooth.
11. Dip each chilled rice cereal ball into the melted candy coating, allowing any excess to drip off before returning it to the baking sheet.
12. Tip: For a smoother coating, tap the stick gently on the edge of the bowl to remove extra candy melt.
13. While the coating is still wet, press one milk chocolate chip into the center of each pop to create a pupil.
14. Use the red decorating gel to draw squiggly lines from the chocolate chip outward, mimicking bloodshot veins.
15. Let the pops set at room temperature for 20 minutes until the candy coating is fully hardened.
Keep these pops chilled until serving—they’re delightfully crunchy on the outside with a soft, chewy center that’s irresistibly sweet. For extra drama, stick them into a foam pumpkin centerpiece or serve them alongside a bowl of ‘witch’s brew’ punch at your Halloween party.
Broomstick Rice Krispie Stirrers
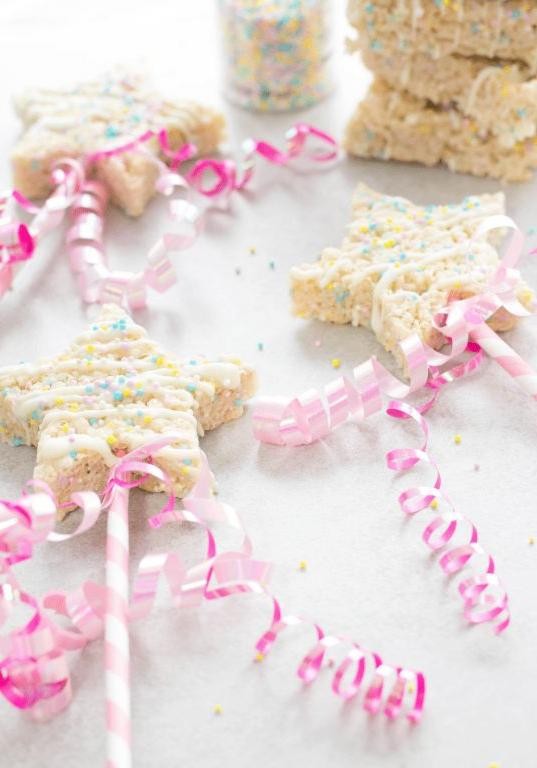
Mmm, just when you thought Rice Krispie treats couldn’t get more magical, we’re whipping up these broomstick-shaped delights that’ll have your little witches and wizards spellbound! These crispy, marshmallow-y wands are perfect for Halloween parties or whenever you need to sweep some smiles into your kitchen.
12
portions15
minutes2
minutesIngredients
- 6 cups of those classic crispy rice cereal
- a 10-ounce bag of marshmallows (the fluffy white kind)
- 3 tablespoons of butter (salted or unsalted, your call)
- a good pinch of salt to balance the sweetness
- 12 wooden craft sticks for our broom handles
- a quick spritz of cooking spray to prevent sticking
Instructions
- Grab a large microwave-safe bowl and toss in your butter and marshmallows.
- Microwave on high for 90 seconds, then pause to stir everything together with a rubber spatula.
- Pop it back in the microwave for another 30 seconds until the mixture is completely smooth and pourable.
- Quickly stir in your pinch of salt to enhance all the flavors.
- Immediately pour the hot marshmallow mixture over your 6 cups of crispy rice cereal in a separate large bowl.
- Gently fold everything together until every single cereal piece is coated in marshmallow goodness.
- Lightly spray your hands with cooking spray to prevent sticking, then grab golf ball-sized portions of the mixture.
- Shape each portion around the top of a wooden craft stick, creating a broom head that’s slightly flattened at the bottom.
- Press firmly so the cereal mixture grips the stick securely—no wobbly brooms allowed!
- Let your broomstick treats cool completely on a parchment-lined baking sheet for about 30 minutes until firm.
Now, these crispy creations deliver that perfect crackle with every bite, while the chewy marshmallow center keeps things delightfully sticky. Try standing them upright in a cauldron filled with candy corn for a spellbinding centerpiece, or wrap individual ones in cellophane for magical party favors.
Ghostly Graveyard Rice Krispie Cups

Ladies and gentlemen, gather ’round your cauldrons—we’re about to conjure up some spooky magic that’s equal parts adorable and delicious! These ghostly graveyard Rice Krispie cups are the perfect treat to haunt your Halloween party without scaring off your sweet tooth. Let’s dive into this no-bake delight that’s so easy, even a zombie could pull it off.
12
cups15
minutes5
minutesIngredients
– 3 cups of crispy rice cereal
– A generous 10 oz bag of mini marshmallows
– A solid 3 tablespoons of unsalted butter
– A splash of vanilla extract (about 1 teaspoon)
– A couple of Oreo cookies, crushed into crumbs
– A handful of candy eyes and some chocolate cookie sticks for decorating
Instructions
1. Melt the 3 tablespoons of unsalted butter in a large saucepan over low heat, swirling occasionally until fully liquid—this prevents burning and ensures a smooth base.
2. Add the entire 10 oz bag of mini marshmallows to the melted butter, stirring constantly with a spatula until they’re completely melted and glossy, which should take about 3–4 minutes.
3. Remove the saucepan from heat and quickly stir in the splash of vanilla extract for that warm, aromatic kick.
4. Immediately pour in the 3 cups of crispy rice cereal, folding gently until every piece is evenly coated in the marshmallow mixture—work fast to avoid clumps!
5. Lightly grease a standard 12-cup muffin tin with butter or cooking spray to prevent sticking, then divide the Rice Krispie mixture evenly among the cups, pressing down firmly with your fingers to shape them.
6. Sprinkle the crushed Oreo cookie crumbs over the top of each cup to create a “graveyard dirt” effect, pressing lightly so they adhere.
7. Insert one chocolate cookie stick vertically into each cup as a “tombstone,” then carefully press a few candy eyes onto the surface to form ghostly faces.
8. Chill the entire muffin tin in the refrigerator for at least 30 minutes, or until the cups are firm and hold their shape when removed.
9. Gently pop the Rice Krispie cups out of the tin using a butter knife if needed, and arrange them on a serving platter.
You’ll love the chewy, marshmallow-y texture that gives way to the crunchy cookie dirt and playful decorations. These little gravesites are a blast to customize—try adding gummy worms peeking out for extra eeriness!
Conclusion
Creative Rice Krispie treats make Halloween magical! These 30 spooktacular recipes offer fun, easy ways to delight your family and friends. I hope you found some inspiration—try your favorites and let me know which ones you love in the comments below! Don’t forget to share this roundup on Pinterest so others can join the festive fun. Happy baking!