Our love for Asian cuisine knows no bounds, especially when it comes to the versatile and comforting world of rice dishes. From quick weeknight dinners to impressive weekend feasts, these 20 delicious recipes will transform your kitchen into an Asian culinary haven. Get ready to explore flavors that will have your family asking for seconds—let’s dive into these mouthwatering creations you’re going to love!
Spicy Kimchi Fried Rice
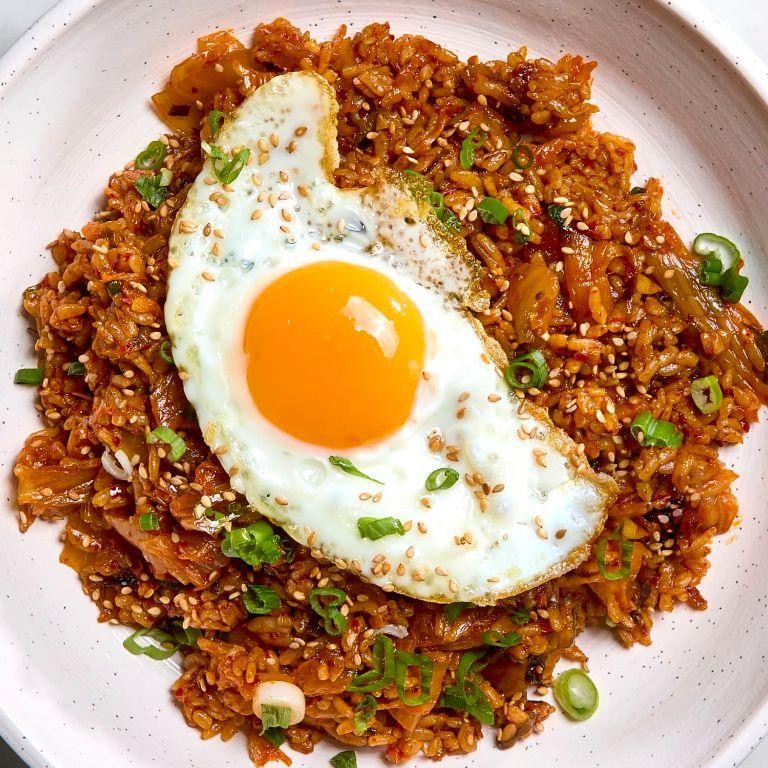
Craving something that kicks your taste buds awake faster than your morning alarm? This spicy kimchi fried rice is the culinary equivalent of a friendly slap on the back—jarringly delightful and guaranteed to cure even the most stubborn case of the blahs. It’s the kind of meal that makes you wonder why you ever settled for boring leftovers.
2
servings10
minutes10
minutesIngredients
- 2 cups cooked, day-old white rice (cold rice fries better!)
- 1 cup chopped kimchi, plus 2 tbsp of its juice (the funkier, the better)
- 2 tbsp vegetable oil (or any neutral oil)
- 2 large eggs
- 2 tbsp soy sauce (low-sodium works too)
- 1 tbsp gochujang (Korean red pepper paste; adjust for more or less heat)
- 2 green onions, thinly sliced
- 1 tsp toasted sesame oil (for finishing)
- Optional: 1/2 cup cooked protein like diced Spam or shrimp
Instructions
- Heat 1 tbsp vegetable oil in a large skillet or wok over medium-high heat until it shimmers, about 1 minute.
- Add the chopped kimchi and stir-fry for 2–3 minutes until it sizzles and softens slightly, releasing its pungent aroma.
- Push the kimchi to one side of the skillet and pour the remaining 1 tbsp oil into the empty space.
- Crack the eggs directly into the oil and scramble them vigorously with a spatula for 30–45 seconds until just set but still slightly runny.
- Mix the eggs with the kimchi, then add the cold rice, breaking up any clumps with your spatula.
- Drizzle the soy sauce and gochujang evenly over the rice, stirring constantly to coat every grain, for 2 minutes.
- Pour in the 2 tbsp kimchi juice and continue stir-frying for another 2–3 minutes until the rice is heated through and slightly crispy in spots.
- Remove the skillet from heat and stir in the sliced green onions and toasted sesame oil.
Kimchi fried rice delivers a satisfying chew from the crispy rice grains, balanced by the tangy, spicy punch of fermented kimchi. Serve it straight from the skillet with a sunny-side-up egg on top for extra drama, or pack it for a lunch that’ll make your coworkers jealous.
Mango Sticky Rice with Coconut Cream
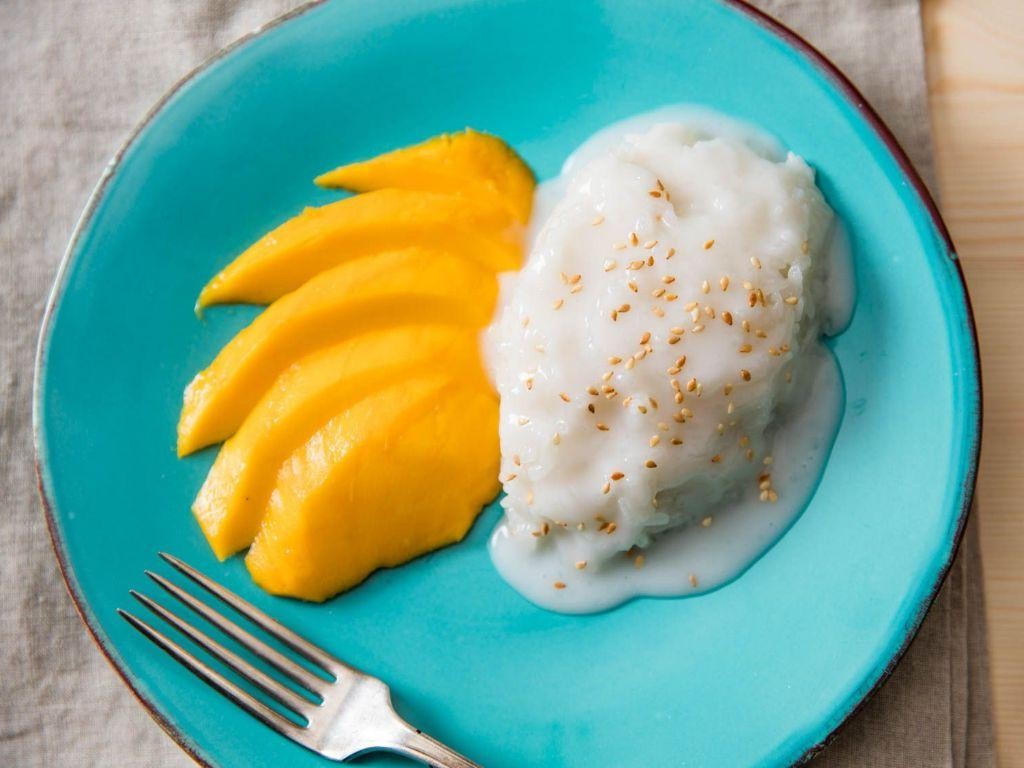
Who knew that sticky rice and mango could throw such a tropical party in your mouth? This isn’t just dessert—it’s a vacation on a plate that’ll have you dreaming of palm trees and ocean breezes. Get ready to impress your taste buds with this ridiculously easy Thai-inspired treat that’s basically sunshine with a spoon.
2
servings15
minutes28
minutesIngredients
– 1 cup glutinous rice, rinsed until water runs clear (don’t skip this—it removes excess starch!)
– 1 13.5 oz can coconut milk, full-fat for maximum creaminess
– 1/2 cup granulated sugar, or substitute with coconut sugar for deeper flavor
– 1/4 tsp salt, to balance the sweetness
– 2 ripe mangoes, peeled and sliced (look for fragrant, slightly soft ones)
– 1 tbsp toasted sesame seeds, for crunch and visual pop
Instructions
1. Soak the rinsed glutinous rice in cold water for at least 4 hours or overnight—this ensures perfectly tender grains.
2. Drain the rice thoroughly and steam it in a bamboo steamer lined with cheesecloth over boiling water for 25 minutes until translucent and chewy.
3. While rice steams, combine coconut milk, sugar, and salt in a saucepan over medium heat, stirring constantly until sugar dissolves completely (about 3-4 minutes).
4. Remove saucepan from heat and immediately mix 3/4 of the warm coconut mixture into the steamed rice, folding gently to coat every grain without mashing.
5. Let the rice sit covered for 15 minutes to absorb the coconut cream fully—this step is key for that luxurious texture.
6. Arrange sliced mangoes alongside the coconut rice on serving plates.
7. Drizzle the remaining coconut sauce over the mangoes and rice just before serving to keep everything fresh.
8. Sprinkle toasted sesame seeds generously over the top for a nutty finish.
Just imagine that first bite: warm, creamy rice melting into juicy mango with a hint of coconut sweetness. Try serving it in hollowed-out coconut shells for that extra Instagram-worthy flair, or layer it in glasses for a fancy parfait effect that’ll make everyone think you’re a pastry pro.
Japanese Onigiri Rice Balls

Picture this: you’re craving something deliciously portable that won’t judge your questionable life choices. These Japanese onigiri rice balls are basically edible stress balls that happen to taste incredible—perfect for when adulting gets too real.
8
portions45
minutes15
minutesIngredients
- 2 cups Japanese short-grain rice (rinsed until water runs clear)
- 2 1/4 cups water (for perfectly fluffy rice)
- 1 tsp salt (or to taste)
- 2 sheets nori seaweed (cut into 1-inch wide strips)
- 1/2 cup canned tuna, drained (or cooked salmon for pescatarian pals)
- 2 tbsp mayonnaise (Japanese Kewpie mayo recommended)
- 1 tsp soy sauce (for umami boost)
- Optional fillings: pickled plum, cooked mushrooms, or anything that makes your heart happy
Instructions
- Rinse 2 cups Japanese short-grain rice in a fine-mesh strainer under cold running water until the water runs completely clear, about 3-4 minutes of gentle swirling.
- Combine the rinsed rice and 2 1/4 cups water in a heavy-bottomed pot, letting it soak for 30 minutes—this hydrates the grains for maximum fluffiness.
- Bring the rice and water to a rolling boil over high heat, then immediately reduce to the lowest possible simmer and cover with a tight-fitting lid.
- Cook the rice for exactly 15 minutes without peeking—steam is your secret weapon here for perfect texture.
- Remove the pot from heat and let it stand covered for 10 minutes—no cheating! This finishing steam makes all the difference.
- While rice rests, mix 1/2 cup drained tuna, 2 tbsp mayonnaise, and 1 tsp soy sauce in a small bowl until well combined.
- Transfer hot rice to a large bowl and gently fold in 1 tsp salt with a rice paddle using cutting motions to avoid crushing grains.
- Wet your hands with cool water and rub with a pinch of salt to prevent sticking—this pro tip saves you from rice-hand syndrome.
- Take 1/3 cup of rice into your palm, create a small indentation, and place 1 tbsp of tuna mixture in the center.
- Carefully mold the rice around the filling, pressing firmly to form a compact triangle shape about 1-inch thick.
- Wrap a nori strip around the base of each rice ball, shiny side out, for that classic presentation and handy grip.
- Repeat with remaining rice and filling, rewetting hands as needed—you should get about 8 substantial rice balls.
Oh, the glorious contrast! You’ll get slightly crisp nori giving way to warm, seasoned rice that hugs a creamy, savory center. Tuck these in lunch boxes with pickled ginger, or be extra and serve them picnic-style with extra soy sauce for dipping—because everything tastes better when you’re pretending to have your life together.
Chinese Egg Fried Rice

Zesty, versatile, and ridiculously easy to whip up, Chinese egg fried rice is the ultimate fridge-clearing hero that transforms leftover grains into a crave-worthy meal faster than you can say “takeout.” This humble dish packs more flavor punch per spoonful than most restaurant entrees, proving that culinary magic often hides in the simplest ingredients. Get ready to ditch the delivery app and become the wok star of your own kitchen!
2
servings5
minutes6
minutesIngredients
– 3 cups cold cooked white rice (day-old works best for perfect texture)
– 3 large eggs (room temperature for fluffier scrambling)
– 2 tablespoons vegetable oil (or any neutral high-heat oil)
– 1/2 cup frozen peas and carrots mix (no need to thaw)
– 2 tablespoons soy sauce (or tamari for gluten-free)
– 1 teaspoon sesame oil (for that authentic finishing aroma)
– 2 green onions, thinly sliced (reserve some greens for garnish)
– 1/4 teaspoon white pepper (adds subtle heat without black specks)
Instructions
1. Crack 3 eggs into a small bowl and whisk vigorously until uniform in color and slightly frothy.
2. Heat a large wok or skillet over medium-high heat until a drop of water sizzles and evaporates immediately upon contact.
3. Pour 2 tablespoons vegetable oil into the hot wok, swirling to coat the surface evenly.
4. Add whisked eggs to the oil and let them set for 15 seconds without stirring.
5. Use a spatula to scramble the eggs, breaking them into small curds, cooking for 45-60 seconds until just set but still moist.
6. Add 3 cups cold cooked rice to the wok, using the spatula to break up any clumps while tossing with the eggs.
7. Cook the rice mixture for 2 minutes, stirring constantly, until grains are separated and lightly toasted.
8. Sprinkle 1/2 cup frozen peas and carrots over the rice, continuing to stir-fry for 90 seconds until vegetables are heated through.
9. Drizzle 2 tablespoons soy sauce evenly around the edges of the wok where it will sizzle and caramelize.
10. Add 1/4 teaspoon white pepper and most of the sliced green onions, reserving about 1 tablespoon for garnish.
11. Toss everything together for 30 seconds until well combined and fragrant.
12. Remove wok from heat and stir in 1 teaspoon sesame oil to finish.
Remarkably fluffy eggs and distinct, separate grains create a texture that’s simultaneously tender and satisfyingly chewy. The savory soy sauce base gets bright pops from the peas and aromatic depth from that final sesame oil drizzle. Serve it straight from the wok with extra green onions scattered on top, or go full fusion by stuffing it into tortillas for breakfast fried rice burritos!
Thai Pineapple Fried Rice
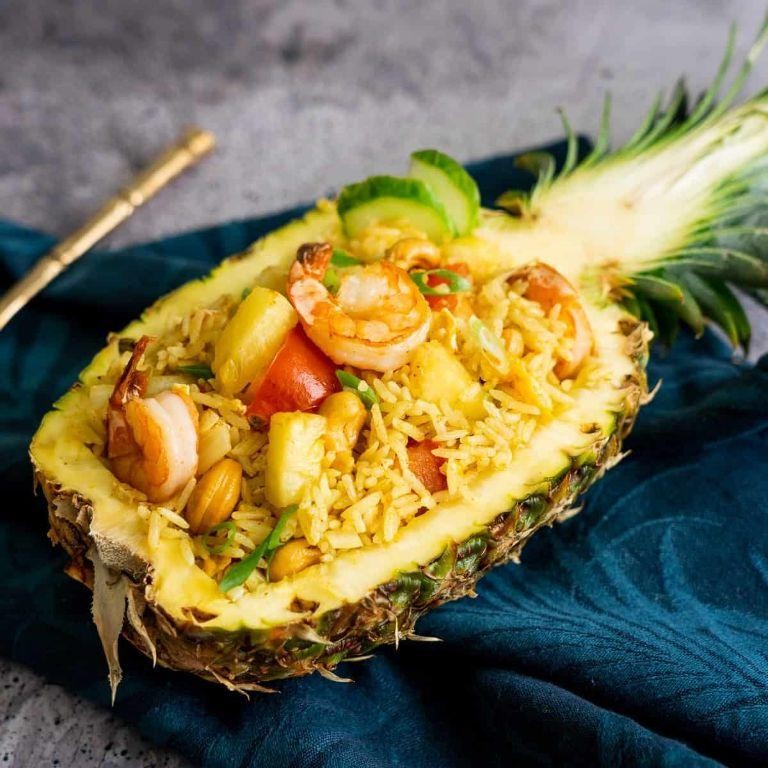
Ditch those boring rice bowls, because we’re taking your taste buds on a tropical vacation with this Thai pineapple fried rice that’s so good, it should come with its own tiny umbrella. This vibrant dish transforms simple ingredients into a flavor explosion that’ll make you forget all about takeout. Get ready to wok and roll!
4
servings15
minutes8
minutesIngredients
– 2 cups cooked jasmine rice, day-old works best for perfect texture
– 1 cup fresh pineapple chunks, about 1/2 inch pieces for even cooking
– 1/2 cup diced yellow onion, roughly chopped is fine
– 2 cloves garlic, minced
– 2 tbsp vegetable oil, or any neutral high-heat oil
– 2 tbsp soy sauce, low-sodium if preferred
– 1 tbsp fish sauce, or substitute with soy sauce for vegetarian
– 1 tsp curry powder, adjust for more or less spice
– 2 eggs, lightly beaten
– 1/4 cup frozen peas, no need to thaw
– 1/4 cup chopped cilantro, for garnish
– 1 lime, cut into wedges for serving
Instructions
1. Heat a large wok or skillet over medium-high heat until a drop of water sizzles immediately.
2. Add 2 tablespoons of vegetable oil and swirl to coat the entire cooking surface evenly.
3. Add 2 lightly beaten eggs and scramble for 45-60 seconds until just set but still slightly runny.
4. Transfer the eggs to a clean plate immediately to prevent overcooking.
5. Add the diced yellow onion to the same hot wok and cook for 2 minutes until slightly softened.
6. Add the minced garlic and cook for 30 seconds until fragrant but not browned.
7. Add the fresh pineapple chunks and frozen peas, stirring constantly for 1 minute.
8. Crumble the day-old jasmine rice into the wok, breaking up any large clumps with your spatula.
9. Sprinkle 1 teaspoon of curry powder evenly over the rice mixture.
10. Pour 2 tablespoons of soy sauce and 1 tablespoon of fish sauce around the edges of the wok.
11. Stir-fry everything together for 3-4 minutes until the rice is heated through and slightly crispy.
12. Return the scrambled eggs to the wok and toss to combine all ingredients thoroughly.
13. Remove from heat and stir in the chopped cilantro just before serving.
Just look at that glorious golden rice studded with sweet pineapple and pops of green peas! The texture hits all the right notes—fluffy rice with crispy bits, tender pineapple, and creamy egg ribbons. Serve it in the hollowed-out pineapple shell for maximum Instagram appeal, or just dive right in with a big spoon—we won’t judge!
Vietnamese Com Tam Broken Rice
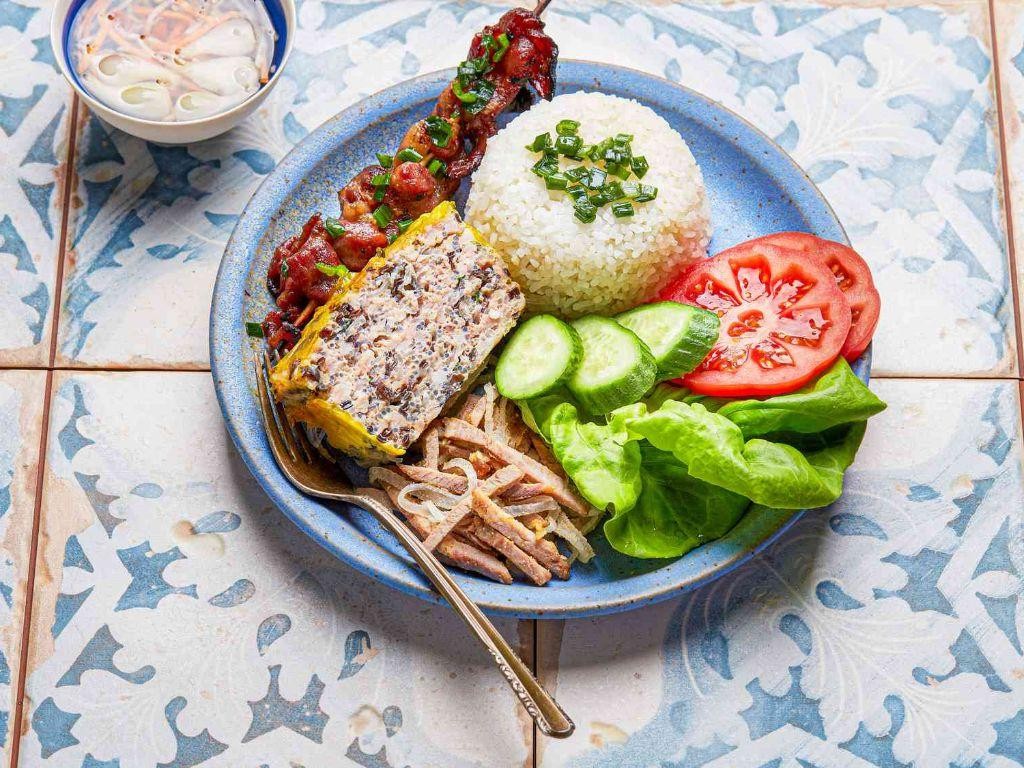
Let’s be real—most of us have rice drama in our pantry, but Vietnamese Com Tam transforms those broken rice grains into a flavor-packed masterpiece that’ll make you forget all about perfect grains. This humble dish proves that sometimes the “broken” things in life create the most delicious outcomes, especially when topped with grilled pork, a fried egg, and that magical fish sauce dressing.
2
servings25
minutes24
minutesIngredients
– 2 cups broken rice grains (regular short-grain works too)
– 1 lb pork shoulder, thinly sliced (freeze for 15 minutes for easier slicing)
– 3 tbsp fish sauce (or soy sauce for vegetarian option)
– 2 tbsp granulated sugar
– 3 cloves garlic, minced (fresh makes all the difference)
– 1 tbsp neutral oil (vegetable or canola)
– 4 large eggs
– 1 cup shredded cucumber
– 1 cup pickled carrots and daikon (store-bought or homemade)
– 2 green onions, thinly sliced
– 1 fresh lime, cut into wedges
Instructions
1. Rinse 2 cups broken rice under cold water until water runs clear to remove excess starch.
2. Cook rice in rice cooker with 2.5 cups water using the white rice setting (or simmer covered on stove for 18 minutes).
3. Combine 3 tbsp fish sauce, 2 tbsp sugar, and 3 cloves minced garlic in small bowl, stirring until sugar dissolves completely.
4. Marinate 1 lb sliced pork shoulder in half the fish sauce mixture for 20 minutes at room temperature.
5. Heat 1 tbsp oil in large skillet over medium-high heat until shimmering (about 350°F).
6. Cook marinated pork slices in single layer for 3 minutes per side until caramelized and internal temperature reaches 145°F.
7. Remove pork from skillet and fry 4 eggs sunny-side up in remaining oil until whites are set but yolks remain runny.
8. Divide cooked rice among 4 bowls, topping each with grilled pork, one fried egg, and ¼ cup each shredded cucumber and pickled vegetables.
9. Drizzle remaining fish sauce mixture over bowls and garnish with sliced green onions.
10. Serve immediately with lime wedges for squeezing over top.
Zesty, savory, and slightly sweet—this dish delivers incredible texture contrast between the tender pork, crispy egg edges, and soft rice grains. Try serving it with extra chili sauce for heat lovers, or pack the components separately for a next-level lunch bowl that’ll make your coworkers genuinely jealous of your culinary skills.
Korean Bibimbap Rice Bowl
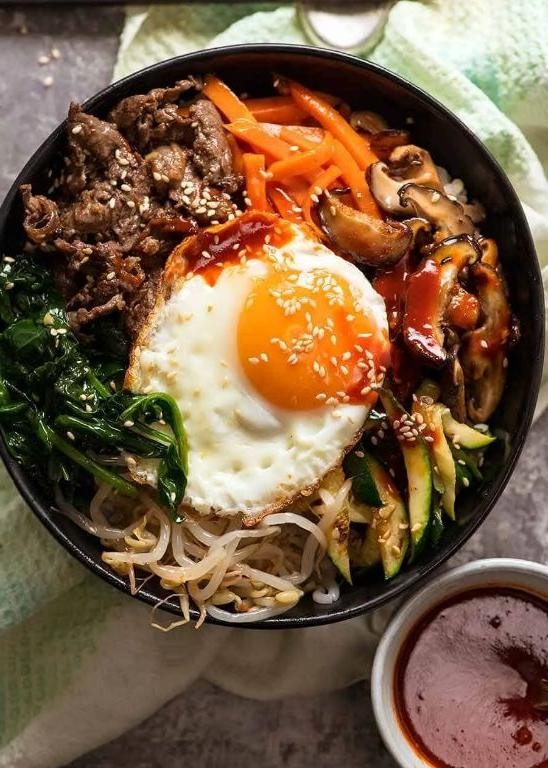
Tired of the same old boring bowls? This Korean Bibimbap is about to become your new kitchen obsession—it’s basically a flavor party in a bowl that’s so vibrant, your Instagram feed might just explode. Think of it as the culinary equivalent of finally organizing that junk drawer, but way more delicious and way less stressful.
5
bowls15
minutes30
minutesIngredients
– 1 cup short-grain white rice (rinsed until water runs clear)
– 1 ¼ cups water
– 2 tbsp vegetable oil (or any neutral oil)
– 1 carrot, julienned
– 1 zucchini, julienned
– 2 cups fresh spinach
– 4 oz beef sirloin, thinly sliced
– 2 cloves garlic, minced
– 2 tbsp soy sauce (low-sodium works too)
– 1 tbsp sesame oil
– 1 tsp sugar
– 4 eggs
– Gochujang sauce for serving (adjust spice level to your bravery)
Instructions
1. Rinse 1 cup short-grain white rice under cold water until the water runs clear, then drain completely.
2. Combine the rinsed rice and 1 ¼ cups water in a medium saucepan, bring to a boil over high heat, then immediately reduce heat to low, cover, and simmer for 18 minutes.
3. Remove the rice from heat and let it stand, covered, for 5 minutes to steam—this prevents a gummy texture.
4. Heat 1 tbsp vegetable oil in a large skillet over medium-high heat until shimmering, about 1 minute.
5. Add the julienned carrot and cook for 2 minutes, stirring frequently, until slightly softened but still crisp.
6. Transfer the carrot to a plate, then add the julienned zucchini to the same skillet and cook for 2 minutes until tender-crisp.
7. Remove the zucchini, then add the fresh spinach and cook for 1 minute, just until wilted, then set aside.
8. In the same skillet, add the remaining 1 tbsp vegetable oil and the thinly sliced beef sirloin, cooking for 3 minutes until no longer pink.
9. Stir in the minced garlic and cook for 30 seconds until fragrant—don’t let it burn or it’ll taste bitter.
10. Add 2 tbsp soy sauce, 1 tbsp sesame oil, and 1 tsp sugar to the beef, stirring to coat, and cook for 1 minute.
11. Fry 4 eggs sunny-side up in a separate non-stick skillet over medium heat until the whites are set but yolks are runny, about 3 minutes.
12. Divide the cooked rice among 4 bowls, then artfully arrange the carrots, zucchini, spinach, and beef over the rice.
13. Top each bowl with a fried egg and drizzle generously with gochujang sauce.
Now for the grand finale: grab a spoon and mix everything together until the runny yolk and gochujang create a glossy, spicy coating. The result is a symphony of textures—creamy rice, crisp veggies, tender beef, and that saucy kick that’ll make your taste buds do a happy dance. Serve it straight from the bowl while binge-watching your favorite K-drama for maximum authenticity.
Indonesian Nasi Goreng

Jazz up your dinner routine with this Indonesian Nasi Goreng that’s so flavorful, your taste buds might just throw a party! This isn’t your average fried rice—it’s a saucy, savory masterpiece that’ll make you feel like a culinary rockstar. Trust me, once you try it, plain rice will seem downright boring.
4
servings15
minutes15
minutesIngredients
– 2 cups cooked jasmine rice, cold (day-old works best for texture)
– 2 tbsp vegetable oil (or any neutral oil)
– 2 large eggs, beaten
– 1 small yellow onion, finely chopped
– 2 cloves garlic, minced
– 1 tbsp sweet soy sauce (kecap manis, or sub with 2 tsp soy sauce + 1 tsp brown sugar)
– 1 tbsp regular soy sauce (adjust to taste)
– 1 tsp sambal oelek (or any chili paste, for heat)
– 1 cup shredded cooked chicken (optional, or use shrimp)
– 2 green onions, sliced (for garnish)
– 1 lime, cut into wedges (for serving)
Instructions
1. Heat 1 tablespoon of vegetable oil in a large skillet or wok over medium-high heat (350°F).
2. Pour the beaten eggs into the hot skillet and swirl to form a thin layer.
3. Cook the eggs for 1–2 minutes until set, then flip and cook for another 30 seconds before removing and slicing into strips.
4. Add the remaining 1 tablespoon of oil to the same skillet.
5. Sauté the chopped onion for 3–4 minutes until translucent and lightly golden.
6. Stir in the minced garlic and cook for 30 seconds until fragrant (tip: don’t let it burn!).
7. Add the shredded chicken (if using) and cook for 2 minutes, stirring to warm through.
8. Crumble the cold rice into the skillet, breaking up any clumps with a spatula.
9. Drizzle the sweet soy sauce, regular soy sauce, and sambal oelek over the rice.
10. Toss everything together for 3–4 minutes until the rice is evenly coated and heated through (tip: a firm spatula helps mix without mashing the rice).
11. Fold in the egg strips and half of the sliced green onions.
12. Cook for 1 more minute to combine.
13. Remove from heat and garnish with the remaining green onions.
14. Serve immediately with lime wedges on the side (tip: a squeeze of lime brightens all the flavors!).
Zesty, savory, and slightly spicy, this Nasi Goreng boasts a perfect balance of chewy rice, tender protein, and umami-rich sauce. Top it with a fried egg for extra decadence, or pack it for lunch—it’s just as delicious the next day!
Malaysian Nasi Lemak
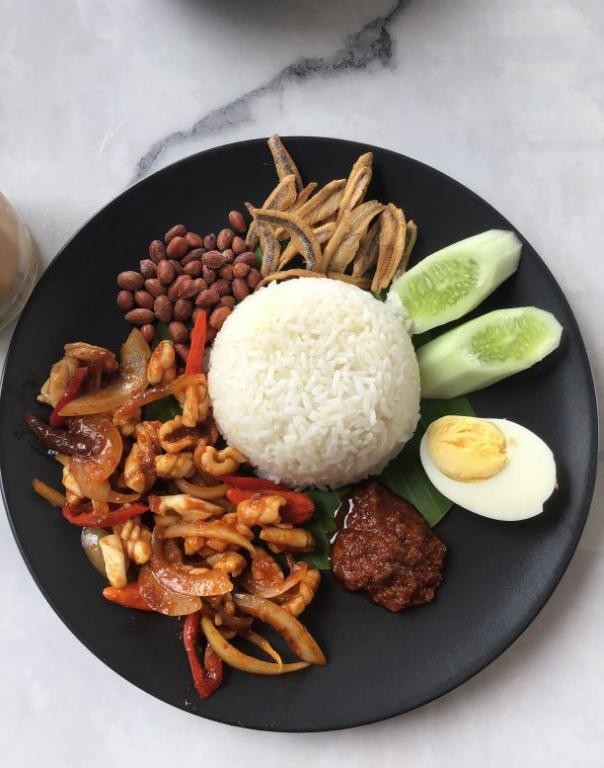
Yikes, your taste buds are about to take a tropical vacation without leaving your kitchen! This Malaysian Nasi Lemak is the ultimate flavor party—creamy coconut rice, spicy sambal, and crispy anchovies all crashing together in one glorious plate. Consider this your edible passport to Southeast Asia, where every bite is more exciting than the last.
2
servings15
minutes28
minutesIngredients
– 2 cups jasmine rice, rinsed until water runs clear
– 1 (13.5 oz) can coconut milk, shaken well before opening
– 1 pandan leaf, tied into a knot (optional but highly recommended for authentic aroma)
– 1 tsp salt, or to taste
– 4 cups water
– 1 cup dried anchovies, rinsed and patted dry
– 1/4 cup vegetable oil, or any neutral oil
– 1 large cucumber, sliced into thin rounds
– 4 hard-boiled eggs, peeled and halved
– 1/2 cup roasted peanuts, unsalted
– 1/2 cup sambal oelek, adjust to spice preference
Instructions
1. Combine rinsed jasmine rice, coconut milk, pandan leaf, salt, and water in a medium saucepan.
2. Bring the mixture to a boil over high heat, stirring once to prevent sticking.
3. Reduce heat to low, cover the saucepan, and simmer for 18 minutes until liquid is fully absorbed. Tip: Resist peeking—keeping the lid on ensures perfectly steamed rice!
4. Remove the saucepan from heat and let it sit, covered, for 10 minutes to allow the rice to fluff up.
5. Heat vegetable oil in a skillet over medium-high heat until it shimmers, about 350°F.
6. Fry dried anchovies in the hot oil for 2–3 minutes until golden brown and crispy, stirring frequently.
7. Use a slotted spoon to transfer anchovies to a paper towel-lined plate to drain excess oil. Tip: Fry in batches to avoid overcrowding for maximum crispiness!
8. Arrange cucumber slices, hard-boiled egg halves, roasted peanuts, and fried anchovies on a serving platter.
9. Fluff the coconut rice with a fork and mound it in the center of the platter.
10. Spoon sambal oelek into a small bowl and place it alongside the rice. Tip: For extra zing, stir a squeeze of lime juice into the sambal right before serving.
Amazingly creamy rice meets fiery sambal and crunchy toppings in a texture showdown that’ll have you forgetting all about your usual meal routine. Serve it family-style with extra cucumber slices for cooling relief, or pack individual portions for a lunchbox that screams ‘adventure’ louder than your coworker’s gossip.
Filipino Arroz Caldo
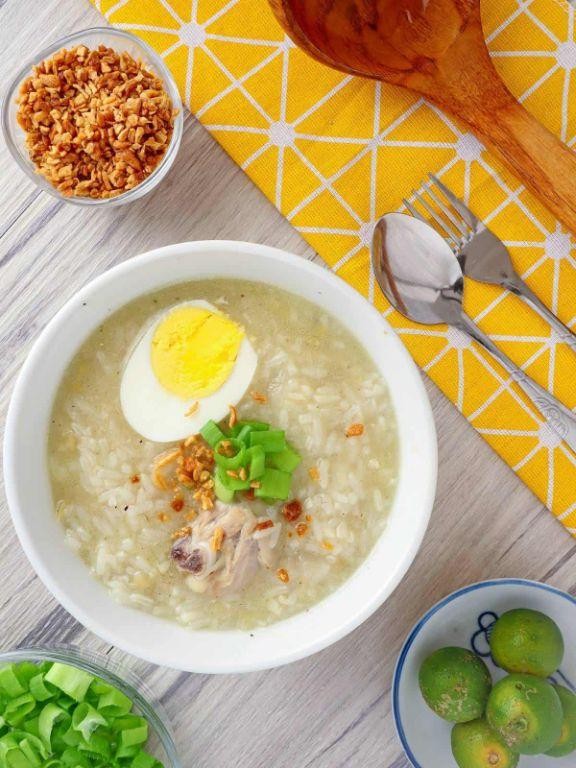
Dive into a bowl of pure comfort that’s basically a warm hug for your soul—Filipino Arroz Caldo is the cozy, savory rice porridge that’ll make you wonder why you ever settled for boring old chicken soup. This garlicky, ginger-kissed masterpiece is like congee’s cooler cousin who knows how to party, and it’s ridiculously easy to whip up even on your laziest day. Trust me, your taste buds will throw a fiesta after just one spoonful.
3
servings15
minutes45
minutesIngredients
- 1 cup jasmine rice (or any short-grain rice for extra creaminess)
- 1 lb boneless, skinless chicken thighs, cut into bite-sized pieces (or sub with shredded rotisserie chicken for a shortcut)
- 1 large onion, finely chopped
- 4 cloves garlic, minced (because more garlic is always the answer)
- 1 thumb-sized piece of ginger, peeled and thinly sliced into matchsticks
- 8 cups chicken broth (low-sodium if you’re watching salt)
- 2 tbsp fish sauce (adjust to taste—start light, you can always add more!)
- 1 tsp ground black pepper
- 2 tbsp cooking oil (or any neutral oil like canola)
- 2 hard-boiled eggs, peeled and halved (for topping, because eggs make everything better)
- 2 green onions, thinly sliced (for a fresh, colorful finish)
- 1 lemon or calamansi, cut into wedges (squeeze over at the end for a zesty kick)
Instructions
- Heat 2 tbsp of cooking oil in a large pot or Dutch oven over medium heat until it shimmers—this usually takes about 1 minute.
- Sauté the chopped onion, minced garlic, and ginger matchsticks for 3–4 minutes, stirring frequently, until the onion turns translucent and the kitchen smells like heaven.
- Add the chicken pieces and cook for 5–6 minutes, turning occasionally, until the outside is no longer pink. Pro tip: Don’t rush this step—browning the chicken lightly adds depth to the broth!
- Stir in 1 cup of jasmine rice and toast it with the chicken and aromatics for 1–2 minutes, just until the grains look slightly opaque.
- Pour in 8 cups of chicken broth, 2 tbsp of fish sauce, and 1 tsp of black pepper, then give everything a good stir to combine.
- Bring the mixture to a boil over high heat, then reduce the heat to low, cover the pot, and let it simmer gently for 30–35 minutes. Pro tip: Resist the urge to stir too often—letting it bubble slowly helps the rice break down and thicken naturally.
- After 30 minutes, check the consistency; if it’s too thick, add a splash more broth or water until it reaches your preferred porridge-like texture.
- Ladle the Arroz Caldo into bowls and top each with a halved hard-boiled egg, a sprinkle of sliced green onions, and a lemon wedge on the side. Pro tip: Squeeze that lemon right before eating—the acidity cuts through the richness and brightens every bite!
This glorious porridge is luxuriously creamy with tender chicken and pops of ginger in every spoonful. Try serving it with extra crispy fried garlic on top for a crunchy contrast, or pair it with toasted pandesal for the ultimate Filipino breakfast vibe. The flavors deepen if you let it sit for a bit, so don’t be shy about making a big batch—leftovers are basically a reward for future you.
Burmese Coconut Rice
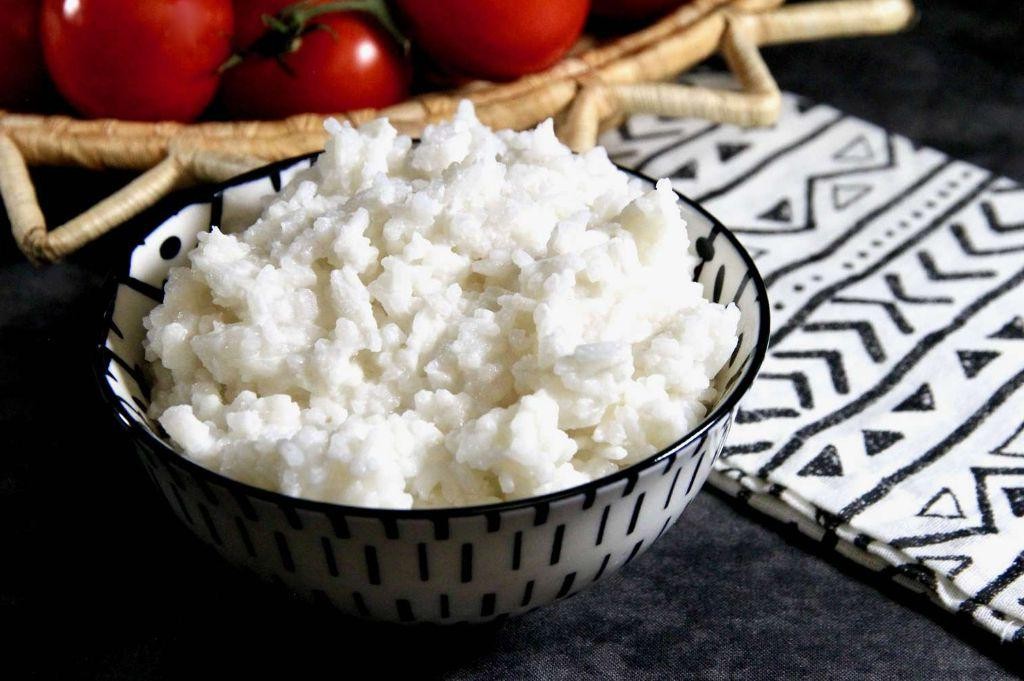
Zesty, fragrant, and ridiculously easy to make, this Burmese Coconut Rice is the weeknight hero your taste buds have been dreaming of—it’s basically a tropical vacation in a bowl, minus the sunscreen. With just a handful of pantry staples, you’ll whip up a dish so flavorful, your family might start calling you ‘the rice whisperer.’ Trust me, this one’s a game-changer.
3
servings5
minutes30
minutesIngredients
– 1 cup jasmine rice (rinsed until water runs clear for fluffier results)
– 1 cup coconut milk (full-fat for maximum creaminess)
– 1 cup water
– 1 tbsp coconut oil (or any neutral oil like vegetable)
– 1 tsp salt (adjust to taste)
– 1/2 tsp turmeric (for that golden glow)
– 2 pandan leaves, knotted (optional, but adds a floral aroma)
Instructions
1. Rinse 1 cup jasmine rice under cold water in a fine-mesh strainer until the water runs nearly clear, about 1–2 minutes, to remove excess starch.
2. In a medium saucepan, heat 1 tbsp coconut oil over medium heat for 30 seconds until shimmering.
3. Add the rinsed rice to the saucepan and toast for 2 minutes, stirring constantly, until grains are lightly fragrant and coated in oil.
4. Pour in 1 cup coconut milk, 1 cup water, 1 tsp salt, 1/2 tsp turmeric, and the knotted pandan leaves (if using), and stir gently to combine.
5. Bring the mixture to a boil over high heat, then immediately reduce the heat to low and cover the saucepan tightly with a lid.
6. Simmer the rice for 18 minutes without lifting the lid to ensure even cooking and steam retention.
7. Remove the saucepan from the heat and let it sit, covered, for 10 minutes to allow the rice to absorb any residual liquid and steam fully.
8. Fluff the rice gently with a fork, discarding the pandan leaves, and serve warm.
Miraculously creamy with a subtle sweetness from the coconut milk, this rice pairs beautifully with grilled chicken or spicy curries. For a fun twist, shape it into small rounds and pan-fry until crispy-edged—it’s a textural dream you’ll want to make on repeat.
Singapore Hainanese Chicken Rice

Kickstarting your taste buds on a tropical vacation without leaving your kitchen, this Singapore Hainanese Chicken Rice is the ultimate comfort food hack that’s so good, it should probably come with a frequent flyer program. Get ready to transform humble chicken and rice into a flavor-packed masterpiece that’ll have your family begging for seconds—and possibly thirds.
3
servings15
minutes75
minutesIngredients
– 1 whole chicken (3–4 lbs), giblets removed
– 2 cups jasmine rice, rinsed until water runs clear
– 4 cloves garlic, smashed
– 2-inch piece ginger, sliced
– 2 green onions, cut into 2-inch pieces
– 1 tbsp sesame oil
– 2 tbsp vegetable oil (or any neutral oil)
– 1 tbsp soy sauce
– 1 tsp salt, plus more for seasoning
– 4 cups water
– Fresh cilantro, for garnish
– Sliced cucumber, for serving
Instructions
1. Place the whole chicken in a large pot and add 4 cups of water, ensuring it’s fully submerged.
2. Add the smashed garlic, sliced ginger, and green onion pieces to the pot.
3. Bring the water to a boil over high heat, then immediately reduce to a gentle simmer.
4. Simmer the chicken for 30 minutes, skimming off any foam that rises to the surface.
5. Remove the pot from heat, cover, and let the chicken steep in the hot broth for 20 minutes to cook through without drying out.
6. Transfer the chicken to an ice bath for 5 minutes to stop the cooking process and tighten the skin.
7. Pat the chicken dry with paper towels, then rub it all over with 1 tbsp sesame oil and 1 tsp salt.
8. Heat 2 tbsp vegetable oil in a separate pot over medium heat.
9. Sauté the remaining ginger and garlic slices until fragrant, about 2 minutes.
10. Add the rinsed jasmine rice and stir continuously for 1 minute to toast lightly.
11. Pour in 3 cups of the reserved chicken broth (strained) and bring to a boil.
12. Reduce heat to low, cover the pot, and cook the rice for 18 minutes without peeking.
13. Let the rice rest off heat for 5 minutes before fluffing with a fork.
14. Combine 1 tbsp soy sauce with 2 tbsp of the remaining chicken broth to create a simple dipping sauce.
15. Carve the chicken into serving pieces, discarding the bones.
16. Serve the sliced chicken over the fragrant rice, garnished with fresh cilantro and accompanied by sliced cucumber.
Every bite delivers silky, tender chicken and aromatic rice that’s soaked up all the savory goodness. The contrasting cool cucumber and bright cilantro make this dish a textural playground—try stacking the chicken over the rice like a savory Jenga tower for maximum drama.
Indian Lemon Rice
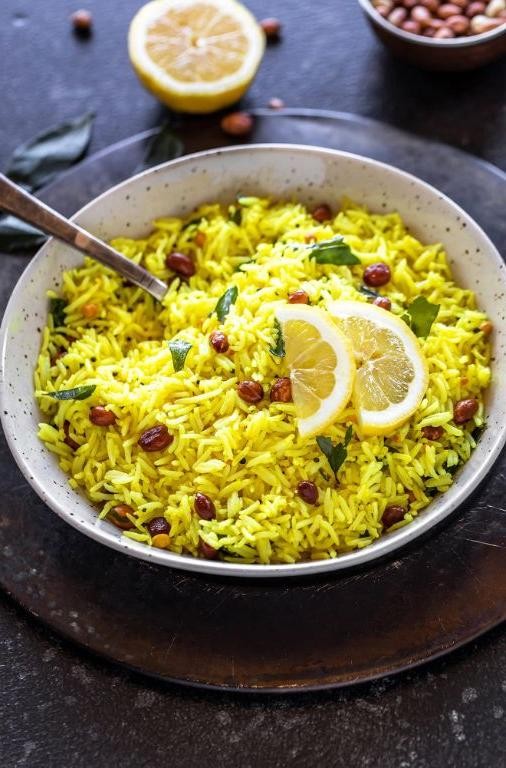
Razzle-dazzle your taste buds with this vibrant Indian Lemon Rice that’s so zesty, it might just convince your Monday to take a vacation. Think of it as sunshine on a plate—a quick, tangy escape from the usual rice routine that’s packed with flavor and ready in a flash. Seriously, if lemons could throw a party, this dish would be the life of it.
2
servings10
minutes20
minutesIngredients
– 1 cup basmati rice (rinsed until water runs clear for fluffier results)
– 2 tbsp vegetable oil (or any neutral oil like canola)
– 1 tsp mustard seeds
– 1 tsp turmeric powder (for that golden glow)
– 2 dried red chilies (crumbled, or swap for red pepper flakes)
– 1/4 cup peanuts (raw, for crunch)
– 3 tbsp fresh lemon juice (about 1 large lemon, adjust for extra tang)
– Salt to taste (start with 1/2 tsp and tweak)
– 2 cups water
Instructions
1. Rinse 1 cup basmati rice under cold water until the water runs nearly clear to remove excess starch.
2. In a medium pot, combine the rinsed rice and 2 cups water, bring to a boil over high heat, then reduce heat to low, cover, and simmer for 15 minutes until water is fully absorbed.
3. Tip: Let the cooked rice sit covered for 5 minutes off heat to steam and fluff up naturally.
4. Heat 2 tbsp vegetable oil in a large skillet over medium heat until it shimmers, about 1 minute.
5. Add 1 tsp mustard seeds and cook for 30 seconds until they start to pop and dance in the pan.
6. Stir in 1 tsp turmeric powder and 2 crumbled dried red chilies, sautéing for 30 seconds until fragrant.
7. Tip: Toast the spices briefly to unlock their aroma without burning—they should smell nutty, not bitter.
8. Add 1/4 cup raw peanuts and cook for 2 minutes, stirring frequently, until lightly golden and crisp.
9. Gently fold the cooked rice into the skillet, mixing evenly to coat with the spiced oil.
10. Drizzle 3 tbsp fresh lemon juice over the rice and sprinkle with salt, stirring for 1 minute to combine.
11. Tip: Add the lemon juice off-heat to preserve its bright, fresh flavor and avoid bitterness.
12. Remove from heat and let rest for 2 minutes to allow flavors to meld.
Effortlessly delightful, this lemon rice boasts a fluffy texture with pops of peanut crunch and a bold, citrusy kick that’s irresistibly tangy. Serve it warm as a standalone lunch or pair it with grilled chicken for a meal that’s anything but basic—it’s the side dish that secretly steals the show.
Pakistani Biryani

Fabulous food adventurers, prepare your taste buds for a journey to flavor town! Pakistani Biryani isn’t just a dish—it’s a fragrant, spice-kissed masterpiece that’ll have you questioning every bland meal you’ve ever endured. This aromatic wonder layers tender meat, fluffy rice, and enough spices to make your kitchen smell like a Mumbai street food stall (in the best way possible).
5
servings25
minutes55
minutesIngredients
– 2 cups basmati rice (rinsed until water runs clear)
– 1.5 lbs chicken thighs (bone-in for maximum flavor, or substitute with lamb)
– 1 large yellow onion, thinly sliced (these will become your golden crispy garnish)
– 4 cloves garlic, minced (fresh is best, but jarred works in a pinch)
– 1-inch piece ginger, grated (don’t skip—this is flavor magic)
– 1 cup plain yogurt (full-fat for creaminess, Greek works too)
– 2 tbsp biryani masala (store-bought blend or homemade)
– 1 tsp turmeric powder (for that golden glow)
– 1/2 tsp red chili powder (adjust heat level to your bravery)
– 4 tbsp vegetable oil (or any neutral oil with high smoke point)
– 4 cups water (for perfectly cooked rice)
– 1/2 cup fresh cilantro, chopped (for that fresh finish)
– 1/4 cup fresh mint leaves, chopped (the secret aromatic weapon)
– 1 tsp salt (adjust to taste, but don’t be shy)
Instructions
1. Heat 2 tablespoons of vegetable oil in a large, heavy-bottomed pot over medium-high heat until shimmering (about 350°F).
2. Add thinly sliced onions and cook for 8-10 minutes, stirring frequently, until they turn deep golden brown and crispy—this is your flavor foundation, so don’t rush it!
3. Remove half the crispy onions for garnish later—this prevents sogginess and gives you textural contrast.
4. To the remaining onions in the pot, add minced garlic and grated ginger, sautéing for 60 seconds until fragrant but not burned.
5. Add chicken thighs skin-side down and sear for 3-4 minutes per side until golden brown—this creates a flavorful crust that’ll infuse the entire dish.
6. Stir in yogurt, biryani masala, turmeric, red chili powder, and salt, coating the chicken completely—the yogurt tenderizes while the spices bloom.
7. Reduce heat to low, cover the pot, and let the chicken simmer in the spice mixture for 20 minutes until partially cooked and infused with flavor.
8. Meanwhile, in a separate pot, bring 4 cups of water to a rolling boil and add rinsed basmati rice—cook for exactly 6 minutes until grains are partially cooked but still firm.
9. Drain the par-cooked rice immediately to stop the cooking process—this prevents mushy biryani and ensures separate, fluffy grains.
10. Layer the partially cooked chicken mixture with the drained rice in the original pot, creating alternating layers and sprinkling chopped mint and cilantro between each.
11. Cover the pot with a tight-fitting lid and cook on the lowest heat setting for 15 minutes—this dum (steaming) method allows flavors to marry beautifully.
12. Turn off the heat and let the biryani rest, covered, for 10 additional minutes—this final resting period ensures every grain absorbs the aromatic steam.
13. Gently fluff the biryani with a fork, mixing the layers slightly while maintaining the distinct rice and chicken sections.
14. Garnish with reserved crispy onions and additional fresh herbs before serving.
Marvel at the glorious layers you’ve created! The fluffy basmati rice should separate easily, each grain perfumed with spices while the chicken remains fall-off-the-bone tender. Serve this showstopper with cool cucumber raita to balance the warmth, or go full celebration mode with hard-boiled eggs and fried potatoes nestled into the fragrant mound.
Laotian Sticky Rice with Jeow
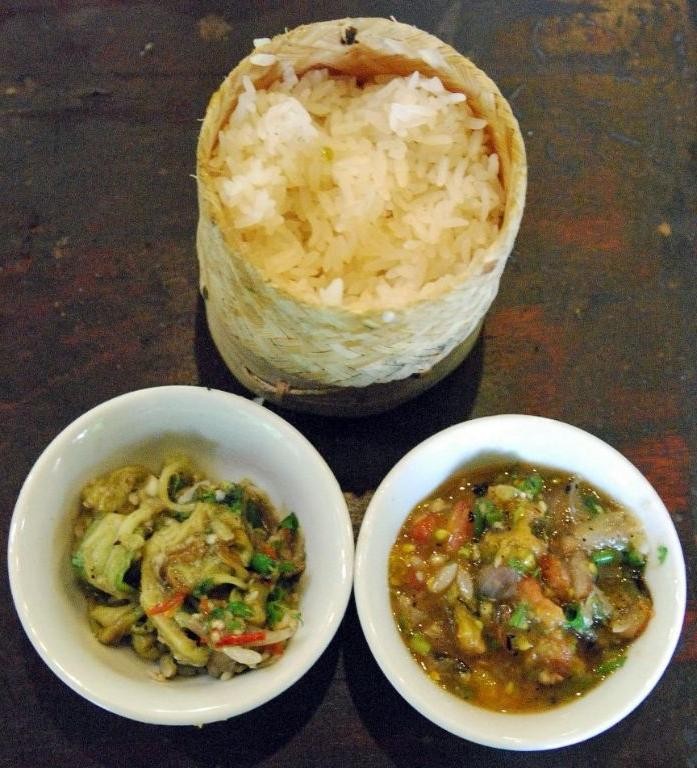
Tired of the same old rice routine? Meet your new obsession: Laotian Sticky Rice with Jeow, a dish that’s so delightfully chewy and explosively flavorful, it’ll make your taste buds do a happy dance. This isn’t just a side dish—it’s a hands-on, dip-everything-in-it experience that’s perfect for shaking up your weeknight dinner game. Get ready to get a little messy and a lot satisfied.
5
servings15
minutes25
minutesIngredients
– 2 cups glutinous rice (also called sweet rice, don’t use regular long-grain)
– 1 ¾ cups water for soaking
– 4 cloves garlic, minced (fresh is best for that punchy flavor)
– 2 Thai chilies, finely chopped (seeds removed for less heat, or leave ’em in for a fiery kick)
– 2 tbsp fish sauce (or soy sauce for a vegan version)
– 1 tbsp lime juice (freshly squeezed, please—bottled just won’t cut it)
– 1 tsp sugar (balances the tang and saltiness, adjust to your sweet tooth)
– ¼ cup chopped cilantro (stems and all for extra herbaceousness)
– 2 tbsp chopped green onion (the green parts add a fresh, mild bite)
Instructions
1. Rinse the 2 cups of glutinous rice in a fine-mesh strainer under cold running water until the water runs clear, not cloudy.
2. Soak the rinsed rice in 1 ¾ cups of cold water for at least 4 hours or up to overnight—this step is non-negotiable for that perfect sticky texture.
3. Drain the soaked rice thoroughly using the strainer, shaking off any excess water.
4. Line a steamer basket with cheesecloth or a clean kitchen towel to prevent the rice from sticking during steaming.
5. Spread the drained rice evenly in the prepared steamer basket, creating a shallow layer for even cooking.
6. Steam the rice over boiling water for 25 minutes, covered, until the grains are translucent and tender. Tip: Don’t peek too often—keeping the steam trapped is key!
7. While the rice steams, combine the 4 minced garlic cloves and 2 chopped Thai chilies in a small mortar and pestle.
8. Pound the garlic and chilies into a coarse paste, releasing their aromatic oils—this builds the flavor foundation for your jeow.
9. Stir in the 2 tbsp fish sauce, 1 tbsp lime juice, and 1 tsp sugar until the sugar dissolves completely.
10. Fold in the ¼ cup chopped cilantro and 2 tbsp chopped green onion just before serving to keep them vibrant and crisp. Tip: Taste and tweak—add more lime for zing or chili for heat!
11. Fluff the steamed rice gently with a fork or rice paddle to separate the grains slightly.
12. Serve the warm sticky rice immediately with the jeow sauce for dipping. Tip: Use your hands to shape small rice balls for an authentic, fun eating experience.
Dig into this glorious combo and you’ll love the contrast: the rice is chewy and subtly sweet, clinging together perfectly, while the jeow sauce delivers a bold, salty, and spicy punch that wakes up every bite. Try scooping up the jeow with little rice bundles, or get creative by pairing it with grilled meats or fresh veggies for a full Southeast Asian feast.
Cambodian Bai Sach Chrouk
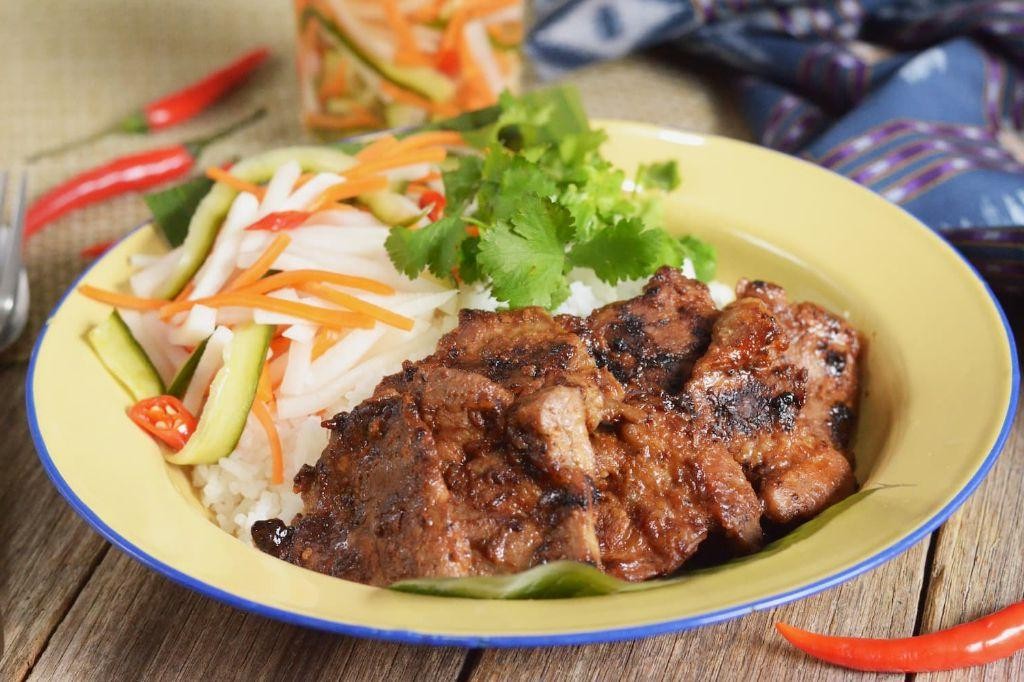
Tired of the same old breakfast routine? Let’s shake things up with Cambodian Bai Sach Chrouk—the grilled pork and rice dish that’ll make your morning scramble look downright boring. This flavor-packed wonder combines sweet, savory, and smoky notes in a way that’ll have you questioning why you ever settled for plain bacon.
5
portions20
minutes30
minutesIngredients
– 1.5 lbs pork shoulder, sliced ¼-inch thick (fat cap on for maximum flavor)
– ½ cup coconut cream (shake the can well before opening)
– 3 tbsp soy sauce (or tamari for gluten-free)
– 2 tbsp fish sauce (the funky, umami-packed secret weapon)
– 3 cloves garlic, minced (fresh is best, but 1 tbsp jarred works in a pinch)
– 1 tbsp palm sugar (or brown sugar as a substitute)
– 1 tsp black pepper (freshly cracked adds extra zing)
– 2 cups jasmine rice, rinsed until water runs clear
– 4 cups water for cooking rice
– 2 tbsp vegetable oil (or any neutral oil for grilling)
– 4 eggs (room temperature for even cooking)
– Sliced cucumbers and green onions for garnish (the crisp, fresh counterpoint)
Instructions
1. Combine coconut cream, soy sauce, fish sauce, minced garlic, palm sugar, and black pepper in a large bowl, whisking until the sugar fully dissolves.
2. Add pork slices to the marinade, ensuring each piece is thoroughly coated, then cover and refrigerate for at least 4 hours or overnight for deeper flavor penetration.
3. Rinse jasmine rice under cold running water until the water runs nearly clear to remove excess starch for fluffier results.
4. Place rinsed rice and 4 cups water in a rice cooker, pressing the cook button, or simmer covered on stove-top over low heat for 18 minutes if cooking manually.
5. Heat a grill pan or outdoor grill to medium-high (400°F), lightly brushing grates with vegetable oil to prevent sticking.
6. Remove pork from marinade, shaking off excess, and grill for 4-5 minutes per side until caramelized with visible grill marks and internal temperature reaches 145°F.
7. While pork grills, heat 1 tbsp vegetable oil in a non-stick skillet over medium heat and fry eggs sunny-side up for 3-4 minutes until whites are set but yolks remain runny.
8. Fluff cooked rice with a fork to separate grains and divide evenly among four bowls.
9. Top each rice bowl with grilled pork slices, a fried egg, and garnish with sliced cucumbers and green onions.
Perfectly charred pork mingles with creamy egg yolk and fluffy rice in every bite. Serve this with a side of pickled vegetables or drizzle with extra marinade reduced in a saucepan for an extra flavor boost—because breakfast should never be basic.
Conclusion
Get ready to transform your kitchen with these incredible Asian rice dishes! From comforting classics to exciting new flavors, this collection offers something delicious for every home cook. We’d love to hear which recipes become your family favorites—drop a comment below and don’t forget to pin your must-try dishes to share the inspiration!