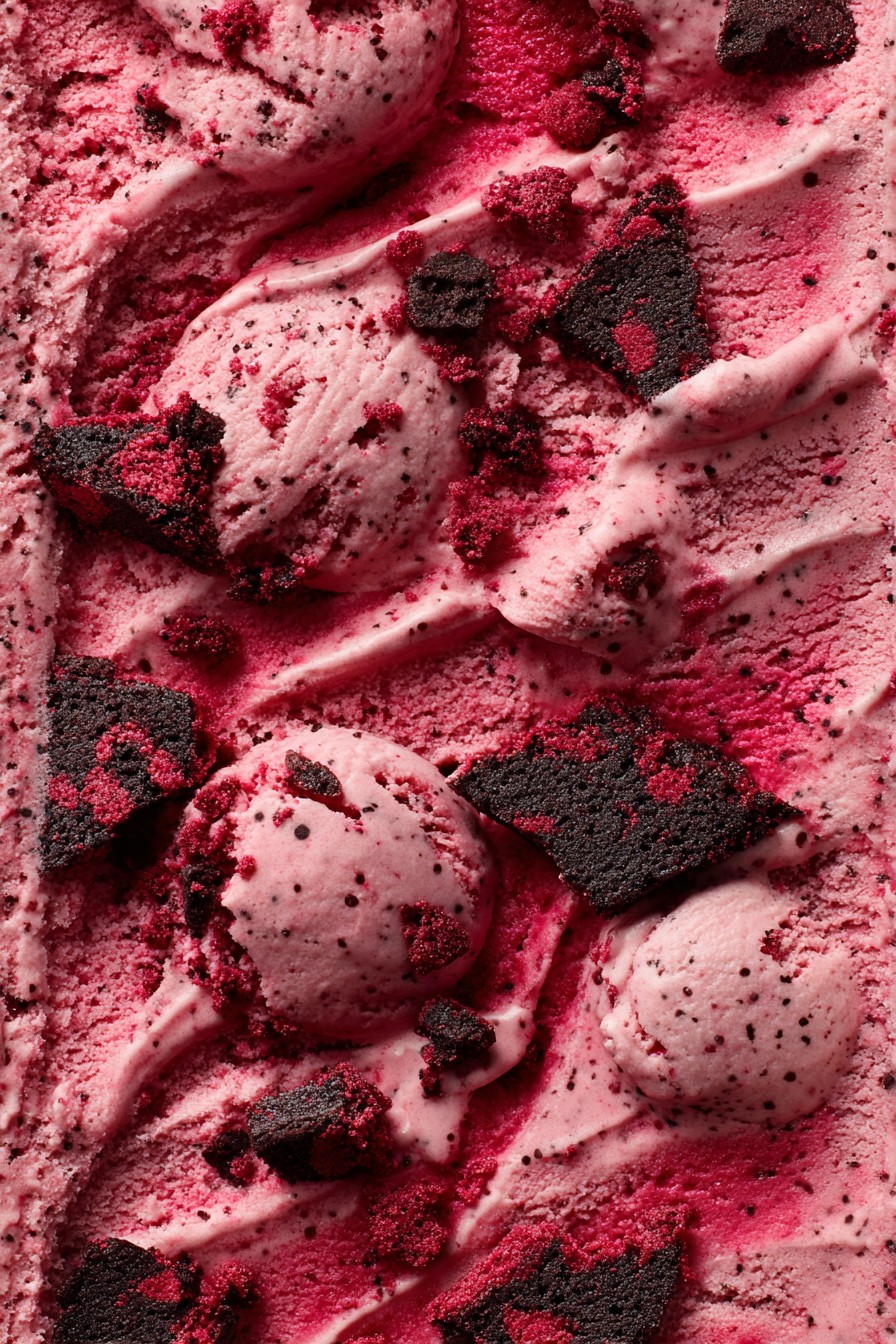
Savoring the iconic flavors of red velvet cake in frozen form represents the pinnacle of dessert innovation. This sophisticated ice cream formulation captures the essence of the classic Southern dessert while showcasing advanced frozen custard techniques that ensure optimal texture and flavor development throughout the freezing process.
Why This Recipe Works
- The incorporation of cream cheese directly into the custard base provides both structural integrity and authentic tanginess that mimics traditional red velvet frosting, while the high-fat content prevents ice crystal formation during the churning process
- Utilizing both Dutch-process cocoa powder and natural cocoa creates a complex chocolate profile with balanced acidity and depth, mirroring the nuanced flavor of red velvet cake batter without overwhelming the palate with single-note chocolate intensity
- The strategic addition of white vinegar enhances the characteristic red velvet tang while lowering the pH to optimize the chemical reaction with baking soda, creating the signature velvety texture and ensuring proper color development from the food coloring
- Employing a cooked custard base with precise temperature control at 175°F guarantees proper egg yolk emulsification and starch gelatinization, resulting in exceptionally smooth mouthfeel and superior stability during storage
- Incorporating crushed red velvet cake pieces as a mix-in during the final minutes of churning provides textural contrast and reinforces the dessert’s identity while maintaining the ice cream’s scoopability through proper freezing point depression calculations
Ingredients
- 2 cups heavy cream (36-40% butterfat)
- 1 cup whole milk (3.25% milkfat)
- 3/4 cup granulated sugar
- 1/4 cup light brown sugar, packed
- 6 large egg yolks
- 8 ounces full-fat cream cheese, softened to room temperature
- 2 tablespoons Dutch-process cocoa powder
- 1 tablespoon natural cocoa powder
- 2 teaspoons pure vanilla extract
- 1 teaspoon white vinegar
- 1/2 teaspoon fine sea salt
- 1/4 teaspoon baking soda
- 1-2 tablespoons red gel food coloring
- 1 1/2 cups red velvet cake cubes (1/2-inch pieces), frozen
Equipment Needed
- Ice cream maker with frozen bowl
- Digital instant-read thermometer
- Heavy-bottomed saucepan (3-quart)
- Fine-mesh strainer
- Stand mixer or electric hand mixer
- Heatproof spatula
- Whisk
- Mixing bowls (various sizes)
- Plastic wrap
- Airtight freezer container
Instructions
Prepare the Cream Cheese Base
Begin by placing the softened cream cheese in the bowl of a stand mixer fitted with the paddle attachment. Beat on medium speed for 2-3 minutes until completely smooth and free of lumps, scraping down the sides periodically with a rubber spatula. Meanwhile, combine the heavy cream and whole milk in a heavy-bottomed saucepan, then gradually incorporate both granulated and light brown sugars while whisking continuously to prevent clumping. Add both types of cocoa powder, whisking vigorously until no dry pockets remain and the mixture appears homogenous. The dual cocoa approach provides nuanced chocolate flavor—Dutch-process for smoothness and natural for acidity—that forms the foundation of authentic red velvet character. Heat this dairy mixture over medium heat until it reaches 150°F on a digital thermometer, stirring constantly with a heatproof spatula to prevent scorching on the bottom.
Temper the Egg Yolks
While the dairy mixture heats, whisk the six egg yolks in a separate heatproof bowl until they become pale yellow and slightly thickened, about 2-3 minutes of vigorous whisking. Once the dairy mixture reaches 150°F, slowly ladle approximately one cup of the hot liquid into the egg yolks while whisking constantly—this gradual introduction prevents the eggs from scrambling. Continue tempering by adding another half-cup of hot liquid while maintaining vigorous whisking motion. The tempered egg mixture should now be warm to the touch and slightly thickened. Pour this tempered egg mixture back into the saucepan with the remaining dairy, using a spatula to scrape every bit into the pan. This technique ensures proper emulsion formation and even heat distribution throughout the custard.
Cook the Custard to Perfection
Return the saucepan to medium-low heat and cook the custard mixture, stirring constantly with a heatproof spatula in a figure-eight pattern across the entire bottom surface. Monitor the temperature closely with a digital thermometer, maintaining the heat to achieve a gradual temperature increase of about 2°F per minute. The custard is properly cooked when it reaches 175°F and coats the back of a spoon—draw your finger through the coating; if it leaves a clean path, the custard has reached nappé stage. Immediately remove from heat and strain through a fine-mesh sieve into a clean bowl to remove any potential cooked egg particles. This precise temperature control ensures proper starch gelatinization and protein coagulation for optimal texture.
Incorporate Flavor Components
While the custard is still hot, gradually whisk in the prepared cream cheese base about one-quarter at a time, ensuring each addition is fully incorporated before adding the next. This method prevents temperature shock and maintains emulsion stability. Once fully combined, whisk in the pure vanilla extract, white vinegar, fine sea salt, and baking soda—the chemical reaction between vinegar and baking soda will create slight foaming, which is normal and contributes to the characteristic red velvet texture. Finally, add the red gel food coloring one tablespoon at a time, whisking thoroughly after each addition until achieving the desired vibrant crimson hue. Cover the surface directly with plastic wrap to prevent skin formation and refrigerate for at least 4 hours or preferably overnight until the base reaches 40°F.
Churn and Add Mix-Ins
Pour the thoroughly chilled custard base into your pre-frozen ice cream maker bowl and churn according to manufacturer’s instructions, typically 20-25 minutes, until the ice cream reaches soft-serve consistency and has increased in volume by approximately 30%. During the final 2 minutes of churning, gradually add the frozen red velvet cake pieces through the opening in the lid, allowing them to distribute evenly without overmixing. The frozen state of the cake pieces prevents them from breaking down excessively during incorporation. Transfer the churned ice cream to an airtight container, pressing plastic wrap directly onto the surface before sealing with the lid. For optimal texture development, harden in the freezer for at least 4 hours at 0°F before serving.
Tips and Tricks
For professional-level results, consider these advanced techniques that elevate the ice cream from merely good to exceptional. When selecting cream cheese, opt for full-fat brick-style varieties rather than whipped or spreadable versions, as their higher protein content and lower air incorporation provide superior structure and mouthfeel. The cream cheese should be softened properly—leave it at room temperature for 2 hours rather than microwaving, which can create hot spots that compromise the emulsion. For the custard base, using a combination of granulated and brown sugars isn’t just for flavor; the molasses in brown sugar acts as a natural anti-freeze agent, improving scoopability straight from the freezer. When tempering eggs, ensure all equipment is meticulously clean and free of any fat residue, as even trace amounts can inhibit proper emulsion formation.
Temperature control represents the most critical aspect of premium ice cream production. Invest in a high-quality digital thermometer with 0.1°F increments for precise monitoring during custard cooking. The ideal 175°F target represents the point where egg proteins have sufficiently denatured to thicken the custard without becoming rubbery. During chilling, rapid temperature reduction is key—place the hot custard in an ice bath for 15 minutes before refrigerating to quickly pass through the temperature danger zone. For the churning phase, ensure your ice cream maker bowl has been frozen for at least 24 hours at 0°F or below; insufficient freezing leads to inadequate aeration and icy texture. When adding mix-ins, the frozen cake pieces should be precisely 1/2-inch cubes—larger pieces become difficult to scoop, while smaller pieces lose their textural identity.
Storage techniques significantly impact final quality. Always use shallow, airtight containers rather than deep ones to minimize temperature fluctuations during serving. When pressing plastic wrap onto the surface, ensure complete contact to prevent ice crystal formation through sublimation. For long-term storage up to three weeks, maintain consistent freezer temperature and avoid storing near the door where temperature fluctuations occur. If the ice cream becomes too hard, temper it in the refrigerator for 15-20 minutes before serving rather than microwaving, which creates undesirable melt-refreeze cycles. For professional presentation, dip your ice cream scoop in hot water between servings to create clean, round scoops that showcase the vibrant color and visible cake pieces.
Recipe Variations
- Red Velvet Cheesecake Ice Cream: Incorporate 4 ounces of finely chopped white chocolate into the hot custard base after straining, then fold in 1 cup of graham cracker crust pieces during the final minute of churning. The white chocolate enhances creaminess while providing a subtle flavor contrast, and the graham cracker pieces mimic cheesecake crust elements. For additional authenticity, swirl in 1/2 cup of cheesecake batter (prepared separately with cream cheese, sugar, and egg) during the transfer to the storage container, creating marbled ribbons throughout the frozen dessert.
- Chocolate Chip Red Velvet: Add 3/4 cup of mini chocolate chips that have been tossed with 1 teaspoon of cocoa powder (to prevent sinking) during the last minute of churning. For enhanced texture contrast, use a combination of milk chocolate and white chocolate chips. The miniature size ensures even distribution without overwhelming individual bites, while the cocoa coating technique maintains suspension throughout the freezing process. Consider toasting the chocolate chips briefly in a 300°F oven for 5 minutes before cooling completely to enhance their flavor profile.
- Red Velvet Brownie Chunk: Replace the cake pieces with 1 1/2 cups of fudge brownie chunks (1/2-inch cubes) that have been frozen solid. For optimal results, prepare brownies specifically for this purpose—bake until just set with a fudgy center rather than cake-like texture. The dense, chocolatey brownie pieces provide richer flavor and more substantial textural contrast than cake alone. For additional complexity, sprinkle the brownie chunks with flaky sea salt before freezing to create sweet-salty interplay.
- White Chocolate Raspberry Swirl: After churning, layer the ice cream in the storage container with 3/4 cup of raspberry sauce (made by simmering fresh raspberries with 2 tablespoons sugar and 1 teaspoon lemon juice until thickened, then strained). Use a knife to create subtle swirls rather than fully incorporating. The tart raspberry provides bright acidity that cuts through the richness while complementing the cream cheese notes. For additional elegance, garnish servings with fresh raspberries and white chocolate shavings.
Frequently Asked Questions
Can I make this recipe without an ice cream maker?
While an ice cream maker provides optimal aeration and texture, you can achieve respectable results using the freeze-and-stir method. Pour the chilled base into a shallow metal baking pan and freeze for 45 minutes until the edges begin to set. Remove and vigorously whisk with a hand mixer or fork to break up ice crystals, then return to freezer. Repeat this process every 30 minutes for 3-4 cycles until the desired consistency is reached. The final texture will be denser with slightly larger ice crystals, but still enjoyable. For best manual results, ensure your freezer maintains consistent 0°F temperature and work quickly during each mixing session to minimize melting.
Why did my ice cream turn out icy instead of creamy?
Icy texture typically results from insufficient fat content, improper emulsion, or inadequate churning. Ensure you’re using heavy cream with 36-40% butterfat rather than lighter alternatives. The custard must reach precisely 175°F to properly thicken and bind water molecules. Inadequate chilling before churning causes larger ice crystal formation—the base must reach 40°F. If your ice cream maker bowl wasn’t fully frozen (24 hours at 0°F), the churning process won’t freeze the mixture rapidly enough. Finally, overstorage can cause iciness; consume within 2-3 weeks for optimal texture, as prolonged freezing eventually leads to crystal growth despite proper formulation.
Can I reduce the sugar content without affecting texture?
Sugar serves multiple functions beyond sweetness—it lowers the freezing point, controls ice crystal size, and contributes to smooth mouthfeel. Reducing sugar by more than 25% will result in unpleasantly hard, icy texture. For moderate reduction, replace 1/4 cup of granulated sugar with allulose, which provides similar freezing point depression with reduced calories. Alternatively, incorporate 2 tablespoons of vodka or other alcohol (which doesn’t freeze) to maintain scoopability. The current formulation represents the optimal balance between sweetness and technical function; significant alterations require reformulating multiple components to maintain proper texture and stability.
How can I achieve more vibrant red color?
The characteristic red velvet hue requires sufficient color concentration to overcome the darkening effect of cocoa powder. Gel food coloring provides more intense pigmentation than liquid varieties without adding excess moisture. For maximum vibrancy, use professional-grade red gel color and consider adding 1/8 teaspoon of cocoa powder-extracted color (soak cocoa powder in hot water, strain, use the dark liquid) to deepen the shade. The chemical reaction between vinegar and baking soda also enhances color development—ensure these ingredients are fresh and properly measured. If color remains unsatisfactory, additional gel coloring can be added after churning during the transfer to storage container.
Why include both vinegar and baking soda in a frozen dessert?
This combination serves multiple technical purposes beyond flavor authenticity. The acid-base reaction creates minute carbon dioxide bubbles that contribute to the characteristic “velvety” mouthfeel by slightly aerating the mixture. Vinegar also lowers the pH, which enhances the perception of sweetness without additional sugar and helps stabilize the red color against oxidation. From a food science perspective, the slightly acidic environment improves protein stability in the custard and inhibits ice crystal growth. The quantities are carefully calibrated to provide these benefits without overwhelming the flavor profile—the result should be subtle tanginess rather than pronounced acidity.
Summary
This sophisticated red velvet ice cream formulation combines precise temperature control with balanced ingredient ratios to achieve professional-quality results. The technique-driven approach ensures optimal texture, authentic flavor replication, and stunning visual appeal that distinguishes this frozen dessert from simpler preparations.
Red Velvet Ice Cream
5
servings35
minutes15
minutesIngredients
Instructions
- 1 Beat cream cheese until smooth. Heat cream, milk, sugars, and cocoas to 150°F.
- 2 Temper egg yolks with hot dairy mixture, then combine all custard ingredients.
- 3 Cook custard to 175°F, strain, then incorporate cream cheese mixture.
- 4 Add vanilla, vinegar, salt, baking soda, and food coloring. Chill to 40°F.
- 5 Churn in ice cream maker, add frozen cake pieces during final 2 minutes.
- 6 Transfer to airtight container, harden 4 hours at 0°F before serving.