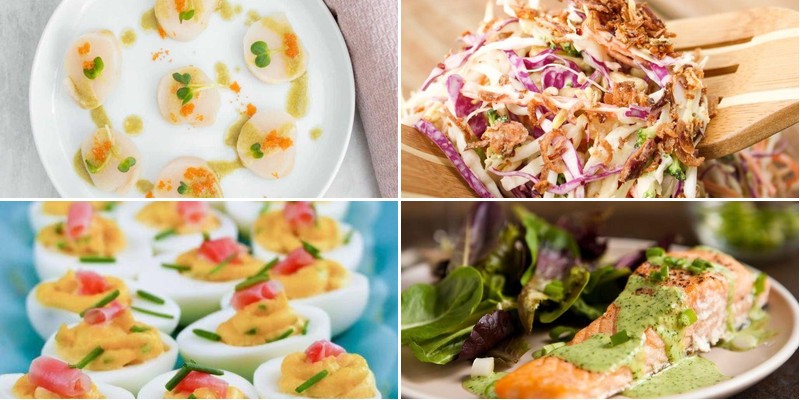
Kick your meals up a notch with these fiery wasabi creations! If you’re craving that signature heat and zesty punch that only wasabi can deliver, you’ve come to the right place. From quick weeknight dinners to impressive appetizers, we’ve gathered 22 spicy recipes that will truly ignite your taste buds. Get ready to explore bold flavors and transform your cooking—let’s dive into the heat!
Grilled Salmon with Wasabi Sauce
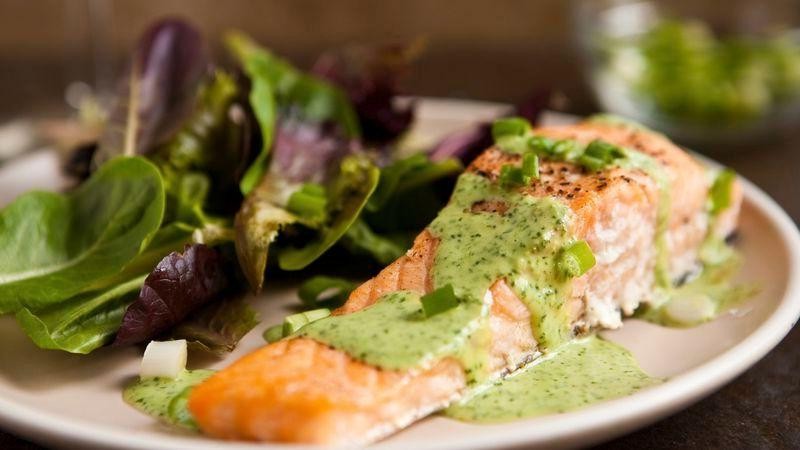
Mastering grilled salmon transforms weeknight dinners into restaurant-quality experiences, especially when paired with a zesty wasabi sauce that brings both heat and brightness to each flaky bite. This methodical approach ensures perfectly cooked fish every time, guiding you through each precise step with confidence-building clarity.
Ingredients
- 4 (6-ounce) skin-on salmon fillets with vibrant pink flesh
- 2 tablespoons rich extra virgin olive oil
- 1 teaspoon coarse kosher salt
- ½ teaspoon freshly cracked black pepper
- ¼ cup creamy mayonnaise
- 2 tablespoons zesty fresh lime juice
- 1 tablespoon pungent prepared wasabi paste
- 1 teaspoon aromatic toasted sesame oil
- 2 tablespoons thinly sliced fresh green onions
Instructions
- Preheat your outdoor grill to medium-high heat, approximately 400°F, and lightly oil the grates with a folded paper towel dipped in olive oil.
- Pat the salmon fillets completely dry with paper towels to ensure crispy skin.
- Brush both sides of each salmon fillet evenly with the extra virgin olive oil.
- Sprinkle the coarse kosher salt and freshly cracked black pepper evenly over both sides of the fillets.
- Place the salmon skin-side down on the preheated grill and close the lid.
- Grill for exactly 6 minutes without moving the fish to develop grill marks.
- Carefully flip the salmon using a thin metal spatula and grill for 4 more minutes until the internal temperature reaches 125°F.
- Transfer the grilled salmon to a clean plate and let rest for 5 minutes to allow juices to redistribute.
- While the salmon rests, whisk together the creamy mayonnaise, zesty fresh lime juice, pungent prepared wasabi paste, and aromatic toasted sesame oil in a small bowl until completely smooth.
- Stir in the thinly sliced fresh green onions until evenly distributed throughout the sauce.
- Drizzle the wasabi sauce generously over the rested salmon fillets just before serving.
Delicate flakes separate effortlessly from the crispy skin, revealing moist, medium-rare flesh that contrasts beautifully with the creamy, sinus-clearing wasabi sauce. For a stunning presentation, serve over jasmine rice with steamed edamame, letting the vibrant green sauce cascade down the pink salmon in artistic drips that promise both visual appeal and layered flavor complexity.
Wasabi Sauce Chicken Wings

Diving into the world of bold flavors, these Wasabi Sauce Chicken Wings transform a classic game-day snack into an unforgettable culinary adventure with just the right amount of heat. Discover how simple ingredients create complex layers of flavor that will have everyone asking for the recipe. Follow each step carefully to achieve perfectly crispy wings coated in that signature wasabi kick.
Ingredients
– 2 pounds of fresh chicken wings, separated at joints
– 1 tablespoon of toasted sesame oil
– 1 teaspoon of coarse kosher salt
– ½ teaspoon of freshly ground black pepper
– 3 tablespoons of premium soy sauce
– 2 tablespoons of rich honey
– 1 tablespoon of freshly grated ginger root
– 2 cloves of aromatic garlic, minced
– 2 tablespoons of creamy mayonnaise
– 1-2 tablespoons of vibrant wasabi paste (adjust for heat preference)
– 1 tablespoon of fresh lime juice
– 2 tablespoons of thinly sliced scallions
Instructions
1. Preheat your oven to 400°F and line a large baking sheet with parchment paper.
2. Pat the fresh chicken wings completely dry with paper towels to ensure maximum crispiness.
3. Toss the dried wings with toasted sesame oil, coarse kosher salt, and freshly ground black pepper in a large bowl until evenly coated.
4. Arrange the wings in a single layer on the prepared baking sheet, making sure they aren’t touching.
5. Bake for 40-45 minutes, flipping halfway through, until the skin is golden brown and crispy.
6. While the wings bake, combine premium soy sauce, rich honey, freshly grated ginger root, and minced aromatic garlic in a small saucepan.
7. Simmer the sauce mixture over medium heat for 3-4 minutes until slightly thickened, then remove from heat.
8. Whisk in creamy mayonnaise, vibrant wasabi paste, and fresh lime juice until the sauce is smooth and well-combined.
9. Transfer the baked wings to a clean large bowl and pour the warm wasabi sauce over them.
10. Toss the wings vigorously until every surface is coated with the glossy sauce.
11. Transfer the sauced wings to a serving platter and immediately sprinkle with thinly sliced scallions.
For the ultimate experience, these wings deliver a satisfying crunch that gives way to tender, juicy meat beneath the bold wasabi glaze. The heat builds gradually rather than overwhelming, making them perfect for both spice lovers and those new to wasabi. Serve them alongside crisp cucumber slices and a cold lager to balance the warmth and create a complete flavor journey.
Soba Noodles with Wasabi Dipping Sauce
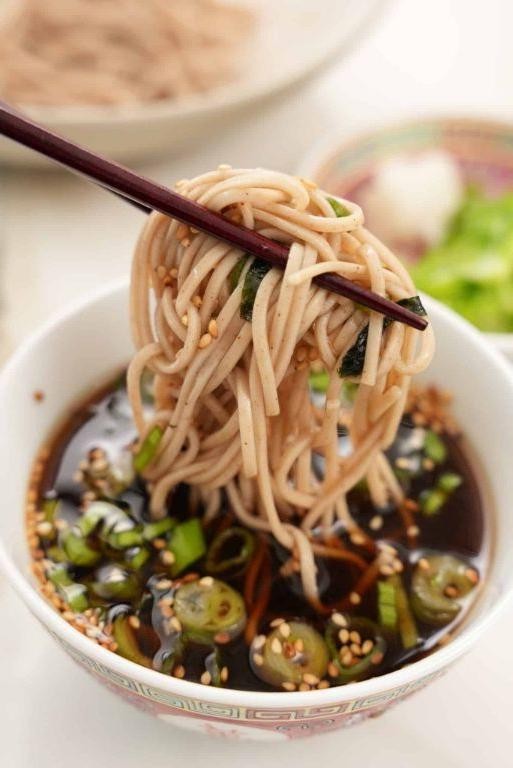
Eager to explore Japanese cuisine? This soba noodle dish offers a perfect introduction with its clean flavors and interactive dipping style that makes even weeknight dinners feel special. Following these methodical steps will ensure you achieve the perfect al dente noodles and balanced wasabi sauce every time.
Ingredients
– 8 ounces dried soba noodles
– 1 cup cold filtered water
– ¼ cup premium soy sauce
– 2 tablespoons mirin
– 1 teaspoon freshly grated wasabi paste
– 1 sheet nori seaweed
– 2 thinly sliced green onions
Instructions
1. Bring 4 quarts of water to a rolling boil in a large stockpot over high heat.
2. Add 8 ounces of dried soba noodles to the boiling water, stirring immediately to prevent sticking.
3. Cook noodles for exactly 5 minutes, setting a timer to ensure perfect texture.
4. Drain noodles immediately into a colander and rinse under cold running water for 1 full minute to stop the cooking process and remove excess starch.
5. Gently shake the colander to remove excess water from the rinsed noodles.
6. Toast 1 sheet of nori seaweed over a gas flame for 10 seconds until crisp and fragrant, or use a toaster oven at 300°F for 1 minute.
7. Crumble the toasted nori into small pieces using your fingers.
8. Combine ¼ cup premium soy sauce, 2 tablespoons mirin, and 1 cup cold filtered water in a small mixing bowl.
9. Whisk 1 teaspoon of freshly grated wasabi paste into the sauce mixture until fully dissolved.
10. Divide the chilled soba noodles between two serving bowls.
11. Sprinkle crumbled nori and thinly sliced green onions evenly over the noodles.
12. Serve the wasabi dipping sauce in two small separate bowls alongside the noodle bowls.
Remarkably satisfying, the chewy soba noodles contrast beautifully with the sharp, sinus-clearing wasabi sauce. For a creative twist, try adding tempura shrimp or chilled tofu cubes to your dipping platter. The cool noodles and spicy sauce create a refreshing temperature contrast that’s particularly enjoyable during warmer months.
Wasabi Crusted Tofu Steaks
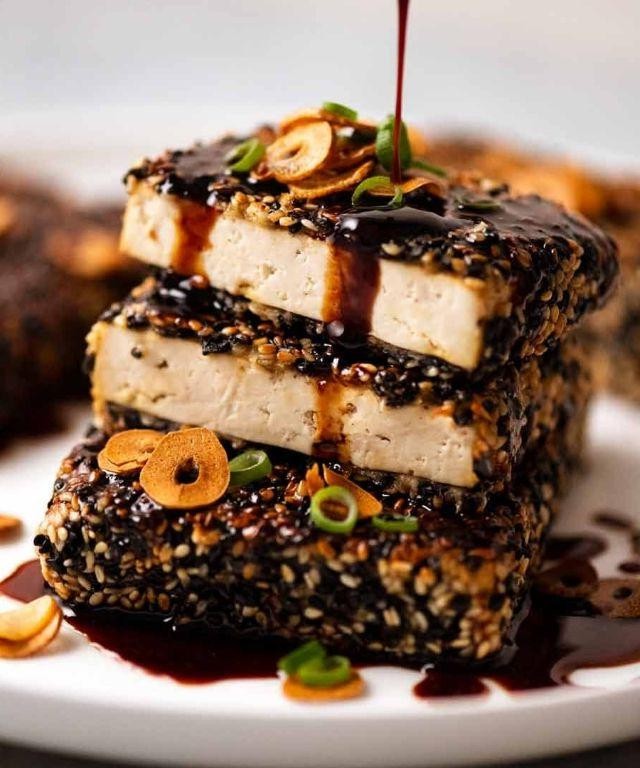
You’ve probably been searching for that perfect plant-based main dish that delivers both impressive flavor and satisfying texture. Wasabi crusted tofu steaks transform humble tofu into a restaurant-worthy centerpiece with a crispy, flavorful coating and tender interior that even skeptics will love.
Ingredients
– 1 (14-ounce) block of extra-firm tofu, pressed dry
– 2 tablespoons high-quality wasabi paste
– 1/4 cup panko breadcrumbs with visible texture
– 2 tablespoons all-purpose flour
– 1 large egg, beaten until smooth
– 3 tablespoons neutral avocado oil
– 1 teaspoon toasted sesame oil
– 1 tablespoon low-sodium soy sauce
– 1 teaspoon freshly grated ginger root
– 1/2 teaspoon garlic powder
Instructions
1. Press the extra-firm tofu block between paper towels with a heavy pan for 20 minutes to remove excess moisture.
2. Cut the pressed tofu into 1-inch thick steaks using a sharp knife.
3. Whisk together the wasabi paste, soy sauce, toasted sesame oil, and freshly grated ginger in a small bowl until fully combined.
4. Brush both sides of each tofu steak generously with the wasabi mixture using a pastry brush.
5. Place the all-purpose flour in a shallow dish and dredge each tofu steak until lightly coated.
6. Dip each flour-coated tofu steak into the beaten egg, ensuring complete coverage.
7. Press each tofu steak firmly into the panko breadcrumbs, coating both sides evenly.
8. Heat the neutral avocado oil in a large skillet over medium-high heat until it shimmers (about 350°F).
9. Carefully place the breaded tofu steaks in the hot oil without crowding the pan.
10. Cook for 3-4 minutes until the bottom develops a deep golden-brown crust.
11. Flip each tofu steak using tongs and cook for another 3-4 minutes on the second side.
12. Transfer the cooked tofu steaks to a wire rack to maintain crispiness.
Tip: Pressing tofu thoroughly prevents steaming during cooking and ensures maximum crispiness.
Tip: Test oil temperature by dropping in a breadcrumb – it should sizzle immediately.
Tip: Use a wire rack instead of paper towels to prevent the crust from becoming soggy.
The resulting texture combines a shatteringly crisp exterior with a remarkably tender, almost creamy interior that contrasts beautifully. That distinctive wasabi heat builds gradually without overwhelming, while the toasted sesame notes provide depth and complexity. Try serving these steaks sliced over a bed of jasmine rice with steamed bok choy, or layer them in a sandwich with crisp lettuce and spicy mayo for a completely different experience.
Wasabi Sauce Glazed Pork Chops
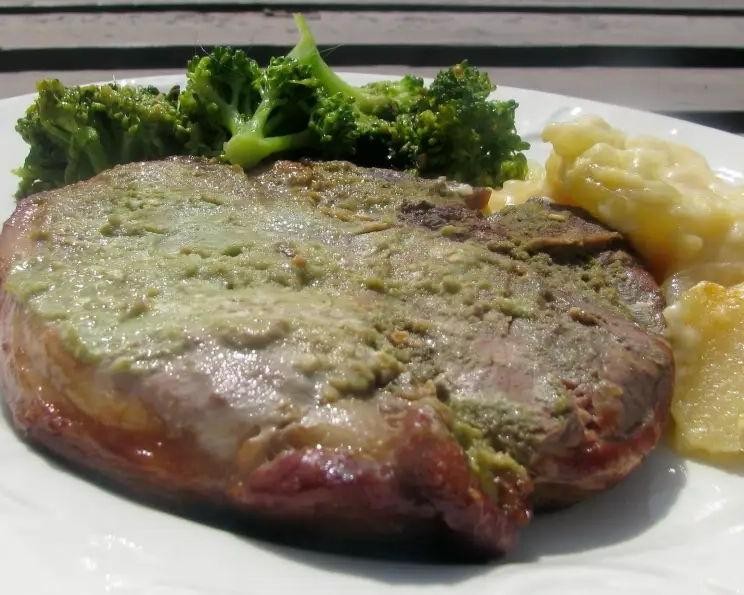
Let’s create a dish that transforms ordinary pork chops into something extraordinary with a bold wasabi glaze. Learning to balance the spicy kick of wasabi with sweet and savory elements will give you restaurant-quality results right at home. This method ensures perfectly cooked, juicy pork with a glossy, flavorful crust that’s surprisingly simple to master.
Ingredients
– 4 bone-in pork chops, about 1-inch thick
– 2 tablespoons extra virgin olive oil
– 1 teaspoon coarse kosher salt
– ½ teaspoon freshly cracked black pepper
– 3 tablespoons prepared wasabi paste
– 2 tablespoons pure maple syrup
– 1 tablespoon low-sodium soy sauce
– 2 cloves fresh garlic, minced
– 1 teaspoon freshly grated ginger root
– 2 tablespoons unsalted butter, cut into small pieces
Instructions
1. Pat the bone-in pork chops completely dry with paper towels to ensure proper browning.
2. Rub both sides of each pork chop with extra virgin olive oil using your hands.
3. Season both sides evenly with coarse kosher salt and freshly cracked black pepper.
4. Preheat a large cast-iron skillet over medium-high heat for 3 minutes until hot but not smoking.
5. Place pork chops in the hot skillet, leaving space between them for even cooking.
6. Sear for 4-5 minutes without moving until a golden-brown crust forms on the bottom.
7. Flip each pork chop using tongs and cook for another 4 minutes on the second side.
8. Reduce heat to medium and insert an instant-read thermometer into the thickest part of a chop, avoiding the bone.
9. Continue cooking until the thermometer reads 145°F for medium doneness, about 2-3 more minutes.
10. Transfer pork chops to a clean plate and tent loosely with aluminum foil to rest.
11. In the same skillet, add prepared wasabi paste, pure maple syrup, low-sodium soy sauce, minced fresh garlic, and freshly grated ginger root.
12. Whisk constantly for 1 minute until the mixture bubbles and thickens slightly.
13. Add unsalted butter pieces and whisk until fully melted and incorporated into the glaze.
14. Return pork chops to the skillet and spoon the wasabi glaze over them repeatedly for 30 seconds.
15. Remove from heat and let the glazed pork chops rest in the skillet for 2 minutes before serving. Buttery, spicy, and slightly sweet, these pork chops deliver a complex flavor profile that develops with each bite. Serve them alongside steamed jasmine rice to soak up the extra glaze, or slice them over a crisp Asian slaw for contrasting textures that highlight the wasabi’s gentle heat.
Sushi Rolls with Wasabi Cream
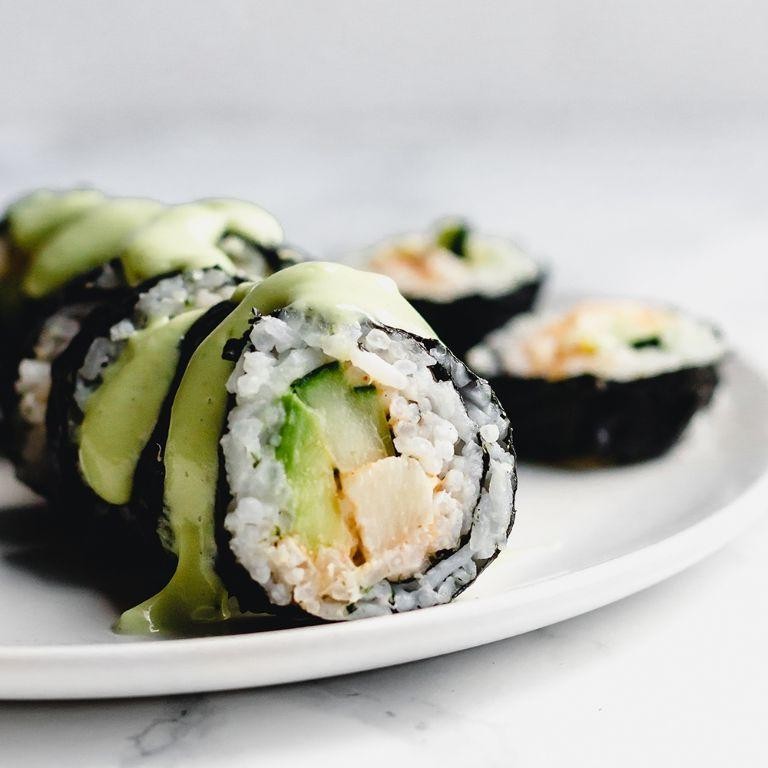
Perfecting homemade sushi may seem intimidating, but with this methodical approach, you’ll create restaurant-quality sushi rolls with a creamy wasabi kick that will impress even the most discerning palates. Preparing sushi rice with precision and handling nori sheets carefully are the foundations for success in this delightful Japanese-inspired dish.
Ingredients
– 1 cup short-grain sushi rice
– 1 ¼ cups filtered water
– 2 tablespoons seasoned rice vinegar
– 1 teaspoon granulated sugar
– ½ teaspoon fine sea salt
– 4 sheets roasted nori seaweed
– ½ pound fresh sushi-grade salmon, thinly sliced
– 1 ripe avocado, peeled and sliced
– 1 small English cucumber, julienned
– ¼ cup full-fat mayonnaise
– 1 tablespoon prepared wasabi paste
– 1 teaspoon fresh lemon juice
Instructions
1. Rinse 1 cup short-grain sushi rice under cold running water until the water runs clear, gently swirling the grains with your fingers to remove excess starch.
2. Combine the rinsed rice and 1 ¼ cups filtered water in a medium saucepan, then bring to a boil over high heat without stirring.
3. Reduce heat to low, cover the saucepan tightly, and simmer for exactly 18 minutes until all water is absorbed and rice appears slightly translucent.
4. Remove the cooked rice from heat and let it rest, covered, for 10 minutes to allow steam to finish cooking the grains evenly.
5. Gently fold 2 tablespoons seasoned rice vinegar, 1 teaspoon granulated sugar, and ½ teaspoon fine sea salt into the warm rice using a cutting motion with a rice paddle to avoid crushing the grains.
6. Spread the seasoned rice in a thin layer on a baking sheet and cool to room temperature, about 15 minutes, while occasionally turning sections with the paddle.
7. Place one 4-inch square roasted nori seaweed sheet shiny-side down on a bamboo sushi mat, aligning the rough side upward to better grip the rice.
8. Moisten your hands with water to prevent sticking, then evenly spread one-quarter of the cooled rice over the nori, leaving a 1-inch border at the top edge.
9. Arrange one-quarter of the ½ pound fresh sushi-grade salmon slices, 1 ripe avocado slices, and 1 small English cucumber julienne horizontally across the bottom third of the rice-covered nori.
10. Lift the bamboo mat edge closest to you and firmly roll the nori and filling away from you, applying even pressure to create a tight cylinder.
11. Repeat the rolling process with the remaining 3 nori sheets and fillings, keeping completed rolls under a damp cloth to prevent drying.
12. Whisk together ¼ cup full-fat mayonnaise, 1 tablespoon prepared wasabi paste, and 1 teaspoon fresh lemon juice in a small bowl until smooth and pale green.
13. Use a sharp knife dipped in water to cleanly slice each sushi roll into 8 equal pieces, wiping the blade between cuts for neat edges.
14. Arrange the sliced sushi rolls on a serving platter and drizzle with the wasabi cream sauce just before serving.
Really notice how the creamy wasabi sauce contrasts with the firm, slightly chewy rice and the silky texture of fresh salmon. The cool crispness of cucumber provides a refreshing crunch against the rich avocado, making each bite a perfect balance of textures and temperatures. For an elegant presentation, garnish with pickled ginger and serve immediately while the nori retains its delicate crispness.
Wasabi-Infused Deviled Eggs

Yielding to the perfect balance of creamy comfort and bold zing, these wasabi-infused deviled eggs transform a classic appetizer into an unforgettable experience. You’ll master the art of balancing heat with richness through simple, precise steps that ensure success every time you prepare this crowd-pleasing dish.
Ingredients
– 6 large farm-fresh eggs
– 1/4 cup creamy mayonnaise
– 1 teaspoon Dijon mustard with tangy complexity
– 1-2 teaspoons prepared wasabi paste, depending on your heat preference
– 1 tablespoon freshly squeezed lemon juice
– 1/4 teaspoon fine sea salt
– 1/8 teaspoon freshly ground black pepper
– 1 tablespoon finely chopped fresh chives
– Paprika for dusting
Instructions
1. Place 6 large farm-fresh eggs in a single layer in a medium saucepan and cover with cold water by 1 inch.
2. Bring the water to a rolling boil over high heat, then immediately cover the pan and remove it from heat.
3. Let the eggs stand in the hot water for exactly 12 minutes to achieve perfectly cooked yolks without gray rings.
4. Transfer the eggs to a bowl of ice water and let them cool completely for 15 minutes to stop the cooking process.
5. Gently tap each egg on the counter and roll between your palms to crack the shell evenly for easy peeling.
6. Peel all eggs under cool running water, starting from the wider end where the air pocket makes removal easier.
7. Slice each peeled egg in half lengthwise using a sharp knife wiped clean between cuts for neat edges.
8. Carefully pop the yolks into a medium bowl and arrange the white halves on a serving platter.
9. Mash the yolks with a fork until they form fine crumbs with no large lumps remaining.
10. Add 1/4 cup creamy mayonnaise, 1 teaspoon Dijon mustard, and 1-2 teaspoons prepared wasabi paste to the yolks.
11. Stir the mixture vigorously until completely smooth and well combined.
12. Mix in 1 tablespoon freshly squeezed lemon juice, 1/4 teaspoon fine sea salt, and 1/8 teaspoon freshly ground black pepper.
13. Fold in 1 tablespoon finely chopped fresh chives until evenly distributed throughout the filling.
14. Spoon or pipe the yolk mixture into the egg white halves, mounding it slightly in the center.
15. Lightly dust each filled egg with paprika for color and a subtle smoky flavor contrast.
Our finished deviled eggs offer a creamy, smooth texture that contrasts beautifully with the crisp egg whites. The wasabi provides a clean, sinus-clearing heat that builds gradually rather than overwhelming the palate. For an elegant presentation, try serving them on a bed of microgreens or alongside pickled ginger to complement the Japanese-inspired flavors.
Crab Cakes with Wasabi Aioli

Zesty and sophisticated, these crab cakes with wasabi aioli bring restaurant-quality elegance to your home kitchen. We’ll walk through each technique carefully, ensuring even beginner cooks achieve perfectly crisp exteriors and tender, flavorful interiors. Let’s begin with gathering our premium ingredients and methodically building these impressive patties.
Ingredients
– 1 pound fresh lump crab meat, carefully picked through for shells
– 1/3 cup panko breadcrumbs, for extra crispiness
– 1/4 cup mayonnaise, creamy and rich
– 1 large farm-fresh egg, lightly beaten
– 2 tablespoons freshly chopped parsley, vibrant green
– 1 tablespoon Dijon mustard, tangy and smooth
– 1 teaspoon Worcestershire sauce, deeply savory
– 1/2 teaspoon Old Bay seasoning, classic and aromatic
– 1/4 teaspoon finely ground black pepper
– 2 tablespoons vegetable oil, for high-heat frying
– 1/2 cup mayonnaise, for the aioli base
– 1 tablespoon freshly squeezed lemon juice, bright and acidic
– 1 teaspoon prepared wasabi paste, pungent and spicy
– 1/4 teaspoon garlic powder, for subtle depth
Instructions
1. Combine 1/2 cup mayonnaise, 1 tablespoon lemon juice, 1 teaspoon wasabi paste, and 1/4 teaspoon garlic powder in a small bowl, whisking until completely smooth.2. Cover the wasabi aioli with plastic wrap and refrigerate for at least 30 minutes to allow flavors to meld.3. Place 1 pound lump crab meat in a medium mixing bowl, gently flaking it with your fingers while checking for any remaining shell fragments.4. Add 1/3 cup panko breadcrumbs, 1/4 cup mayonnaise, 1 beaten egg, 2 tablespoons parsley, 1 tablespoon Dijon mustard, 1 teaspoon Worcestershire sauce, 1/2 teaspoon Old Bay seasoning, and 1/4 teaspoon black pepper to the crab.5. Use a rubber spatula to fold the mixture together gently, being careful not to break up the crab lumps too much.6. Divide the mixture into 8 equal portions and shape each into a 3/4-inch thick patty with your hands.7. Place the formed crab cakes on a parchment-lined baking sheet and refrigerate for 15 minutes to help them hold their shape during cooking.8. Heat 2 tablespoons vegetable oil in a large skillet over medium-high heat until it shimmers and easily coats the pan.9. Carefully place 4 crab cakes in the hot skillet, leaving space between them for even browning.10. Cook for 4-5 minutes until the bottoms develop a deep golden-brown crust that releases easily from the pan.11. Gently flip each crab cake using a thin spatula and cook for another 4-5 minutes until the second side is equally golden brown.12. Transfer the cooked crab cakes to a paper towel-lined plate to drain excess oil, then repeat with remaining patties. The contrast between the crispy, golden exterior and the delicate, sweet crab interior creates wonderful textural complexity. Serve these warm crab cakes with the cool, spicy wasabi aioli drizzled over the top or alongside for dipping, perhaps accompanied by a simple arugula salad to balance the richness.
Wasabi Sauce Shrimp Skewers

These wasabi sauce shrimp skewers transform simple ingredients into an impressive appetizer with just the right amount of heat. The methodical process ensures perfectly cooked shrimp every time, while the vibrant wasabi sauce adds a punch of flavor that complements the sweet, briny shrimp beautifully.
Ingredients
- 1 pound large raw shrimp, peeled and deveined
- 2 tablespoons creamy wasabi paste
- 3 tablespoons rich mayonnaise
- 1 tablespoon fresh lime juice
- 1 teaspoon aromatic toasted sesame oil
- 1 tablespoon floral honey
- 1 tablespoon savory soy sauce
- 2 cloves fragrant garlic, minced
- 1 teaspoon freshly grated ginger root
- 8 wooden skewers, soaked in water for 30 minutes
- 1 tablespoon neutral vegetable oil
- 1 tablespoon toasted sesame seeds
- 2 tablespoons thinly sliced fresh scallions
Instructions
- Soak 8 wooden skewers in water for exactly 30 minutes to prevent burning during cooking.
- Pat 1 pound of large raw shrimp completely dry with paper towels to ensure proper searing.
- Thread 3-4 shrimp onto each soaked skewer, piercing through both the head and tail sections for secure placement.
- Whisk together 2 tablespoons creamy wasabi paste, 3 tablespoons rich mayonnaise, 1 tablespoon fresh lime juice, 1 teaspoon aromatic toasted sesame oil, 1 tablespoon floral honey, 1 tablespoon savory soy sauce, 2 cloves minced fragrant garlic, and 1 teaspoon freshly grated ginger root in a medium bowl until smooth.
- Brush both sides of the shrimp skewers lightly with 1 tablespoon neutral vegetable oil using a pastry brush.
- Preheat your grill or grill pan to 400°F over medium-high heat for 10 minutes until properly heated.
- Place shrimp skewers on the hot grill and cook for 2 minutes without moving them to develop grill marks.
- Flip skewers using tongs and cook for another 2 minutes until shrimp turn opaque and firm to the touch.
- Transfer cooked shrimp skewers to a clean platter and immediately brush generously with the prepared wasabi sauce.
- Sprinkle skewers evenly with 1 tablespoon toasted sesame seeds and 2 tablespoons thinly sliced fresh scallions.
Delight in the contrast between the firm, juicy shrimp and the creamy, spicy wasabi sauce that clings to each bite. The toasted sesame seeds add satisfying crunch while the fresh scallions provide a bright, oniony finish that cuts through the richness. For an elegant presentation, arrange the skewers over a bed of crisp cucumber ribbons or serve alongside steamed jasmine rice to soak up every last drop of the flavorful sauce.
Wasabi Beef Stir-Fry

Now, let’s dive into a Wasabi Beef Stir-Fry that’s surprisingly simple to master at home. Nothing beats the kick of fresh wasabi paired with tender beef and crisp vegetables for a weeknight meal that feels both exciting and approachable. You’ll find each step broken down clearly, so even if you’re new to stir-frying, you can create a restaurant-quality dish with confidence.
Ingredients
– 1 pound thinly sliced sirloin steak
– 2 tablespoons toasted sesame oil
– 3 cloves garlic, minced
– 1 tablespoon freshly grated ginger
– 1/4 cup low-sodium soy sauce
– 2 teaspoons prepared wasabi paste
– 1 tablespoon honey
– 1 red bell pepper, thinly sliced
– 1 cup snap peas, trimmed
– 2 green onions, sliced
– 1 tablespoon cornstarch
– 2 tablespoons water
Instructions
1. Pat the thinly sliced sirloin steak completely dry with paper towels to ensure a good sear.
2. In a small bowl, whisk together the low-sodium soy sauce, prepared wasabi paste, and honey until smooth.
3. Heat a large skillet or wok over high heat for 1 minute until very hot.
4. Add the toasted sesame oil and swirl to coat the pan evenly.
5. Add the thinly sliced sirloin steak in a single layer and cook undisturbed for 2 minutes to develop a brown crust.
6. Flip the steak and cook for another 1 minute until just cooked through, then transfer to a plate.
7. Tip: Always preheat your pan thoroughly—this prevents the beef from steaming and keeps it tender.
8. Reduce the heat to medium and add the minced garlic and freshly grated ginger to the same skillet.
9. Sauté for 30 seconds until fragrant, stirring constantly to avoid burning.
10. Add the thinly sliced red bell pepper and trimmed snap peas to the skillet.
11. Stir-fry for 3–4 minutes until the vegetables are bright and crisp-tender.
12. Tip: Cut vegetables uniformly so they cook at the same rate for even texture.
13. In a separate small bowl, mix the cornstarch and water to create a smooth slurry.
14. Pour the wasabi-soy sauce mixture into the skillet with the vegetables.
15. Add the cornstarch slurry and stir continuously for 1–2 minutes until the sauce thickens.
16. Return the cooked steak to the skillet and toss to coat evenly with the sauce.
17. Tip: Add the cornstarch slurry off the heat initially to avoid lumps, then return to heat to thicken.
18. Remove from heat and stir in the sliced green onions.
19. Serve immediately while hot. Mustard greens or steamed jasmine rice make excellent bases for this stir-fry, balancing the wasabi’s heat with their mild flavors. The beef stays juicy against the crisp vegetables, and the wasabi adds a sharp, sinus-clearing kick that mellows into a savory finish.
Avocado Wasabi Sauce Dip

Wondering how to elevate your snack game with something creamy, spicy, and utterly addictive? This avocado wasabi sauce dip combines the buttery richness of ripe avocados with the sharp kick of wasabi for a dip that’s both refreshing and bold. Follow these simple steps to create a crowd-pleasing appetizer that’s perfect for parties or a quick treat.
Ingredients
– 2 large, ripe Hass avocados
– 2 tablespoons prepared wasabi paste
– 1/4 cup plain Greek yogurt
– 2 tablespoons freshly squeezed lime juice
– 1/4 teaspoon fine sea salt
– 1/4 cup cold water
Instructions
1. Cut the 2 large, ripe Hass avocados in half lengthwise, remove the pits, and scoop the flesh into a medium mixing bowl.
2. Add the 2 tablespoons prepared wasabi paste, 1/4 cup plain Greek yogurt, 2 tablespoons freshly squeezed lime juice, and 1/4 teaspoon fine sea salt to the bowl.
3. Use a fork or potato masher to mash the ingredients together until mostly smooth, with a few small chunks for texture.
4. Gradually stir in the 1/4 cup cold water, one tablespoon at a time, until the dip reaches your desired consistency.
5. Taste the dip and adjust seasoning if needed, but avoid overmixing to keep it from turning brown.
6. Transfer the dip to a serving bowl and cover it tightly with plastic wrap, pressing the wrap directly onto the surface to prevent oxidation.
7. Refrigerate the dip for at least 30 minutes to allow the flavors to meld and the texture to firm up slightly.
8. Serve chilled with vegetable sticks, tortilla chips, or as a spread for sandwiches.
Your dip will have a creamy, velvety texture with a bold wasabi heat that builds slowly, balanced by the cool richness of avocado. Try it as a zesty topping for grilled fish or swirl it into rice bowls for an extra kick—it’s versatile enough to brighten up any meal.
Wasabi Sauce Marinated Tuna
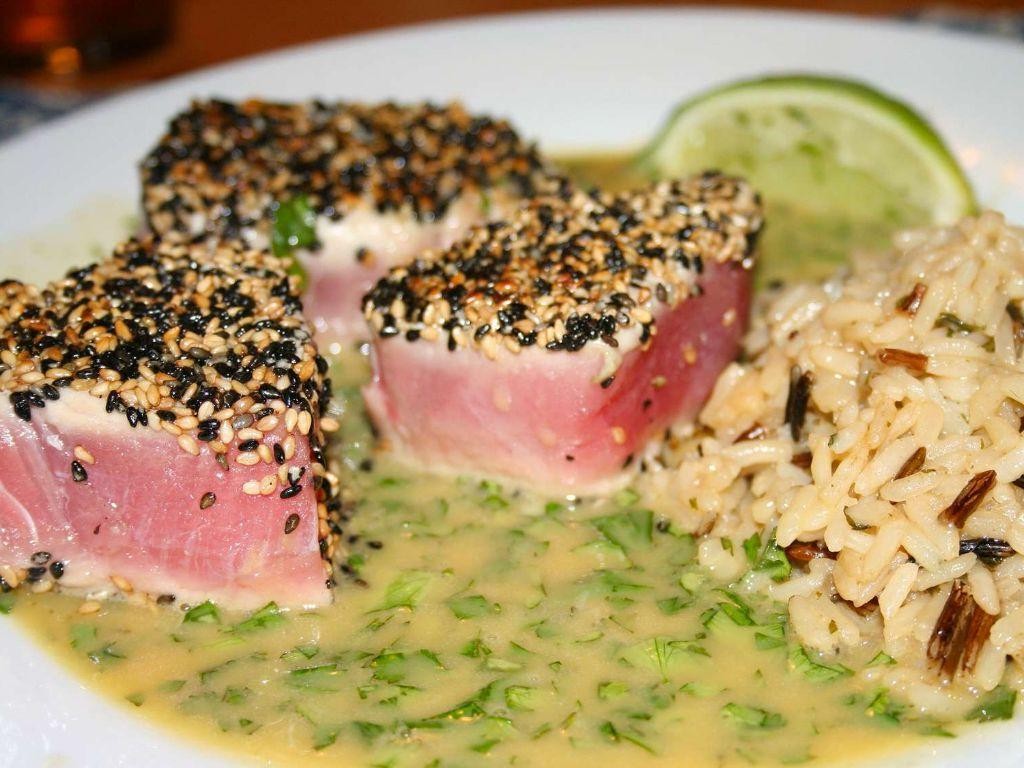
Searing fresh tuna with a wasabi kick transforms this protein into an elegant, restaurant-quality dish you can master at home. Start with sushi-grade tuna steaks for the best texture and flavor, then let the bold marinade work its magic before a quick sear that keeps the center beautifully rare. Follow these precise steps to create perfectly marinated tuna every time.
Ingredients
– 2 (6-ounce) sushi-grade tuna steaks
– 3 tablespoons premium soy sauce
– 2 tablespoons vibrant toasted sesame oil
– 1 tablespoon freshly prepared wasabi paste
– 2 teaspoons fragrant rice vinegar
– 1 teaspoon finely grated fresh ginger
– 1 tablespoon high-smoke-point avocado oil
– 2 tablespoons thinly sliced fresh scallions
– 1 teaspoon toasted sesame seeds
Instructions
1. Pat both sushi-grade tuna steaks completely dry with paper towels to ensure proper searing.
2. Whisk together 3 tablespoons premium soy sauce, 2 tablespoons vibrant toasted sesame oil, 1 tablespoon freshly prepared wasabi paste, 2 teaspoons fragrant rice vinegar, and 1 teaspoon finely grated fresh ginger in a shallow dish until fully combined.
3. Place the dried tuna steaks in the marinade, turning to coat all surfaces evenly.
4. Cover the dish with plastic wrap and refrigerate for exactly 20 minutes—no longer, as the acid can begin to “cook” the tuna.
5. Remove tuna from refrigerator and let stand at room temperature for 10 minutes before cooking.
6. Heat 1 tablespoon high-smoke-point avocado oil in a heavy skillet over medium-high heat until shimmering but not smoking, about 375°F.
7. Remove tuna from marinade, letting excess drip off, and place in the hot skillet.
8. Sear for exactly 90 seconds on the first side until a golden-brown crust forms.
9. Flip tuna carefully with tongs and sear for another 60 seconds on the second side for rare doneness.
10. Transfer tuna to a cutting board and let rest for 3 minutes to allow juices to redistribute.
11. Slice tuna against the grain into ½-inch thick pieces using a sharp knife.
12. Arrange sliced tuna on plates and garnish with 2 tablespoons thinly sliced fresh scallions and 1 teaspoon toasted sesame seeds.
Each slice reveals a jewel-toned rare center surrounded by that flavorful seared crust. The wasabi provides a subtle heat that builds without overwhelming, while the sesame notes add depth to every bite. Try serving these elegant slices over chilled soba noodles or alongside crisp cucumber salad for contrasting textures.
Crispy Wasabi Chicken Tenders
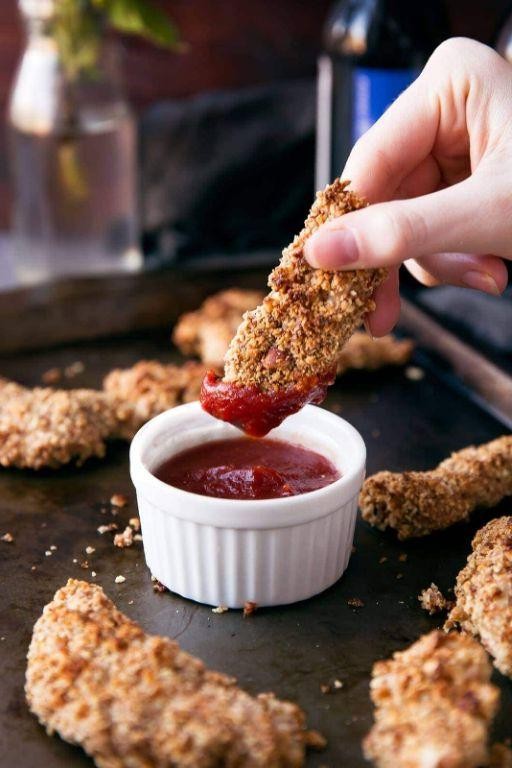
Let’s create these irresistible Crispy Wasabi Chicken Tenders that deliver the perfect balance of heat and crunch. Learning to make restaurant-quality tenders at home means you can control the spice level and enjoy them fresh from your own kitchen. This method ensures maximum crispiness with that signature wasabi kick in every bite.
Ingredients
– 1.5 pounds of fresh chicken breast tenders
– 1 cup of all-purpose flour
– 2 large farm-fresh eggs
– 1.5 cups of panko breadcrumbs
– 2 tablespoons of wasabi powder
– 1 teaspoon of garlic powder
– 1 teaspoon of onion powder
– 1/2 teaspoon of fine sea salt
– 1/4 teaspoon of freshly ground black pepper
– 2 cups of vegetable oil for frying
Instructions
1. Pat the fresh chicken breast tenders completely dry with paper towels to ensure the coating adheres properly.
2. In a shallow bowl, whisk together the all-purpose flour, garlic powder, onion powder, fine sea salt, and freshly ground black pepper until fully combined.
3. In a second shallow bowl, beat the 2 large farm-fresh eggs until smooth and uniform in color.
4. In a third shallow bowl, mix the 1.5 cups of panko breadcrumbs with the 2 tablespoons of wasabi powder, distributing the wasabi evenly throughout.
5. Dredge each chicken tender first in the seasoned flour mixture, shaking off any excess.
6. Dip the floured tender into the beaten eggs, coating all sides completely.
7. Press the egg-coated tender firmly into the wasabi-panko mixture, ensuring an even, thick coating on all surfaces.
8. Place the breaded tenders on a wire rack and let them rest for 10 minutes to help the coating set.
9. Heat 2 cups of vegetable oil in a heavy-bottomed pot to 375°F, using a deep-fry thermometer to monitor the temperature accurately.
10. Carefully lower 3-4 tenders into the hot oil using tongs, being careful not to overcrowd the pot.
11. Fry the tenders for 3-4 minutes until golden brown and crispy, turning them halfway through cooking.
12. Remove the cooked tenders from the oil and drain them on a wire rack set over a baking sheet.
13. Repeat the frying process with the remaining chicken tenders, allowing the oil to return to 375°F between batches.
14. Check that the internal temperature of the chicken reaches 165°F using an instant-read thermometer inserted into the thickest part of a tender.
Zesty and satisfying, these tenders offer an addictive crunch that gives way to tender, juicy chicken inside. The wasabi provides a clean heat that builds gradually rather than overwhelming the palate immediately. Serve them with a cooling dipping sauce like creamy ranch or spicy mayo to balance the heat, or slice them over a fresh green salad for a complete meal.
Wasabi and Honey Glazed Carrots

Getting perfectly glazed carrots with a kick is easier than you think, and this wasabi-honey combination will become your new favorite side dish. Gently roasting brings out the carrots’ natural sweetness while the glaze adds a sophisticated balance of heat and floral notes. Follow these steps precisely for restaurant-quality results at home.
Ingredients
– 1 pound fresh, slender carrots with vibrant orange color
– 2 tablespoons rich, golden honey
– 1 tablespoon premium soy sauce
– 1 teaspoon freshly prepared wasabi paste
– 2 tablespoons high-quality olive oil
– ½ teaspoon coarse sea salt
– ¼ teaspoon freshly cracked black pepper
Instructions
1. Preheat your oven to 425°F and position the rack in the center for even heating.
2. Wash 1 pound of fresh, slender carrots thoroughly under cold running water to remove any dirt.
3. Pat the carrots completely dry with clean kitchen towels to ensure proper roasting.
4. Trim off the carrot tops and cut any larger carrots in half lengthwise to create uniform pieces.
5. Arrange the prepared carrots in a single layer on a large, rimmed baking sheet.
6. Drizzle 2 tablespoons of high-quality olive oil evenly over the carrots, using your hands to coat each piece thoroughly.
7. Sprinkle ½ teaspoon of coarse sea salt and ¼ teaspoon of freshly cracked black pepper over the oiled carrots.
8. Roast the carrots in the preheated 425°F oven for 15 minutes until they begin to soften slightly.
9. While the carrots roast, combine 2 tablespoons of rich, golden honey, 1 tablespoon of premium soy sauce, and 1 teaspoon of freshly prepared wasabi paste in a small bowl.
10. Whisk the glaze ingredients vigorously for 30 seconds until completely smooth and emulsified.
11. Remove the baking sheet from the oven after 15 minutes and carefully pour the prepared glaze over the partially roasted carrots.
12. Use tongs to toss the carrots in the glaze, ensuring each piece is evenly coated with the mixture.
13. Return the glazed carrots to the 425°F oven and continue roasting for another 10-12 minutes.
14. Check the carrots at the 10-minute mark – they should be tender when pierced with a fork and the glaze should be bubbling and slightly caramelized.
15. Remove the baking sheet from the oven when the carrots are fork-tender and the glaze has formed a shiny coating.
16. Transfer the finished carrots to a serving dish immediately to prevent sticking to the hot pan.
Resulting in a beautiful side dish, these carrots offer a delightful contrast between the crisp-tender texture and the glossy, sticky glaze. The initial sweetness from the honey and roasted carrots gives way to a subtle wasabi heat that lingers pleasantly on the palate. Consider serving them alongside grilled salmon or as part of a holiday spread where their vibrant color and unique flavor profile will stand out beautifully.
Wasabi Mayo Slaw
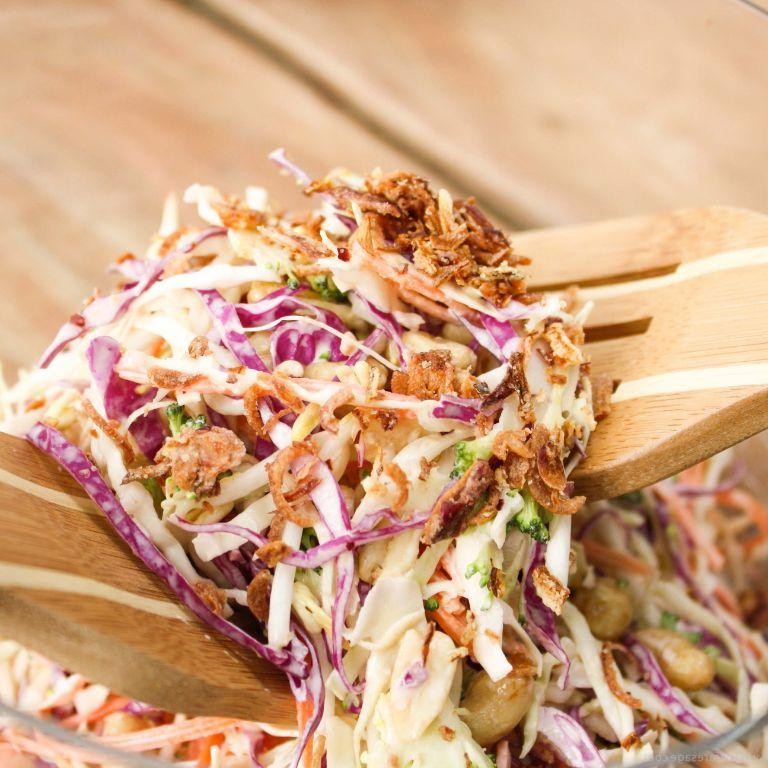
Brace yourself for a flavor adventure that transforms ordinary coleslaw into something extraordinary. This wasabi mayo slaw brings together creamy richness with a subtle heat that dances on your palate, creating the perfect balance for everything from burgers to fish tacos. Let me walk you through each step to ensure your slaw turns out crisp, flavorful, and perfectly dressed every time.
Ingredients
– 4 cups finely shredded green cabbage
– 1 cup shredded carrots
– 1/2 cup mayonnaise
– 2 tablespoons rice vinegar
– 1 tablespoon wasabi paste
– 1 teaspoon granulated sugar
– 1/2 teaspoon fine sea salt
Instructions
1. Place 4 cups of finely shredded green cabbage and 1 cup of shredded carrots in a large mixing bowl.
2. In a separate small bowl, combine 1/2 cup mayonnaise, 2 tablespoons rice vinegar, 1 tablespoon wasabi paste, 1 teaspoon granulated sugar, and 1/2 teaspoon fine sea salt.
3. Whisk the dressing ingredients vigorously for 30 seconds until completely smooth and well-incorporated.
4. Pour the prepared dressing over the cabbage and carrot mixture in the large bowl.
5. Use tongs or two large spoons to toss the slaw, ensuring every shred is evenly coated with the dressing.
6. Cover the bowl tightly with plastic wrap and refrigerate for exactly 30 minutes to allow the flavors to meld and the cabbage to slightly soften.
7. Remove the slaw from refrigerator and give it one final gentle toss before serving.
Refreshingly crisp with a creamy kick, this slaw offers a satisfying crunch that holds up beautifully against the spicy wasabi undertones. The vibrant green-flecked dressing clings perfectly to each shred, making it ideal for piling high on pulled pork sandwiches or serving alongside grilled salmon for a complete meal that’s anything but ordinary.
Seared Scallops with Wasabi-Lime Sauce
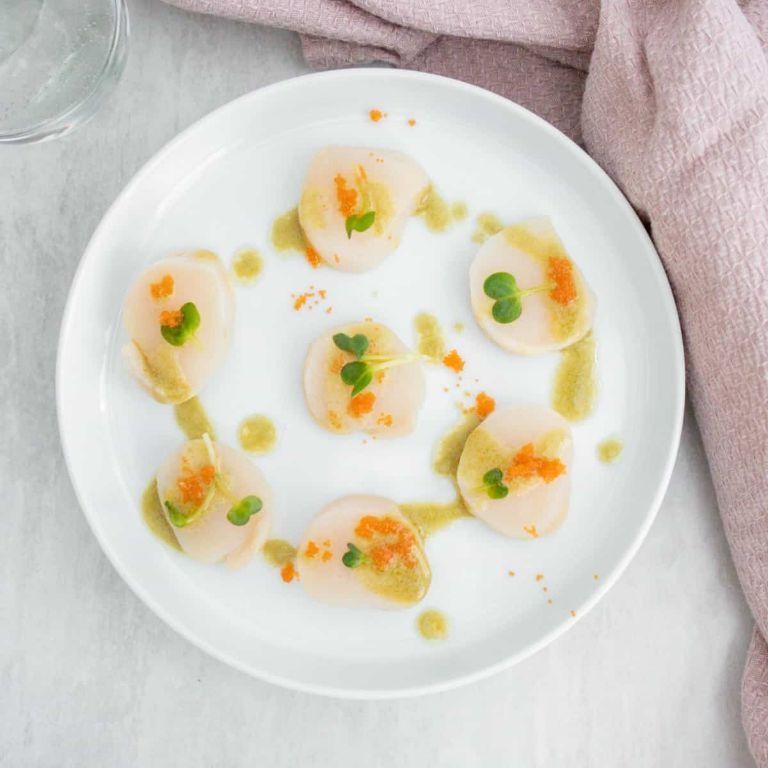
Now, let’s master perfectly seared scallops with a zesty wasabi-lime sauce—a restaurant-quality dish you can confidently prepare at home. Gather your ingredients and follow each step precisely for tender, caramelized scallops balanced by a bright, creamy sauce.
Ingredients
– 12 large, dry-packed sea scallops
– 2 tablespoons high-smoke-point avocado oil
– 1/4 teaspoon fine sea salt
– 1/4 teaspoon freshly cracked black pepper
– 1/3 cup rich full-fat Greek yogurt
– 1 tablespoon freshly squeezed lime juice
– 1 teaspoon prepared wasabi paste
– 1 teaspoon finely grated lime zest
– 1 tablespoon thinly sliced fresh chives
–
Instructions
1. Pat the dry-packed sea scallops thoroughly with paper towels until completely dry on all surfaces. Tip: Moisture is the enemy of a good sear—dry scallops ensure a golden crust.
2. Season both sides of the scallops evenly with fine sea salt and freshly cracked black pepper.
3. Heat a large stainless steel or cast-iron skillet over medium-high heat for 2 full minutes until very hot.
4. Add the high-smoke-point avocado oil to the hot skillet and swirl to coat the bottom.
5. Carefully place the scallops in the skillet, spacing them 1 inch apart to avoid steaming.
6. Sear the scallops undisturbed for 90 seconds until a deep golden-brown crust forms on the bottom. Tip: Resist moving them—this builds the sear.
7. Flip each scallop using tongs and cook for another 60 seconds until firm to the touch but slightly yielding in the center.
8. Transfer the scallops to a clean plate to rest.
9. In a small bowl, whisk together the rich full-fat Greek yogurt, freshly squeezed lime juice, prepared wasabi paste, and finely grated lime zest until smooth.
10. Stir in the thinly sliced fresh chives.
11. Spoon the wasabi-lime sauce onto serving plates and top with the seared scallops. Tip: Serve immediately—scallops are best hot and fresh.
Get ready for a textural delight: the crisp, caramelized exterior gives way to a buttery-soft interior, while the creamy sauce adds a refreshing kick of lime and subtle wasabi heat. For a vibrant presentation, pair it with steamed jasmine rice or a simple arugula salad to complement the dish’s elegant flavors.
Conclusion
Ready to spice up your kitchen routine? These 22 wasabi-infused recipes offer exciting ways to bring bold, fiery flavor to your table. Whether you’re craving sushi rolls, spicy noodles, or creative appetizers, there’s something here to ignite every palate. We’d love to hear which recipes become your favorites—drop a comment below and share your spicy creations on Pinterest!