
Venture beyond the candy bowl with these irresistible Hershey Kisses recipes! From festive holiday treats to easy weeknight desserts, these simple creations transform America’s favorite chocolate into spectacular baked goods, no-bake delights, and creative confections. Get ready to unwrap some serious kitchen magic—your next delicious adventure starts right here.
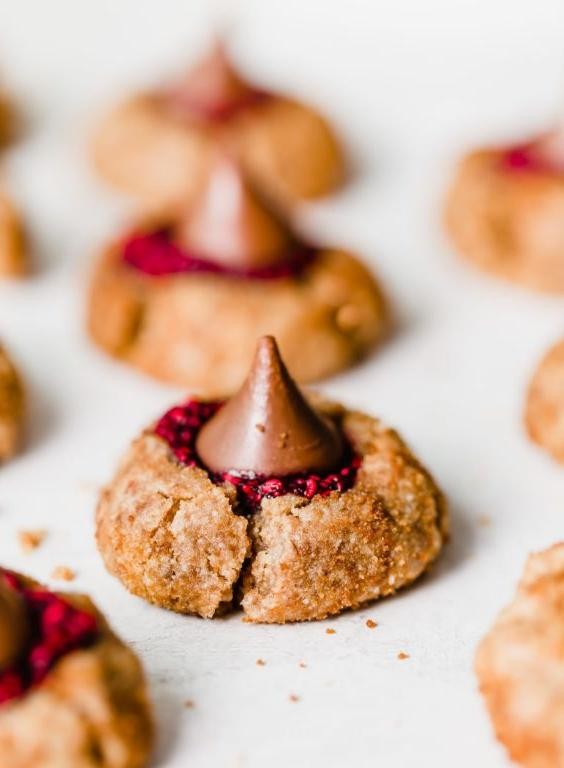
Chocolate Blossom Cookies with Hershey Kisses

Unbelievably, these chocolate blossom cookies have been my go-to holiday treat since I first burned a batch back in college—now I’ve perfected the method and they disappear faster than I can bake them. There’s something magical about that chocolate kiss melting into the warm cookie that makes everyone feel like a kid again.
Ingredients
- 1 cup unsalted butter, softened
- 1 cup granulated sugar
- 1 cup light brown sugar, packed
- 2 large eggs
- 2 teaspoons vanilla extract
- 2 ¼ cups all-purpose flour
- ¾ cup unsweetened cocoa powder
- 1 teaspoon baking soda
- ½ teaspoon salt
- ½ cup granulated sugar for rolling
- 48 Hershey’s Kisses, unwrapped
Instructions
- Preheat your oven to 375°F and line two baking sheets with parchment paper.
- Cream together the softened butter, 1 cup granulated sugar, and brown sugar in a large bowl until light and fluffy, about 3 minutes.
- Beat in the eggs one at a time, then mix in the vanilla extract until fully incorporated.
- In a separate bowl, whisk together the flour, cocoa powder, baking soda, and salt to ensure even distribution.
- Gradually add the dry ingredients to the wet mixture, mixing just until combined—overmixing will make cookies tough.
- Place the ½ cup granulated sugar for rolling in a small bowl.
- Scoop 1 tablespoon of dough and roll into a ball between your palms.
- Roll each dough ball in the granulated sugar until completely coated.
- Place dough balls 2 inches apart on prepared baking sheets.
- Bake for 8-10 minutes until the cookies have spread and surfaces crack slightly.
- Immediately press one Hershey’s Kiss into the center of each hot cookie—they’ll crack further around the edges.
- Let cookies cool on the baking sheet for 5 minutes before transferring to a wire rack.
Honestly, these cookies achieve the perfect balance—crisp sugar coating gives way to a fudgy, brownie-like center that melts around the chocolate kiss. I love serving them slightly warm with cold milk, or crumbling them over vanilla ice cream for an instant dessert upgrade that always impresses guests.
Minty Hershey Kiss Brownie Bites

A few weeks ago, I was cleaning out my pantry and discovered a forgotten bag of Hershey Kisses from last Christmas—you know how those holiday treats tend to hide in the back corners! Immediately, I thought about how perfectly their classic chocolate flavor would pair with fresh mint in a bite-sized brownie. After a couple of test batches (and plenty of happy taste-testers), I landed on this simple recipe that’s become my new go-to for quick dessert cravings.
Ingredients
– 1 cup all-purpose flour
– 1/2 cup unsweetened cocoa powder
– 1/2 teaspoon baking powder
– 1/4 teaspoon salt
– 1/2 cup unsalted butter, melted
– 1 cup granulated sugar
– 2 large eggs
– 1 teaspoon vanilla extract
– 1/2 teaspoon peppermint extract
– 24 Hershey Kisses, unwrapped
Instructions
1. Preheat your oven to 350°F and lightly grease a 24-cup mini muffin pan.
2. In a medium bowl, whisk together 1 cup all-purpose flour, 1/2 cup unsweetened cocoa powder, 1/2 teaspoon baking powder, and 1/4 teaspoon salt until no streaks remain.
3. In a separate large bowl, combine 1/2 cup melted unsalted butter and 1 cup granulated sugar, stirring for about 1 minute until the mixture is smooth and slightly glossy.
4. Beat in 2 large eggs one at a time, mixing just until each is fully incorporated.
5. Stir in 1 teaspoon vanilla extract and 1/2 teaspoon peppermint extract until evenly distributed.
6. Gradually fold the dry flour mixture into the wet ingredients using a spatula, mixing until the batter is uniform with no dry pockets—be careful not to overmix to keep the brownies tender.
7. Spoon 1 tablespoon of batter into each prepared mini muffin cup, filling them about two-thirds full.
8. Press 1 unwrapped Hershey Kiss into the center of each brownie bite, ensuring it’s submerged but not touching the bottom.
9. Bake for 12–14 minutes, or until the edges are set and the tops spring back lightly when touched—a toothpick inserted near the edge should come out with moist crumbs, not raw batter.
10. Let the brownie bites cool in the pan for 5 minutes before transferring them to a wire rack to cool completely, which helps them firm up without sticking.
Finally, these brownie bites deliver a fudgy, melt-in-your-mouth texture with a cool mint undertone that perfectly complements the gooey Hershey Kiss center. For a festive twist, I love dusting them with powdered sugar or serving them alongside a scoop of vanilla ice cream—they disappear fast at potlucks!
Peanut Butter Hershey Kiss Thumbprints

Years ago, my grandmother would make these peanut butter thumbprint cookies every Christmas, and the smell alone would bring our entire family running to the kitchen. I’ve tweaked her recipe slightly over time, but the joy of pressing that Hershey’s Kiss into the warm, peanut buttery center remains one of my favorite holiday traditions—and honestly, they’re too good to save just for December.
Ingredients
– 1 cup creamy peanut butter
– 1 cup granulated sugar
– 1 large egg
– 1 tsp vanilla extract
– 24 Hershey’s Kisses, unwrapped
Instructions
1. Preheat your oven to 350°F and line a baking sheet with parchment paper.
2. In a medium bowl, combine 1 cup creamy peanut butter, 1 cup granulated sugar, 1 large egg, and 1 tsp vanilla extract.
3. Mix the ingredients with a spatula until a uniform dough forms—it will be slightly sticky but should hold together when pressed.
4. Scoop 1 tablespoon of dough and roll it into a ball between your palms; this recipe makes about 24 balls.
5. Place each ball 2 inches apart on the prepared baking sheet.
6. Use your thumb to press a deep indentation into the center of each dough ball, being careful not to press all the way through.
7. Bake the cookies at 350°F for 10–12 minutes, or until the edges are lightly golden and the centers look set.
8. Remove the baking sheet from the oven and immediately press one unwrapped Hershey’s Kiss into the center of each warm cookie.
9. Let the cookies cool on the baking sheet for 5 minutes to allow the chocolate to soften slightly.
10. Transfer the cookies to a wire rack to cool completely, about 20–30 minutes.
Soft and crumbly with a melt-in-your-mouth texture, these cookies balance the nutty richness of peanut butter with the sweet creaminess of chocolate. I love serving them slightly warm with a cold glass of milk, or even crumbling them over vanilla ice cream for an easy dessert upgrade.
Hershey Kiss-Stuffed Chocolate Croissants

Yesterday, I was craving something decadent but easy, and these Hershey Kiss-Stuffed Chocolate Croissants came to mind—they’re my go-to when I want to impress without the stress. Honestly, there’s nothing like biting into that flaky, buttery pastry and hitting that molten chocolate center; it’s pure comfort in every bite.
Ingredients
– 1 package (8 count) refrigerated crescent roll dough
– 8 Hershey’s Kisses, unwrapped
– 1 large egg
– 1 tablespoon water
– 2 tablespoons granulated sugar
Instructions
1. Preheat your oven to 375°F and line a baking sheet with parchment paper.
2. Unroll the crescent roll dough and separate it into 8 triangles along the perforated lines.
3. Place one unwrapped Hershey’s Kiss at the wide end of each dough triangle.
4. Roll each triangle tightly from the wide end to the tip, enclosing the chocolate completely, and gently pinch the seams to seal—this prevents leaks during baking.
5. In a small bowl, whisk together the egg and water to create an egg wash.
6. Brush the top of each rolled croissant lightly with the egg wash using a pastry brush.
7. Sprinkle granulated sugar evenly over the brushed croissants for a sweet, crisp finish.
8. Arrange the croissants on the prepared baking sheet, spacing them about 2 inches apart to allow for expansion.
9. Bake in the preheated oven for 11–13 minutes, or until the croissants are golden brown and puffed.
10. Remove the baking sheet from the oven and let the croissants cool on the sheet for 5 minutes before serving.
Seriously, the contrast between the flaky, buttery layers and the gooey chocolate inside is irresistible. I love serving these warm with a dusting of powdered sugar or alongside a scoop of vanilla ice cream for an extra treat—they disappear fast, so make a double batch if you’re sharing!
Raspberry Hershey Kiss Chocolate Tarts
Mmm, there’s something magical about the combination of tart raspberries and rich chocolate that always makes me feel like I’m creating edible jewelry in my kitchen. I first made these tarts for a girls’ night last summer, and now my friends request them for every gathering—they’re that perfect balance of elegant and approachable. As someone who always keeps Hershey Kisses in the pantry for emergency baking sessions, I love how this recipe turns simple ingredients into something truly special.
Ingredients
– 1 ½ cups all-purpose flour
– ½ cup unsalted butter, cold and cubed
– ¼ cup granulated sugar
– 1 large egg yolk
– 2 tbsp ice water
– 24 fresh raspberries
– 24 Hershey Kisses, unwrapped
– ½ cup heavy cream
– ¼ cup powdered sugar
Instructions
1. Preheat your oven to 350°F and lightly grease 12 mini tart pans.
2. Combine 1 ½ cups all-purpose flour, ½ cup cold cubed unsalted butter, and ¼ cup granulated sugar in a food processor.
3. Pulse the mixture until it resembles coarse crumbs, about 10-12 pulses.
4. Add 1 large egg yolk and 2 tablespoons ice water to the food processor.
5. Pulse just until the dough comes together, being careful not to overmix.
6. Divide the dough into 12 equal portions and press each portion into the prepared tart pans.
7. Use a fork to prick the bottom of each tart shell 4-5 times to prevent puffing.
8. Bake the tart shells at 350°F for 12-15 minutes until lightly golden around the edges.
9. Remove the tart shells from the oven and immediately press 2 fresh raspberries into the bottom of each warm shell.
10. Place 2 unwrapped Hershey Kisses on top of the raspberries in each tart shell.
11. Heat ½ cup heavy cream in a small saucepan over medium heat until it just begins to simmer.
12. Pour the hot cream over the Hershey Kisses in each tart shell, stirring gently with a toothpick to create a smooth ganache.
13. Let the tarts cool completely at room temperature for 1 hour.
14. Dust the cooled tarts with ¼ cup powdered sugar using a fine-mesh sieve.
15. Refrigerate the tarts for 30 minutes to set the ganache completely.
So satisfying when you bite into that crisp shell and hit the creamy chocolate-raspberry center—it’s like a flavor explosion in miniature form. Sometimes I’ll arrange these on a tiered stand for parties, or pack them in individual boxes as sweet gifts that always earn rave reviews.
Hershey Kiss and Marshmallow S’mores Bars
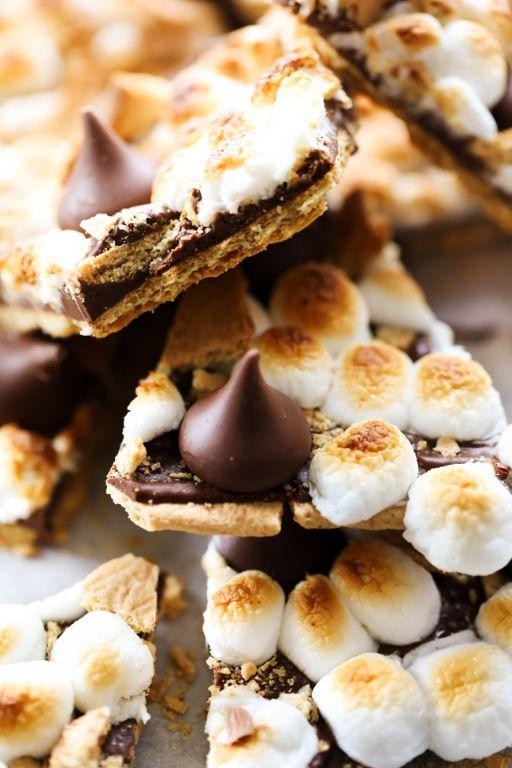
Baking these Hershey Kiss and Marshmallow S’mores Bars takes me right back to summer campfires, minus the smoke in my hair! I love how this recipe captures that nostalgic s’mores flavor in an easy bar form that’s perfect for potlucks or late-night cravings. Honestly, I usually double the batch because my family devours them within hours of cooling.
Ingredients
– 1 ½ cups graham cracker crumbs
– ½ cup unsalted butter, melted
– ¼ cup granulated sugar
– 2 cups semi-sweet chocolate chips
– 3 cups mini marshmallows
– 24 Hershey’s Kisses, unwrapped
Instructions
1. Preheat your oven to 350°F and line an 8×8 inch baking pan with parchment paper, leaving overhang on two sides for easy removal.
2. Combine 1 ½ cups graham cracker crumbs, ½ cup melted unsalted butter, and ¼ cup granulated sugar in a medium bowl until the mixture resembles wet sand.
3. Press the graham cracker mixture firmly into the bottom of the prepared pan using the bottom of a measuring cup to create an even layer.
4. Bake the crust at 350°F for 8 minutes until lightly golden around the edges.
5. Remove the pan from the oven and immediately sprinkle 2 cups semi-sweet chocolate chips evenly over the hot crust.
6. Let the chocolate chips sit for 2 minutes to melt slightly, then spread them into an even layer with an offset spatula.
7. Sprinkle 3 cups mini marshmallows evenly over the chocolate layer.
8. Arrange 24 unwrapped Hershey’s Kisses evenly across the marshmallow layer, pressing each one gently into the marshmallows.
9. Return the pan to the oven and bake at 350°F for 10-12 minutes until the marshmallows are puffed and golden brown.
10. Transfer the pan to a wire rack and let cool completely for 2 hours before lifting out using the parchment paper overhang.
11. Use a sharp knife to cut into 16 bars, wiping the blade clean between cuts for neat edges.
Perfectly chewy marshmallows contrast with the crisp graham cracker base, while the Hershey’s Kisses add creamy pockets that melt in your mouth. I love serving these slightly warmed with a scoop of vanilla ice cream for an extra-indulgent treat that makes any Tuesday feel like a weekend celebration.
Hershey Kiss Peppermint Bark

My holiday baking tradition always kicks off with this magical peppermint bark that never fails to impress. I first discovered this recipe during a snowy December afternoon when I needed a last-minute gift for neighbors, and now it’s become my signature holiday treat that everyone requests year after year.
Ingredients
– 12 ounces semi-sweet chocolate chips
– 12 ounces white chocolate chips
– 1 cup crushed candy canes
– 1 teaspoon peppermint extract
– 1 tablespoon vegetable shortening
Instructions
1. Line a 9×13 inch baking sheet with parchment paper, ensuring the paper extends slightly over the edges for easy removal.
2. Combine semi-sweet chocolate chips and 1/2 tablespoon vegetable shortening in a microwave-safe bowl.
3. Microwave the chocolate mixture on high power for 30 seconds, then stir thoroughly with a spatula.
4. Continue microwaving in 15-second intervals, stirring after each interval, until the chocolate is completely melted and smooth (about 60-90 seconds total).
5. Immediately pour the melted chocolate onto the prepared baking sheet and spread evenly using an offset spatula.
6. Tap the baking sheet gently on the counter 2-3 times to remove any air bubbles from the chocolate layer.
7. Refrigerate the chocolate layer for 15 minutes or until firm to the touch.
8. Combine white chocolate chips, remaining 1/2 tablespoon vegetable shortening, and peppermint extract in a clean microwave-safe bowl.
9. Microwave the white chocolate mixture using the same method as before, heating in 15-second intervals and stirring until completely smooth.
10. Quickly pour the melted white chocolate over the chilled dark chocolate layer and spread evenly.
11. Immediately sprinkle the crushed candy canes evenly over the white chocolate layer, gently pressing them in with your hands.
12. Refrigerate the completed bark for 30 minutes or until completely firm.
13. Remove the bark from the refrigerator and break it into irregular pieces by hand or cut into squares with a sharp knife.
Absolutely divine with its satisfying snap and cool peppermint finish, this bark makes gorgeous edible gifts when packaged in festive tins. The contrast between rich dark chocolate and creamy white chocolate creates an elegant treat that’s perfect for holiday parties or cozy nights by the fire.
Caramel Hershey Kiss Fudge Squares
Perfect for holiday gatherings or when you need a quick sweet fix, these caramel Hershey Kiss fudge squares have become my go-to dessert. I first made them during a chaotic cookie exchange when I realized I’d forgotten my planned contribution, and now they’re requested at every family event. There’s something magical about how just a few simple ingredients transform into such decadent treats.
Ingredients
- 3 cups semi-sweet chocolate chips
- 1 can (14 oz) sweetened condensed milk
- 2 tbsp unsalted butter
- 1 tsp vanilla extract
- 24 caramel Hershey Kisses, unwrapped
- 1/4 tsp sea salt
Instructions
- Line an 8×8 inch baking pan with parchment paper, leaving overhang on two sides for easy removal.
- Combine 3 cups semi-sweet chocolate chips, 1 can sweetened condensed milk, and 2 tbsp unsalted butter in a medium saucepan.
- Heat the mixture over low heat, stirring constantly with a silicone spatula until completely smooth and glossy, about 5-7 minutes.
- Remove the saucepan from heat and stir in 1 tsp vanilla extract and 1/4 tsp sea salt until fully incorporated.
- Pour half of the fudge mixture into the prepared pan and spread evenly with an offset spatula.
- Arrange 24 unwrapped caramel Hershey Kisses in even rows across the fudge layer, pressing each one gently into the surface.
- Carefully pour the remaining fudge mixture over the Hershey Kisses, using the spatula to spread it evenly and completely cover the candies.
- Refrigerate the fudge for at least 2 hours, or until completely firm and set.
- Use the parchment paper overhang to lift the fudge block from the pan and place it on a cutting board.
- Cut the fudge into 1-inch squares using a sharp knife wiped clean between cuts for neat edges.
Buttery caramel centers burst through the rich chocolate with every bite, creating the perfect sweet-and-salty balance. These squares stay remarkably creamy at room temperature, making them ideal for gift boxes or party platters. Try serving them slightly chilled with coffee for an elegant dessert that belies how simple they are to make.
Hershey Kiss Hot Cocoa Bites

Gosh, there’s something magical about finding a recipe that combines childhood nostalgia with grown-up baking skills. I first discovered these Hershey Kiss Hot Cocoa Bites when my niece begged me to make “something chocolatey” during our annual holiday baking marathon, and now they’ve become our signature winter treat that fills the kitchen with the most incredible cocoa aroma.
Ingredients
– 2 cups all-purpose flour
– 1/2 cup unsweetened cocoa powder
– 1 tsp baking soda
– 1/2 tsp salt
– 1 cup unsalted butter, softened
– 3/4 cup granulated sugar
– 3/4 cup brown sugar, packed
– 2 large eggs
– 2 tsp vanilla extract
– 24 Hershey’s Kisses, unwrapped
– 1/4 cup powdered sugar
Instructions
1. Preheat your oven to 350°F and line two baking sheets with parchment paper.
2. Whisk together 2 cups all-purpose flour, 1/2 cup unsweetened cocoa powder, 1 teaspoon baking soda, and 1/2 teaspoon salt in a medium bowl until fully combined.
3. Cream 1 cup softened unsalted butter with 3/4 cup granulated sugar and 3/4 cup packed brown sugar in a large mixing bowl using an electric mixer on medium speed for exactly 2 minutes until light and fluffy.
4. Beat in 2 large eggs one at a time, waiting until each egg is fully incorporated before adding the next.
5. Mix in 2 teaspoons vanilla extract until just combined.
6. Gradually add the dry ingredients to the wet ingredients, mixing on low speed until a thick dough forms and no flour streaks remain.
7. Scoop tablespoon-sized portions of dough and roll them into smooth balls between your palms.
8. Place dough balls 2 inches apart on prepared baking sheets and press one unwrapped Hershey’s Kiss firmly into the center of each ball until the kiss is halfway submerged.
9. Bake at 350°F for 10-12 minutes until the edges are set but the centers still appear slightly soft.
10. Remove baking sheets from the oven and let cookies cool on the sheets for 5 minutes before transferring to a wire rack.
11. Sift 1/4 cup powdered sugar over the completely cooled cookies using a fine-mesh sieve.
Unbelievably, these bites deliver that perfect hot cocoa experience in cookie form – the edges have a satisfying crispness while the Hershey’s Kiss center stays wonderfully melty. They’re fantastic served warm with a glass of cold milk, or you could even crumble them over vanilla ice cream for an extra-decadent dessert that’ll have everyone asking for seconds.
Pumpkin-Spiced Hershey Kiss Muffins

Zesty autumn mornings always make me crave something warm from the oven, especially when there’s a chill in the air. I first made these Pumpkin-Spiced Hershey Kiss Muffins during a cozy fall baking session with my niece, and now they’re our seasonal tradition—perfect with a hot cup of coffee while the leaves crunch outside. Honestly, they’re so simple and satisfying, you’ll want to double the batch every time.
Ingredients
– 2 cups all-purpose flour
– 1 cup granulated sugar
– 1 tsp baking soda
– 1/2 tsp salt
– 1 tsp ground cinnamon
– 1/2 tsp ground nutmeg
– 1/4 tsp ground cloves
– 1 cup canned pumpkin puree
– 2 large eggs
– 1/2 cup vegetable oil
– 1/4 cup milk
– 24 Hershey’s Kisses, unwrapped
Instructions
1. Preheat your oven to 350°F and line a 12-cup muffin tin with paper liners.
2. In a large bowl, whisk together the all-purpose flour, granulated sugar, baking soda, salt, ground cinnamon, ground nutmeg, and ground cloves until fully combined.
3. In a separate medium bowl, whisk the canned pumpkin puree, large eggs, vegetable oil, and milk until smooth and uniform in color.
4. Pour the wet pumpkin mixture into the dry flour mixture and stir gently with a spatula until just combined; do not overmix to keep the muffins tender.
5. Fill each muffin liner about two-thirds full with the batter using a spoon or scoop.
6. Press one unwrapped Hershey’s Kiss into the center of each muffin, pushing it down until it is fully submerged but not touching the bottom.
7. Bake the muffins in the preheated oven for 18–22 minutes, or until a toothpick inserted near the edge (not the center) comes out clean.
8. Let the muffins cool in the tin for 5 minutes, then transfer them to a wire rack to cool completely to prevent sogginess.
Lusciously moist with a spiced pumpkin crumb, these muffins hide a melty chocolate surprise that pairs wonderfully with a dollop of whipped cream or crumbled over vanilla ice cream. The contrast of warm spice and rich Hershey’s Kiss makes them irresistible for breakfast or as an afternoon treat—my family always fights over the last one!
Salted Pretzel and Hershey Kiss Bites
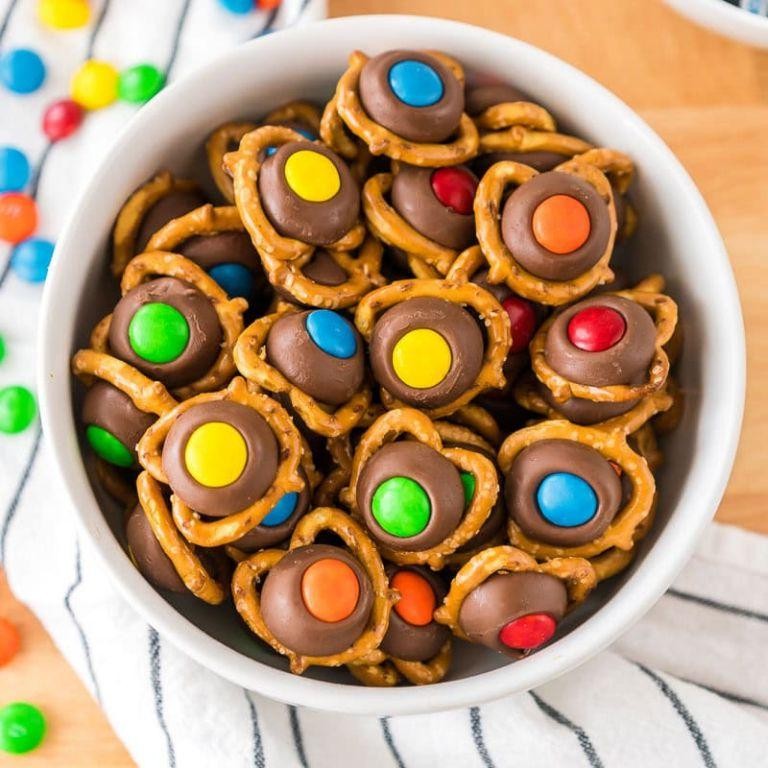
Every time I host game night, I’m reminded how the simplest treats often steal the show. That’s exactly what happened when I first threw together these Salted Pretzel and Hershey Kiss Bites—they disappeared faster than the chips and dip! Now I always keep the ingredients on hand for last-minute cravings or unexpected guests.
Ingredients
– 24 square pretzels
– 24 Hershey’s Kisses
– 24 whole pecans
– 1/4 cup coarse sea salt
Instructions
1. Preheat your oven to 275°F and line a baking sheet with parchment paper.
2. Arrange 24 square pretzels in a single layer on the prepared baking sheet.
3. Unwrap 24 Hershey’s Kisses and place one centered on each pretzel.
4. Bake for exactly 3 minutes at 275°F until the chocolate looks glossy but hasn’t lost its shape.
5. Immediately press one whole pecan firmly into each softened Hershey’s Kiss—the warmth helps it adhere.
6. Sprinkle a pinch of coarse sea salt over each assembled bite while the chocolate is still tacky.
7. Transfer the baking sheet to your refrigerator and chill for 15 minutes until the chocolate fully sets.
8. Use a thin spatula to gently lift the bites from the parchment paper once firm.
My favorite part is how the salty crunch gives way to that creamy chocolate center—they’re dangerously addictive straight from the fridge. Try stacking them in mini towers for parties or packing them in lunchboxes for a sweet surprise.
Hershey Kiss Cookie Dough Truffles
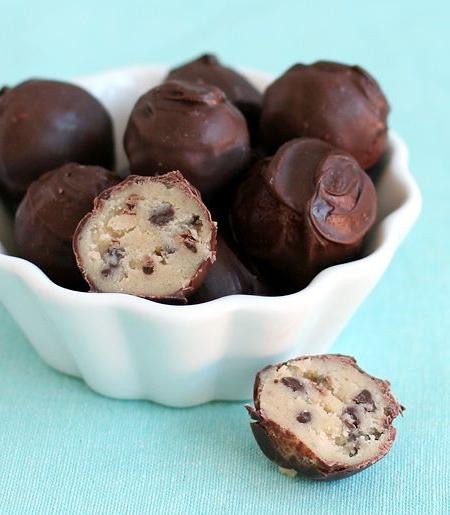
Y’know how some recipes just feel like a warm hug? These Hershey Kiss Cookie Dough Truffles are exactly that – the kind of treat I find myself making whenever I need a little pick-me-up or want to surprise my kids after school. There’s something magical about that classic cookie dough flavor wrapped around a chocolate kiss that feels both nostalgic and exciting.
Ingredients
– 1 cup unsalted butter, softened
– 1 ½ cups light brown sugar, packed
– 2 tsp vanilla extract
– 2 ½ cups all-purpose flour
– 1 can (14 oz) sweetened condensed milk
– 1 cup mini chocolate chips
– 36 Hershey’s Kisses, unwrapped
– 12 oz semi-sweet chocolate chips
– 2 tsp coconut oil
Instructions
1. In a large mixing bowl, cream together 1 cup softened unsalted butter and 1 ½ cups packed light brown sugar using an electric mixer on medium speed for 2 minutes until light and fluffy.
2. Add 2 teaspoons vanilla extract and mix for 30 seconds until fully incorporated.
3. Gradually add 2 ½ cups all-purpose flour in three additions, mixing on low speed after each addition until just combined.
4. Pour in the entire 14-ounce can of sweetened condensed milk and mix on low speed for 1 minute until the dough comes together smoothly.
5. Fold in 1 cup mini chocolate chips using a spatula until evenly distributed throughout the dough.
6. Cover the bowl with plastic wrap and refrigerate the dough for 30 minutes until firm enough to handle. Tip: Chilling the dough prevents it from sticking to your hands and makes shaping much easier.
7. Using a 1-tablespoon cookie scoop, portion out the dough and roll into smooth balls between your palms.
8. Press one unwrapped Hershey’s Kiss into the center of each dough ball, then reshape to completely enclose the chocolate.
9. Place the filled truffles on a parchment-lined baking sheet and freeze for 20 minutes until very firm. Tip: Freezing ensures the chocolate coating sets quickly and creates that perfect snap when you bite into them.
10. While the truffles chill, melt 12 ounces semi-sweet chocolate chips with 2 teaspoons coconut oil in a microwave-safe bowl, heating in 30-second intervals and stirring between each until completely smooth.
11. Using a fork, dip each frozen truffle into the melted chocolate, tapping gently against the bowl edge to remove excess coating.
12. Return the coated truffles to the parchment-lined baking sheet and let set at room temperature for 45 minutes until the chocolate hardens completely. Tip: Adding coconut oil to the chocolate creates a smoother, shinier finish that looks professionally made.
Keeping these truffles in the refrigerator gives them that irresistible firm-yet-creamy texture where the sweet cookie dough gives way to the melty chocolate center. They’re perfect for holiday cookie exchanges or simply stashing in the freezer for those moments when only something decadent will do – my family loves finding them hidden behind the frozen vegetables as a sweet surprise.
Conclusion
Excitingly, these 20 recipes showcase how versatile Hershey Kisses can transform everyday treats into something special. I hope you feel inspired to whip up a batch (or two!)—don’t forget to share your favorites in the comments and pin this roundup on Pinterest for later. Happy baking!