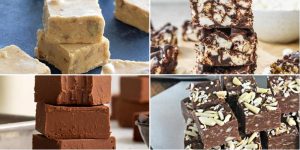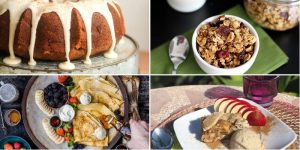
You probably have a box of cake mix sitting in your pantry right now, but did you know it can transform into so much more than just a simple cake? From decadent cookies to creative desserts, we’ve gathered 21 delightful recipes that will make your boxed mix the star of your kitchen. Get ready to be inspired—these easy, fun ideas are perfect for busy home cooks looking to whip up something special!
Chocolate Cherry Dump Cake
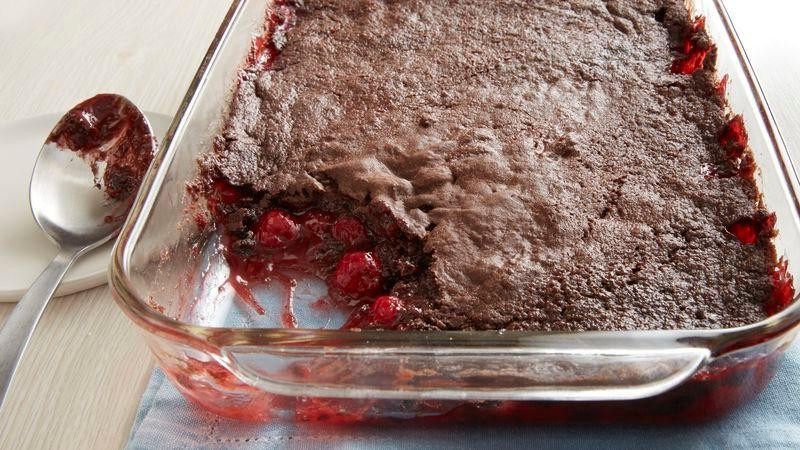
Now, let’s talk about the dessert that basically makes itself while you pretend to be a baking wizard. Nothing says “I totally planned this” like a dump cake that magically transforms pantry staples into a warm, gooey masterpiece that’ll have everyone begging for your secret (which is basically just dumping stuff in a pan).
12
servings15
minutes50
minutesIngredients
– 1 (21 oz) can cherry pie filling
– 1 (15.25 oz) box chocolate cake mix
– ½ cup unsalted butter
– 1 cup semi-sweet chocolate chips
– ½ cup chopped pecans
– Vanilla ice cream for serving
Instructions
1. Preheat your oven to 350°F and grab a 9×13-inch baking dish.
2. Dump the entire can of cherry pie filling into the baking dish, spreading it evenly across the bottom.
3. Sprinkle the dry chocolate cake mix evenly over the cherry layer, but do not stir—this creates that magical crust-and-filling separation.
4. Slice the cold butter into very thin pats and arrange them in a single layer across the top of the cake mix, covering as much surface area as possible to help with browning.
5. Scatter the chocolate chips evenly over the butter and cake mix layer.
6. Sprinkle the chopped pecans over everything for that delightful crunch.
7. Bake at 350°F for 45-50 minutes, until the top is golden brown and you can see the cherry filling bubbling around the edges.
8. Remove from oven and let it cool for at least 15 minutes—this allows the layers to set properly so you get clean slices.
Oh my goodness, the contrast between that crisp, buttery topping and the molten cherry-chocolate center is pure magic. Serve it warm with a scoop of vanilla ice cream melting into all those nooks and crannies, or honestly, just grab a spoon and dive right in—we won’t judge!
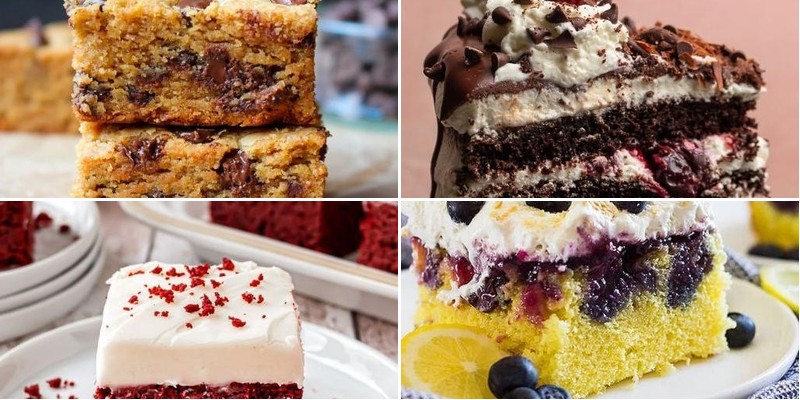
Lemon Blueberry Poke Cake
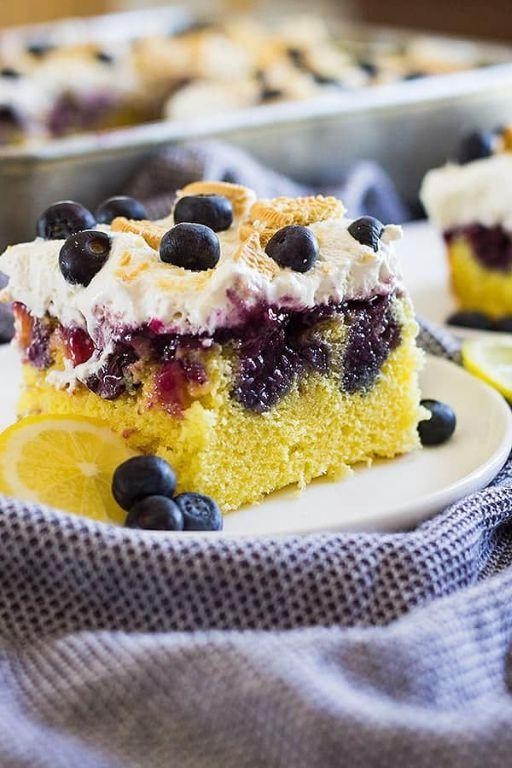
Ugh, who decided lemon and blueberry should be separated? This Lemon Blueberry Poke Cake is here to right that wrong with maximum citrusy, berry-packed energy that’ll make your taste buds do a happy dance.
12
servings20
minutes32
minutesIngredients
– 1 box lemon cake mix
– 3 large eggs
– 1/2 cup vegetable oil
– 1 cup water
– 1 can sweetened condensed milk
– 1/2 cup lemon juice
– 1 cup fresh blueberries
– 8 oz whipped topping
– 1/2 cup lemon curd
Instructions
1. Preheat your oven to 350°F and grease a 9×13 inch baking pan.
2. In a large bowl, combine the lemon cake mix, eggs, vegetable oil, and water until smooth.
3. Pour the batter into the prepared pan and bake for 28-32 minutes until a toothpick inserted in the center comes out clean.
4. Let the cake cool in the pan for 15 minutes, then use the handle of a wooden spoon to poke holes all over the surface.
5. Whisk together the sweetened condensed milk and lemon juice until fully combined.
6. Slowly pour the lemon milk mixture over the warm cake, making sure it seeps into all the holes.
7. Sprinkle fresh blueberries evenly across the top of the cake.
8. Refrigerate the cake for at least 2 hours to allow the flavors to meld and the cake to fully cool.
9. In a separate bowl, gently fold the lemon curd into the whipped topping until swirled.
10. Spread the lemon whipped topping mixture over the chilled cake, covering it completely.
11. Return the cake to the refrigerator for another 30 minutes to set the topping.
My goodness, the texture is pure magic—moist cake soaked with tangy lemon syrup, bursting blueberries, and that cloud-like lemon topping. Serve this beauty chilled with extra fresh berries on the side, or get fancy with edible flowers for your next summer gathering.
Strawberry Shortcake Trifle

A dessert so delightfully decadent, it’ll make your taste buds throw a party and your guests beg for the recipe—this strawberry shortcake trifle is the ultimate no-fuss showstopper that layers fluffy cake, juicy berries, and clouds of whipped cream into pure bliss.
8
servings25
minutes10
minutesIngredients
– 1 package (16 oz) pound cake, cubed
– 1 lb fresh strawberries, hulled and sliced
– 1/4 cup granulated sugar
– 2 cups heavy cream
– 1/4 cup powdered sugar
– 1 tsp vanilla extract
Instructions
1. Preheat your oven to 350°F.
2. Arrange the pound cake cubes in a single layer on a baking sheet.
3. Bake the cubes for 8–10 minutes, until lightly golden and crisp on the edges.
4. Combine the sliced strawberries and granulated sugar in a medium bowl.
5. Let the strawberry mixture sit at room temperature for 15 minutes, until the berries release their juices.
6. In a large mixing bowl, pour the heavy cream, powdered sugar, and vanilla extract.
7. Use an electric mixer on medium-high speed to whip the cream mixture until stiff peaks form, about 3–4 minutes.
8. Spread one-third of the toasted pound cake cubes in an even layer at the bottom of a trifle dish or large glass bowl.
9. Spoon half of the macerated strawberries and their juices over the cake layer.
10. Top the strawberries with one-third of the whipped cream, spreading it gently to the edges.
11. Repeat the layers with another third of cake, the remaining strawberries, and another third of whipped cream.
12. Finish with the final layer of pound cake cubes.
13. Spread the remaining whipped cream over the top layer, creating soft peaks with a spatula.
14. Garnish with a few reserved strawberry slices, if desired.
15. Cover the trifle with plastic wrap and refrigerate for at least 2 hours before serving.
Sweet, creamy, and bursting with berry goodness, this trifle boasts a dreamy contrast of tender cake, syrupy fruit, and pillowy whipped cream. Serve it in individual mason jars for a portable picnic treat, or scoop straight from the dish for a family-style centerpiece that disappears fast!
Pumpkin Spice Cake Bars
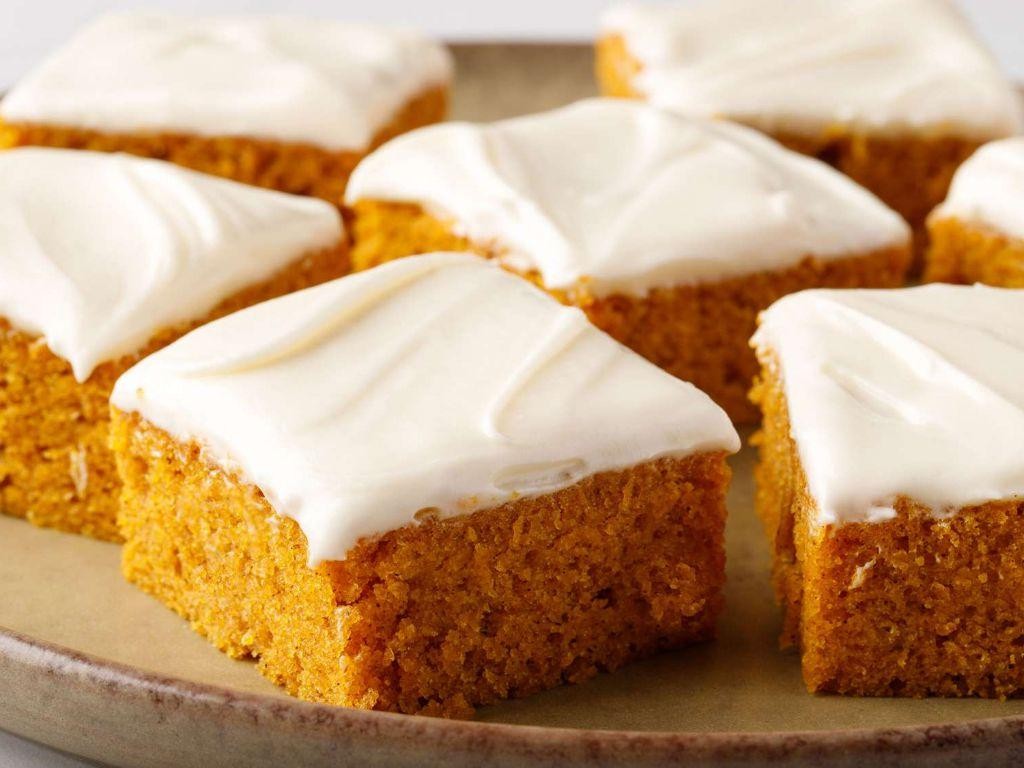
Ugh, are you tired of basic pumpkin recipes that scream “basic” louder than your aunt at a Taylor Swift concert? These Pumpkin Spice Cake Bars are here to save your fall from flavor boredom with their cozy, spiced-up swagger and irresistible moistness that’ll have you sneaking slices before they even cool.
12
bars15
minutes30
minutesIngredients
– 2 cups all-purpose flour
– 1 tsp baking soda
– 1/2 tsp salt
– 2 tsp pumpkin pie spice
– 1 cup granulated sugar
– 1/2 cup brown sugar
– 1/2 cup unsalted butter, softened
– 2 large eggs
– 1 cup pumpkin puree
– 1 tsp vanilla extract
– 1/2 cup milk
Instructions
1. Preheat your oven to 350°F and grease a 9×13-inch baking pan.
2. In a medium bowl, whisk together 2 cups all-purpose flour, 1 tsp baking soda, 1/2 tsp salt, and 2 tsp pumpkin pie spice until fully combined.
3. In a large bowl, use an electric mixer to cream 1 cup granulated sugar, 1/2 cup brown sugar, and 1/2 cup softened unsalted butter on medium speed for 2 minutes until light and fluffy.
4. Add 2 large eggs one at a time to the butter mixture, beating for 30 seconds after each addition until incorporated.
5. Mix in 1 cup pumpkin puree and 1 tsp vanilla extract on low speed until just blended.
6. Gradually add the dry flour mixture to the wet ingredients in three parts, alternating with 1/2 cup milk, beginning and ending with the flour mixture, and mix on low until no streaks remain.
7. Pour the batter into the prepared pan and spread it evenly with a spatula.
8. Bake at 350°F for 25–30 minutes, or until a toothpick inserted into the center comes out clean.
9. Let the bars cool in the pan on a wire rack for 1 hour before slicing.
Glory awaits with each tender bite—these bars boast a soft, cake-like crumb infused with warm spices, and they’re downright dreamy served warm with a scoop of vanilla ice cream or crumbled over morning yogurt for a breakfast treat that defies all rules.
Gooey Butter Cake Cookies
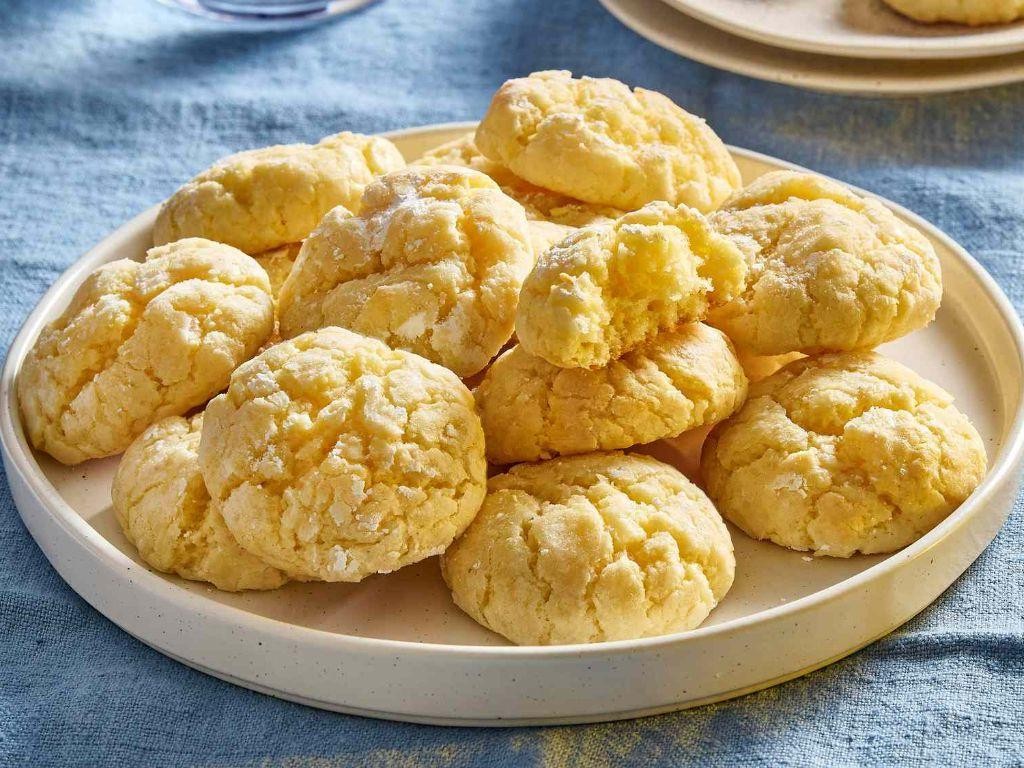
Ridiculously addictive and dangerously delicious, these Gooey Butter Cake Cookies are what happens when St. Louis’ favorite dessert rebels against its pie-shaped origins. Imagine the iconic gooey butter cake decided to go rogue, trading its sliceable dignity for portable cookie glory that sticks to your fingers in the most delightful way possible. You’ve been warned: these little clouds of joy disappear faster than your New Year’s resolutions.
24
cookies15
minutes12
minutesIngredients
– 2 cups all-purpose flour
– 1 1/2 cups granulated sugar
– 8 oz cream cheese
– 1/2 cup unsalted butter
– 2 large eggs
– 1 tsp vanilla extract
– 1 tsp baking powder
– 1/4 tsp salt
– 1/4 cup powdered sugar
Instructions
1. Preheat your oven to 350°F and line two baking sheets with parchment paper.
2. Beat 8 oz softened cream cheese and 1/2 cup room temperature butter together in a large bowl until completely smooth and creamy, about 2 minutes.
3. Gradually add 1 1/2 cups granulated sugar while continuing to beat the mixture until light and fluffy.
4. Crack in 2 large eggs one at a time, beating well after each addition until fully incorporated.
5. Stir in 1 tsp vanilla extract until the mixture is uniformly combined.
6. In a separate bowl, whisk together 2 cups all-purpose flour, 1 tsp baking powder, and 1/4 tsp salt.
7. Gradually add the dry ingredients to the wet mixture, mixing just until no flour streaks remain—do not overmix.
8. Cover the dough and chill in refrigerator for 30 minutes to prevent excessive spreading during baking.
9. Using a cookie scoop or tablespoon, portion dough into 1.5-inch balls and roll each in 1/4 cup powdered sugar until heavily coated.
10. Place dough balls 2 inches apart on prepared baking sheets and bake at 350°F for 10-12 minutes until edges are set but centers still appear slightly underbaked.
11. Cool cookies on baking sheets for 5 minutes before transferring to wire racks to cool completely.
Zesty with powdered sugar and impossibly soft, these cookies deliver that signature crackled top giving way to a center that’s pure molten bliss. Serve them slightly warm with cold milk for maximum gooey contrast, or crumble them over vanilla ice cream for an instant dessert upgrade that’ll make you question why regular cookies even bother trying.
Red Velvet Cake Mix Brownies

C’mon, let’s be real—when a box of red velvet cake mix stares you down from the pantry, it’s basically begging to be reborn as something even more decadent. We’re skipping the layers and diving fork-first into fudgy, crimson bliss with these ridiculously easy brownies that’ll make you question why you ever bothered with from-scratch drama.
16
brownies10
minutes25
minutesIngredients
– 1 box red velvet cake mix
– ½ cup unsalted butter, melted
– 1 large egg
– ½ cup semi-sweet chocolate chips
Instructions
1. Preheat your oven to 350°F and line an 8×8-inch baking pan with parchment paper, leaving some overhang for easy removal later.
2. In a medium bowl, combine the red velvet cake mix, melted unsalted butter, and large egg until a thick, cohesive dough forms. (Pro tip: If the dough feels too dry, add another tablespoon of melted butter—this ensures extra fudginess.)
3. Fold in the semi-sweet chocolate chips evenly throughout the dough, reserving a small handful for sprinkling on top.
4. Press the dough firmly into the prepared pan, using wet fingers or a spatula to smooth it into an even layer without gaps.
5. Scatter the reserved chocolate chips over the surface, gently pressing them in so they don’t roll off during baking.
6. Bake for 20–25 minutes, until the edges are set but the center still appears slightly soft when you give the pan a gentle shake. (Watch closely after 18 minutes—overbaking turns these from fudgy to cakey, and nobody wants that.)
7. Let the brownies cool completely in the pan on a wire rack for at least 1 hour before slicing; this prevents crumbly edges and lets the chocolate chips set.
Velvety and rich with a crackly top, these brownies deliver that signature cocoa-kissed tang in every dense, chewy bite. Serve them warm with a scoop of vanilla ice cream for a stunning red-and-white dessert, or crumble them over yogurt for a breakfast treat that’s totally justified.
Funfetti Cake Batter Fudge
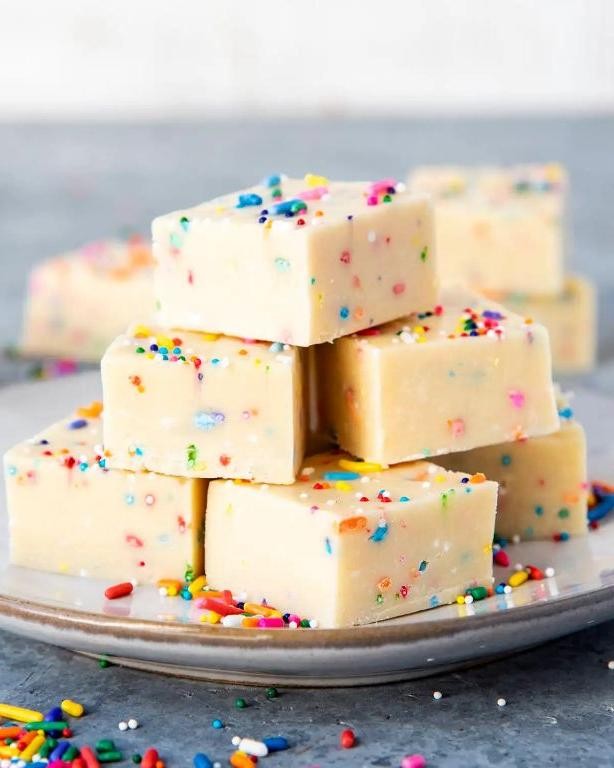
Whoever said you can’t have your cake and eat fudge too clearly never tried this magical creation. Welcome to the world of Funfetti Cake Batter Fudge, where childhood birthday party nostalgia meets grown-up dessert sophistication in the most delightfully chaotic way possible. This colorful confection will make you the hero of every potluck, party, or Tuesday night Netflix binge.
64
squares15
minutes7
minutesIngredients
– 3 cups white chocolate chips
– 1 can (14 oz) sweetened condensed milk
– 1/4 cup unsalted butter
– 1 tsp vanilla extract
– 1/2 cup rainbow sprinkles
– 1/4 tsp salt
Instructions
1. Line an 8×8 inch baking pan with parchment paper, leaving overhang on two sides for easy removal.
2. Combine white chocolate chips, sweetened condensed milk, and butter in a medium saucepan over low heat.
3. Stir continuously with a rubber spatula until the mixture is completely smooth and no chocolate chunks remain, about 5-7 minutes.
4. Remove the saucepan from heat immediately once melted to prevent scorching.
5. Stir in vanilla extract and salt until fully incorporated.
6. Allow the mixture to cool for 2 minutes to prevent sprinkles from melting.
7. Fold in rainbow sprinkles gently until evenly distributed throughout the fudge.
8. Transfer the fudge mixture to the prepared pan and spread into an even layer using an offset spatula.
9. Press additional sprinkles onto the surface for extra color and visual appeal.
10. Refrigerate the fudge for at least 3 hours, or until completely firm and sliceable.
11. Use the parchment paper overhang to lift the fudge from the pan onto a cutting board.
12. Cut into 1-inch squares using a sharp knife wiped clean between cuts for neat edges.
Zesty and vibrant, this fudge delivers that classic cake batter flavor with a creamy, melt-in-your-mouth texture that’s surprisingly sophisticated. The colorful sprinkles create little bursts of crunch against the smooth white chocolate base, making each bite a textural adventure. Serve these squares stacked like building blocks or crumbled over vanilla ice cream for an instant party upgrade.
Banana Bread with Cake Mix

Pardon my enthusiasm, but I’m about to drop the easiest banana bread recipe that’ll make you question why you ever bothered with the from-scratch drama. Seriously, this cake mix hack is so brilliantly lazy, it’s practically genius—get ready to impress with minimal effort and maximum banana-y goodness.
1
loaf15
minutes55
minutesIngredients
- 1 box yellow cake mix
- 3 ripe bananas, mashed
- 3 large eggs
- 1/2 cup vegetable oil
- 1/4 cup water
- 1 tsp vanilla extract
- 1/2 cup chopped walnuts (optional)
- cooking spray
Instructions
- Preheat your oven to 350°F and generously coat a 9×5-inch loaf pan with cooking spray.
- In a large mixing bowl, combine the yellow cake mix, mashed bananas, eggs, vegetable oil, water, and vanilla extract.
- Use an electric mixer on medium speed to blend everything for about 2 minutes, until the batter is smooth and no dry streaks remain—this ensures a tender crumb.
- If using walnuts, gently fold them into the batter with a spatula to distribute evenly without overmixing.
- Pour the batter into the prepared loaf pan and smooth the top with the spatula.
- Bake in the preheated oven for 50–60 minutes, or until a toothpick inserted into the center comes out clean—this visual cue guarantees it’s fully baked.
- Let the banana bread cool in the pan for 10 minutes to set, then transfer it to a wire rack to cool completely before slicing.
- For extra moisture, wrap any leftovers tightly in plastic wrap; it stays soft for days.
Every slice of this banana bread is blissfully moist with a tender, cake-like crumb that’s packed with sweet banana flavor. Try toasting a thick slab and slathering it with creamy peanut butter for a next-level snack, or crumble it over vanilla ice cream for a decadent dessert twist.
Pineapple Upside-Down Cupcakes

Craving something that turns dessert traditions literally upside down? These pineapple upside-down cupcakes are here to flip your world with their caramelized pineapple tops and tender vanilla cake bottoms—because why should cakes have all the fun? Get ready to bake a batch that’s as playful as it is delicious, with a golden-brown surprise waiting under every liner!
12
cupcakes15
minutes22
minutesIngredients
- 1/2 cup unsalted butter, melted
- 3/4 cup light brown sugar, packed
- 1 (20 oz) can pineapple rings, drained and patted dry
- 6 maraschino cherries, halved
- 1 1/2 cups all-purpose flour
- 1 tsp baking powder
- 1/2 tsp baking soda
- 1/4 tsp salt
- 1/2 cup granulated sugar
- 1/4 cup vegetable oil
- 2 large eggs
- 1 tsp vanilla extract
- 1/2 cup buttermilk
Instructions
- Preheat your oven to 350°F and line a 12-cup muffin tin with paper liners.
- Divide 1/2 cup melted butter evenly among the liners, using about 2 tsp per cup.
- Sprinkle 3/4 cup brown sugar evenly over the butter in each liner.
- Cut each pineapple ring into 6 wedges and arrange 3-4 wedges over the sugar in each liner.
- Place 1 cherry half in the center of each pineapple arrangement.
- In a medium bowl, whisk together 1 1/2 cups flour, 1 tsp baking powder, 1/2 tsp baking soda, and 1/4 tsp salt until combined.
- In a separate large bowl, whisk 1/2 cup granulated sugar, 1/4 cup oil, 2 eggs, and 1 tsp vanilla until smooth and pale.
- Alternately add the dry ingredients and 1/2 cup buttermilk to the wet ingredients, mixing just until no streaks remain—overmixing can make cupcakes tough.
- Spoon the batter evenly over the pineapple layer in each liner, filling each about 2/3 full.
- Bake for 18-22 minutes, or until a toothpick inserted into the cake portion comes out clean.
- Let the cupcakes cool in the pan for exactly 5 minutes to set the topping.
- Carefully invert the entire pan onto a wire rack, gently lifting it to reveal the caramelized pineapple tops—if any stick, use a knife to loosen them.
Let these cupcakes shine with their sticky-sweet pineapple crowns and fluffy vanilla base, perfect for serving warm with a dollop of whipped cream or as a sunny addition to brunch. Their gooey caramel layer seeps into every bite, making each one a mini celebration you’ll want to flip for again and again!
Coffee Cake with Streusel Topping
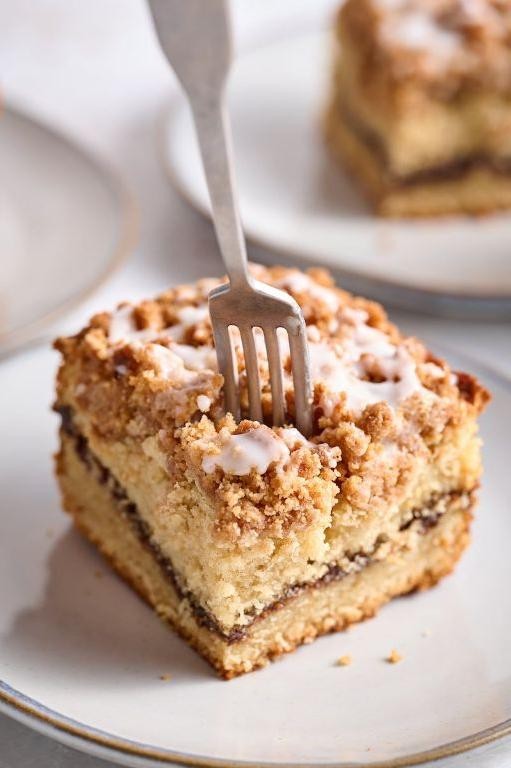
Kickstarting your morning just got exponentially more delicious with this coffee cake that basically doubles as an acceptable breakfast dessert. Picture this: tender, buttery cake hiding beneath a crunchy, cinnamon-spiked streusel topping that’ll have you sneaking bites before the coffee even brews. It’s the kind of treat that makes waking up before noon feel like a reward rather than a punishment.
9
servings40
minutesIngredients
– 2 cups all-purpose flour
– 1 cup granulated sugar
– 1/2 cup unsalted butter
– 1/2 cup brown sugar
– 1/2 cup sour cream
– 2 large eggs
– 1/4 cup milk
– 2 tsp baking powder
– 1 tsp vanilla extract
– 1 tsp ground cinnamon
– 1/2 tsp salt
Instructions
1. Preheat your oven to 350°F and grease a 9-inch square baking pan.
2. Whisk together 2 cups all-purpose flour, 1 cup granulated sugar, 2 tsp baking powder, and 1/2 tsp salt in a large bowl.
3. Cut 1/2 cup unsalted butter into the dry ingredients using a pastry cutter until the mixture resembles coarse crumbs.
4. Reserve 3/4 cup of the crumb mixture in a separate bowl for the streusel topping.
5. Beat 2 large eggs, 1/2 cup sour cream, 1/4 cup milk, and 1 tsp vanilla extract in another bowl until smooth.
6. Pour the wet ingredients into the remaining dry ingredients and stir just until combined—don’t overmix or your cake will be tough.
7. Spread the batter evenly into the prepared pan using a spatula.
8. Add 1/2 cup brown sugar and 1 tsp ground cinnamon to the reserved crumb mixture, mixing with your fingers until clumps form.
9. Sprinkle the streusel topping evenly over the batter, pressing lightly so it adheres.
10. Bake for 35-40 minutes until a toothpick inserted in the center comes out clean and the topping is golden brown.
11. Cool the cake in the pan on a wire rack for at least 30 minutes before slicing.
Moist, tender crumb meets that irresistible crunchy streusel in every forkful, creating the perfect textural contrast that’ll have you coming back for seconds. The cinnamon-sugar topping caramelizes beautifully against the soft cake base, making this equally fantastic served warm with your morning coffee or as an afternoon pick-me-up. Try topping slices with a dollop of whipped cream and fresh berries for an extra special treat that feels downright fancy.
Carrot Cake Muffins
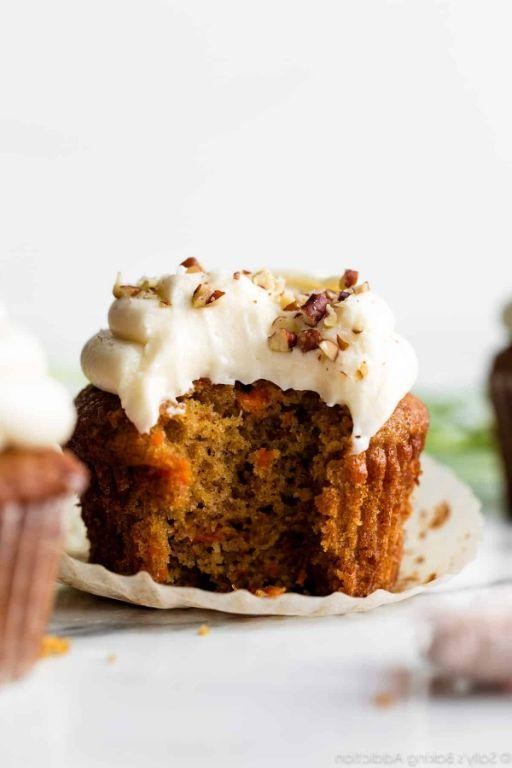
Delightfully deceptive, these carrot cake muffins masquerade as virtuous breakfast fare while secretly packing all the spiced, moist, and cream-cheese-glory of your favorite dessert. They’re the ultimate morning hustle hustle—because who says you can’t have cake for breakfast and call it responsible? Consider this your official permission slip to indulge before noon, no judgment here.
12
muffins15
minutes22
minutesIngredients
- 2 cups all-purpose flour
- 1 cup granulated sugar
- 1 tsp baking soda
- 1 tsp baking powder
- 1 tsp ground cinnamon
- 1/2 tsp salt
- 2 large eggs
- 1/2 cup vegetable oil
- 1/4 cup whole milk
- 1 tsp vanilla extract
- 1 1/2 cups grated carrots
- 1/2 cup chopped walnuts
- 4 oz cream cheese, softened
- 1 cup powdered sugar
- 1 tbsp whole milk
Instructions
- Preheat your oven to 375°F and line a 12-cup muffin tin with paper liners.
- Whisk together 2 cups all-purpose flour, 1 cup granulated sugar, 1 tsp baking soda, 1 tsp baking powder, 1 tsp ground cinnamon, and 1/2 tsp salt in a large bowl until fully combined.
- In a separate bowl, beat 2 large eggs with 1/2 cup vegetable oil, 1/4 cup whole milk, and 1 tsp vanilla extract until smooth.
- Pour the wet ingredients into the dry ingredients and stir just until no flour streaks remain—overmixing can lead to dense muffins.
- Fold in 1 1/2 cups grated carrots and 1/2 cup chopped walnuts until evenly distributed.
- Divide the batter evenly among the 12 muffin cups, filling each about 3/4 full.
- Bake for 18–22 minutes, or until a toothpick inserted into the center of a muffin comes out clean.
- Transfer the muffins to a wire rack and let them cool completely before frosting.
- While the muffins cool, beat 4 oz softened cream cheese with 1 cup powdered sugar and 1 tbsp whole milk until smooth and spreadable.
- Frost each cooled muffin with the cream cheese mixture using a knife or offset spatula.
Absolutely irresistible, these muffins boast a tender crumb speckled with sweet carrots and crunchy walnuts, all wrapped in a tangy cream cheese blanket. Serve them slightly warm with a drizzle of extra frosting for a decadent brunch treat, or pack them for a lunchbox surprise that screams “I adult responsibly… mostly.”
Peanut Butter Chocolate Chip Bars
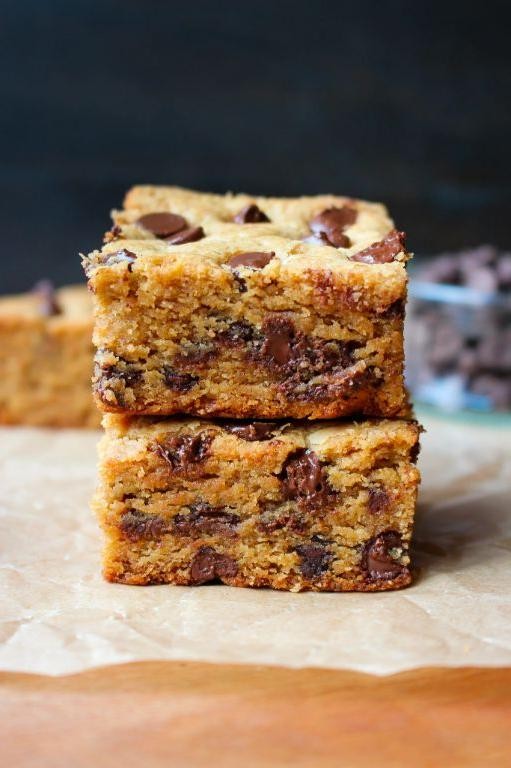
Zesty doesn’t even begin to describe the magic that happens when peanut butter and chocolate decide to throw a party in bar form. These peanut butter chocolate chip bars are the edible equivalent of finding money in your pocket—unexpectedly delightful and guaranteed to make your day. Get ready to become the hero of your next potluck or Tuesday afternoon.
12
bars15
minutes25
minutesIngredients
– 1 cup creamy peanut butter
– 1/2 cup unsalted butter, softened
– 1 cup light brown sugar, packed
– 1/4 cup granulated sugar
– 2 large eggs
– 1 teaspoon vanilla extract
– 1 1/2 cups all-purpose flour
– 1 teaspoon baking soda
– 1/2 teaspoon salt
– 1 1/2 cups semi-sweet chocolate chips
Instructions
1. Preheat your oven to 350°F and line a 9×13-inch baking pan with parchment paper, leaving overhang on two sides for easy removal.
2. In a large bowl, combine 1 cup creamy peanut butter, 1/2 cup softened unsalted butter, 1 cup packed light brown sugar, and 1/4 cup granulated sugar using an electric mixer on medium speed for 2 minutes until light and fluffy.
3. Add 2 large eggs one at a time, beating for 30 seconds after each addition until fully incorporated.
4. Mix in 1 teaspoon vanilla extract until just combined.
5. In a separate bowl, whisk together 1 1/2 cups all-purpose flour, 1 teaspoon baking soda, and 1/2 teaspoon salt.
6. Gradually add the dry ingredients to the wet ingredients, mixing on low speed until no flour streaks remain—don’t overmix!
7. Fold in 1 1/2 cups semi-sweet chocolate chips using a spatula until evenly distributed throughout the batter.
8. Spread the batter evenly into the prepared pan using an offset spatula or the back of a spoon.
9. Bake at 350°F for 22-25 minutes until the edges are golden brown and the center appears set but still slightly soft.
10. Cool completely in the pan on a wire rack for at least 1 hour before lifting out using the parchment overhang.
Just out of the oven, these bars strike the perfect balance between chewy and cake-like with pockets of melted chocolate that’ll make you weak in the knees. The peanut butter flavor shines through without overwhelming, creating that nostalgic comfort we all crave. Try serving them slightly warm with a scoop of vanilla ice cream for an instant dessert upgrade, or cut them into tiny squares for the most popular party platter you’ll ever assemble.
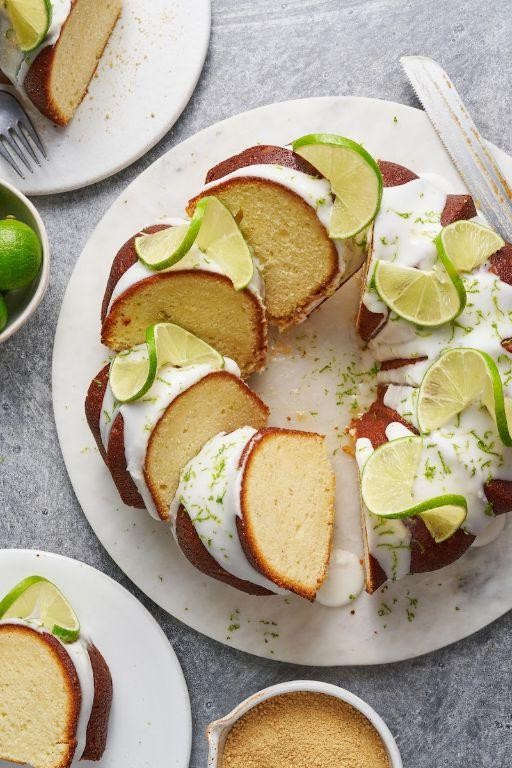
Key Lime Bundt Cake
Nope, your average citrus dessert just got a major glow-up! This Key Lime Bundt Cake is here to prove that life’s too short for boring cakes—it’s tart, tender, and ridiculously easy to fall in love with. Get ready to bake a showstopper that’ll have everyone begging for the recipe (and maybe a second slice).
10
servings20
minutes50
minutesIngredients
– 2 cups all-purpose flour
– 1 1/2 cups granulated sugar
– 1/2 cup unsalted butter, softened
– 1/2 cup vegetable oil
– 3 large eggs
– 1 cup plain Greek yogurt
– 1/4 cup Key lime juice
– 1 tbsp Key lime zest
– 1 tsp baking powder
– 1/2 tsp baking soda
– 1/2 tsp salt
– 1 cup powdered sugar
– 2 tbsp milk
Instructions
1. Preheat your oven to 350°F and generously grease a 10-cup Bundt pan with baking spray, making sure to reach all the nooks and crannies.
2. In a medium bowl, whisk together 2 cups all-purpose flour, 1 tsp baking powder, 1/2 tsp baking soda, and 1/2 tsp salt until fully combined.
3. In a large mixing bowl, use an electric mixer on medium speed to cream 1/2 cup softened unsalted butter, 1 1/2 cups granulated sugar, and 1/2 cup vegetable oil until light and fluffy, about 2–3 minutes.
4. Beat in 3 large eggs one at a time, mixing just until each egg is incorporated to avoid overbeating.
5. Stir in 1 cup plain Greek yogurt, 1/4 cup Key lime juice, and 1 tbsp Key lime zest until the batter is smooth and evenly mixed.
6. Gradually add the dry flour mixture to the wet ingredients, mixing on low speed until no streaks of flour remain—don’t overmix!
7. Pour the batter into the prepared Bundt pan and spread it evenly with a spatula.
8. Bake at 350°F for 45–50 minutes, or until a toothpick inserted into the center comes out clean.
9. Let the cake cool in the pan on a wire rack for 15 minutes, then invert it onto the rack to cool completely.
10. For the glaze, whisk 1 cup powdered sugar and 2 tbsp milk in a small bowl until smooth, then drizzle it over the cooled cake.
The cake’s crumb is incredibly moist and tender, thanks to the Greek yogurt, while the zesty lime glaze adds a bright, tangy kick. Serve it with a scoop of coconut ice cream for a tropical twist, or enjoy a thick slice with your morning coffee—because dessert for breakfast is always a good idea.
Tiramisu Poke Cake

Darlings, prepare to have your dessert dreams come true with this Italian-inspired marvel that transforms classic tiramisu into the easiest, most irresistible poke cake you’ll ever make. Forget fussy layers and temperamental mascarpone—this beauty delivers all the coffee-kissed, cocoa-dusted magic in one gloriously simple pan.
12
servings20
minutes32
minutesIngredients
– 1 box (15.25 oz) vanilla cake mix
– 3 large eggs
– 1/2 cup vegetable oil
– 1 cup water
– 1 cup strong brewed coffee, cooled
– 1/2 cup coffee liqueur
– 8 oz mascarpone cheese, softened
– 1 cup heavy whipping cream
– 1/2 cup granulated sugar
– 2 tbsp unsweetened cocoa powder
Instructions
1. Preheat your oven to 350°F and grease a 9×13-inch baking pan.
2. In a large bowl, combine the vanilla cake mix, eggs, vegetable oil, and water until smooth.
3. Pour the batter into the prepared pan and bake for 28-32 minutes, or until a toothpick inserted in the center comes out clean.
4. While the cake bakes, whisk together the cooled coffee and coffee liqueur in a measuring cup.
5. Let the cake cool in the pan for 15 minutes, then use the handle of a wooden spoon to poke holes all over the surface, spacing them about 1 inch apart.
6. Slowly pour the coffee mixture over the warm cake, aiming for the holes to ensure maximum absorption.
7. In a separate bowl, beat the softened mascarpone cheese with an electric mixer until creamy.
8. Add the heavy whipping cream and granulated sugar to the mascarpone, then whip on medium-high speed for 3-4 minutes until stiff peaks form.
9. Spread the mascarpone mixture evenly over the cooled cake, creating swoops and swirls with your spatula.
10. Sift the cocoa powder through a fine-mesh sieve over the top for a dusting that won’t clump.
11. Refrigerate the cake for at least 4 hours, or overnight, to allow the flavors to meld and the texture to set.
Zesty with coffee and luxuriously creamy, this cake’s tender crumb soaks up every drop of that boozy kick. Serve it chilled with an extra dusting of cocoa or alongside a shot of espresso for the ultimate grown-up treat.
Black Forest Layer Cake

A Black Forest Layer Cake that’ll make you feel like a pastry pro without the stress of culinary school! This decadent dessert combines rich chocolate, boozy cherries, and clouds of whipped cream in a way that’s downright magical—and guaranteed to impress even your pickiest foodie friends.
8
servings25
minutes35
minutesIngredients
– 2 cups all-purpose flour
– 1 ¾ cups granulated sugar
– ¾ cup unsweetened cocoa powder
– 2 tsp baking soda
– 1 tsp baking powder
– 1 tsp salt
– 2 large eggs
– 1 cup buttermilk
– ½ cup vegetable oil
– 2 tsp vanilla extract
– 1 cup boiling water
– 1 can (21 oz) cherry pie filling
– 2 tbsp kirsch liqueur
– 2 cups heavy whipping cream
– ¼ cup powdered sugar
– 1 tsp vanilla extract
– ½ cup semi-sweet chocolate shavings
Instructions
1. Preheat your oven to 350°F and grease two 9-inch round cake pans, then line them with parchment paper for easy removal.
2. Whisk together 2 cups all-purpose flour, 1 ¾ cups granulated sugar, ¾ cup unsweetened cocoa powder, 2 tsp baking soda, 1 tsp baking powder, and 1 tsp salt in a large bowl until no lumps remain.
3. Add 2 large eggs, 1 cup buttermilk, ½ cup vegetable oil, and 2 tsp vanilla extract to the dry ingredients, mixing on medium speed just until combined—don’t overmix!
4. Carefully pour in 1 cup boiling water and stir gently until the batter is smooth and thin; the hot water enhances the chocolate flavor.
5. Divide the batter evenly between the prepared pans and bake for 30–35 minutes, or until a toothpick inserted into the center comes out clean.
6. Let the cakes cool in the pans for 10 minutes, then transfer them to a wire rack to cool completely to avoid sogginess.
7. While the cakes cool, stir 2 tbsp kirsch liqueur into 1 can (21 oz) cherry pie filling in a small bowl and set aside.
8. Whip 2 cups heavy whipping cream, ¼ cup powdered sugar, and 1 tsp vanilla extract on high speed until stiff peaks form, about 3–4 minutes; chill it until use.
9. Level the cooled cake layers with a serrated knife if domed for even stacking.
10. Place one cake layer on a serving plate, spread half the whipped cream over it, then spoon half the cherry mixture on top.
11. Top with the second cake layer and repeat with remaining whipped cream and cherries.
12. Sprinkle ½ cup semi-sweet chocolate shavings over the top for a rustic finish. Each bite delivers moist chocolate cake, tangy cherries, and airy cream that melts in your mouth—serve it chilled with coffee for a cozy treat, or slice it thick for a showstopping dessert table centerpiece!
Orange Creamsicle Cake

Ugh, who decided that childhood nostalgia should be limited to frozen treats on a stick? We’re taking that dreamy orange-vanilla combo and turning it into the cake of your adult dreams—no sticky fingers required, we promise.
8
servings30
minutes30
minutesIngredients
– 2 cups all-purpose flour
– 1 1/2 cups granulated sugar
– 1/2 cup unsalted butter, softened
– 3 large eggs
– 1 cup whole milk
– 1/4 cup vegetable oil
– 2 tsp baking powder
– 1/2 tsp salt
– 1 tbsp orange zest
– 1/4 cup fresh orange juice
– 2 tsp vanilla extract
– 8 oz cream cheese, softened
– 1/2 cup powdered sugar
– 1 cup heavy whipping cream
Instructions
1. Preheat your oven to 350°F and grease two 8-inch round cake pans.
2. Whisk together 2 cups all-purpose flour, 1 1/2 cups granulated sugar, 2 tsp baking powder, and 1/2 tsp salt in a large bowl.
3. Beat 1/2 cup softened unsalted butter with 1/4 cup vegetable oil on medium speed for 2 minutes until creamy.
4. Add 3 large eggs one at a time, beating for 30 seconds after each addition.
5. Mix in 1 tbsp orange zest, 1/4 cup fresh orange juice, and 2 tsp vanilla extract until combined.
6. Alternate adding the dry ingredients and 1 cup whole milk to the butter mixture, beginning and ending with dry ingredients, mixing just until combined after each addition.
7. Divide the batter evenly between the prepared pans and bake at 350°F for 25-30 minutes until a toothpick inserted in the center comes out clean.
8. Cool the cakes in pans for 15 minutes before transferring to a wire rack to cool completely.
9. Beat 8 oz softened cream cheese with 1/2 cup powdered sugar on medium speed for 2 minutes until smooth.
10. In a separate bowl, whip 1 cup heavy whipping cream on high speed for 3-4 minutes until stiff peaks form.
11. Gently fold the whipped cream into the cream cheese mixture until no white streaks remain.
12. Place one cooled cake layer on a serving plate and spread with half of the frosting.
13. Top with the second cake layer and frost the top and sides with remaining frosting.
14. Refrigerate the cake for at least 1 hour before serving to allow the frosting to set.
Know that first bite will transport you straight back to summer vacations, with its cloud-like vanilla frosting melting into the bright orange-kissed cake. The texture is impossibly tender—somewhere between a dream and a memory—making it perfect for slicing thick wedges to enjoy with an extra sprinkle of orange zest or alongside a tall glass of cold milk.
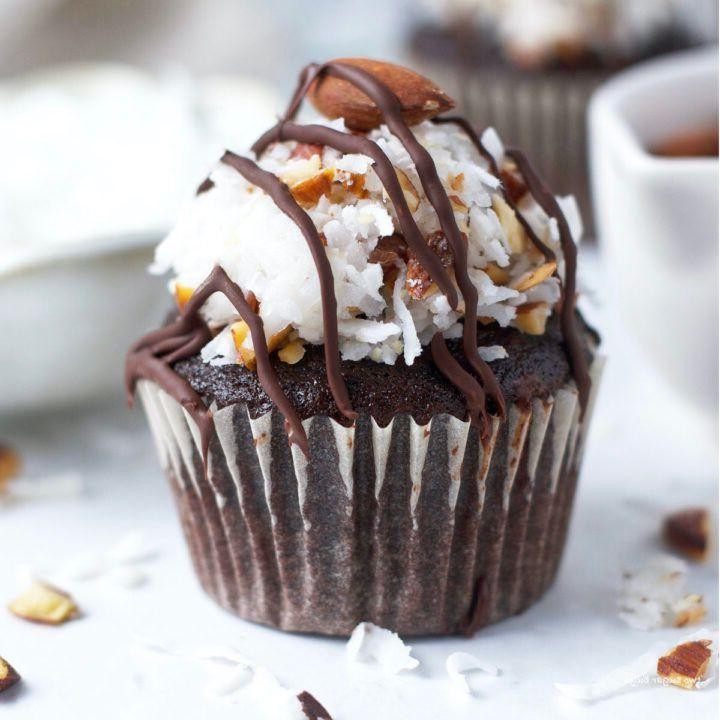
Almond Joy Cupcakes
Ever had that moment when you’re craving something sweet, but your sweet tooth can’t decide between candy bar decadence and cupcake comfort? Enter these Almond Joy Cupcakes, the dessert that boldly declares, “Why choose?” They’re basically a tropical vacation for your taste buds, packed with coconut, chocolate, and almond goodness, guaranteed to make you the hero of any bake sale or Tuesday night.
12
cupcakes20
minutes22
minutesIngredients
- 1 ½ cups all-purpose flour
- 1 cup granulated sugar
- ½ cup unsweetened cocoa powder
- 1 tsp baking soda
- ½ tsp salt
- 1 cup buttermilk
- ½ cup vegetable oil
- 2 large eggs
- 1 tsp vanilla extract
- 1 cup sweetened shredded coconut
- ½ cup sliced almonds
- 8 oz cream cheese, softened
- ½ cup unsalted butter, softened
- 4 cups powdered sugar
- 1 tsp almond extract
Instructions
- Preheat your oven to 350°F and line a 12-cup muffin tin with paper liners.
- In a large bowl, whisk together 1 ½ cups all-purpose flour, 1 cup granulated sugar, ½ cup unsweetened cocoa powder, 1 tsp baking soda, and ½ tsp salt until no lumps remain.
- In a separate medium bowl, whisk 1 cup buttermilk, ½ cup vegetable oil, 2 large eggs, and 1 tsp vanilla extract until fully combined.
- Pour the wet ingredients into the dry ingredients and stir with a spatula just until the batter is smooth, being careful not to overmix.
- Fold in 1 cup sweetened shredded coconut and ½ cup sliced almonds until evenly distributed throughout the batter.
- Divide the batter evenly among the 12 prepared muffin cups, filling each about two-thirds full.
- Bake for 18–22 minutes, or until a toothpick inserted into the center of a cupcake comes out clean.
- Transfer the cupcakes to a wire rack and let them cool completely, about 1 hour.
- While the cupcakes cool, make the frosting by beating 8 oz softened cream cheese and ½ cup softened unsalted butter in a stand mixer with the paddle attachment on medium speed until light and fluffy, about 2 minutes.
- Gradually add 4 cups powdered sugar and 1 tsp almond extract, beating on low speed until incorporated, then increase to high and beat for 2 more minutes until smooth and spreadable.
- Frost the cooled cupcakes generously with the cream cheese frosting using an offset spatula or piping bag.
- Sprinkle the frosted cupcakes with additional sliced almonds and shredded coconut for extra texture and visual appeal.
Perfectly moist and rich, these cupcakes deliver a delightful crunch from the almonds against the creamy, coconut-speckled crumb. Pair one with a cold glass of milk for the ultimate nostalgic treat, or get fancy and serve them slightly warmed with a scoop of vanilla ice cream for a next-level dessert experience.
Conclusion
You’ve just discovered 21 brilliant ways to transform boxed cake mix into extraordinary treats! From cookies to cheesecakes, these recipes prove that convenience and creativity go hand-in-hand. We hope you’re inspired to whip up something delicious—don’t forget to share your favorite in the comments and pin this article to your Pinterest boards for future baking adventures!