Unlock the secret to guilt-free indulgence with our collection of 25 delicious recipes, each under 300 calories! Whether you’re craving quick weeknight dinners or cozy comfort food, we’ve got flavorful, healthy meals that won’t leave you hungry. Dive in to discover how easy and satisfying eating well can be—your taste buds and waistline will thank you!
Low-Calorie Chicken Stir Fry
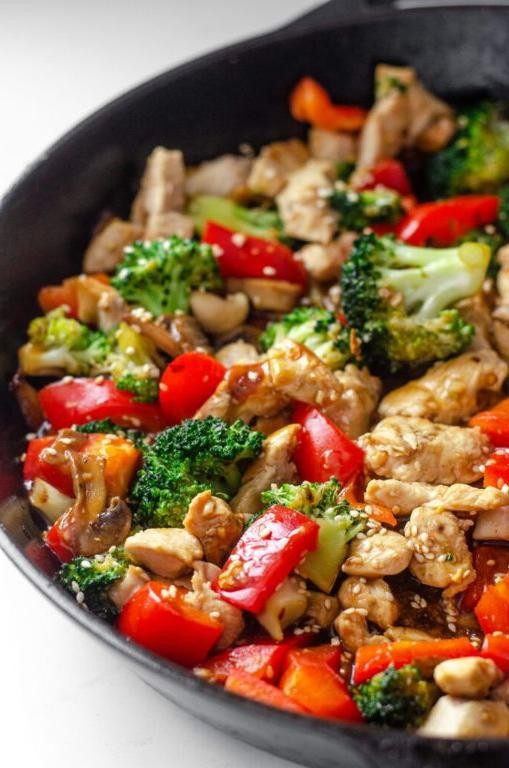
Need a quick, healthy dinner that doesn’t sacrifice flavor? This low-calorie chicken stir fry delivers lean protein and crisp vegetables in under 30 minutes. No complicated sauces or techniques required.
Serving: 4 | Pre Time: 15 minutes | Cooking Time: 12 minutes
Ingredients
– 1 lb boneless, skinless chicken breast, cut into 1-inch cubes
– 2 tbsp avocado oil, divided
– 1 tbsp low-sodium tamari
– 1 tsp toasted sesame oil
– 1 tbsp fresh ginger, finely grated
– 2 garlic cloves, minced
– 1 large red bell pepper, julienned
– 1 cup broccoli florets, cut into bite-sized pieces
– 1 cup snap peas, trimmed
– 1/2 cup low-sodium chicken broth
– 1 tbsp cornstarch
– 2 green onions, thinly sliced on a bias
Instructions
1. In a medium bowl, combine the cubed chicken breast, 1 tablespoon of avocado oil, and the low-sodium tamari. Toss to coat evenly and set aside to marinate for 10 minutes.
2. Whisk together the toasted sesame oil, grated ginger, minced garlic, low-sodium chicken broth, and cornstarch in a small bowl until smooth to create the sauce slurry.
3. Heat a large wok or skillet over high heat until a drop of water sizzles and evaporates immediately.
4. Add the remaining 1 tablespoon of avocado oil to the hot wok, swirling to coat the surface.
5. Add the marinated chicken in a single layer. Cook undisturbed for 2 minutes to achieve a golden sear.
6. Flip the chicken pieces and continue cooking for another 2-3 minutes until the exterior is opaque and the internal temperature reaches 165°F. Transfer the chicken to a clean plate.
7. Add the julienned red bell pepper and broccoli florets to the wok. Stir-fry for 3 minutes until the broccoli brightens in color and the pepper begins to soften.
8. Incorporate the trimmed snap peas and stir-fry for 1 additional minute.
9. Return the cooked chicken to the wok with the vegetables.
10. Give the sauce slurry a final whisk and pour it into the center of the wok. Stir constantly for 1-2 minutes until the sauce thickens, becomes glossy, and coats all ingredients.
11. Remove the wok from the heat and fold in the thinly sliced green onions.
Serve immediately over cauliflower rice for a low-carb option. The chicken remains tender and juicy, while the vegetables retain a satisfying crunch. The glossy, savory sauce, brightened by fresh ginger, clings perfectly to every bite without heaviness.
Zucchini Noodles with Pesto
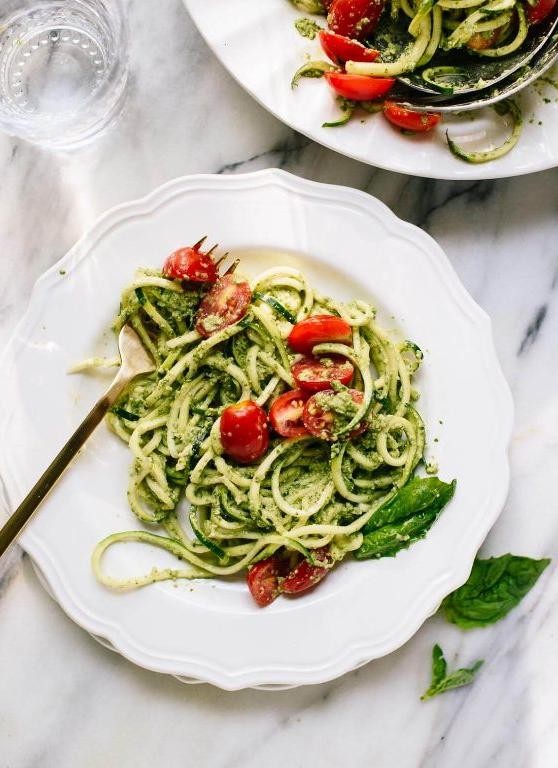
Ditch the carb-heavy pasta for this vibrant, vegetable-forward dish. Zucchini noodles with pesto deliver fresh flavors and satisfying texture in under 30 minutes. It’s a versatile base for countless protein additions or seasonal vegetables.
Serving: 4 | Pre Time: 15 minutes | Cooking Time: 5 minutes
Ingredients
- 4 medium zucchini, spiralized into ¼-inch noodles
- 2 cups fresh basil leaves, packed
- ½ cup extra-virgin olive oil
- ⅓ cup pine nuts, toasted
- 2 garlic cloves, peeled
- ½ cup Parmigiano-Reggiano cheese, finely grated
- 1 tablespoon fresh lemon juice
- ½ teaspoon kosher salt
- ¼ teaspoon freshly cracked black pepper
- 2 tablespoons unsalted butter
Instructions
- Place basil leaves, pine nuts, and garlic cloves in a food processor.
- Pulse 8-10 times until coarsely chopped, scraping down sides as needed.
- With processor running on low, slowly drizzle in extra-virgin olive oil through the feed tube until emulsified.
- Transfer pesto to a bowl and fold in Parmigiano-Reggiano cheese, lemon juice, kosher salt, and black pepper. Tip: For brighter flavor, add lemon juice just before serving to prevent oxidation.
- Heat a large skillet over medium-high heat for 90 seconds.
- Add unsalted butter and swirl until melted and foaming subsides.
- Add zucchini noodles and sauté for 2-3 minutes, tossing constantly with tongs. Tip: Cook just until al dente—overcooking releases excess moisture and creates soggy noodles.
- Remove skillet from heat and immediately fold in prepared pesto until noodles are evenly coated. Tip: Off-heat incorporation preserves the pesto’s vibrant color and fresh garlic bite.
- Divide among four plates and serve immediately.
The zucchini noodles retain a pleasant bite while the rich, herbaceous pesto clings perfectly to each strand. For a luxurious finish, top with seared scallops or add roasted cherry tomatoes for bursts of sweetness.
Grilled Shrimp Skewers with Lemon

Nothing beats the simplicity of grilled shrimp for a quick, flavorful meal. Nowhere is this more evident than with these lemon-kissed skewers, which deliver bright, coastal flavors in under 30 minutes.
Serving: 4 | Pre Time: 15 minutes | Cooking Time: 8 minutes
Ingredients
- 1 ½ pounds large wild-caught shrimp (21-25 count), peeled and deveined
- ¼ cup extra-virgin olive oil
- 3 tablespoons freshly squeezed lemon juice
- 4 garlic cloves, finely minced
- 1 teaspoon kosher salt
- ½ teaspoon freshly cracked black pepper
- 1 tablespoon finely chopped fresh parsley
- 1 lemon, cut into 8 wedges
- 8 (10-inch) wooden skewers, soaked in water for 30 minutes
Instructions
- Pat the shrimp completely dry with paper towels to ensure proper searing.
- In a medium bowl, whisk together the extra-virgin olive oil, freshly squeezed lemon juice, finely minced garlic cloves, kosher salt, and freshly cracked black pepper to create the marinade.
- Add the dried shrimp to the marinade, tossing gently to coat each piece evenly.
- Let the shrimp marinate at room temperature for exactly 10 minutes—any longer and the acid will begin to cook the protein.
- While the shrimp marinates, soak 8 wooden skewers in water for a full 30 minutes to prevent burning on the grill.
- Thread 4-5 shrimp onto each pre-soaked skewer, leaving a small space between each piece for even heat circulation.
- Preheat a gas or charcoal grill to high heat, achieving a surface temperature of 450-500°F.
- Place the skewers directly on the hot grill grates and cook for 3 minutes without moving them to develop pronounced grill marks.
- Using tongs, carefully flip each skewer and cook for an additional 2-3 minutes, just until the shrimp turn opaque and firm to the touch.
- Transfer the cooked skewers to a clean platter and immediately garnish with finely chopped fresh parsley and lemon wedges.
Finally, these skewers offer a perfect textural contrast: a lightly charred, crisp exterior gives way to a tender, juicy interior. For a creative presentation, serve them over a bed of herbaceous couscous or alongside grilled asparagus spears to soak up the bright, garlicky lemon marinade.
Roasted Red Pepper Soup

On chilly evenings, nothing satisfies like a bowl of roasted red pepper soup. This velvety blend of sweet peppers and savory aromatics is both comforting and elegant. It comes together with minimal effort for maximum flavor.
Serving: 4 | Pre Time: 15 minutes | Cooking Time: 45 minutes
Ingredients
– 4 large red bell peppers, halved and seeded
– 2 tbsp extra-virgin olive oil, divided
– 1 medium yellow onion, finely diced
– 3 garlic cloves, minced
– 1 tsp smoked paprika
– 4 cups low-sodium vegetable stock
– 1/2 cup heavy cream
– 1 tbsp fresh thyme leaves
– Kosher salt and freshly ground black pepper
– 1/4 cup crème fraîche for garnish
– 2 tbsp chopped fresh chives for garnish
Instructions
1. Preheat your oven to 425°F (218°C).
2. Arrange the halved red bell peppers on a parchment-lined baking sheet, cut-side down.
3. Drizzle 1 tablespoon of extra-virgin olive oil over the peppers.
4. Roast the peppers for 25–30 minutes until the skins are charred and blistered.
5. Transfer the roasted peppers to a bowl and cover tightly with plastic wrap to steam for 10 minutes—this loosens the skins for easy peeling.
6. While the peppers steam, heat the remaining 1 tablespoon of olive oil in a large Dutch oven or heavy-bottomed pot over medium heat.
7. Add the finely diced yellow onion and cook for 6–8 minutes, stirring occasionally, until translucent and lightly golden.
8. Stir in the minced garlic and smoked paprika, cooking for 1 minute until fragrant.
9. Peel the skins from the steamed peppers and discard them; roughly chop the pepper flesh.
10. Add the chopped roasted peppers to the pot with the onions.
11. Pour in the low-sodium vegetable stock and bring the mixture to a simmer.
12. Reduce the heat to low, cover, and simmer gently for 15 minutes to allow the flavors to meld.
13. Carefully purée the soup in batches using a high-speed blender until completely smooth, or use an immersion blender directly in the pot.
14. Return the puréed soup to the pot and stir in the heavy cream and fresh thyme leaves.
15. Season with kosher salt and freshly ground black pepper, then heat through for 2–3 minutes without boiling.
16. Ladle the soup into warm bowls.
17. Garnish each serving with a dollop of crème fraîche and a sprinkle of chopped fresh chives.
With its silky texture and deep, smoky-sweet flavor, this soup feels luxurious yet approachable. The cream enriches without overwhelming the peppers’ natural sweetness. For a creative twist, serve it chilled in the summer or swirl in a teaspoon of harissa for a spicy kick.
Berry and Almond Yogurt Parfait

Yield a vibrant, layered breakfast or dessert that balances creamy, crunchy, and tart elements. This parfait assembles quickly for a nutritious treat, perfect for meal prep or elegant brunches. It’s endlessly customizable with seasonal fruits and nuts.
Serving: 4 | Pre Time: 15 minutes | Cooking Time: 0 minutes
Ingredients
– 2 cups plain whole-milk Greek yogurt
– 1 cup fresh mixed berries (such as raspberries, blueberries, and blackberries), rinsed and patted dry
– 1/2 cup sliced almonds, toasted
– 1/4 cup pure maple syrup
– 1 teaspoon pure vanilla extract
– 1/4 teaspoon fine sea salt
Instructions
1. In a medium mixing bowl, combine 2 cups plain whole-milk Greek yogurt, 1/4 cup pure maple syrup, 1 teaspoon pure vanilla extract, and 1/4 teaspoon fine sea salt.
2. Whisk the yogurt mixture vigorously for 30 seconds until completely smooth and well-integrated, ensuring no lumps remain.
3. Rinse 1 cup fresh mixed berries under cold running water and gently pat dry with paper towels to prevent sogginess.
4. Toast 1/2 cup sliced almonds in a dry skillet over medium heat for 3-5 minutes, stirring constantly until fragrant and lightly golden, then immediately transfer to a plate to cool.
5. Select four clear parfait glasses or jars, each holding at least 8 ounces.
6. Spoon 2 tablespoons of the yogurt mixture into the bottom of each glass to create an even base layer.
7. Add a layer of 2 tablespoons fresh mixed berries on top of the yogurt in each glass.
8. Sprinkle 1 tablespoon toasted sliced almonds over the berry layer in each glass.
9. Repeat the layering sequence once more: yogurt, berries, then almonds, dividing the remaining ingredients evenly among the glasses.
10. Chill the assembled parfaits in the refrigerator for at least 30 minutes to allow the flavors to meld and the layers to set firmly.
11. Serve the parfaits directly from the refrigerator, optionally garnishing with an extra berry or almond slice on top.
With its creamy yogurt base, the parfait offers a tangy contrast to the sweet maple and juicy berries, while the toasted almonds provide a satisfying crunch. For a festive twist, layer in crumbled almond biscotti or drizzle with a berry coulis just before serving.
Veggie-Packed Egg White Omelette

This veggie-packed egg white omelette delivers a protein-rich, low-fat breakfast in minutes. Transform leftover vegetables into a satisfying meal that keeps you full until lunch. The technique ensures a tender, fluffy texture without any rubberiness.
Serving: 1 | Pre Time: 5 minutes | Cooking Time: 4 minutes
Ingredients
– 4 large pasture-raised egg whites, lightly beaten
– 1/4 cup finely diced red bell pepper
– 1/4 cup chopped baby spinach
– 2 tbsp minced yellow onion
– 1 tsp clarified butter
– 1/8 tsp fine sea salt
– 1/8 tsp freshly cracked black pepper
– 1 tbsp chopped fresh chives
Instructions
1. Heat a 10-inch nonstick skillet over medium heat for 1 minute.
2. Add clarified butter and swirl to coat the skillet evenly.
3. Sauté minced yellow onion and diced red bell pepper for 2 minutes, until softened.
4. Add chopped baby spinach and cook for 30 seconds, just until wilted.
5. Tip: Spread vegetables evenly across the skillet to create a uniform base.
6. Pour lightly beaten egg whites over the vegetables, tilting the skillet to distribute evenly.
7. Season with fine sea salt and freshly cracked black pepper.
8. Cook undisturbed for 1 minute, until edges begin to set.
9. Tip: Use a silicone spatula to gently lift edges, allowing uncooked egg to flow underneath.
10. Continue cooking for 1 more minute, until the surface is mostly set but still slightly moist.
11. Fold the omelette in half using the spatula.
12. Slide onto a plate and garnish with chopped fresh chives.
13. Tip: Serve immediately to prevent residual heat from overcooking the eggs.
A delicate, airy texture contrasts with the crisp-tender vegetables. The clarified butter adds a subtle nutty richness without overpowering the fresh ingredients. For a creative twist, top with a dollop of herbed goat cheese or serve alongside roasted cherry tomatoes.
Spicy Grilled Fish Tacos
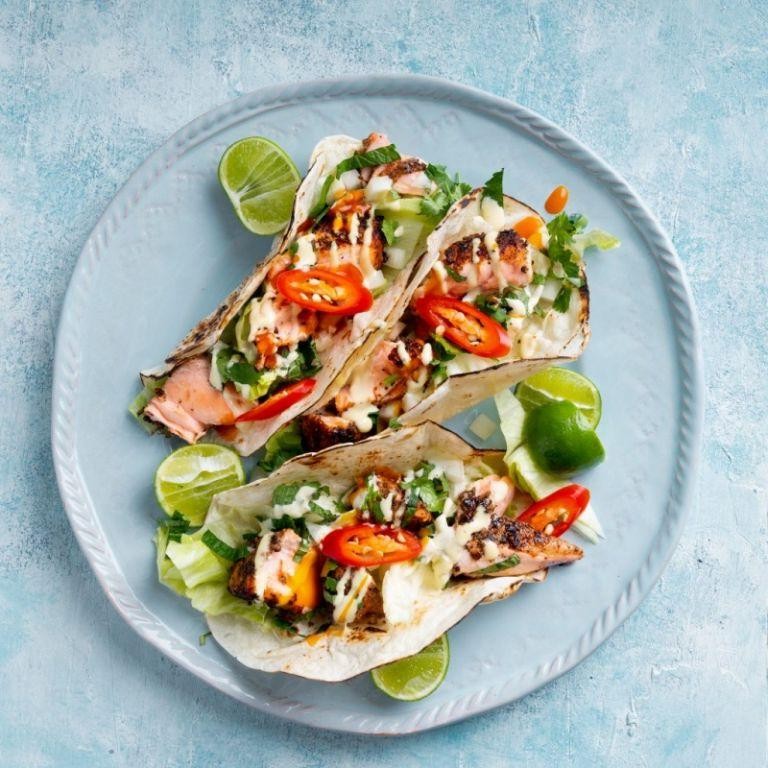
Bold flavors meet casual dining in these spicy grilled fish tacos. Marinated white fish gets charred on the grill, then tucked into warm tortillas with a crisp, cooling slaw. It’s a perfect balance of heat and freshness for any summer gathering.
Serving: 4 | Pre Time: 25 minutes | Cooking Time: 10 minutes
Ingredients
– 1.5 lbs firm white fish fillets (such as cod or mahi-mahi)
– 3 tbsp avocado oil
– 2 tbsp fresh lime juice
– 2 cloves garlic, minced
– 1 tsp smoked paprika
– 1 tsp ground cumin
– 1/2 tsp chipotle powder
– 1/2 tsp fine sea salt
– 8 small corn tortillas
– 2 cups finely shredded green cabbage
– 1/4 cup crumbled cotija cheese
– 1/4 cup fresh cilantro leaves
– 1/4 cup crema Mexicana
– 1 lime, cut into wedges
Instructions
1. Pat the fish fillets completely dry with paper towels to ensure proper searing.
2. In a shallow dish, whisk together the avocado oil, lime juice, minced garlic, smoked paprika, ground cumin, chipotle powder, and fine sea salt to create the marinade.
3. Place the fish fillets in the marinade, turning to coat all sides. Let marinate at room temperature for 15 minutes.
4. While the fish marinates, warm the corn tortillas directly over a gas burner flame for 15-20 seconds per side until lightly charred and pliable, or wrap them in a damp towel and heat in a 300°F oven for 5 minutes.
5. Preheat a clean grill or grill pan to medium-high heat (approximately 400°F).
6. Place the marinated fish fillets on the hot grill. Cook for 4-5 minutes per side until the fish is opaque throughout and has defined grill marks.
7. Transfer the grilled fish to a cutting board and use a fork to flake it into large chunks.
8. To assemble each taco, place a warm tortilla on a plate and add a portion of the flaked fish.
9. Top the fish with a generous pinch of the finely shredded green cabbage.
10. Drizzle approximately 1/2 tablespoon of crema Mexicana over the cabbage on each taco.
11. Sprinkle each taco with crumbled cotija cheese and fresh cilantro leaves.
12. Serve immediately with lime wedges on the side for squeezing.
Zesty lime and smoky chipotle permeate the flaky, perfectly charred fish. The cool crunch of the cabbage and rich crema create a delightful textural contrast. For a creative twist, serve the components deconstructed on a platter for a build-your-own taco bar.
Cauliflower Rice Sushi Rolls
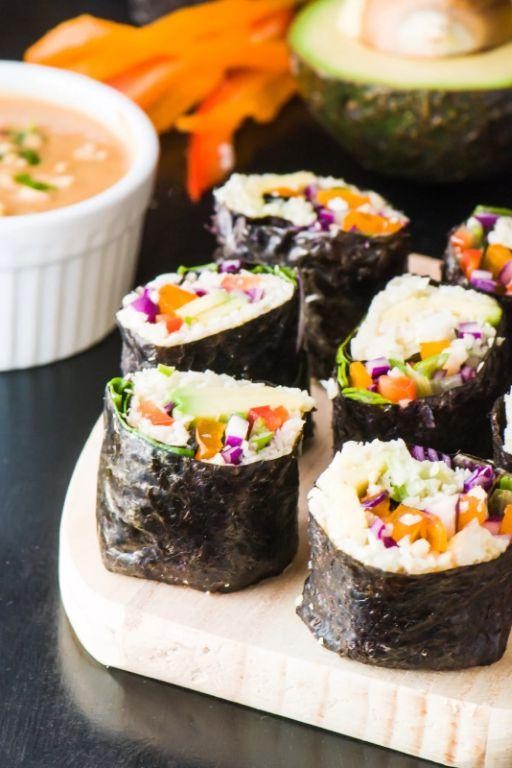
Skipping traditional rice doesn’t mean sacrificing sushi night. Cauliflower rice sushi rolls deliver the same satisfying experience with a low-carb twist. They’re surprisingly simple to assemble once you master the technique.
Serving: 4 | Pre Time: 25 minutes | Cooking Time: 5 minutes
Ingredients
– 1 large head of cauliflower, riced (about 4 cups raw riced cauliflower)
– 2 tablespoons unseasoned rice vinegar
– 1 teaspoon granulated sugar
– 1 teaspoon fine sea salt
– 4 sheets nori (seaweed)
– 1 medium avocado, sliced into thin strips
– 1 small cucumber, julienned
– 4 ounces sushi-grade raw salmon, sliced into thin strips
– 2 tablespoons tamari (for serving)
– 1 teaspoon wasabi paste (for serving)
– 1 tablespoon pickled ginger (for serving)
Instructions
1. Pulse the cauliflower florets in a food processor until they resemble fine rice grains, about 15-20 pulses.
2. Transfer the riced cauliflower to a microwave-safe bowl and microwave on high for 4 minutes to steam and soften.
3. Spread the hot cauliflower rice onto a baking sheet in a thin layer and let it cool completely for 10 minutes; this prevents soggy nori.
4. In a small bowl, whisk together the rice vinegar, granulated sugar, and fine sea salt until the sugar and salt dissolve.
5. Place the cooled cauliflower rice in a mixing bowl and gently fold in the vinegar mixture until evenly coated.
6. Lay a bamboo sushi mat on your work surface and place one sheet of nori on top, shiny side down.
7. With slightly damp hands, spread about 1 cup of the seasoned cauliflower rice evenly over the nori, leaving a 1-inch border at the top edge.
8. Arrange a few strips of avocado, julienned cucumber, and sushi-grade salmon horizontally along the bottom third of the rice-covered nori.
9. Using the bamboo mat, tightly roll the sushi away from you, applying even pressure along the length of the roll.
10. Moisten the top 1-inch border of nori with a little water to seal the roll completely.
11. Repeat the process with the remaining nori sheets and fillings.
12. Using a very sharp knife, slice each roll into 8 even pieces, wiping the blade clean with a damp cloth between cuts for neat slices.
13. Serve immediately with small dishes of tamari, wasabi paste, and pickled ginger on the side.
Freshly made, these rolls offer a crisp, clean bite with a subtle tang from the seasoned cauliflower. For a vibrant presentation, arrange the slices on a platter and garnish with microgreens or toasted sesame seeds. The cauliflower rice holds its structure well, providing a satisfying texture that pairs perfectly with the rich salmon and creamy avocado.
Balsamic Glazed Brussels Sprouts

Unlock the savory-sweet potential of Brussels sprouts with this glossy, caramelized side dish. Balsamic vinegar reduces to a sticky glaze that clings to each roasted sprout, creating a sophisticated balance of flavors. This recipe transforms the humble vegetable into a restaurant-worthy accompaniment in under 30 minutes.
Serving: 4 | Pre Time: 10 minutes | Cooking Time: 20 minutes
Ingredients
– 1 pound fresh Brussels sprouts, trimmed and halved
– 2 tablespoons extra-virgin olive oil
– ½ teaspoon kosher salt
– ¼ teaspoon freshly cracked black pepper
– 3 tablespoons aged balsamic vinegar
– 1 tablespoon pure maple syrup
– 1 teaspoon Dijon mustard
– 1 tablespoon unsalted butter
– 1 tablespoon finely chopped fresh thyme leaves
Instructions
1. Preheat your oven to 425°F (218°C) and position a rack in the center.
2. In a large mixing bowl, toss the halved Brussels sprouts with extra-virgin olive oil, kosher salt, and freshly cracked black pepper until evenly coated.
3. Arrange the sprouts in a single layer on a rimmed baking sheet, ensuring cut sides face down for optimal caramelization.
4. Roast for 15 minutes, or until the edges are deeply browned and the sprouts are fork-tender.
5. While the sprouts roast, combine aged balsamic vinegar, pure maple syrup, and Dijon mustard in a small saucepan over medium heat.
6. Bring the mixture to a simmer, then reduce heat to medium-low and cook for 4-5 minutes, stirring frequently, until it thickens to a syrup-like consistency that coats the back of a spoon.
7. Remove the glaze from heat and immediately whisk in unsalted butter until fully emulsified and glossy.
8. Transfer the roasted Brussels sprouts to a clean serving bowl.
9. Pour the warm balsamic glaze over the sprouts and toss gently to coat every piece evenly.
10. Garnish with finely chopped fresh thyme leaves and serve immediately.
Caramelized edges give way to tender centers, while the reduced balsamic glaze provides a tangy-sweet counterpoint. For a textural contrast, sprinkle with toasted pine nuts or crumbled goat cheese before serving. This versatile side pairs exceptionally well with roasted chicken or seared salmon.
Chilled Cucumber Avocado Soup

Vividly refreshing and requiring zero heat, this chilled soup combines crisp cucumbers with creamy avocados for a perfect warm-weather meal. It comes together in minutes with a blender, offering a cool, satisfying lunch or starter. The bright flavors are balanced with tangy yogurt and fresh herbs.
Serving: 4 | Pre Time: 15 minutes | Cooking Time: 0 minutes
Ingredients
– 2 large English cucumbers, peeled and roughly chopped
– 2 ripe Hass avocados, pitted and scooped
– 1 cup plain whole-milk Greek yogurt
– ½ cup cold vegetable broth
– 3 tablespoons fresh lime juice
– ¼ cup loosely packed fresh dill fronds
– 2 tablespoons extra-virgin olive oil
– 1 teaspoon fine sea salt
– ½ teaspoon freshly ground white pepper
– ¼ cup thinly sliced radishes, for garnish
– 2 tablespoons microgreens, for garnish
Instructions
1. Combine the peeled, chopped cucumbers, scooped avocados, Greek yogurt, cold vegetable broth, fresh lime juice, dill fronds, extra-virgin olive oil, fine sea salt, and freshly ground white pepper in a high-speed blender.
2. Blend on high speed for 60–90 seconds until completely smooth and emulsified, scraping down the sides once with a rubber spatula to ensure no chunks remain.
3. Taste the soup and adjust seasoning with additional salt if needed, blending for 5 more seconds to incorporate. Tip: For optimal flavor, chill the soup for at least 2 hours before serving to allow the ingredients to meld.
4. Pour the soup into a large bowl or individual serving bowls. Tip: To prevent browning, press plastic wrap directly onto the surface of the soup before chilling.
5. Cover the bowls tightly with plastic wrap and refrigerate for a minimum of 2 hours, or until thoroughly chilled to 40°F.
6. Just before serving, garnish each bowl with thinly sliced radishes and a sprinkle of microgreens. Tip: For a creamier texture, add an extra tablespoon of Greek yogurt during blending.
Yielding a velvety, pale green puree, this soup delivers a cool, creamy mouthfeel with bright acidity from the lime. The fresh dill and crisp radish garnish provide contrasting textures and herbal notes. Serve it in chilled bowls or as an elegant shooter for a summer gathering.
Mushroom and Spinach Stuffed Peppers

Mushroom and spinach stuffed peppers deliver a satisfying, savory meal that’s both hearty and healthy. These vibrant bell peppers are packed with a rich, umami filling, making them a perfect weeknight dinner or impressive dish for guests.
Serving: 4 | Pre Time: 20 minutes | Cooking Time: 35 minutes
Ingredients
– 4 large bell peppers, halved lengthwise and seeded
– 2 tbsp extra-virgin olive oil
– 1 medium yellow onion, finely diced
– 3 garlic cloves, minced
– 8 oz cremini mushrooms, finely chopped
– 5 oz fresh spinach leaves, roughly chopped
– 1 cup cooked quinoa
– 1/2 cup grated Parmesan cheese
– 1/4 cup heavy cream
– 1 tsp smoked paprika
– 1/2 tsp kosher salt
– 1/4 tsp freshly ground black pepper
Instructions
1. Preheat the oven to 375°F.
2. Arrange the bell pepper halves cut-side up in a baking dish.
3. Heat the extra-virgin olive oil in a large skillet over medium heat.
4. Add the finely diced yellow onion and sauté until translucent, about 5 minutes.
5. Stir in the minced garlic and cook until fragrant, about 30 seconds.
6. Add the finely chopped cremini mushrooms and cook until they release their liquid and brown, about 8 minutes.
7. Incorporate the roughly chopped fresh spinach leaves and cook until wilted, about 2 minutes.
8. Remove the skillet from the heat and stir in the cooked quinoa, grated Parmesan cheese, heavy cream, smoked paprika, kosher salt, and freshly ground black pepper until fully combined.
9. Divide the filling evenly among the bell pepper halves, packing it gently.
10. Cover the baking dish with aluminum foil and bake for 25 minutes.
11. Remove the foil and bake for an additional 10 minutes, or until the peppers are tender and the tops are lightly browned.
12. Let the stuffed peppers rest for 5 minutes before serving.
Brilliantly tender peppers cradle a deeply savory filling with earthy mushrooms and creamy Parmesan. The quinoa adds a pleasant chew, while the smoked paprika lends a subtle smokiness. For a vibrant presentation, garnish with fresh herbs or a drizzle of balsamic reduction.
Garlic Parmesan Roasted Asparagus
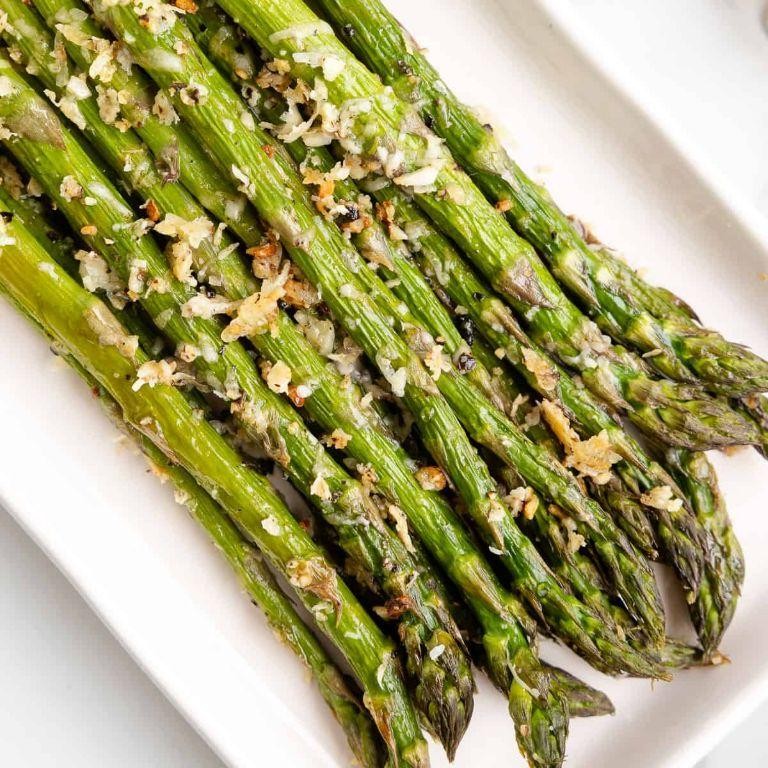
Roasting transforms asparagus into a crispy, caramelized delight. This garlic parmesan version elevates the vegetable with savory depth and cheesy richness. It’s a simple side that steals the spotlight.
Serving: 4 | Pre Time: 10 minutes | Cooking Time: 15 minutes
Ingredients
– 1 pound fresh asparagus spears, woody ends trimmed
– 2 tablespoons extra-virgin olive oil
– 4 cloves fresh garlic, minced
– 1/4 cup finely grated Parmigiano-Reggiano cheese
– 1/2 teaspoon kosher salt
– 1/4 teaspoon freshly cracked black pepper
– 1/4 teaspoon crushed red pepper flakes (optional)
Instructions
1. Preheat your oven to 425°F (218°C) and position a rack in the center.
2. Rinse the asparagus spears under cold water and pat them completely dry with paper towels to ensure proper roasting.
3. Trim the tough, woody ends from the asparagus spears by snapping them off where they naturally break.
4. Arrange the dried asparagus in a single layer on a large, rimmed baking sheet.
5. Drizzle the extra-virgin olive oil evenly over the asparagus spears.
6. Add the minced fresh garlic, kosher salt, and freshly cracked black pepper to the baking sheet.
7. Using your hands, toss the asparagus until every spear is thoroughly coated with the oil and seasonings.
8. Spread the asparagus back into a single layer, ensuring the spears are not touching for optimal crisping.
9. Roast in the preheated oven for 10 minutes, until the spears are tender and beginning to blister.
10. Remove the baking sheet from the oven and immediately sprinkle the finely grated Parmigiano-Reggiano cheese evenly over the hot asparagus.
11. For an optional spicy kick, sprinkle the crushed red pepper flakes over the cheese.
12. Return the baking sheet to the oven and roast for an additional 3-5 minutes, just until the cheese is melted and lightly golden.
13. Transfer the roasted asparagus to a serving platter using a spatula, scraping up any crispy cheese from the pan.
Hearty roasted asparagus offers a satisfying snap with tender interiors. The garlic infuses a pungent aroma, while the parmesan forms a delicate, savory crust. Serve it alongside a grilled ribeye or chop it into a warm farro salad for a textural contrast.
Tomato and Basil Salad with Balsamic Vinaigrette
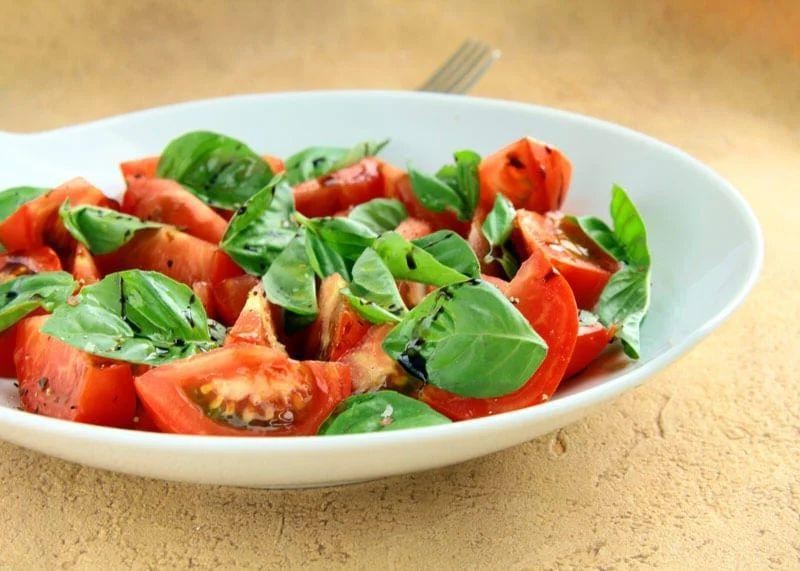
Nothing beats the simplicity of a fresh, vibrant salad on a busy day. This tomato and basil salad with balsamic vinaigrette is a quick, elegant solution that highlights peak-season produce. You’ll have it ready in minutes, making it perfect for a light lunch or a sophisticated side.
Serving: 4 | Pre Time: 15 minutes | Cooking Time: 0 minutes
Ingredients
– 2 lbs heirloom tomatoes, cored and cut into 1-inch wedges
– 1 cup fresh basil leaves, torn
– 1/2 cup extra-virgin olive oil
– 1/4 cup aged balsamic vinegar
– 1 tbsp Dijon mustard
– 1 tsp fine sea salt
– 1/2 tsp freshly cracked black pepper
Instructions
1. Arrange the heirloom tomato wedges on a large serving platter in a single layer.
2. Sprinkle the torn fresh basil leaves evenly over the tomatoes.
3. In a small mixing bowl, whisk together the extra-virgin olive oil and aged balsamic vinegar for 30 seconds until emulsified.
4. Add the Dijon mustard to the bowl and whisk vigorously for 15 seconds to incorporate fully.
5. Season the vinaigrette with fine sea salt and freshly cracked black pepper, whisking for another 10 seconds.
6. Drizzle the vinaigrette evenly over the tomatoes and basil using a slow, circular motion.
7. Let the salad rest at room temperature for 5 minutes to allow the flavors to meld.
8. Gently toss the salad once with serving utensils just before presenting.
9. Serve immediately on chilled plates to maintain freshness.
Unexpectedly, this salad offers a delightful contrast of textures—juicy tomatoes against the crisp basil—with a tangy, rich vinaigrette that clings perfectly. For a creative twist, layer it over grilled ciabatta or top with shaved Parmigiano-Reggiano for added depth. The bright acidity and herbal notes make it a versatile companion to grilled meats or a standalone star.
Herbed Turkey and Zucchini Burger
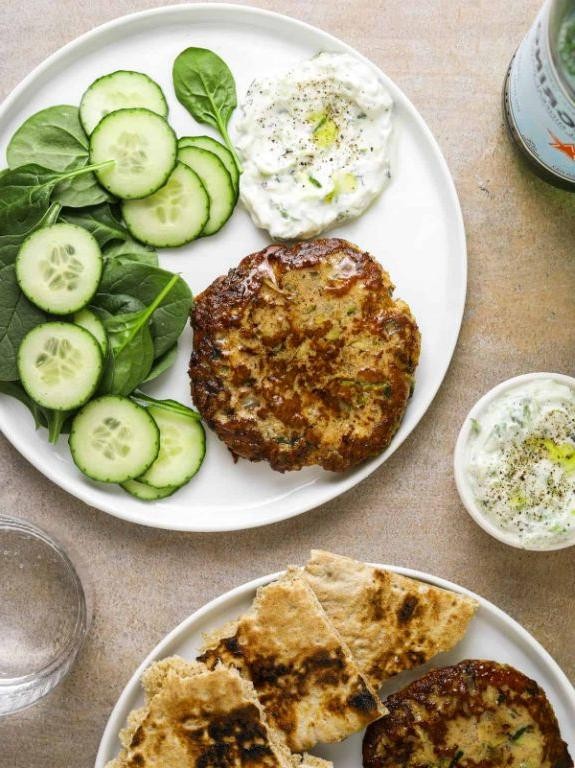
Zucchini transforms ground turkey into a surprisingly moist burger that’s both light and satisfying. This herbed version skips the bun for a low-carb, flavor-packed meal that comes together quickly. Perfect for a weeknight dinner that doesn’t sacrifice taste.
Serving: 4 | Pre Time: 15 minutes | Cooking Time: 12 minutes
Ingredients
– 1 lb ground turkey (93% lean)
– 1 medium zucchini, finely grated and squeezed dry with cheesecloth
– 1 large pasture-raised egg, lightly beaten
– ¼ cup finely grated Parmigiano-Reggiano
– 2 tbsp finely chopped fresh flat-leaf parsley
– 1 tbsp finely chopped fresh oregano
– 1 tsp fine sea salt
– ½ tsp freshly cracked black pepper
– 2 tbsp extra-virgin olive oil
– 4 slices aged sharp cheddar cheese
– 4 large butter lettuce leaves
– 4 tbsp garlic aioli
Instructions
1. In a large mixing bowl, combine the ground turkey, squeezed zucchini, beaten egg, Parmigiano-Reggiano, parsley, oregano, sea salt, and black pepper.
2. Gently mix with your hands until just combined, being careful not to overwork the meat, which can lead to tough burgers.
3. Divide the mixture into 4 equal portions and shape each into a ¾-inch-thick patty, pressing a slight indentation into the center of each to prevent doming during cooking.
4. Heat the extra-virgin olive oil in a large cast-iron skillet over medium-high heat until it shimmers, about 2 minutes.
5. Carefully place the patties in the skillet and cook undisturbed for 5 minutes to develop a deep golden-brown crust.
6. Flip the patties using a thin metal spatula and cook for an additional 4 minutes.
7. Top each patty with a slice of aged cheddar cheese, cover the skillet, and cook for 1 more minute, or until the cheese is fully melted and the internal temperature reaches 165°F on an instant-read thermometer.
8. Transfer the burgers to a wire rack to rest for 3 minutes; this allows the juices to redistribute, ensuring a moist result.
9. To serve, place each burger on a butter lettuce leaf and top with 1 tablespoon of garlic aioli.
Vibrant with fresh herbs and sharp cheese, these burgers offer a juicy, tender bite thanks to the moisture-retaining zucchini. The crisp lettuce and rich aioli provide contrasting textures and flavors. For a creative twist, serve them open-faced on toasted sourdough or alongside a shaved fennel and apple salad.
Lemon Basil Grilled Chicken Breast
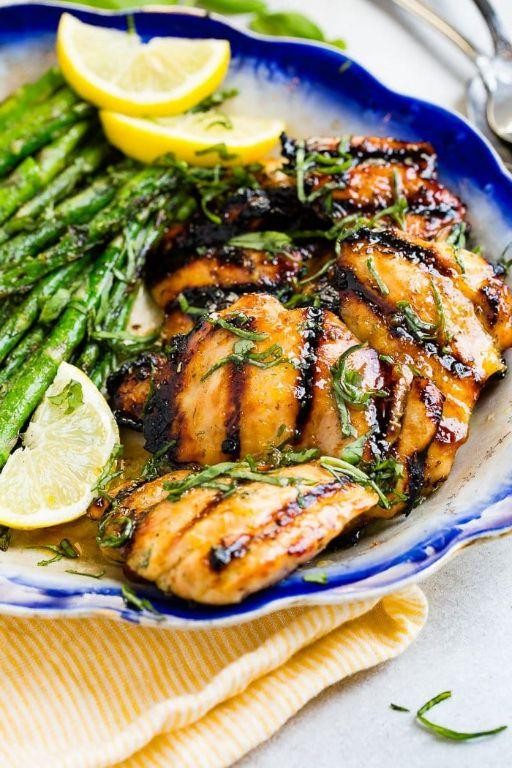
Forget bland grilled chicken—this lemon basil version delivers bright, herbaceous flavor in every bite. A quick marinade infuses the poultry with zesty citrus and aromatic herbs, while high-heat grilling creates a beautifully charred exterior. You’ll have a restaurant-quality main ready in under 30 minutes.
Serving: 4 | Pre Time: 15 minutes | Cooking Time: 12 minutes
Ingredients
– 4 boneless, skinless chicken breasts (about 6 oz each), pounded to ½-inch thickness
– ¼ cup extra-virgin olive oil
– 3 tbsp freshly squeezed lemon juice
– 2 tbsp finely chopped fresh basil leaves
– 1 tbsp minced garlic
– 1 tsp kosher salt
– ½ tsp freshly cracked black pepper
– 1 tsp lemon zest
Instructions
1. In a medium glass bowl, whisk together ¼ cup extra-virgin olive oil, 3 tbsp freshly squeezed lemon juice, 2 tbsp finely chopped fresh basil leaves, 1 tbsp minced garlic, 1 tsp kosher salt, ½ tsp freshly cracked black pepper, and 1 tsp lemon zest until fully emulsified.
2. Add 4 boneless, skinless chicken breasts to the marinade, turning to coat each piece thoroughly. Tip: For maximum flavor penetration, score the chicken breasts lightly with a sharp knife before marinating.
3. Cover the bowl with plastic wrap and refrigerate for exactly 10 minutes—no longer, as the acid in the lemon juice can begin to toughen the protein.
4. While the chicken marinates, preheat a gas or charcoal grill to 450°F, creating two heat zones: one for direct high heat and one for indirect medium heat.
5. Remove the chicken from the marinade, letting excess liquid drip off, and discard the used marinade.
6. Place the chicken breasts on the direct heat zone of the preheated grill. Grill for 4 minutes without moving to develop distinct grill marks.
7. Flip each chicken breast using tongs and grill for another 4 minutes on the second side. Tip: Avoid pressing down on the chicken with the spatula, as this squeezes out precious juices.
8. Move the chicken to the indirect heat zone of the grill. Close the lid and cook for 4 more minutes, or until the internal temperature reaches 165°F when checked with an instant-read thermometer inserted into the thickest part. Tip: Letting the chicken rest off direct heat prevents the exterior from burning while ensuring the center cooks through.
9. Transfer the grilled chicken to a clean cutting board and let rest for 5 minutes before slicing against the grain.
Dense grill marks contrast with the tender, juicy interior, while the lemon-basil marinade permeates each slice. Serve over a bed of arugula with shaved Parmesan, or slice thinly for vibrant summer salads. The bright acidity cuts through the richness, making it equally suited for casual weeknights or elegant dinner parties.
Sweet Potato and Black Bean Tacos
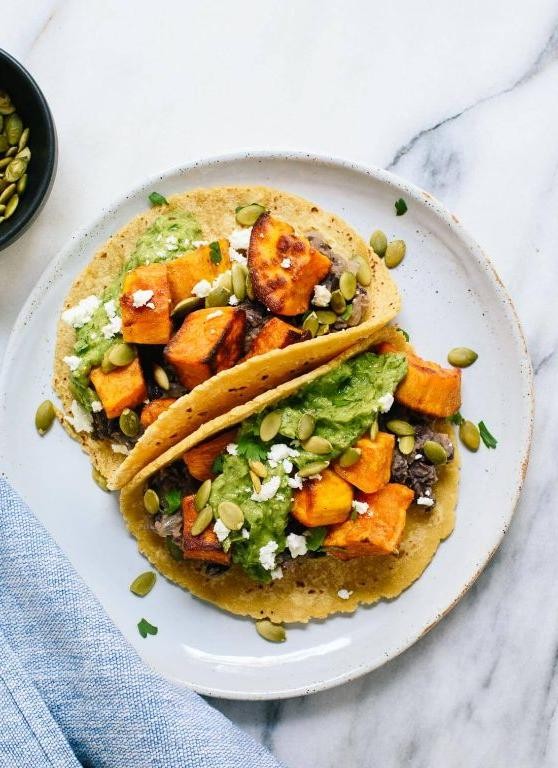
Let’s make a quick, satisfying vegetarian taco that’s packed with flavor and texture. Loaded with roasted sweet potatoes and spiced black beans, these tacos come together fast for a perfect weeknight meal. They’re hearty, healthy, and endlessly customizable with your favorite toppings.
Serving: 4 | Pre Time: 10 minutes | Cooking Time: 25 minutes
Ingredients
– 2 medium sweet potatoes, peeled and diced into ½-inch cubes
– 1 tablespoon extra-virgin olive oil
– 1 teaspoon smoked paprika
– ½ teaspoon ground cumin
– ¼ teaspoon fine sea salt
– 1 (15-ounce) can black beans, drained and rinsed
– 1 small yellow onion, finely diced
– 2 cloves garlic, minced
– 8 small corn tortillas
– ½ cup crumbled queso fresco
– ¼ cup chopped fresh cilantro
– 1 lime, cut into wedges
Instructions
1. Preheat your oven to 425°F and line a baking sheet with parchment paper.
2. In a large bowl, toss the diced sweet potatoes with olive oil, smoked paprika, cumin, and sea salt until evenly coated.
3. Spread the sweet potatoes in a single layer on the prepared baking sheet.
4. Roast for 20–25 minutes, flipping halfway through, until the potatoes are tender and caramelized at the edges.
5. While the potatoes roast, heat a medium skillet over medium heat.
6. Add the diced onion and cook for 5–7 minutes, stirring occasionally, until softened and translucent.
7. Stir in the minced garlic and cook for 1 minute until fragrant.
8. Add the drained black beans to the skillet and cook for 3–4 minutes, mashing slightly with a fork to thicken the mixture.
9. Warm the corn tortillas in a dry skillet over medium heat for 30 seconds per side, or wrap in a damp towel and microwave for 30 seconds.
10. To assemble, divide the roasted sweet potatoes and black bean mixture evenly among the warm tortillas.
11. Top each taco with crumbled queso fresco and chopped cilantro.
12. Serve immediately with lime wedges on the side for squeezing.
Perfectly balanced, these tacos offer a delightful contrast between the creamy, spiced beans and the sweet, caramelized potatoes. The fresh cilantro and tangy lime brighten each bite, while the queso fresco adds a salty, crumbly finish. For a creative twist, try serving them open-faced on a platter with a drizzle of chipotle crema or alongside a crisp jicama slaw.
Mango and Lime Chia Seed Pudding
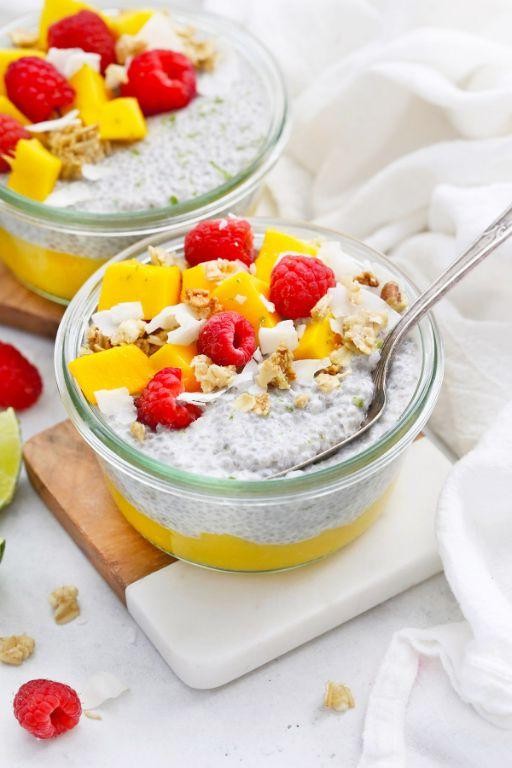
Perfect for a quick breakfast or a light dessert, this mango and lime chia seed pudding requires minimal effort. Prepare it the night before for a grab-and-go morning meal. Its tropical flavors will brighten any day.
Serving: 4 | Pre Time: 10 minutes | Cooking Time: 0 minutes
Ingredients
– 2 cups unsweetened coconut milk
– ½ cup chia seeds
– 2 ripe mangoes, peeled and diced
– ¼ cup fresh lime juice
– 2 tablespoons pure maple syrup
– 1 teaspoon pure vanilla extract
– Pinch of fine sea salt
Instructions
1. In a large mixing bowl, combine 2 cups of unsweetened coconut milk and ½ cup of chia seeds.
2. Whisk vigorously for 1 minute to prevent clumping and ensure even distribution.
3. Add ¼ cup of fresh lime juice, 2 tablespoons of pure maple syrup, 1 teaspoon of pure vanilla extract, and a pinch of fine sea salt to the bowl.
4. Whisk again until all ingredients are fully incorporated, about 30 seconds.
5. Cover the bowl tightly with plastic wrap, pressing it directly onto the surface of the mixture to prevent a skin from forming.
6. Refrigerate for at least 4 hours or overnight until the pudding has thickened to a spoonable consistency.
7. While the pudding chills, peel and dice 2 ripe mangoes into ½-inch cubes.
8. After chilling, remove the pudding from the refrigerator and give it a final stir to break up any gel-like clumps.
9. Divide the pudding evenly among 4 serving glasses or bowls.
10. Top each serving with the diced mango, arranging it in an even layer.
11. Serve immediately, or refrigerate for up to 2 days with toppings added just before serving for optimal texture.
Chilled and creamy, this pudding offers a delightful contrast between the smooth chia base and the juicy mango chunks. The bright acidity of lime cuts through the richness, creating a balanced, refreshing flavor. For a creative twist, layer it with granola or garnish with toasted coconut flakes for added crunch.
Crispy Kale and Quinoa Salad
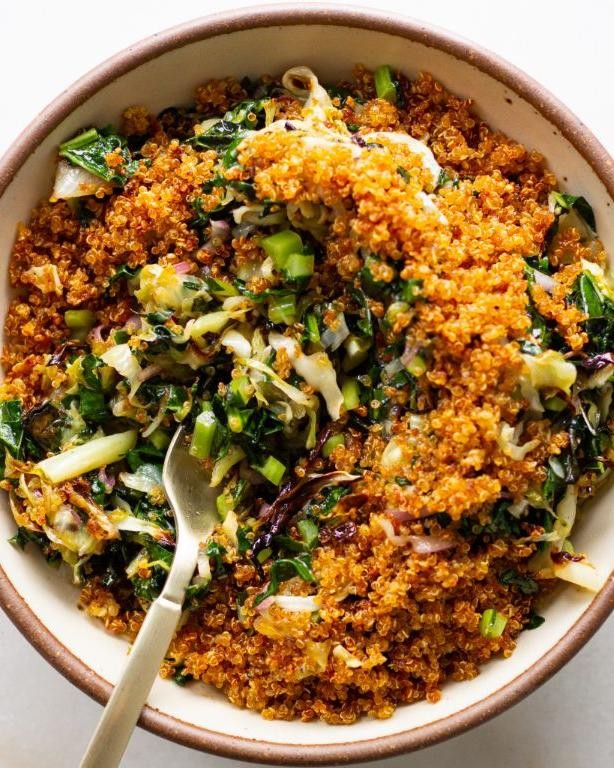
Ditch the boring greens—this salad transforms humble kale into crispy chips and pairs them with nutty quinoa for a satisfying crunch. It’s a nutrient-packed meal that comes together quickly, perfect for a healthy lunch or light dinner. The contrast of textures keeps every bite interesting.
Serving: 4 | Pre Time: 15 minutes | Cooking Time: 25 minutes
Ingredients
– 1 large bunch lacinato kale, stems removed and leaves torn into 2-inch pieces
– 1 cup quinoa, rinsed thoroughly
– 2 cups filtered water
– ¼ cup extra-virgin olive oil, divided
– 2 tbsp freshly squeezed lemon juice
– 1 tsp fine sea salt, divided
– ½ tsp freshly cracked black pepper
– ¼ cup toasted pine nuts
– 2 oz aged Parmesan cheese, shaved with a vegetable peeler
Instructions
1. Preheat your oven to 300°F and line a baking sheet with parchment paper.
2. In a medium saucepan, combine the rinsed quinoa and filtered water; bring to a boil over high heat.
3. Reduce heat to low, cover, and simmer for 15 minutes until the quinoa absorbs all the water and the grains are tender.
4. Remove the quinoa from heat, fluff with a fork, and let it cool uncovered to prevent mushiness—this ensures a light, separate texture.
5. While the quinoa cooks, toss the kale pieces with 2 tablespoons of olive oil and ½ teaspoon of sea salt in a large bowl, massaging gently to coat evenly.
6. Spread the kale in a single layer on the prepared baking sheet, avoiding overcrowding to allow proper crisping.
7. Bake for 20 minutes, rotating the sheet halfway through, until the kale is crisp and lightly browned at the edges.
8. In a small bowl, whisk together the remaining 2 tablespoons of olive oil, lemon juice, ½ teaspoon of sea salt, and black pepper to create a vinaigrette.
9. Combine the cooled quinoa, crispy kale, toasted pine nuts, and shaved Parmesan in a serving bowl.
10. Drizzle the vinaigrette over the salad and toss gently to combine, preserving the kale’s crispiness by adding it last.
11. Serve immediately for optimal texture.
Kale’s crispness provides a delightful contrast to the fluffy quinoa, while the lemon vinaigrette brightens the earthy notes. For a creative twist, top with a soft-boiled pasture-raised egg or serve alongside grilled chicken for added protein. The salad holds up well if stored separately, but assemble just before eating to maintain the kale’s signature crunch.
Conclusion
Savor these 25 delicious, low-calorie recipes that prove healthy eating can be both easy and incredibly tasty! We hope you find some new favorites to add to your weekly rotation. Don’t forget to leave a comment below telling us which recipe you loved most, and please share this roundup on Pinterest to help other home cooks discover these fantastic meals.