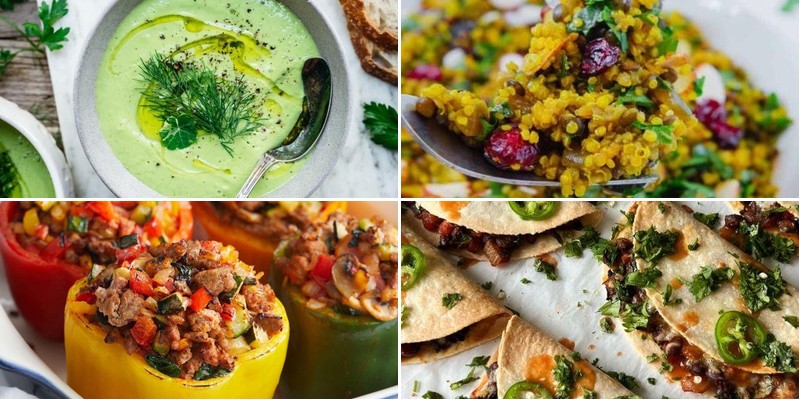
Balancing blood sugar doesn’t mean sacrificing flavor or spending hours in the kitchen! We’ve gathered 33 mouthwatering recipes that naturally help stabilize glucose levels while delivering incredible taste. From quick weeknight dinners to satisfying comfort foods, these dishes prove that eating for your health can be absolutely delicious. Get ready to transform your meals and feel your best—let’s dive into these blood sugar-friendly favorites!
Spiced Lentil and Quinoa Salad
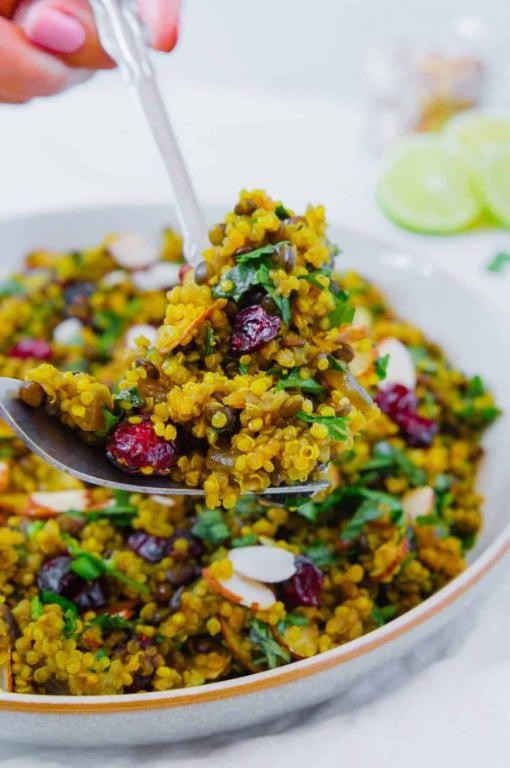
Gosh, are you tired of sad desk lunches that taste like regret and broken dreams? This spiced lentil and quinoa salad is here to rescue your taste buds from the abyss of boring meals—it’s basically a flavor party in a bowl, and everyone’s invited! Get ready to fall in love with something that’s as nutritious as it is delicious, because this dish is about to become your new go-to obsession.
2
servings15
minutes30
minutesIngredients
– 1 cup of dry quinoa (trust me, it fluffs up nicely)
– 1 cup of brown lentils (the sturdy kind that won’t turn to mush)
– 2 tablespoons of olive oil (a good glug for sautéing)
– 1 medium red onion, finely chopped (for a bit of zing)
– 2 cloves of garlic, minced (because everything’s better with garlic)
– 1 teaspoon of ground cumin (hello, warmth!)
– 1/2 teaspoon of smoked paprika (for that smoky kick)
– A big pinch of salt (to make it all sing)
– 4 cups of vegetable broth (or water if you’re in a pinch)
– A generous handful of fresh parsley, chopped (for a pop of green)
– Juice of 1 lemon (a bright squeeze to finish)
Instructions
1. Rinse the quinoa under cold water in a fine-mesh strainer for about 30 seconds to remove any bitterness—this little trick ensures it cooks up fluffy, not funky.
2. Heat the olive oil in a medium saucepan over medium heat until it shimmers, about 1 minute.
3. Add the chopped red onion and cook for 4–5 minutes, stirring occasionally, until it turns soft and translucent.
4. Stir in the minced garlic and cook for another 1 minute until fragrant—don’t let it brown, or it’ll taste bitter!
5. Add the cumin and smoked paprika to the pan, toasting them for 30 seconds to wake up their flavors.
6. Pour in the rinsed quinoa and lentils, stirring to coat them evenly with the spices.
7. Add the vegetable broth and salt, then bring everything to a boil over high heat.
8. Once boiling, reduce the heat to low, cover the pan, and simmer for 18–20 minutes until the liquid is absorbed and the quinoa is tender.
9. Remove the pan from the heat and let it sit, covered, for 5 minutes—this resting step lets the grains soak up any remaining moisture for perfect texture.
10. Fluff the mixture with a fork, then stir in the chopped parsley and lemon juice until everything is well combined.
And just like that, you’ve got a salad that’s bursting with earthy lentils, fluffy quinoa, and a zesty lemon kick—it’s hearty enough to stand alone or fabulous stuffed into pita pockets for a lunch that’ll make your coworkers jealous!
Mediterranean Chickpea Wraps
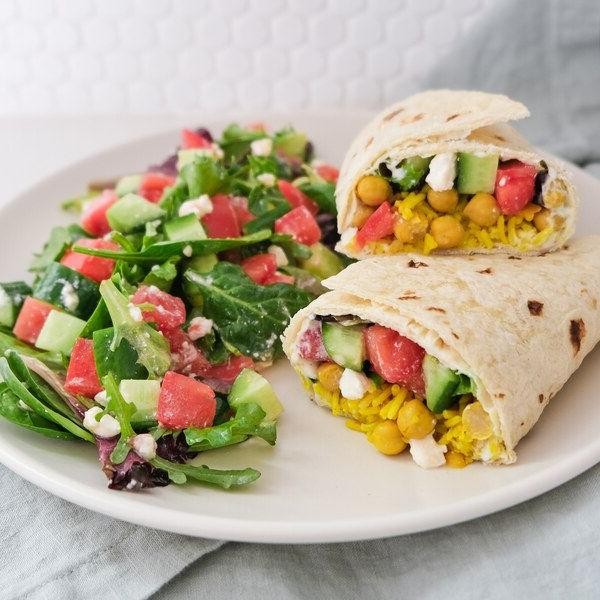
Tired of the same old lunch routine that makes your taste buds yawn louder than a Monday morning meeting? These Mediterranean Chickpea Wraps are about to become your desk-side salvation—packed with so much flavor, they’ll make your sad desk salad weep with envy. Think of them as a vacation for your mouth, minus the passport and questionable sunburn.
5
wraps15
minutes25
minutesIngredients
– A couple of 15-ounce cans of chickpeas, drained and rinsed
– A generous glug of extra virgin olive oil (about 2 tablespoons)
– A big squeeze of fresh lemon juice (roughly 2 tablespoons)
– A couple of minced garlic cloves
– A hearty sprinkle of cumin (1 teaspoon)
– A pinch of smoked paprika (½ teaspoon)
– A handful of chopped fresh parsley
– A splash of tahini (2 tablespoons)
– 4 large flour tortillas
– A big handful of baby spinach
– A couple of diced cucumbers
– A handful of crumbled feta cheese
Instructions
1. Preheat your oven to 400°F and line a baking sheet with parchment paper.
2. Pat the drained chickpeas completely dry with paper towels—this helps them get crispy instead of steaming. (Tip: Rolling them gently between towels prevents mushiness!)
3. Toss the dried chickpeas with olive oil, cumin, and smoked paprika on the baking sheet until evenly coated.
4. Roast the chickpeas for 20-25 minutes, shaking the pan halfway, until they’re golden and slightly crispy.
5. While the chickpeas roast, whisk together lemon juice, minced garlic, and tahini in a medium bowl to make the dressing.
6. Let the roasted chickpeas cool for 5 minutes, then toss them in the dressing bowl with chopped parsley.
7. Warm the tortillas in a dry skillet over medium heat for 30 seconds per side, just until pliable. (Tip: Don’t let them crisp—soft tortillas wrap without cracking!)
8. Lay each tortilla flat and layer baby spinach, diced cucumbers, and the dressed chickpea mixture down the center.
9. Sprinkle crumbled feta over the chickpeas in each wrap.
10. Fold the bottom edge of the tortilla up over the filling, then tightly roll from one side to enclose everything. (Tip: Don’t overstuff, or you’ll have a flavor explosion in your hands—literally!)
Nothing beats the crunch of those spiced chickpeas against the cool cucumbers and creamy feta—it’s a texture party in every bite. Serve these wraps whole for a tidy lunch, or slice them diagonally to show off those vibrant layers at your next picnic.
Zucchini Noodles with Avocado Pesto
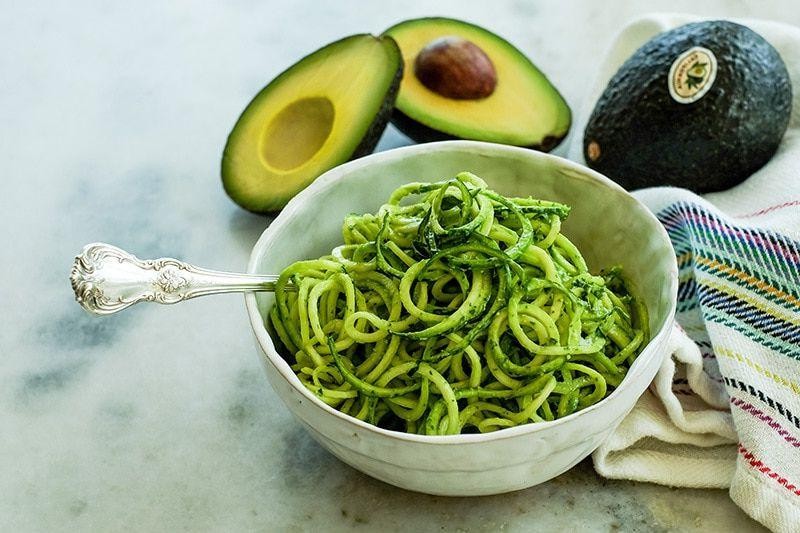
Kidding me, it’s zucchini noodle season and your spiralizer is begging for action! This vibrant, no-cook wonder transforms humble veggies into a creamy, dreamy bowl of goodness that’ll make you forget all about regular pasta. Seriously, your taste buds are about to throw a confetti-filled party.
3
servings15
minutesIngredients
– 3 medium zucchinis, spiralized into noodles
– 2 ripe avocados, pitted and scooped
– A big handful of fresh basil leaves (about 1 cup packed)
– A couple of garlic cloves, peeled
– A generous squeeze of fresh lemon juice (about 2 tablespoons)
– A glug of extra virgin olive oil (about 1/4 cup)
– A sprinkle of salt (about 1 teaspoon)
– A pinch of red pepper flakes
Instructions
1. Spiralize all 3 zucchinis into noodles using the medium blade of your spiralizer, placing them in a large bowl.
2. In a food processor, combine the avocado flesh, basil leaves, garlic cloves, lemon juice, olive oil, salt, and red pepper flakes.
3. Pulse the mixture for 30 seconds, scrape down the sides with a spatula, then blend for another 45 seconds until completely smooth and creamy.
4. Pour the avocado pesto directly over the zucchini noodles in the bowl.
5. Use tongs to toss everything together for about 2 minutes, ensuring every noodle gets coated in the vibrant green sauce.
6. Let the dressed noodles sit at room temperature for 10 minutes to allow the flavors to meld and the zucchini to slightly soften.
7. Give the noodles one final gentle toss before serving to redistribute any sauce that may have settled.
8. Divide between bowls and serve immediately for the freshest texture and flavor.
For maximum creaminess, make sure your avocados are perfectly ripe—they should yield slightly to gentle pressure. Freshly squeezed lemon juice not only adds brightness but also keeps the avocado pesto from browning. Letting the dressed noodles rest for those 10 minutes is key—it softens the zucchini just enough to mimic al dente pasta without making it watery. Finally, zucchini noodles release moisture over time, so serve this beauty right after that resting period for the best texture.
Fantastically creamy yet surprisingly light, these zucchini noodles deliver a fresh herb punch from the basil with just enough garlic kick to keep things interesting. The cool, silky noodles against the rich avocado pesto create a texture party in your mouth—try topping with grilled shrimp or cherry tomatoes for extra color and protein, or pack it cold for a next-level lunch that won’t get soggy.
Grilled Lemon Herb Salmon

Who says fancy dinners have to be complicated? This grilled lemon herb salmon is here to prove that you can feel like a gourmet chef without spending hours in the kitchen—or your entire paycheck on ingredients. Get ready to impress your taste buds (and maybe some dinner guests) with this zesty, flaky masterpiece that’s basically summer on a plate.
2
servings10
minutes8
minutesIngredients
– A couple of 6-ounce salmon fillets (skin-on or off, your call!)
– A generous glug of olive oil (about 2 tablespoons)
– The juice of one whole lemon (plus extra slices for grilling drama)
– A small handful of fresh chopped parsley (about 2 tablespoons)
– A couple of minced garlic cloves (because garlic makes everything better)
– A pinch of salt and a few cracks of black pepper
– A sprinkle of dried oregano (about 1 teaspoon)
Instructions
1. Preheat your grill to medium-high heat (around 400°F) so it’s ready to work its magic.
2. Pat the salmon fillets completely dry with paper towels—this helps get that gorgeous sear instead of a sad steam.
3. In a small bowl, whisk together the olive oil, lemon juice, parsley, garlic, salt, pepper, and oregano until it’s a happy, herbaceous marinade.
4. Brush the marinade generously all over both sides of the salmon fillets, making sure every nook and cranny is coated.
5. Place the salmon skin-side down on the hot grill grates and close the lid—no peeking for at least 4 minutes!
6. Carefully flip the salmon using a spatula and grill for another 3–4 minutes until the flesh flakes easily with a fork.
7. Throw a few lemon slices on the grill during the last minute to char them slightly for a smoky garnish.
8. Remove the salmon from the grill and let it rest for 2 minutes (this keeps it juicy instead of dry).
Delightfully flaky with a crispy-edged crust, this salmon bursts with bright lemon and earthy herbs in every bite. Serve it over a bed of quinoa for a healthy twist, or stuff it into tacos with a dollop of avocado crema—because why should Tuesday night be boring?
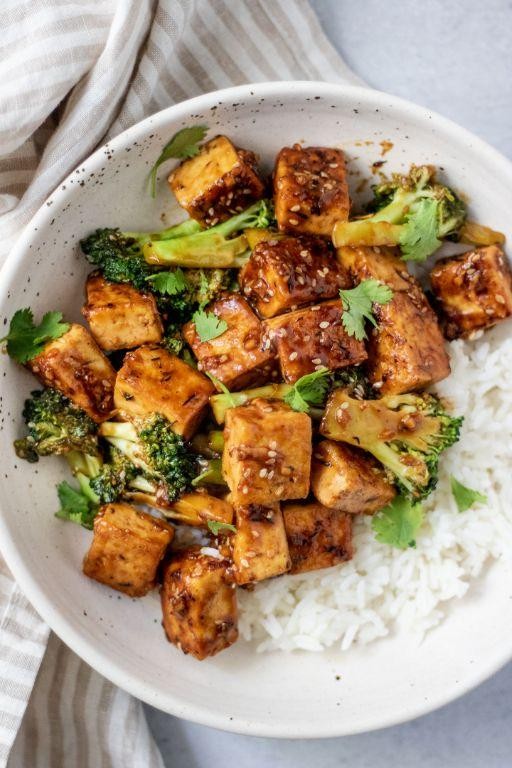
Broccoli and Tofu Stir Fry
Ugh, another boring Tuesday? Let’s fix that with a Broccoli and Tofu Stir Fry that’s so easy, even your cat could probably whip it up (if it had thumbs, of course). This veggie-packed powerhouse is your ticket to a flavor fiesta in under 30 minutes—no culinary degree required, just a skillet and a sense of adventure.
2
servings15
minutes16
minutesIngredients
– A 14-ounce block of firm tofu, pressed and cubed
– A couple of cups of broccoli florets (because who’s counting?)
– A splash of vegetable oil (about 2 tbsp)
– 3 cloves of garlic, minced (don’t skimp—it’s the soulmate here)
– A thumb-sized nub of ginger, grated (fresh is best, but we won’t judge)
– ¼ cup of soy sauce (low-sodium if you’re watching it)
– 1 tbsp of sesame oil (for that nutty hug)
– 1 tsp of rice vinegar (a zesty wink)
– A pinch of red pepper flakes (for a gentle kick)
Instructions
1. Press the tofu for 15 minutes using a heavy pan to remove excess water—this prevents a soggy stir-fry and gives it a crispy edge.
2. Cut the pressed tofu into 1-inch cubes and set aside.
3. Heat 1 tbsp of vegetable oil in a large skillet over medium-high heat until it shimmers.
4. Add the tofu cubes and cook for 5-7 minutes, flipping halfway, until golden brown on all sides.
5. Remove the tofu from the skillet and set it on a plate.
6. Add the remaining 1 tbsp of vegetable oil to the same skillet.
7. Toss in the broccoli florets and stir-fry for 4-5 minutes until bright green and slightly tender.
8. Push the broccoli to one side and add the minced garlic and grated ginger to the empty space; cook for 30 seconds until fragrant—this toasts the flavors without burning them.
9. Combine everything in the skillet and add the soy sauce, sesame oil, rice vinegar, and red pepper flakes.
10. Stir everything together and cook for 2 more minutes until the sauce coats the ingredients evenly.
11. Return the tofu to the skillet and toss gently to warm through for 1 minute. Got leftovers? Store the tofu separately to keep it crisp for round two!
Gloriously, this stir-fry delivers a crunch from the broccoli, a firm bite from the tofu, and a savory-sweet sauce that clings like your favorite cozy sweater. Serve it over rice for a classic move, or stuff it into tortillas for a fusion twist that’ll make Taco Tuesday jealous.
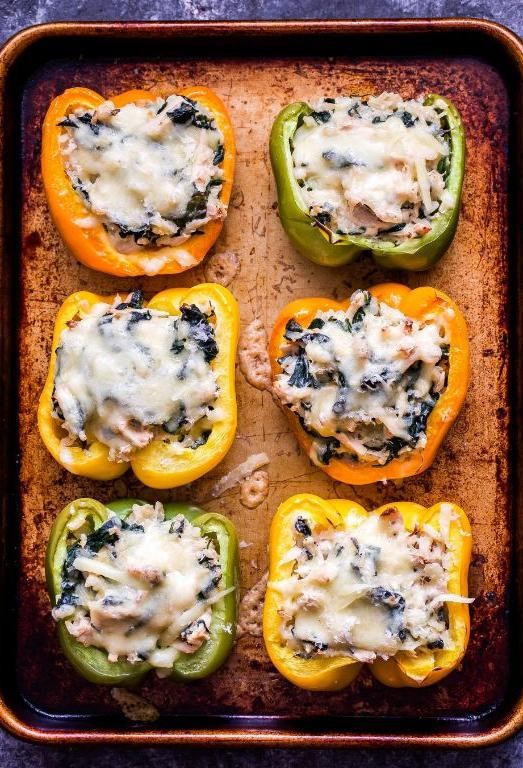
Chicken and Spinach Stuffed Peppers
Unbelievably delicious and surprisingly simple, these chicken and spinach stuffed peppers are about to become your new weeknight hero—they’re basically edible sunshine that won’t judge you for eating three in one sitting.
3
servings20
minutes55
minutesIngredients
4 large bell peppers (any color that makes you happy), 1 pound of ground chicken (the leaner, the meaner), 2 cups of fresh spinach (give it a good chop), 1 cup of cooked rice (leftovers work great here), 1 cup of shredded mozzarella (because cheese is life), 1/2 cup of marinara sauce (your favorite jarred kind is fine), 1/4 cup of finely chopped onion (no one needs big onion chunks), 2 cloves of garlic (minced until it can’t argue back), 1 tablespoon of olive oil (just a glug), 1 teaspoon of Italian seasoning (the magic dust), and 1/2 teaspoon of salt (to keep things interesting).
Instructions
1. Preheat your oven to 375°F—get it nice and toasty. 2. Slice the bell peppers in half lengthwise and scoop out all the seeds and membranes (clean them out like you’re tidying up for guests). 3. In a large skillet, heat the olive oil over medium heat until it shimmers. 4. Add the chopped onion and cook for 3–4 minutes, until it’s soft and translucent (tip: don’t rush this—caramelized onions are worth the wait). 5. Toss in the minced garlic and cook for another minute, just until fragrant (garlic burns fast, so keep an eye on it). 6. Add the ground chicken to the skillet, breaking it up with a spoon, and cook for 6–8 minutes until no pink remains. 7. Stir in the chopped spinach and cook for 2–3 minutes until it wilts down (it’ll shrink a lot, so don’t be shy). 8. Mix in the cooked rice, marinara sauce, Italian seasoning, and salt, stirring until everything is well combined and heated through. 9. Remove the skillet from the heat and fold in half of the shredded mozzarella (saving the rest for topping). 10. Spoon the filling evenly into the pepper halves, packing it in firmly (tip: overstuff them—they can handle it). 11. Place the stuffed peppers in a baking dish and sprinkle the remaining mozzarella on top. 12. Cover the dish with foil and bake for 25 minutes (this steams the peppers to tenderness). 13. Remove the foil and bake for another 10–15 minutes, until the cheese is golden and bubbly (tip: broil for the last 2 minutes if you want extra crispiness). 14. Let the peppers cool for 5 minutes before serving (they’re lava-hot straight out of the oven). Ready to dig in? The peppers turn tender-crisp, hugging a savory filling that’s cheesy, herby, and downright comforting. Serve them with a side salad for a balanced meal, or go all-in and top with extra marinara—because why not?
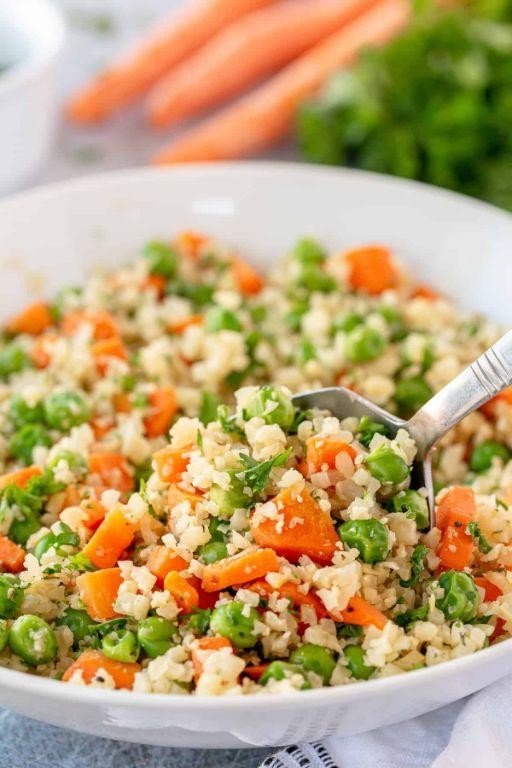
Cauliflower Rice Pilaf
Juggling dinner plans and trying to eat healthier? This cauliflower rice pilaf is about to become your new best friend—it’s so deliciously sneaky, you might forget you’re eating vegetables (and your kids definitely will).
2
servings15
minutes15
minutesIngredients
– 1 large head of cauliflower, riced (about 4 cups)
– 2 tablespoons of olive oil
– 1 small yellow onion, finely chopped
– 2 cloves of garlic, minced
– 1 cup of low-sodium chicken broth
– A generous handful of fresh parsley, chopped
– A squeeze of fresh lemon juice (about 1 tablespoon)
– Salt and black pepper, to your liking
Instructions
1. Heat 2 tablespoons of olive oil in a large skillet over medium heat until it shimmers. 2. Add 1 small chopped yellow onion and sauté for 4–5 minutes, until it turns translucent and soft. 3. Stir in 2 minced garlic cloves and cook for 1 minute until fragrant—don’t let it brown! 4. Tip in 4 cups of riced cauliflower and toss to coat evenly with the oil and aromatics. 5. Pour in 1 cup of low-sodium chicken broth and bring to a gentle simmer. 6. Cover the skillet and let it cook for 8–10 minutes, until the cauliflower is tender but not mushy. 7. Uncover and stir in a handful of chopped fresh parsley and a squeeze of lemon juice. 8. Season with salt and black pepper, then fluff with a fork before serving. Marvel at how this pilaf nails the fluffy, grain-like texture without any actual grains, with a bright, herby kick from the parsley and lemon. Try piling it under grilled chicken or stuffing it into bell peppers for a low-carb twist that’s anything but boring.
Kale and Bean Tacos

Gather ’round, taco enthusiasts, because we’re about to make your Tuesday night infinitely more exciting than scrolling through streaming services. These kale and bean tacos are the culinary equivalent of finding $20 in your winter coat pocket – unexpectedly delightful and surprisingly satisfying.
8
tacos10
minutes10
minutesIngredients
– 8 small corn tortillas (the real MVP)
– 2 cups of chopped kale, stems removed (give those tough guys the boot)
– 1 can of black beans, rinsed and drained (no one wants that canned liquid drama)
– 1 tablespoon of olive oil (the good stuff)
– 1 teaspoon of cumin (for that warm hug flavor)
– ½ teaspoon of chili powder (just enough kick to keep things interesting)
– A generous pinch of salt (the flavor fairy)
– Juice from half a lime (the zesty finale)
– A handful of crumbled cotija cheese (because cheese makes everything better)
Instructions
1. Heat your large skillet over medium heat for 2 minutes until it’s properly warmed up.
2. Add 1 tablespoon of olive oil to the hot skillet and swirl it around to coat the bottom evenly.
3. Toss in your 2 cups of chopped kale and sauté for exactly 3 minutes until it’s bright green and slightly wilted.
4. Tip: Don’t overcrowd the kale – give it space to breathe and crisp up properly.
5. Add the rinsed black beans, 1 teaspoon of cumin, ½ teaspoon of chili powder, and a generous pinch of salt to the skillet.
6. Cook everything together for 4 minutes, stirring occasionally, until the beans are heated through and the spices are fragrant.
7. Squeeze the juice from half a lime directly over the kale and bean mixture, stirring to combine.
8. Tip: Warm your corn tortillas in a dry skillet for 30 seconds per side – this prevents them from cracking when you fold them.
9. Divide the kale and bean filling evenly among your 8 warmed tortillas.
10. Sprinkle each taco with a handful of crumbled cotija cheese.
11. Tip: Let the filling cool for 1 minute before assembling to prevent soggy tortillas.
These tacos deliver the perfect textural symphony – crispy kale meets creamy beans with that delightful cheese crunch. The lime juice cuts through the earthiness beautifully, making each bite brighter than your phone screen at 2 AM. Try stacking them high with extra cotija and serving alongside a spicy margarita for maximum taco Tuesday vibes.
Herbed Mushroom Omelette

Craving something that’ll make your taste buds do a happy dance without requiring a culinary degree? Let’s talk herbed mushroom omelette—the fluffy, savory hero of lazy weekend brunches and “I forgot to meal prep” dinners. This beauty is so forgiving, even if you accidentally channel your inner tornado in the kitchen, it’ll still turn out gloriously.
1
servings5
minutes10
minutesIngredients
– A couple of large eggs
– A splash of whole milk or heavy cream
– A small handful of sliced cremini mushrooms
– A tiny glug of olive oil or a pat of unsalted butter
– A pinch of kosher salt and a few cracks of black pepper
– A generous sprinkle of fresh chopped chives and parsley
Instructions
1. Crack two large eggs into a medium bowl and add a splash of whole milk.
2. Whisk the eggs and milk vigorously for about 30 seconds until the mixture is fully blended and slightly frothy.
3. Heat a non-stick skillet over medium heat and add a tiny glug of olive oil, swirling to coat the bottom evenly.
4. Toss in a small handful of sliced cremini mushrooms and sauté for 4–5 minutes, stirring occasionally, until they’re golden brown and have released their moisture.
5. Sprinkle a pinch of kosher salt and a few cracks of black pepper over the mushrooms, then transfer them to a plate.
6. Wipe the skillet clean with a paper towel and return it to medium-low heat.
7. Pour the whisked egg mixture into the skillet, tilting it to spread the eggs into an even layer.
8. Let the eggs cook undisturbed for 1–2 minutes until the edges set and the bottom is lightly golden.
9. Scatter the sautéed mushrooms evenly over one half of the omelette.
10. Sprinkle a generous amount of fresh chopped chives and parsley over the mushrooms.
11. Gently lift the unfilled side of the omelette and fold it over the mushroom-herb side using a spatula.
12. Cook for another 1–2 minutes until the center is fully set but still tender.
13. Slide the omelette onto a plate, herbed side up. That first bite? Pure bliss—the eggs are cloud-soft, the mushrooms add an earthy umami punch, and the fresh herbs brighten everything up. Try serving it with a side of crispy hash browns or atop a toasted English muffin for a next-level breakfast sandwich situation.
Roasted Beetroot and Feta Salad

Let’s be real—most beet salads look like they’ve been through a food processor identity crisis, but this roasted beetroot and feta situation? Pure elegance with a side of sass. It’s the kind of dish that makes you feel fancy without requiring a culinary degree, and honestly, it might just convert beet skeptics into full-on root vegetable enthusiasts.
2
servings15
minutes35
minutesIngredients
– A couple of medium beetroots, peeled and cubed
– A generous glug of olive oil (about 2 tablespoons)
– A big handful of fresh arugula
– A hearty crumble of feta cheese (about ½ cup)
– A small handful of toasted walnuts (about ¼ cup)
– A squeeze of fresh lemon juice (about 1 tablespoon)
– A pinch of salt and a crack of black pepper
Instructions
1. Preheat your oven to 400°F—no lukewarm commitments here.
2. Toss the peeled, cubed beetroots with 1 tablespoon of olive oil, plus the salt and pepper, on a baking sheet. (Pro tip: Use a separate cutting board for beets unless you want your kitchen to look like a crime scene.)
3. Roast the beets for 30–35 minutes, until they’re tender enough to easily pierce with a fork and have crispy edges.
4. While the beets roast, spread the walnuts on a separate baking sheet and toast them in the oven for 5–7 minutes, until fragrant and lightly golden. (Watch them closely—nuts go from perfectly toasted to burnt regrets in seconds.)
5. Let the roasted beets and toasted walnuts cool for 5–10 minutes—this keeps the arugula from wilting into a sad, warm heap.
6. In a large bowl, combine the arugula, cooled beets, crumbled feta, and toasted walnuts.
7. Drizzle the salad with the remaining 1 tablespoon of olive oil and the fresh lemon juice, then toss gently to coat everything evenly. (Tossing with clean hands gives you better control and makes you feel like a salad wizard.)
8. Serve immediately while the beets are still slightly warm for maximum flavor melding.
You’ll love the contrast between the earthy, sweet beets and the salty, creamy feta, with the walnuts adding a satisfying crunch. Try piling it on toasted sourdough for an open-faced sandwich situation, or top it with grilled chicken if you’re feeling extra hungry. Either way, it’s a vibrant dish that eats as good as it looks.
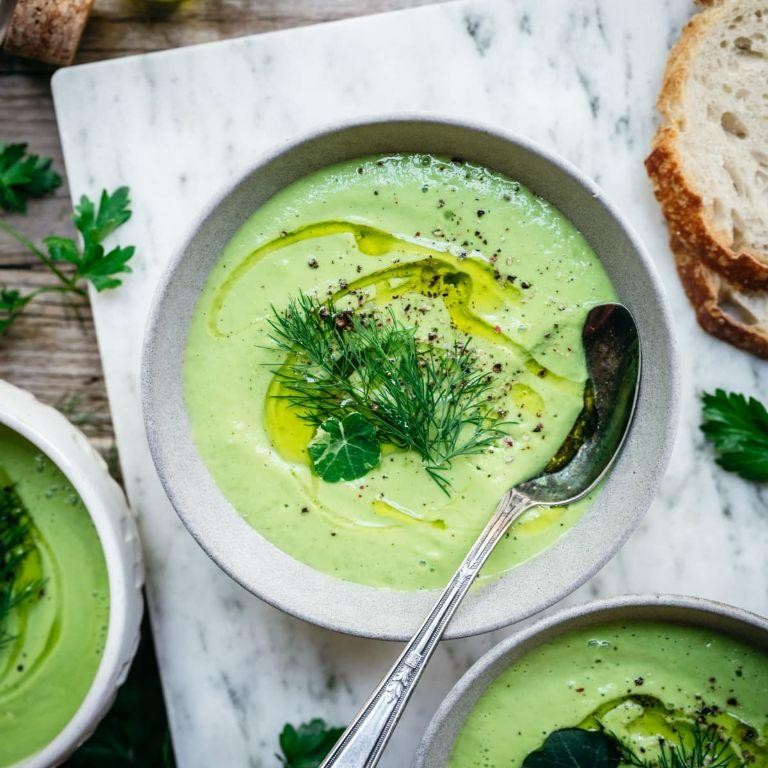
Cucumber and Avocado Gazpacho
Gosh, who needs a stove when you’ve got this gloriously green, no-cook wonder that’s basically summer in a bowl? This chilled soup is so refreshing it’ll make your air conditioner jealous, and it comes together faster than you can say “heat wave.”
2
servings15
minutesIngredients
- 2 large English cucumbers, roughly chopped (about 4 cups)
- 2 ripe avocados, pitted and scooped
- 1 cup plain Greek yogurt
- 1/4 cup fresh lime juice (from about 2 limes)
- 1/4 cup extra virgin olive oil
- 1 small garlic clove, minced
- A big handful of fresh cilantro
- A splash of cold water (about 1/2 cup)
- A couple of ice cubes
- 1 teaspoon salt
- 1/2 teaspoon black pepper
Instructions
- Combine the chopped cucumbers, avocado flesh, Greek yogurt, lime juice, olive oil, minced garlic, cilantro, salt, and pepper in your blender.
- Add the splash of cold water and ice cubes to the blender—this helps keep everything chilled and creates a smoother texture.
- Blend on high speed for 1-2 minutes until completely smooth and pale green, scraping down the sides halfway through if needed.
- Taste and adjust seasoning—if it’s too thick, add another tablespoon of water and blend for 15 seconds more.
- Pour the gazpacho into a large pitcher or bowl and cover tightly with plastic wrap.
- Refrigerate for at least 2 hours, or until thoroughly chilled to 40°F—this resting time allows the flavors to meld beautifully.
- Give the gazpacho a good stir before serving, as it may separate slightly during chilling.
- Ladle into chilled bowls and garnish with additional diced cucumber, avocado slices, or a drizzle of olive oil.
For the perfect chilled consistency, pop your serving bowls in the freezer for 15 minutes before filling. The creamy avocado base creates this luxurious, silky texture that contrasts wonderfully with the bright, tangy lime and fresh cucumber notes. Fancy it up by serving in hollowed-out cucumber “boats” or with grilled shrimp skewers for a complete meal—either way, it’s guaranteed to become your go-to summer cooler.
Eggplant and Green Bean Curry
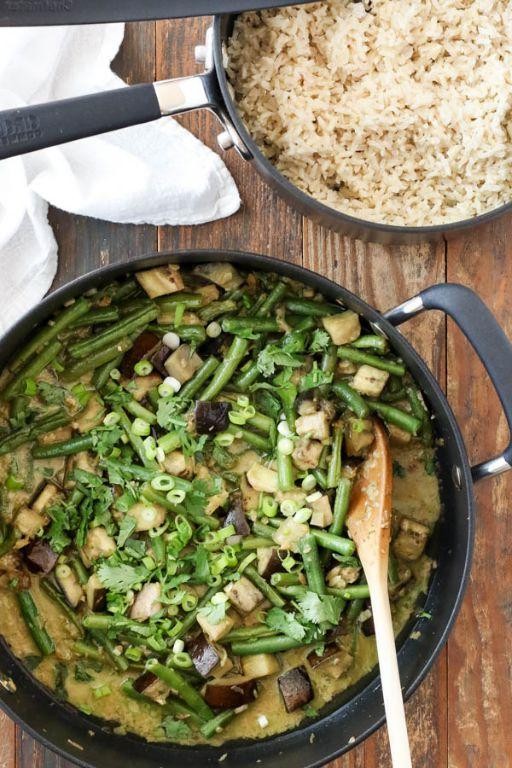
Tired of the same old dinner routine? This eggplant and green bean curry is about to become your new weeknight superhero—packed with flavor, ready to rescue your taste buds from boredom, and guaranteed to make your kitchen smell like a spice market in the best way possible.
2
servings15
minutes35
minutesIngredients
– 1 large eggplant, cubed
– 2 cups fresh green beans, trimmed
– 1 onion, chopped
– 3 cloves garlic, minced
– 1 tablespoon fresh ginger, grated
– 1 can (14 oz) coconut milk
– 2 tablespoons curry powder
– 1 teaspoon turmeric
– 1/2 teaspoon red pepper flakes
– A generous glug of olive oil
– A big pinch of salt
Instructions
1. Heat 2 tablespoons of olive oil in a large pot over medium heat until it shimmers.
2. Add the chopped onion and cook for 5 minutes, stirring occasionally, until translucent.
3. Stir in the minced garlic and grated ginger, cooking for 1 minute until fragrant.
4. Add the cubed eggplant and cook for 8 minutes, stirring frequently, until slightly softened.
5. Sprinkle in the curry powder, turmeric, and red pepper flakes, toasting for 30 seconds to unlock their flavors.
6. Pour in the entire can of coconut milk, scraping the bottom of the pot to incorporate any browned bits.
7. Add the trimmed green beans and a big pinch of salt, stirring to combine.
8. Bring the mixture to a gentle boil, then reduce heat to low and simmer uncovered for 20 minutes.
9. Check that the eggplant is tender when pierced with a fork and the green beans are crisp-tender.
10. Remove from heat and let rest for 5 minutes before serving.
Absolutely magical how the creamy eggplant melts into the coconut sauce while the green beans keep their satisfying crunch. Serve this vibrant curry over fluffy rice or with warm naan for dipping—either way, prepare for your bowl to be empty in record time.
Ginger Garlic Shrimp Skewers

Zesty doesn’t even begin to cover these flavor-packed shrimp skewers that’ll have your taste buds doing a happy dance. Ginger and garlic join forces in this quick-fire recipe that’s perfect for when you want something impressive but secretly easy. Get ready to become the grill master you were always meant to be!
8
skewers45
minutes4
minutesIngredients
– A pound of large shrimp, peeled and deveined
– 3 cloves of garlic, minced
– A thumb-sized piece of fresh ginger, grated
– 2 tablespoons of olive oil
– 1 tablespoon of soy sauce
– A squeeze of fresh lime juice
– A pinch of red pepper flakes
– A handful of wooden skewers, soaked in water for 30 minutes
Instructions
1. Soak 8-10 wooden skewers in water for 30 minutes to prevent burning.
2. In a medium bowl, combine 3 minced garlic cloves, 1 tablespoon of grated ginger, 2 tablespoons of olive oil, 1 tablespoon of soy sauce, juice from half a lime, and a pinch of red pepper flakes.
3. Add 1 pound of peeled and deveined shrimp to the marinade, tossing to coat completely.
4. Let the shrimp marinate at room temperature for 15 minutes (no longer, or the acid will start cooking the shrimp!).
5. Thread 4-5 shrimp onto each soaked skewer, leaving small spaces between them for even cooking.
6. Preheat your grill or grill pan to medium-high heat (about 400°F).
7. Place the skewers on the hot grill and cook for 2 minutes.
8. Flip the skewers and cook for another 2 minutes until the shrimp turn pink and opaque.
9. Remove from heat immediately to avoid overcooking – shrimp go from perfect to rubbery in seconds!
Kick these skewers up a notch by serving them over coconut rice or stuffing them into warm tortillas with crunchy slaw. The ginger-garlic marinade creates this incredible caramelized crust while keeping the shrimp juicy and tender inside. Honestly, they’re so good you might just skip the plates and eat them straight off the skewer!
Stuffed Bell Peppers with Turkey
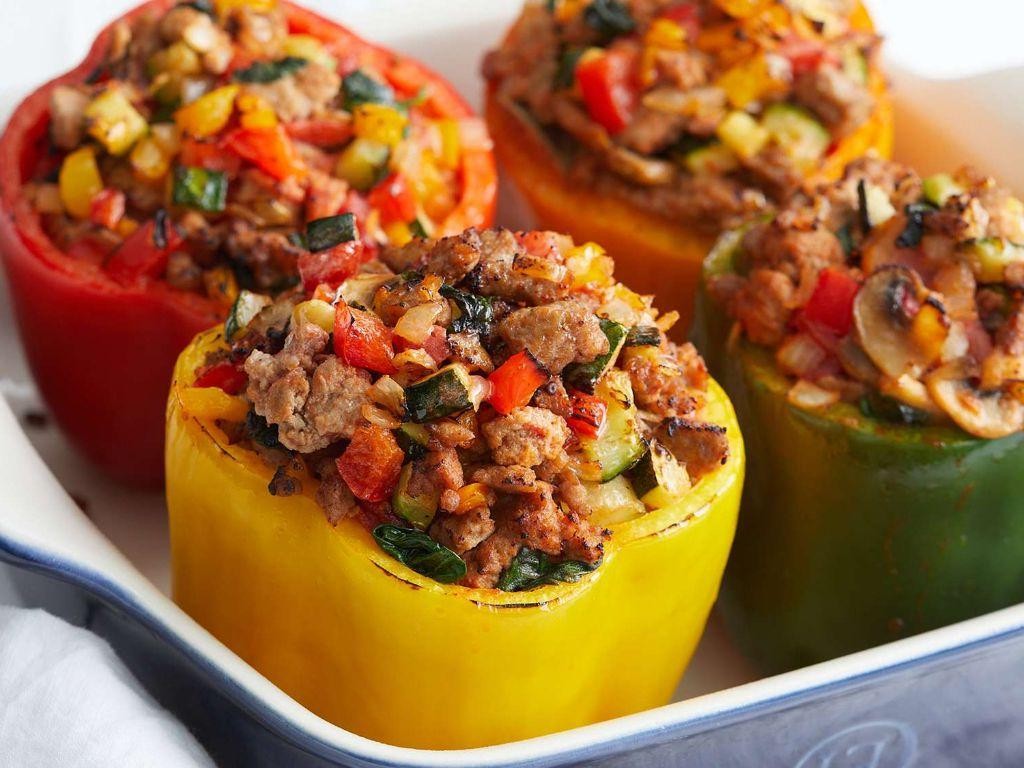
Hooray for hollowed-out veggies that moonlight as edible bowls! These stuffed bell peppers with turkey are basically the culinary equivalent of a surprise party—every bite delivers a festive explosion of flavor that’ll make your taste buds RSVP ‘yes’ to seconds. Let’s turn those vibrant peppers into the main event your dinner table deserves.
2
portions20
minutes45
minutesIngredients
– 4 big, sturdy bell peppers (any color you’re vibing with)
– 1 pound of lean ground turkey
– 1 cup of cooked rice (white or brown, your call)
– 1 small onion, finely chopped
– 2 cloves of garlic, minced
– 1 cup of shredded mozzarella cheese
– 1 can (15 ounces) of tomato sauce
– A generous splash of olive oil
– A couple of dashes of dried oregano
– Salt and black pepper, to your heart’s content
Instructions
1. Preheat your oven to 375°F and grab a baking dish that fits all 4 peppers snugly.
2. Slice the tops off the bell peppers and scoop out the seeds and membranes with a spoon—save the tops if you’re feeling fancy for garnish later.
3. Heat a splash of olive oil in a large skillet over medium heat until it shimmers, about 1–2 minutes.
4. Add the chopped onion and cook for 4–5 minutes, stirring occasionally, until it turns translucent and smells sweet.
5. Toss in the minced garlic and cook for just 30 seconds more to avoid burning it—garlic bitterness is a party foul.
6. Crumble in the ground turkey and cook for 6–8 minutes, breaking it up with a spatula, until it’s no longer pink.
7. Stir in the cooked rice, tomato sauce, oregano, salt, and black pepper, and let it simmer for 3–4 minutes so the flavors mingle like old friends.
8. Carefully spoon the turkey mixture into the hollowed bell peppers, packing it down lightly to prevent air pockets.
9. Top each pepper with a generous handful of shredded mozzarella cheese—because cheese is the ultimate comfort blanket.
10. Place the stuffed peppers in the baking dish and pour 1/4 cup of water around them to create steam for tender cooking.
11. Bake for 25–30 minutes, or until the peppers are tender when pierced with a fork and the cheese is golden and bubbly.
12. Let them rest for 5 minutes before serving to avoid a molten-lava mouth situation.
Oh, the joy of slicing into these beauties! The peppers soften into a sweet, slightly crisp vessel, while the filling stays moist and savory with a cheesy pull in every bite. Serve them alongside a simple green salad or over a bed of quinoa for a wholesome twist that’ll have everyone asking for the recipe.
Berry and Chia Seed Parfait
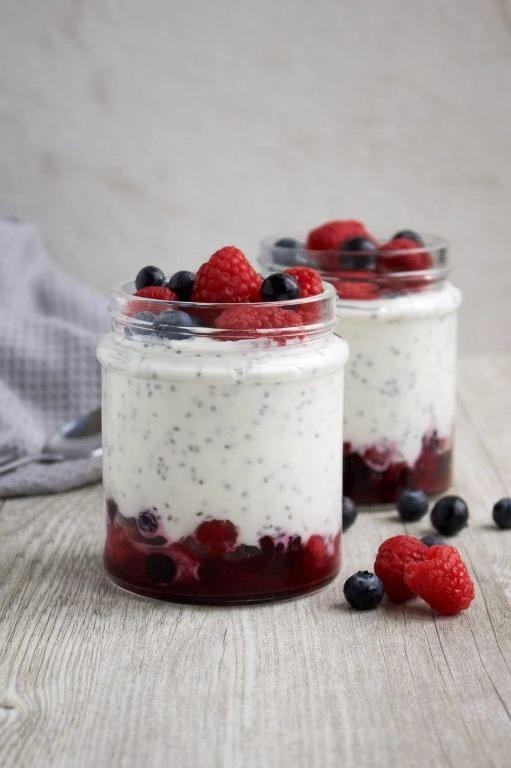
Ready to ditch your boring breakfast routine? This berry and chia seed parfait is basically dessert masquerading as a healthy meal—a delicious conspiracy your taste buds will thank you for, and your body won’t even suspect a thing!
2
parfaits15
minutesIngredients
– A couple of cups of plain Greek yogurt
– A generous half cup of chia seeds
– A good glug of maple syrup (about 2 tablespoons)
– A splash of vanilla extract (around 1 teaspoon)
– A couple of cups of mixed fresh berries (like strawberries, blueberries, and raspberries)
– A handful of granola for that essential crunch
Instructions
1. In a medium-sized mixing bowl, combine the 2 cups of plain Greek yogurt, 1/2 cup of chia seeds, 2 tablespoons of maple syrup, and 1 teaspoon of vanilla extract.
2. Whisk the mixture vigorously for about 1 minute until everything is fully incorporated and no clumps of chia seeds remain. (Tip: A good whisk now prevents a lumpy, seedy surprise later!)
3. Cover the bowl tightly with plastic wrap and place it in the refrigerator for at least 4 hours, or ideally overnight, to allow the chia seeds to fully absorb the liquid and thicken the mixture into a pudding-like consistency.
4. While the chia pudding sets, wash and thoroughly dry your 2 cups of mixed fresh berries.
5. If using strawberries, slice them into thin, uniform pieces so they layer nicely and are easy to eat.
6. Grab your favorite parfait glasses or bowls and begin assembling: spoon a layer of the set chia pudding into the bottom of each glass.
7. Top the chia pudding layer with a generous handful of your prepared mixed fresh berries.
8. Sprinkle a layer of granola over the berries to add a satisfying crunch. (Tip: Press the granola down gently so it doesn’t just sit on top but integrates into the layers!)
9. Repeat the layering process—chia pudding, berries, granola—until your glasses are filled to the top, finishing with a final berry and granola garnish for a beautiful look.
10. Serve your parfaits immediately for the best texture contrast, or refrigerate for up to 1 hour if preparing ahead. (Tip: If making ahead, add the final granola layer just before serving to keep it perfectly crisp!)
Zesty, creamy, and delightfully crunchy, this parfait is a textural party in a glass. The tangy yogurt and sweet berries play off each other brilliantly, while the chia seeds add a fun, gelatinous pop. For a next-level move, try serving it in mason jars with long spoons for a portable breakfast that looks as Insta-worthy as it tastes.
Quinoa and Black Bean Chili
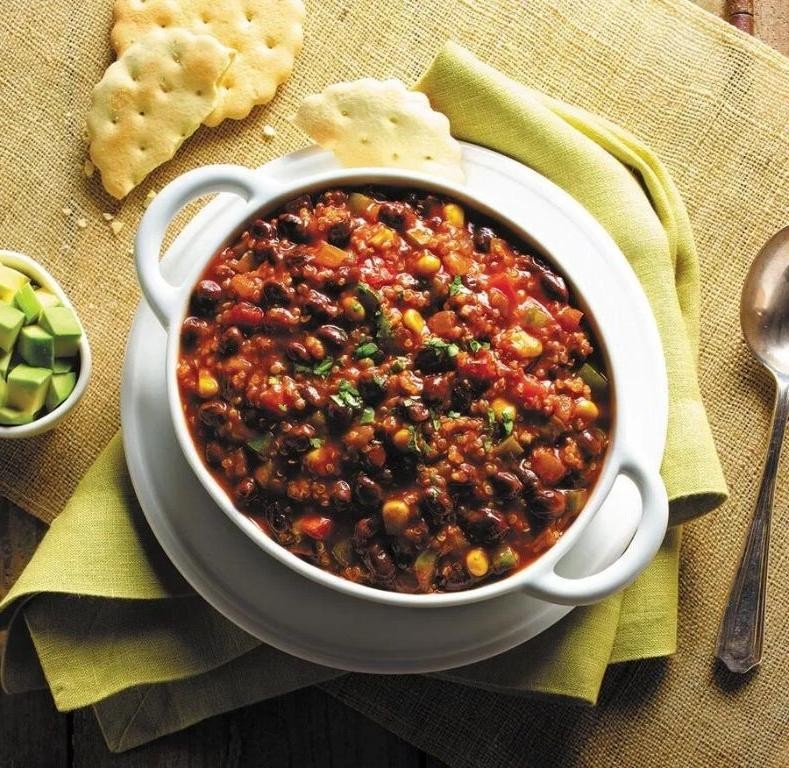
Just when you thought chili couldn’t get any better, quinoa crashes the party and makes this vegetarian version so satisfying even carnivores won’t miss the meat. This hearty bowl of comfort packs protein power and flavor fireworks that’ll have you doing a happy dance with every spoonful. Get ready to fall in love with chili all over again!
5
servings15
minutes30
minutesIngredients
– A couple of tablespoons of olive oil
– One large yellow onion, chopped
– Three cloves of garlic, minced
– One red bell pepper, diced
– Two tablespoons of chili powder
– One teaspoon of ground cumin
– A good pinch of salt
– One 15-ounce can of black beans, drained and rinsed
– One 15-ounce can of diced tomatoes
– Four cups of vegetable broth
– One cup of quinoa, rinsed
– A splash of lime juice
– A handful of fresh cilantro, chopped
Instructions
1. Heat 2 tablespoons of olive oil in a large pot over medium heat for 1 minute until shimmering.
2. Add 1 chopped large yellow onion and cook for 5 minutes, stirring occasionally, until translucent.
3. Stir in 3 minced garlic cloves and cook for 30 seconds until fragrant.
4. Add 1 diced red bell pepper and cook for 3 minutes until slightly softened.
5. Sprinkle in 2 tablespoons of chili powder, 1 teaspoon of cumin, and a good pinch of salt, then stir for 30 seconds to toast the spices.
6. Pour in 1 can of drained black beans, 1 can of diced tomatoes with their juices, and 4 cups of vegetable broth.
7. Bring the mixture to a boil over high heat, then reduce to a simmer.
8. Stir in 1 cup of rinsed quinoa and simmer uncovered for 20 minutes, stirring occasionally.
9. Check that the quinoa has popped open and is tender, then remove from heat.
10. Stir in a splash of lime juice and a handful of chopped fresh cilantro.
Creamy quinoa creates the most satisfying texture that clings to every bean and vegetable in this vibrant chili. The lime juice brightens all those warm spices while the cilantro adds that fresh pop that makes each bite exciting. Try serving it over baked sweet potatoes or with a generous sprinkle of tortilla chips for some satisfying crunch!
Spinach and Ricotta Stuffed Chicken

Brace yourselves, chicken lovers—we’re about to stuff that bird with so much cheesy, spinach-y goodness it might just start telling dad jokes. This Spinach and Ricotta Stuffed Chicken is the culinary equivalent of a surprise party in your mouth, where everyone’s invited and no one leaves hungry. Get ready to impress your taste buds (and maybe your mother-in-law) with this flavor-packed masterpiece.
2
servings15
minutes30
minutesIngredients
– 4 boneless, skinless chicken breasts (the plump ones, please!)
– A couple of big handfuls of fresh spinach
– About a cup of ricotta cheese (the good, creamy stuff)
– A generous half-cup of shredded mozzarella
– A quarter-cup of grated Parmesan (because more cheese is always the answer)
– 2 minced garlic cloves (fresh, not from a jar—we’re fancy)
– A tablespoon of olive oil (for that golden sizzle)
– A teaspoon of dried Italian seasoning
– A good pinch of salt and a few cracks of black pepper
Instructions
1. Preheat your oven to 375°F and grab a baking dish—no need to grease it yet.
2. In a medium bowl, mix together the ricotta, mozzarella, Parmesan, minced garlic, Italian seasoning, salt, and pepper until it’s one happy, cheesy family.
3. Wilt the spinach by microwaving it for 1 minute or sautéing in a pan for 2–3 minutes until it’s bright green and limp, then squeeze out all the water (seriously, get it dry or your filling will be soggy).
4. Chop the wilted spinach finely and stir it into the cheese mixture until everything is evenly distributed.
5. Lay each chicken breast flat on a cutting board and use a sharp knife to slice a deep pocket horizontally through the thickest part, being careful not to cut all the way through.
6. Stuff each chicken pocket with about ¼ cup of the spinach-ricotta mixture, pressing it in gently but firmly so it doesn’t burst out during cooking.
7. Heat the olive oil in a large oven-safe skillet over medium-high heat until it shimmers (about 1–2 minutes).
8. Place the stuffed chicken breasts in the hot skillet and sear for 3–4 minutes per side until they develop a golden-brown crust—this locks in juices and adds flavor.
9. Transfer the skillet to the preheated oven and bake for 20–25 minutes, or until the internal temperature reaches 165°F on a meat thermometer (don’t guess—this ensures safety and perfect doneness).
10. Let the chicken rest for 5 minutes before slicing to keep all those delicious juices inside.
Velvety ricotta melts into the tender chicken, while the spinach adds a fresh, earthy contrast that’ll make you forget you’re eating something healthy. Serve it sliced over a bed of garlic mashed potatoes or alongside a crisp salad for a meal that’s as Instagram-worthy as it is satisfying—leftovers (if there are any) make a killer sandwich filling the next day.
Conclusion
Keeping your blood sugar in check can be both delicious and simple with these 33 recipes. We hope you find new favorites that nourish your body and delight your taste buds. Try them out, leave a comment with which ones you love most, and don’t forget to share this roundup on Pinterest to help others discover these tasty, healthy options!


