Did you know that humble sliced bread can become the star of your next meal? From quick weeknight dinners to cozy comfort food favorites, we’ve gathered 18 creative recipes that will transform your everyday loaf into something extraordinary. Get ready to rediscover the magic in your pantry—these delicious ideas will have you looking at sliced bread in a whole new light!
Garlic Herb Bread Crisps

Gosh, you know those times when you’ve got leftover bread that’s just sitting there? Garlic herb bread crisps are the perfect solution—they transform that stale loaf into something crunchy, flavorful, and totally addictive. You’re going to love how easy these are to whip up for snacking or as a side.
3
servings5
minutes15
minutesIngredients
– 4 cups day-old bread cubes
– 3 tbsp olive oil
– 2 tsp dried oregano
– 1 tsp garlic powder
– 1/2 tsp salt
Instructions
1. Preheat your oven to 375°F and line a baking sheet with parchment paper.
2. Place the bread cubes in a large mixing bowl.
3. Drizzle the olive oil over the bread cubes, tossing to coat evenly.
4. Sprinkle the dried oregano, garlic powder, and salt over the bread cubes.
5. Toss everything together until the bread is uniformly coated with the herb mixture.
6. Spread the seasoned bread cubes in a single layer on the prepared baking sheet.
7. Bake for 12-15 minutes, shaking the pan halfway through for even browning.
8. Remove from the oven when the crisps are golden brown and crisp to the touch.
9. Let the crisps cool completely on the baking sheet before serving.
Just imagine that satisfying crunch with every bite—these crisps are wonderfully crispy with a savory garlic-herb flavor that pairs perfectly with soups or salads. Try sprinkling them over tomato soup for extra texture, or serve alongside a cheese board for a simple appetizer that always impresses.
Savory Bread Pudding with Cheese
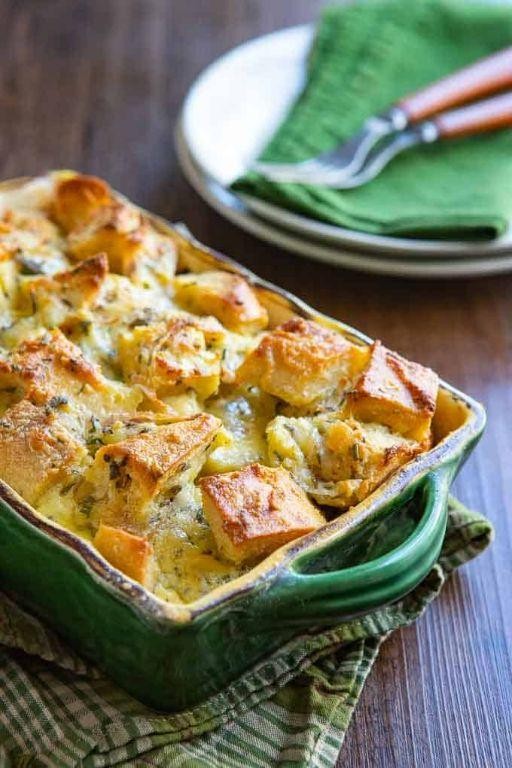
Zesty doesn’t always mean citrus—sometimes it’s about that savory kick you get from a comforting bread pudding loaded with cheese. You know those days when you want something cozy but still impressive? This dish is your answer, transforming simple ingredients into a bubbly, golden masterpiece that feels both fancy and familiar.
8
servings20
minutes56
minutesIngredients
– 6 cups cubed day-old bread
– 1 1/2 cups shredded cheddar cheese
– 4 large eggs
– 2 cups whole milk
– 1/2 cup heavy cream
– 1 small onion, finely chopped
– 2 cloves garlic, minced
– 1 tbsp olive oil
– 1 tsp salt
– 1/2 tsp black pepper
– 1/4 tsp paprika
Instructions
1. Preheat your oven to 350°F and grease a 9×13-inch baking dish with butter or non-stick spray.
2. Heat 1 tbsp olive oil in a skillet over medium heat and sauté 1 small chopped onion for 5 minutes until translucent.
3. Add 2 minced garlic cloves and cook for 1 more minute, stirring to avoid burning.
4. In a large bowl, whisk together 4 eggs, 2 cups whole milk, 1/2 cup heavy cream, 1 tsp salt, 1/2 tsp black pepper, and 1/4 tsp paprika until fully combined.
5. Tip: Letting the custard mixture sit for a minute helps the spices blend evenly.
6. Stir in the sautéed onion and garlic mixture into the egg custard.
7. Add 6 cups cubed day-old bread to the custard, pressing down gently to ensure all pieces are soaked.
8. Fold in 1 1/2 cups shredded cheddar cheese, reserving 1/4 cup for topping.
9. Pour the entire mixture into the prepared baking dish and spread it evenly.
10. Sprinkle the reserved 1/4 cup cheese on top for a golden crust.
11. Tip: For extra crunch, lightly spray the top with cooking oil before baking.
12. Bake at 350°F for 45–50 minutes, until the top is golden brown and a knife inserted in the center comes out clean.
13. Tip: If the top browns too quickly, loosely tent it with foil for the last 10 minutes.
14. Let the pudding rest for 10 minutes before serving to allow the custard to set.
Lusciously creamy with a crisp, cheesy top, this pudding balances rich custard and savory notes perfectly. Serve it warm alongside a fresh green salad for a satisfying meal, or slice it into squares for a hearty brunch centerpiece that’s sure to impress.
Classic Grilled Cheese with Tomato

Friendly reminder: sometimes the simplest foods hit the spot the most. You just can’t beat that perfect combo of crispy, buttery bread and melty cheese, especially with a juicy tomato slice adding a fresh twist.
1
sandwich5
minutes9
minutesIngredients
– 2 slices white sandwich bread
– 2 tbsp salted butter, softened
– 2 slices sharp cheddar cheese
– 1 medium tomato, sliced ¼-inch thick
– ¼ tsp garlic powder
Instructions
1. Spread 1 tablespoon of softened butter evenly on one side of each bread slice.
2. Place one bread slice buttered-side down in a cold, non-stick skillet.
3. Layer both slices of cheddar cheese evenly on the bread in the skillet.
4. Arrange the tomato slices in a single layer over the cheese.
5. Sprinkle the garlic powder evenly over the tomato slices.
6. Top with the second bread slice, buttered-side facing up.
7. Turn the stove burner to medium-low heat.
8. Cook for 4-5 minutes until the bottom bread is golden brown. (Tip: Start with a cold pan for even melting and browning.)
9. Carefully flip the sandwich using a spatula.
10. Cook for another 3-4 minutes until the second side is golden brown and cheese is fully melted. (Tip: Press down gently with the spatula to help the cheese melt evenly.)
11. Remove from skillet and let rest for 1 minute before cutting. (Tip: Letting it rest prevents the cheese from oozing out immediately.)
12. Cut the sandwich diagonally and serve immediately.
Deliciously crispy on the outside and wonderfully gooey inside, this grilled cheese delivers that perfect comfort food satisfaction. The tomato adds a bright, juicy contrast to the rich cheese, making each bite more interesting than the last. Try serving it alongside a bowl of tomato soup for the ultimate cozy meal, or add a sprinkle of fresh basil for an herby twist.
French Toast with Vanilla Maple Syrup

Nothing beats waking up to the smell of warm cinnamon and vanilla filling your kitchen. You’re about to make the most incredible French toast that’s crispy on the outside, custardy in the middle, and drenched in homemade vanilla maple syrup. Trust me, this will become your new weekend tradition.
8
servings10
minutes32
minutesIngredients
– 8 slices thick-cut brioche bread
– 4 large eggs
– 1 cup whole milk
– 1/4 cup heavy cream
– 2 tbsp granulated sugar
– 1 tsp vanilla extract
– 1/2 tsp ground cinnamon
– 1/4 tsp salt
– 3 tbsp unsalted butter
– 1 cup pure maple syrup
– 1 vanilla bean
Instructions
1. Slice the vanilla bean lengthwise and scrape out the seeds using the back of your knife.
2. Combine the vanilla bean seeds with maple syrup in a small saucepan over low heat.
3. Heat the vanilla maple syrup for 5 minutes, stirring occasionally, then remove from heat.
4. In a large shallow bowl, whisk together eggs, milk, heavy cream, sugar, vanilla extract, cinnamon, and salt until fully combined.
5. Preheat a large non-stick skillet or griddle over medium heat.
6. Melt 1 tablespoon of butter in the preheated skillet, swirling to coat the surface evenly.
7. Dip one slice of brioche bread into the egg mixture, letting it soak for 20 seconds per side.
8. Place the soaked bread slice in the hot skillet.
9. Cook the French toast for 3-4 minutes until the bottom is golden brown and crispy.
10. Flip the French toast using a spatula and cook for another 3-4 minutes until the second side is golden brown.
11. Transfer the cooked French toast to a wire rack set over a baking sheet.
12. Repeat steps 7-11 with remaining bread slices, adding more butter to the skillet as needed.
13. Serve the French toast immediately with warm vanilla maple syrup poured over the top.
Really, the magic happens when that crispy exterior gives way to the rich, custard-like center. The vanilla-infused syrup adds this incredible depth that makes store-bought versions seem boring by comparison. Try stacking it high with fresh berries and a dusting of powdered sugar for that perfect brunch-worthy presentation.
Avocado Toast with Poached Egg
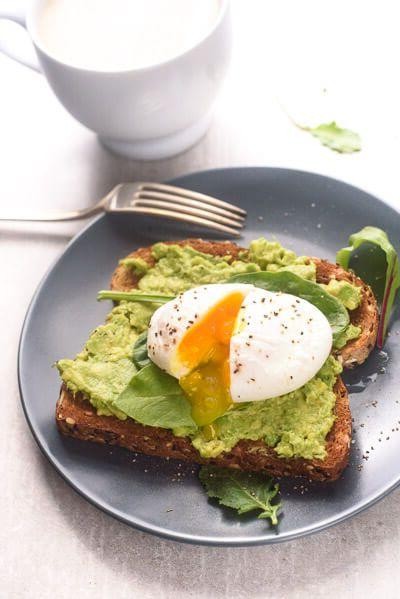
Craving something delicious and satisfying for breakfast or brunch? You’ve probably seen avocado toast with poached egg all over social media, and for good reason—it’s creamy, hearty, and totally customizable to your taste. Let’s make the perfect version right at home.
2
servings10
minutes5
minutesIngredients
– 2 slices sourdough bread
– 1 ripe avocado
– 2 large eggs
– 1 tbsp white vinegar
– 1/2 tsp red pepper flakes
– 1/4 tsp kosher salt
– 1/4 tsp black pepper
– 1 tbsp olive oil
Instructions
1. Fill a medium saucepan with 3 inches of water and bring to a gentle simmer over medium heat.
2. Add 1 tablespoon white vinegar to the simmering water to help the egg whites coagulate neatly.
3. Crack each egg into a separate small ramekin or cup for easy sliding into the water.
4. Create a gentle whirlpool in the water with a spoon, then slide one egg into the center and repeat with the second egg.
5. Poach the eggs for exactly 3 minutes for runny yolks and set whites, adjusting time for firmer yolks.
6. While eggs poach, toast 2 slices of sourdough bread in a toaster or skillet until golden and crisp.
7. Halve the avocado, remove the pit, and scoop the flesh into a small bowl.
8. Mash the avocado with a fork until slightly chunky or smooth, as you prefer.
9. Stir in 1/4 teaspoon kosher salt, 1/4 teaspoon black pepper, and 1/2 teaspoon red pepper flakes.
10. Drizzle 1 tablespoon olive oil over the toasted sourdough slices.
11. Spread the mashed avocado evenly onto each toast slice.
12. Remove the poached eggs with a slotted spoon, draining excess water, and place one on each toast.
13. Season the eggs with an extra pinch of salt and pepper before serving immediately.
Each bite gives you that dreamy contrast of crisp toast, creamy avocado, and a silky yolk that oozes over everything. Try topping it with microgreens for a fresh crunch or a sprinkle of everything bagel seasoning for extra flavor—it’s a simple dish that always feels special.
Cheesy Spinach and Artichoke Bread Roll

Diving into comfort food territory, this cheesy spinach and artichoke bread roll is the ultimate crowd-pleaser. You get that warm, gooey filling wrapped in soft, golden bread—perfect for game day or cozy nights in.
1
roll20
minutes32
minutesIngredients
– 1 package (16 oz) frozen spinach, thawed and squeezed dry
– 1 can (14 oz) artichoke hearts, drained and chopped
– 1 cup shredded mozzarella cheese
– 1/2 cup grated Parmesan cheese
– 1/2 cup mayonnaise
– 1/2 cup sour cream
– 1 tsp garlic powder
– 1/2 tsp onion powder
– 1/4 tsp black pepper
– 1 loaf (1 lb) French bread, unsliced
– 2 tbsp melted butter
– 1/4 tsp dried parsley
Instructions
1. Preheat your oven to 375°F and line a baking sheet with parchment paper.
2. In a large bowl, combine the spinach, artichoke hearts, mozzarella, Parmesan, mayonnaise, sour cream, garlic powder, onion powder, and black pepper until fully mixed.
3. Slice the French bread horizontally, cutting almost through but leaving one long edge attached so it opens like a book.
4. Hollow out the center of both bread halves, removing about 1 inch of soft interior to create a trough for the filling.
5. Evenly spread the spinach-artichoke mixture into the hollowed-out bread, pressing it down gently.
6. Close the bread and brush the entire outside with melted butter, then sprinkle with dried parsley.
7. Wrap the filled loaf tightly in aluminum foil and bake for 20 minutes.
8. Unwrap the foil and continue baking for another 10–12 minutes, until the bread is golden and the filling is bubbly.
9. Remove from the oven and let it rest for 5 minutes before slicing into 1-inch thick pieces.
10. Serve warm. Very gooey and savory, this roll delivers a creamy, garlicky filling with a crisp bread shell. Try dipping slices in marinara sauce or pairing with a simple salad for a complete meal.
Open-Faced Tuna Melt Sandwich
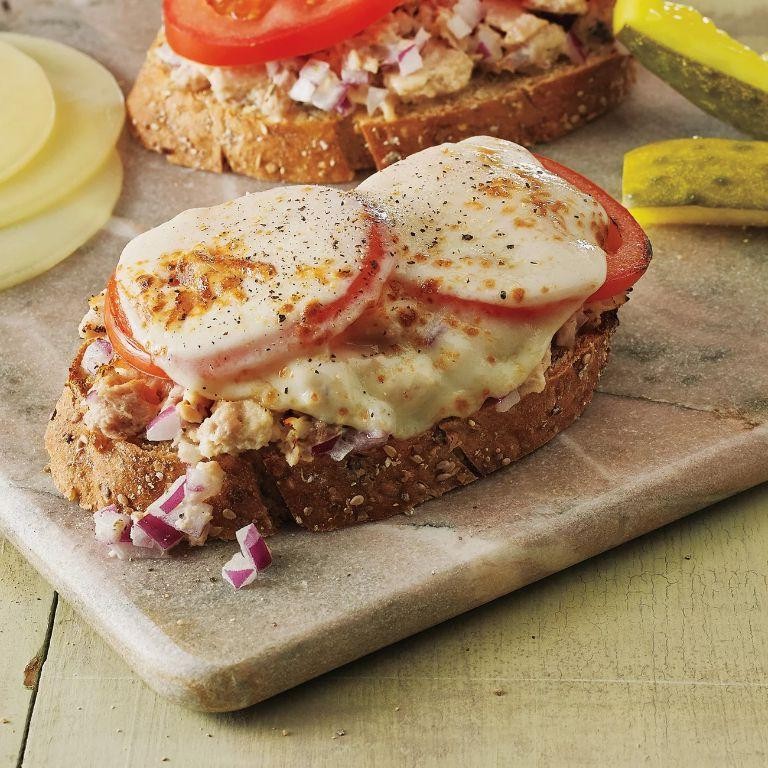
Zesty, satisfying, and ready in minutes—this open-faced tuna melt sandwich is your new go-to lunch. You get that perfect combo of creamy tuna salad and melted cheese, all piled high on toasted bread. It’s comfort food that feels a little fancy but comes together with zero fuss.
2
sandwiches10
minutes8
minutesIngredients
- 2 slices sourdough bread
- 1 (5 oz) can tuna in water, drained
- 1/4 cup mayonnaise
- 1 tbsp lemon juice
- 1/4 cup finely chopped celery
- 2 tbsp finely chopped red onion
- 1/4 tsp black pepper
- 4 slices cheddar cheese
- 1 tbsp unsalted butter, softened
Instructions
- Preheat your oven broiler to 500°F and position a rack 6 inches below the heating element.
- Place the sourdough bread slices on a baking sheet and lightly toast them under the broiler for 1–2 minutes per side, watching closely to avoid burning.
- In a medium bowl, combine the drained tuna, mayonnaise, lemon juice, celery, red onion, and black pepper until evenly mixed. Tip: For extra flavor, let the tuna salad sit for 5 minutes so the celery and onion soften slightly.
- Spread the softened butter evenly over the toasted side of each bread slice to help them crisp up under the broiler.
- Divide the tuna salad mixture between the two bread slices, spreading it to cover the surface evenly but leaving a small border around the edges.
- Top each sandwich with 2 slices of cheddar cheese, covering the tuna completely.
- Broil the sandwiches for 3–4 minutes, or until the cheese is fully melted and bubbly with golden-brown spots. Tip: Rotate the baking sheet halfway through for even melting if your broiler heats unevenly.
- Carefully remove the baking sheet from the oven using oven mitts. Tip: Let the sandwiches rest for 1 minute before serving to allow the cheese to set slightly, making them easier to handle.
Fantastic straight from the oven, this sandwich delivers a satisfying crunch from the buttery toast against the creamy, savory tuna and gooey cheese. For a fresh twist, serve it with a side of pickles or a simple green salad to cut through the richness. It’s the kind of meal that feels indulgent but is totally doable on even the busiest days.
Bruschetta with Tomato and Basil

A perfect summer appetizer that’s as easy as it is delicious, bruschetta with tomato and basil brings fresh, vibrant flavors to your table in minutes. You’ll love how simple it is to throw together for a last-minute gathering or a light snack.
1
loaf15
minutes10
minutesIngredients
– 1 loaf Italian bread
– 3 tablespoons olive oil
– 2 cloves garlic
– 4 medium tomatoes
– 1/4 cup fresh basil
– 1/2 teaspoon salt
– 1/4 teaspoon black pepper
Instructions
1. Preheat your oven to 400°F.
2. Slice the Italian bread into 1/2-inch thick pieces.
3. Brush both sides of each bread slice with olive oil using a pastry brush.
4. Arrange the bread slices in a single layer on a baking sheet.
5. Bake for 8-10 minutes until the edges are golden brown and crisp.
6. Remove the baking sheet from the oven using oven mitts.
7. Cut the garlic cloves in half.
8. Rub the cut side of garlic firmly over the top of each warm toast.
9. Core the tomatoes and dice them into 1/4-inch pieces.
10. Stack the basil leaves, roll them tightly, and slice thinly to create ribbons.
11. Combine the diced tomatoes, basil ribbons, salt, and black pepper in a medium bowl.
12. Let the tomato mixture sit for 5 minutes to allow the flavors to meld.
13. Spoon the tomato-basil mixture generously onto each garlic-rubbed toast.
14. Drizzle any remaining juices from the bowl over the topped bruschetta.
15. Serve immediately on a platter.
Outrageously fresh and satisfying, these bruschetta boast a juicy, chunky tomato topping that contrasts beautifully with the crisp, garlicky toast. The basil adds a sweet, aromatic note that makes each bite burst with summer flavor. Try serving them alongside a charcuterie board or as a starter for Italian night—they’re always a hit!
Bread Panzanella Salad

Savor those leftover bread heels and day-old loaves you’ve been saving—this bread panzanella salad transforms them into something spectacular. You’ll love how the crispy bread soaks up all the vibrant dressing while staying wonderfully textured. It’s the perfect way to make something delicious out of what might otherwise go to waste.
4
servings20
minutes15
minutesIngredients
– 4 cups cubed stale bread
– 3 tbsp olive oil
– 1 pint cherry tomatoes
– 1 English cucumber
– 1/2 red onion
– 1/4 cup red wine vinegar
– 1 tsp Dijon mustard
– 1/4 tsp black pepper
– 1/2 tsp salt
– 1/4 cup fresh basil
Instructions
1. Preheat your oven to 375°F.
2. Toss 4 cups cubed stale bread with 2 tablespoons olive oil until evenly coated.
3. Spread bread cubes in a single layer on a baking sheet.
4. Bake for 12-15 minutes until golden brown and crisp.
5. Let bread cool completely on the baking sheet—this prevents sogginess when mixed with dressing.
6. Halve 1 pint cherry tomatoes and place in a large bowl.
7. Dice 1 English cucumber into 1/2-inch pieces and add to bowl.
8. Thinly slice 1/2 red onion and add to the vegetable mixture.
9. Whisk together remaining 1 tablespoon olive oil, 1/4 cup red wine vinegar, 1 teaspoon Dijon mustard, 1/2 teaspoon salt, and 1/4 teaspoon black pepper in a small bowl.
10. Pour dressing over vegetables and toss gently to coat.
11. Add cooled bread cubes to the dressed vegetables.
12. Toss everything together until bread is evenly distributed.
13. Let salad sit for 10 minutes so bread can absorb some dressing while maintaining texture.
14. Chop 1/4 cup fresh basil and sprinkle over salad just before serving.
15. Gently toss one final time to incorporate basil.
Don’t be surprised when this becomes your new favorite summer meal—the contrast between the crisp bread and juicy tomatoes is absolutely addictive. For a heartier version, top with grilled chicken or chickpeas, or serve alongside grilled fish for a complete dinner that feels both rustic and refined.
Chicken Caesar Salad Sandwich

Virtually everyone loves a good Caesar salad, but have you ever thought about turning it into a sandwich? You get all that creamy, garlicky goodness in a portable, no-fork-required package. It’s the perfect lunch upgrade when you’re craving something fresh but substantial.
2
sandwiches15
minutes15
minutesIngredients
– 1 lb boneless, skinless chicken breast
– 1/2 tsp salt
– 1/4 tsp black pepper
– 1 tbsp olive oil
– 1/2 cup mayonnaise
– 2 tbsp grated Parmesan cheese
– 1 tbsp lemon juice
– 1 tsp Dijon mustard
– 1 garlic clove, minced
– 4 slices bread
– 2 cups chopped romaine lettuce
– 1/4 cup croutons
Instructions
1. Pat the chicken breast dry with paper towels and season both sides evenly with 1/2 teaspoon salt and 1/4 teaspoon black pepper.
2. Heat 1 tablespoon olive oil in a skillet over medium-high heat until it shimmers, about 1 minute.
3. Place the chicken in the hot skillet and cook for 6–7 minutes without moving it to develop a golden-brown crust.
4. Flip the chicken and cook for another 6–7 minutes until the internal temperature reaches 165°F on an instant-read thermometer.
5. Transfer the chicken to a cutting board and let it rest for 5 minutes to allow the juices to redistribute.
6. While the chicken rests, whisk together 1/2 cup mayonnaise, 2 tablespoons grated Parmesan cheese, 1 tablespoon lemon juice, 1 teaspoon Dijon mustard, and 1 minced garlic clove in a medium bowl.
7. Thinly slice the rested chicken against the grain for maximum tenderness.
8. Toast 4 slices of bread until golden brown and crisp.
9. Spread a generous layer of the Caesar dressing on one side of each slice of toast.
10. Top two slices of toast with 2 cups chopped romaine lettuce, the sliced chicken, and 1/4 cup croutons.
11. Place the remaining slices of toast on top, dressing-side down, and press gently.
12. Cut each sandwich in half diagonally and serve immediately.
Unbelievably satisfying, this sandwich delivers a fantastic crunch from the toasted bread and croutons against the cool, crisp lettuce and tender chicken. The creamy, garlic-Parmesan dressing soaks into the bread just enough without making it soggy. For a fun twist, try serving it open-faced or with a side of extra dressing for dipping.
Cinnamon Sugar Bread Crust Chips

Kind of amazing how something so simple can become your new favorite snack, right? You probably have leftover bread crusts sitting around, and with just a few pantry staples, you can transform them into these irresistible cinnamon sugar chips. They’re perfect for when you want something sweet and crunchy without much effort.
3
cups10
minutes15
minutesIngredients
- 4 cups bread crusts
- 1/4 cup granulated sugar
- 1 tbsp ground cinnamon
- 3 tbsp unsalted butter, melted
Instructions
- Preheat your oven to 350°F and line a baking sheet with parchment paper.
- Toss the bread crusts with melted butter in a large bowl until evenly coated. Tip: Make sure all crust pieces are similar in thickness for even baking.
- Combine the sugar and cinnamon in a separate small bowl.
- Sprinkle the cinnamon sugar mixture over the buttered crusts and toss thoroughly to coat every piece.
- Spread the coated crusts in a single layer on your prepared baking sheet. Tip: Don’t overcrowd the pan—use two sheets if needed for proper air circulation.
- Bake for 12-15 minutes, flipping halfway through, until the chips are golden brown and crisp.
- Remove from oven and let cool completely on the baking sheet. Tip: They’ll continue crisping as they cool, so be patient for the perfect crunch.
Very satisfyingly crunchy with that warm cinnamon sugar flavor we all love. These make fantastic toppings for yogurt or ice cream, or just enjoy them by the handful while they’re still slightly warm.
Egg and Cheese Breakfast Muffin

Breakfast just got a whole lot easier with this egg and cheese muffin recipe. You can whip these up in minutes, and they’re perfect for busy mornings when you need something satisfying but don’t have time to fuss. They’re basically handheld breakfast sandwiches that keep you full until lunch.
6
muffins10
minutes20
minutesIngredients
– 4 large eggs
– 1/4 cup milk
– 1 cup shredded cheddar cheese
– 1/2 cup diced ham
– 1/4 cup chopped green onions
– 1 tbsp butter
– 1/2 tsp salt
– 1/4 tsp black pepper
– Cooking spray
Instructions
1. Preheat your oven to 350°F.
2. Generously spray a 6-cup muffin tin with cooking spray to prevent sticking.
3. Crack 4 large eggs into a medium mixing bowl.
4. Add 1/4 cup milk to the eggs.
5. Whisk the eggs and milk together until fully combined and slightly frothy.
6. Mix in 1/2 tsp salt and 1/4 tsp black pepper.
7. Stir in 1 cup shredded cheddar cheese, 1/2 cup diced ham, and 1/4 cup chopped green onions.
8. Divide the egg mixture evenly among the 6 muffin cups, filling each about 3/4 full.
9. Bake at 350°F for 18-20 minutes until the tops are golden brown and the centers are set.
10. Let the muffins cool in the pan for 5 minutes before removing.
11. Run a knife around the edges of each muffin to loosen them from the pan.
12. Serve warm.
Perfect for meal prep, these muffins have a fluffy texture with gooey cheese pockets and savory ham bits throughout. They’re fantastic warmed up the next day, and you can customize them by adding diced bell peppers or swapping the ham for cooked bacon crumbles.
Bread and Butter Pudding

Craving something cozy and comforting? This bread and butter pudding is your answer. It transforms simple ingredients into a warm, custardy dessert that feels like a hug in a baking dish.
8
servings25
minutes50
minutesIngredients
– 6 cups cubed day-old bread
– 4 tablespoons unsalted butter, softened
– 3/4 cup granulated sugar
– 4 large eggs
– 2 cups whole milk
– 1 cup heavy cream
– 1 teaspoon vanilla extract
– 1/2 teaspoon ground cinnamon
– 1/4 teaspoon salt
Instructions
1. Preheat your oven to 350°F and grease a 9×13-inch baking dish with 1 tablespoon of the softened butter.
2. Spread the remaining 3 tablespoons of softened butter evenly on one side of each bread cube.
3. Arrange the buttered bread cubes in a single layer in the prepared baking dish.
4. In a large mixing bowl, whisk together the granulated sugar and eggs until pale and slightly thickened, about 2 minutes.
5. Gradually whisk in the whole milk, heavy cream, vanilla extract, ground cinnamon, and salt until fully combined.
6. Slowly pour the custard mixture evenly over the bread cubes in the baking dish.
7. Press down gently on the bread cubes with a spatula to ensure they are fully submerged in the custard.
8. Let the pudding sit for 20 minutes to allow the bread to absorb the custard.
9. Bake in the preheated oven for 45-50 minutes, or until the top is golden brown and the center is set with no liquid jiggle.
10. Remove from the oven and let it cool for 15 minutes before serving.
Make sure to use day-old bread for better texture—it soaks up the custard without turning mushy. Pressing the bread down helps it absorb the liquid evenly, and checking for a set center ensures it’s perfectly cooked. Moist and creamy with a golden, slightly crisp top, this pudding balances sweet custard with buttery bread. Serve it warm with a drizzle of caramel sauce or a scoop of vanilla ice cream for extra indulgence.
Homemade Bread Crumb Coated Chicken

Very few things beat the satisfying crunch of perfectly coated chicken. You’ll love how simple this homemade bread crumb version comes together, and the crispy golden result is totally worth the little extra effort. It’s that perfect weeknight dinner that feels special without being complicated.
5
servings15
minutes20
minutesIngredients
– 1.5 lbs chicken breasts
– 1 cup all-purpose flour
– 2 large eggs
– 2 cups panko bread crumbs
– 1 tsp garlic powder
– 1 tsp paprika
– 1 tsp salt
– 1/2 tsp black pepper
– 1/2 cup vegetable oil
Instructions
1. Preheat your oven to 400°F and line a baking sheet with parchment paper.
2. Pat the chicken breasts completely dry with paper towels to help the coating stick better.
3. Cut each chicken breast into 1-inch thick strips for even cooking.
4. In a shallow bowl, combine the flour, garlic powder, paprika, salt, and black pepper.
5. In a second shallow bowl, beat the eggs until fully blended.
6. Place the panko bread crumbs in a third shallow bowl.
7. Dredge each chicken strip in the flour mixture, shaking off any excess.
8. Dip the floured chicken into the beaten eggs, letting any extra drip off.
9. Press the chicken firmly into the panko bread crumbs, coating all sides evenly.
10. Heat the vegetable oil in a large skillet over medium-high heat until it shimmers, about 350°F.
11. Carefully place the coated chicken strips in the hot oil without crowding the pan.
12. Fry for 2-3 minutes per side until golden brown and crispy.
13. Transfer the partially cooked chicken to the prepared baking sheet.
14. Bake in the preheated oven for 10-12 minutes until the internal temperature reaches 165°F.
15. Let the chicken rest on a wire rack for 5 minutes before serving to keep the crust crisp. What makes this chicken so irresistible is that shatteringly crisp panko crust giving way to juicy, tender meat inside. Try slicing it over a fresh garden salad or tucking it into soft buns with pickles and mayo for an amazing sandwich. The garlic and paprika add just enough savory depth that even picky eaters will be asking for seconds.
Sliced Bread Pizza Margherita

Kind of craving pizza but don’t want the hassle of making dough? You’ve probably got everything you need right in your kitchen. This sliced bread pizza gives you that cheesy, saucy goodness in minutes.
5
portions5
minutes10
minutesIngredients
– 4 slices white bread
– 1/2 cup pizza sauce
– 1 cup shredded mozzarella cheese
– 8 fresh basil leaves
– 2 tbsp olive oil
– 1/4 tsp garlic powder
Instructions
1. Preheat your oven to 400°F.
2. Place 4 slices of white bread on a baking sheet.
3. Brush the top of each bread slice with 2 tablespoons of olive oil using a pastry brush.
4. Spread 2 tablespoons of pizza sauce evenly over each bread slice, leaving a small border around the edges.
5. Sprinkle 1/4 cup of shredded mozzarella cheese over the sauce on each bread slice.
6. Sprinkle 1/4 teaspoon of garlic powder evenly over all four pizzas.
7. Bake at 400°F for 8-10 minutes until the cheese is completely melted and bubbly.
8. Remove the baking sheet from the oven using oven mitts.
9. Place 2 fresh basil leaves on top of each pizza immediately after removing from the oven.
10. Let the pizzas rest for 2 minutes before serving to allow the cheese to set slightly.
That crispy bread base holds up beautifully against the gooey melted cheese. The fresh basil adds a bright, herbal note that cuts through the richness perfectly. Try serving these as fun individual pizzas for game day or cutting them into strips for easy dipping in extra marinara sauce.
Mushroom and Swiss Cheese Sandwich
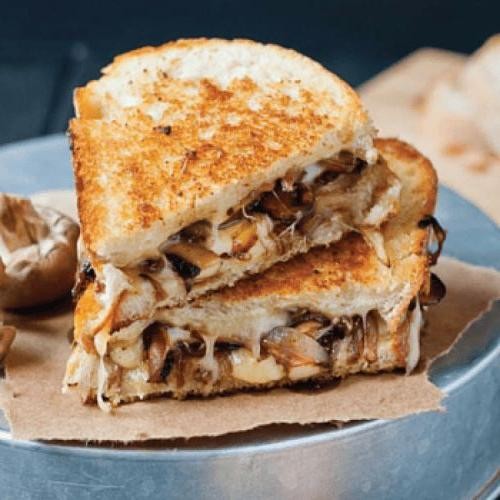
Finally, there’s nothing quite like a warm, melty mushroom and Swiss sandwich when you’re craving something comforting yet easy. This version comes together in minutes but tastes like you spent hours in the kitchen. You’ll love how the earthy mushrooms pair with that nutty, gooey cheese.
2
sandwiches5
minutes18
minutesIngredients
– 2 tbsp unsalted butter
– 1 tbsp olive oil
– 8 oz cremini mushrooms, sliced
– 1/4 tsp garlic powder
– 1/4 tsp black pepper
– 1/4 tsp salt
– 4 slices sourdough bread
– 4 slices Swiss cheese
Instructions
1. Heat 1 tablespoon of butter and 1 tablespoon of olive oil in a large skillet over medium heat until the butter melts completely.
2. Add 8 ounces of sliced cremini mushrooms to the skillet in a single layer.
3. Sprinkle 1/4 teaspoon of garlic powder, 1/4 teaspoon of black pepper, and 1/4 teaspoon of salt evenly over the mushrooms.
4. Cook the mushrooms for 6-8 minutes, stirring occasionally, until they release their liquid and turn golden brown.
5. Transfer the cooked mushrooms to a plate and wipe the skillet clean with a paper towel.
6. Spread the remaining 1 tablespoon of butter on one side of each of the 4 slices of sourdough bread.
7. Place 2 slices of bread buttered-side down in the skillet over medium-low heat.
8. Layer 2 slices of Swiss cheese on each piece of bread in the skillet.
9. Divide the cooked mushrooms evenly over the cheese on both sandwiches.
10. Top each sandwich with the remaining 2 slices of bread, buttered-side facing up.
11. Cook for 3-4 minutes until the bottom bread is golden brown and crispy.
12. Carefully flip each sandwich using a spatula.
13. Cook for another 3-4 minutes until the second side is golden brown and the cheese is completely melted.
14. Remove the sandwiches from the skillet and let them rest for 1 minute before slicing.
Let this sandwich cool just enough so you don’t burn your mouth—that melted Swiss cheese gets seriously hot! The crispy sourdough gives way to that earthy, savory mushroom filling that’s just bursting with flavor. Try serving it with a side of tomato soup for the ultimate cozy meal, or pack it cold for a next-day lunch that still tastes amazing.
Banana and Nutella Sandwich Pockets
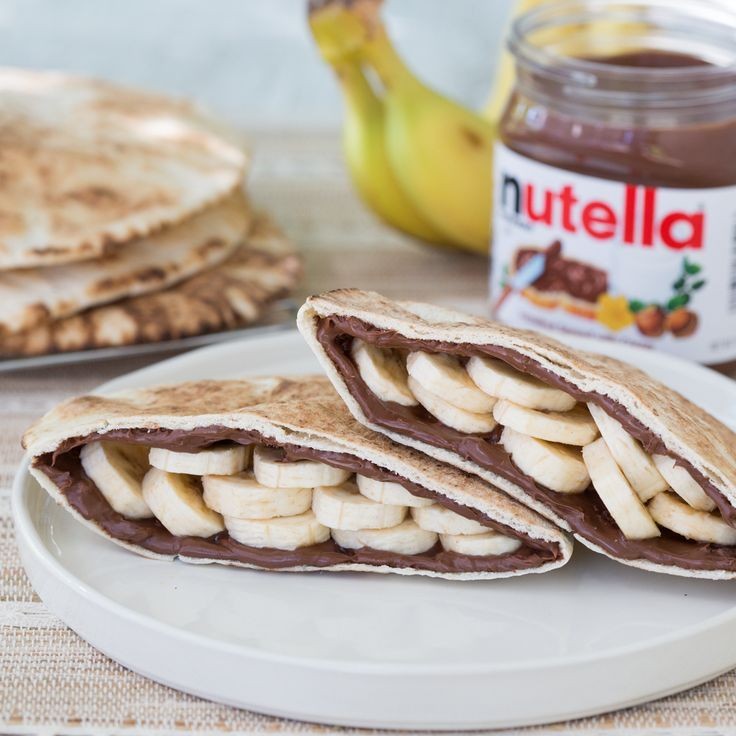
Zesty banana and creamy Nutella come together in these warm, crispy sandwich pockets that make the perfect quick treat. You’ll love how the sweet filling oozes out with each bite. They’re so simple to make, you can whip them up any time a craving strikes.
5
sandwiches5
minutes12
minutesIngredients
– 4 slices white bread
– 2 tablespoons Nutella
– 1 medium banana
– 2 tablespoons unsalted butter
– 1 tablespoon powdered sugar
Instructions
1. Lay 4 slices of white bread flat on a clean work surface.
2. Spread 1/2 tablespoon of Nutella evenly over one slice of bread, leaving a 1/2-inch border around the edges.
3. Slice the banana into 1/4-inch thick rounds and arrange them in a single layer over the Nutella-covered bread.
4. Place another slice of bread on top to create a sandwich, pressing gently around the edges.
5. Use a fork to firmly press and seal all four edges of the sandwich completely. This prevents the filling from leaking during cooking.
6. Melt 1 tablespoon of unsalted butter in a non-stick skillet over medium heat (350°F).
7. Carefully place two sealed sandwiches in the skillet and cook for 2-3 minutes until the bottom is golden brown and crispy.
8. Flip the sandwiches using a spatula and add the remaining 1 tablespoon of butter to the skillet.
9. Cook for another 2-3 minutes until the second side is equally golden brown and crispy. Watch for even browning to ensure perfect texture.
10. Transfer the cooked sandwich pockets to a wire rack to cool slightly, about 2 minutes.
11. Repeat steps 6-10 with the remaining two sandwiches.
12. Dust all four sandwich pockets evenly with 1 tablespoon of powdered sugar using a fine-mesh sieve.
So satisfying when you bite into that crispy exterior and find the warm, melted Nutella and soft banana inside. The contrast between the crunchy bread and gooey center is pure magic. Try serving them with a scoop of vanilla ice cream for an extra special dessert treat.
Conclusion
Elevate your everyday sliced bread with these 18 creative recipes that turn simple loaves into extraordinary meals! From savory French toast to gourmet grilled cheese, there’s something for every craving. We’d love to hear which recipes become your family favorites—drop us a comment below and don’t forget to share your bread transformations on Pinterest!