Ready to satisfy your sweet tooth without spending hours in the kitchen? You’ve come to the right place! We’ve gathered 25 irresistible recipes for quick and easy desserts that are perfect for busy weeknights, last-minute guests, or just because you deserve a treat. From no-bake delights to simple bakes, these desserts promise maximum flavor with minimal effort. Let’s dive in and find your next favorite sweet fix!
No-Bake Chocolate Hazelnut Tart
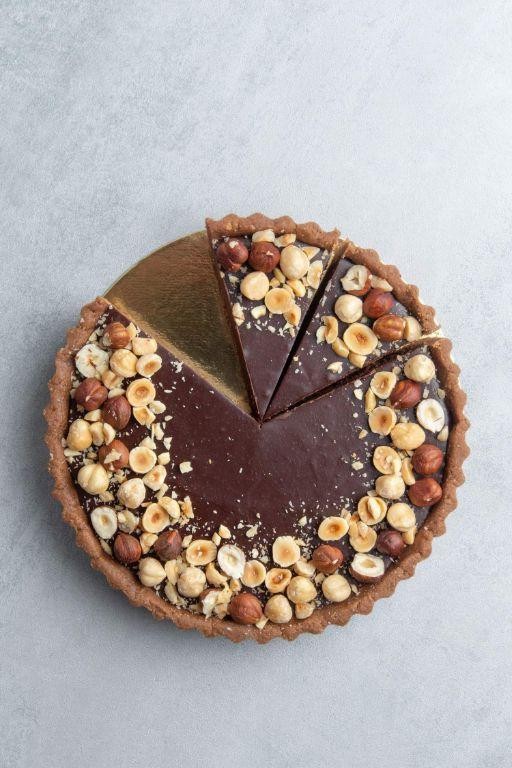
Last weekend, as I was scrolling through my phone looking for something sweet to make without turning on the oven, I stumbled upon the idea for this incredible no-bake tart. It’s the perfect solution for a hot day or when you just don’t feel like baking, and trust me, the rich chocolate-hazelnut flavor is absolutely worth it.
Serving: 8 | Pre Time: 25 minutes | Cooking Time: 0 minutes
Ingredients
– Chocolate wafer cookies – 1 ½ cups (crushed)
– Unsalted butter – 6 tbsp, melted
– Chocolate hazelnut spread – 1 ¼ cups
– Heavy cream – 1 cup
– Semi-sweet chocolate chips – 1 cup
– Chopped hazelnuts – ½ cup
Instructions
1. Place the chocolate wafer cookies in a zip-top bag and crush them into fine crumbs using a rolling pin until you have 1 ½ cups.
2. In a medium bowl, combine the crushed cookie crumbs with the 6 tbsp of melted unsalted butter until the mixture resembles wet sand. Tip: Press a small amount between your fingers—it should hold together without crumbling.
3. Firmly press the crumb mixture into the bottom and up the sides of a 9-inch tart pan with a removable bottom to form an even crust.
4. Place the crust in the refrigerator to chill and set for at least 15 minutes.
5. While the crust chills, pour 1 cup of heavy cream into a small saucepan and heat it over medium heat until it just begins to simmer, which should take about 3-4 minutes; do not let it boil.
6. Immediately remove the saucepan from the heat and add 1 cup of semi-sweet chocolate chips, stirring constantly until the chocolate is completely melted and the mixture is smooth.
7. Stir 1 ¼ cups of chocolate hazelnut spread into the warm chocolate mixture until fully incorporated. Tip: If the spread is stiff, warming it slightly in the microwave for 10 seconds can make blending easier.
8. Remove the chilled crust from the refrigerator and pour the chocolate-hazelnut filling into it, using a spatula to spread it evenly.
9. Sprinkle ½ cup of chopped hazelnuts evenly over the top of the filling. Tip: For extra crunch, toast the hazelnuts in a dry skillet over medium heat for 5 minutes, stirring frequently, before chopping and sprinkling.
10. Return the tart to the refrigerator and chill until completely set, which will take at least 4 hours or preferably overnight.
This tart sets into a wonderfully firm yet creamy texture that slices cleanly. The deep chocolate flavor pairs beautifully with the nutty crunch, making it a decadent treat. Try serving it with a dollop of whipped cream or a sprinkle of sea salt for an elegant finish.
5-Minute Strawberry Shortcake Cups

Gosh, I’ve been craving something sweet and fruity all week, but with my hectic schedule, I needed a dessert that comes together in a flash. That’s where these 5-Minute Strawberry Shortcake Cups come in—they’re my go-to when I want a treat without the fuss, and they remind me of the simple joys of summer picnics. Honestly, I love how they let me sneak in a little kitchen time between meetings, and they’re so easy that even my kids can help assemble them.
Serving: 4 | Pre Time: 5 minutes | Cooking Time: 0 minutes
Ingredients
– Pound cake – 4 slices
– Strawberries – 1 cup, sliced
– Whipped cream – 1 cup
– Honey – 2 tbsp
Instructions
1. Cut 4 slices of pound cake into 1-inch cubes using a sharp knife for clean edges. Tip: If the cake is slightly stale, it holds up better without getting soggy.
2. Place the cake cubes evenly into 4 serving cups or glasses, filling each about halfway.
3. Slice 1 cup of fresh strawberries into thin pieces, about ¼-inch thick, to ensure they layer nicely. Tip: Use ripe strawberries for the best natural sweetness.
4. In a small bowl, toss the sliced strawberries with 2 tbsp of honey until they’re lightly coated, which adds a glossy shine and enhances the flavor.
5. Spoon the honey-coated strawberries over the cake cubes in each cup, dividing them equally.
6. Top each cup with ¼ cup of whipped cream, spreading it gently to cover the strawberries. Tip: For extra fluffiness, whip the cream just before serving if you have time.
7. Serve immediately to enjoy the fresh, crisp texture. The combination of soft cake, juicy strawberries, and creamy topping creates a delightful balance—try adding a sprinkle of crushed graham crackers for a fun crunch, or layer it in a mason jar for a portable treat on the go.
Microwave Mug Brownie

Venturing into the kitchen after a long day, I often crave something sweet but lack the energy for a full baking session—that’s where this microwave mug brownie comes in, a lifesaver for those cozy, lazy evenings when only chocolate will do. It’s my go-to for a quick treat that feels indulgent without the fuss, and I love how it fills the house with that warm, comforting aroma in just minutes.
Serving: 1 | Pre Time: 2 minutes | Cooking Time: 1 minute
Ingredients
– All-purpose flour – 2 tbsp
– Granulated sugar – 2 tbsp
– Unsweetened cocoa powder – 1 tbsp
– Vegetable oil – 1 tbsp
– Milk – 1 tbsp
– Vanilla extract – ¼ tsp
– Salt – ⅛ tsp
Instructions
1. In a microwave-safe mug, combine the all-purpose flour, granulated sugar, unsweetened cocoa powder, and salt, whisking with a fork until fully blended to avoid lumps—this ensures a smooth batter.
2. Add the vegetable oil, milk, and vanilla extract to the mug, stirring vigorously with the fork for about 30 seconds until the mixture is thick and uniform; scrape the sides to incorporate all ingredients evenly.
3. Microwave the mug on high power for 60 seconds, checking at the 45-second mark—the brownie should look set on top but slightly moist in the center, as it will continue to cook from residual heat.
4. Carefully remove the mug from the microwave using an oven mitt, as it will be hot, and let it cool for 1-2 minutes before serving to prevent burns and allow the texture to firm up.
5. Enjoy the brownie directly from the mug for a cozy treat, or tip it onto a plate if preferred.
Decadently fudgy with a rich chocolate flavor, this brownie is perfect for satisfying those sudden cravings. I love topping it with a scoop of vanilla ice cream or a drizzle of caramel for an extra touch—it’s a simple delight that never disappoints.
Instant Oreo Cheesecake Parfaits
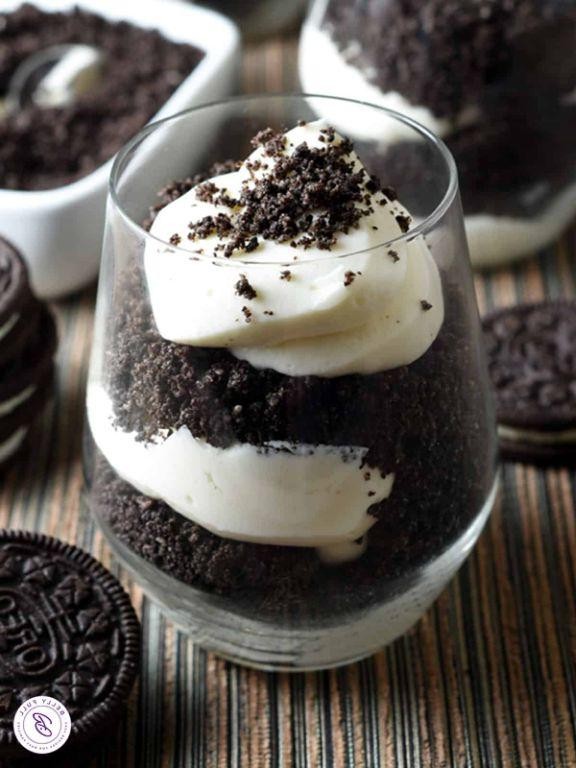
Oreo cheesecake in minutes? Yes, please! I whipped up these Instant Oreo Cheesecake Parfaits last weekend when a craving hit and friends dropped by unexpectedly. They’re my go-to for a no-bake, impressively easy dessert that feels indulgent but comes together with just a few ingredients from my pantry.
Serving: 4 | Pre Time: 15 minutes | Cooking Time: 0 minutes
Ingredients
– Cream cheese – 8 oz, softened
– Heavy cream – 1 cup
– Powdered sugar – ½ cup
– Vanilla extract – 1 tsp
– Oreo cookies – 16 cookies
Instructions
1. Place the softened cream cheese in a large mixing bowl and beat with an electric mixer on medium speed for 1 minute until smooth and creamy. Tip: Let the cream cheese sit at room temperature for 30 minutes beforehand to avoid lumps.
2. Add the powdered sugar and vanilla extract to the bowl and beat on medium speed for 1 minute until fully combined and fluffy.
3. In a separate large bowl, pour in the heavy cream and beat on high speed for 2–3 minutes until stiff peaks form. Tip: Chill the bowl and beaters in the freezer for 10 minutes first to help the cream whip faster.
4. Gently fold the whipped cream into the cream cheese mixture using a spatula until no white streaks remain, being careful not to deflate the mixture.
5. Place 12 Oreo cookies in a zip-top bag, seal it, and crush them into coarse crumbs using a rolling pin or the bottom of a heavy glass.
6. In serving glasses or jars, layer 1 tablespoon of the crushed Oreos, followed by ¼ cup of the cheesecake mixture, repeating until you have two layers of each, ending with cheesecake on top. Tip: For neat layers, use the back of a spoon to gently press down each cheesecake layer before adding the next.
7. Crush the remaining 4 Oreo cookies finely and sprinkle them evenly over the top of each parfait.
8. Refrigerate the parfaits for at least 1 hour before serving to allow the flavors to meld and the texture to set.
This dessert is all about that creamy, rich cheesecake filling paired with the satisfying crunch of Oreo layers. The texture is luxuriously smooth with just the right amount of cookie bite, and for a fun twist, try drizzling chocolate sauce between layers or topping with fresh berries for a pop of color.
Simple Berry Fool
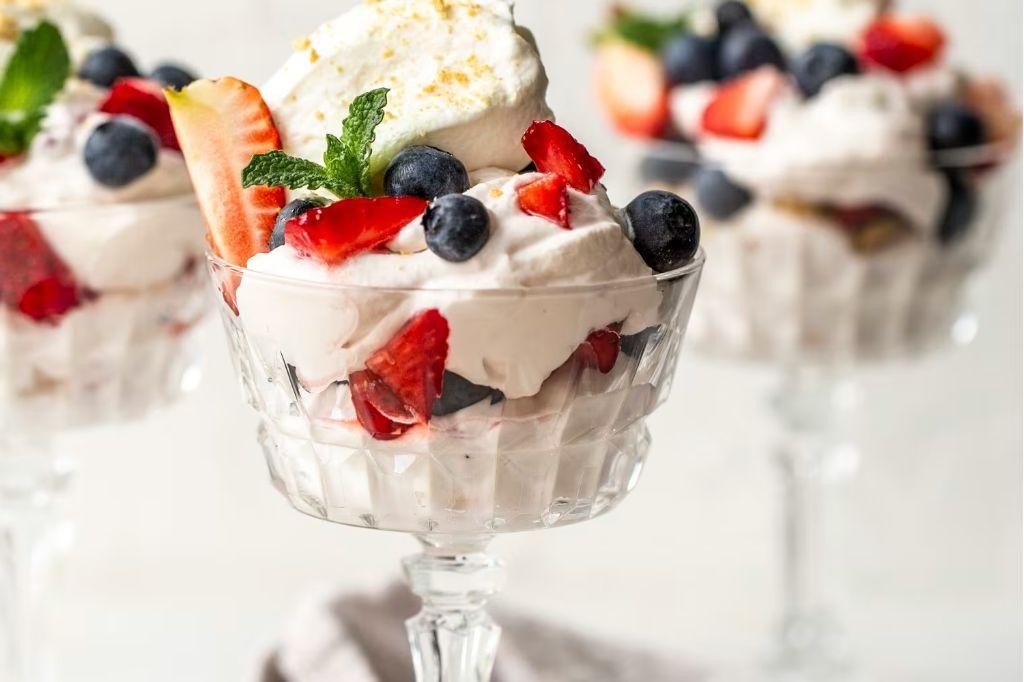
Zipping through my recipe archives, I stumbled upon this gem I used to whip up during my college days when I needed a quick, impressive dessert without breaking the bank. It’s the kind of no-fuss treat that reminds me of lazy summer afternoons at my grandma’s house, where simple ingredients always turned into something magical.
Serving: 4 | Pre Time: 15 minutes | Cooking Time: 0 minutes
Ingredients
– Heavy cream – 1 cup
– Granulated sugar – ¼ cup
– Mixed berries – 2 cups
– Vanilla extract – 1 tsp
Instructions
1. Place 2 cups of mixed berries in a medium bowl and mash them thoroughly with a fork until they are juicy and broken down, leaving some small chunks for texture. Tip: If your berries are frozen, thaw them first at room temperature for about 30 minutes to make mashing easier and release more natural juices.
2. In a separate large mixing bowl, pour 1 cup of heavy cream and add ¼ cup of granulated sugar and 1 tsp of vanilla extract.
3. Using an electric mixer on medium-high speed, whip the cream mixture for 3 to 4 minutes until it forms stiff peaks that hold their shape when the beaters are lifted. Tip: Chill your mixing bowl and beaters in the freezer for 10 minutes before whipping to help the cream thicken faster and prevent it from turning grainy.
4. Gently fold the mashed berries into the whipped cream with a spatula, using a circular motion until just combined, with streaks of berry visible. Tip: Avoid overmixing to keep the fool light and fluffy; stop as soon as the ingredients are incorporated to maintain that airy texture.
5. Divide the mixture evenly among 4 serving glasses or bowls.
6. Refrigerate the desserts for at least 1 hour to allow the flavors to meld and the texture to set slightly.
Kicking back with this berry fool, you’ll love how the creamy, pillowy whipped cream contrasts with the bright, tangy bursts of berry. It’s delightfully light yet satisfying, perfect for serving in mason jars for a rustic touch or topping with a sprinkle of crushed graham crackers for extra crunch.
Vanilla Pudding with Caramel Drizzle
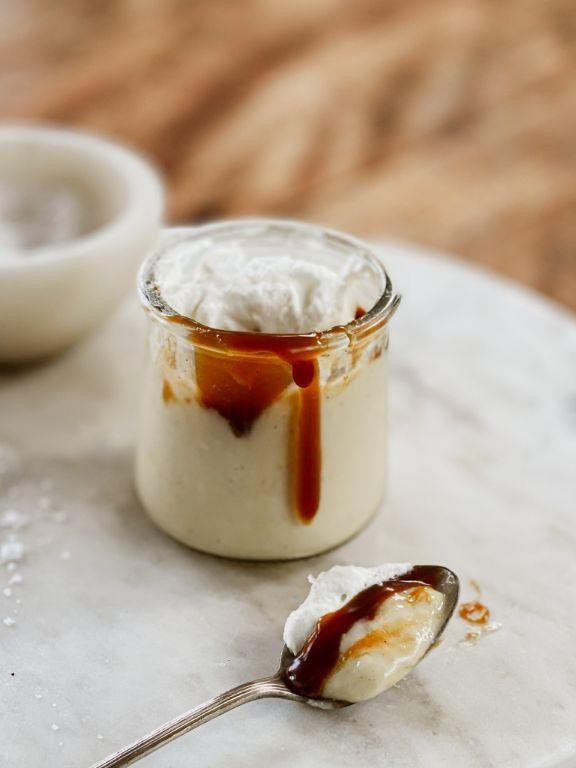
Sometimes the simplest desserts are the most satisfying, especially when you need a little comfort. I love making this vanilla pudding when I want something creamy and nostalgic—it reminds me of my grandma’s kitchen, where she’d always have a bowl chilling in the fridge. The caramel drizzle adds just the right touch of indulgence without being overly fussy.
Serving: 4 | Pre Time: 10 minutes | Cooking Time: 15 minutes
Ingredients
– Whole milk – 2 cups
– Granulated sugar – ½ cup
– Cornstarch – ¼ cup
– Egg yolks – 2
– Unsalted butter – 2 tbsp
– Vanilla extract – 1 tsp
– Heavy cream – ¼ cup
– Light brown sugar – ¼ cup
Instructions
1. In a medium saucepan, whisk together 1½ cups of the whole milk and the granulated sugar over medium heat until the sugar dissolves and the mixture is warm to the touch, about 3–4 minutes.
2. In a separate bowl, whisk the cornstarch into the remaining ½ cup of whole milk until completely smooth to prevent lumps in the pudding.
3. Slowly pour the cornstarch mixture into the warm milk in the saucepan, whisking constantly to combine evenly.
4. Cook the mixture over medium heat, stirring continuously with a wooden spoon, until it thickens and large bubbles break the surface, about 5–7 minutes; this ensures it reaches the proper pudding consistency.
5. Remove the saucepan from the heat and quickly whisk in the egg yolks one at a time until fully incorporated to avoid curdling.
6. Stir in the unsalted butter and vanilla extract until the butter melts and the mixture is smooth and glossy.
7. Pour the pudding into four individual serving bowls or a large dish, cover the surface directly with plastic wrap to prevent a skin from forming, and refrigerate for at least 2 hours until set and chilled.
8. For the caramel drizzle, combine the heavy cream and light brown sugar in a small saucepan over medium heat, stirring constantly until the sugar dissolves and the mixture simmers gently, about 2–3 minutes; let it cool slightly to thicken.
9. Drizzle the caramel over the chilled pudding just before serving.
You’ll love the silky, custard-like texture of this pudding paired with the rich, buttery caramel—it’s pure comfort in a bowl. Try topping it with a sprinkle of sea salt or fresh berries for a fun twist that balances the sweetness perfectly.
Quick Lemon Mousse
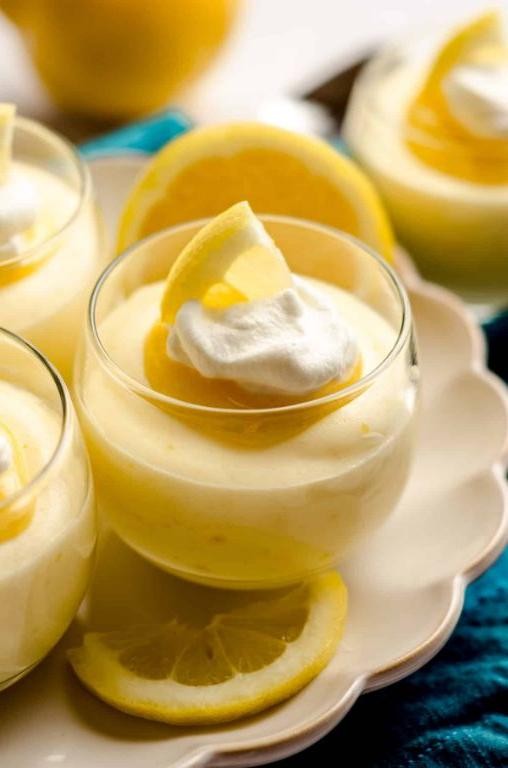
Just when I thought my week couldn’t get any busier, I stumbled upon this lifesaver of a dessert while cleaning out my grandma’s old recipe box. Quick Lemon Mousse is the perfect pick-me-up for when you need something bright and creamy without spending hours in the kitchen—trust me, I’ve been there more times than I’d like to admit!
Serving: 4 | Pre Time: 15 minutes | Cooking Time: 0 minutes
Ingredients
– Heavy cream – 1 cup
– Lemon juice – ¼ cup
– Granulated sugar – ½ cup
– Cream cheese – 8 oz
Instructions
1. Place the heavy cream in a large mixing bowl and beat it with an electric mixer on high speed for 3–4 minutes, until stiff peaks form (a tip: chill your bowl and beaters in the freezer for 10 minutes first for faster whipping).
2. In a separate medium bowl, combine the cream cheese and granulated sugar, then beat them together on medium speed for 2 minutes until smooth and creamy.
3. Gradually pour the lemon juice into the cream cheese mixture while beating on low speed for 1 minute, scraping down the sides of the bowl with a spatula to ensure it’s fully incorporated.
4. Gently fold the whipped cream into the lemon-cream cheese mixture using a rubber spatula, making slow, sweeping motions to keep the mixture light and airy (another tip: avoid overmixing to prevent deflating the cream).
5. Divide the mousse evenly among 4 serving glasses or bowls, then refrigerate them for at least 2 hours to set properly (a final tip: cover the glasses with plastic wrap to prevent a skin from forming on top).
But the real magic happens after that chill—this mousse transforms into a cloud-like treat with a tangy lemon zing that’s not too sweet. I love serving it with a sprinkle of crushed graham crackers or fresh berries for a little crunch, and it always disappears faster than I can say “dessert time!”
Easy Peach Cobbler with Biscuit Topping
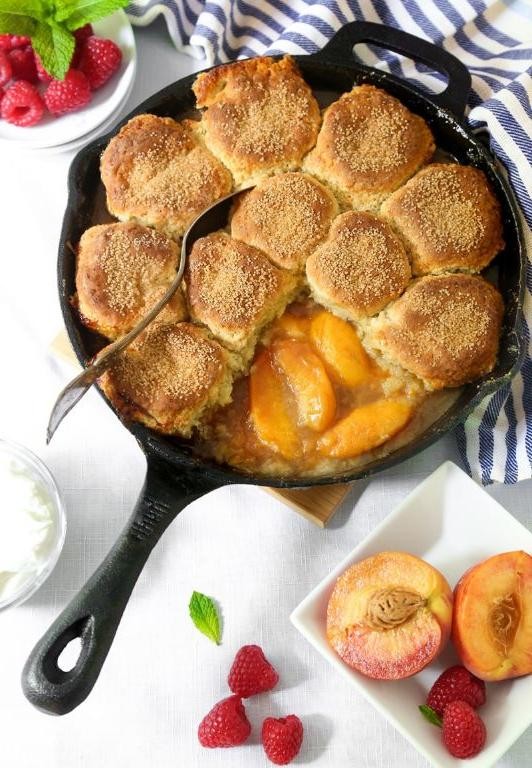
Warm summer afternoons always make me crave something sweet and comforting, and this easy peach cobbler with a fluffy biscuit topping is my go-to treat. I love how the juicy peaches bubble up around the golden biscuits, filling the kitchen with that irresistible cinnamon-sugar aroma. It’s the kind of dessert that feels like a hug in a baking dish—perfect for lazy weekends or last-minute gatherings.
Serving: 8 | Pre Time: 15 minutes | Cooking Time: 45 minutes
Ingredients
- Peaches – 6 cups, sliced
- Sugar – 1 cup
- Flour – 1 cup
- Baking powder – 2 tsp
- Salt – ½ tsp
- Milk – ¾ cup
- Butter – ½ cup, melted
- Cinnamon – 1 tsp
Instructions
- Preheat your oven to 375°F and grease a 9×13-inch baking dish.
- Spread the sliced peaches evenly in the prepared baking dish.
- Sprinkle ½ cup of the sugar and the cinnamon over the peaches, tossing gently to coat them evenly.
- In a medium bowl, whisk together the flour, remaining ½ cup of sugar, baking powder, and salt until well combined.
- Pour the milk and melted butter into the dry ingredients, stirring just until a thick batter forms—be careful not to overmix, as this keeps the biscuits tender.
- Drop spoonfuls of the batter over the peaches, covering them in an even layer but leaving small gaps for the juices to bubble through.
- Bake in the preheated oven for 45 minutes, or until the topping is golden brown and a toothpick inserted into the biscuit part comes out clean.
- Let the cobbler cool on a wire rack for 10 minutes before serving to allow the filling to thicken slightly.
Here’s the magic: the biscuits soak up just enough of the syrupy peach juices while staying fluffy on top, creating a delightful contrast of textures. I love serving it warm with a scoop of vanilla ice cream that melts into the crevices, or for a twist, try it with a dollop of whipped cream and a sprinkle of toasted almonds for extra crunch.
Chocolate-Covered Marshmallow Bites

Crafting these chocolate-covered marshmallow bites always brings back memories of rainy afternoons in my grandmother’s kitchen—they’re the perfect blend of nostalgic comfort and effortless fun. With just three ingredients and minimal prep, you can whip up a batch that’ll disappear faster than you can say “s’mores.” I love making these when I need a quick sweet fix without turning on the oven, and they’re a hit at every potluck I’ve brought them to.
Serving: 24 bites | Pre Time: 15 minutes | Cooking Time: 5 minutes
Ingredients
– Mini marshmallows – 24 pieces
– Semi-sweet chocolate chips – 1 cup
– Vegetable shortening – 1 tbsp
Instructions
1. Line a baking sheet with parchment paper and set it aside on your counter.
2. Place the chocolate chips and vegetable shortening in a microwave-safe bowl.
3. Microwave the mixture on high for 30 seconds, then stir thoroughly with a spatula.
4. Repeat microwaving in 15-second intervals, stirring after each, until the chocolate is completely melted and smooth—this usually takes about 60–90 seconds total. Tip: Avoid overheating, as chocolate can seize and become grainy; if it starts to look thick, stop microwaving and stir vigorously to melt any remaining chips.
5. Using a fork or dipping tool, dip each mini marshmallow into the melted chocolate, coating it entirely.
6. Tap the fork gently against the bowl’s edge to remove excess chocolate, which helps prevent pooling on the parchment.
7. Place each coated marshmallow onto the prepared baking sheet, spacing them about 1 inch apart.
8. Let the bites sit at room temperature for 30–45 minutes until the chocolate hardens completely. Tip: For a quicker set, you can refrigerate them for 15 minutes, but bring them to room temperature before serving to avoid condensation making the chocolate sticky.
9. Once hardened, use a thin spatula to carefully lift the bites off the parchment paper. Tip: If any chocolate sticks, gently slide the spatula underneath; storing them in an airtight container at room temperature keeps them fresh for up to a week.
Zesty and delightfully simple, these bites offer a satisfying crunch from the firm chocolate shell that gives way to a soft, pillowy marshmallow center. I love sprinkling them with a pinch of sea salt or crushed nuts before the chocolate sets for an extra flavor boost, or serving them alongside fresh berries for a playful dessert platter.
Raspberry Almond Crumble
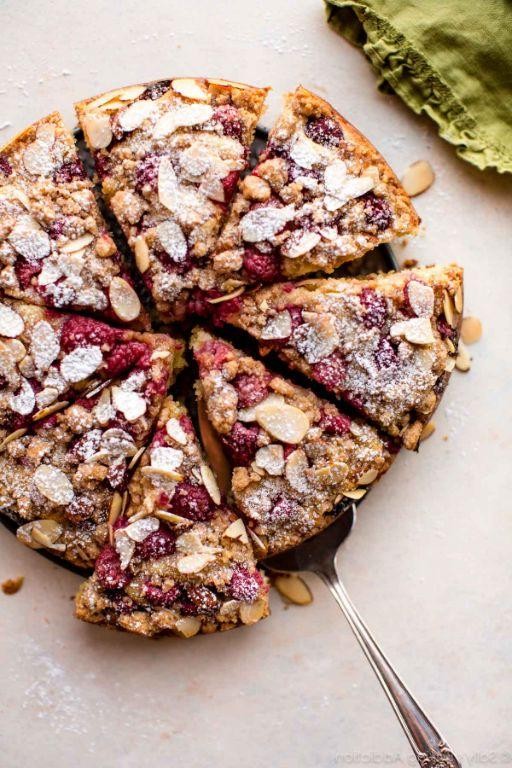
Nothing says cozy comfort like a warm fruit dessert, especially when it’s this simple Raspberry Almond Crumble. I first made it for a last-minute potluck and now it’s my go-to when I need something impressive but effortless—it always disappears before I can get a second helping!
Serving: 6 | Pre Time: 15 minutes | Cooking Time: 35 minutes
Ingredients
– Fresh raspberries – 4 cups
– Granulated sugar – ½ cup
– All-purpose flour – 1 cup
– Old-fashioned rolled oats – ½ cup
– Sliced almonds – ½ cup
– Unsalted butter – ½ cup (1 stick)
– Light brown sugar – ⅓ cup
– Ground cinnamon – 1 tsp
– Salt – ¼ tsp
Instructions
1. Preheat your oven to 375°F (190°C) and lightly grease an 8×8-inch baking dish.
2. In a large bowl, combine the fresh raspberries and granulated sugar, then spread this mixture evenly into the prepared baking dish.
3. In a separate medium bowl, whisk together the all-purpose flour, old-fashioned rolled oats, sliced almonds, light brown sugar, ground cinnamon, and salt until fully combined.
4. Cut the unsalted butter into small cubes and add them to the dry mixture. Use your fingers or a pastry cutter to work the butter into the flour mixture until it resembles coarse crumbs with some pea-sized pieces remaining—this creates that perfect crumbly texture.
5. Sprinkle the crumb topping evenly over the raspberry layer in the baking dish, covering it completely.
6. Place the baking dish in the preheated oven and bake for 30–35 minutes, or until the topping is golden brown and the raspberry filling is bubbling around the edges.
7. Remove the crumble from the oven and let it cool on a wire rack for at least 15 minutes before serving to allow the filling to set slightly.
8. Serve the crumble warm, optionally with a scoop of vanilla ice cream or a dollop of whipped cream on top.
Ultimately, this dessert is all about contrasts: the juicy, tart raspberries soften into a vibrant jam beneath the crisp, buttery oat and almond topping. I love how the sliced almonds add a subtle crunch that plays off the tender fruit. For a fun twist, try serving individual portions in small mason jars—it makes for a charming, portable treat that’s perfect for picnics or gifting to friends.
Coconut Chia Seed Pudding
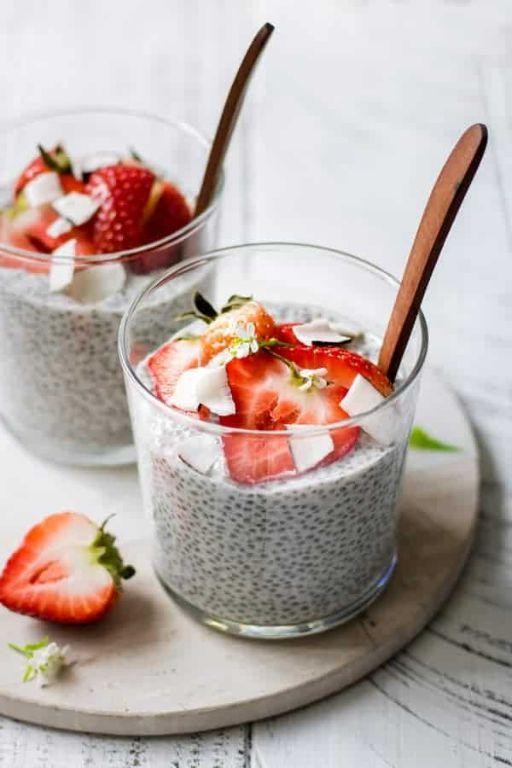
Waking up to a creamy, dreamy breakfast that practically makes itself overnight is my kind of morning magic. I stumbled upon this coconut chia seed pudding during a hectic week when I needed a grab-and-go option, and now it’s a staple in my fridge—it’s the perfect make-ahead treat for busy days or a sweet, healthy dessert.
Serving: 2 | Pre Time: 5 minutes | Cooking Time: 0 minutes
Ingredients
- Canned coconut milk – 1 cup
- Chia seeds – ¼ cup
- Maple syrup – 2 tbsp
- Vanilla extract – 1 tsp
Instructions
- Pour 1 cup of canned coconut milk into a medium-sized mixing bowl or a jar with a lid.
- Add ¼ cup of chia seeds to the coconut milk in the bowl.
- Measure and pour 2 tablespoons of maple syrup into the mixture.
- Add 1 teaspoon of vanilla extract to the bowl. Tip: Use pure vanilla extract for the best flavor, as imitation can taste artificial.
- Whisk all the ingredients together vigorously for about 1 minute until fully combined and no clumps of chia seeds remain. Tip: Whisking well prevents the seeds from clumping and ensures a smooth texture.
- Cover the bowl tightly with plastic wrap or seal the jar lid.
- Place the covered mixture in the refrigerator for at least 4 hours, or preferably overnight for 8 hours. Tip: Letting it sit overnight allows the chia seeds to fully absorb the liquid and thicken perfectly.
- After chilling, remove the pudding from the refrigerator and give it a quick stir to check consistency.
- Divide the pudding evenly between two serving bowls or jars.
- Serve immediately, or store covered in the refrigerator for up to 3 days.
Delightfully thick and pudding-like, this treat has a subtle coconut sweetness with a satisfying gel-like texture from the chia seeds. I love topping it with fresh berries or a sprinkle of toasted coconut for extra crunch, making it a versatile base for endless creative variations.
Effortless Banana Split Sundae

You know those days when you’re craving something sweet and nostalgic, but you just can’t muster the energy for a complicated dessert? Yeah, me too—that’s exactly why I keep this effortless banana split sundae in my back pocket. It’s my go-to for turning a simple craving into a little moment of joy without any fuss.
Serving: 1 | Pre Time: 5 minutes | Cooking Time: 0 minutes
Ingredients
– Banana – 1 large
– Vanilla ice cream – 1 scoop
– Chocolate syrup – 2 tbsp
– Whipped cream – 2 tbsp
– Maraschino cherry – 1
Instructions
1. Peel the banana and slice it in half lengthwise using a sharp knife, placing the halves side by side in a long dish.
2. Scoop the vanilla ice cream directly between the banana halves, pressing gently so it sits snugly—this helps prevent melting too quickly.
3. Drizzle the chocolate syrup evenly over the ice cream and banana, aiming for a zigzag pattern to cover everything nicely.
4. Spoon the whipped cream on top of the sundae, creating a fluffy mound that contrasts with the rich chocolate.
5. Place the maraschino cherry carefully on the peak of the whipped cream to finish the presentation.
6. Serve immediately to enjoy the cold, creamy texture before the ice cream softens.
Cool and creamy, this sundae hits all the classic notes with its soft banana, smooth ice cream, and sweet chocolate drizzle. For a fun twist, try adding a sprinkle of crushed nuts or swapping the chocolate syrup for caramel—it’s endlessly adaptable to whatever you’re craving.
Swift Chocolate Peanut Butter Bars
Remember those frantic afternoons when you need a sweet fix but don’t have hours to spend in the kitchen? I’ve been there more times than I can count, which is exactly why I developed these Swift Chocolate Peanut Butter Bars—they come together in a flash and satisfy every craving.
Serving: 16 | Pre Time: 15 minutes | Cooking Time: 25 minutes
Ingredients
– Graham cracker crumbs – 2 cups
– Unsalted butter – ½ cup
– Creamy peanut butter – 1 cup
– Semi-sweet chocolate chips – 2 cups
– Sweetened condensed milk – 1 (14 oz) can
Instructions
1. Preheat your oven to 350°F and line an 8×8-inch baking pan with parchment paper, leaving an overhang on two sides for easy removal later—this is my favorite trick for no-stress bars.
2. Melt the unsalted butter in a medium microwave-safe bowl by heating it in 30-second intervals, stirring between each, until fully liquid, about 1 minute total.
3. Combine the graham cracker crumbs with the melted butter in a large mixing bowl, stirring with a fork until the mixture resembles wet sand and holds together when pressed.
4. Firmly press the crumb mixture evenly into the bottom of the prepared pan using the bottom of a measuring cup to create a compact, level base for your layers.
5. Spread the creamy peanut butter in an even layer over the crumb base, using an offset spatula for smooth coverage—if your peanut butter is stiff, a quick 10-second microwave warm-up makes it easier to spread.
6. Sprinkle the semi-sweet chocolate chips evenly over the peanut butter layer, ensuring they cover the surface completely for a rich chocolate finish.
7. Pour the sweetened condensed milk evenly over the chocolate chips, tilting the pan gently to help it seep into all the gaps and coat everything thoroughly.
8. Bake in the preheated oven for 20–25 minutes, until the edges are lightly golden and the center appears set but still slightly soft—it will firm up as it cools, so avoid overbaking.
9. Remove the pan from the oven and let it cool completely on a wire rack for at least 2 hours, then refrigerate for 1 hour to ensure clean cuts when slicing.
10. Use the parchment overhang to lift the bars from the pan, place them on a cutting board, and slice into 16 squares with a sharp knife wiped clean between cuts for neat edges.
Zesty and decadent, these bars boast a fudgy, chewy texture with a perfect salty-sweet balance from the peanut butter and chocolate. I love serving them slightly chilled for a firmer bite or at room temperature for a gooier treat—they’re also fantastic crumbled over vanilla ice cream for an instant dessert upgrade.
Conclusion
You’ve just discovered a treasure trove of 25 irresistible desserts that prove delicious doesn’t have to be difficult. From no-bake wonders to quick bakes, there’s something sweet for every craving and occasion. We’d love to hear which recipes become your new favorites—drop a comment below! If you enjoyed this roundup, please share the sweet inspiration with fellow bakers on Pinterest. Happy baking!