Making appetizers shouldn’t be complicated or time-consuming—especially when you’re hosting friends or craving a tasty snack. Whether you’re planning a party or just want something delicious to munch on, these 31 easy appetizer recipes have you covered with minimal effort and maximum flavor. Get ready to impress your guests (and yourself!) with these simple yet sensational bites.
Spinach and Artichoke Dip
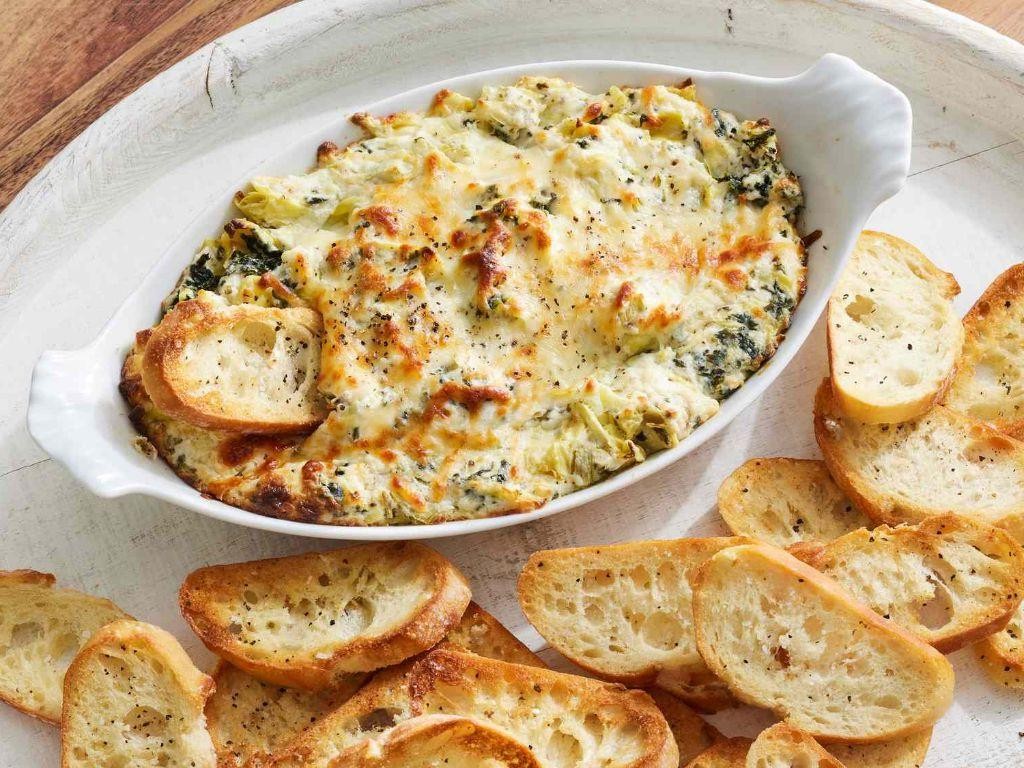
Back when I first started hosting game nights, I quickly learned that nothing brings people together quite like a warm, cheesy dip. This spinach and artichoke dip has become my go-to recipe after years of tweaking – it’s the one dish that always disappears first, no matter the crowd. I love making it on Sunday afternoons while prepping for the week ahead, and the aroma of garlic and melting cheese filling my kitchen is pure comfort.
8
servings20
minutes30
minutesIngredients
– 1 package (10 oz) frozen chopped spinach
– 1 can (14 oz) artichoke hearts
– 1 cup mayonnaise
– 1 cup sour cream
– 1 cup grated Parmesan cheese
– 1 cup shredded mozzarella cheese
– 1/2 cup cream cheese
– 2 cloves garlic
– 1 tsp lemon juice
– 1/2 tsp black pepper
– 1/4 tsp salt
Instructions
1. Thaw the frozen spinach completely in the refrigerator for 4 hours or overnight.
2. Preheat your oven to 375°F.
3. Drain the thawed spinach thoroughly by squeezing it in a clean kitchen towel until no liquid remains.
4. Drain the canned artichoke hearts and chop them into 1/2-inch pieces.
5. Mince the garlic cloves finely.
6. Combine the mayonnaise, sour cream, Parmesan cheese, mozzarella cheese, and cream cheese in a large mixing bowl.
7. Add the drained spinach, chopped artichokes, minced garlic, lemon juice, black pepper, and salt to the bowl.
8. Mix all ingredients thoroughly until well combined and no streaks of individual ingredients remain.
9. Transfer the mixture to a 9-inch baking dish and spread it evenly with a spatula.
10. Bake at 375°F for 25-30 minutes until the edges are bubbling and the top develops golden brown spots.
11. Remove from the oven and let it rest for 5 minutes before serving. Seriously, that creamy texture comes together perfectly when you let it settle for a moment. Something magical happens when those cheeses melt together into that perfect dip consistency. Serve it with crispy tortilla chips for that satisfying crunch contrast, or spread it on toasted baguette slices for an elegant appetizer – either way, it’s guaranteed to be the star of your gathering.
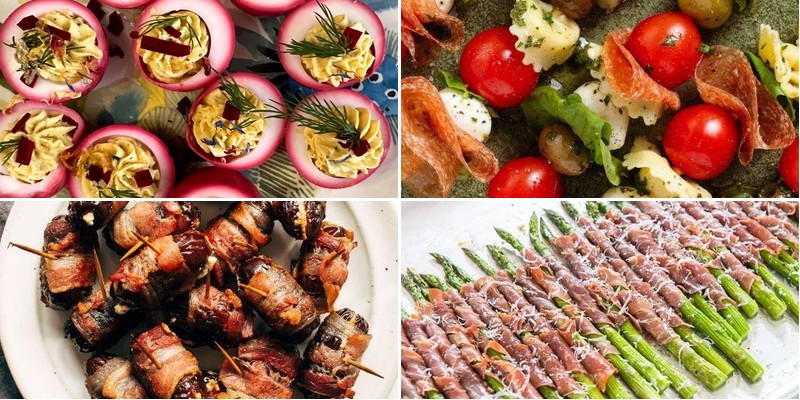
Caprese Salad Skewers

Sometimes the simplest recipes are the ones that steal the show at gatherings, and these Caprese Salad Skewers are my go-to when I need something elegant yet effortless. I first started making these for my book club meetings after realizing how much time I was spending in the kitchen instead of chatting with friends—now they’re requested at every potluck! Seriously, if you can thread items onto a stick, you can make these stunning appetizers that look far more impressive than the minimal effort required.
12
skewers15
minutesIngredients
– 1 pint cherry tomatoes
– 8 ounces fresh mozzarella balls (ciliegine size)
– 1/4 cup fresh basil leaves
– 2 tablespoons extra virgin olive oil
– 1 tablespoon balsamic glaze
– 1/4 teaspoon sea salt
– 1/8 teaspoon black pepper
Instructions
1. Rinse 1 pint cherry tomatoes under cool running water and pat completely dry with paper towels.
2. Drain 8 ounces fresh mozzarella balls from their liquid and pat dry with separate paper towels to prevent sogginess.
3. Select 1/4 cup fresh basil leaves that are similar in size for uniform skewers, avoiding any wilted or discolored leaves.
4. Thread one cherry tomato onto a 6-inch wooden skewer, pushing it about halfway down the stick.
5. Add one fresh mozzarella ball directly next to the tomato on the same skewer.
6. Fold one basil leaf in half and thread it onto the skewer next to the mozzarella ball.
7. Repeat steps 4-6 with remaining ingredients until all skewers contain one tomato, one mozzarella ball, and one basil leaf each.
8. Arrange completed skewers in a single layer on a serving platter.
9. Drizzle 2 tablespoons extra virgin olive oil evenly over all skewers, making sure each gets a light coating.
10. Drizzle 1 tablespoon balsamic glaze in a zigzag pattern across the skewers for both flavor and visual appeal.
11. Sprinkle 1/4 teaspoon sea salt uniformly over the entire platter.
12. Finish with 1/8 teaspoon black pepper distributed evenly across all skewers.
The cool, creamy mozzarella against the juicy burst of tomatoes creates such a satisfying texture contrast, while the basil adds that fresh herbal punch that makes this combination timeless. I love serving these arranged in a sunburst pattern on a large wooden board—they disappear within minutes every time!
Stuffed Mushrooms with Cheese

These stuffed mushrooms with cheese have become my go-to appetizer for everything from holiday parties to casual game nights. I first discovered this recipe when my neighbor brought them over during a potluck, and now I make them so often I could probably prepare them blindfolded!
16
mushrooms25
minutes31
minutesIngredients
- 16 large white mushrooms
- 2 tablespoons olive oil
- 1/2 cup finely chopped onion
- 2 cloves garlic, minced
- 4 ounces cream cheese, softened
- 1/2 cup grated Parmesan cheese
- 1/4 cup breadcrumbs
- 1 tablespoon fresh parsley, chopped
- 1/4 teaspoon salt
- 1/8 teaspoon black pepper
Instructions
- Preheat your oven to 375°F and line a baking sheet with parchment paper.
- Gently twist the mushroom stems to remove them from the caps, being careful not to break the caps.
- Finely chop the mushroom stems and set aside.
- Heat olive oil in a skillet over medium heat until shimmering, about 1 minute.
- Sauté chopped onion for 3-4 minutes until translucent and fragrant.
- Add minced garlic and cook for 1 minute until golden but not browned.
- Stir in the chopped mushroom stems and cook for 5-6 minutes until they release their moisture and become tender.
- Transfer the mushroom mixture to a mixing bowl and let it cool for 5 minutes.
- Add softened cream cheese, Parmesan cheese, breadcrumbs, parsley, salt, and pepper to the bowl.
- Mix all ingredients thoroughly until well combined and the filling holds together when pressed.
- Spoon the filling mixture into each mushroom cap, mounding it slightly in the center.
- Arrange the stuffed mushrooms on the prepared baking sheet, spacing them about 1 inch apart.
- Bake for 18-20 minutes until the mushrooms are tender and the filling is golden brown on top.
- Let the mushrooms rest for 3-4 minutes before serving to allow the filling to set.
Out of the oven, these mushrooms offer the perfect contrast between the tender caps and the creamy, savory filling. The Parmesan creates a beautiful golden crust while the cream cheese keeps the interior wonderfully rich and smooth. I love serving these alongside a crisp white wine or as part of a larger appetizer spread with other bite-sized treats.
Prosciutto-Wrapped Asparagus
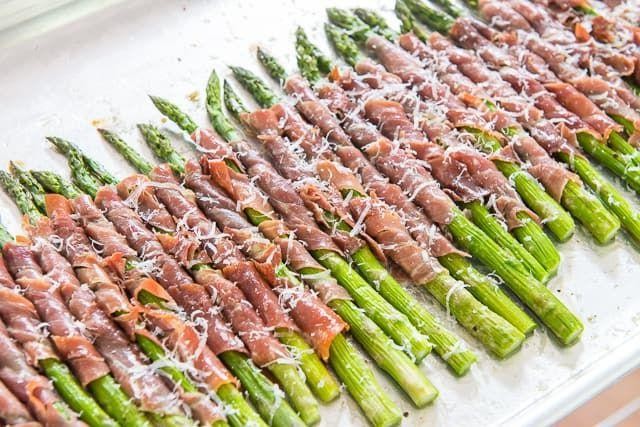
Baking prosciutto-wrapped asparagus always reminds me of those frantic holiday gatherings where I need an impressive appetizer that won’t keep me tied to the kitchen. There’s something magical about how the salty prosciutto crisps up around tender asparagus spears – it’s become my go-to dish when I want to look fancy with minimal effort.
8
bundles10
minutes15
minutesIngredients
– 1 pound fresh asparagus spears
– 8 thin slices prosciutto
– 2 tablespoons olive oil
– 1/2 teaspoon black pepper
– 1/4 teaspoon garlic powder
Instructions
1. Preheat your oven to 400°F and line a baking sheet with parchment paper.
2. Trim the tough ends from the asparagus spears by bending each spear until it snaps naturally at the tender point.
3. Divide the asparagus into 8 equal bundles, each containing 4-5 spears depending on thickness.
4. Wrap one slice of prosciutto around the middle of each asparagus bundle, overlapping the ends slightly.
5. Arrange the wrapped bundles in a single layer on the prepared baking sheet, making sure they don’t touch each other.
6. Drizzle the olive oil evenly over all the bundles, using a pastry brush to coat any dry spots for even browning.
7. Sprinkle the black pepper and garlic powder evenly over the bundles.
8. Bake at 400°F for 12-15 minutes until the prosciutto is crispy and the asparagus is tender when pierced with a fork.
9. Remove from oven and let rest for 2 minutes before serving to allow the asparagus to firm up slightly.
The contrast between the crispy, salty prosciutto and the tender, slightly sweet asparagus creates an addictive texture that disappears within minutes at any gathering. I love serving these alongside a creamy dip or arranged dramatically on a wooden board for holiday parties – they always earn compliments despite their simplicity.
Mini Caprese Sandwiches

Holiday parties always leave me scrambling for impressive yet simple appetizers, and these Mini Caprese Sandwiches have become my absolute go-to. I first made them for a last-minute Friendsgiving gathering, and now they’re requested at every potluck—they’re that perfect balance of elegant and effortless.
1
loaf15
minutes10
minutesIngredients
– 1 loaf French baguette
– 8 oz fresh mozzarella cheese
– 2 large ripe tomatoes
– 1/2 cup fresh basil leaves
– 3 tbsp extra virgin olive oil
– 1 tbsp balsamic glaze
– 1/2 tsp sea salt
– 1/4 tsp black pepper
Instructions
1. Preheat your oven to 375°F.
2. Slice the French baguette into 1/2-inch thick rounds using a serrated knife for clean cuts.
3. Arrange the bread slices in a single layer on a baking sheet.
4. Brush each bread slice lightly with 2 tablespoons of olive oil using a pastry brush.
5. Bake the bread slices for 8-10 minutes until golden brown and crisp around the edges.
6. Remove the toasted bread from the oven and let cool completely on a wire rack.
7. Slice the fresh mozzarella into 1/4-inch thick pieces that match the size of your bread rounds.
8. Cut the tomatoes into 1/4-inch thick slices, patting them dry with paper towels to prevent sogginess.
9. Layer one mozzarella slice onto each cooled bread round.
10. Top each mozzarella slice with one tomato slice.
11. Place one fresh basil leaf on top of each tomato slice.
12. Drizzle the remaining 1 tablespoon of olive oil evenly over all the sandwiches.
13. Drizzle the balsamic glaze in a zigzag pattern across the sandwiches.
14. Sprinkle sea salt and black pepper evenly over the finished sandwiches.
15. Serve immediately or cover lightly and refrigerate for up to 2 hours.
What makes these little sandwiches so magical is how the crisp bread contrasts with the creamy mozzarella and juicy tomatoes. The balsamic glaze adds just enough sweetness to balance the fresh basil, creating that classic Caprese flavor in perfect bite-sized form. For an extra festive touch, I sometimes arrange them on a platter with small flags identifying them—they disappear faster than any other appetizer I’ve ever served.
Honey Garlic Shrimp Bites

Honey garlic shrimp bites are one of those recipes that always disappears faster than I can make them! Having hosted countless game day parties and casual get-togethers, I’ve found these little bites strike the perfect balance between sweet, savory, and downright addictive—plus, they come together in under 20 minutes, which is a lifesaver when you’re juggling guests and snacks.
4
servings10
minutes8
minutesIngredients
– 1 lb raw medium shrimp, peeled and deveined
– 3 tbsp honey
– 3 tbsp soy sauce
– 2 tbsp minced garlic
– 1 tbsp olive oil
– 1 tsp cornstarch
– 1/4 tsp black pepper
– 1 tbsp chopped fresh parsley
– 1 tbsp sesame seeds
Instructions
1. Pat the shrimp completely dry with paper towels to ensure a crisp sear.
2. In a small bowl, whisk together the honey, soy sauce, minced garlic, cornstarch, and black pepper until smooth.
3. Heat the olive oil in a large skillet over medium-high heat until it shimmers.
4. Add the shrimp to the skillet in a single layer, cooking for 2 minutes without moving them to develop a golden crust.
5. Flip each shrimp and cook for another 1–2 minutes until opaque and firm.
6. Pour the honey-garlic sauce over the shrimp, stirring continuously for 1–2 minutes until the sauce thickens and coats the shrimp evenly.
7. Remove the skillet from heat and immediately sprinkle with chopped parsley and sesame seeds.
8. Transfer the shrimp to a serving plate and let rest for 1 minute before serving. Using freshly minced garlic instead of jarred will give the sauce a brighter, more aromatic flavor. Undeniably, these bites are sticky, glossy, and packed with umami—the garlic mellows into sweetness while the shrimp stay tender and juicy. I love skewering them on toothpicks for easy grabbing, or piling them over steamed rice to soak up every last drop of that irresistible sauce.
Bruschetta with Tomatoes and Basil

Just last weekend, I found myself with an abundance of ripe tomatoes from my garden and that familiar craving for something fresh and vibrant. There’s something so satisfying about transforming simple summer produce into a stunning appetizer that always impresses guests. This bruschetta recipe has become my go-to for last-minute gatherings or even just a fancy lunch for myself.
1
loaf15
minutes10
minutesIngredients
– 1 loaf French baguette
– 3 tablespoons olive oil
– 2 cups diced tomatoes
– 1/4 cup chopped fresh basil
– 2 cloves minced garlic
– 1 tablespoon balsamic vinegar
– 1/4 teaspoon salt
– 1/4 teaspoon black pepper
Instructions
1. Preheat your oven to 375°F.
2. Slice the French baguette into 1/2-inch thick pieces.
3. Brush both sides of each bread slice with olive oil using a pastry brush.
4. Arrange the bread slices in a single layer on a baking sheet.
5. Bake for 8-10 minutes until the edges turn golden brown and crisp.
6. While the bread toasts, combine diced tomatoes, chopped basil, and minced garlic in a medium bowl.
7. Drizzle the balsamic vinegar over the tomato mixture.
8. Sprinkle salt and black pepper evenly over the ingredients.
9. Gently toss everything together until well combined.
10. Let the tomato mixture sit for 5 minutes to allow the flavors to meld.
11. Remove the toasted bread from the oven and let cool for 2 minutes.
12. Spoon the tomato mixture generously onto each bread slice, ensuring even distribution.
13. Serve immediately while the bread is still warm and crisp. For the best flavor, use the highest quality olive oil you have available – it really makes a difference in this simple dish. When dicing the tomatoes, I prefer to remove the seeds and excess juice to prevent the bruschetta from becoming soggy. Always let your toasted bread cool slightly before adding the topping to maintain that perfect crunch. Freshly made bruschetta offers the most delightful contrast between the warm, crispy bread and the cool, juicy tomato topping. The garlic infuses every bite with a subtle kick that complements the sweet acidity of the tomatoes beautifully. For a creative twist, try topping these with a thin slice of fresh mozzarella before adding the tomato mixture, or serve them alongside a chilled white wine for the perfect summer appetizer.
Pesto and Cheese Puff Pastry Twists
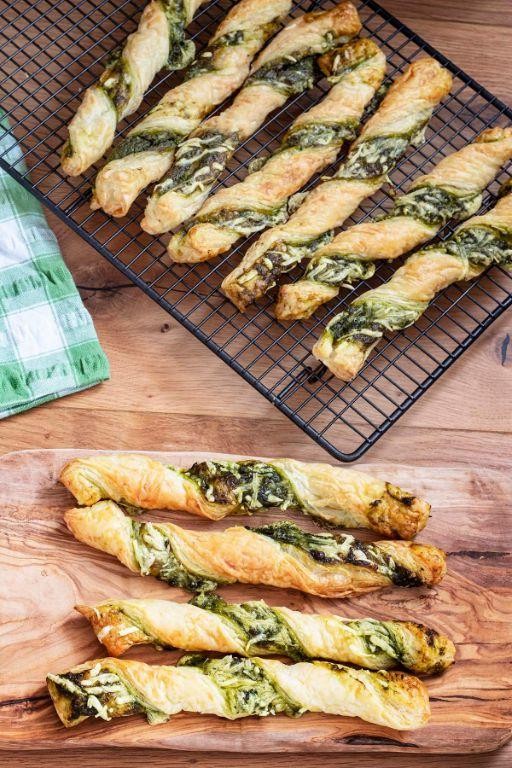
Never underestimate the power of puff pastry to transform simple ingredients into something spectacular. I first discovered these twists during a frantic pre-party kitchen experiment, and now they’re my go-to appetizer that always disappears within minutes. There’s something magical about how the flaky layers embrace the vibrant pesto and melty cheese.
10
portions15
minutes18
minutesIngredients
– 1 sheet frozen puff pastry
– 1/4 cup basil pesto
– 1/2 cup shredded mozzarella cheese
– 1/4 cup grated Parmesan cheese
– 1 tablespoon olive oil
– 1 large egg
Instructions
1. Thaw the puff pastry sheet at room temperature for 40 minutes until pliable but still cold to the touch.
2. Preheat your oven to 400°F and line a baking sheet with parchment paper.
3. Lightly flour your work surface and roll the puff pastry into a 10×12 inch rectangle.
4. Spread the basil pesto evenly over the entire surface of the pastry, leaving a 1/2-inch border around the edges.
5. Sprinkle the shredded mozzarella cheese and grated Parmesan cheese evenly over the pesto layer.
6. Fold the pastry in half lengthwise, pressing gently to seal the edges.
7. Cut the folded pastry into 1-inch wide strips using a sharp knife or pizza cutter.
8. Twist each strip 3-4 times, creating a spiral pattern with the filling visible between the layers.
9. Place the twists 2 inches apart on the prepared baking sheet.
10. Whisk the egg with 1 tablespoon of water to create an egg wash.
11. Brush each twist lightly with the egg wash using a pastry brush.
12. Drizzle the olive oil lightly over the twists.
13. Bake for 15-18 minutes until golden brown and puffed, rotating the pan halfway through baking.
14. Transfer the twists to a wire rack and let cool for 5 minutes before serving.
What makes these twists truly special is the contrast between the crisp, buttery exterior and the gooey, herbaceous center. The Parmesan adds a salty crunch that plays beautifully against the mild mozzarella, while the pesto keeps each bite bright and fresh. I love serving these warm with marinara sauce for dipping, or crumbling them over salads for an unexpected crunch.
Garlic Parmesan Chicken Wings

Finally, after years of testing different wing recipes for game day, I’ve perfected these Garlic Parmesan Chicken Wings that always disappear within minutes. My husband actually hides a few for himself now after learning the hard way during last year’s Super Bowl party when his brother ate the last six wings right off his plate.
2
servings15
minutes45
minutesIngredients
– 2 lbs chicken wings
– 2 tbsp olive oil
– 1 tsp salt
– 1/2 tsp black pepper
– 1/2 tsp garlic powder
– 1/2 cup grated Parmesan cheese
– 1/4 cup butter
– 4 cloves garlic, minced
– 2 tbsp fresh parsley, chopped
– 1 tbsp lemon juice
Instructions
1. Preheat your oven to 400°F and line a baking sheet with parchment paper.
2. Pat the chicken wings completely dry with paper towels to ensure crispy skin.
3. Toss the dried wings with olive oil, salt, black pepper, and garlic powder in a large bowl until evenly coated.
4. Arrange the wings in a single layer on the prepared baking sheet, making sure they don’t touch each other.
5. Bake for 40-45 minutes, flipping the wings halfway through cooking time.
6. Check for doneness by ensuring the internal temperature reaches 165°F and the skin is golden brown and crispy.
7. While wings bake, melt butter in a small saucepan over medium heat.
8. Add minced garlic to the melted butter and cook for 1-2 minutes until fragrant but not browned.
9. Remove the garlic butter from heat and stir in grated Parmesan cheese, chopped parsley, and lemon juice.
10. Transfer the baked wings to a large clean bowl while still hot.
11. Pour the garlic Parmesan sauce over the hot wings and toss vigorously to coat every wing evenly.
12. Serve immediately while the wings are still warm and the cheese is melty.
Perfectly crispy wings coated in that savory garlic Parmesan sauce create an irresistible texture contrast that keeps everyone coming back for more. I love serving these with celery sticks and blue cheese dressing to cut through the richness, though my neighbor swears they’re best enjoyed straight from the bowl while standing in the kitchen.
Bacon-Wrapped Dates

Finally, after years of hosting holiday parties, I’ve perfected the ultimate crowd-pleasing appetizer that always disappears first from my platter. These bacon-wrapped dates are my go-to because they require minimal prep but deliver maximum flavor impact—plus they remind me of that time my cousin ate twelve in one sitting and declared them “little bites of heaven.”
24
portions15
minutes22
minutesIngredients
– 24 large Medjool dates
– 8 slices thick-cut bacon
– 4 oz goat cheese
– 2 tbsp honey
– 1/2 tsp black pepper
– 1/4 tsp smoked paprika
Instructions
1. Preheat your oven to 400°F and line a baking sheet with parchment paper.
2. Make a lengthwise slit in each date and remove the pit completely.
3. Fill each date cavity with approximately 1 teaspoon of goat cheese using a small spoon.
4. Cut each bacon slice into three equal pieces crosswise.
5. Wrap one bacon piece tightly around each stuffed date, securing with a toothpick through the center.
6. Arrange dates seam-side down on the prepared baking sheet, spacing them 1 inch apart.
7. Drizzle honey evenly over all dates using a spoon.
8. Sprinkle black pepper and smoked paprika uniformly over the dates.
9. Bake at 400°F for 18-22 minutes until bacon is crispy and caramelized around the edges.
10. Transfer dates to a wire rack using tongs and let rest for 5 minutes before serving.
The contrast between the crispy, salty bacon and the sweet, creamy date filling creates an addictive texture that crackles with each bite. I love serving these alongside spicy arugula salad to cut through the richness, or stacking them on crostini for extra crunch.
Cucumber Bites with Cream Cheese
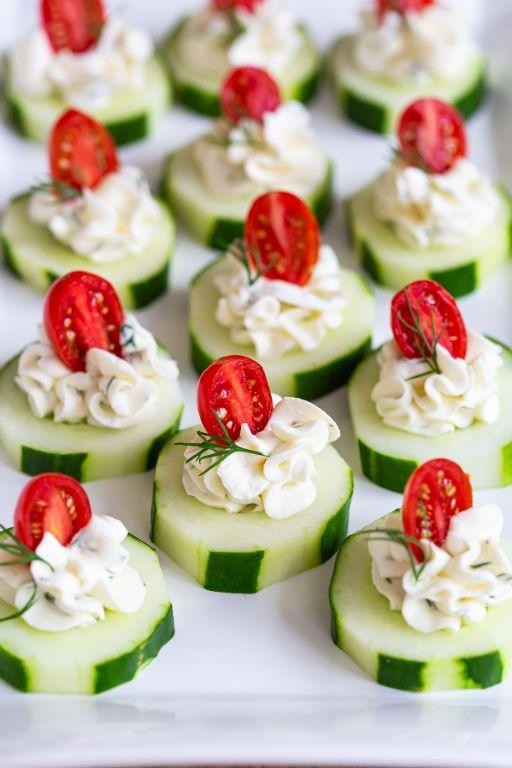
Sometimes the simplest appetizers are the ones that disappear fastest at parties, and these cucumber bites are living proof. I first made these for a last-minute potluck when my elaborate dip failed spectacularly, and now they’re my go-to when I need something impressive but effortless. Seriously, my friends actually request these more than my fancy charcuterie boards!
30
bites25
minutesIngredients
– 2 large English cucumbers
– 8 oz cream cheese, softened
– 1/4 cup sour cream
– 2 tbsp fresh dill, chopped
– 1 tbsp lemon juice
– 1/2 tsp garlic powder
– 1/4 tsp salt
– 1/8 tsp black pepper
– 1/4 cup smoked salmon, finely chopped
– 1 tbsp fresh chives, minced
Instructions
1. Wash 2 large English cucumbers thoroughly under cool running water and pat completely dry with paper towels.
2. Using a sharp knife, slice cucumbers into 1/2-inch thick rounds, discarding the ends.
3. Use a small melon baller or teaspoon to scoop out the center seeds from each cucumber round, creating a small well while leaving the bottom intact.
4. Place cucumber rounds on a paper towel-lined baking sheet to absorb excess moisture while you prepare the filling.
5. In a medium mixing bowl, combine 8 oz softened cream cheese, 1/4 cup sour cream, 2 tbsp chopped fresh dill, 1 tbsp lemon juice, 1/2 tsp garlic powder, 1/4 tsp salt, and 1/8 tsp black pepper.
6. Beat the mixture with an electric mixer on medium speed for 2 minutes until completely smooth and well combined.
7. Gently fold in 1/4 cup finely chopped smoked salmon and 1 tbsp minced fresh chives using a spatula until evenly distributed.
8. Transfer the cream cheese mixture to a piping bag fitted with a star tip, or use a zip-top bag with one corner snipped off.
9. Pipe approximately 1 tablespoon of the cream cheese mixture into each prepared cucumber round, mounding it slightly.
10. Arrange the filled cucumber bites on a serving platter and refrigerate for at least 30 minutes before serving to allow flavors to meld.
Very refreshing and satisfying, these bites offer a wonderful contrast between the cool, crisp cucumber and the rich, creamy filling. The smoked salmon adds a subtle smokiness that pairs beautifully with the bright dill and lemon, making them perfect for brunch gatherings or as an elegant starter before dinner. I love serving them on a bed of crushed ice to keep them extra chilled throughout your event.
Cheesy Jalapeño Poppers

Zesty doesn’t even begin to describe these cheesy jalapeño poppers that have become my go-to game day snack—I actually started making them after my friend brought a similar version to our annual football party, and now I’m the designated popper provider for every gathering. There’s something magical about that creamy, cheesy filling contrasted with the spicy kick of fresh jalapeños, all wrapped in that perfectly crispy bacon exterior.
24
poppers20
minutes25
minutesIngredients
– 12 fresh jalapeño peppers
– 8 ounces cream cheese, softened
– 1 cup shredded cheddar cheese
– 1/2 teaspoon garlic powder
– 1/2 teaspoon onion powder
– 12 slices bacon
– 1 tablespoon olive oil
Instructions
1. Preheat your oven to 400°F and line a baking sheet with parchment paper.
2. Cut each jalapeño in half lengthwise and use a small spoon to carefully scrape out all seeds and membranes—wearing gloves for this step prevents any accidental eye irritation later.
3. In a medium mixing bowl, combine the softened cream cheese, shredded cheddar cheese, garlic powder, and onion powder until fully incorporated.
4. Spoon the cheese mixture evenly into each jalapeño half, filling them just to the top but not overflowing.
5. Wrap one slice of bacon around each stuffed jalapeño half, starting at one end and overlapping slightly until the entire pepper is covered.
6. Arrange the wrapped poppers on the prepared baking sheet and lightly brush each one with olive oil to help the bacon crisp evenly.
7. Bake for 20-25 minutes until the bacon is fully cooked and crispy, and the cheese filling is bubbly and golden around the edges.
8. Let the poppers rest on the baking sheet for 5 minutes before serving—this allows the cheese to set slightly so they’re easier to handle.
Every bite delivers that satisfying crunch from the bacon followed by the creamy, rich cheese filling that perfectly balances the jalapeño’s heat. I love serving these with a cool ranch dip or even drizzling them with a bit of honey for that sweet-and-spicy combination that always disappears first from the platter.
Deviled Eggs with a Twist
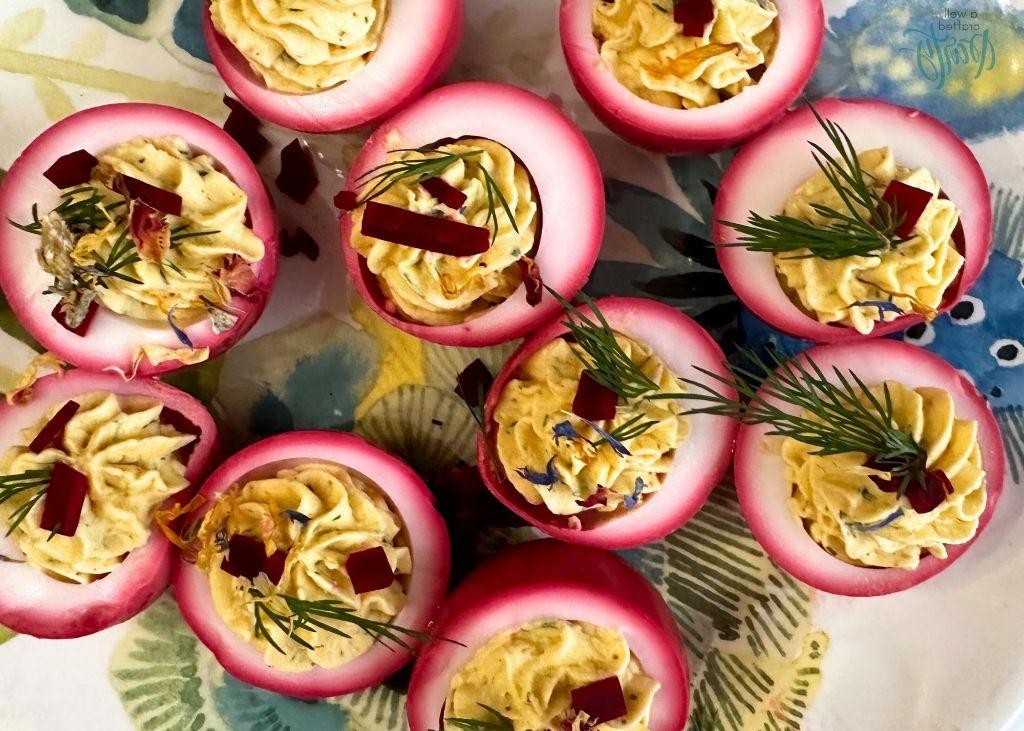
Oof, I can’t believe it’s already October! With holiday potlucks just around the corner, I’ve been experimenting with classic appetizers, and these deviled eggs have become my new go-to. They’re the perfect blend of familiar comfort food with just enough surprise to make guests ask for the recipe.
12
portions20
minutes12
minutesIngredients
– 6 large eggs
– 1/4 cup mayonnaise
– 1 tbsp Dijon mustard
– 1 tbsp sweet pickle relish
– 1/8 tsp paprika
– 1/8 tsp salt
– 1 tbsp fresh chives
Instructions
1. Place 6 large eggs in a single layer in a saucepan and cover with cold water by 1 inch.
2. Bring the water to a rolling boil over high heat, then immediately remove from heat and cover the pan.
3. Let eggs sit in the hot water for 12 minutes exactly for perfectly cooked yolks without gray rings.
4. Transfer eggs to a bowl of ice water and let cool for 15 minutes to stop the cooking process.
5. Gently tap each egg on the counter and roll to crack the shell completely for easier peeling.
6. Peel all eggs under running cool water to help remove stubborn shell pieces.
7. Slice each egg in half lengthwise using a sharp knife wiped clean between cuts.
8. Carefully pop out the yolks into a medium bowl and arrange the whites on a serving platter.
9. Mash the yolks with a fork until they reach a fine, crumbly texture.
10. Add 1/4 cup mayonnaise, 1 tbsp Dijon mustard, 1 tbsp sweet pickle relish, 1/8 tsp paprika, and 1/8 tsp salt to the yolks.
11. Mix thoroughly until the filling is completely smooth and well combined.
12. Spoon the yolk mixture into a piping bag fitted with a star tip for elegant presentation.
13. Pipe the filling evenly into the 12 egg white halves.
14. Finely chop 1 tbsp fresh chives and sprinkle over the filled eggs.
Perfect for any gathering, these deviled eggs offer a creamy, tangy filling that contrasts beautifully with the firm egg whites. The sweet pickle relish adds a subtle crunch that keeps people coming back for more—I love serving them on a rustic wooden board garnished with extra chives for that professional touch.
Smoked Salmon and Avocado Crostini

Every time I host friends for brunch, I find myself reaching for this elegant yet effortless smoked salmon crostini recipe. It’s become my go-t0 because it looks fancy but comes together in minutes, and I love how the creamy avocado balances the smoky salmon perfectly.
12
crostini15
minutes10
minutesIngredients
- 1 baguette
- 2 tablespoons olive oil
- 1 ripe avocado
- 1 tablespoon lemon juice
- 1/4 teaspoon salt
- 1/8 teaspoon black pepper
- 4 ounces smoked salmon
- 2 tablespoons fresh dill
- 1/4 cup red onion
Instructions
- Preheat your oven to 375°F and line a baking sheet with parchment paper.
- Slice the baguette into 1/2-inch thick rounds, arranging them in a single layer on the prepared baking sheet.
- Brush both sides of each baguette slice lightly with olive oil using a pastry brush.
- Bake for 8-10 minutes until the edges are golden brown and the centers are crisp.
- While the crostini bake, halve the avocado, remove the pit, and scoop the flesh into a small bowl.
- Mash the avocado with a fork until smooth but slightly chunky for texture.
- Stir in the lemon juice, salt, and black pepper until fully combined.
- Thinly slice the red onion into fine strips for a milder bite.
- Chop the fresh dill, reserving a few sprigs for garnish.
- Remove the crostini from the oven and let them cool for 2 minutes on a wire rack.
- Spread a generous layer of the avocado mixture evenly onto each crostini.
- Top each with a piece of smoked salmon, folding it gently for visual appeal.
- Sprinkle with chopped dill and garnish with red onion slices.
Keeping these crostini simple lets the textures shine—the crisp bread against the creamy avocado and silky salmon is pure perfection. I often serve them alongside mimosas for brunch or as elegant appetizers at dinner parties, and they always disappear within minutes.
Lemon and Herb Hummus with Pita Chips
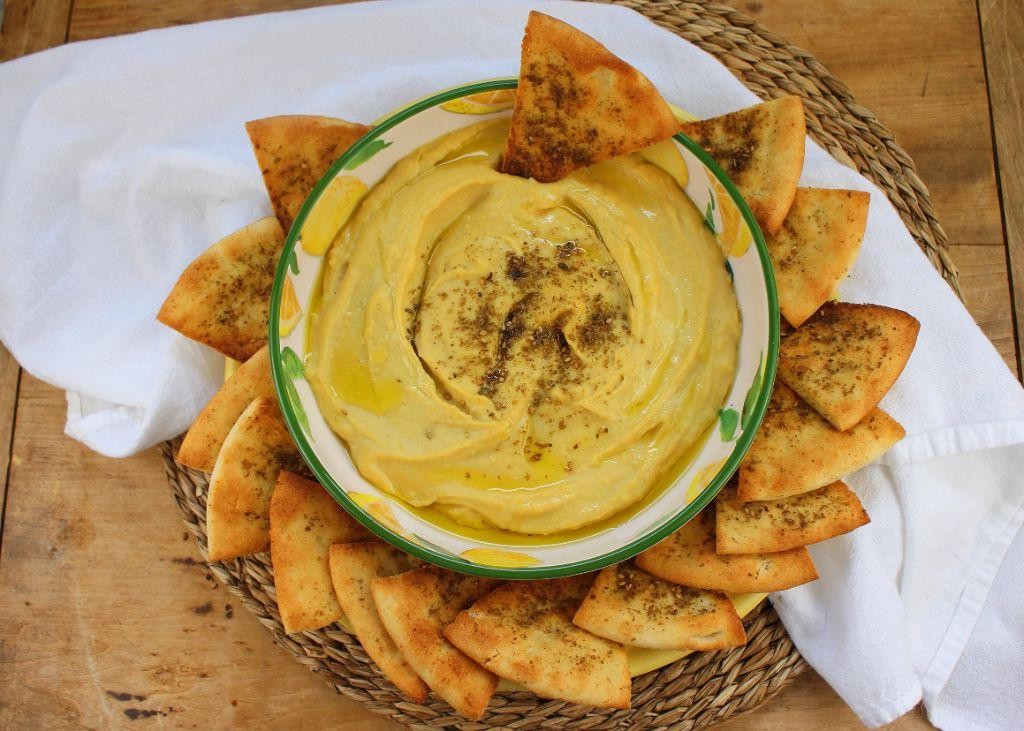
Back when I was living in that tiny apartment with the world’s smallest kitchen, I discovered that some of the best recipes come from having limited space and even more limited patience. This lemon and herb hummus became my go-to for last-minute gatherings, and I’ve been perfecting it ever since.
4
servings15
minutes15
minutesIngredients
– 2 cans (15 oz each) chickpeas
– 1/2 cup tahini
– 1/4 cup fresh lemon juice
– 1/4 cup olive oil
– 3 cloves garlic
– 1/4 cup fresh parsley
– 2 tbsp fresh dill
– 1 tsp salt
– 1/2 tsp black pepper
– 1/4 cup ice water
– 4 pita breads
– 2 tbsp olive oil
– 1/2 tsp garlic powder
– 1/2 tsp salt
Instructions
1. Preheat your oven to 375°F.
2. Drain and rinse 2 cans of chickpeas thoroughly under cold running water.
3. Cut 4 pita breads into 8 wedges each using a sharp knife.
4. Arrange pita wedges in a single layer on a baking sheet.
5. Brush pita wedges evenly with 2 tablespoons of olive oil.
6. Sprinkle 1/2 teaspoon garlic powder and 1/2 teaspoon salt over the pita wedges.
7. Bake pita chips for 12-15 minutes until golden brown and crisp.
8. Combine drained chickpeas, 1/2 cup tahini, and 1/4 cup lemon juice in a food processor.
9. Add 3 peeled garlic cloves, 1/4 cup fresh parsley, and 2 tablespoons fresh dill to the processor.
10. Pour in 1/4 cup olive oil and process for 1 minute until ingredients are roughly combined.
11. Scrape down the sides of the food processor bowl with a spatula to ensure even mixing.
12. Add 1 teaspoon salt and 1/2 teaspoon black pepper to the mixture.
13. Process for another 2 minutes until the hummus becomes smooth and creamy.
14. While the processor is running, slowly stream in 1/4 cup ice water through the feed tube.
15. Continue processing for 1 additional minute until the hummus reaches your desired consistency. Keep this hummus wonderfully creamy by adding ice water gradually while blending—it makes all the difference in texture. For the brightest herb flavor, I always chop my parsley and dill right before adding them to the processor. When baking pita chips, watch for that perfect golden-brown color around the edges to ensure maximum crispiness without burning. Knowing when to stop blending is key—you want it smooth but not gummy, which usually takes about 4-5 minutes total processing time.
Roasted Red Pepper and Feta Pinwheels

Just last weekend, I found myself staring at a jar of roasted red peppers in my pantry, remembering how my grandmother always kept them on hand for impromptu appetizers. These pinwheels have become my go-to party staple because they come together in minutes but look like you spent hours in the kitchen. Honestly, I love how the vibrant red peppers peek through the golden pastry—they never fail to impress guests.
12
portions20
minutes20
minutesIngredients
– 1 sheet frozen puff pastry, thawed
– 4 oz cream cheese, softened
– 1/2 cup crumbled feta cheese
– 1/3 cup finely chopped roasted red peppers, patted dry
– 2 tbsp fresh parsley, chopped
– 1 egg, beaten
– 1 tbsp water
Instructions
1. Preheat your oven to 400°F and line a baking sheet with parchment paper.
2. Unfold the thawed puff pastry sheet on a lightly floured surface, rolling it gently to smooth any creases.
3. In a medium bowl, combine the softened cream cheese, crumbled feta, chopped roasted red peppers, and fresh parsley until evenly mixed.
4. Spread the cheese mixture evenly over the entire surface of the puff pastry, leaving a 1/2-inch border around the edges.
5. Starting from one long side, tightly roll the pastry into a log, using the parchment paper to help guide it evenly.
6. Wrap the log in plastic wrap and chill in the freezer for 15 minutes to firm up for easier slicing.
7. In a small bowl, whisk together the beaten egg and 1 tablespoon of water to create an egg wash.
8. Remove the pastry log from the freezer and unwrap it, then brush the entire surface with the egg wash.
9. Using a sharp serrated knife, slice the log into 1/2-inch thick rounds, wiping the knife clean between cuts for neat edges.
10. Arrange the pinwheels 1 inch apart on the prepared baking sheet, pressing gently to flatten slightly.
11. Bake for 18-20 minutes until the pastry is puffed and golden brown with no damp spots visible.
12. Transfer the pinwheels to a wire rack to cool for 5 minutes before serving.
You’ll love the flaky, buttery layers that shatter with each bite, giving way to the creamy, tangy filling. The roasted peppers add just enough sweetness to balance the salty feta, making these irresistible whether served warm or at room temperature. I often arrange them on a wooden board with sprigs of fresh thyme for a beautiful presentation that always disappears first from the appetizer table.
Antipasto Skewers with Cheese and Olives

Aren’t you tired of spending hours in the kitchen for party appetizers? I certainly was until I discovered these antipasto skewers—they’ve become my go-to for last-minute gatherings and lazy weekend snacks. My Italian grandmother would probably shake her head at my shortcut version, but when friends keep asking for the recipe, I know I’ve struck gold.
8
skewers35
minutesIngredients
– 8 ounces mozzarella balls
– 1/2 cup cherry tomatoes
– 1/4 cup pitted kalamata olives
– 1/4 cup pitted green olives
– 1/4 cup pepperoni slices
– 1/4 cup salami slices
– 2 tablespoons olive oil
– 1 tablespoon balsamic vinegar
– 1 teaspoon dried oregano
– 8 wooden skewers
Instructions
1. Soak 8 wooden skewers in cold water for 30 minutes to prevent burning during assembly.
2. Drain mozzarella balls thoroughly using a colander to remove excess liquid.
3. Pat cherry tomatoes dry with paper towels to ensure ingredients stay securely on skewers.
4. Combine olive oil, balsamic vinegar, and dried oregano in a small bowl, whisking for 30 seconds until emulsified.
5. Thread one cherry tomato onto the first skewer, pushing it to within 2 inches of the blunt end.
6. Add one mozzarella ball immediately after the tomato, leaving a 1/4-inch space between ingredients.
7. Fold one pepperoni slice in half and thread it onto the skewer next to the cheese.
8. Alternate between adding one kalamata olive and one green olive for visual contrast.
9. Repeat the pattern with salami slices, creating layers of color and texture.
10. Continue threading ingredients until each skewer has 6-8 components, leaving 2 inches empty at the pointed end.
11. Arrange completed skewers on a serving platter in a single layer.
12. Drizzle the oil-vinegar mixture evenly over all skewers just before serving. Never skip the marinated mozzarella tip—it makes the cheese absorb flavors beautifully. Now these beauties are ready to shine at your next gathering. Nothing beats the satisfying pop of juicy tomatoes against salty olives and creamy cheese. Try serving them alongside crusty bread for scooping up any remaining dressing, or layer them over a bed of arugula for an instant salad upgrade.
Conclusion
My goodness, what a collection! From simple dips to elegant bites, these 31 appetizers make entertaining effortless. I hope you find some new favorites to share with friends and family. Give these recipes a try, leave a comment with your top picks, and don’t forget to pin this article to your Pinterest boards for your next gathering!


