Ready to transform your dinner routine with a dish that’s both foolproof and fabulous? These baked boneless chicken thighs deliver maximum flavor with minimal effort, making them the perfect solution for busy weeknights or lazy weekends when you crave something delicious without the fuss.
Why This Recipe Works
- The high-fat content in chicken thighs keeps them incredibly juicy and tender throughout the baking process, preventing the dryness that often plagues chicken breasts.
- Our strategic seasoning blend creates a flavor explosion with every bite, combining savory herbs, aromatic spices, and just the right amount of salt to enhance the natural chicken goodness.
- The baking technique we employ ensures a beautifully crispy exterior while maintaining a moist, succulent interior that will have everyone asking for seconds.
- Boneless thighs cook faster than bone-in options, cutting your kitchen time significantly while still delivering that rich, dark meat flavor we all love.
- This recipe adapts beautifully to various dietary preferences and can be customized with endless seasoning variations to keep your taste buds entertained.
Ingredients
- 2 pounds boneless, skin-on chicken thighs (about 6-8 pieces)
- 3 tablespoons olive oil
- 2 teaspoons kosher salt
- 1 teaspoon black pepper, freshly ground
- 1 teaspoon garlic powder
- 1 teaspoon paprika
- 1/2 teaspoon onion powder
- 1/2 teaspoon dried thyme
- 1/4 teaspoon cayenne pepper (optional for heat)
- 1 lemon, cut into wedges for serving
- Fresh parsley, chopped for garnish
Equipment Needed
- Rimmed baking sheet
- Wire rack that fits inside baking sheet
- Mixing bowl
- Measuring spoons
- Tongs
- Paper towels
- Instant-read thermometer
Instructions

Prep Your Chicken and Preheat
Begin by preheating your oven to 425°F – this high temperature is crucial for achieving that perfect crispy skin we’re after. While the oven heats, pat your chicken thighs completely dry with paper towels; this step is non-negotiable for crispy results. In a small bowl, combine all your dry spices – the kosher salt, black pepper, garlic powder, paprika, onion powder, dried thyme, and cayenne if using. Drizzle the olive oil over the chicken thighs, then rub it evenly over both sides, making sure every nook and cranny gets some love. Sprinkle the spice mixture generously over both sides of each thigh, gently pressing to help the seasoning adhere. Let the seasoned thighs sit at room temperature for about 15 minutes while the oven finishes preheating – this helps them cook more evenly.
Arrange for Maximum Crispiness
Place your wire rack inside the rimmed baking sheet – this setup allows hot air to circulate around the chicken, promoting even browning and preventing soggy bottoms. Arrange the seasoned chicken thighs skin-side up on the wire rack, making sure they aren’t touching each other; overcrowding leads to steaming rather than crisping. If you notice any areas where the skin seems particularly thick or uneven, you can gently loosen it from the meat with your fingers to create more surface area for crisping. The positioning matters more than you might think – thighs toward the center of the rack will cook most evenly, while those near the edges might brown faster. Don’t be tempted to skip the rack – it’s the secret weapon for achieving that restaurant-quality texture without any flipping or fussing halfway through cooking.
Bake to Golden Perfection
Slide your prepared baking sheet into the preheated 425°F oven on the middle rack and set your timer for 20 minutes. Resist the urge to open the oven door during the first 15 minutes – that blast of consistent heat is working its magic on the skin. After 20 minutes, check the chicken – you should see beautiful golden-brown coloration and hear a gentle sizzling sound. If your thighs are particularly large or your oven runs cool, they might need another 5-10 minutes. The skin should look crackly and crisp, and the edges of the chicken should be pulling away slightly from the rack. If you notice any areas browning too quickly, you can rotate the pan halfway through, but usually the rack helps eliminate hot spots. The aroma filling your kitchen right now should be absolutely irresistible – that’s how you know things are going exactly according to plan.
Check for Doneness and Rest
After 25-30 minutes total baking time, insert an instant-read thermometer into the thickest part of the largest thigh, avoiding the rack beneath. You’re looking for an internal temperature of 165°F – this ensures safety while maintaining juiciness. If you don’t have a thermometer, make a small cut into the thickest part; the juices should run clear, not pink. Once perfectly cooked, transfer the chicken thighs to a clean plate or cutting board using tongs, being careful not to tear that beautiful crispy skin. Let them rest for at least 5-10 minutes before serving – this allows the juices to redistribute throughout the meat, resulting in incredibly tender chicken. While resting, the internal temperature will continue to rise slightly, reaching about 170°F, which is ideal for dark meat. The resting period also gives the skin time to firm up slightly, making it even more satisfyingly crisp when you bite into it.
Serve and Enjoy Immediately
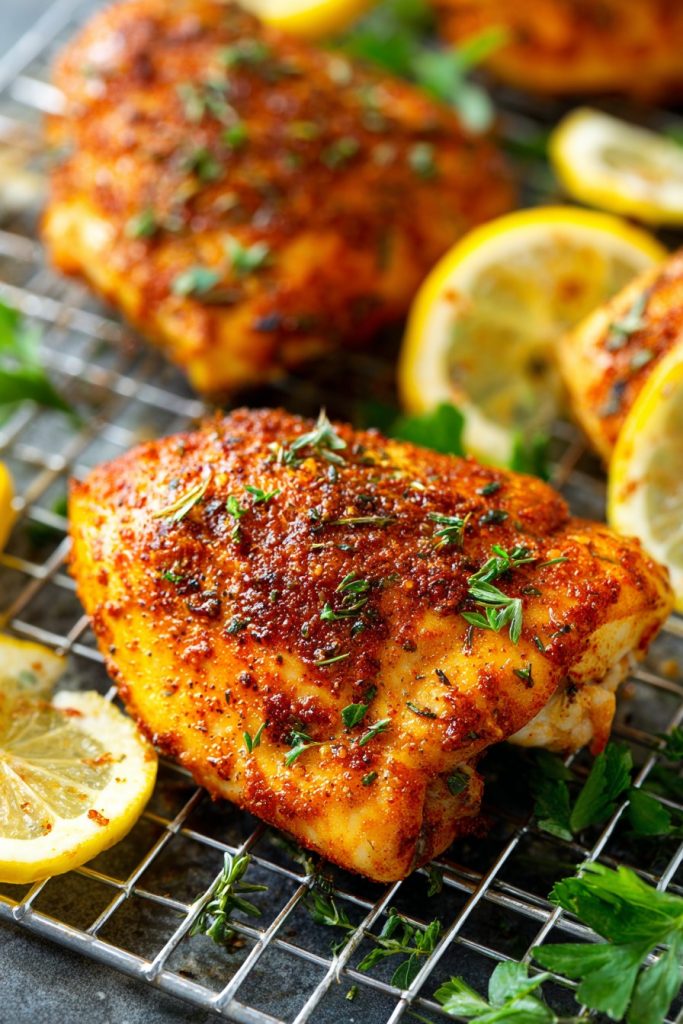
Arrange your perfectly rested chicken thighs on a serving platter, squeezing fresh lemon juice over the top – the acidity brightens all the rich flavors beautifully. Sprinkle with freshly chopped parsley for a pop of color and fresh herbal note that complements the savory spices. Serve immediately while the skin is at its crispiest peak – these thighs don’t wait well, so have your side dishes ready to go. They pair wonderfully with roasted vegetables, mashed potatoes, or a simple green salad. If you have any pan drippings, you can drizzle them over the chicken for extra flavor, though the wire rack method minimizes excess fat. Remember – crispy chicken skin waits for no one, so dig in while that perfect texture is at its absolute best!
Tips and Tricks
For the ultimate crispy skin, consider air-drying your chicken thighs in the refrigerator uncovered for a few hours or overnight before cooking – this removes even more surface moisture than patting dry. If you’re really serious about crackling-crisp skin, you can lightly dust the skin with baking powder (about 1/2 teaspoon mixed into the spices) which helps break down proteins and promotes browning. When seasoning, don’t forget the underside of the thighs – that meat benefits from flavor too, even if it won’t get crispy. If your chicken thighs come with excess fat around the edges, you can trim it slightly, but leave about 1/4 inch as it will render and help crisp the skin. For extra flavor infusion, you can marinate the thighs in the oil and spice mixture for up to 4 hours in the refrigerator before baking – just bring them to room temperature before cooking. If you don’t have a wire rack, you can create a makeshift one with sliced onions or potatoes on the baking sheet to elevate the chicken. For easier cleanup, line your baking sheet with aluminum foil before placing the wire rack – the rendered fat can be messy. If you’re doubling the recipe, use two baking sheets and rotate them between upper and lower racks halfway through cooking for even browning. Leftover chicken thighs can be refrigerated for up to 4 days and make fantastic additions to salads, sandwiches, or pasta dishes – though the skin will lose its crispness. To reheat while maintaining some crispness, use a 375°F oven or air fryer for about 10 minutes rather than the microwave. If you prefer super-crispy skin all around, you can start the thighs skin-side down for the first 10 minutes, then flip – but this requires careful handling to avoid tearing. For garlic lovers, add 2-3 minced fresh garlic cloves to the oil rub for more pronounced garlic flavor. If you’re watching sodium, reduce the salt to 1 teaspoon and add more herbs like rosemary or oregano for flavor without salt. Always let your baking sheet and rack preheat in the oven for 5 minutes before adding chicken for extra initial sizzle. For perfect browning, make sure your oven is fully preheated – use an oven thermometer if you suspect your oven temperature might be inaccurate. If the skin isn’t as crispy as you’d like after baking, you can briefly broil for 1-2 minutes, watching carefully to prevent burning. For meal prep, you can season the thighs and store them in an airtight container in the refrigerator for up to 2 days before baking. If using frozen thighs, thaw completely in the refrigerator overnight and pat extra dry, as they release more moisture during cooking.
Recipe Variations
- Italian Herb Version: Replace the spice blend with 2 teaspoons dried Italian seasoning, 1 teaspoon garlic powder, 1/2 teaspoon red pepper flakes, and add 1/4 cup grated Parmesan cheese pressed onto the skin before baking. Serve with marinara sauce for a chicken Parmesan vibe without the breading.
- Lemon Herb Mediterranean: Use 2 tablespoons lemon juice mixed with the oil, and season with 1 tablespoon dried oregano, 2 teaspoons garlic powder, and 1 teaspoon sumac if available. Add sliced lemons and Kalamata olives to the baking sheet during the last 10 minutes of cooking.
- Spicy Buffalo Style: Toss baked thighs with 1/2 cup hot sauce mixed with 2 tablespoons melted butter after cooking. Serve with celery sticks and blue cheese dressing for a healthier take on buffalo wings.
- BBQ Glazed: Brush thighs with your favorite BBQ sauce during the last 10 minutes of baking, repeating every few minutes until sticky and caramelized. Add a teaspoon of smoked paprika to the dry rub for authentic smokehouse flavor.
- Asian-Inspired: Replace oil with 2 tablespoons sesame oil and season with 1 tablespoon ginger powder, 2 teaspoons garlic powder, and 1/4 cup soy sauce. Glaze with hoisin sauce during last 5 minutes and garnish with sesame seeds and sliced green onions.
Frequently Asked Questions
Can I use skinless boneless chicken thighs?
Absolutely! Skinless thighs will still be delicious and juicy, but you’ll miss out on that wonderful crispy texture. Without the skin, reduce the baking time by 5-7 minutes since there’s no fat layer to render, and consider increasing the oven temperature to 450°F for better browning on the meat itself. The internal temperature should still reach 165°F, but check earlier since they cook faster. You might want to add an extra tablespoon of oil to the seasoning rub to prevent drying out, and consider adding a sprinkle of breadcrumbs or Parmesan for texture variation.
How do I know when the chicken is done without a thermometer?
While I always recommend using a meat thermometer for accuracy, you can check doneness by making a small cut into the thickest part of the largest thigh – the juices should run completely clear with no pinkness. The meat should feel firm to the touch but still have some give, and the edges will pull away from the bone area slightly. Another visual cue is that the chicken will shrink about 25% in size when fully cooked. If you’re uncertain, it’s better to cook a few minutes longer – chicken thighs are forgiving due to their higher fat content, though overcooking can still make them dry.
Can I make this recipe with chicken breasts instead?
You can, but you’ll need to adjust significantly since breasts cook faster and dry out more easily. Reduce the cooking time to 18-22 minutes and consider pounding the breasts to even thickness for consistent cooking. Use a lower temperature of 400°F to prevent the outside from overcooking before the inside reaches 165°F. Breast meat has less fat, so increase the oil to 4 tablespoons and consider brining them for 30 minutes beforehand for extra moisture. The spice amounts can stay the same, but the result will be leaner and less flavorful than thigh meat in my opinion.
Why did my chicken skin turn out soggy instead of crispy?
Soggy skin usually results from three main issues: not patting the chicken completely dry before seasoning, overcrowding the pan which causes steaming, or not using a wire rack to elevate the chicken above the rendered fat. Other factors include opening the oven door too frequently during cooking, using too low oven temperature, or not preheating the baking sheet properly. If your thighs were particularly fatty, the excess rendering fat might have splashed back up onto the skin. Next time, ensure thorough drying, proper spacing, rack elevation, and maintain that high oven temperature without peeking for the first 15 minutes.
Can I prepare these ahead of time for a party?
You can season the thighs up to 24 hours in advance and store them covered in the refrigerator – this actually enhances the flavor penetration. However, for best texture, bake them fresh rather than reheating. If you must make ahead, bake until just done (160°F), cool completely, then reheat in a 375°F oven for 10-12 minutes until heated through and skin re-crisped. For parties, consider baking in batches and keeping finished thighs in a warm oven (200°F) for up to 30 minutes. The skin will lose some crispness over time, but they’ll still taste great.
Summary
These crispy baked boneless chicken thighs deliver restaurant-quality results with minimal effort. The perfect blend of spices, high-heat baking, and proper resting creates juicy, flavorful chicken with irresistibly crispy skin that will become your new weeknight favorite.
Crispy Baked Boneless Chicken Thighs
6
servings15
minutes25
minutesIngredients
Instructions
- 1 Preheat oven to 425°F and place wire rack in rimmed baking sheet.
- 2 Pat chicken thighs dry with paper towels, rub with olive oil, and season both sides with spice mixture.
- 3 Arrange thighs skin-side up on wire rack without overcrowding.
- 4 Bake for 20-25 minutes until internal temperature reaches 165°F and skin is crispy and golden.
- 5 Rest for 5-10 minutes before serving with lemon wedges and fresh parsley.


