Aren’t we all searching for that perfect dinner recipe that’s both ridiculously easy and incredibly delicious? Absolutely, and these baked chicken legs are here to save your weeknight meals with minimal effort and maximum flavor. Let’s get cooking!
Why This Recipe Works
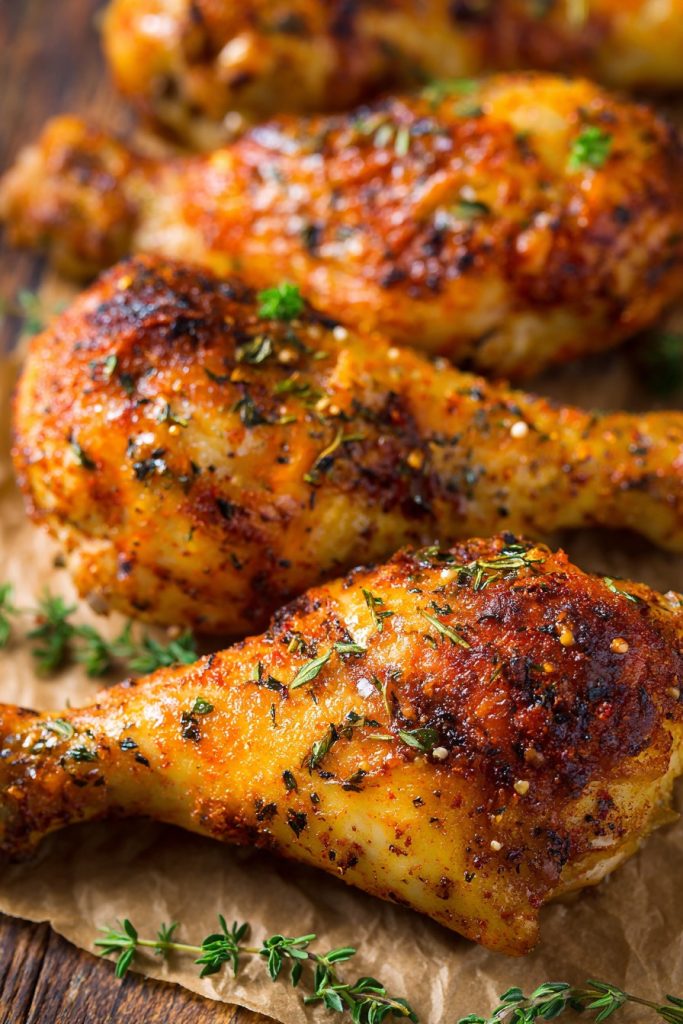
- The high-temperature baking method creates an incredibly crispy skin while keeping the meat juicy and tender inside
- Using a simple dry rub instead of a marinade means no waiting time – you can season and bake immediately
- Baking on a wire rack allows air to circulate around the chicken, ensuring even browning on all sides
- The combination of paprika, garlic powder, and onion powder creates a flavor profile that’s both familiar and exciting
- This recipe requires minimal hands-on time, making it perfect for busy weeknights or lazy weekends
Ingredients
- 4 pounds chicken legs (about 8-10 pieces), patted dry with paper towels
- 2 tablespoons olive oil
- 1 tablespoon smoked paprika
- 2 teaspoons garlic powder
- 2 teaspoons onion powder
- 1 teaspoon dried thyme
- 1 teaspoon salt
- ½ teaspoon black pepper
- ¼ teaspoon cayenne pepper (optional for heat)
Equipment Needed
- Rimmed baking sheet
- Wire rack that fits inside baking sheet
- Mixing bowls
- Measuring spoons
- Tongs
- Paper towels
- Meat thermometer
Instructions

Preheat and Prepare Your Oven
Preheat your oven to 425°F and position one rack in the center of the oven. This high temperature is crucial for achieving that perfect crispy skin we’re after. While the oven heats up, line your rimmed baking sheet with aluminum foil for easy cleanup – trust me, you’ll thank yourself later when there’s no scrubbing involved. Place the wire rack on top of the prepared baking sheet; this elevates the chicken legs and allows hot air to circulate around them, ensuring even cooking and browning on all sides rather than just the top. Make sure your wire rack is oven-safe and lightly grease it with cooking spray to prevent sticking.
Create the Flavorful Dry Rub
In a medium bowl, combine the smoked paprika, garlic powder, onion powder, dried thyme, salt, black pepper, and cayenne pepper if using. Whisk these dry ingredients together until they’re thoroughly combined and uniform in color. The smoked paprika will give your chicken legs that beautiful reddish-brown color and smoky flavor, while the garlic and onion powders provide that classic savory base that everyone loves. The thyme adds an herby note that complements the chicken beautifully, and the cayenne pepper gives just enough kick to keep things interesting without overwhelming the other flavors. Tip: For the best flavor distribution, make sure your spices are fresh – if your spices have been in the cabinet for more than a year, it’s time for an upgrade!
Prepare and Season the Chicken Legs
Pat the chicken legs completely dry with paper towels – this step is non-negotiable for achieving crispy skin. Moisture is the enemy of crispiness, so take your time and really get those legs dry. Place the dried chicken legs in a large bowl and drizzle with the olive oil, then use your hands or tongs to toss until each piece is lightly coated. The oil helps the seasoning stick and promotes browning. Now sprinkle your prepared dry rub over the chicken, again using your hands or tongs to massage the seasoning into every nook and cranny of each chicken leg. Make sure you get under the skin where possible and cover all surfaces evenly for maximum flavor in every bite.
Arrange and Bake to Perfection
Arrange the seasoned chicken legs on the prepared wire rack, making sure they aren’t touching each other to allow for proper air circulation. Space them about an inch apart if possible. Place the baking sheet in the preheated 425°F oven and bake for 35-45 minutes. The exact time will depend on the size of your chicken legs, but you’re looking for deeply golden brown skin that appears crispy and crackly. About halfway through the baking time, rotate the baking sheet 180 degrees to ensure even cooking since most ovens have hot spots. Tip: Resist the temptation to open the oven door frequently – every time you do, you let heat escape and slow down the cooking process!
Check Doneness and Rest Before Serving
After 35 minutes, check the internal temperature of the largest chicken leg using an instant-read thermometer inserted into the thickest part of the meat without touching bone. You’re looking for 165°F – this is the safe internal temperature for poultry according to USDA guidelines. If they haven’t reached this temperature yet, continue baking in 5-minute increments until they do. Once properly cooked, remove the baking sheet from the oven and let the chicken legs rest on the wire rack for 5-10 minutes before serving. This resting period allows the juices to redistribute throughout the meat, resulting in more tender and flavorful chicken. The skin will remain crispy during this short rest, I promise!
Tips and Tricks
If you really want to take your chicken legs to the next level, consider brining them before baking. Create a simple brine by dissolving ¼ cup of salt and 2 tablespoons of sugar in 4 cups of warm water, then add 4 cups of cold water and submerge the chicken legs for 2-4 hours in the refrigerator. This process helps the meat retain moisture during the high-heat cooking process, resulting in even juicier chicken. Just make sure to pat them completely dry after brining and before seasoning. For extra crispy skin, you can place the patted-dry chicken legs uncovered in the refrigerator for a few hours or overnight before baking – this air-drying technique helps remove even more surface moisture. When it comes to seasoning, don’t be afraid to get under the skin! Gently loosen the skin from the meat with your fingers and rub some of the seasoning directly onto the meat itself – this creates layers of flavor that will blow your mind. If you’re watching your fat intake, you can remove the skin before eating, but I highly recommend baking with the skin on for maximum flavor and moisture retention, then removing it afterward if desired. For easy cleanup, use heavy-duty aluminum foil on your baking sheet and consider lining the bottom with a layer of potatoes or vegetables to catch the drippings – you’ll get a bonus side dish out of the deal! If you find your chicken is browning too quickly, you can tent it loosely with foil, but with this method, that’s rarely necessary. Leftover chicken legs make fantastic chicken salad or can be shredded for tacos, sandwiches, or soups. Always let your chicken come to room temperature for about 20 minutes before baking for more even cooking, but never leave raw poultry out for more than 2 hours for food safety reasons.
Recipe Variations
- For a lemon-herb version, replace the paprika-based rub with a mixture of 2 tablespoons chopped fresh rosemary, 2 tablespoons chopped fresh thyme, the zest of 2 lemons, 4 minced garlic cloves, 1 teaspoon salt, and ½ teaspoon pepper. Add lemon slices to the baking sheet for extra citrus flavor that permeates the chicken as it bakes.
- Create Asian-inspired chicken legs by mixing 3 tablespoons soy sauce, 2 tablespoons honey, 1 tablespoon sesame oil, 2 minced garlic cloves, and 1 tablespoon grated fresh ginger. Marinate the chicken in this mixture for 30 minutes before patting dry and proceeding with the baking instructions. Sprinkle with sesame seeds before serving.
- Try a barbecue dry rub by combining 2 tablespoons brown sugar, 1 tablespoon smoked paprika, 1 teaspoon chili powder, 1 teaspoon garlic powder, 1 teaspoon onion powder, 1 teaspoon salt, and ½ teaspoon black pepper. The brown sugar creates a beautiful caramelized crust that’s sweet and smoky.
- For buffalo-style chicken legs, toss the baked chicken legs in a mixture of ½ cup hot sauce and 2 tablespoons melted butter after they come out of the oven. Return to the oven for 3-5 minutes to set the sauce, then serve with celery sticks and blue cheese dressing.
- Mediterranean variation: Use a rub of 2 tablespoons dried oregano, 1 tablespoon lemon zest, 2 teaspoons garlic powder, 1 teaspoon salt, and ½ teaspoon black pepper. During the last 10 minutes of baking, sprinkle with crumbled feta cheese and kalamata olives.
Frequently Asked Questions
Can I use chicken thighs instead of whole legs?
Absolutely! Chicken thighs work beautifully with this method and might even become your new favorite. The cooking time will be slightly shorter – start checking at around 30 minutes for doneness. Since thighs are typically smaller and more uniform in size, they often cook more evenly than whole legs. The higher fat content in thighs also makes them incredibly juicy and forgiving if slightly overcooked. Just maintain the same 425°F temperature and use the same seasoning approach, adjusting quantities based on the weight of thighs you’re using.
How do I know when the chicken is done without a thermometer?
While I always recommend using a meat thermometer for food safety, if you don’t have one, there are visual cues. The chicken should have golden brown, crispy skin, and the juices should run clear when you pierce the thickest part with a knife or fork. The meat should no longer be pink near the bone, and the leg joint should move easily when wiggled. However, these methods are less reliable than a thermometer, which guarantees both safety and perfect doneness without overcooking. Investing in a simple instant-read thermometer is one of the best kitchen decisions you’ll make!
Can I make this recipe with frozen chicken legs?
I strongly recommend thawing your chicken legs completely before baking for food safety and even cooking. If you bake frozen chicken legs, the outside will likely overcook and dry out before the interior reaches a safe temperature. To safely thaw, place the frozen chicken in the refrigerator for 24 hours, or use the cold water thawing method: keep the chicken in its sealed packaging and submerge in cold water, changing the water every 30 minutes until thawed. Never thaw chicken at room temperature, as this allows bacteria to multiply in the danger zone between 40°F and 140°F.
Why is my chicken skin not getting crispy?
Several factors could be preventing crispy skin: not patting the chicken dry enough before seasoning, overcrowding the baking sheet, oven temperature being too low, or opening the oven door too frequently during cooking. The single most important step is thoroughly drying the skin with paper towels – moisture is the enemy of crispiness. Also ensure your oven is fully preheated to 425°F and that you’re using a wire rack to elevate the chicken for air circulation. If your skin still isn’t crispy enough, you can try broiling for the last 2-3 minutes, but watch carefully to prevent burning.
How long do leftovers last and how should I reheat them?
Properly stored in an airtight container, leftover baked chicken legs will keep in the refrigerator for 3-4 days. For best results when reheating, use an oven or toaster oven rather than a microwave to maintain the crispy texture. Preheat to 375°F and place the chicken on a wire rack over a baking sheet. Heat for 10-15 minutes until warmed through. The microwave will make the skin rubbery, so avoid it if possible. You can also enjoy leftover chicken cold in salads or sandwiches, where the texture difference matters less.
Summary
These incredibly crispy baked chicken legs deliver maximum flavor with minimal effort, featuring a savory spice rub and perfect high-heat technique for juicy meat and crackling skin every time.
Crispy Baked Chicken Legs
4
servings10
minutes40
minutesIngredients
Instructions
- 1 Preheat oven to 425°F and line a rimmed baking sheet with foil. Place a wire rack on top.
- 2 Whisk together all dry spices in a medium bowl until combined.
- 3 Pat chicken legs dry, coat with olive oil, then rub with seasoning mixture.
- 4 Arrange chicken on wire rack and bake for 35-45 minutes until internal temperature reaches 165°F.
- 5 Let rest for 5-10 minutes before serving.


