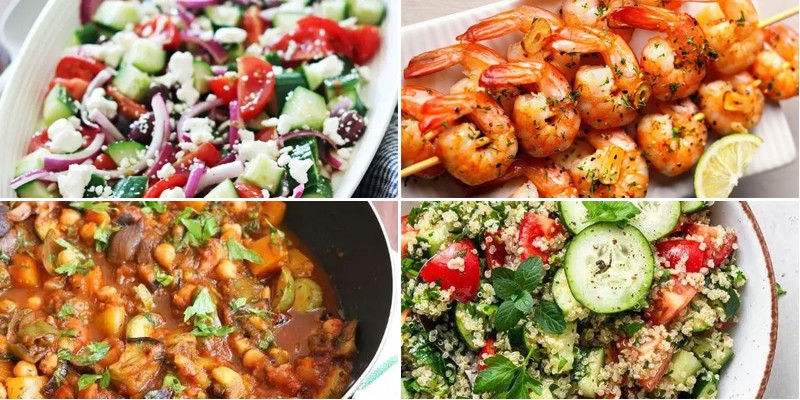
Unlock the vibrant flavors of the Mediterranean without spending hours in the kitchen! We’ve gathered 27 delicious, quick recipes perfect for busy weeknights. From zesty lemon chicken to refreshing Greek salads, these dishes bring sunshine to your table in 30 minutes or less. Get ready to transform your dinner routine with these easy, healthy, and utterly satisfying meals. Let’s dive in!
Easy Mediterranean Hummus Wraps

Evenings like this, when the light slants golden through the kitchen window, I find myself reaching for the simplest of comforts, the kind that requires little more than a quiet moment and a few good ingredients to feel like a small, personal feast. It’s in these gentle pauses that I assemble these wraps, a humble homage to sun-drenched coasts and shared tables.
2
wraps10
minutesIngredients
– A couple of large flour tortillas
– About a cup of your favorite hummus
– A good handful of fresh spinach leaves
– Half of a cucumber, sliced into thin rounds
– A small handful of Kalamata olives, pitted and roughly chopped
– A couple of tablespoons of crumbled feta cheese
– A generous drizzle of extra virgin olive oil
– A squeeze of fresh lemon juice
Instructions
1. Lay one large flour tortilla flat on your clean countertop.
2. Spread about a half-cup of hummus evenly over the center of the tortilla, leaving a 2-inch border around the edges. (Tip: Warming the tortilla for 10 seconds in the microwave makes it more pliable and less likely to tear.)
3. Arrange a generous handful of fresh spinach leaves in a single layer over the hummus.
4. Place a single layer of thinly sliced cucumber rounds over the spinach.
5. Scatter the roughly chopped Kalamata olives evenly over the cucumber layer.
6. Sprinkle the crumbled feta cheese over the olives.
7. Drizzle about one tablespoon of extra virgin olive oil evenly over the fillings.
8. Squeeze the juice from one lemon wedge (about two teaspoons) evenly over the entire filling. (Tip: Rolling the lemon firmly on the counter before juicing helps release more juice.)
9. Fold the bottom edge of the tortilla up and over the fillings, then fold the left and right sides inward, and roll tightly away from you to form a secure wrap. (Tip: For a neat, portable wrap, wrap it snugly in parchment paper and twist the ends.)
You’ll find the cool, creamy hummus and crisp cucumber play beautifully against the salty bite of feta and olives, a quiet symphony in your hands. Sometimes, I’ll slice it diagonally on a wooden board, the vibrant cross-section a little work of art, perfect for a solitary lunch by the window.
Quick Greek Salad with Feta
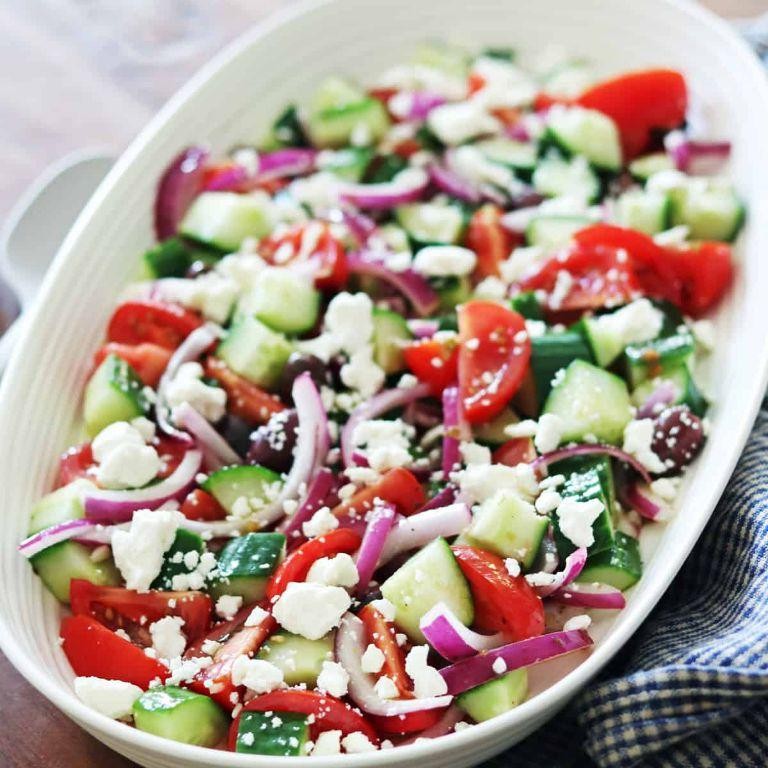
Remembering how the afternoon light used to fall across my grandmother’s kitchen table, I find myself craving something bright and simple—a salad that feels like a quiet moment of gathering, where each ingredient has its own little story to tell.
2
servings15
minutesIngredients
- a couple of large, ripe tomatoes
- half of a crisp English cucumber
- one small red onion
- a generous handful of Kalamata olives
- a big block of feta cheese
- a good glug of extra virgin olive oil
- a splash of red wine vinegar
- a pinch of dried oregano
- a sprinkle of salt and a few cracks of black pepper
Instructions
- Wash the tomatoes and cucumber under cool running water, then pat them dry with a clean kitchen towel.
- Chop the tomatoes into bite-sized chunks, about 1-inch pieces, letting any excess juices fall away.
- Slice the cucumber in half lengthwise, then cut it into half-moons, each about 1/4-inch thick.
- Peel the red onion and slice it into very thin strips, which will mellow nicely in the dressing.
- Place the tomatoes, cucumber, and onion in a large mixing bowl.
- Add the Kalamata olives to the bowl, giving them a gentle press with the back of a spoon to release their briny flavor.
- Crumble the feta cheese over the vegetables, using your fingers to break it into rustic, uneven pieces.
- Drizzle the extra virgin olive oil evenly over the salad, using about 3 tablespoons.
- Splash in the red wine vinegar, roughly 1 tablespoon, for a touch of acidity.
- Sprinkle the dried oregano, salt, and black pepper over the top.
- Toss everything together gently with salad tongs or two large spoons, just until the ingredients are lightly coated—avoid overmixing to keep the textures distinct.
- Let the salad sit at room temperature for 10 minutes to allow the flavors to meld together.
During this brief rest, the salt coaxes out the tomatoes’ sweetness, while the olive oil and vinegar soften the sharpness of the onion. I love how the creamy feta contrasts with the crisp cucumber, and sometimes I’ll serve it tucked into warm pita bread for a handheld lunch that feels both nourishing and effortless.
Simple Mediterranean Chickpea Stew
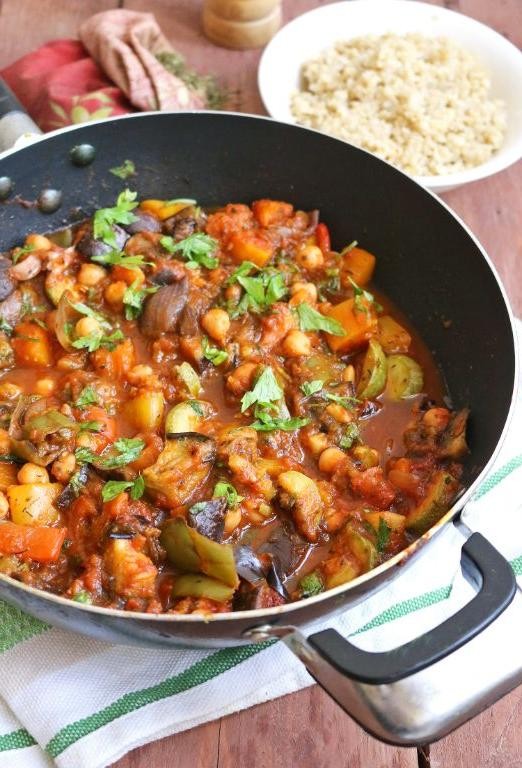
Wandering through my kitchen this quiet afternoon, I found myself craving something warm and nourishing, the kind of meal that simmers slowly and fills the house with comforting aromas. This simple chickpea stew has become my go-to when I need a gentle reminder to slow down and savor the process of cooking as much as the eating itself. It’s humble, forgiving, and deeply satisfying in its simplicity.
5
servings15
minutes38
minutesIngredients
– A couple of tablespoons of olive oil
– One large yellow onion, chopped
– Three cloves of garlic, minced
– A 15-ounce can of chickpeas, drained and rinsed
– A 28-ounce can of crushed tomatoes
– A couple of cups of vegetable broth
– A teaspoon of smoked paprika
– A splash of lemon juice
– A handful of fresh parsley, chopped
Instructions
1. Heat 2 tablespoons of olive oil in a large pot over medium heat for about 2 minutes until it shimmers.
2. Add 1 chopped large yellow onion and cook for 8-10 minutes, stirring occasionally, until the onion turns translucent and soft.
3. Stir in 3 minced garlic cloves and cook for 1 minute until fragrant but not browned.
4. Tip: Toasting the spices at this stage deepens their flavor—add 1 teaspoon of smoked paprika and stir for 30 seconds.
5. Pour in the drained and rinsed chickpeas from one 15-ounce can, stirring to coat them in the spiced oil.
6. Add one 28-ounce can of crushed tomatoes and 2 cups of vegetable broth, scraping the bottom of the pot to lift any browned bits.
7. Bring the stew to a gentle boil, then reduce the heat to low and let it simmer uncovered for 25 minutes.
8. Tip: Simmering uncovered allows the stew to thicken naturally—stir occasionally to prevent sticking.
9. After 25 minutes, stir in a splash of lemon juice to brighten the flavors.
10. Tip: For a creamier texture, mash about a quarter of the chickpeas against the side of the pot with a spoon.
11. Stir in a handful of chopped fresh parsley just before serving.
12. Remove the pot from the heat and let the stew rest for 5 minutes to allow the flavors to meld.
Velvety and rich, this stew cradles soft chickpeas in a tangy tomato broth that’s both light and deeply satisfying. I love ladling it over a slice of crusty bread to soak up every last drop, or topping it with a dollop of cool yogurt for a contrast that feels like a quiet celebration.
Fast Grilled Lemon-Herb Chicken
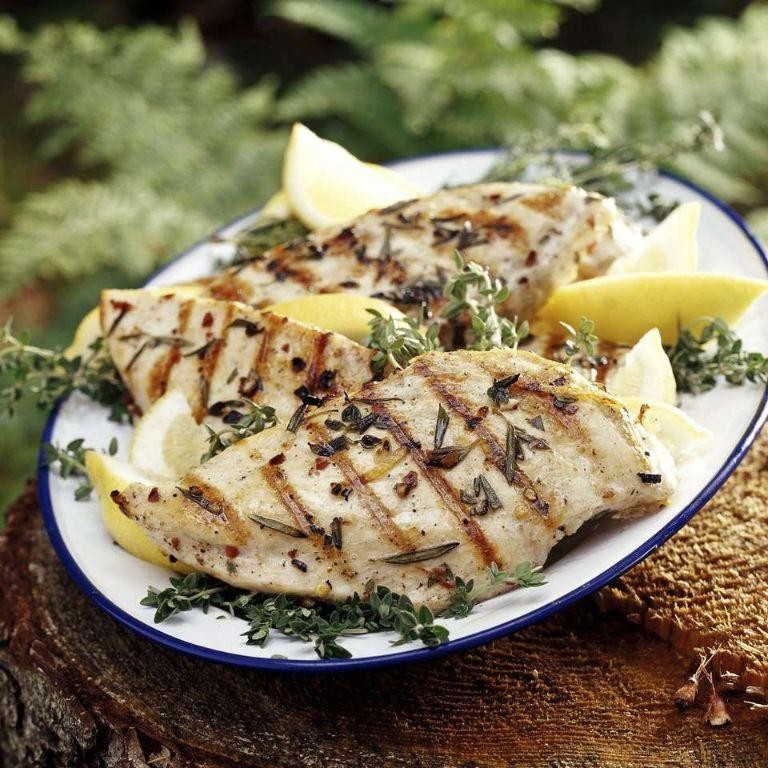
Wandering through the kitchen this afternoon, I found myself craving something simple yet deeply satisfying, the kind of meal that feels like a quiet conversation with summer itself. There’s a gentle comfort in the ritual of grilling, the way the scents of lemon and herbs can fill the air and slow the world down for a moment. This fast grilled lemon-herb chicken is that small, nourishing pause in a busy day.
2
servings20
minutes14
minutesIngredients
– 2 boneless, skinless chicken breasts (about 1 pound total)
– 2 tablespoons of olive oil
– The juice from half a large lemon (about 2 tablespoons)
– A couple of minced garlic cloves
– A small handful of fresh chopped parsley (about 2 tablespoons)
– A teaspoon of dried oregano
– A good pinch of kosher salt (about ¾ teaspoon)
– A few cracks of black pepper (about ¼ teaspoon)
Instructions
1. Pat the chicken breasts completely dry with paper towels to help them sear nicely on the grill.
2. In a medium bowl, whisk together the olive oil, lemon juice, minced garlic, chopped parsley, dried oregano, kosher salt, and black pepper.
3. Place the chicken breasts into the bowl and turn them several times to coat evenly in the marinade.
4. Let the chicken sit at room temperature for 15 minutes to allow the flavors to penetrate.
5. While the chicken marinates, preheat your grill to medium-high heat, around 425°F.
6. Lightly oil the grill grates with a folded paper towel dipped in a little extra olive oil to prevent sticking.
7. Place the marinated chicken breasts onto the hot grill and close the lid.
8. Grill for 6-7 minutes, until you see clear grill marks and the bottom edges are opaque.
9. Flip the chicken breasts over using tongs.
10. Grill for another 6-7 minutes with the lid closed.
11. Check for doneness by inserting an instant-read thermometer into the thickest part of a breast; it should read 165°F.
12. Transfer the grilled chicken to a clean plate and let it rest for 5 minutes before slicing or serving.
Each bite offers a tender, juicy texture with bright, zesty lemon and the earthy warmth of herbs. I love slicing it thinly over a bed of greens or tucking it into warm pita with a dollop of yogurt. Even the next day, cold from the fridge, it holds onto its vibrant, comforting character.
Speedy Mediterranean Tuna Pasta
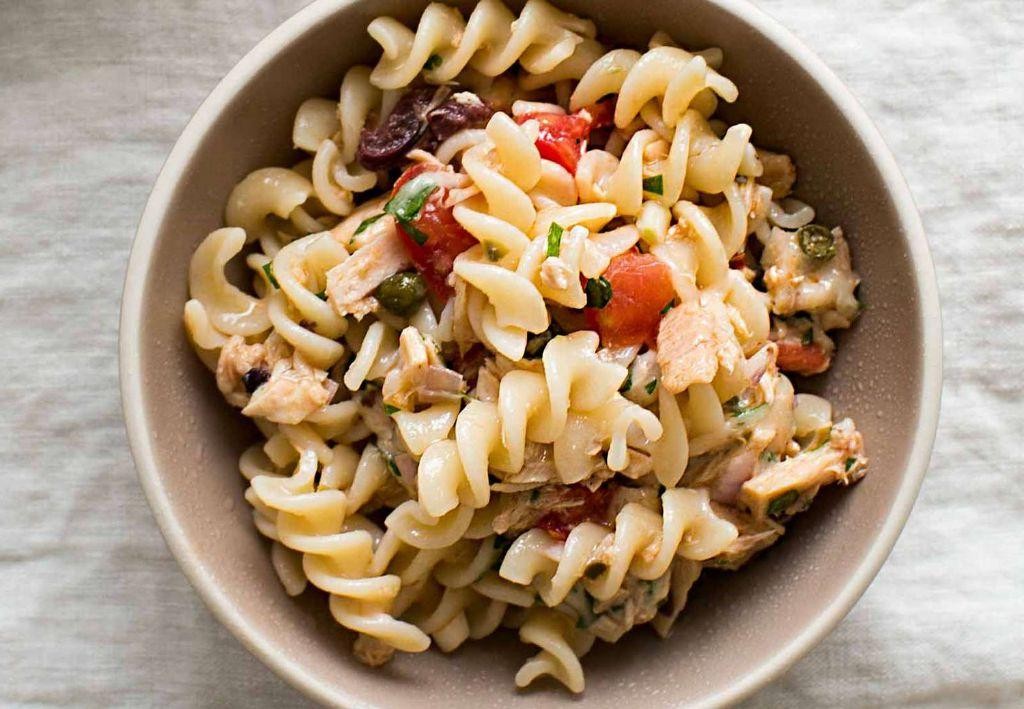
Perhaps it’s the way the afternoon light falls across my kitchen counter that makes me crave something simple yet soulful, something that bridges the gap between a busy day and a peaceful evening. This Mediterranean tuna pasta is exactly that—a gentle reminder that good food doesn’t need to be complicated to feel like a warm embrace. Pulling it together feels less like cooking and more like a quiet ritual, one that leaves the air fragrant with garlic and herbs.
2
servings10
minutes12
minutesIngredients
– A couple of cups of dried penne pasta
– A 5-ounce can of solid white tuna in olive oil, undrained
– A generous glug of extra virgin olive oil, about 2 tablespoons
– A couple of cloves of garlic, thinly sliced
– A small handful of Kalamata olives, pitted and halved
– A splash of fresh lemon juice, about 1 tablespoon
– A pinch of red pepper flakes
– A small bunch of fresh parsley, roughly chopped
– A sprinkle of sea salt
Instructions
1. Bring a large pot of salted water to a rolling boil over high heat.
2. Add the dried penne pasta to the boiling water and cook for exactly 9 minutes, stirring occasionally to prevent sticking.
3. While the pasta cooks, heat the extra virgin olive oil in a large skillet over medium-low heat.
4. Add the thinly sliced garlic to the skillet and sauté for about 2 minutes, until it turns fragrant and pale gold but not brown—this keeps it from turning bitter.
5. Stir in the undrained tuna, breaking it into large flakes with a fork, and cook for 1 minute to warm through.
6. Add the halved Kalamata olives, red pepper flakes, and a sprinkle of sea salt, stirring gently to combine.
7. Drain the cooked pasta, reserving 1/4 cup of the starchy pasta water to help the sauce cling beautifully.
8. Transfer the drained pasta directly into the skillet with the tuna mixture.
9. Pour in the reserved pasta water and the fresh lemon juice, tossing everything together until the pasta is evenly coated.
10. Turn off the heat and fold in the chopped parsley just before serving to keep its color vibrant and flavor fresh.
And just like that, you’re left with a bowl that’s both sturdy and bright—the tender pasta cradling briny olives and flaky tuna, all lifted by the zing of lemon. I love it piled high with an extra drizzle of olive oil, or tucked into a lunchbox the next day, the flavors mingling even more overnight.
Rapid Tzatziki Sauce with Fresh Dill
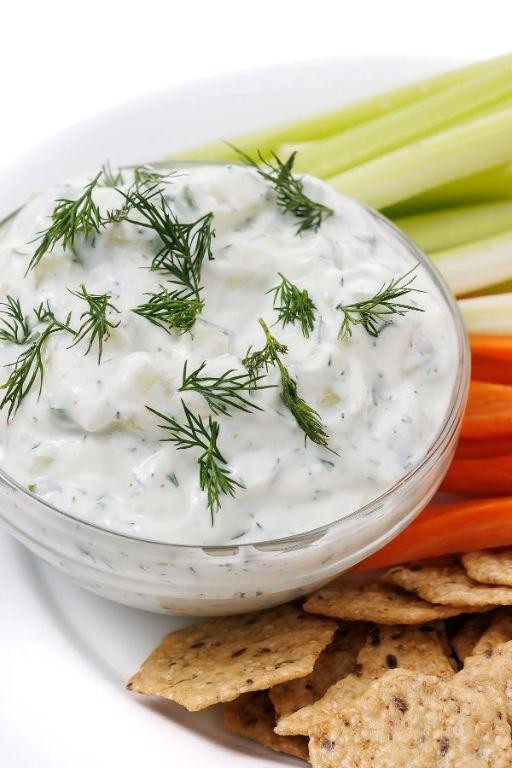
Under the gentle afternoon light, I find myself reaching for the cool, creamy comfort of tzatziki, that simple yogurt sauce that somehow makes everything taste like summer. Usually, I let the cucumbers drain for hours, but today, I’m embracing a quicker path to that same refreshing flavor, a small rebellion against the clock.
2
servings15
minutesIngredients
– 1 cup of plain, full-fat Greek yogurt
– 1 medium cucumber, grated
– 1 tablespoon of extra virgin olive oil
– A big splash of fresh lemon juice (about 1 tablespoon)
– 1 small garlic clove, minced
– A small handful of fresh dill, finely chopped
– A good pinch of kosher salt
Instructions
1. Grate the entire cucumber, skin on, using the large holes of a box grater.
2. Place the grated cucumber in the center of a clean kitchen towel, gather the edges, and squeeze firmly over the sink for 1 full minute to remove excess water; this prevents a watery sauce.
3. In a medium mixing bowl, combine the 1 cup of Greek yogurt and 1 tablespoon of olive oil, stirring with a spoon until smooth.
4. Add the squeezed, dried cucumber to the yogurt mixture.
5. Mince 1 small garlic clove and add it to the bowl.
6. Finely chop a small handful of fresh dill until you have about 1 tablespoon and add it to the bowl.
7. Pour in a big splash of fresh lemon juice, approximately 1 tablespoon.
8. Add a good pinch of kosher salt.
9. Stir all ingredients together with a spoon for about 30 seconds, just until everything is fully incorporated; overmixing can make the yogurt thin.
10. Cover the bowl tightly with plastic wrap and place it in the refrigerator for at least 20 minutes to allow the flavors to meld.
A final stir before serving reveals a sauce that is wonderfully thick and speckled with green. The cool, tangy yogurt is brightened by the lemon and punctuated by the gentle, aromatic dill. I love it dolloped over grilled lamb, swirled into a grain bowl, or simply as a dip for warm pita bread on a quiet evening.
Light Mediterranean Quinoa Tabbouleh
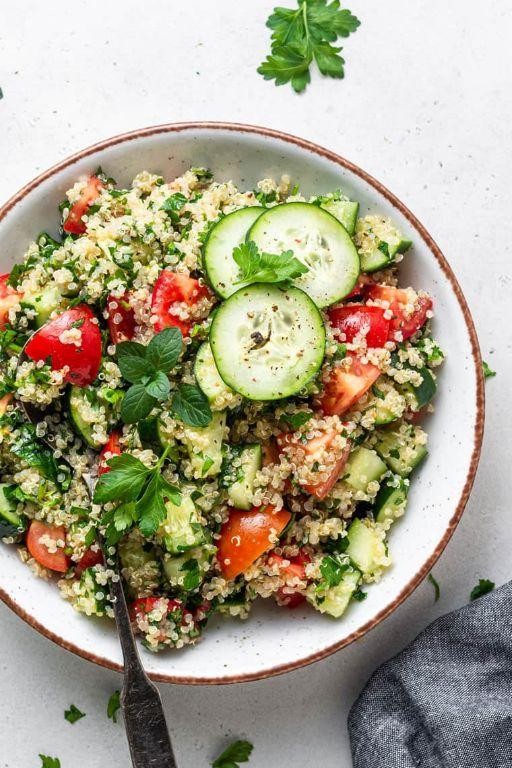
Unfolding the morning light across my kitchen counter, I find myself drawn to the quiet rhythm of preparing this tabbouleh, each ingredient whispering stories of sun-drenched hills and coastal breezes that settle gently into the soul.
5
servings25
minutes15
minutesIngredients
– 1 cup of dry quinoa
– 2 cups of water
– A generous handful of fresh parsley, finely chopped
– A couple of ripe tomatoes, diced small
– Half an English cucumber, chopped into little pieces
– A quarter of a red onion, minced ever so finely
– A big splash of extra virgin olive oil
– The juice from one whole lemon
– A pinch of salt and a few cracks of black pepper
Instructions
1. Rinse 1 cup of quinoa under cold running water in a fine-mesh strainer for about 1 minute, swirling with your fingers until the water runs clear.
2. Combine the rinsed quinoa and 2 cups of water in a medium saucepan, then bring to a boil over high heat.
3. Once boiling, reduce heat to low, cover the saucepan, and simmer for exactly 15 minutes—you’ll know it’s ready when the grains become translucent and the little white tails unfurl.
4. Remove the cooked quinoa from heat, fluff it gently with a fork, and let it cool completely to room temperature, which usually takes about 20-25 minutes.
5. While quinoa cools, finely chop a generous handful of fresh parsley until you have about 1½ cups packed.
6. Dice 2 ripe tomatoes into ¼-inch pieces, letting their juices collect on the cutting board.
7. Chop half an English cucumber into similar-sized pieces as the tomatoes.
8. Mince a quarter of a red onion into the tiniest pieces you can manage—this prevents any overwhelming sharpness in the final dish.
9. In a large mixing bowl, combine the cooled quinoa, chopped parsley, diced tomatoes, chopped cucumber, and minced red onion.
10. Drizzle a big splash of extra virgin olive oil (about 3 tablespoons) over the mixture.
11. Squeeze the juice from one whole lemon directly into the bowl, catching any seeds with your other hand.
12. Sprinkle a pinch of salt and a few cracks of black pepper over everything.
13. Toss all ingredients together gently but thoroughly with a large spoon, making sure every grain of quinoa gets coated in the dressing.
14. Let the tabbouleh rest for at least 10 minutes before serving—this allows the flavors to meld beautifully.
Keeping this tabbouleh in the refrigerator for an hour transforms it, the quinoa absorbing the lemon and olive oil until each bite bursts with bright, herbaceous freshness. I love how the cucumbers maintain their delicate crunch against the fluffy quinoa, creating a texture that feels both nourishing and light—perfect tucked into lettuce cups or scooped up with warm pita bread on a lazy afternoon.
Instant Pita Bread with Greek Spice
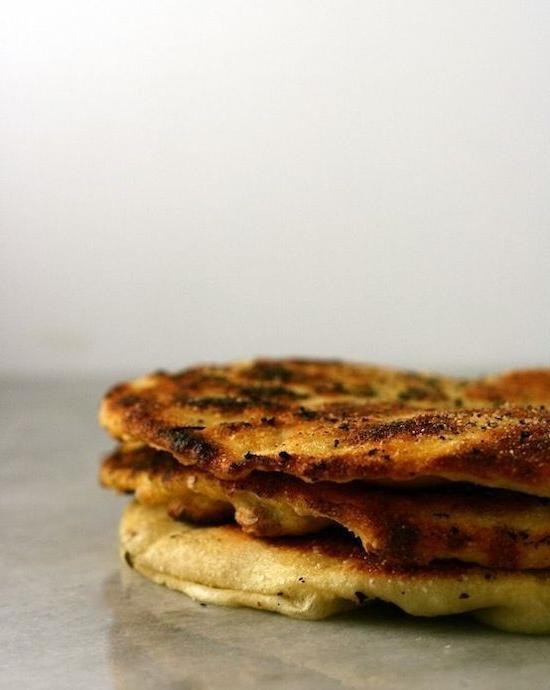
Gently, as the afternoon light settles across the kitchen counter, I find myself reaching for the simplest of comforts—a warm, pliable bread that feels both ancient and immediate, a quiet promise of nourishment. It’s a small ritual, this making of pita, one that fills the room with the earthy scent of Greek spices and the soft warmth of dough coming to life.
2
portions15
minutes16
minutesIngredients
– 2 cups of all-purpose flour, plus a little extra for dusting
– 1 teaspoon of instant yeast
– 1 teaspoon of sugar
– 3/4 cup of warm water (around 110°F)
– 2 tablespoons of olive oil
– 1 teaspoon of dried oregano
– 1/2 teaspoon of garlic powder
– 1/2 teaspoon of dried dill
– A generous pinch of salt
Instructions
1. In a large bowl, whisk together the 2 cups of flour, instant yeast, sugar, and salt until evenly combined.
2. Pour in the 3/4 cup of warm water (test it on your wrist—it should feel comfortably warm, not hot) and 2 tablespoons of olive oil, then stir with a wooden spoon until a shaggy dough forms.
3. Turn the dough out onto a lightly floured surface and knead for 5–7 minutes, until it becomes smooth and elastic (a tip: if it sticks, dust with a bit more flour, but avoid adding too much).
4. Place the dough back in the bowl, cover it with a damp kitchen towel, and let it rest in a warm spot for 30 minutes—it won’t double in size, but it will become softer and more pliable.
5. While the dough rests, mix the dried oregano, garlic powder, and dried dill in a small bowl to create your Greek spice blend.
6. After resting, divide the dough into 4 equal pieces and roll each into a ball on a floured surface.
7. Use a rolling pin to flatten each ball into a 1/4-inch thick circle, sprinkling the Greek spice blend evenly over one side of each round (a tip: press gently so the spices adhere without tearing the dough).
8. Heat a dry skillet or griddle over medium-high heat until a drop of water sizzles and evaporates immediately.
9. Place one spiced pita round in the hot skillet, spice-side up, and cook for 1–2 minutes, until bubbles form and the bottom develops golden-brown spots.
10. Flip the pita and cook for another 1–2 minutes, until the second side is lightly charred and the bread puffs up slightly (a tip: don’t press down—let the steam do the work for that soft pocket).
11. Repeat with the remaining dough rounds, stacking the cooked pitas under a towel to keep them warm and pliable.
Perfectly warm and flecked with herbs, these pitas emerge tender with a subtle chew, their aroma hinting at sun-drenched hillsides. Tear one open to cradle hummus or tuck in grilled vegetables, or simply enjoy them plain, their gentle flavor a quiet companion to any meal.
Rapid Falafel with Tahini Sauce

When the afternoon light slants through the kitchen window, I find myself craving something earthy and nourishing, something that fills the space with the warm scent of cumin and chickpeas. This rapid falafel comes together in moments, a humble bowl of comfort that feels both ancient and immediate.
12
patties15
minutes25
minutesIngredients
– A 15-ounce can of chickpeas, drained and rinsed
– A quarter cup of all-purpose flour
– A couple of cloves of garlic, minced
– A tablespoon of olive oil
– A teaspoon of ground cumin
– Half a teaspoon of baking powder
– A generous pinch of salt
– A quarter cup of tahini
– A tablespoon of lemon juice
– A splash of water
Instructions
1. Preheat your oven to 375°F and line a baking sheet with parchment paper.
2. In a medium bowl, combine the drained chickpeas, minced garlic, cumin, salt, and baking powder.
3. Mash the mixture with a fork or potato masher until it holds together but still has some texture.
4. Stir in the flour until just combined—overmixing can make the falafel dense.
5. Shape the mixture into 12 small patties, about 1-inch thick, and place them on the prepared baking sheet.
6. Brush the tops of the patties lightly with olive oil.
7. Bake for 20–25 minutes, flipping halfway through, until golden brown and crisp on the outside.
8. While the falafel bakes, whisk together the tahini, lemon juice, and a splash of water in a small bowl until smooth.
9. Add more water, a teaspoon at a time, if needed, to reach a drizzling consistency—this prevents the sauce from seizing up.
My favorite way to serve these is tucked into warm pita with crisp lettuce and a generous drizzle of that creamy tahini sauce. The falafel are wonderfully crisp on the outside, tender within, with a nutty, savory depth that’s brightened by the lemon in the sauce.
Swift Mediterranean Veggie Pizza

Dipping into the quiet kitchen this afternoon, I found myself craving something both vibrant and comforting, something that would fill the space with the warm, earthy scents of the Mediterranean without demanding too much effort. This simple veggie pizza came together like a gentle thought, each ingredient a quiet note in a familiar, satisfying melody. It’s the kind of meal that feels like a slow, deep breath at the end of a long day.
1
pizza25
minutes15
minutesIngredients
– One store-bought pizza dough ball, about a pound
– A generous half cup of your favorite tomato sauce
– A couple of big handfuls of shredded mozzarella cheese
– A small handful of crumbled feta cheese
– A good drizzle of extra virgin olive oil
– A splash of balsamic glaze for finishing
– A small red onion, thinly sliced
– One red bell pepper, cut into thin strips
– A couple of cloves of garlic, minced
– A small handful of pitted Kalamata olives, halved
– A big pinch of dried oregano
Instructions
1. Place your pizza dough ball on a lightly floured counter and let it sit at room temperature for 30 minutes to relax, which makes it much easier to stretch without snapping back.
2. Preheat your oven to 475°F and place a pizza stone or baking sheet inside to heat up for at least 20 minutes; a hot surface is key for a crisp crust.
3. On a floured surface, gently stretch and press the dough into a 12-inch round, being careful not to tear it.
4. Carefully remove the hot pizza stone or baking sheet from the oven and place the stretched dough directly onto it.
5. Spread the tomato sauce evenly over the dough, leaving a 1-inch border around the edges for the crust.
6. Sprinkle the shredded mozzarella cheese evenly over the sauce.
7. Scatter the sliced red onion, bell pepper strips, minced garlic, and halved Kalamata olives over the cheese.
8. Dot the surface with the crumbled feta cheese.
9. Drizzle the entire pizza with the extra virgin olive oil.
10. Sprinkle the dried oregano evenly over the top.
11. Bake the pizza in the preheated 475°F oven for 12-15 minutes, until the crust is golden brown and the cheese is bubbly and slightly spotted.
12. Remove the pizza from the oven and let it rest on a cutting board for 3 minutes before slicing; this allows the cheese to set so it doesn’t slide off.
13. Drizzle the baked pizza with the balsamic glaze just before serving.
Every bite offers a wonderful contrast—the crisp, chewy crust against the soft, melted cheeses and tender vegetables. The salty feta and briny olives play beautifully against the sweet bell pepper and sharp red onion, while the balsamic glaze adds a final touch of tangy sweetness. For a lovely variation, try scattering a handful of fresh arugula over the hot pizza right after it comes out of the oven, letting it wilt gently into the toppings.
Quick Shrimp Skewers with Garlic

Unfolding the foil on my counter, I remembered how these quick shrimp skewers became my go-to when life feels hurried yet I crave something that tastes like slow, careful attention. The garlic scent alone makes the kitchen feel like a sanctuary, even on the busiest evenings.
2
skewers25
minutes6
minutesIngredients
– About a pound of raw shrimp, peeled and deveined
– A couple of tablespoons of olive oil
– Three or four cloves of garlic, minced up finely
– A squeeze of fresh lemon juice, maybe a tablespoon
– A pinch of salt and a few cracks of black pepper
– A handful of wooden skewers, soaked in water for a bit
Instructions
1. Soak your wooden skewers in cold water for at least 20 minutes to keep them from burning on the grill.
2. Pat the shrimp completely dry with paper towels—this helps them get a nice sear instead of steaming.
3. In a medium bowl, whisk together the olive oil, minced garlic, lemon juice, salt, and pepper.
4. Add the shrimp to the bowl and toss gently until each one is coated in the marinade.
5. Thread the shrimp onto the soaked skewers, placing about 4 to 5 shrimp per skewer.
6. Preheat your grill or grill pan to medium-high heat, around 400°F.
7. Place the skewers on the hot grill and cook for 2 to 3 minutes per side, until the shrimp turn pink and opaque with slight grill marks.
8. Remove the skewers from the heat immediately to avoid overcooking—shrimp can go from perfect to rubbery in seconds.
9. Let them rest for a minute before serving to allow the juices to settle.
You’ll love how the garlic infuses each bite with warmth, while the shrimp stay tender and juicy. Try serving them over a bed of fluffy rice or with a simple salad to soak up the lemony drippings—it turns a quick meal into a little celebration.
Easy Mediterranean Couscous Salad
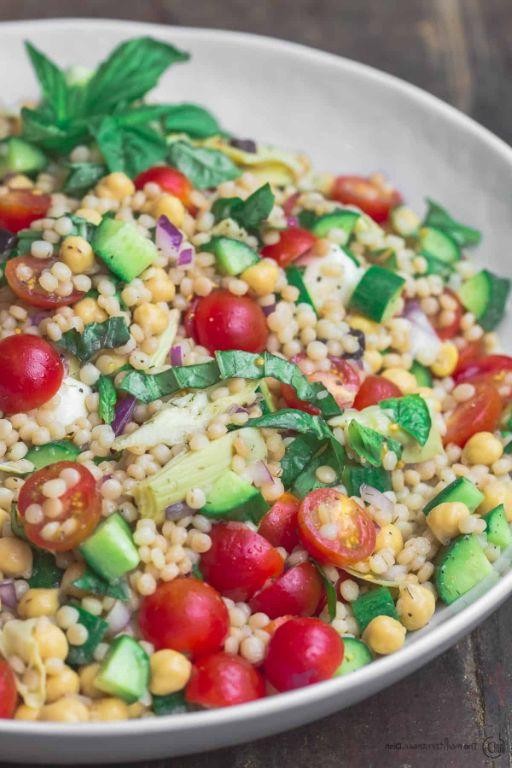
Years of bustling kitchens and hurried meals have taught me that some of the most satisfying dishes are born from quiet moments and simple ingredients. Yesterday afternoon, as golden light spilled across the counter, I found myself reaching for the familiar comforts of the Mediterranean pantry, letting my hands guide me toward something both nourishing and effortless.
2
servings20
minutes10
minutesIngredients
– 1 cup of dry couscous
– 1 ¼ cups of boiling water
– a generous glug of extra virgin olive oil
– a couple of juicy lemons, for their bright juice
– a big pinch of kosher salt
– a handful of fresh parsley, roughly chopped
– a small handful of fresh mint leaves, torn gently
– a couple of ripe cherry tomatoes, halved
– half of a crisp cucumber, diced small
– a quarter of a red onion, sliced paper-thin
– a handful of briny Kalamata olives, pitted
– a good crumbling of feta cheese
Instructions
1. Place 1 cup of dry couscous in a medium heatproof bowl.
2. Pour 1 ¼ cups of boiling water directly over the couscous.
3. Immediately cover the bowl tightly with plastic wrap and let it sit undisturbed for exactly 10 minutes—this allows the couscous to steam perfectly and absorb all the liquid.
4. While the couscous rests, whisk together a generous ¼ cup of extra virgin olive oil and the juice of 2 lemons in a small bowl until emulsified.
5. Stir in 1 teaspoon of kosher salt into the dressing.
6. After 10 minutes, uncover the bowl and fluff the couscous thoroughly with a fork to separate the grains and prevent clumping.
7. Pour the prepared dressing over the warm, fluffed couscous and toss gently to coat every grain.
8. Add ½ cup of roughly chopped fresh parsley and ¼ cup of torn fresh mint leaves to the couscous.
9. Gently fold in 1 cup of halved cherry tomatoes, 1 cup of diced cucumber, ¼ cup of thinly sliced red onion, and ½ cup of pitted Kalamata olives until evenly distributed.
10. Crumble ½ cup of feta cheese over the top and give one final, light toss to incorporate, leaving some cheese visible for visual appeal.
11. Let the salad rest at room temperature for 15 minutes before serving to allow the flavors to meld together beautifully. Here, the salad settles into itself, the grains plump and separate, each bite a little symphony of creamy feta, sharp onion, and the fresh burst of herbs. I love scooping it into butter lettuce cups for a light lunch or piling it next to grilled chicken for a more substantial supper.
Fast Caprese Stuffed Avocados
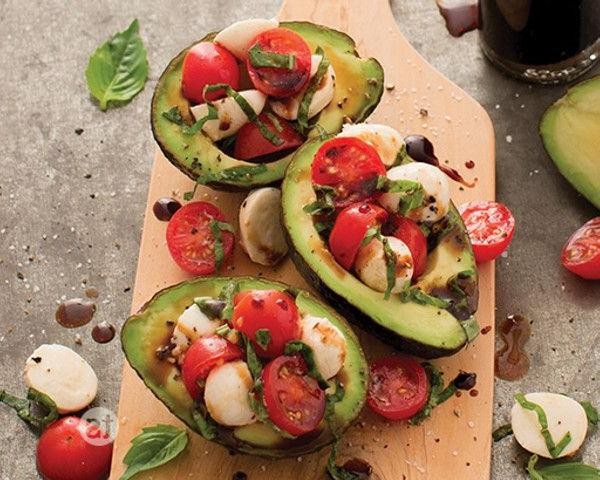
Sometimes the simplest combinations feel like small miracles when you’re standing in your kitchen, staring at ingredients that need to become lunch. Soft avocados and bright tomatoes come together here in a way that feels both effortless and special, like remembering a recipe you’ve always known but never written down.
3
portions15
minutesIngredients
– 2 ripe but firm avocados
– a couple of handfuls of cherry tomatoes
– a small ball of fresh mozzarella cheese
– a generous drizzle of extra virgin olive oil
– a splash of balsamic glaze
– a small handful of fresh basil leaves
– a pinch of flaky sea salt
– a few cracks of black pepper
Instructions
1. Rinse 2 ripe but firm avocados under cool running water and pat them completely dry with a clean kitchen towel.
2. Carefully slice each avocado in half lengthwise around the pit, then twist the halves gently to separate them.
3. Remove the pits by tapping them sharply with a chef’s knife blade and twisting the knife to lift the pit out—keep your fingers clear of the blade.
4. Use a spoon to slightly enlarge each avocado half’s cavity by scooping out about 1 tablespoon of flesh, creating more room for filling.
5. Rinse a couple of handfuls of cherry tomatoes under cold water, then slice each tomato in half horizontally.
6. Tear a small ball of fresh mozzarella cheese into rough, bite-sized chunks using your fingers.
7. Arrange the tomato halves and mozzarella pieces evenly inside the avocado cavities, alternating them for visual appeal.
8. Drizzle a generous amount of extra virgin olive oil over each stuffed avocado half, making sure some oil reaches the filling.
9. Add a splash of balsamic glaze across the top, creating thin lines that will mingle with the olive oil.
10. Tear a small handful of fresh basil leaves into pieces and scatter them over the stuffed avocados.
11. Finish with a pinch of flaky sea salt and a few cracks of black pepper directly over each serving.
When you bite into these, the cool creaminess of avocado gives way to the juicy burst of tomatoes and the gentle stretch of mozzarella. I love serving these open-faced on a dark wooden board with crusty bread for scooping up any escaped olive oil and balsamic that pools beneath.
Speedy Olives and Feta Tapenade
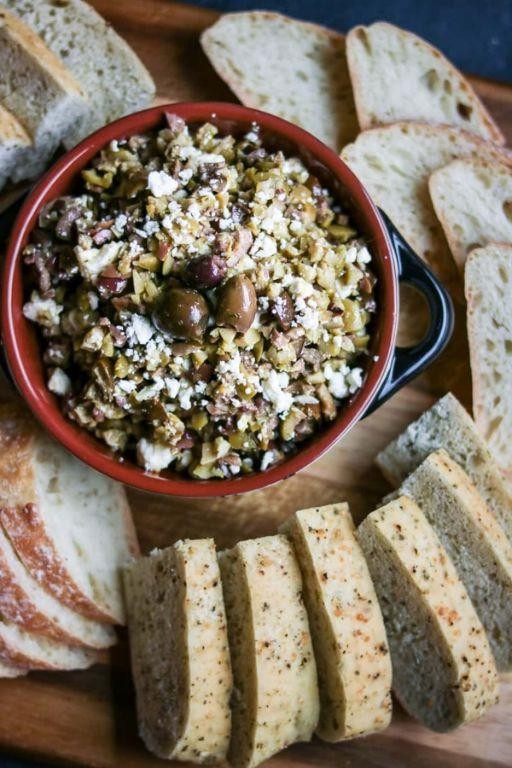
Lately, I’ve been craving something that bridges the gap between a thoughtful preparation and an instant reward, a little jar of sunshine for when the afternoon feels long. This tapenade, with its briny olives and creamy feta, is exactly that—a simple pleasure that comes together in moments, yet feels deeply satisfying.
3
servings10
minutesIngredients
– A generous cup of pitted Kalamata olives
– A heaping half-cup of crumbled feta cheese
– A couple of tablespoons of extra virgin olive oil
– A small handful of fresh parsley leaves
– One medium garlic clove
– A squeeze of fresh lemon juice (about half a lemon’s worth)
– A pinch of freshly cracked black pepper
Instructions
1. Place the pitted Kalamata olives, crumbled feta cheese, fresh parsley leaves, and the peeled garlic clove into the bowl of a food processor.
2. Pulse the ingredients about 5 to 7 times, just until they are coarsely chopped and combined, being careful not to over-process them into a paste.
3. With the food processor running on low speed, slowly drizzle in the extra virgin olive oil through the feed tube until the mixture just begins to come together.
4. Add the fresh lemon juice and a pinch of freshly cracked black pepper to the food processor bowl.
5. Pulse the mixture 2 to 3 more times to incorporate the new ingredients, stopping as soon as everything is evenly distributed.
6. Transfer the tapenade to a small serving bowl using a rubber spatula to scrape the sides of the processor bowl clean.
Creamy from the feta and robust from the olives, this spread has a wonderfully chunky texture that’s perfect for scooping. I love it smeared thickly on warm, toasted baguette slices, or try it as a vibrant topping for grilled chicken to cut through the richness.
Conclusion
Zesty, vibrant, and wonderfully simple—these 27 Mediterranean recipes bring healthy, delicious meals to your table in no time. We hope you find new favorites to add to your weekly rotation! Give a few a try, then drop a comment below telling us which one you loved most. Don’t forget to share this roundup on Pinterest so your friends can enjoy these quick dishes, too!


