
Sometimes, life gets so hectic that cooking feels like a chore. But what if you could whip up delicious, satisfying meals in minutes? We’ve gathered 20 delightful recipes perfect for busy days—think quick dinners, comforting classics, and fresh favorites that save time without skimping on flavor. Ready to make your evenings easier and tastier? Dive into this roundup and rediscover the joy of stress-free cooking!
Spicy Garlic Shrimp
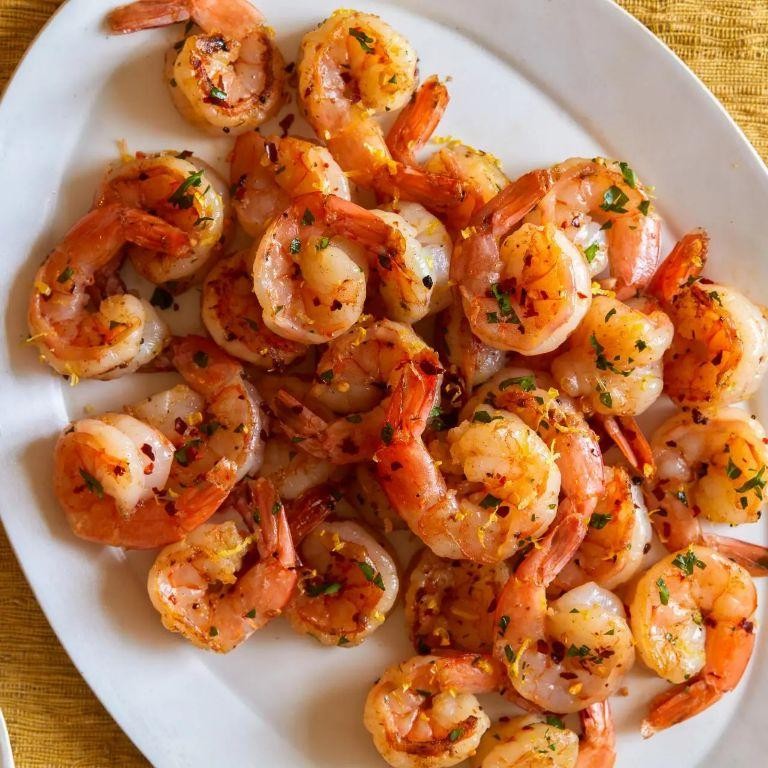
Whenever I’m craving something that feels fancy but comes together in minutes, this spicy garlic shrimp is my go-to. I actually discovered this recipe during a last-minute dinner panic when friends showed up unexpectedly, and now it’s my signature quick-entertaining dish. There’s something magical about how garlic, butter, and spice transform simple shrimp into something truly special.
4
servings10
minutes5
minutesIngredients
- For the shrimp:
- 1 pound large raw shrimp, peeled and deveined
- 2 tablespoons olive oil
- 1 teaspoon salt
- 1/2 teaspoon black pepper
- For the sauce:
- 4 tablespoons unsalted butter
- 6 garlic cloves, minced
- 1 teaspoon red pepper flakes
- 2 tablespoons fresh lemon juice
- 2 tablespoons chopped fresh parsley
Instructions
- Pat the shrimp completely dry with paper towels to ensure they sear properly instead of steaming.
- Season the shrimp evenly with 1 teaspoon salt and 1/2 teaspoon black pepper on both sides.
- Heat 2 tablespoons olive oil in a large skillet over medium-high heat until it shimmers, about 2 minutes.
- Add the shrimp to the hot skillet in a single layer, making sure they don’t overlap.
- Cook the shrimp for 2 minutes on the first side until they turn pink around the edges.
- Flip each shrimp individually using tongs and cook for exactly 1 more minute.
- Transfer the cooked shrimp to a clean plate, leaving any oil in the skillet.
- Reduce the heat to medium and add 4 tablespoons unsalted butter to the same skillet.
- Add 6 minced garlic cloves and 1 teaspoon red pepper flakes once the butter melts.
- Cook the garlic mixture for 45 seconds, stirring constantly until fragrant but not browned.
- Remove the skillet from heat and stir in 2 tablespoons fresh lemon juice to stop the cooking.
- Return the cooked shrimp to the skillet and toss to coat evenly with the sauce.
- Sprinkle 2 tablespoons chopped fresh parsley over the shrimp and give one final toss.
Honestly, the texture is what gets me every time – the shrimp stay juicy inside while the quick sear gives them that perfect slight crispness. That garlicky, buttery sauce with just the right kick from the red pepper flakes makes this dish absolutely irresistible over pasta or served with crusty bread to soak up every last drop. I love doubling the sauce recipe when I’m serving it to guests because everyone always wants extra for dipping!
Creamy Pesto Chicken Pasta
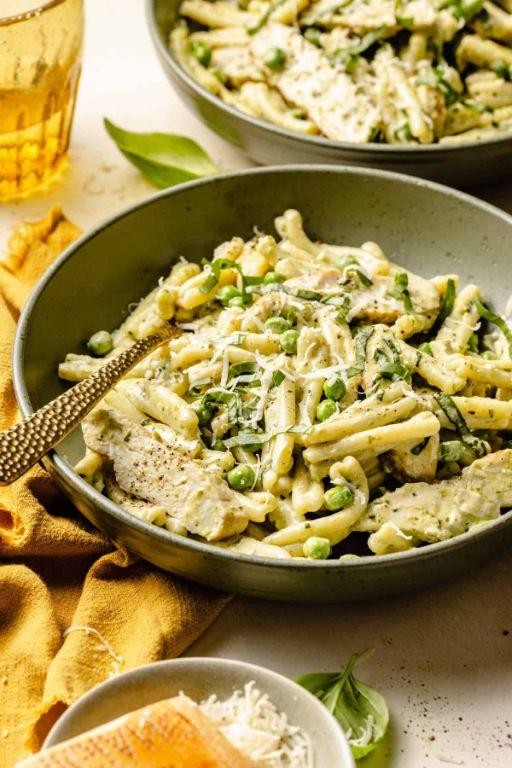
Tuesdays are my pasta night, and this Creamy Pesto Chicken Pasta has become our family’s absolute favorite. I first made it when I needed to use up leftover rotisserie chicken, and now I find myself buying extra chicken just to make this dish—it’s that good! The creamy pesto sauce comes together in minutes but tastes like you spent hours in the kitchen.
4
servings15
minutes20
minutesIngredients
For the chicken and pasta:
– 1 lb boneless, skinless chicken breasts, cut into 1-inch pieces
– 1 tbsp olive oil
– 1 tsp garlic powder
– 1/2 tsp salt
– 1/4 tsp black pepper
– 12 oz penne pasta
– 4 quarts water
– 1 tbsp salt for pasta water
For the creamy pesto sauce:
– 1 cup heavy cream
– 1/2 cup prepared basil pesto
– 1/2 cup grated Parmesan cheese
– 1/4 cup chicken broth
– 2 cloves garlic, minced
Instructions
1. Bring 4 quarts of water to a rolling boil in a large pot over high heat.
2. Add 1 tablespoon of salt to the boiling water, then add 12 ounces of penne pasta.
3. Cook the pasta for 9-11 minutes until al dente, stirring occasionally to prevent sticking.
4. While pasta cooks, heat 1 tablespoon of olive oil in a large skillet over medium-high heat.
5. Season 1 pound of chicken pieces with 1 teaspoon garlic powder, 1/2 teaspoon salt, and 1/4 teaspoon black pepper.
6. Cook chicken in the hot skillet for 6-8 minutes, turning pieces until golden brown and internal temperature reaches 165°F.
7. Remove cooked chicken from skillet and set aside on a plate.
8. Reduce heat to medium and add 2 minced garlic cloves to the same skillet, cooking for 30 seconds until fragrant.
9. Pour 1 cup of heavy cream into the skillet, scraping up any browned bits from the bottom.
10. Add 1/2 cup of pesto and 1/4 cup of chicken broth to the cream, whisking until smooth.
11. Simmer the sauce for 3-4 minutes until slightly thickened, stirring constantly.
12. Stir in 1/2 cup of grated Parmesan cheese until melted and fully incorporated.
13. Drain the cooked pasta, reserving 1/2 cup of pasta water.
14. Return drained pasta to the pot and add the cooked chicken pieces.
15. Pour the creamy pesto sauce over the pasta and chicken, tossing to coat evenly.
16. If the sauce is too thick, add reserved pasta water 2 tablespoons at a time until desired consistency is reached.
The creamy sauce clings beautifully to every noodle, while the pesto provides that fresh, herby punch that cuts through the richness. I love serving this with a simple arugula salad on the side—the peppery greens complement the creamy pasta perfectly, and it makes me feel slightly more virtuous about indulging in such a decadent dish!
Speedy Vegetable Stir-Fry
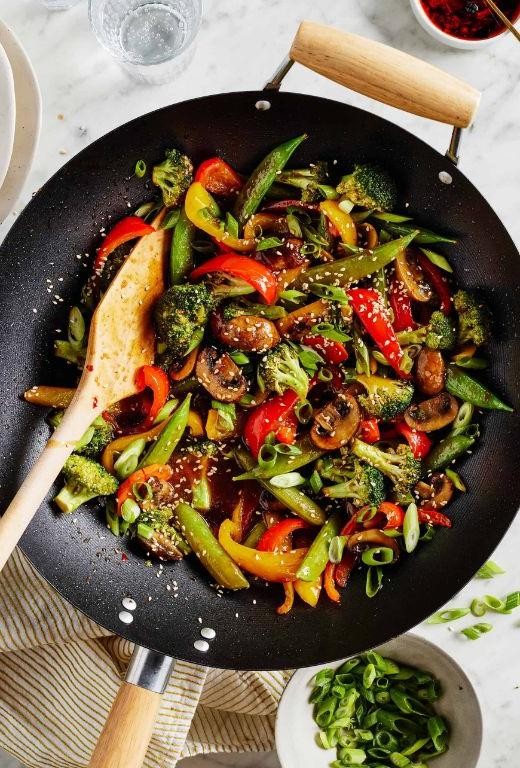
Yesterday, after another chaotic day of work deadlines and kid activities, I found myself staring into the fridge at 6 PM, willing dinner to magically appear. That’s when this lightning-fast vegetable stir-fry saved the evening—it’s become my go-to when time is tight but we still want something fresh and satisfying.
2
servings10
minutes8
minutesIngredients
- For the vegetables:
- 1 tbsp vegetable oil
- 2 cups broccoli florets
- 1 red bell pepper, sliced into strips
- 1 cup sliced carrots
- For the sauce:
- 2 tbsp soy sauce
- 1 tbsp rice vinegar
- 1 tsp sesame oil
- 1 tsp cornstarch
Instructions
- Heat 1 tbsp vegetable oil in a large wok or skillet over medium-high heat until it shimmers, about 1 minute.
- Add 2 cups broccoli florets and stir constantly for 2 minutes until they turn bright green. Tip: Cutting broccoli into uniform-sized florets ensures even cooking.
- Add 1 cup sliced carrots and continue stirring for another 2 minutes until they begin to soften.
- Add 1 sliced red bell pepper and cook for 1 more minute, stirring frequently.
- While vegetables cook, whisk together 2 tbsp soy sauce, 1 tbsp rice vinegar, 1 tsp sesame oil, and 1 tsp cornstarch in a small bowl until smooth.
- Pour the sauce mixture over the vegetables in the skillet. Tip: Whisk the cornstarch thoroughly to prevent lumps in your sauce.
- Cook, stirring constantly, for 2-3 minutes until the sauce thickens and coats all vegetables. Tip: Don’t walk away during this step—the sauce can burn quickly once thickened.
- Remove from heat immediately when sauce reaches a glossy, thickened consistency.
Last night, we ate this straight from the skillet while standing at the kitchen counter—the vegetables still had that perfect crisp-tender bite, and the savory sauce clung to every piece. Leftovers make amazing filling for lunch wraps the next day, or try serving it over quinoa for extra protein.
Simple Lemon Herb Baked Salmon
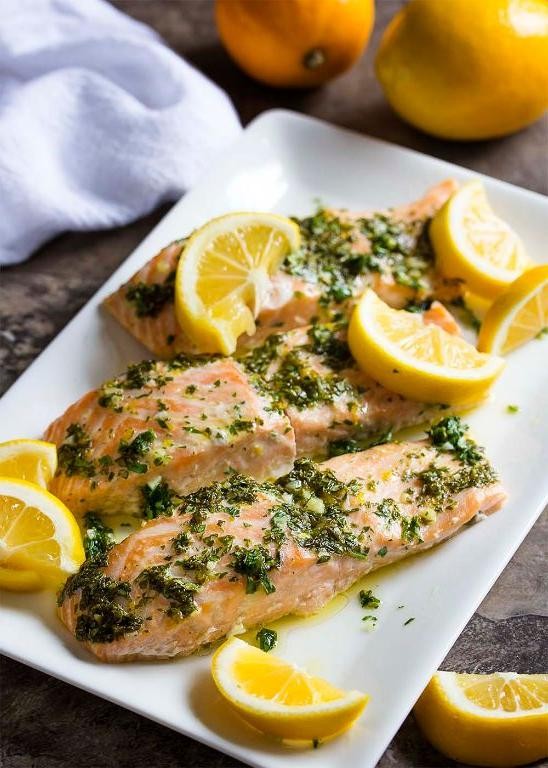
Every time I make this lemon herb baked salmon, I’m reminded of that first time I tried it at my friend’s lakeside cabin—simple ingredients coming together to create something truly magical. It’s become my go-to weeknight dinner when I want something impressive but don’t have hours to spend in the kitchen.
2
servings10
minutes15
minutesIngredients
For the Salmon Base:
– 4 (6-ounce) salmon fillets, skin-on
– 2 tablespoons olive oil
– 1 teaspoon kosher salt
– ½ teaspoon black pepper
For the Lemon Herb Topping:
– 3 tablespoons fresh lemon juice
– 2 tablespoons chopped fresh dill
– 1 tablespoon chopped fresh parsley
– 2 cloves garlic, minced
– 1 teaspoon lemon zest
Instructions
1. Preheat your oven to 400°F and line a baking sheet with parchment paper.
2. Pat the 4 salmon fillets completely dry with paper towels to ensure crispy skin.
3. Brush both sides of each salmon fillet with the 2 tablespoons of olive oil.
4. Sprinkle the 1 teaspoon of kosher salt and ½ teaspoon of black pepper evenly over all fillets.
5. Place the salmon fillets skin-side down on the prepared baking sheet, spaced 2 inches apart.
6. In a small bowl, combine the 3 tablespoons of fresh lemon juice, 2 tablespoons of chopped dill, 1 tablespoon of chopped parsley, 2 minced garlic cloves, and 1 teaspoon of lemon zest.
7. Spoon the lemon herb mixture evenly over the top of each salmon fillet, covering the surface completely.
8. Bake at 400°F for 12-15 minutes until the internal temperature reaches 145°F and the flesh flakes easily with a fork.
9. Remove the baking sheet from the oven and let the salmon rest for 3 minutes before serving.
Here’s what makes this dish special—the salmon develops beautifully flaky flesh while the herb crust creates a fragrant, slightly crispy topping. I love serving it over a bed of quinoa with roasted asparagus, or flaking it into tacos with avocado crema for a fun twist on taco Tuesday.
Effortless Chicken Tacos

During my busy weeknights, I’ve found that nothing beats a quick, flavorful meal that the whole family loves—and these effortless chicken tacos are my go-to. I actually started making them after a last-minute grocery run where I grabbed a rotisserie chicken, and now they’re a staple in our house.
8
tacos15
minutes15
minutesIngredients
- For the chicken filling:
- 2 cups shredded cooked chicken (from a rotisserie chicken)
- 1 tbsp olive oil
- 1 small onion, diced
- 1 tsp chili powder
- 1/2 tsp cumin
- 1/4 tsp garlic powder
- 1/4 cup chicken broth
- For assembling tacos:
- 8 small corn tortillas
- 1 cup shredded lettuce
- 1/2 cup diced tomatoes
- 1/4 cup shredded cheddar cheese
- 1/4 cup sour cream
Instructions
- Heat 1 tbsp olive oil in a large skillet over medium heat until it shimmers.
- Add 1 small diced onion and cook for 3–4 minutes, stirring occasionally, until softened and translucent.
- Sprinkle 1 tsp chili powder, 1/2 tsp cumin, and 1/4 tsp garlic powder over the onions, stirring for 30 seconds to toast the spices and release their aroma.
- Add 2 cups shredded cooked chicken to the skillet, tossing to coat evenly with the spice mixture.
- Pour in 1/4 cup chicken broth, scraping any browned bits from the bottom of the skillet to add depth of flavor.
- Simmer the mixture for 5–7 minutes, stirring occasionally, until the liquid is mostly absorbed and the chicken is heated through.
- While the chicken simmers, warm 8 small corn tortillas one at a time in a dry skillet over medium heat for 20–30 seconds per side until pliable and lightly toasted.
- Place the warmed tortillas on a serving plate.
- Spoon the chicken mixture evenly into the center of each tortilla.
- Top each taco with 1 cup shredded lettuce, 1/2 cup diced tomatoes, 1/4 cup shredded cheddar cheese, and 1/4 cup sour cream.
Crunchy lettuce and juicy tomatoes contrast beautifully with the tender, spiced chicken, while a dollop of cool sour cream balances the warmth. Consider serving these with a side of black beans or pairing them with a zesty mango salsa for a fresh twist that brightens every bite.
Quick Tomato Basil Soup

Sometimes on busy weeknights, I find myself craving that classic tomato soup comfort but without the lengthy simmering time—that’s when this quick version becomes my go-to. Zesty, fresh, and ready in under 30 minutes, it’s perfect for those evenings when you need warmth without the wait, and I love how the basil brightens everything up.
2
servings10
minutes21
minutesIngredients
– For the soup base: 2 tablespoons olive oil, 1 medium yellow onion (diced), 2 cloves garlic (minced), 1 (28-ounce) can crushed tomatoes, 2 cups vegetable broth, 1 teaspoon granulated sugar, 1/2 teaspoon salt, 1/4 teaspoon black pepper
– For finishing: 1/4 cup heavy cream, 1/4 cup fresh basil leaves (chopped)
Instructions
1. Heat 2 tablespoons olive oil in a large pot over medium heat until it shimmers.
2. Add 1 diced medium yellow onion and cook for 5 minutes, stirring occasionally, until translucent.
3. Stir in 2 minced garlic cloves and cook for 1 minute until fragrant.
4. Pour in 1 (28-ounce) can crushed tomatoes, 2 cups vegetable broth, 1 teaspoon granulated sugar, 1/2 teaspoon salt, and 1/4 teaspoon black pepper.
5. Bring the mixture to a boil, then reduce heat to low and simmer uncovered for 15 minutes.
6. Carefully transfer the soup to a blender and blend on high for 1 minute until completely smooth.
7. Return the blended soup to the pot and stir in 1/4 cup heavy cream until fully incorporated.
8. Turn off the heat and mix in 1/4 cup chopped fresh basil leaves.
9. Ladle the soup into bowls and serve immediately.
Zippy and velvety, this soup has a smooth texture that clings to a grilled cheese sandwich perfectly for dipping. The basil adds a fresh, aromatic finish that makes it feel gourmet without any fuss—I sometimes swirl in an extra drizzle of cream for presentation.
Cheesy Mushroom Quesadillas

Huddled in my tiny apartment kitchen during a rainy Tuesday, I realized cheesy mushroom quesadillas were the perfect comfort food solution—quick, satisfying, and endlessly customizable. Honestly, they’ve become my go-to when I want something delicious without spending hours cooking, and I love how the earthy mushrooms pair with that glorious melted cheese. It’s the kind of meal that feels indulgent but comes together in minutes, which is exactly what I need on busy weeknights.
5
portions10
minutes28
minutesIngredients
– For the mushroom filling:
– 8 oz cremini mushrooms, sliced
– 1 tbsp olive oil
– 1/4 tsp salt
– 1/4 tsp black pepper
– 1/4 tsp garlic powder
– For assembly:
– 4 large flour tortillas (10-inch)
– 2 cups shredded Monterey Jack cheese
– 2 tbsp unsalted butter, divided
Instructions
1. Heat a large skillet over medium-high heat and add 1 tablespoon olive oil.
2. Add 8 ounces sliced cremini mushrooms to the hot skillet and cook for 6-8 minutes, stirring occasionally, until they release their liquid and turn golden brown.
3. Sprinkle 1/4 teaspoon salt, 1/4 teaspoon black pepper, and 1/4 teaspoon garlic powder over the mushrooms, then stir to combine evenly.
4. Transfer the cooked mushroom mixture to a plate and wipe the skillet clean with a paper towel.
5. Return the skillet to medium heat and melt 1/2 tablespoon butter, swirling to coat the bottom.
6. Place one flour tortilla in the skillet and sprinkle 1/2 cup shredded Monterey Jack cheese evenly over one half of the tortilla.
7. Spoon one-quarter of the mushroom mixture over the cheese, spreading it evenly.
8. Fold the empty half of the tortilla over the filling and press down gently with a spatula.
9. Cook for 2-3 minutes until the bottom is golden brown and crispy, then flip carefully using the spatula.
10. Cook for another 2-3 minutes until the second side is golden brown and the cheese is completely melted.
11. Transfer the finished quesadilla to a cutting board and repeat steps 5-10 with the remaining ingredients.
12. Cut each quesadilla into 3 wedges using a sharp knife or pizza cutter.
Really, the magic happens when you bite into that crispy tortilla and get that stretchy cheese pull with the savory mushrooms. Resting the quesadillas for just a minute before cutting helps the cheese set slightly, making them easier to handle without losing any of that wonderful gooey texture. I sometimes serve them with a quick avocado crema or just good old-fashioned salsa for dipping—either way, they disappear fast!
Instant Pot Beef Chili

Craving something hearty that practically cooks itself? As a busy parent who’s always juggling work and after-school activities, my Instant Pot has become my kitchen superhero, especially on chilly autumn evenings like this one. This beef chili recipe is my go-to comfort food that fills the house with the most incredible aroma while requiring minimal hands-on time.
6
servings15
minutes35
minutesIngredients
For Browning:
– 2 lbs ground beef (80/20 blend)
– 1 tbsp olive oil
Aromatics & Vegetables:
– 1 large yellow onion, diced
– 3 cloves garlic, minced
– 1 green bell pepper, diced
Spices & Flavor Base:
– 2 tbsp chili powder
– 1 tsp cumin
– 1 tsp smoked paprika
– 1/2 tsp salt
– 1/4 tsp black pepper
Liquid & Beans:
– 1 can (15 oz) kidney beans, drained and rinsed
– 1 can (15 oz) diced tomatoes
– 1 cup beef broth
Instructions
1. Press the “Sauté” function on your Instant Pot and wait until the display reads “HOT” (about 3 minutes).
2. Add 1 tbsp olive oil to the pot, swirling to coat the bottom evenly.
3. Place 2 lbs ground beef in the pot, breaking it apart with a wooden spoon into small crumbles.
4. Cook the beef for 6-8 minutes until no pink remains, stirring occasionally to prevent sticking.
5. Add 1 diced yellow onion and cook for 3 minutes until translucent and fragrant.
6. Stir in 3 minced garlic cloves and cook for 30 seconds until aromatic (don’t let it brown).
7. Add 1 diced green bell pepper and cook for 2 minutes until slightly softened.
8. Sprinkle 2 tbsp chili powder, 1 tsp cumin, 1 tsp smoked paprika, 1/2 tsp salt, and 1/4 tsp black pepper over the mixture.
9. Stir constantly for 1 minute to toast the spices and coat all ingredients evenly.
10. Pour in 1 cup beef broth, using your spoon to scrape any browned bits from the bottom of the pot (this adds incredible flavor).
11. Add 1 can diced tomatoes with their juices and 1 can drained kidney beans, stirring gently to combine.
12. Secure the lid, ensuring the valve is set to “Sealing” position.
13. Press “Manual” or “Pressure Cook” and set the timer for 15 minutes at high pressure.
14. When cooking completes, allow natural pressure release for 10 minutes, then carefully turn the valve to “Venting” for quick release of remaining steam.
15. Carefully remove the lid away from your face to avoid steam burns.
16. Let the chili rest for 5 minutes before serving to allow flavors to meld and thickness to develop.
Perfectly hearty with tender beef and creamy beans swimming in a richly spiced tomato broth, this chili develops even deeper flavor if you can resist eating it immediately. Personally, I love serving it over baked potatoes or with a generous sprinkle of sharp cheddar cheese for that ultimate comfort food experience.
15-Minute Veggie Fried Rice
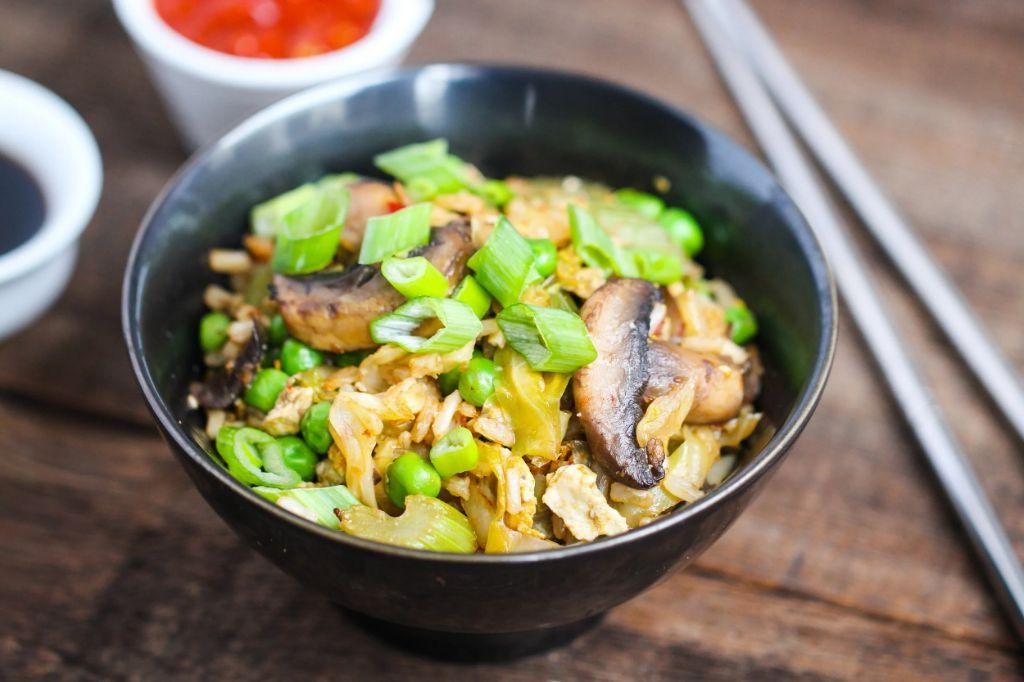
Finally, after one too many hectic weeknights ordering takeout, I perfected this lightning-fast veggie fried rice that’s become my go-to rescue meal. It all started when my neighbor dropped off a bag of garden vegetables right as my stomach was rumbling—talk about perfect timing! Now I keep pre-chopped veggies in my fridge just for this recipe, because let’s be honest, when hunger strikes, nobody wants to spend ages prepping.
2
servings5
minutes10
minutesIngredients
For the rice base
– 3 cups cold cooked white rice
– 2 tablespoons vegetable oil
For the vegetables
– 1 cup frozen mixed vegetables (peas, carrots, corn)
– 1/2 cup finely chopped yellow onion
– 2 cloves garlic, minced
For seasoning
– 2 tablespoons soy sauce
– 1 teaspoon sesame oil
– 2 large eggs
Instructions
1. Heat a large skillet or wok over medium-high heat until a drop of water sizzles immediately upon contact.
2. Pour 2 tablespoons vegetable oil into the hot skillet and swirl to coat the surface evenly.
3. Add 1/2 cup chopped yellow onion and cook for 2 minutes, stirring constantly until translucent.
4. Add 2 minced garlic cloves and cook for 30 seconds until fragrant but not browned.
5. Push onions and garlic to one side of the skillet to create space for the eggs.
6. Crack 2 large eggs directly into the empty space and scramble vigorously with a spatula for 1 minute until softly set.
7. Add 1 cup frozen mixed vegetables and cook for 2 minutes, breaking up any clumps with your spatula.
8. Incorporate 3 cups cold cooked rice, using the back of your spatula to break up any lumps for even cooking.
9. Pour 2 tablespoons soy sauce evenly over the rice mixture and stir continuously for 3 minutes until fully incorporated.
10. Drizzle 1 teaspoon sesame oil over the finished fried rice and toss one final time to distribute the flavor.
11. Remove from heat immediately to prevent overcooking. Actually, the beauty of this dish lies in the contrasting textures—fluffy rice grains against crisp-tender vegetables with that signature wok-kissed flavor. I love serving it in bowls topped with extra soy sauce and sriracha for those who want extra heat, and it pairs wonderfully with simple cucumber salad for a complete meal that feels anything but rushed.
Easy Caprese Salad
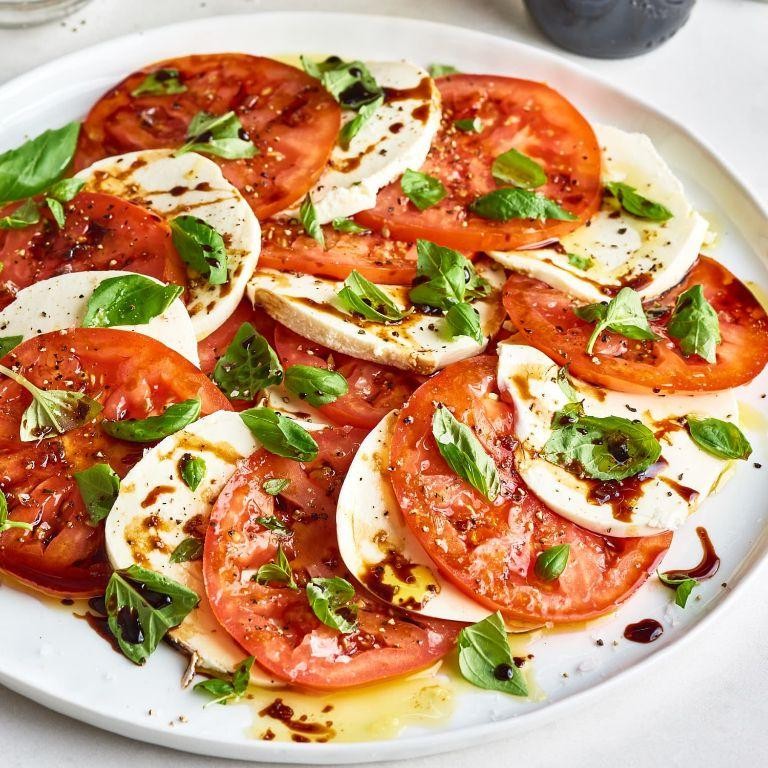
On those sweltering summer afternoons when even the thought of turning on the oven makes me sweat, this Easy Caprese Salad becomes my go-to lifesaver. I first started making it during a heatwave last July when my basil plant was threatening to take over the windowsill, and now it’s my favorite way to use up garden-fresh tomatoes.
4
servings15
minutesIngredients
- For assembly:
- 2 large ripe tomatoes
- 8 ounces fresh mozzarella cheese
- 1/4 cup fresh basil leaves
- For the dressing:
- 2 tablespoons extra virgin olive oil
- 1 tablespoon balsamic vinegar
- 1/4 teaspoon salt
- 1/8 teaspoon black pepper
Instructions
- Wash the 2 large ripe tomatoes under cool running water.
- Slice each tomato into 1/4-inch thick rounds using a sharp serrated knife. (Tip: A serrated knife prevents squishing the delicate tomato flesh.)
- Slice the 8 ounces fresh mozzarella cheese into 1/4-inch thick rounds that match your tomato slices.
- Arrange the tomato and mozzarella slices in an alternating pattern on your serving platter.
- Tuck the 1/4 cup fresh basil leaves between the tomato and mozzarella slices.
- In a small bowl, whisk together the 2 tablespoons extra virgin olive oil and 1 tablespoon balsamic vinegar until emulsified.
- Drizzle the olive oil and balsamic mixture evenly over the arranged salad.
- Sprinkle the 1/4 teaspoon salt and 1/8 teaspoon black pepper evenly across the entire salad. (Tip: Seasoning at the end ensures the salt doesn’t draw out too much moisture from the tomatoes.)
- Let the salad rest at room temperature for 10 minutes before serving to allow the flavors to meld. (Tip: Never refrigerate tomatoes as it ruins their texture and flavor.)
Using heirloom tomatoes creates a stunning rainbow effect that always impresses guests at potlucks. The creamy mozzarella against the juicy tomatoes creates this wonderful textural contrast that just melts in your mouth. Sometimes I’ll serve it over toasted baguette slices for a heartier appetizer that soaks up all the delicious dressing.
Rapid Garlic Butter Steak Bites
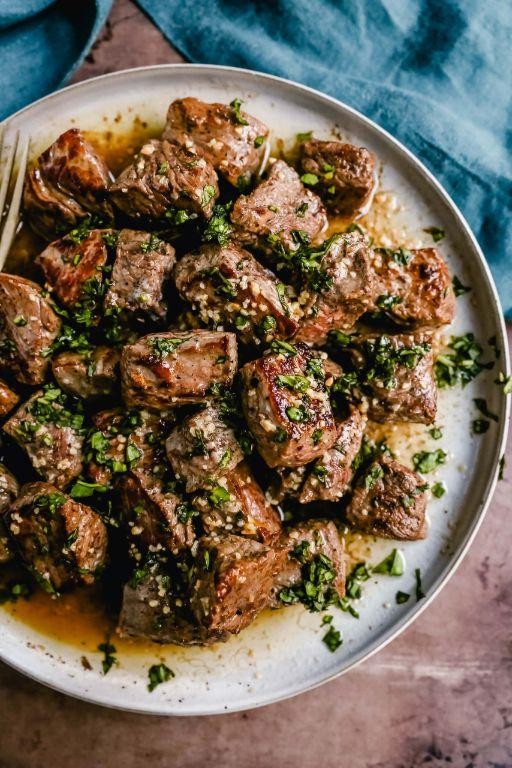
Gosh, I can’t tell you how many times this recipe has saved my weeknight dinners when I’m craving something fancy but have zero time to fuss. Growing up, my mom always said garlic makes everything better, and these steak bites are living proof of that delicious wisdom.
3
servings10
minutes7
minutesIngredients
For the steak:
- 1.5 lbs sirloin steak, cut into 1-inch cubes
- 2 tbsp olive oil
- 1 tsp kosher salt
- 1/2 tsp black pepper
For the garlic butter sauce:
- 4 tbsp unsalted butter
- 4 garlic cloves, minced
- 2 tbsp fresh parsley, chopped
- 1 tbsp lemon juice
Instructions
- Pat the sirloin steak cubes completely dry with paper towels to ensure proper browning.
- Season all sides of the steak cubes evenly with kosher salt and black pepper.
- Heat olive oil in a large skillet over medium-high heat until it shimmers, about 2 minutes.
- Arrange steak cubes in a single layer in the hot skillet, being careful not to overcrowd the pan.
- Sear steak cubes for 2 minutes without moving them to develop a golden-brown crust.
- Flip each steak cube and cook for another 2 minutes for medium-rare doneness.
- Transfer cooked steak bites to a clean plate using tongs, leaving any drippings in the skillet.
- Reduce skillet heat to medium-low and add unsalted butter to the pan drippings.
- Add minced garlic cloves to the melted butter and cook for 30 seconds until fragrant but not browned.
- Remove skillet from heat and stir in fresh parsley and lemon juice until well combined.
- Return all steak bites to the skillet and toss gently to coat evenly with the garlic butter sauce.
Absolutely incredible how these tender steak bites soak up that rich garlic butter sauce while maintaining their juicy interior. I love serving them over creamy mashed potatoes to catch every last drop of that glorious sauce, or tossing them into a crisp salad for a quick protein boost that feels anything but ordinary.
One-Pan Lemon Dill Chicken

You know those days when you want something delicious but don’t want to deal with a mountain of dishes afterward? That’s exactly why this one-pan lemon dill chicken has become my go-to weeknight hero.
5
servings15
minutes52
minutesIngredients
For the chicken:
– 4 boneless, skinless chicken breasts (about 1.5 lbs)
– 2 tbsp olive oil
– 1 tsp kosher salt
– 1/2 tsp black pepper
For the vegetables:
– 1 lb baby potatoes, halved
– 1 lb asparagus, trimmed
– 1 lemon, sliced into 1/4-inch rounds
For the sauce:
– 3 cloves garlic, minced
– 1/4 cup chicken broth
– 1/4 cup fresh dill, chopped
– 2 tbsp butter
Instructions
1. Preheat your oven to 400°F.
2. Pat the chicken breasts completely dry with paper towels to ensure proper browning.
3. Season both sides of the chicken breasts evenly with kosher salt and black pepper.
4. Heat 2 tablespoons of olive oil in a large oven-safe skillet over medium-high heat until shimmering.
5. Place the chicken breasts in the hot skillet and cook for 5-6 minutes until golden brown on one side.
6. Flip the chicken breasts and cook for another 3 minutes on the second side.
7. Remove the chicken from the skillet and set aside on a plate.
8. Add the halved baby potatoes to the same skillet in a single layer.
9. Roast the potatoes in the preheated 400°F oven for 15 minutes.
10. Remove the skillet from the oven and add the trimmed asparagus around the potatoes.
11. Arrange the lemon slices over the vegetables.
12. Return the seared chicken breasts to the skillet, nestling them among the vegetables.
13. Roast everything together in the 400°F oven for 18-20 minutes until the chicken reaches 165°F internally.
14. Transfer the chicken and vegetables to a serving platter.
15. Place the skillet back on the stovetop over medium heat.
16. Add the minced garlic to the skillet and cook for 1 minute until fragrant.
17. Pour in 1/4 cup of chicken broth, scraping up all the browned bits from the bottom of the pan.
18. Stir in 2 tablespoons of butter until melted and incorporated.
19. Remove the skillet from heat and stir in 1/4 cup of fresh chopped dill.
20. Pour the finished sauce over the chicken and vegetables.
Really, the magic happens when that bright lemon and fresh dill sauce soaks into the tender chicken and roasted vegetables. The potatoes become wonderfully crisp on the outside while staying fluffy inside, and the asparagus keeps just enough crunch to contrast the melt-in-your-mouth chicken. I love serving this over a bed of couscous to catch every last drop of that incredible pan sauce.
Fast Avocado Toast with Poached Egg

Waking up to a busy morning doesn’t mean sacrificing a delicious breakfast—this fast avocado toast with poached egg has been my go-to savior on countless rushed weekdays. I actually started making this after burning one too many slices of toast while scrambling eggs separately, and now it’s become my little kitchen hack for feeling fancy without the fuss. There’s something so satisfying about that creamy avocado and runny yolk combo that makes even the most chaotic mornings feel manageable.
2
servings8
minutes8
minutesIngredients
- For the toast and assembly:
- 2 slices sourdough bread
- 1 tablespoon olive oil
- 1 ripe avocado
- 1 tablespoon lemon juice
- 1/4 teaspoon salt
- 1/4 teaspoon black pepper
- 1/4 teaspoon red pepper flakes
- For the poached eggs:
- 2 large eggs
- 4 cups water
- 1 tablespoon white vinegar
Instructions
- Place 2 slices of sourdough bread in a toaster and toast on medium setting until golden brown, about 3 minutes.
- While bread toasts, cut 1 ripe avocado in half, remove the pit, and scoop the flesh into a small bowl.
- Add 1 tablespoon lemon juice, 1/4 teaspoon salt, 1/4 teaspoon black pepper, and 1/4 teaspoon red pepper flakes to the avocado bowl.
- Mash the avocado mixture with a fork until smooth but slightly chunky, about 1 minute.
- Pour 4 cups water and 1 tablespoon white vinegar into a medium saucepan and bring to a gentle simmer over medium-high heat, about 5 minutes.
- Crack 1 egg into a small ramekin, then gently slide it into the simmering water—this prevents the egg from spreading too much.
- Repeat with the second egg, cooking both for exactly 3 minutes for runny yolks.
- Remove toasted bread from toaster and brush each slice with 1/2 tablespoon olive oil.
- Spread the mashed avocado mixture evenly over both toast slices.
- Using a slotted spoon, lift each poached egg from the water, letting excess water drain for 10 seconds.
- Place one poached egg on top of each avocado toast slice.
Nothing beats that moment when you cut into the poached egg and the golden yolk rivers through the creamy avocado. The slight crunch of the sourdough against the silky textures makes every bite interesting, while the red pepper flakes add just enough heat to wake up your taste buds. I love serving this with a simple side of cherry tomatoes or sometimes even topping it with crispy bacon bits for when I’m feeling extra indulgent.
Conclusion
You now have 20 delightful recipes to make busy days delicious and stress-free. We hope these quick and easy ideas bring joy to your kitchen! Try them out, leave a comment telling us your favorite, and don’t forget to share this roundup on Pinterest to help other busy cooks.