Picture this: crispy, spicy, finger-licking-good hot wings that come together faster than your favorite team can score a touchdown. Perfectly baked wings that deliver all the flavor of deep-fried without the mess or guilt. Prepare to become the MVP of game day snacks with this incredibly simple yet utterly delicious recipe!
Why This Recipe Works
- The baking powder coating creates an incredibly crispy exterior without needing to deep fry, giving you that satisfying crunch while keeping things healthier
- Our double-baking technique ensures maximum crispiness – first at high heat to render fat, then at moderate heat to achieve perfect golden-brown perfection
- The simple but powerful sauce combination of butter and hot sauce creates that classic buffalo wing flavor that clings perfectly to every nook and cranny
- Using aluminum foil and a wire rack setup means easy cleanup while allowing air circulation for even cooking and browning on all sides
- The quick 30-minute marinade in baking powder and salt draws out moisture from the skin, resulting in that professional-level crispiness we all crave
Ingredients
- 2 pounds chicken wings, separated into drumettes and flats
- 2 tablespoons baking powder (aluminum-free preferred)
- 1 teaspoon kosher salt
- 1/2 cup Frank’s RedHot Original Cayenne Pepper Sauce
- 1/4 cup unsalted butter, melted
- 1 tablespoon white vinegar
- 1/2 teaspoon garlic powder
- 1/2 teaspoon Worcestershire sauce
- Blue cheese dressing for serving
- Celery sticks for serving
- Carrot sticks for serving
Equipment Needed
- Large mixing bowl
- Wire rack
- Rimmed baking sheet
- Aluminum foil
- Tongs
- Medium saucepan
- Whisk
- Paper towels
- Instant-read thermometer
Instructions
Prep and Dry the Wings
Begin by patting your chicken wings completely dry with paper towels – I mean bone-dry, like desert-at-noon dry! This step is absolutely crucial because any moisture on the skin will steam instead of crisp up in the oven. Place your wings in a large mixing bowl and sprinkle with the baking powder and kosher salt. Now comes the fun part: toss those wings like you’re mixing a salad at a fancy restaurant! Make sure every single wing piece is evenly coated with the baking powder mixture. The baking powder works its magic by raising the pH of the skin, helping it brown and crisp up beautifully. Let them sit at room temperature for exactly 30 minutes – this gives the baking powder time to work its science magic. Pro tip: line your baking sheet with aluminum foil now to make cleanup an absolute breeze later!
Arrange for Maximum Crispiness
While your wings are marinating, position your wire rack over the foil-lined baking sheet – this setup is your secret weapon for perfect wings! The wire rack allows hot air to circulate around every wing, ensuring even cooking and preventing that dreaded soggy bottom. Arrange your wings in a single layer on the wire rack, making sure none of them are touching each other. Think of it like giving each wing its own personal space at a very exclusive wing party. If they’re too crowded, they’ll steam each other instead of getting crispy. If you need to cook more wings, use two baking sheets rather than overcrowding one. Preheat your oven to 425°F – this initial high heat is what gives us that fantastic crispy texture without deep frying. The rack position should be in the middle of the oven for even heating.
First Bake for Crispy Foundation
Slide your beautifully arranged wings into the preheated 425°F oven and set your timer for 25 minutes. This initial high-heat blast is where the magic happens – it renders out the fat from the skin and starts creating that gorgeous golden color we’re after. Resist the temptation to open the oven door during this time! Every time you peek, you let out precious heat and slow down the cooking process. After 25 minutes, you should see the wings starting to turn a beautiful light golden brown and hear that satisfying sizzle. The skin should be visibly tightening and crisping up. Using tongs, carefully flip each wing piece – this ensures both sides get equally crispy and beautiful. The bottom sides will be paler, but don’t worry, they’ll catch up in the next phase!
Second Bake and Sauce Preparation
Reduce the oven temperature to 375°F and continue baking for another 15-20 minutes. While the wings are finishing up, it’s sauce time! In a medium saucepan over low heat, combine the melted butter, Frank’s RedHot sauce, white vinegar, garlic powder, and Worcestershire sauce. Whisk constantly until everything is beautifully emulsified and warm – about 3-4 minutes. You’ll know it’s ready when the sauce is smooth and slightly thickened. Keep it warm but don’t let it boil. Meanwhile, check your wings – they should be deep golden brown and crispy looking. The internal temperature should reach 165°F when tested with an instant-read thermometer inserted into the thickest part of the meat without touching bone. If they need more time, give them another 5 minutes.
Final Toss and Serving
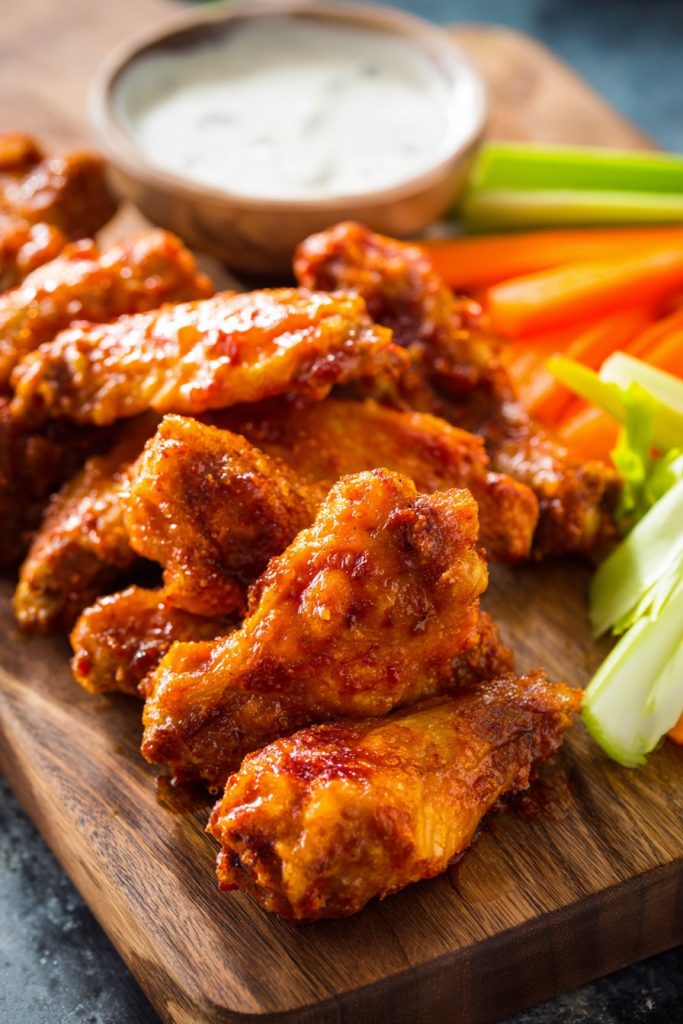
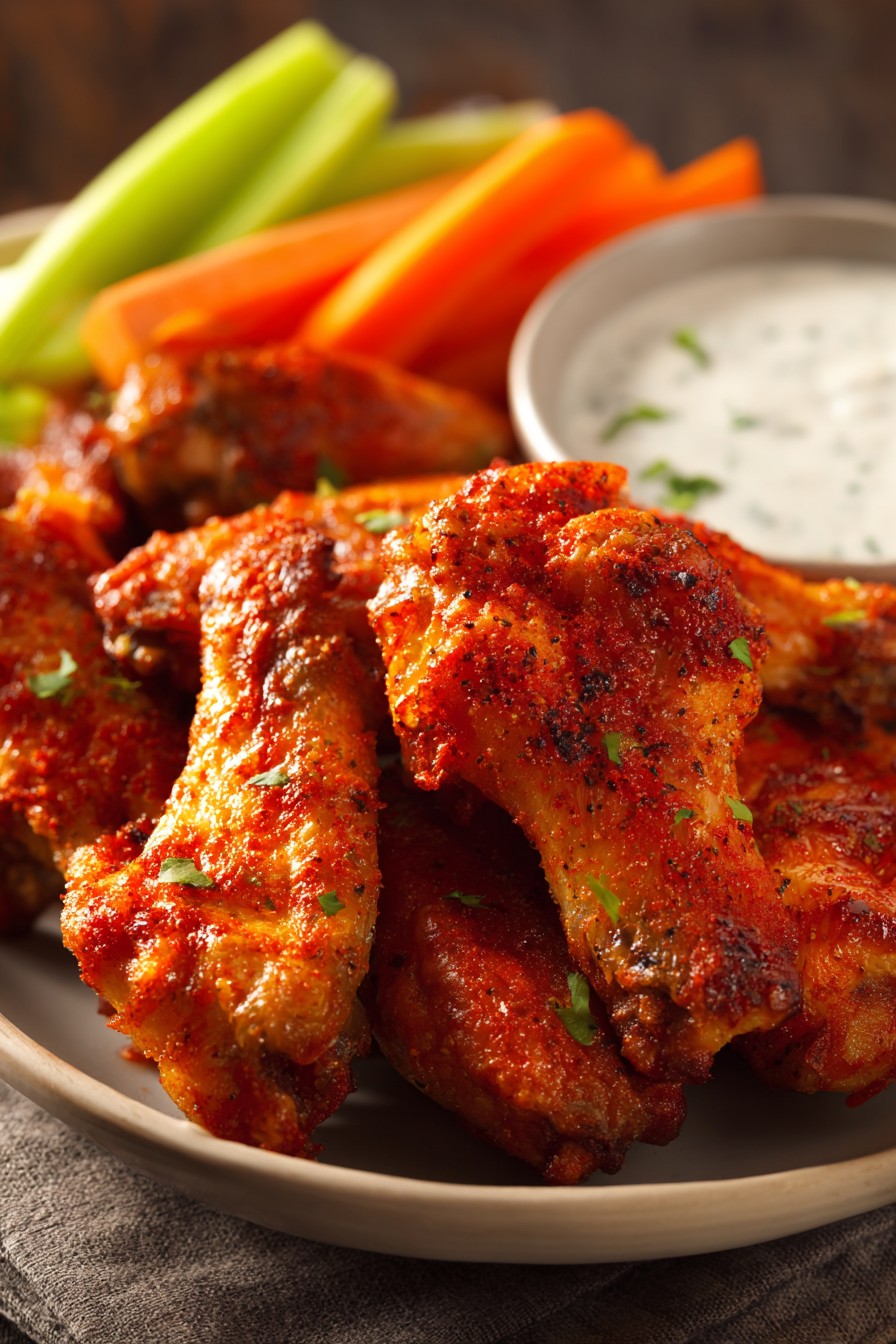
Remove the wings from the oven and let them rest on the wire rack for exactly 2 minutes – this allows the exterior to set up extra crispy. Transfer the hot wings to a large clean bowl and pour about half of your warm sauce over them. Using tongs, toss the wings gently but thoroughly until every surface is coated in that glorious orange-red sauce. Add more sauce gradually until you achieve your desired sauciness level – some like them dripping, others prefer a lighter coating. Serve immediately with crisp celery sticks, carrot sticks, and plenty of blue cheese dressing for dipping. The contrast between the spicy hot wings and cool creamy dressing is what dreams are made of! Pro tip: serve them right away while they’re still piping hot for the ultimate texture experience.
Tips and Tricks
For the absolute crispiest wings possible, try leaving them uncovered in the refrigerator overnight after coating with baking powder. This extended drying time works miracles on the skin texture! If you’re watching your sodium intake, you can reduce the salt in the baking powder coating by half – the baking powder alone will still help with crispiness. When making the sauce, consider using clarified butter instead of regular melted butter; it has a higher smoke point and creates a smoother emulsion with the hot sauce. For extra flavor depth, add a teaspoon of smoked paprika or a dash of cayenne pepper to your sauce mixture. If you’re serving a crowd, you can keep finished wings warm in a 200°F oven for up to 30 minutes before saucing them – just don’t sauce them until right before serving to maintain crispiness. For easier cleanup, spray your wire rack with non-stick cooking spray before arranging the wings – this prevents any sticking issues. If you don’t have a wire rack, you can use a slotted broiler pan or even create a makeshift rack with crumpled aluminum foil balls placed strategically on the baking sheet. For those who like extra heat, add a tablespoon of your favorite hot pepper flakes to the sauce mixture or serve with additional hot sauce on the side. When testing for doneness, make sure to check multiple wings since sizes can vary – the smallest ones might be done sooner than larger drumettes. If you’re making these for meal prep, cook the wings without sauce and store them separately; reheat the wings in a 400°F oven for 10 minutes before saucing. For an extra professional touch, use a pastry brush to apply a thin layer of sauce rather than tossing – this gives you more control over coverage. Always let your wings rest for a couple of minutes after baking before saucing – this helps the skin firm up and prevents it from getting soggy when the sauce hits it.
Recipe Variations
- Honey Garlic Variation: Replace the hot sauce mixture with 1/2 cup honey, 1/4 cup soy sauce, 4 minced garlic cloves, 1 tablespoon grated ginger, and 2 tablespoons rice vinegar. Simmer until slightly thickened for a sweet and savory alternative that’s family-friendly and absolutely addictive. The honey caramelizes beautifully on the crispy wings creating a sticky, glossy coating that’s perfect for those who prefer less heat but maximum flavor.
- Lemon Pepper Dry Rub: Skip the wet sauce altogether and toss your baked wings with 2 tablespoons lemon pepper seasoning, 1 teaspoon garlic powder, 1/2 teaspoon onion powder, and 1 tablespoon grated lemon zest. This creates a bright, zesty coating that highlights the natural chicken flavor and maintains maximum crispiness since there’s no liquid involved. Perfect for picnics or parties where you don’t want saucy fingers.
- Spicy Korean Gochujang: Create an Asian-inspired version by mixing 1/4 cup gochujang paste, 2 tablespoons honey, 1 tablespoon sesame oil, 2 minced garlic cloves, 1 tablespoon rice vinegar, and 1 teaspoon grated ginger. The result is a complex, slightly sweet, and deeply spicy wing with incredible umami depth that will have everyone asking for the recipe. Garnish with sesame seeds and sliced green onions for presentation points.
- BBQ Ranch Twist: Combine 1/2 cup of your favorite barbecue sauce with 1/4 cup ranch dressing and 1 teaspoon smoked paprika for a creamy, smoky variation that bridges the gap between traditional buffalo and barbecue wings. The creaminess of the ranch tempers the heat while adding a cool, herby dimension that makes these incredibly approachable for all palates.
- Garlic Parmesan Elegance: After baking, toss wings with 3 tablespoons melted butter mixed with 4 minced garlic cloves, then sprinkle with 1/2 cup grated Parmesan cheese and 2 tablespoons chopped fresh parsley. The cheese creates a delicious crust that complements the crispy skin, making these feel fancy enough for dinner parties while still being utterly craveable.
Frequently Asked Questions
Can I use frozen wings for this recipe?
Absolutely, but proper thawing is crucial! Always thaw frozen wings completely in the refrigerator overnight before patting them dry and proceeding with the recipe. If you try to bake frozen wings, they’ll release too much moisture and steam instead of getting crispy. For best results, place them on a plate in the fridge for 24 hours, then pat extremely dry with paper towels. The baking powder coating needs dry skin to work its magic, so take extra time with the drying step if using previously frozen wings.
Why baking powder instead of flour or cornstarch?
Baking powder is the secret weapon because it chemically alters the pH of the chicken skin, helping it brown and crisp up much more effectively than traditional coatings. While flour and cornstarch can create a crust, baking powder actually changes how the proteins in the skin react to heat, resulting in dramatically crispier texture without any heaviness. It also doesn’t leave a starchy taste or coating like flour might. The aluminum-free variety is preferred to avoid any metallic aftertaste.
How can I make these wings less spicy?
You have several options for dialing down the heat while maintaining great flavor! Start by reducing the Frank’s RedHot to 1/4 cup and increasing the butter to 1/3 cup for a milder sauce. You could also mix in 2 tablespoons of honey or brown sugar to balance the heat with sweetness. Another approach is to serve the sauce on the side rather than tossing the wings, allowing everyone to control their own spice level. For extremely sensitive palates, try using a mild wing sauce or even barbecue sauce instead.
Can I prepare these wings ahead of time?
Yes, with some strategic planning! You can coat the wings with baking powder and salt up to 24 hours in advance and store them uncovered in the refrigerator – this actually improves crispiness. The sauce can be made 3 days ahead and refrigerated; simply reheat gently before using. For parties, bake the wings without sauce and keep them warm in a 200°F oven for up to 30 minutes, then sauce right before serving. Fully sauced wings don’t reheat well as they lose crispiness.
What’s the best way to reheat leftover wings?
The oven is your best friend for reviving leftover wings! Preheat your oven to 375°F and place the wings on a wire rack over a baking sheet. Bake for 10-15 minutes until heated through and crispy again. Avoid the microwave at all costs – it will make them rubbery and sad. If the wings were sauced, they might not get quite as crispy upon reheating, but the oven method still works better than any other approach. For extra crispiness, you can give them a quick broil for the last minute.
Summary
These quick baked hot wings deliver incredible crispiness without deep frying, featuring a perfect buffalo sauce and professional results in just 45 minutes. Perfect for game day or any gathering craving spicy, finger-licking goodness with minimal cleanup required.
Quick Baked Hot Wings
4
servings15
minutes45
minutesIngredients
Instructions
- 1 Pat wings dry and toss with baking powder and salt. Let sit 30 minutes.
- 2 Arrange on wire rack over foil-lined baking sheet. Bake at 425°F for 25 minutes.
- 3 Flip wings, reduce oven to 375°F, bake 15-20 minutes until 165°F internal temperature.
- 4 Meanwhile, combine sauce ingredients in saucepan and warm through.
- 5 Toss hot wings with sauce and serve immediately with celery and blue cheese dressing.


