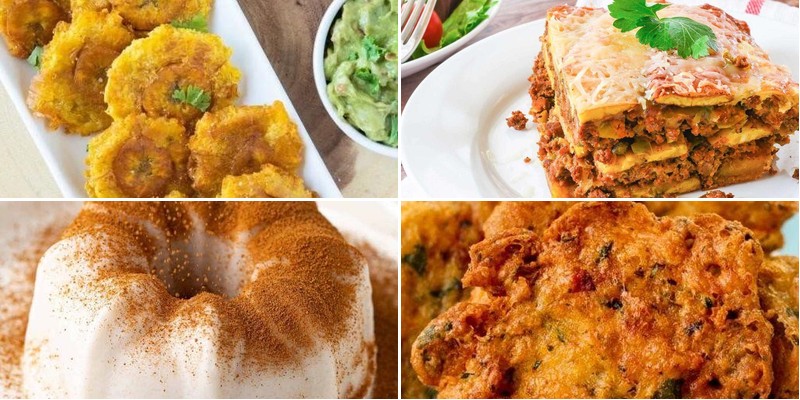
Nothing transports you to the vibrant streets of Puerto Rico quite like the island’s incredible cuisine. From comforting mofongo to zesty pernil, these authentic recipes bring the bold flavors and rich traditions of Puerto Rican cooking right to your kitchen. Get ready to spice up your meals with these 25 delicious dishes that will have your family asking for seconds!
Arroz con Gandules
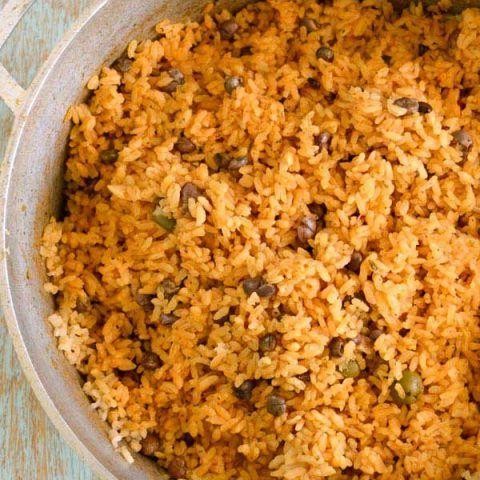
Yielding to the comforting aromas of traditional Puerto Rican cuisine, arroz con gandules combines fluffy rice with tender pigeon peas in a vibrant, seasoned base. This one-pot wonder delivers a complete meal that’s both satisfying and straightforward to prepare, even for novice cooks. Let’s walk through each step methodically to ensure your dish turns out perfectly every time.
5
servings15
minutes38
minutesIngredients
For the sofrito base:
– 2 tbsp olive oil
– 1/2 cup finely chopped yellow onion
– 1/4 cup chopped green bell pepper
– 2 tbsp chopped cilantro
– 2 cloves minced garlic
For the rice and peas:
– 1 cup long-grain white rice
– 1 (15 oz) can gandules (pigeon peas), drained
– 2 cups chicken broth
– 1 tsp dried oregano
– 1/2 tsp ground cumin
– 1/4 tsp black pepper
Instructions
1. Heat 2 tbsp olive oil in a large, heavy-bottomed pot over medium heat until it shimmers.
2. Add 1/2 cup chopped yellow onion and 1/4 cup chopped green bell pepper, sautéing for 4–5 minutes until onions turn translucent.
3. Stir in 2 tbsp chopped cilantro and 2 cloves minced garlic, cooking for 1 minute until fragrant.
4. Pour in 1 can drained gandules, 1 tsp dried oregano, 1/2 tsp ground cumin, and 1/4 tsp black pepper, stirring to coat evenly.
5. Add 1 cup long-grain white rice to the pot, toasting it for 2 minutes while stirring constantly to prevent sticking.
6. Carefully pour in 2 cups chicken broth, bringing the mixture to a boil over high heat.
7. Once boiling, immediately reduce heat to low, cover the pot tightly with a lid, and simmer for 20 minutes.
8. After 20 minutes, remove the pot from heat and let it rest, covered, for 10 minutes to allow steam to finish cooking the rice.
9. Uncover the pot and fluff the rice gently with a fork to separate grains without mashing them.
Creating a fluffy, well-seasoned dish, this arroz con gandules features tender rice grains that hold their shape alongside soft, earthy peas. The subtle herbaceous notes from oregano and cilantro balance the savory broth, making it a standout side or main course. For a creative twist, serve it topped with fried plantains or alongside grilled chicken to enhance the meal’s Caribbean flair.
Pernil Asado

Perfectly seasoned and slow-roasted to tender perfection, Pernil Asado is a traditional Puerto Rican pork shoulder that delivers incredible flavor with minimal effort. Preparing this dish requires patience but rewards you with juicy, fall-apart meat and an irresistible crispy skin. Let me guide you through each step to create this Caribbean masterpiece in your own kitchen.
8
servings30
minutes300
minutesIngredients
For the marinade:
– 1 (6-8 lb) bone-in pork shoulder
– 8 cloves garlic, minced
– 2 tbsp dried oregano
– 1 tbsp ground cumin
– 2 tsp black pepper
– 1/4 cup olive oil
– 2 tbsp white vinegar
– 2 tbsp salt
For roasting:
– 1 cup chicken broth
– 2 bay leaves
Instructions
1. Pat the pork shoulder completely dry with paper towels, including all skin surfaces.
2. Using a sharp knife, make deep slits about 2 inches apart all over the pork, cutting through the fat layer but not into the meat.
3. Combine minced garlic, oregano, cumin, black pepper, olive oil, vinegar, and salt in a small bowl to create a thick paste.
4. Rub the seasoning paste thoroughly into all the slits and over the entire surface of the pork, including under the skin where possible.
5. Place the seasoned pork in a large baking dish, cover tightly with plastic wrap, and refrigerate for at least 12 hours or overnight.
6. Remove the pork from refrigerator 2 hours before cooking and let it come to room temperature.
7. Preheat your oven to 325°F.
8. Pour chicken broth into the bottom of a roasting pan and add bay leaves.
9. Place the pork skin-side up on a rack in the roasting pan, ensuring it’s not touching the liquid.
10. Roast the pork for 4-5 hours, or until the internal temperature reaches 165°F when measured in the thickest part.
11. Increase oven temperature to 450°F and continue roasting for 20-30 minutes until the skin becomes golden brown and crispy.
12. Remove the pork from oven and let it rest for 30 minutes before carving.
13. Shred the meat using two forks, discarding any large fat pieces.
Finally, you’ll be rewarded with incredibly tender, flavorful meat that practically falls apart at the touch of a fork. The crispy skin provides a wonderful textural contrast to the juicy interior, while the garlic and oregano create an aromatic depth that fills your kitchen. Serve this pernil shredded over rice, stuffed into tacos, or as the centerpiece of your next family gathering with fried plantains on the side.
Mofongo
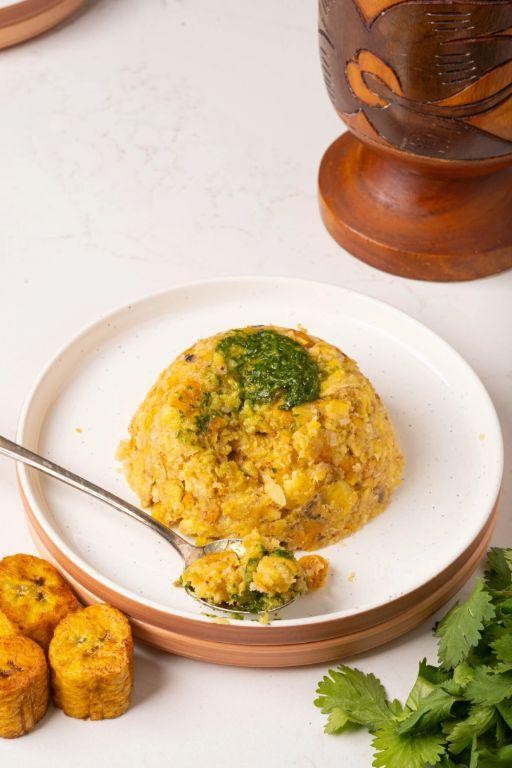
This traditional Puerto Rican dish transforms humble green plantains into a flavorful mashed creation that’s both comforting and versatile. To make authentic mofongo, you’ll need just a few key ingredients and some patient preparation to achieve its signature texture and garlicky flavor profile.
3
portions20
minutes28
minutesIngredients
For the plantains:
– 4 green plantains
– 4 cups vegetable oil for frying
– 1 tsp salt
For the seasoning mixture:
– 6 cloves garlic, minced
– 2 tbsp olive oil
– ¼ cup chicken broth
For serving:
– 1 lb shrimp, peeled and deveined
– 2 cups tomato sauce
Instructions
1. Peel all 4 green plantains completely, removing all skin and fibrous strings.
2. Cut each plantain into 1-inch thick rounds using a sharp knife.
3. Pour 4 cups vegetable oil into a heavy-bottomed pot and heat to 350°F, checking with a deep-fry thermometer.
4. Carefully add plantain pieces to the hot oil in a single layer without crowding the pot.
5. Fry plantains for 8-10 minutes until golden brown and tender when pierced with a fork.
6. Remove fried plantains with a slotted spoon and drain on paper towels.
7. While plantains are still warm, transfer them to a traditional pilón (wooden mortar) or large bowl.
8. Add 1 teaspoon salt, 6 minced garlic cloves, and 2 tablespoons olive oil to the plantains.
9. Mash the mixture vigorously with a pestle or potato masher until it forms a coarse, sticky paste.
10. Gradually pour in ¼ cup chicken broth while continuing to mash until the mixture holds together.
11. In a separate skillet, sauté 1 pound shrimp over medium-high heat for 3-4 minutes until pink and opaque.
12. Add 2 cups tomato sauce to the shrimp and simmer for 5 minutes until heated through.
13. Shape the mashed plantain mixture into 4 equal-sized balls using slightly wet hands to prevent sticking.
14. Create an indentation in the center of each mofongo ball to form a bowl shape.
15. Spoon the shrimp and tomato sauce mixture into the center of each mofongo bowl.
The resulting mofongo offers a wonderful contrast between the dense, garlicky plantain mash and the tender shrimp in savory tomato sauce. For a creative twist, try stuffing the mofongo with stewed chicken or crispy pork chunks instead of shrimp, or serve it alongside a fresh avocado salad to balance the rich flavors.
Tostones

A perfect crispy snack that’s surprisingly simple to make, tostones are twice-fried plantain slices that deliver satisfying crunch with every bite. These golden disks start with green plantains and transform through a specific frying and pressing technique that creates their characteristic texture. Let me walk you through each step to ensure your tostones come out perfectly crisp and delicious.
5
servings10
minutes15
minutesIngredients
– For the plantains: 2 large green plantains
– For frying: 2 cups vegetable oil
– For seasoning: 1 tablespoon kosher salt
Instructions
1. Pour 2 cups vegetable oil into a heavy-bottomed skillet and heat to 350°F, checking with a deep-fry thermometer.
2. Cut both ends off 2 large green plantains using a sharp knife.
3. Make 3 shallow lengthwise cuts through the peel only, being careful not to cut into the flesh.
4. Peel away the plantain skins completely, removing all green peel.
5. Cut each peeled plantain into 1-inch thick rounds on a diagonal angle.
6. Carefully place plantain rounds into the 350°F oil using tongs, working in batches to avoid crowding.
7. Fry for 3 minutes until the rounds are pale yellow and slightly softened but not browned.
8. Remove fried rounds from oil and drain on paper towels for 2 minutes until cool enough to handle.
9. Place one fried round between two small plates and press firmly until the round flattens to about ¼-inch thickness.
10. Repeat the pressing process with all remaining fried rounds.
11. Return the flattened plantain disks to the 350°F oil in batches.
12. Fry for 2-3 minutes until golden brown and crispy on both sides.
13. Remove the crispy tostones from the oil and drain on fresh paper towels.
14. Sprinkle 1 tablespoon kosher salt evenly over the hot tostones while they’re still draining.
Keep in mind that properly flattened tostones develop those satisfying crispy edges while maintaining a slightly tender center. Their savory, starchy flavor makes them incredibly versatile – try serving them alongside black bean dip or topped with fresh pico de gallo for a complete snack experience.
Pastelón

Keeping weeknight dinners exciting can be a challenge, but this Pastelón—a savory Puerto Rican plantain lasagna—delivers layers of sweet, salty, and cheesy goodness that come together with straightforward steps. Known for its comforting blend of ripe plantains and seasoned beef, it’s a crowd-pleaser that feels special yet is approachable for any home cook. Let’s walk through building this dish from the ground up, ensuring each component shines in the final bake.
2
servings25
minutes55
minutesIngredients
- For the plantain layers:
- 4 large ripe yellow plantains, peeled and sliced lengthwise into 1/4-inch thick strips
- 2 tablespoons olive oil
- For the beef filling:
- 1 pound ground beef (80% lean)
- 1 medium yellow onion, finely diced
- 1 green bell pepper, finely diced
- 3 cloves garlic, minced
- 1 (8-ounce) can tomato sauce
- 1 teaspoon dried oregano
- 1/2 teaspoon ground cumin
- 1/4 cup pitted green olives, sliced
- 1 tablespoon olive oil
- For assembly:
- 2 large eggs, beaten
- 1 cup shredded mozzarella cheese
Instructions
- Preheat your oven to 375°F and lightly grease a 9×9-inch baking dish with olive oil.
- Heat 2 tablespoons olive oil in a large skillet over medium-high heat until it shimmers, about 1 minute.
- Fry the plantain strips in batches for 2–3 minutes per side until golden brown and slightly softened, transferring them to a paper towel-lined plate to drain excess oil. Tip: Avoid overcrowding the skillet to ensure even browning and crisp edges.
- In the same skillet, heat 1 tablespoon olive oil over medium heat and sauté the diced onion and bell pepper for 4–5 minutes until translucent.
- Add the minced garlic and cook for 1 minute until fragrant, stirring constantly to prevent burning.
- Add the ground beef, breaking it up with a wooden spoon, and cook for 6–8 minutes until no pink remains.
- Stir in the tomato sauce, dried oregano, ground cumin, and sliced olives, simmering for 5 minutes until the mixture thickens slightly. Tip: Taste the filling now and adjust salt if needed, as the olives add saltiness.
- Arrange half of the fried plantain strips in a single layer at the bottom of the prepared baking dish.
- Spread all of the beef filling evenly over the plantain layer.
- Top with the remaining plantain strips, pressing gently to form a cohesive layer.
- Pour the beaten eggs evenly over the top, allowing them to seep between the layers. Tip: The eggs act as a binder, so drizzle slowly to cover the entire surface.
- Sprinkle the shredded mozzarella cheese uniformly over the top.
- Bake for 25–30 minutes until the cheese is bubbly and golden brown, and the edges are lightly crisp.
- Let the Pastelón rest for 10 minutes before slicing to set the layers. Makes this dish a showstopper by serving it with a crisp side salad to contrast the rich, savory-sweet layers, where the soft plantains meld with the zesty beef and gooey cheese. Each bite offers a balance of tender and firm textures, with the olives adding a briny pop that cuts through the richness.
Pollo Guisado

Knowing how to create a comforting, one-pot meal is essential for any home cook, and Pollo Guisado delivers exactly that with its tender chicken and rich, savory sauce that simmers to perfection in under an hour. This traditional Latin American stew brings together simple ingredients in a way that feels both familiar and exciting, making it perfect for weeknight dinners or casual gatherings. Let me guide you through each step to ensure your Pollo Guisado turns out flavorful and satisfying every time.
5
servings15
minutes60
minutesIngredients
For the chicken and initial sauté:
– 2 lbs chicken thighs, bone-in and skin-on
– 2 tbsp olive oil
– 1 tsp salt
– 1/2 tsp black pepper
For the vegetable base:
– 1 large yellow onion, diced
– 1 green bell pepper, diced
– 4 cloves garlic, minced
– 2 tbsp tomato paste
For the simmering liquid and seasoning:
– 4 cups chicken broth
– 1/2 cup dry white wine
– 1 tsp dried oregano
– 2 bay leaves
– 1 large potato, peeled and cubed into 1-inch pieces
– 1 large carrot, peeled and sliced into 1/2-inch rounds
Instructions
1. Pat the chicken thighs completely dry with paper towels and season both sides evenly with salt and black pepper.
2. Heat 2 tbsp olive oil in a large Dutch oven or heavy-bottomed pot over medium-high heat until the oil shimmers, about 2 minutes.
3. Place the chicken thighs skin-side down in the hot oil and cook undisturbed for 6-8 minutes until the skin is golden brown and crispy.
4. Flip the chicken thighs and cook for another 4 minutes on the second side, then transfer them to a clean plate. Tip: Don’t overcrowd the pot—cook in batches if needed to ensure proper browning.
5. Reduce the heat to medium and add the diced onion and green bell pepper to the same pot, scraping up any browned bits from the bottom.
6. Sauté the vegetables for 5-7 minutes, stirring occasionally, until the onion becomes translucent and softened.
7. Add the minced garlic and tomato paste to the pot and cook for 1 minute, stirring constantly, until fragrant.
8. Pour in 1/2 cup dry white wine and use a wooden spoon to deglaze the pot, scraping up all the browned bits from the bottom.
9. Add 4 cups chicken broth, 1 tsp dried oregano, and 2 bay leaves to the pot, stirring to combine all ingredients.
10. Return the browned chicken thighs to the pot along with any accumulated juices from the plate.
11. Bring the liquid to a gentle boil, then reduce the heat to low, cover the pot, and simmer for 25 minutes. Tip: Maintain a gentle simmer—bubbles should break the surface occasionally but not vigorously.
12. Add the cubed potato and sliced carrot to the pot, submerging them in the liquid.
13. Cover the pot again and continue simmering for another 20-25 minutes until the potatoes and carrots are fork-tender and the chicken reaches an internal temperature of 165°F. Tip: Check doneness by inserting a fork into a potato cube—it should slide in easily without resistance.
14. Remove the pot from heat and discard the bay leaves before serving.
Falling-apart tender chicken and soft vegetables soak up the deeply savory broth, creating a stew that’s both hearty and comforting. The potatoes break down slightly to naturally thicken the sauce, while the carrots add subtle sweetness that balances the rich tomato and garlic notes. Serve it over fluffy white rice or with crusty bread for soaking up every last drop of the flavorful liquid, or try stuffing the stew into warm tortillas for a creative twist on taco night.
Asopao de Pollo

This comforting Puerto Rican chicken and rice stew brings warmth to any table with its rich broth and tender ingredients. Think of it as a cross between soup and risotto, where the rice absorbs all the flavorful cooking liquid while remaining distinct. Today we’ll build this dish methodically, starting with a flavorful base and layering ingredients for maximum depth.
2
servings15
minutes44
minutesIngredients
For the sofrito base:
– 2 tbsp olive oil
– 1 medium yellow onion, diced
– 1 green bell pepper, diced
– 4 garlic cloves, minced
– 2 tbsp tomato paste
For the chicken and seasoning:
– 2 lbs chicken thighs, bone-in
– 1 tsp dried oregano
– 1 tsp ground cumin
– 1 tsp smoked paprika
– 1 tsp salt
For the rice and liquid:
– 1 cup long-grain white rice
– 4 cups chicken broth
– 1 cup water
– 1 bay leaf
For finishing:
– 1/4 cup fresh cilantro, chopped
– 1 tbsp fresh lime juice
Instructions
- Heat 2 tbsp olive oil in a large Dutch oven over medium heat until shimmering.
- Add diced onion and green bell pepper, cooking for 5 minutes until softened.
- Stir in minced garlic and cook for 1 minute until fragrant.
- Add tomato paste and cook for 2 minutes, stirring constantly to deepen its flavor.
- Season chicken thighs with oregano, cumin, smoked paprika, and salt on all sides.
- Place chicken skin-side down in the pot and cook for 6 minutes until golden brown.
- Flip chicken and cook for another 4 minutes to brown the other side.
- Add 1 cup rice to the pot, stirring to coat with the oil and seasonings.
- Pour in 4 cups chicken broth and 1 cup water, then add the bay leaf.
- Bring the mixture to a boil, then reduce heat to low and cover the pot.
- Simmer for 25 minutes until rice is tender and has absorbed most of the liquid.
- Remove the pot from heat and let it rest covered for 5 minutes.
- Stir in chopped cilantro and fresh lime juice just before serving.
Creating the perfect asopao means achieving that distinctive texture where the rice grains remain separate yet swim in abundant broth. The chicken becomes incredibly tender from slow simmering, falling effortlessly from the bone when served. Consider garnishing with avocado slices or serving with fried plantains to complement the stew’s savory richness.
Bacalaitos

Zesty and satisfying, bacalaitos are Puerto Rican salt cod fritters that transform humble ingredients into crispy, golden delights. These savory snacks feature a light, airy batter surrounding flavorful flakes of salted codfish, creating a perfect balance of textures. Today I’ll guide you through each step to achieve that signature crisp exterior and tender interior that makes these fritters so irresistible.
16
portions50
minutes25
minutesIngredients
For the salt cod preparation:
– 8 ounces salt cod
– 4 cups cold water
For the batter:
– 1 cup all-purpose flour
– 1/4 cup cornstarch
– 1 teaspoon baking powder
– 1/2 teaspoon garlic powder
– 1/4 teaspoon black pepper
– 2 tablespoons fresh cilantro, chopped
– 1/4 cup onion, finely diced
– 1 cup reserved salt cod cooking water
For frying:
– 2 cups vegetable oil
Instructions
1. Place 8 ounces of salt cod in a medium bowl and cover with 4 cups of cold water.
2. Soak the salt cod for 24 hours, changing the water every 8 hours to remove excess salt.
3. Drain the salt cod and transfer it to a small saucepan.
4. Cover the salt cod with fresh water and bring to a boil over medium-high heat.
5. Reduce heat to low and simmer for 15 minutes until the fish flakes easily.
6. Reserve 1 cup of the cooking water and let it cool to room temperature.
7. Drain the cooked salt cod and let it cool until safe to handle.
8. Remove any skin and bones from the salt cod.
9. Flake the salt cod into small pieces using your fingers or a fork.
10. In a large mixing bowl, whisk together 1 cup all-purpose flour, 1/4 cup cornstarch, 1 teaspoon baking powder, 1/2 teaspoon garlic powder, and 1/4 teaspoon black pepper.
11. Add 2 tablespoons chopped fresh cilantro and 1/4 cup finely diced onion to the dry ingredients.
12. Gradually pour in 1 cup of the reserved cooking water while whisking continuously.
13. Mix until the batter is smooth and has the consistency of pancake batter.
14. Gently fold the flaked salt cod into the batter until evenly distributed.
15. Let the batter rest for 10 minutes to allow the flavors to meld and the baking powder to activate.
16. Heat 2 cups vegetable oil in a deep skillet to 375°F, using a candy thermometer to monitor temperature.
17. Drop tablespoon-sized portions of batter into the hot oil, being careful not to overcrowd the pan.
18. Fry for 2-3 minutes until the bottom is golden brown and bubbles form on the surface.
19. Flip each bacalaito using tongs and fry for another 2-3 minutes until both sides are evenly golden brown.
20. Remove the fried bacalaitos with a slotted spoon and drain on a wire rack set over paper towels.
Notice how these fritters achieve that perfect crisp-to-tender ratio, with the cornstarch creating an extra-crunchy crust while the baking powder ensures a light, airy interior. The salted cod provides a savory depth that pairs wonderfully with the fresh cilantro and aromatic garlic. Serve them immediately with a squeeze of lime or your favorite dipping sauce for an authentic Caribbean street food experience.
Alcapurrias

For those seeking an authentic Puerto Rican street food experience, alcapurrias offer a satisfying combination of crispy exterior and savory filling that’s worth the effort to master. Following these methodical steps will guide you through creating these traditional fritters with confidence, ensuring perfect results every time you make them.
8
portions45
minutes21
minutesIngredients
For the Dough
– 2 cups grated green bananas
– 1 cup grated yautía (taro root)
– 1 teaspoon salt
– 2 tablespoons vegetable oil
For the Filling
– 1 pound ground beef
– 1/4 cup sofrito
– 1 tablespoon olive oil
– 1/4 cup tomato sauce
– 1/4 cup pitted green olives, chopped
– 1 teaspoon adobo seasoning
– Vegetable oil for frying (about 4 cups)
Instructions
1. Place the grated green bananas and yautía in a large bowl. 2. Add 1 teaspoon salt to the grated mixture and mix thoroughly with your hands until well combined. 3. Cover the dough mixture with plastic wrap and refrigerate for 30 minutes to allow it to firm up. 4. Heat 1 tablespoon olive oil in a skillet over medium heat until shimmering. 5. Add 1 pound ground beef to the hot skillet and cook for 5 minutes, breaking it up with a spatula. 6. Stir in 1/4 cup sofrito and cook for 2 minutes until fragrant. 7. Add 1/4 cup tomato sauce, 1/4 cup chopped green olives, and 1 teaspoon adobo seasoning to the beef mixture. 8. Cook the filling for 8 minutes over medium heat, stirring occasionally, until the liquid has reduced. 9. Remove the filling from heat and let it cool completely to room temperature. 10. Take 1/4 cup of the chilled dough and flatten it into a 4-inch circle in the palm of your hand. 11. Place 2 tablespoons of the cooled beef filling in the center of the dough circle. 12. Carefully fold the edges of the dough over the filling to enclose it completely. 13. Shape the filled dough into an oval shape about 3 inches long, ensuring no filling is exposed. 14. Heat 4 cups vegetable oil in a deep pot to 350°F, using a deep-fry thermometer to verify the temperature. 15. Gently place 3-4 alcapurrias into the hot oil using a slotted spoon. 16. Fry the alcapurrias for 6-8 minutes, turning them occasionally with the slotted spoon until golden brown. 17. Remove the fried alcapurrias from the oil and drain them on a wire rack set over a baking sheet for 3 minutes. 18. Repeat the frying process with the remaining alcapurrias, maintaining the oil temperature at 350°F. Very carefully test your first alcapurria by cutting it open to ensure the filling is hot and the dough is cooked through—this golden-brown exterior should give way to a tender, perfectly cooked interior. Vibrant with the complex flavors of seasoned beef and briny olives wrapped in that distinctive starchy casing, these fritters shine when served immediately with a side of hot sauce for dipping.
Sancocho
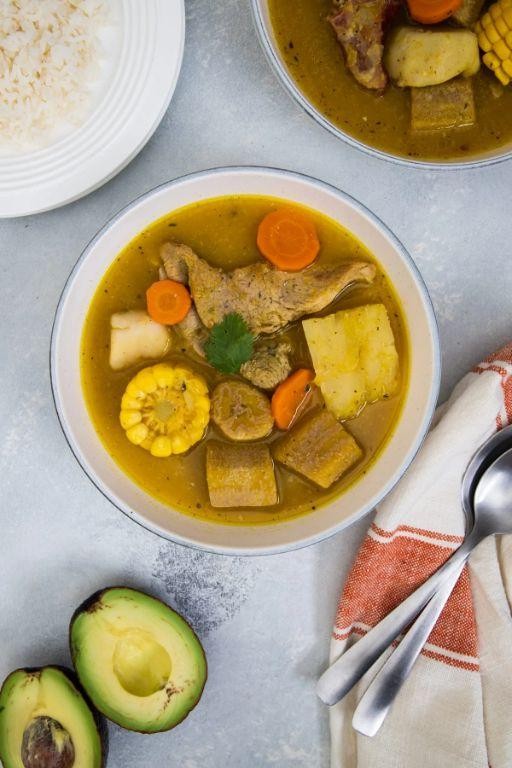
You’re about to discover why sancocho has been a cherished one-pot wonder across Latin American kitchens for generations. This hearty stew slowly simmers an array of root vegetables and meats into a comforting, flavorful broth that’s perfect for feeding a crowd or enjoying as leftovers throughout the week.
8
servings25
minutes90
minutesIngredients
For the Meat Base
- 2 lbs beef chuck, cut into 1-inch cubes
- 1 lb chicken thighs, bone-in
- 2 tbsp olive oil
- 1 large yellow onion, diced
- 4 garlic cloves, minced
- 1 green bell pepper, diced
For the Broth and Vegetables
- 8 cups chicken broth
- 2 ears corn, cut into 2-inch rounds
- 1 lb yuca, peeled and cut into 2-inch chunks
- 1 lb potatoes, peeled and quartered
- 1 lb plantains, peeled and cut into 1-inch slices
- 1 tbsp dried oregano
- 1 tsp ground cumin
- 2 bay leaves
- 1 tbsp salt
For Serving
- 1/4 cup fresh cilantro, chopped
- 1 lime, cut into wedges
- 1 avocado, sliced
Instructions
- Heat 2 tbsp olive oil in a large 8-quart Dutch oven over medium-high heat until shimmering.
- Season 2 lbs beef chuck cubes with 1 tsp salt and sear until browned on all sides, about 6-8 minutes total.
- Add 1 lb chicken thighs skin-side down and cook until golden brown, approximately 4 minutes per side.
- Transfer all meats to a clean plate, leaving drippings in the pot.
- Add diced onion, minced garlic, and diced bell pepper to the hot pot, scraping up browned bits with a wooden spoon.
- Sauté vegetables until softened and fragrant, about 5 minutes.
- Return all meats to the pot along with any accumulated juices.
- Pour in 8 cups chicken broth, ensuring it covers the ingredients by at least 1 inch.
- Stir in 1 tbsp dried oregano, 1 tsp ground cumin, 2 bay leaves, and remaining 2 tsp salt.
- Bring to a boil, then reduce heat to maintain a gentle simmer, partially covering with a lid.
- Cook for 45 minutes, skimming off any foam that rises to the surface with a slotted spoon.
- Add yuca chunks and plantain slices, submerging them completely in the broth.
- Continue simmering for another 20 minutes until yuca becomes slightly translucent around the edges.
- Add potato quarters and corn rounds, arranging them evenly throughout the pot.
- Simmer uncovered for final 15 minutes until potatoes are fork-tender but not falling apart.
- Remove bay leaves and discard them properly.
- Ladle sancocho into deep bowls, ensuring each serving gets a variety of meats and vegetables.
- Garnish with fresh cilantro, avocado slices, and a squeeze of lime juice just before serving.
The finished sancocho presents a rich, amber broth that clings to the softened root vegetables, while the meats become fall-apart tender after their long simmer. Each spoonful delivers contrasting textures—from the starchy yuca to the sweet plantains—balanced by the bright acidity of lime. For a traditional presentation, serve it with white rice on the side to soak up the deeply flavored liquid, or enjoy it as a complete meal in a bowl with warm corn tortillas.
Tembleque

Just imagine a dessert that transforms simple pantry ingredients into a silky, coconut-infused masterpiece with minimal effort. Jiggly yet firm, this Puerto Rican classic requires no baking and delivers tropical elegance in every spoonful. Let’s walk through creating this coconut custard step by step.
8
servings5
minutes12
minutesIngredients
For the coconut mixture:
- 4 cups unsweetened coconut milk
- 1 cup granulated sugar
- 1/2 cup cornstarch
- 1/4 tsp salt
For finishing:
- 1 tsp ground cinnamon
Instructions
- Pour 4 cups unsweetened coconut milk into a heavy-bottomed saucepan.
- Whisk in 1 cup granulated sugar until completely dissolved.
- Add 1/2 cup cornstarch and 1/4 tsp salt to the saucepan.
- Whisk continuously until no cornstarch lumps remain, about 2 minutes.
- Turn the burner to medium heat and cook the mixture, whisking constantly.
- Continue whisking as the mixture thickens, about 8-10 minutes.
- Cook until the mixture becomes very thick and pulls away from the pan sides, about 2 more minutes.
- Immediately pour the thickened mixture into a 9-inch pie dish or individual molds.
- Smooth the top surface with a spatula dipped in warm water.
- Cool the tembleque at room temperature for 30 minutes.
- Cover the dish with plastic wrap, pressing it directly onto the surface.
- Refrigerate for at least 4 hours or until completely set and firm.
- Sprinkle 1 tsp ground cinnamon evenly over the top before serving.
Creamy yet surprisingly light, this tembleque offers a delicate coconut flavor with just the right sweetness. The smooth, jiggly texture makes it feel both luxurious and playful, while the cinnamon dusting adds warm contrast. Serve it chilled with fresh mango slices or toasted coconut flakes for extra tropical flair.
Piñon

Knowing how to make Piñon is like having a secret weapon for family dinners—this layered casserole combines savory ground beef, sweet plantains, and melted cheese in a comforting dish that’s easier to assemble than you might think. Keep your ingredients prepped and follow each step methodically for a foolproof result. Let’s walk through the process together, starting with the plantains and building up to a golden, bubbly finish.
4
servings20
minutes45
minutesIngredients
- For the plantain base:
- 2 large ripe plantains, peeled and sliced into 1/2-inch rounds
- 2 tbsp vegetable oil
- For the meat filling:
- 1 lb ground beef (80% lean)
- 1 medium yellow onion, finely chopped
- 2 cloves garlic, minced
- 1 (8 oz) can tomato sauce
- 1 tsp dried oregano
- 1/2 tsp ground cumin
- 1/2 tsp salt
- 1/4 tsp black pepper
- For assembly:
- 1 cup shredded Monterey Jack cheese
- 1/4 cup chopped fresh cilantro
Instructions
- Preheat your oven to 375°F and lightly grease a 9×9-inch baking dish.
- Heat 2 tbsp vegetable oil in a large skillet over medium heat until it shimmers.
- Arrange the plantain rounds in a single layer in the skillet.
- Fry the plantains for 3–4 minutes per side, until golden brown and slightly caramelized. Tip: Avoid crowding the skillet to ensure even browning.
- Transfer the fried plantains to a paper towel-lined plate to drain excess oil.
- In the same skillet, add the ground beef and cook over medium heat, breaking it up with a spoon, for 5–7 minutes until no pink remains.
- Add the chopped onion and minced garlic to the skillet and cook for 3–4 minutes, until the onion is translucent.
- Stir in the tomato sauce, dried oregano, ground cumin, salt, and black pepper.
- Simmer the mixture for 5 minutes, stirring occasionally, until the sauce thickens slightly.
- Arrange half of the fried plantains in a single layer at the bottom of the prepared baking dish.
- Spread the entire meat mixture evenly over the plantain layer.
- Top with the remaining plantains, arranging them in a neat layer.
- Sprinkle the shredded Monterey Jack cheese evenly over the top. Tip: For extra browning, place the dish on the center oven rack.
- Bake for 20–25 minutes, until the cheese is fully melted and bubbly with golden spots.
- Remove the Piñon from the oven and let it rest for 5 minutes before serving. Tip: Resting allows the layers to set for cleaner slices.
- Sprinkle with chopped fresh cilantro just before serving.
Buttery plantains soften into the spiced beef, while the cheese pulls everything together with a savory richness. Serve it alongside a crisp green salad to balance the heartiness, or scoop it straight from the dish for a cozy weeknight meal that feels both familiar and special.
Empanadillas

Mastering empanadillas begins with understanding their flaky pastry and savory filling. Making these handheld delights requires careful attention to dough handling and filling preparation. Follow these steps precisely for perfect results every time.
8
portions30
minutes29
minutesIngredients
For the dough:
– 2 cups all-purpose flour
– 1/2 cup cold unsalted butter, cubed
– 1/4 cup cold water
– 1/2 teaspoon salt
– 1 large egg, beaten
For the filling:
– 1 tablespoon olive oil
– 1/2 pound ground beef
– 1/4 cup finely chopped onion
– 2 cloves garlic, minced
– 1/4 teaspoon ground cumin
– 1/4 teaspoon smoked paprika
– Salt to season
Instructions
1. Combine 2 cups all-purpose flour and 1/2 teaspoon salt in a large mixing bowl.
2. Cut 1/2 cup cold cubed butter into the flour mixture using a pastry cutter until pea-sized crumbs form.
3. Gradually add 1/4 cup cold water while stirring with a fork until a shaggy dough forms.
4. Knead the dough gently on a floured surface for 30 seconds until it comes together.
5. Wrap the dough in plastic wrap and refrigerate for 30 minutes to relax the gluten.
6. Heat 1 tablespoon olive oil in a skillet over medium heat until shimmering.
7. Add 1/2 pound ground beef and cook for 5 minutes, breaking it up with a spoon.
8. Stir in 1/4 cup chopped onion and cook for 3 minutes until softened.
9. Add 2 minced garlic cloves and cook for 1 minute until fragrant.
10. Sprinkle in 1/4 teaspoon cumin and 1/4 teaspoon smoked paprika, stirring to combine.
11. Season the filling with salt and remove from heat to cool completely.
12. Roll the chilled dough to 1/8-inch thickness on a floured surface.
13. Cut the dough into 4-inch circles using a round cutter.
14. Place 1 tablespoon of cooled filling in the center of each dough circle.
15. Brush the edges of each circle with beaten egg using a pastry brush.
16. Fold the dough over the filling to create a half-moon shape.
17. Press the edges firmly together with your fingers.
18. Crimp the edges with a fork to seal completely.
19. Brush the tops with remaining beaten egg for golden browning.
20. Bake at 375°F for 20 minutes until golden brown and flaky.
Serve these empanadillas immediately while the pastry remains crisp and the filling stays warm. The contrast between the buttery crust and savory beef creates an irresistible texture experience. Try pairing them with a spicy dipping sauce or serving alongside a fresh salad for a complete meal.
Rellenos de Papa

Delve into the comforting world of Rellenos de Papa, a Puerto Rican classic that transforms simple mashed potatoes into crispy, golden pockets filled with savory ground beef. These delightful fritters make a perfect appetizer or main dish, offering a satisfying contrast between the creamy interior and crunchy exterior. Follow these methodical steps to create these flavorful treats in your own kitchen.
8
portions45
minutes40
minutesIngredients
For the potato dough:
– 2 large russet potatoes, peeled and quartered
– 1/4 cup all-purpose flour
– 1 large egg
– 1/2 teaspoon salt
For the beef filling:
– 1/2 pound ground beef (80/20 blend)
– 1/4 cup finely chopped yellow onion
– 1 tablespoon olive oil
– 1/4 teaspoon ground cumin
– 1/4 teaspoon dried oregano
– 1/8 teaspoon black pepper
For frying:
– 2 cups vegetable oil
Instructions
1. Place the quartered potatoes in a medium saucepan and cover with cold water by 1 inch.
2. Bring the water to a boil over high heat, then reduce to a simmer and cook for 15-18 minutes until potatoes are fork-tender.
3. Drain the potatoes thoroughly and return them to the hot pan for 1 minute to evaporate excess moisture.
4. Mash the potatoes in a large bowl until completely smooth with no lumps remaining.
5. Add the flour, egg, and salt to the mashed potatoes and mix until a soft dough forms.
6. Cover the potato dough with plastic wrap and refrigerate for 30 minutes to firm up.
7. Heat the olive oil in a skillet over medium heat and sauté the chopped onion for 3-4 minutes until translucent.
8. Add the ground beef to the skillet and cook for 6-8 minutes, breaking it up with a spoon until browned.
9. Stir in the cumin, oregano, and black pepper, then cook for 1 more minute before removing from heat.
10. Divide the chilled potato dough into 8 equal portions and roll each into a ball.
11. Flatten each ball into a 3-inch circle and place 1 tablespoon of beef filling in the center.
12. Carefully fold the edges over the filling and seal completely, forming a half-moon shape.
13. Heat the vegetable oil in a deep pot to 350°F, using a thermometer to ensure accurate temperature.
14. Fry 3-4 rellenos at a time for 3-4 minutes per side until golden brown and crispy.
15. Remove the fried rellenos with a slotted spoon and drain on a wire rack for 2 minutes.
Perfectly golden Rellenos de Papa offer a wonderful textural experience with their crisp exterior giving way to a soft, savory interior. The seasoned beef filling provides a flavorful surprise that complements the mild potato dough beautifully. Serve these warm with a side of garlic mayo or traditional ají sauce for dipping, or pair them with a fresh green salad for a complete meal.
Flan de Queso

Understanding the perfect Flan de Queso begins with mastering its creamy, cheesecake-like texture and caramel topping. Unlike traditional flan, this version incorporates cream cheese for a richer flavor that balances sweetness with a subtle tang. We’ll build this dessert methodically, starting with the caramel and ending with a smooth, chilled custard.
8
servings20
minutes60
minutesIngredients
- For the caramel:
- 1 cup granulated sugar
- 1/4 cup water
- For the custard:
- 8 oz cream cheese, softened to room temperature
- 4 large eggs
- 1 (14 oz) can sweetened condensed milk
- 1 (12 oz) can evaporated milk
- 1 tsp vanilla extract
Instructions
- Preheat your oven to 350°F (175°C) and place a 9-inch round cake pan inside a larger roasting pan.
- Combine 1 cup granulated sugar and 1/4 cup water in a small saucepan over medium heat.
- Swirl the pan gently until the sugar dissolves completely, about 3–4 minutes.
- Continue cooking without stirring until the syrup turns a deep amber color, approximately 8–10 minutes.
- Immediately pour the hot caramel into the cake pan, tilting to coat the bottom evenly.
- Tip: Work quickly here—caramel hardens fast, so have your pan ready to avoid burning.
- In a large bowl, beat 8 oz softened cream cheese with an electric mixer on medium speed until smooth.
- Add 4 large eggs one at a time, mixing fully after each addition to prevent lumps.
- Pour in 1 can sweetened condensed milk, 1 can evaporated milk, and 1 tsp vanilla extract.
- Blend on low speed for 2 minutes until the mixture is homogenous and airy.
- Strain the custard through a fine-mesh sieve into the caramel-coated pan to remove any curds.
- Tip: Straining ensures a silkier texture, so don’t skip this for professional results.
- Carefully pour hot water into the roasting pan until it reaches halfway up the sides of the cake pan.
- Bake for 50–60 minutes, or until the center jiggles slightly but isn’t liquid.
- Tip: The water bath prevents cracking—if the top browns too fast, tent it loosely with foil.
- Remove the flan from the oven and let it cool to room temperature in the water bath.
- Refrigerate for at least 4 hours or overnight to fully set.
- Run a knife around the edges, place a serving plate upside-down over the pan, and invert firmly.
Flan de Queso emerges with a velvety, dense crème and a glossy caramel pool that soaks into each slice. Its subtle cheesecake essence pairs wonderfully with fresh berries or a drizzle of espresso for a sophisticated twist. Serve it chilled to highlight the contrast between the firm custard and the liquid caramel sauce.
Pastelillos de Guayaba

Sometimes the best treats come in the simplest packages, and these Pastelillos de Guayaba are the perfect example of how flaky pastry and sweet guava paste create a magical dessert that’s both easy to make and impossible to resist. Start by gathering your ingredients and preheating your oven to 375°F to ensure everything comes together smoothly.
18
pastelillos15
minutes22
minutesIngredients
For the filling:
- 1 cup guava paste, cut into ½-inch cubes
- 1 tablespoon water
For assembly and baking:
- 1 package (17.3 ounces) frozen puff pastry sheets, thawed
- 1 large egg
- 1 tablespoon milk
- 2 tablespoons granulated sugar
Instructions
- Unfold both puff pastry sheets on a lightly floured surface.
- Cut each sheet into 9 equal squares using a sharp knife or pizza cutter.
- Place 4-5 cubes of guava paste in the center of half the pastry squares.
- Brush the edges of the filled squares with water using a pastry brush.
- Place the remaining pastry squares over the filling to create tops.
- Press the edges firmly together with your fingers to seal.
- Crimp the sealed edges with a fork to create a decorative pattern and ensure no leakage.
- Whisk together the egg and milk in a small bowl until fully combined.
- Brush the tops of each pastelillo with the egg wash using a pastry brush.
- Sprinkle granulated sugar evenly over the brushed tops.
- Transfer the pastelillos to a baking sheet lined with parchment paper, spacing them 1 inch apart.
- Bake at 375°F for 18-22 minutes until the pastry is puffed and golden brown.
- Remove from the oven and let cool on the baking sheet for 5 minutes.
My favorite thing about these pastelillos is how the crisp, buttery layers shatter with each bite, giving way to the warm, jammy guava filling that’s just sweet enough without being overwhelming. Serve them slightly warm with a scoop of vanilla ice cream for a delightful contrast, or enjoy them as a handheld treat with your morning coffee—they’re wonderfully versatile and always satisfying.
Arroz con Dulce

Let’s explore the comforting world of Arroz con Dulce, a traditional Puerto Rican coconut rice pudding that transforms simple pantry staples into a creamy, spiced dessert. Learning to make this dish properly ensures you’ll achieve that perfect balance of sweet coconut and warm cinnamon in every spoonful. Following these steps carefully will give you authentic results that honor this beloved Caribbean treat.
6
servings10
minutes33
minutesIngredients
For the rice base:
– 1 cup short-grain white rice
– 4 cups water
– 1 cinnamon stick
– 1/4 tsp salt
For the coconut mixture:
– 2 cups coconut milk
– 1 cup granulated sugar
– 1/2 cup raisins
– 1/2 tsp ground cinnamon
– 1/4 tsp ground cloves
For finishing:
– 2 tbsp unsalted butter
– Ground cinnamon for dusting
Instructions
1. Rinse 1 cup short-grain white rice under cold running water until the water runs clear.
2. Combine the rinsed rice, 4 cups water, 1 cinnamon stick, and 1/4 tsp salt in a medium saucepan.
3. Bring the mixture to a boil over medium-high heat, then reduce heat to low and cover the pan.
4. Simmer the rice for 15 minutes until most water is absorbed but rice is still slightly firm.
5. Remove the cinnamon stick from the cooked rice using tongs.
6. Add 2 cups coconut milk, 1 cup granulated sugar, 1/2 cup raisins, 1/2 tsp ground cinnamon, and 1/4 tsp ground cloves to the rice.
7. Stir all ingredients together until fully combined.
8. Cook the mixture over medium-low heat, stirring constantly with a wooden spoon for 8-10 minutes.
9. Check that the rice has absorbed most of the liquid and reached a creamy consistency.
10. Remove the saucepan from heat and stir in 2 tbsp unsalted butter until melted and incorporated.
11. Transfer the Arroz con Dulce to a serving dish and let it cool at room temperature for 30 minutes.
12. Dust the top generously with ground cinnamon before serving.
You’ll notice the finished Arroz con Dulce has a wonderfully creamy texture with plump, sweet raisins scattered throughout. The coconut flavor shines through beautifully while the warm spices create a comforting aroma that fills your kitchen. Try serving it chilled with a sprinkle of toasted coconut flakes for extra texture, or warm it slightly and top with a dollop of whipped cream for an elegant presentation.
Carne Guisada
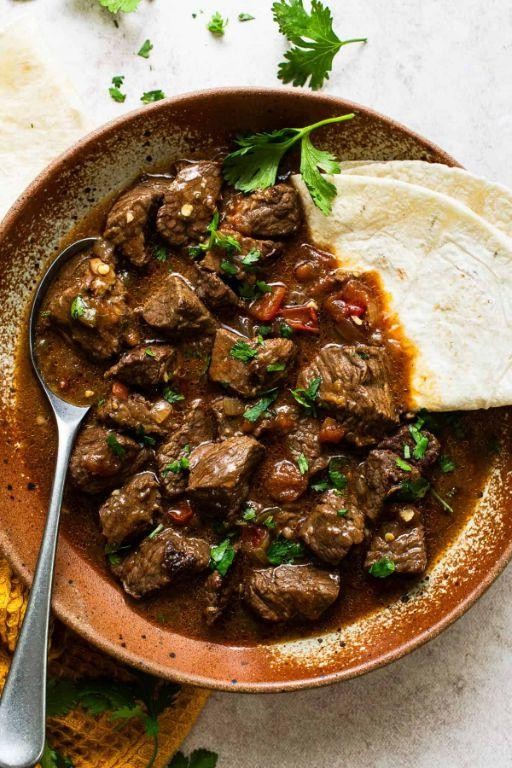
Perfect for chilly evenings, this comforting Carne Guisada transforms simple ingredients into a rich, savory stew through patient simmering. Preparing this classic dish requires just a few key steps to develop deep flavors and tender beef. Let’s walk through the process together to create your perfect pot of Carne Guisada.
6
servings20
minutes150
minutesIngredients
For the beef and initial cooking:
– 2 pounds beef chuck roast, cut into 1-inch cubes
– 2 tablespoons vegetable oil
– 1 large yellow onion, diced
– 4 cloves garlic, minced
– 1 green bell pepper, diced
For the sauce and simmering:
– 2 tablespoons all-purpose flour
– 1 (14.5 ounce) can diced tomatoes
– 2 cups beef broth
– 1 teaspoon ground cumin
– 1 teaspoon dried oregano
– 1/2 teaspoon black pepper
Instructions
1. Pat the beef cubes completely dry with paper towels to ensure proper browning.
2. Heat 2 tablespoons vegetable oil in a large Dutch oven over medium-high heat until shimmering.
3. Add beef cubes in a single layer, working in batches if necessary to avoid overcrowding.
4. Sear beef for 3-4 minutes per side until deeply browned on all surfaces.
5. Remove all beef from the pot and set aside on a plate.
6. Add diced onion to the same pot and cook for 4 minutes until softened and translucent.
7. Stir in minced garlic and cook for 30 seconds until fragrant.
8. Add diced green bell pepper and cook for 3 minutes until slightly softened.
9. Sprinkle 2 tablespoons flour over the vegetables and cook for 1 minute while stirring constantly.
10. Pour in the entire can of diced tomatoes with their juices.
11. Add 2 cups beef broth while scraping the bottom of the pot to release browned bits.
12. Return all seared beef and any accumulated juices to the pot.
13. Stir in 1 teaspoon ground cumin, 1 teaspoon dried oregano, and 1/2 teaspoon black pepper.
14. Bring the mixture to a boil, then immediately reduce heat to low.
15. Cover the pot and simmer for 2 hours, stirring occasionally to prevent sticking.
16. Remove the lid and continue simmering for 30 minutes to thicken the sauce.
17. Test beef tenderness by piercing a cube with a fork – it should slide through easily.
Just as the beef becomes fork-tender, the sauce transforms into a rich, thick gravy that clings beautifully to each piece. The slow simmering process creates layers of flavor where the cumin and oregano meld with the savory beef and sweet peppers. Serve this Carne Guisada over fluffy rice or wrapped in warm flour tortillas for a truly satisfying meal that improves overnight.
Conclusion
Whether you’re craving comforting mofongo, vibrant arroz con gandules, or sweet tembleque, these 25 authentic Puerto Rican recipes bring the island’s incredible flavors right to your kitchen. We hope you’ll try these dishes, share your favorites in the comments below, and pin this article on Pinterest to spread the culinary love. ¡Buen provecho!


