Oh, the quest for satisfying vegetarian meals packed with protein just got a whole lot easier! Whether you’re looking for quick weeknight dinners or hearty comfort food, we’ve gathered 25 delicious recipes that will keep you energized and excited about plant-based eating. Get ready to discover flavorful dishes that prove vegetarian protein can be both simple and spectacular—let’s dive into these tasty options!
Chickpea and Quinoa Salad
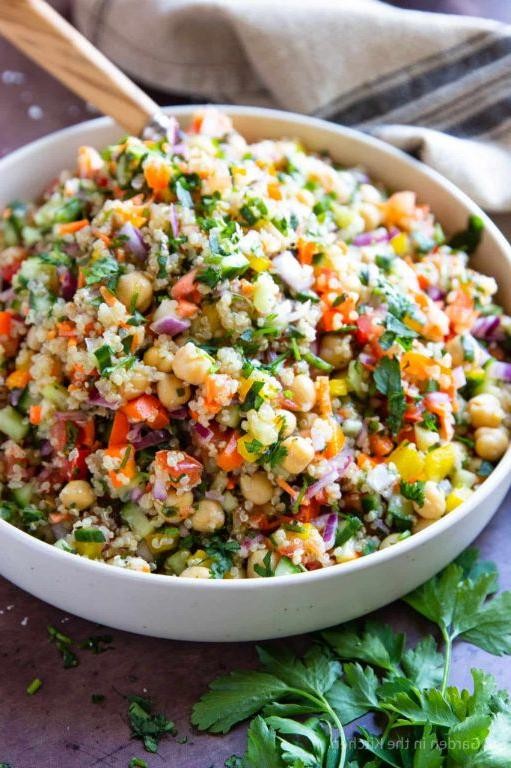
Finally, a chickpea and quinoa salad that’s as simple to make as it is satisfying to eat. Follow these clear, methodical steps to build a vibrant, protein-packed dish perfect for meal prep or a quick lunch. You’ll layer flavors and textures with precision, ensuring every bite is balanced and delicious.
2
servings25
minutes15
minutesIngredients
– 1 cup quinoa, rinsed well to remove bitterness
– 2 cups water
– 1 (15 oz) can chickpeas, drained and rinsed for better texture
– 1 medium cucumber, diced into ¼-inch pieces
– 1 cup cherry tomatoes, halved for even distribution
– ¼ cup red onion, finely chopped (soak in cold water for 5 minutes to mellow sharpness)
– ¼ cup fresh parsley, chopped
– 3 tbsp olive oil, or any neutral oil
– 2 tbsp lemon juice, freshly squeezed for brightness
– 1 tsp salt, adjust based on chickpea saltiness
– ½ tsp black pepper
Instructions
1. Rinse 1 cup quinoa under cold water in a fine-mesh strainer for 1 minute to remove saponins, which can cause bitterness.
2. Combine rinsed quinoa and 2 cups water in a medium saucepan, bring to a boil over high heat, then reduce heat to low, cover, and simmer for 15 minutes until water is fully absorbed.
3. Remove saucepan from heat, let quinoa sit covered for 5 minutes to steam, then fluff with a fork and spread on a baking sheet to cool completely to room temperature, about 20 minutes.
4. Drain and rinse 1 can chickpeas in a colander, then pat dry with paper towels to prevent dressing dilution.
5. Dice 1 medium cucumber into ¼-inch pieces and halve 1 cup cherry tomatoes, placing them in a large mixing bowl.
6. Finely chop ¼ cup red onion, soak in cold water for 5 minutes, drain, and add to the bowl to reduce pungency.
7. Chop ¼ cup fresh parsley and add to the bowl with chickpeas and cooled quinoa.
8. In a small bowl, whisk 3 tbsp olive oil, 2 tbsp lemon juice, 1 tsp salt, and ½ tsp black pepper until emulsified.
9. Pour dressing over salad ingredients and toss gently but thoroughly to coat everything evenly.
10. Let salad rest for 10 minutes before serving to allow flavors to meld.
Bright, lemony notes shine through the earthy quinoa and creamy chickpeas, while the cucumber and tomatoes add a refreshing crunch. Serve it stuffed into pita pockets with a dollop of Greek yogurt or alongside grilled chicken for a heartier meal—it holds up beautifully in the fridge for up to 3 days, making lunches effortless.
Lentil and Spinach Soup

Haven’t you found yourself craving something both nourishing and straightforward after a long day? This lentil and spinach soup delivers exactly that—a comforting bowl packed with protein and greens, ready in under an hour. Let’s walk through each step together so you can confidently create this wholesome meal.
3
servings15
minutes45
minutesIngredients
– 1 tablespoon olive oil (or any neutral oil)
– 1 medium yellow onion, diced
– 2 carrots, peeled and chopped
– 2 celery stalks, chopped
– 3 cloves garlic, minced
– 1 cup brown lentils, rinsed
– 6 cups vegetable broth
– 1 teaspoon dried thyme
– 4 cups fresh spinach
– 1 tablespoon lemon juice
– Salt and black pepper, to taste
Instructions
1. Heat 1 tablespoon olive oil in a large pot over medium heat until it shimmers.
2. Add the diced onion, chopped carrots, and chopped celery, stirring occasionally for 5–7 minutes until the onions are translucent.
3. Stir in the minced garlic and cook for 1 minute until fragrant, being careful not to burn it.
4. Add the rinsed brown lentils, 6 cups vegetable broth, and 1 teaspoon dried thyme to the pot.
5. Bring the mixture to a boil, then reduce the heat to low and cover the pot.
6. Simmer for 30–35 minutes until the lentils are tender but not mushy.
7. Stir in 4 cups fresh spinach and cook for 2–3 minutes until wilted.
8. Turn off the heat and mix in 1 tablespoon lemon juice.
9. Season with salt and black pepper to taste, starting with ½ teaspoon salt and adjusting as needed. Once the spinach wilts into the broth, the soup takes on a vibrant, earthy flavor with a satisfyingly thick texture from the lentils. For a creative twist, top it with a dollop of Greek yogurt or serve alongside crusty bread to soak up every last bit.
Tofu Stir-Fry with Vegetables
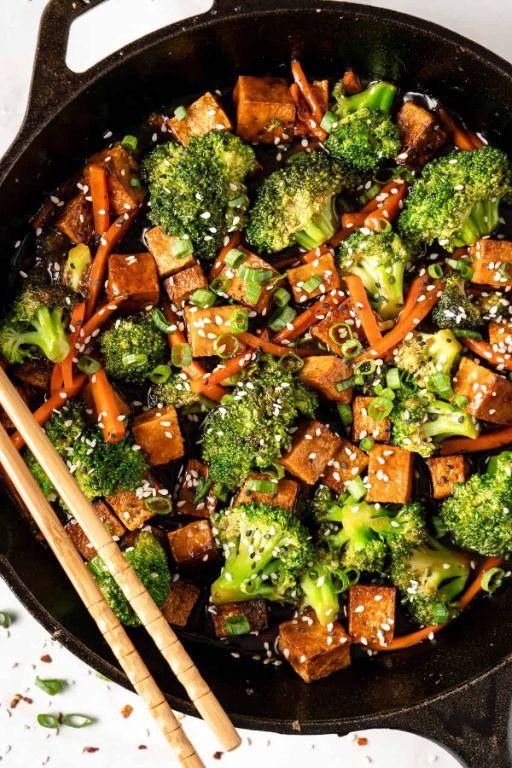
Let’s master this versatile weeknight dinner that comes together faster than takeout. Learning to make tofu stir-fry properly will give you a healthy, protein-packed meal you can customize with whatever vegetables you have on hand.
5
servings15
minutes15
minutesIngredients
– 1 block (14 oz) firm tofu, pressed and cubed
– 2 tbsp cornstarch for crispy coating
– 3 tbsp vegetable oil (or any neutral oil)
– 3 cloves garlic, minced
– 1 tbsp fresh ginger, grated
– 1 cup broccoli florets
– 1 bell pepper, sliced
– 1 carrot, julienned
– 1/4 cup soy sauce (or tamari for gluten-free)
– 1 tbsp rice vinegar
– 1 tsp sesame oil
– 2 green onions, sliced for garnish
Instructions
1. Pat dry the pressed tofu cubes thoroughly with paper towels.
2. Toss tofu cubes with cornstarch until evenly coated on all surfaces.
3. Heat 2 tablespoons of vegetable oil in a large wok or skillet over medium-high heat until shimmering (about 350°F).
4. Add tofu cubes in a single layer, making sure they don’t touch for proper browning.
5. Cook tofu for 3-4 minutes without moving until golden brown on the bottom.
6. Flip each tofu piece carefully using tongs and cook for another 3-4 minutes until crispy on all sides.
7. Transfer crispy tofu to a plate lined with paper towels to drain excess oil.
8. Add remaining 1 tablespoon of vegetable oil to the same pan over medium heat.
9. Sauté garlic and ginger for 30 seconds until fragrant but not browned.
10. Add broccoli florets and stir-fry for 2 minutes until bright green.
11. Add bell pepper slices and julienned carrot, stir-frying for another 2 minutes.
12. Pour in soy sauce and rice vinegar, stirring to coat all vegetables evenly.
13. Return crispy tofu to the pan and toss gently to combine with vegetables and sauce.
14. Drizzle sesame oil over the stir-fry and toss once more.
15. Remove from heat and garnish with sliced green onions.
But the real magic happens when you taste that perfect contrast between the crispy tofu exterior and tender interior. The vegetables maintain just enough crunch while soaking up the savory-sweet sauce, creating layers of texture in every bite. For a creative twist, serve it over quinoa instead of rice or wrap it in lettuce cups for a low-carb option that still delivers all the satisfying flavors.
Black Bean and Avocado Wrap
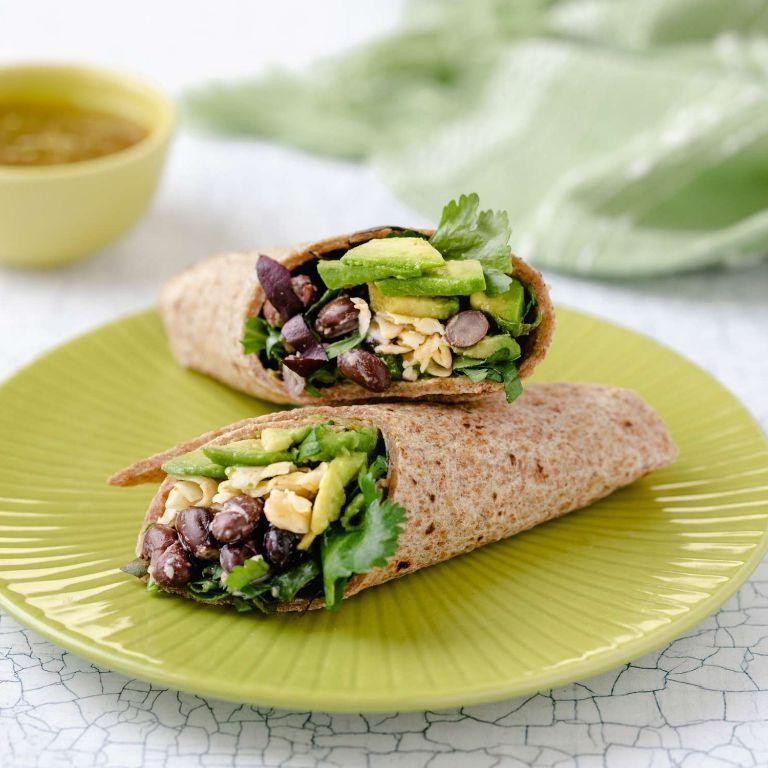
Zesty and satisfying, this black bean and avocado wrap comes together in minutes for a perfect lunch or light dinner. Follow these simple steps to create a balanced, flavorful meal that’s both nutritious and delicious. Let’s get started with gathering our ingredients and preparing each component methodically.
1
wrap15
minutesIngredients
– 1 large flour tortilla (10-inch, or whole wheat for extra fiber)
– 1/2 cup canned black beans, rinsed and drained (or substitute pinto beans)
– 1/4 cup cooked corn kernels (fresh, frozen, or canned)
– 1/4 cup diced red onion (soak in cold water for 5 minutes to mellow sharpness)
– 1/4 cup chopped fresh cilantro (omit if you dislike its flavor)
– 1/2 ripe avocado, sliced (choose one that yields slightly to gentle pressure)
– 1 tbsp lime juice (freshly squeezed for brightest flavor)
– 1/4 tsp ground cumin (toast lightly in a dry pan for 30 seconds to enhance aroma)
– 1/4 tsp chili powder (mild or hot, depending on preference)
– 1/4 tsp salt (fine sea salt or kosher salt)
– 2 tbsp plain Greek yogurt (or sour cream for tanginess)
Instructions
1. Place the flour tortilla on a clean, dry surface.
2. In a medium bowl, combine the black beans, corn, red onion, and cilantro.
3. Add the lime juice, cumin, chili powder, and salt to the bean mixture.
4. Gently stir the ingredients until evenly coated with the seasonings.
5. Spread the Greek yogurt evenly over the center of the tortilla, leaving a 1-inch border around the edges.
6. Spoon the bean mixture in a horizontal line down the middle of the tortilla, on top of the yogurt.
7. Arrange the avocado slices in a single layer over the bean mixture.
8. Fold the bottom edge of the tortilla up over the filling, then fold the left and right sides inward.
9. Roll the tortilla tightly away from you to enclose the filling completely.
10. Cut the wrap in half diagonally with a sharp serrated knife to prevent squishing.
Perfectly portable and packed with fresh flavors, this wrap offers a creamy texture from the avocado and yogurt contrasted with the hearty beans and crisp vegetables. For a fun twist, serve it with a side of salsa for dipping or add a sprinkle of crumbled queso fresco before rolling.
Grilled Tempeh with Zucchini
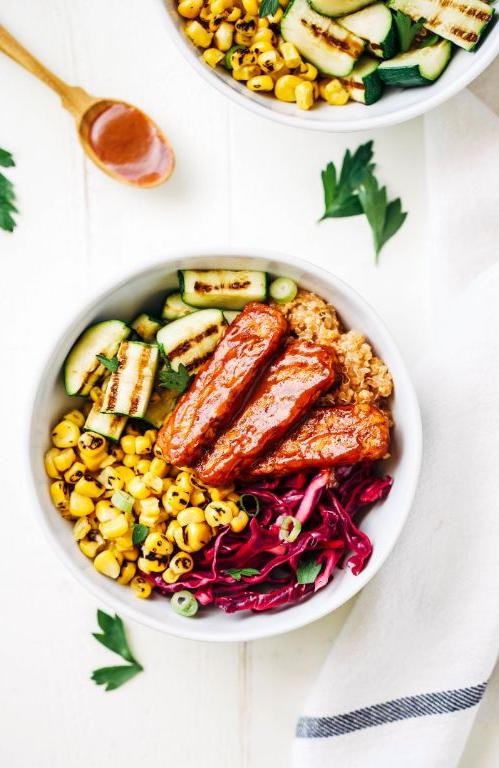
Many home cooks find grilling intimidating, but this grilled tempeh with zucchini recipe breaks it down into simple, foolproof steps that build confidence while creating a satisfying plant-based meal. Mastering these techniques will give you perfectly charred vegetables and protein-packed tempeh every time.
2
servings45
minutes20
minutesIngredients
– 8 ounces tempeh, sliced into ½-inch thick strips (steam first for better texture)
– 2 medium zucchinis, sliced lengthwise into ¼-inch planks (choose firm, unblemished ones)
– 3 tablespoons olive oil (or any neutral high-heat oil)
– 2 tablespoons soy sauce (or tamari for gluten-free)
– 1 tablespoon maple syrup (adjust sweetness to preference)
– 2 cloves garlic, minced (fresh provides best flavor)
– 1 teaspoon smoked paprika (adds depth to the marinade)
– ½ teaspoon black pepper (freshly ground preferred)
Instructions
1. Steam the tempeh slices over boiling water for 10 minutes to remove bitterness and help it absorb marinade better.
2. Whisk together olive oil, soy sauce, maple syrup, minced garlic, smoked paprika, and black pepper in a shallow dish to create the marinade.
3. Place steamed tempeh and zucchini planks in the marinade, ensuring all surfaces are coated, then let sit for 30 minutes at room temperature.
4. Preheat grill to medium-high heat (400°F) and lightly oil the grates to prevent sticking.
5. Grill tempeh for 4-5 minutes per side until grill marks appear and edges are slightly crispy.
6. Grill zucchini for 3-4 minutes per side until tender with visible char marks but still firm enough to hold shape.
7. Brush any remaining marinade over the tempeh during the last minute of grilling for extra flavor.
8. Remove everything from the grill and let rest for 2 minutes before serving to allow juices to redistribute. Here the smoky paprika and garlic meld with the tempeh’s nutty character, while the zucchini provides a tender contrast to the firm protein. Heap everything over quinoa or stuff into warm tortillas for a complete meal that showcases your new grilling skills.
Edamame and Brown Rice Bowl
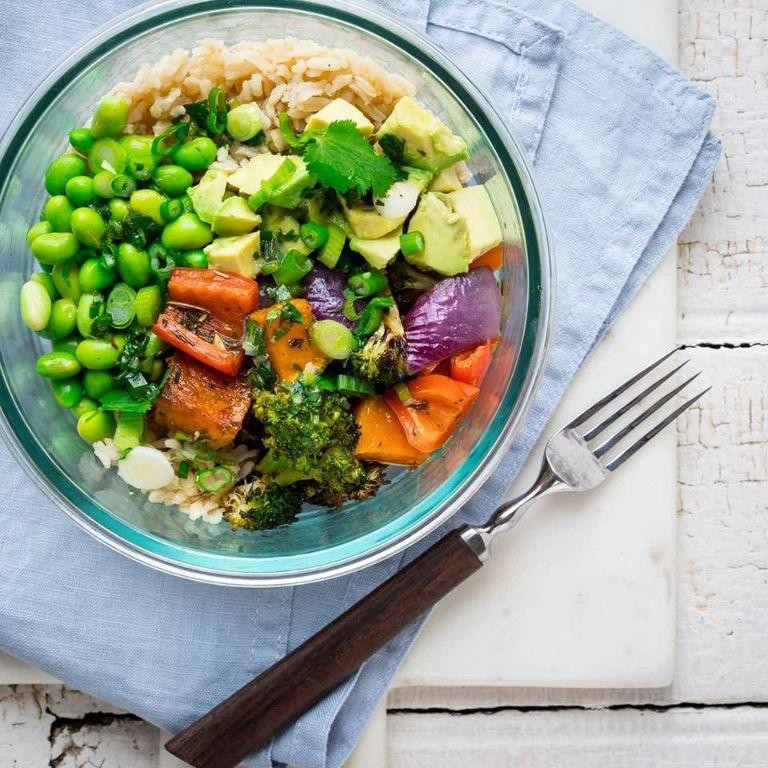
Keeping weeknight dinners simple yet satisfying is key, and this Edamame and Brown Rice Bowl delivers exactly that. Let’s walk through building this nutritious meal together, perfect for busy evenings when you want something wholesome without the fuss. Following these steps carefully will ensure perfectly cooked components every time.
2
bowls15
minutes58
minutesIngredients
– 1 cup brown rice, rinsed
– 2 cups water
– 1 tablespoon olive oil (or any neutral oil)
– 1 small yellow onion, diced
– 2 cloves garlic, minced
– 1 cup frozen shelled edamame
– 2 tablespoons soy sauce (or tamari for gluten-free)
– 1 teaspoon sesame oil
– 1 tablespoon rice vinegar
– 1 teaspoon grated fresh ginger
– ½ teaspoon red pepper flakes (optional, for heat)
Instructions
1. Combine 1 cup rinsed brown rice and 2 cups water in a medium saucepan.
2. Bring the rice and water to a boil over high heat, then immediately reduce heat to low and cover the saucepan.
3. Simmer the rice for 45 minutes without lifting the lid—this prevents steam from escaping and ensures even cooking.
4. Remove the saucepan from heat and let the rice stand covered for 10 minutes to finish steaming.
5. Fluff the cooked rice with a fork to separate the grains.
6. Heat 1 tablespoon olive oil in a large skillet over medium heat until shimmering.
7. Add 1 diced small yellow onion and cook for 5-7 minutes, stirring occasionally, until translucent and lightly browned.
8. Stir in 2 minced garlic cloves and cook for 1 minute until fragrant—be careful not to burn the garlic.
9. Add 1 cup frozen shelled edamame to the skillet and cook for 3-4 minutes, stirring frequently, until heated through and tender.
10. Pour in 2 tablespoons soy sauce, 1 teaspoon sesame oil, 1 tablespoon rice vinegar, and 1 teaspoon grated fresh ginger.
11. Add ½ teaspoon red pepper flakes if using, and stir everything together until well combined.
12. Cook the mixture for 2 more minutes to allow the flavors to meld.
13. Divide the cooked brown rice evenly between two bowls.
14. Top the rice with the edamame mixture, spooning it over evenly.
Ready to enjoy, this bowl offers a delightful contrast between the chewy brown rice and tender edamame, with savory soy and bright ginger shining through. For a creative twist, top with a soft-boiled egg or sprinkle with toasted sesame seeds just before serving.
Paneer Tikka with Mushrooms

Yield perfectly spiced, restaurant-style Paneer Tikka with Mushrooms right in your own kitchen with this straightforward guide. You’ll master the marinating technique and cooking method that ensures tender paneer and juicy mushrooms every single time, even if you’re new to Indian cooking. Let’s walk through each step together to create this vibrant, protein-packed dish that’s perfect for weeknights or entertaining.
2
servings20
minutes22
minutesIngredients
– 1 pound paneer, cut into 1-inch cubes (use firm tofu for vegan option)
– 8 ounces cremini mushrooms, quartered (wipe clean with damp paper towel)
– 1 cup plain yogurt (whole milk works best for creaminess)
– 2 tablespoons lemon juice (freshly squeezed for brightest flavor)
– 2 tablespoons vegetable oil (or any neutral high-heat oil)
– 2 teaspoons garam masala (toast spices for deeper flavor)
– 1 teaspoon Kashmiri red chili powder (provides color without extreme heat)
– 1 teaspoon turmeric powder
– 1 teaspoon salt (fine sea salt dissolves best in marinade)
– 1/2 teaspoon black pepper, freshly ground
– 1 medium red onion, cut into 1-inch chunks
– 1 medium bell pepper, any color, cut into 1-inch pieces
Instructions
1. Whisk together yogurt, lemon juice, vegetable oil, garam masala, Kashmiri red chili powder, turmeric powder, salt, and black pepper in a large bowl until completely smooth.
2. Add paneer cubes, quartered mushrooms, onion chunks, and bell pepper pieces to the marinade bowl.
3. Gently toss all ingredients until every piece is evenly coated with the spiced yogurt mixture.
4. Cover the bowl tightly with plastic wrap and refrigerate for exactly 2 hours to allow flavors to penetrate.
5. Preheat your oven to 425°F and line a baking sheet with parchment paper or aluminum foil.
6. Thread marinated paneer, mushrooms, onions, and peppers alternately onto metal or soaked wooden skewers, leaving small spaces between pieces.
7. Arrange the loaded skewers in a single layer on the prepared baking sheet, ensuring they don’t touch each other.
8. Bake at 425°F for 18-22 minutes, flipping skewers halfway through cooking time.
9. Check for doneness by looking for golden brown edges on paneer and mushrooms with slightly charred spots.
10. Remove from oven when vegetables are tender but still hold their shape and paneer is heated through.
11. Let rest for 3 minutes before carefully sliding pieces off skewers onto serving platter.
Keep this vibrant tikka warm and serve immediately over basmati rice or wrapped in warm naan for the ultimate experience. The mushrooms release their earthy juices into the creamy marinade while the paneer maintains its satisfying chew, creating wonderful textural contrast. For a stunning presentation, garnish with fresh cilantro leaves and lemon wedges to brighten the rich spices.
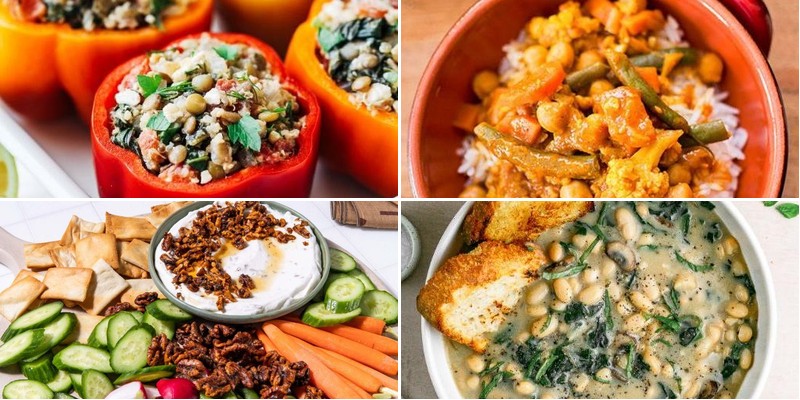
Vegetable and Chickpea Curry
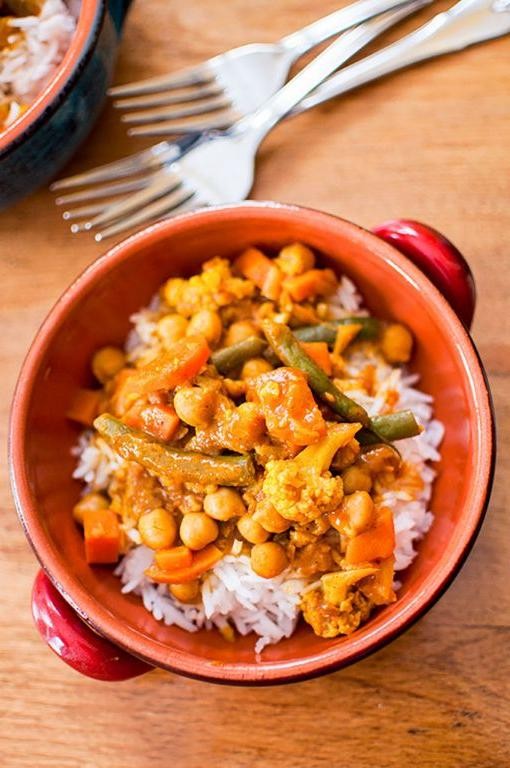
Getting a delicious, healthy dinner on the table doesn’t have to be complicated, especially with this straightforward vegetable and chickpea curry. Guided by these simple steps, you’ll create a flavorful, satisfying meal that’s perfect for a cozy weeknight. Let’s walk through the process together, building layers of flavor from the ground up.
4
servings15
minutes35
minutesIngredients
- 2 tablespoons olive oil (or any neutral oil)
- 1 medium yellow onion, diced
- 3 cloves garlic, minced
- 1 tablespoon fresh ginger, grated
- 1 tablespoon curry powder
- 1 teaspoon ground cumin
- 1/4 teaspoon cayenne pepper (adjust for spice preference)
- 1 (15-ounce) can chickpeas, drained and rinsed
- 1 medium sweet potato, peeled and cut into 1/2-inch cubes
- 1 red bell pepper, chopped
- 1 (14.5-ounce) can diced tomatoes, undrained
- 1 (13.5-ounce) can coconut milk
- 1/2 teaspoon salt
- 1/4 cup fresh cilantro, chopped (for garnish)
- Cooked basmati rice (for serving)
Instructions
- Heat the olive oil in a large pot or Dutch oven over medium heat until it shimmers.
- Add the diced onion and cook for 5-7 minutes, stirring occasionally, until softened and translucent.
- Stir in the minced garlic and grated ginger, cooking for 1 minute until fragrant. Tip: Don’t let the garlic brown, as it can turn bitter.
- Add the curry powder, cumin, and cayenne pepper to the pot, stirring constantly for 30 seconds to toast the spices.
- Pour in the diced tomatoes with their juices, using the liquid to deglaze the pot and scrape up any browned bits from the bottom.
- Add the cubed sweet potato, chopped red bell pepper, drained chickpeas, coconut milk, and salt to the pot, stirring to combine.
- Bring the mixture to a simmer, then reduce the heat to low, cover the pot, and let it cook for 20 minutes. Tip: A gentle simmer means occasional small bubbles breaking the surface.
- After 20 minutes, remove the lid and check if the sweet potato is tender by piercing a cube with a fork; it should slide in easily.
- If the curry is too thin, simmer uncovered for an additional 5-10 minutes to thicken slightly. Tip: The curry will continue to thicken as it cools.
- Turn off the heat and stir in half of the chopped cilantro.
What you’ll love about this finished curry is its creamy texture from the coconut milk, balanced by the soft sweet potatoes and firm chickpeas. The aromatic spices create a warm, complex flavor that’s neither too spicy nor too mild. For a creative twist, try serving it over quinoa instead of rice or with a dollop of cool Greek yogurt on top.
Stuffed Bell Peppers with Quinoa
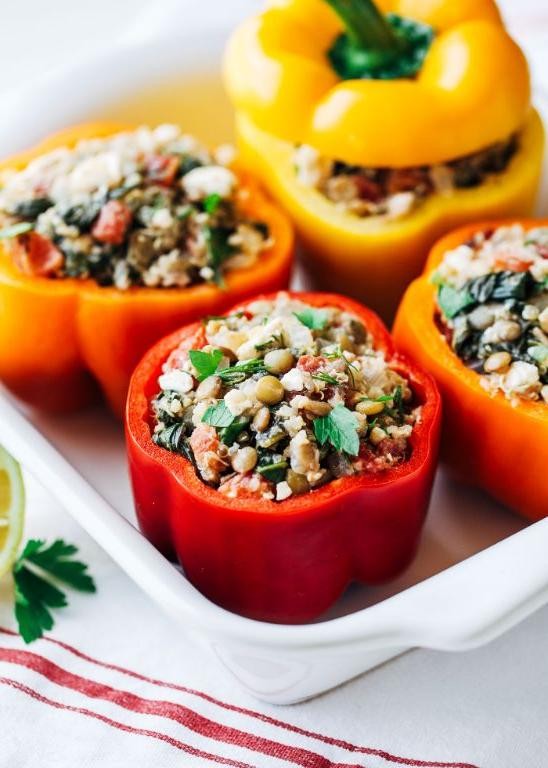
Vibrant, versatile, and packed with wholesome ingredients, stuffed bell peppers with quinoa make for a satisfying meal that’s as nutritious as it is delicious. This recipe walks you through each step methodically, ensuring even beginner cooks can achieve perfect results every time. Let’s create these colorful, protein-packed peppers that work beautifully for weeknight dinners or meal prep.
4
servings20
minutes75
minutesIngredients
– 4 large bell peppers (any color, choose ones that stand upright)
– 1 cup quinoa, rinsed (white or tri-color both work well)
– 2 cups vegetable broth (or water for simpler flavor)
– 1 tablespoon olive oil (or any neutral oil)
– 1 medium yellow onion, diced (about 1 cup)
– 2 cloves garlic, minced
– 1 pound lean ground beef (or ground turkey for lighter option)
– 1 (15-ounce) can diced tomatoes, undrained
– 1 teaspoon dried oregano
– 1/2 teaspoon salt
– 1/4 teaspoon black pepper
– 1 cup shredded mozzarella cheese (or Italian blend)
Instructions
1. Preheat your oven to 375°F and lightly grease a 9×13-inch baking dish.
2. Cut the tops off the bell peppers and remove all seeds and membranes, keeping the peppers intact.
3. Bring vegetable broth to a boil in a medium saucepan, then add rinsed quinoa.
4. Reduce heat to low, cover, and simmer for 15 minutes until liquid is absorbed.
5. Heat olive oil in a large skillet over medium-high heat until shimmering.
6. Add diced onion and cook for 4-5 minutes until translucent and slightly softened.
7. Add minced garlic and cook for 30 seconds until fragrant but not browned.
8. Add ground beef, breaking it up with a wooden spoon, and cook for 6-8 minutes until no pink remains.
9. Stir in diced tomatoes with their juices, dried oregano, salt, and black pepper.
10. Cook the mixture for 3-4 minutes until slightly thickened, then remove from heat.
11. Fluff the cooked quinoa with a fork and combine it with the beef mixture in the skillet.
12. Spoon the quinoa-beef filling evenly into the prepared bell peppers, packing it down gently.
13. Arrange the stuffed peppers upright in the greased baking dish.
14. Cover the dish tightly with aluminum foil and bake for 30 minutes.
15. Remove the foil and sprinkle shredded mozzarella evenly over each pepper.
16. Return to oven uncovered and bake for 10-12 minutes until cheese is melted and bubbly.
17. Carefully remove from oven and let rest for 5 minutes before serving.
Dense with texture and rich in savory flavors, these stuffed peppers offer a satisfying contrast between the tender-crisp pepper shells and the hearty quinoa-beef filling. The melted cheese creates a golden crust that gives way to the aromatic tomato and herb-infused interior. Consider serving them alongside a simple green salad or with crusty bread to soak up any delicious juices that accumulate in the baking dish.
Mushroom and White Bean Stew
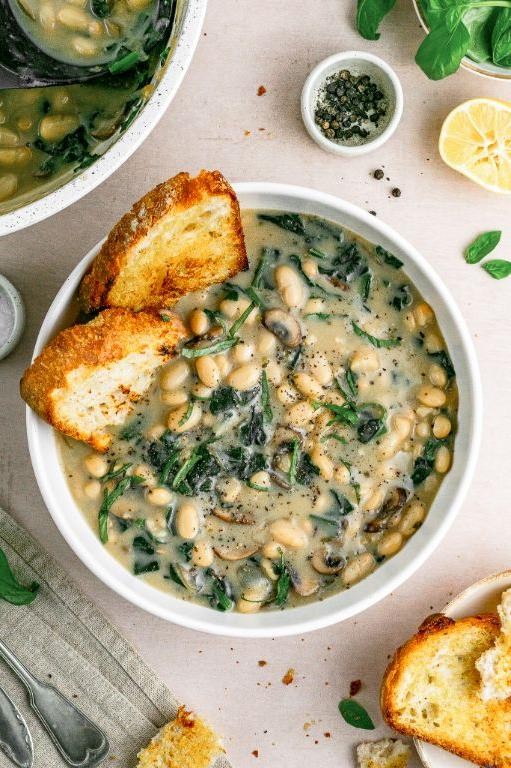
Every home cook needs a reliable, comforting stew in their repertoire, and this mushroom and white bean version delivers deep, earthy flavors with minimal effort. Even beginners can master this hearty dish that transforms simple ingredients into something truly special. Essential techniques like proper browning and deglazing ensure maximum flavor development throughout the cooking process.
2
servings15
minutes45
minutesIngredients
– 2 tablespoons olive oil (or any neutral oil)
– 1 large yellow onion, diced
– 3 cloves garlic, minced
– 1 pound cremini mushrooms, sliced (or mixed wild mushrooms)
– 1 teaspoon dried thyme
– 1/4 cup dry white wine (optional, substitute with vegetable broth)
– 4 cups vegetable broth
– 2 (15-ounce) cans white beans, drained and rinsed
– 1/4 cup heavy cream (or coconut cream for dairy-free)
– 2 tablespoons chopped fresh parsley
– Salt and black pepper to taste
Instructions
1. Heat 2 tablespoons olive oil in a large Dutch oven or heavy-bottomed pot over medium-high heat until shimmering.
2. Add 1 large diced yellow onion and cook for 5-7 minutes, stirring occasionally, until translucent and lightly browned around the edges.
3. Add 3 cloves minced garlic and cook for 1 minute until fragrant, being careful not to burn it.
4. Add 1 pound sliced cremini mushrooms in a single layer and cook without stirring for 4-5 minutes to develop a deep brown crust.
5. Flip mushrooms and cook for another 4-5 minutes until evenly browned and their liquid has evaporated.
6. Sprinkle 1 teaspoon dried thyme over the mushroom mixture and stir to combine.
7. Pour in 1/4 cup dry white wine to deglaze the pan, scraping up all the browned bits from the bottom with a wooden spoon.
8. Add 4 cups vegetable broth and bring to a boil, then reduce heat to maintain a gentle simmer.
9. Stir in 2 cans drained white beans and simmer uncovered for 20 minutes to allow flavors to meld.
10. Stir in 1/4 cup heavy cream and heat through for 2 minutes without boiling.
11. Remove from heat and stir in 2 tablespoons chopped fresh parsley.
12. Season with salt and black pepper to taste, starting with 1 teaspoon salt and 1/2 teaspoon pepper.
You’ll love the creamy texture that contrasts beautifully with the meaty mushrooms and tender beans. This stew develops even richer flavors when made ahead and reheated the next day. Try serving it over creamy polenta or with crusty bread for soaking up every last drop of the savory broth.
Kale and Kidney Bean Salad
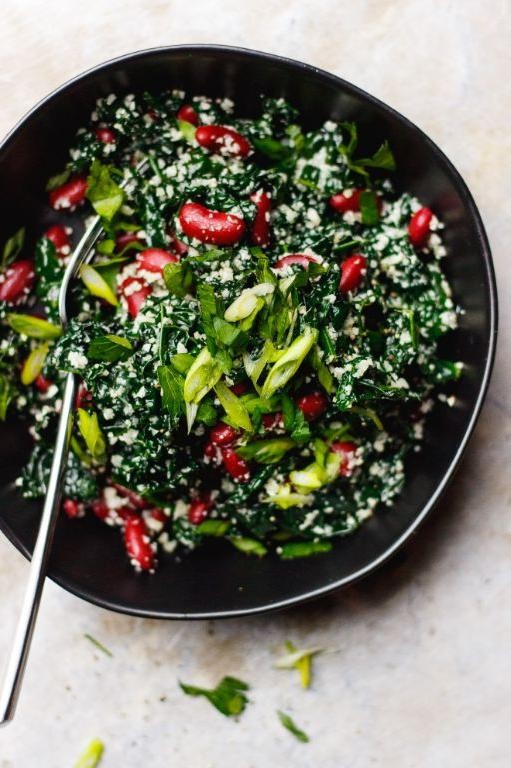
Kale and kidney bean salad offers a perfect balance of hearty nutrition and fresh flavors that comes together in minutes. Knowing how to properly prepare the kale makes all the difference between a tough, bitter salad and a tender, flavorful one. Let’s walk through each step methodically to create this satisfying plant-based meal.
4
servings15
minutesIngredients
– 1 bunch curly kale, stems removed and leaves chopped (about 6 cups packed)
– 1 can (15 oz) kidney beans, rinsed and drained (or any canned beans you prefer)
– 1/4 cup olive oil (or any neutral oil)
– 2 tablespoons lemon juice, freshly squeezed (bottled works in a pinch)
– 1 teaspoon honey (maple syrup for vegan option)
– 1/2 teaspoon garlic powder (fresh minced garlic adds more punch)
– 1/4 teaspoon salt (adjust based on bean saltiness)
– 1/4 teaspoon black pepper, freshly ground (pre-ground works fine)
Instructions
1. Place chopped kale in a large mixing bowl.
2. Drizzle 1 tablespoon of olive oil over the kale.
3. Massage kale with your hands for 2 full minutes until leaves darken and soften.
4. Add rinsed kidney beans to the bowl with the massaged kale.
5. In a small separate bowl, whisk together remaining 3 tablespoons olive oil and 2 tablespoons lemon juice.
6. Whisk 1 teaspoon honey into the dressing until fully incorporated.
7. Whisk in 1/2 teaspoon garlic powder, 1/4 teaspoon salt, and 1/4 teaspoon black pepper.
8. Pour dressing over kale and beans in the large bowl.
9. Toss everything together until evenly coated, about 1 minute.
10. Let salad rest at room temperature for 10 minutes before serving.
Zesty lemon and garlic mingle with earthy beans and tender kale in this nutrient-packed salad. The massaging technique transforms the kale from tough to silky, while the resting period allows flavors to meld beautifully. Try serving it stuffed in pita pockets or alongside grilled chicken for a complete meal.
Spinach and Ricotta Stuffed Shells
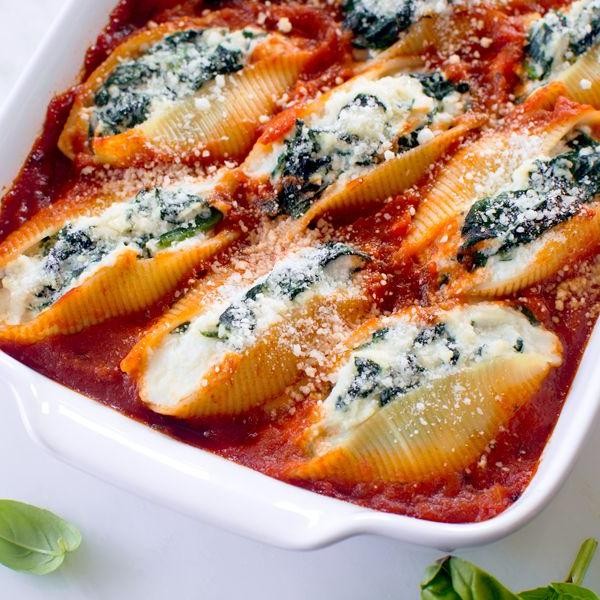
Zesty yet comforting, these spinach and ricotta stuffed shells combine creamy cheese filling with tender pasta in a rich tomato sauce. This classic Italian-American dish is perfect for family dinners or entertaining guests, with make-ahead convenience that only improves the flavors. Follow these methodical steps to create restaurant-quality stuffed shells in your own kitchen.
12
shells25
minutes44
minutesIngredients
– 12 jumbo pasta shells
– 15 oz whole milk ricotta cheese (drain excess liquid for thicker filling)
– 10 oz frozen chopped spinach, thawed
– 1 large egg
– 1 cup shredded mozzarella cheese, divided
– 1/2 cup grated Parmesan cheese
– 24 oz jarred marinara sauce
– 2 tbsp olive oil
– 1 tsp dried oregano
– 1/2 tsp garlic powder
– 1/4 tsp black pepper
– 1/4 tsp salt
Instructions
1. Preheat your oven to 375°F and lightly grease a 9×13 inch baking dish with 1 tablespoon of olive oil.
2. Bring a large pot of salted water to a rolling boil over high heat.
3. Carefully add 12 jumbo pasta shells to the boiling water and cook for 9 minutes until pliable but still firm.
4. Drain the cooked shells in a colander and immediately rinse with cold water to stop the cooking process.
5. While the shells cool, squeeze all excess moisture from the thawed spinach using your hands or a clean kitchen towel.
6. In a medium mixing bowl, combine 15 oz ricotta cheese, the squeezed spinach, 1 large egg, 1/2 cup mozzarella, 1/2 cup Parmesan, 1 tsp oregano, 1/2 tsp garlic powder, 1/4 tsp black pepper, and 1/4 tsp salt.
7. Mix the filling ingredients thoroughly until well combined and uniform in texture.
8. Spread 1 cup of marinara sauce evenly across the bottom of the prepared baking dish.
9. Using a spoon, carefully fill each cooked shell with approximately 2 tablespoons of the ricotta-spinach mixture.
10. Arrange the stuffed shells in a single layer over the sauce in the baking dish.
11. Pour the remaining marinara sauce over the stuffed shells, covering them completely.
12. Sprinkle the remaining 1/2 cup of mozzarella cheese evenly over the sauced shells.
13. Cover the baking dish tightly with aluminum foil and bake at 375°F for 25 minutes.
14. Remove the foil and continue baking for another 10-15 minutes until the cheese is golden and bubbly.
15. Let the stuffed shells rest for 5 minutes before serving to allow the filling to set.
Tender pasta shells give way to a creamy, herbaceous filling that balances the bright acidity of the tomato sauce. The melted mozzarella forms a golden crust that contrasts beautifully with the soft interior textures. For a restaurant-style presentation, garnish with fresh basil leaves and serve alongside garlic bread to soak up the extra sauce.
Cottage Cheese and Walnut Dip
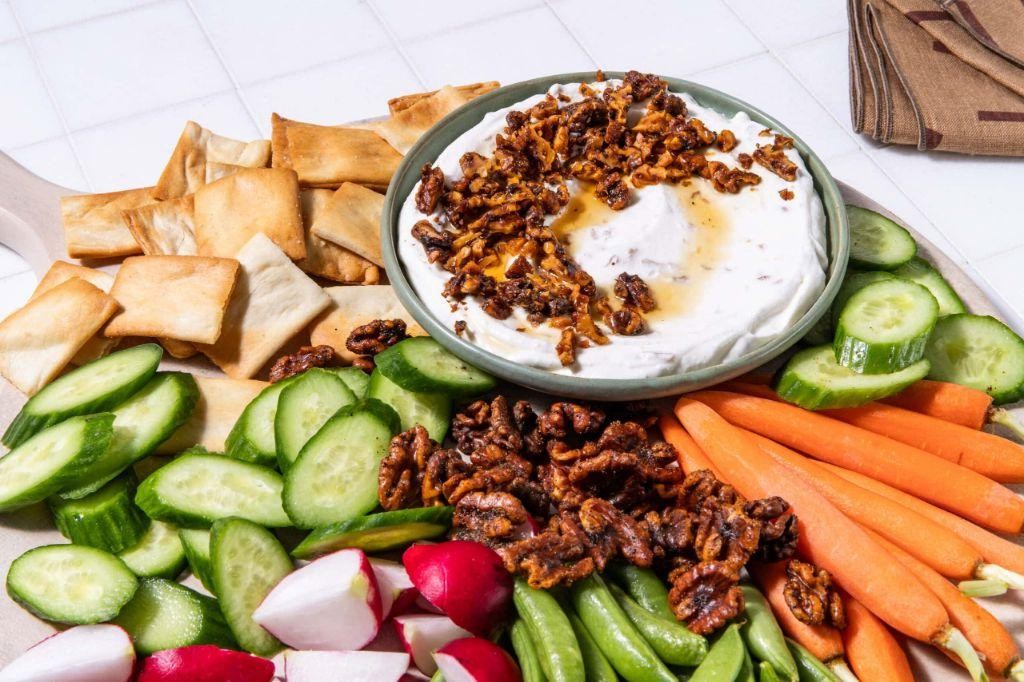
Perfect for those seeking a protein-packed snack that comes together in minutes, this cottage cheese and walnut dip transforms simple ingredients into something surprisingly elegant. Preparing it requires no cooking skills, just a willingness to blend and taste.
5
servings15
minutes10
minutesIngredients
- 2 cups full-fat cottage cheese (for a creamier texture)
- 1 cup raw walnuts
- 2 tablespoons extra virgin olive oil (or any neutral oil)
- 1 tablespoon fresh lemon juice (bottled works in a pinch)
- 1 small garlic clove, minced (about 1 teaspoon)
- 1/4 teaspoon fine sea salt (adjust to taste)
- 1/8 teaspoon black pepper, freshly ground
- 2 tablespoons fresh dill, chopped (or 2 teaspoons dried)
Instructions
- Place the raw walnuts in a single layer on a small, dry baking sheet.
- Toast the walnuts in a preheated 350°F oven for 8-10 minutes, until they are fragrant and lightly golden.
- Allow the toasted walnuts to cool completely on the baking sheet for about 10 minutes.
- Combine the cottage cheese, cooled walnuts, olive oil, lemon juice, minced garlic, salt, and pepper in a high-powered blender or food processor.
- Tip: For the smoothest dip, use a food processor instead of a blender to prevent over-working the cottage cheese.
- Pulse the mixture 5-7 times to begin breaking down the walnuts, then process on high for 45-60 seconds.
- Stop the machine and scrape down the sides with a spatula to ensure everything is incorporated.
- Process again for another 30-45 seconds, until the dip is mostly smooth with some tiny walnut bits for texture.
- Tip: If the dip is too thick, add a tablespoon of water or milk and process for 10 more seconds to reach your desired consistency.
- Transfer the dip to a medium mixing bowl.
- Stir in the chopped fresh dill with a spatula until it is evenly distributed.
- Tip: Let the dip rest in the refrigerator for at least 20 minutes before serving; this allows the flavors to meld and the dip to firm up slightly.
- Taste the chilled dip and adjust seasoning with more salt or pepper if needed.
Mildly tangy from the cottage cheese and deeply nutty from the walnuts, this dip has a wonderfully thick and spreadable texture. It’s fantastic as a vegetable dip, but also makes an incredible sandwich spread or a rich topping for baked potatoes.
Quinoa and Black Bean Chili
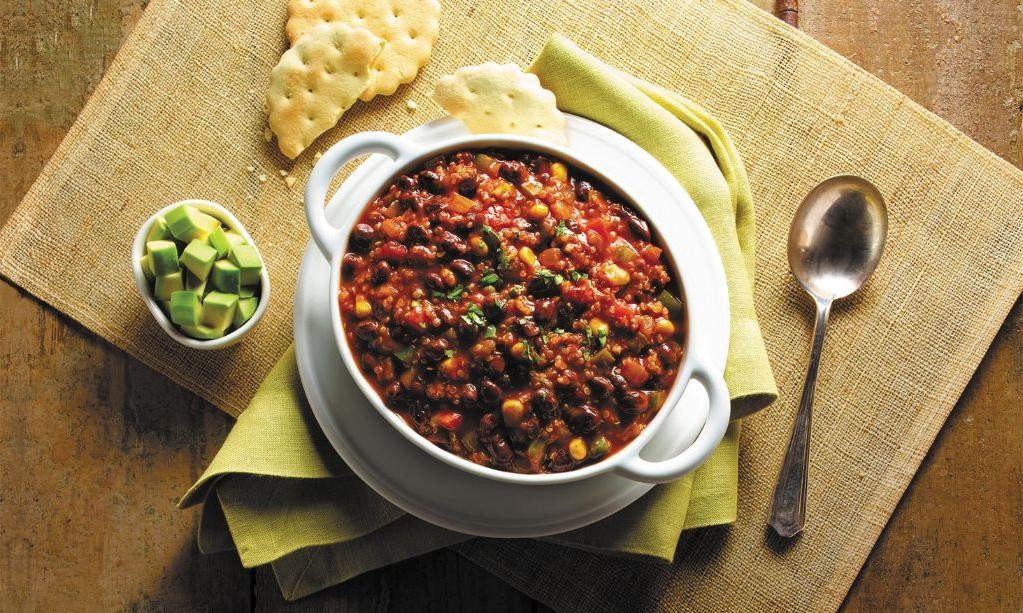
You’ll find this quinoa and black bean chili to be the perfect hearty meal for crisp autumn evenings. Let’s walk through each step together to create this nutritious, protein-packed dish that comes together beautifully in one pot.
3
servings15
minutes34
minutesIngredients
– 1 tbsp olive oil (or any neutral oil)
– 1 medium yellow onion, diced
– 2 cloves garlic, minced
– 1 tbsp chili powder
– 1 tsp ground cumin
– 1 cup quinoa, rinsed
– 2 (15 oz) cans black beans, drained and rinsed
– 1 (15 oz) can diced tomatoes
– 4 cups vegetable broth
– 1 tsp salt
– Optional toppings: avocado slices, cilantro, lime wedges
Instructions
1. Heat 1 tablespoon olive oil in a large pot over medium heat until shimmering.
2. Add diced yellow onion and cook for 5-7 minutes until translucent and softened.
3. Stir in minced garlic and cook for 1 minute until fragrant.
4. Sprinkle in 1 tablespoon chili powder and 1 teaspoon ground cumin, toasting the spices for 30 seconds to deepen their flavor.
5. Add 1 cup rinsed quinoa to the pot, stirring to coat with the spice mixture.
6. Pour in 2 cans drained black beans, 1 can diced tomatoes with their juices, and 4 cups vegetable broth.
7. Stir in 1 teaspoon salt and bring the mixture to a boil.
8. Reduce heat to low, cover the pot, and simmer for 20 minutes until quinoa is tender and has absorbed most of the liquid.
9. Remove from heat and let stand covered for 5 minutes to allow the quinoa to fully absorb remaining moisture.
10. Fluff the chili with a fork before serving.
Vibrant and satisfying, this chili develops a wonderful thick texture as the quinoa releases its natural starches. The combination of earthy black beans and nutty quinoa creates layers of flavor that meld together beautifully. Try serving it over baked sweet potatoes or with a generous dollop of Greek yogurt for extra creaminess.
Sweet Potato and Chickpea Patties

These sweet potato and chickpea patties are perfect for a quick, nutritious meal that even beginners can master. They combine simple ingredients into a satisfying vegetarian option that holds together beautifully when cooked properly. Today we’ll walk through each step methodically to ensure your patties turn out golden and flavorful every time.
8
portions25
minutes70
minutesIngredients
– 2 medium sweet potatoes (about 2 cups mashed)
– 1 (15 oz) can chickpeas, drained and rinsed
– 1/2 cup breadcrumbs
– 1 large egg
– 2 tbsp olive oil (or any neutral oil)
– 1 tsp garlic powder
– 1/2 tsp smoked paprika
– 1/4 tsp salt
– 1/4 tsp black pepper
Instructions
1. Preheat your oven to 400°F and line a baking sheet with parchment paper.
2. Pierce the sweet potatoes several times with a fork and bake for 45-50 minutes until completely soft when squeezed.
3. Let the sweet potatoes cool for 15 minutes until safe to handle, then scoop the flesh into a large bowl.
4. Add the drained chickpeas to the bowl and mash with a potato masher until mostly smooth with some texture remaining.
5. Crack the egg into the mixture and stir until fully incorporated.
6. Mix in the breadcrumbs, garlic powder, smoked paprika, salt, and pepper until well combined.
7. Divide the mixture into 8 equal portions and shape each into a 1/2-inch thick patty.
8. Heat 1 tablespoon of olive oil in a large skillet over medium heat until shimmering.
9. Cook 4 patties for 4-5 minutes until golden brown and crisp on the bottom.
10. Carefully flip the patties and cook for another 4-5 minutes until both sides are evenly browned.
11. Transfer the cooked patties to the prepared baking sheet and repeat with remaining oil and patties.
12. Bake all patties for 10 minutes at 400°F to ensure they’re heated through and hold their shape.
Our sweet potato and chickpea patties develop a wonderfully crisp exterior while remaining moist and tender inside. The smoked paprika adds subtle warmth that complements the natural sweetness beautifully. Try serving them in lettuce wraps with a dollop of Greek yogurt or crumbled over a fresh garden salad for a complete meal.
Broccoli and Lentil Stir-Fry
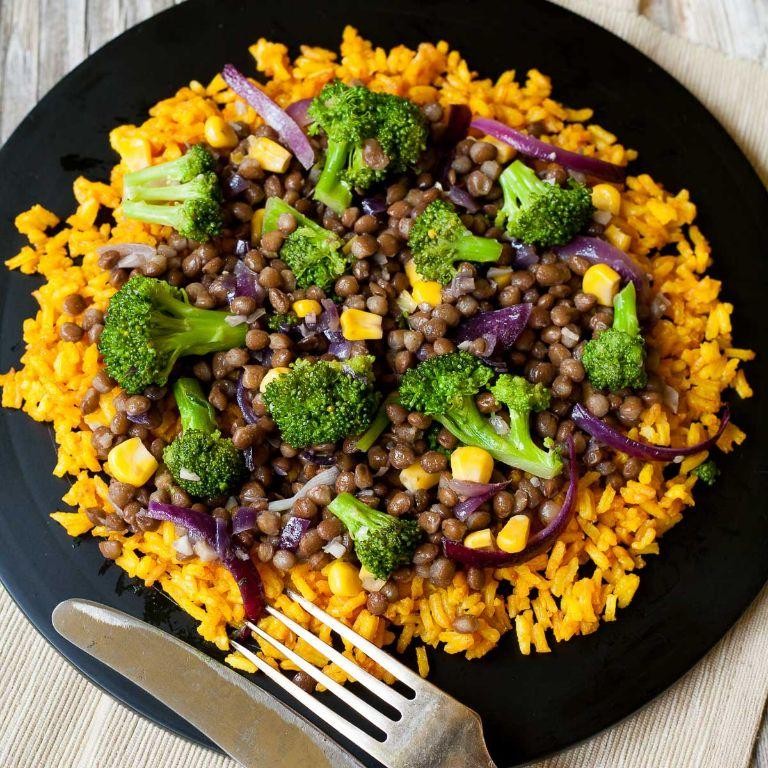
Keeping weeknight dinners both nutritious and delicious can be a challenge, but this Broccoli and Lentil Stir-Fry makes it wonderfully simple. Let me guide you through creating this protein-packed vegetarian meal that comes together in under 30 minutes, perfect for busy evenings when you want something wholesome without the fuss.
4
servings10
minutes30
minutesIngredients
– 1 cup brown lentils (rinsed well, or substitute green lentils)
– 2 cups broccoli florets (cut into bite-sized pieces for even cooking)
– 1 medium yellow onion (thinly sliced, about 1 cup)
– 2 cloves garlic (minced, or 1 tsp garlic powder in a pinch)
– 2 tbsp olive oil (or any neutral oil like avocado)
– 3 tbsp low-sodium soy sauce (or tamari for gluten-free)
– 1 tbsp rice vinegar (adds brightness, lemon juice works too)
– 1 tsp grated fresh ginger (or ½ tsp ground ginger)
– ¼ tsp red pepper flakes (optional, for mild heat)
– ¼ cup water (for steaming)
Instructions
1. Rinse 1 cup brown lentils under cold water until the water runs clear to remove any debris.
2. Heat 2 tablespoons olive oil in a large skillet or wok over medium-high heat until it shimmers, about 1 minute.
3. Add 1 thinly sliced yellow onion and cook, stirring frequently, until softened and lightly browned, about 5-7 minutes.
4. Stir in 2 minced garlic cloves and 1 teaspoon grated ginger, cooking for 30 seconds until fragrant to prevent burning.
5. Add rinsed lentils and ¼ cup water to the skillet, then reduce heat to medium-low, cover, and simmer for 15 minutes until lentils are tender but not mushy.
6. Uncover the skillet and add 2 cups broccoli florets, stirring to combine with the lentil mixture.
7. Increase heat to medium, cover again, and steam the broccoli for 4-5 minutes until bright green and crisp-tender.
8. Pour in 3 tablespoons soy sauce and 1 tablespoon rice vinegar, stirring to coat everything evenly.
9. Sprinkle with ¼ teaspoon red pepper flakes if using, then cook uncovered for 2 more minutes to allow flavors to meld.
10. Remove from heat and let rest for 1 minute before serving to allow the sauce to thicken slightly.
Zesty and satisfying, this stir-fry delivers a wonderful contrast between the tender lentils and crisp broccoli florets. The savory soy sauce base gets a bright lift from the rice vinegar, making each bite complex yet comforting. Try serving it over quinoa or stuffing it into warm tortillas for a creative twist that makes excellent next-day lunches.
Oven-Roasted Tofu with Asparagus
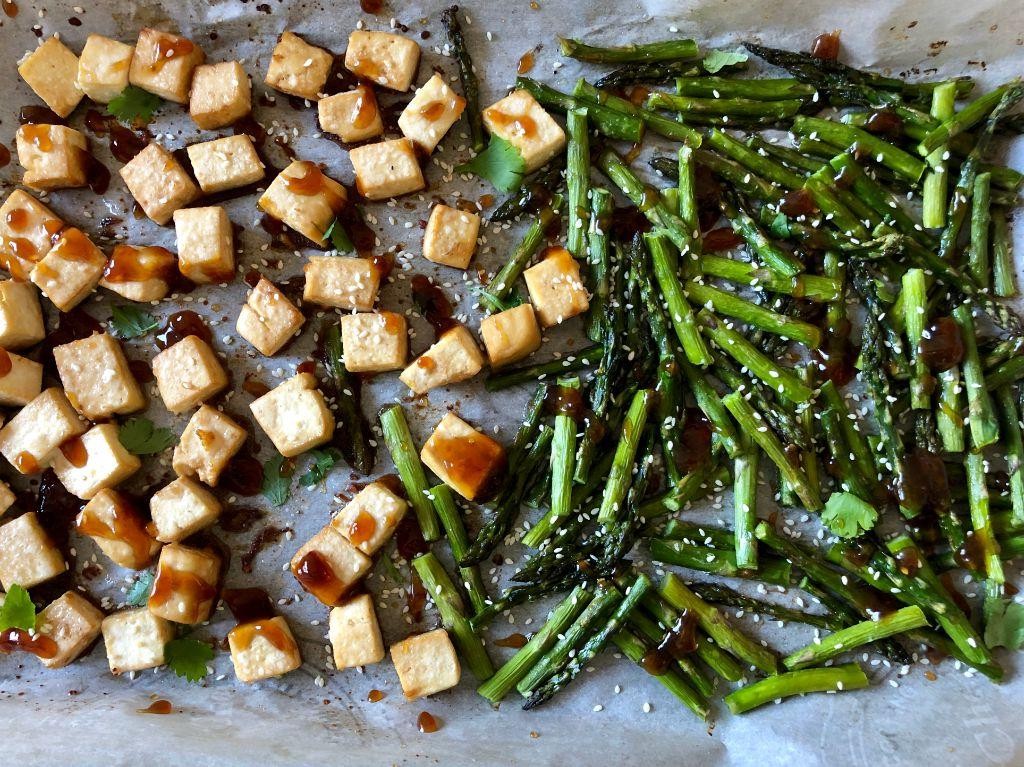
Sometimes the simplest meals are the most satisfying, especially when you want something healthy that comes together with minimal effort. Starting with firm tofu and fresh asparagus, this oven-roasted combination delivers crispy, flavorful results every time.
2
servings35
minutes35
minutesIngredients
– 1 block (14 oz) extra-firm tofu, pressed for 30 minutes
– 1 bunch asparagus (about 1 lb), ends trimmed
– 2 tbsp olive oil (or any neutral oil)
– 1 tbsp soy sauce (or tamari for gluten-free)
– 1 tsp garlic powder
– ½ tsp smoked paprika
– ¼ tsp black pepper
Instructions
1. Preheat your oven to 400°F and line a baking sheet with parchment paper.
2. Cut the pressed tofu into 1-inch cubes and place them in a medium bowl.
3. Add the trimmed asparagus to the bowl with the tofu cubes.
4. Drizzle the olive oil and soy sauce over the tofu and asparagus.
5. Sprinkle the garlic powder, smoked paprika, and black pepper evenly over everything.
6. Toss gently with your hands or a spoon until all pieces are evenly coated.
7. Spread the tofu and asparagus in a single layer on the prepared baking sheet, making sure nothing overlaps.
8. Roast in the preheated oven for 20 minutes.
9. Remove the baking sheet from the oven and carefully flip the tofu pieces and asparagus using tongs.
10. Return to the oven and roast for another 10-15 minutes until the tofu is golden brown and the asparagus is tender-crisp.
11. Remove from the oven and let rest for 2 minutes before serving.
The tofu develops a satisfying crispy exterior while staying tender inside, perfectly complementing the slightly charred, earthy asparagus. Serve it over quinoa for a complete meal, or toss with cooked pasta and a squeeze of lemon for a quick dinner variation.
Pumpkin and Navy Bean Casserole
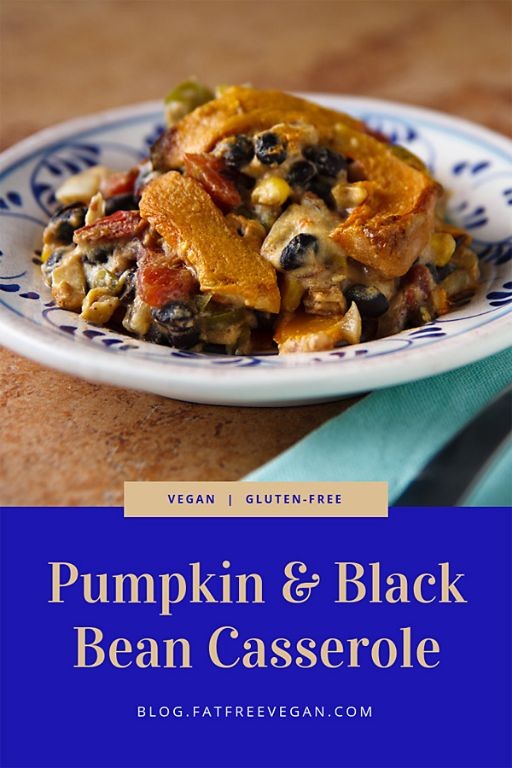
Gathering seasonal ingredients for a comforting casserole is one of autumn’s greatest joys. This pumpkin and navy bean casserole combines creamy textures with earthy flavors, perfect for chilly evenings. Follow these steps carefully for a foolproof result that will become a family favorite.
6
portions25
minutes60
minutesIngredients
– 2 cups cubed pumpkin (1-inch pieces, fresh or canned)
– 1 cup dried navy beans (or 2 cans, drained and rinsed)
– 1 medium yellow onion, diced (about 1 cup)
– 2 cloves garlic, minced
– 1 cup vegetable broth
– 1/2 cup heavy cream (or coconut milk for dairy-free)
– 2 tbsp olive oil (or any neutral oil)
– 1 tsp dried thyme
– 1/2 tsp smoked paprika
– 1/4 tsp ground nutmeg
– 1 cup panko breadcrumbs
– 1/2 cup grated Parmesan cheese (optional, for topping)
– Salt and black pepper (adjust to taste)
Instructions
1. If using dried navy beans, soak them in cold water for 8 hours or overnight, then drain.
2. Preheat your oven to 375°F and lightly grease a 9×13-inch baking dish with olive oil.
3. Heat 1 tablespoon olive oil in a large skillet over medium heat until shimmering.
4. Add diced onion and cook for 5-7 minutes until translucent, stirring occasionally.
5. Stir in minced garlic and cook for 1 minute until fragrant but not browned.
6. Add cubed pumpkin to the skillet and cook for 8-10 minutes until slightly softened.
7. Combine the pumpkin mixture, soaked or canned navy beans, vegetable broth, and heavy cream in a large bowl.
8. Season with thyme, smoked paprika, nutmeg, 1 teaspoon salt, and 1/2 teaspoon black pepper.
9. Transfer the mixture to the prepared baking dish and spread evenly.
10. In a small bowl, mix panko breadcrumbs with remaining 1 tablespoon olive oil and Parmesan cheese if using.
11. Sprinkle the breadcrumb mixture evenly over the casserole surface.
12. Bake uncovered at 375°F for 35-40 minutes until bubbly and the topping is golden brown.
13. Let the casserole rest for 10 minutes before serving to allow the flavors to meld. What emerges from the oven is a beautifully textured dish where creamy pumpkin melts into tender beans beneath a crisp, golden crust. The subtle sweetness of pumpkin balances perfectly with the earthy beans and aromatic spices. Consider serving individual portions topped with a sprinkle of fresh parsley or alongside roasted chicken for a complete autumn meal.
Conclusion
Just imagine—25 delicious, protein-packed vegetarian recipes to keep your meals exciting and nutritious! We hope this roundup inspires your next kitchen adventure. Try a few, leave a comment with your favorites, and don’t forget to share this article on Pinterest to spread the veggie love. Happy cooking!


