Meal planning during pregnancy just got easier! We’ve gathered 25 nourishing dinner recipes packed with essential nutrients to support you and your growing baby. From quick weeknight meals to comforting favorites, these dishes are designed for healthy eating without sacrificing flavor. Ready to simplify your dinner routine? Dive into our roundup and discover delicious options you’ll love making again and again.
Quinoa-Stuffed Bell Peppers
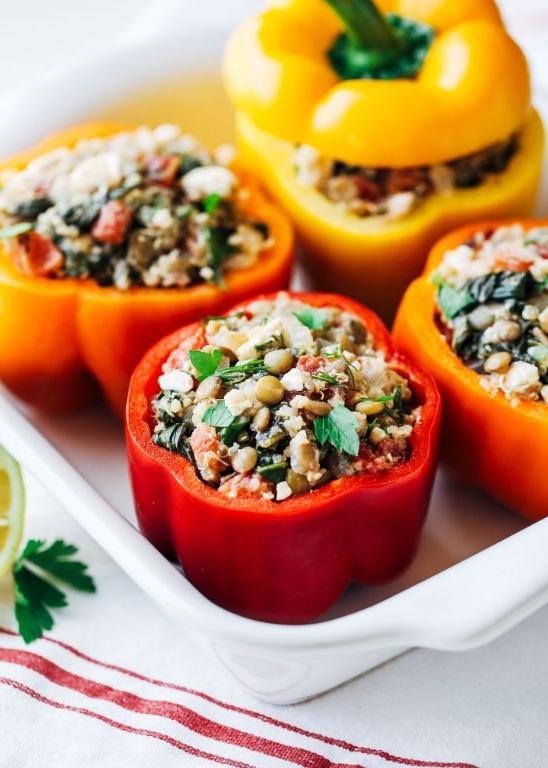
Hilariously versatile and secretly nutritious, these quinoa-stuffed bell peppers are the culinary equivalent of finding money in last winter’s coat—unexpectedly delightful! They transform humble ingredients into vibrant edible vessels that even your pickiest eater will devour without realizing they’re eating something good for them. Consider this your kitchen’s new favorite disguise for getting vegetables past the most skeptical diners.
4
servings20
minutes51
minutesIngredients
– 4 large bell peppers, assorted colors, tops removed and seeded
– 1 cup tri-color quinoa, thoroughly rinsed
– 2 cups vegetable broth, simmering
– 2 tablespoons extra virgin olive oil
– 1 medium yellow onion, finely diced
– 3 garlic cloves, minced
– 1 cup cherry tomatoes, quartered
– 1/2 cup fresh basil leaves, chiffonade
– 1/2 cup grated Parmigiano-Reggiano
– 1/4 cup pine nuts, toasted
– 1 teaspoon smoked paprika
– 1/2 teaspoon crushed red pepper flakes
– Kosher salt and freshly ground black pepper
Instructions
1. Preheat your oven to 375°F and lightly grease a baking dish with olive oil.
2. Bring vegetable broth to a rolling boil in a medium saucepan, then add rinsed quinoa.
3. Reduce heat to low, cover, and simmer quinoa for exactly 15 minutes until liquid is fully absorbed.
4. Heat olive oil in a large skillet over medium heat until shimmering.
5. Sauté diced onion for 4-5 minutes until translucent and fragrant.
6. Add minced garlic and cook for 1 additional minute until aromatic but not browned.
7. Fold cooked quinoa into the skillet mixture, stirring to combine thoroughly.
8. Gently incorporate cherry tomatoes, basil chiffonade, and toasted pine nuts.
9. Season mixture with smoked paprika, red pepper flakes, 1 teaspoon kosher salt, and 1/2 teaspoon black pepper.
10. Spoon quinoa filling evenly into prepared bell peppers, packing gently.
11. Arrange stuffed peppers upright in baking dish and cover tightly with foil.
12. Bake covered for 25 minutes to steam peppers until tender-crisp.
13. Remove foil, sprinkle with Parmigiano-Reggiano, and bake uncovered for 10 minutes until cheese is golden.
14. Let rest for 5 minutes before serving to allow filling to set.
Miraculously, these peppers achieve that perfect textural harmony—the quinoa stays delightfully separate and fluffy while the peppers soften just enough to cut cleanly with a fork. The smoked paprika adds a subtle warmth that plays beautifully against the bright acidity of the tomatoes and the nutty crunch of pine nuts. For an extra flourish, drizzle with basil oil or serve alongside a crisp arugula salad dressed in lemon vinaigrette to cut through the richness.
Lentil and Spinach Soup

Crisp autumn days practically demand a bowl of something warm, soul-soothing, and deceptively simple—like this lentil and spinach soup that’s basically a hug in a bowl, minus the awkward back-patting. It’s the kind of recipe that makes you look like a kitchen wizard with minimal effort, because who doesn’t love a good culinary shortcut that tastes like it simmered for hours?
6
servings15
minutes48
minutesIngredients
- 2 tablespoons extra-virgin olive oil
- 1 large yellow onion, finely diced
- 3 cloves garlic, minced
- 2 medium carrots, peeled and diced into 1/4-inch pieces
- 2 celery stalks, diced into 1/4-inch pieces
- 1 1/2 cups brown lentils, rinsed and drained
- 8 cups vegetable broth
- 1 bay leaf
- 1 teaspoon dried thyme
- 1/2 teaspoon smoked paprika
- 4 cups fresh spinach leaves, stems removed
- 1 tablespoon freshly squeezed lemon juice
- 1/2 teaspoon fine sea salt
- 1/4 teaspoon freshly cracked black pepper
Instructions
- Heat the extra-virgin olive oil in a large Dutch oven or heavy-bottomed pot over medium heat until it shimmers.
- Add the finely diced yellow onion and sauté, stirring frequently, until translucent and fragrant, about 5–7 minutes.
- Stir in the minced garlic and cook for 1 minute until aromatic but not browned.
- Add the diced carrots and celery, cooking for 5 minutes until slightly softened.
- Tip: Sautéing the vegetables until they just begin to soften builds a flavor foundation without losing their texture.
- Pour in the rinsed brown lentils and stir to coat with the vegetable mixture.
- Add the vegetable broth, bay leaf, dried thyme, and smoked paprika, stirring to combine.
- Bring the soup to a boil over high heat, then immediately reduce to a gentle simmer.
- Cover the pot and simmer for 30–35 minutes, until the lentils are tender but not mushy.
- Tip: Simmering uncovered for the last 10 minutes allows the broth to reduce slightly, intensifying the flavor.
- Remove the bay leaf and discard it.
- Stir in the fresh spinach leaves and cook just until wilted, about 2 minutes.
- Add the freshly squeezed lemon juice, fine sea salt, and freshly cracked black pepper, stirring to incorporate.
- Tip: Adding lemon juice at the end brightens the soup and balances the earthiness of the lentils.
- Ladle the soup into bowls and serve immediately. The tender lentils melt into the savory broth, while the spinach adds a pop of color and freshness. For a creative twist, top with a dollop of garlicky yogurt or serve alongside crusty, toasted sourdough for dipping—because every good soup deserves a crunchy sidekick.
Grilled Salmon with Avocado Salad
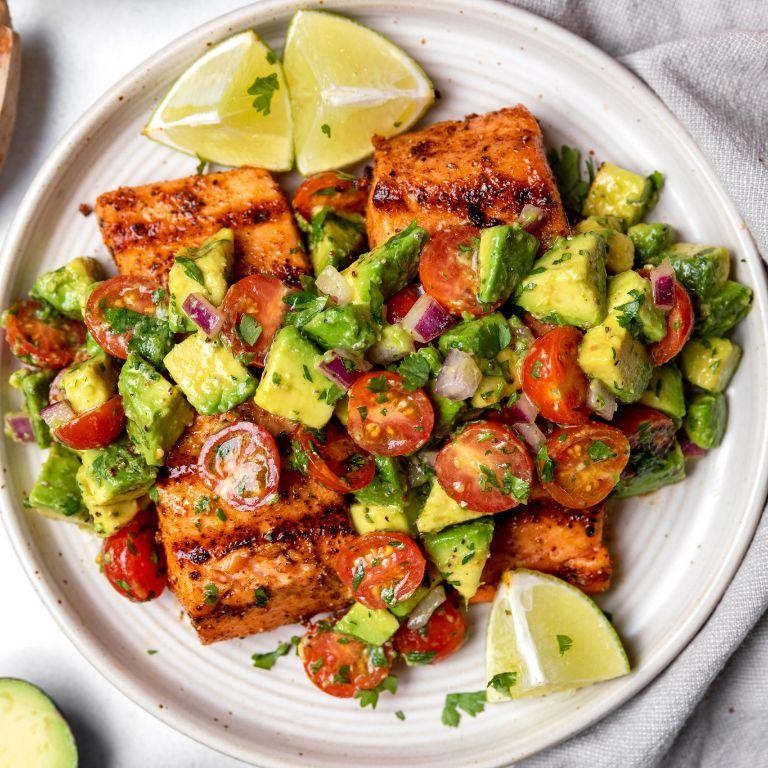
Hang onto your aprons, folks, because we’re about to transform that humble salmon fillet from fridge-dweller to showstopper faster than you can say “extra napkins, please.” This grilled beauty paired with creamy avocado salad is the culinary equivalent of finding money in last winter’s coat pocket—unexpectedly delightful and ridiculously satisfying. Get ready to impress your taste buds (and maybe that judgy neighbor who always peeks at your grill).Servings5
servingsPrep time15
minutesCooking time9
minutesIngredients
– 4 (6-ounce) skin-on wild-caught salmon fillets
– 3 tablespoons extra-virgin olive oil, divided
– 2 teaspoons freshly squeezed lemon juice
– 1 teaspoon kosher salt
– ½ teaspoon freshly cracked black pepper
– 2 ripe Hass avocados, pitted and diced
– 1 cup cherry tomatoes, halved
– ¼ cup finely diced red onion
– 2 tablespoons chopped fresh cilantro
– 1 tablespoon champagne vinegarInstructions
1. Preheat your gas or charcoal grill to medium-high heat (400°F), ensuring grates are clean and lightly oiled.
2. Pat salmon fillets completely dry with paper towels to ensure proper searing.
3. Brush both sides of salmon with 1 tablespoon olive oil using a pastry brush.
4. Season salmon evenly with kosher salt and freshly cracked black pepper.
5. Place salmon skin-side up on the hot grill grates at a 45-degree angle for perfect grill marks.
6. Grill for 4-5 minutes until flesh releases easily from grates and shows prominent char lines.
7. Carefully flip salmon using a fish spatula, maintaining the skin’s integrity.
8. Grill skin-side down for 3-4 minutes until internal temperature reaches 125°F for medium-rare.
9. Transfer salmon to a wire rack to rest while preparing the salad.
10. Combine diced Hass avocados, halved cherry tomatoes, and finely diced red onion in a medium bowl.
11. Whisk together remaining 2 tablespoons olive oil, champagne vinegar, and freshly squeezed lemon juice in a small bowl.
12. Gently toss the avocado mixture with the vinaigrette using a rubber spatula to avoid mashing.
13. Fold in chopped fresh cilantro until evenly distributed.
14. Plate grilled salmon fillets and top generously with avocado salad.Velvety salmon flakes melt against the crisp-tender avocado salad, creating a textural symphony that dances between rich and refreshing. The smoky char plays beautifully against the bright acidity, making this dish equally suited for date night sophistication or Tuesday night triumph—just don’t be surprised when everyone asks for your “secret recipe.”
Turkey and Sweet Potato Skillet

Unbelievably, just when you thought your trusty cast iron skillet couldn’t possibly deliver more cozy dinner magic, along comes this turkey and sweet potato situation that’ll have you questioning all your previous life choices. Seriously, this one-pan wonder is so ridiculously satisfying, it might just replace your favorite sweatpants as the ultimate comfort go-to. Let’s get skillet-y with it!Servings4
servingsPrep time15
minutesCooking time35
minutesIngredients
- 1 lb ground turkey (93% lean)
- 2 medium sweet potatoes, peeled and diced into ½-inch cubes
- 1 large yellow onion, finely diced
- 3 cloves garlic, minced
- 2 tbsp clarified butter
- 1 tsp smoked paprika
- ½ tsp ground cumin
- ¼ tsp cayenne pepper
- ¾ cup low-sodium chicken broth
- 2 tbsp pure maple syrup
- 2 tbsp apple cider vinegar
- ¼ cup fresh parsley, chopped
- Kosher salt and freshly ground black pepper
Instructions
- Heat a 12-inch cast iron skillet over medium-high heat and add 1 tablespoon of clarified butter.
- Add diced sweet potatoes to the skillet and season with ½ teaspoon kosher salt.
- Sauté sweet potatoes for 8-10 minutes, stirring occasionally, until edges begin to caramelize and develop golden-brown spots.
- Push sweet potatoes to one side of the skillet and add remaining tablespoon of clarified butter to the empty space.
- Add finely diced yellow onion to the butter and cook for 3-4 minutes until translucent and fragrant.
- Add minced garlic and cook for 30 seconds until aromatic but not browned.
- Push onion and garlic mixture to join the sweet potatoes, creating space for the ground turkey.
- Add ground turkey to the empty space, breaking it apart with a wooden spoon.
- Season turkey with smoked paprika, ground cumin, cayenne pepper, ½ teaspoon kosher salt, and ¼ teaspoon black pepper.
- Cook turkey for 5-6 minutes, stirring occasionally, until no pink remains and meat is crumbled.
- Combine all ingredients in the skillet and stir to incorporate evenly.
- Pour in low-sodium chicken broth, scraping any browned bits from the bottom of the skillet.
- Add pure maple syrup and apple cider vinegar, stirring to combine.
- Reduce heat to medium-low, cover skillet, and simmer for 12-15 minutes until sweet potatoes are fork-tender.
- Remove lid and cook uncovered for 3-4 minutes to reduce the liquid slightly.
- Remove skillet from heat and stir in chopped fresh parsley.
- Let rest for 2 minutes before serving to allow flavors to meld.
Remarkably tender sweet potatoes practically melt against the savory, well-spiced turkey in this glorious skillet creation. The subtle sweetness from the maple syrup plays beautifully with the smoky paprika and bright vinegar finish. Try serving it over creamy polenta or stuffing it into warm tortillas for an unexpected twist that’ll make your taste buds do a happy dance.
Zucchini Noodles with Pesto and Cherry Tomatoes
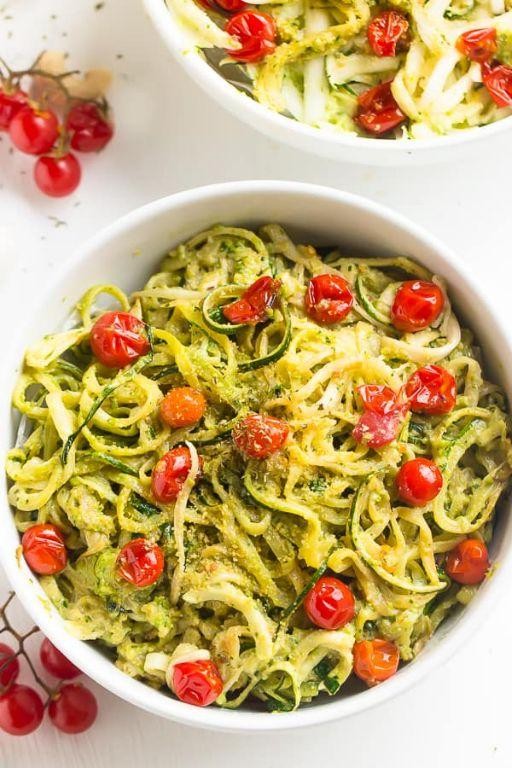
Unbelievably, we’ve found a way to make vegetables feel like a party in your mouth—these zucchini noodles are basically the vegetable equivalent of finding money in last season’s jeans. Who knew spiralized squash could bring such joy?
Servings3
servingsPrep time15
minutesCooking time10
minutesIngredients
- 4 medium zucchini, spiralized into 1/8-inch ribbons
- 2 cups fresh basil leaves, tightly packed
- 1/2 cup extra virgin olive oil, divided
- 1/3 cup pine nuts, lightly toasted
- 2 garlic cloves, minced
- 1/2 cup Parmigiano-Reggiano, freshly grated
- 1 pint cherry tomatoes, halved
- 1 tablespoon fresh lemon juice
- 1/4 teaspoon fine sea salt
- 1/8 teaspoon freshly cracked black pepper
Instructions
- Place basil leaves, pine nuts, minced garlic, and 1/4 cup olive oil in a food processor bowl.
- Pulse mixture for 15 seconds until coarsely chopped, scraping down sides with a rubber spatula.
- Add remaining 1/4 cup olive oil and process for 30 seconds until a coarse paste forms.
- Transfer pesto to a medium bowl and stir in grated Parmigiano-Reggiano until fully incorporated.
- Season pesto with fine sea salt and freshly cracked black pepper, then stir in fresh lemon juice.
- Heat a large skillet over medium-high heat until a water droplet sizzles upon contact.
- Add halved cherry tomatoes to the dry skillet and cook for 3-4 minutes until skins begin to blister.
- Remove tomatoes from skillet and set aside in a small bowl.
- Return skillet to medium heat and add spiralized zucchini noodles.
- Sauté zucchini for 2-3 minutes until just tender but still al dente, stirring constantly with tongs.
- Remove skillet from heat and immediately fold in prepared pesto until noodles are evenly coated.
- Gently incorporate blistered cherry tomatoes into the zucchini noodle mixture.
- Divide among serving bowls and garnish with additional Parmigiano-Reggiano if desired.
Delightfully fresh and surprisingly satisfying, these zucchini noodles offer a vibrant crunch that plays beautifully against the creamy pesto. The blistered tomatoes burst with sweet acidity that cuts through the rich cheese and nuts perfectly. Try serving this beauty in wide, shallow bowls with crusty bread for dipping into any remaining pesto—because wasting that green gold should be illegal.
Chickpea and Kale Stir-Fry
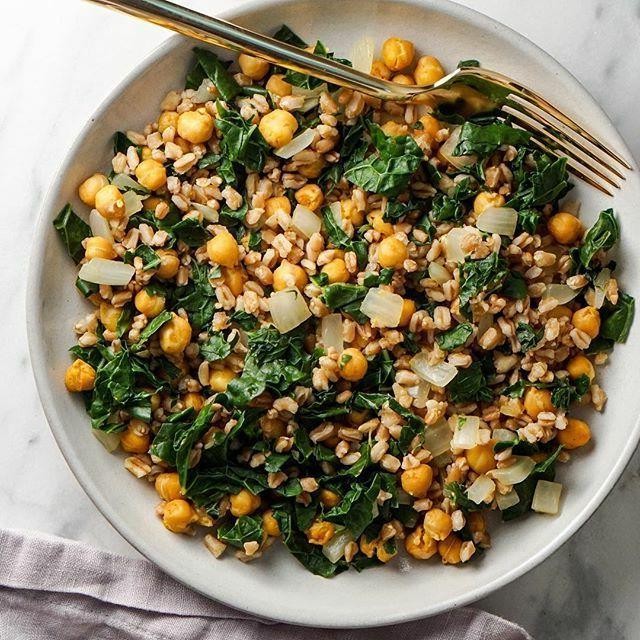
Hangry? Let’s fix that with a dish that transforms humble chickpeas and kale into a weeknight superhero situation—this stir-fry is so delicious, it might just make your takeout apps jealous. Seriously, who knew healthy could taste this ridiculously good?Servings3
servingsPrep time15
minutesCooking time15
minutesIngredients
– 2 tablespoons extra-virgin olive oil
– 1 large yellow onion, finely diced
– 3 garlic cloves, minced
– 1 tablespoon freshly grated ginger
– 1 (15-ounce) can chickpeas, drained and rinsed
– 1 bunch lacinato kale, stems removed and leaves chopped
– 2 tablespoons tamari
– 1 tablespoon rice vinegar
– 1 teaspoon toasted sesame oil
– ½ teaspoon crushed red pepper flakesInstructions
1. Heat 2 tablespoons of extra-virgin olive oil in a large skillet over medium-high heat until shimmering.
2. Add 1 large finely diced yellow onion and sauté for 4–5 minutes, stirring frequently, until translucent and lightly golden.
3. Stir in 3 minced garlic cloves and 1 tablespoon of freshly grated ginger, cooking for 1 minute until fragrant (tip: avoid browning the garlic to prevent bitterness).
4. Add 1 (15-ounce) can of drained and rinsed chickpeas, spreading them in a single layer, and cook undisturbed for 2 minutes to develop a crisp exterior.
5. Incorporate 1 bunch of chopped lacinato kale, tossing continuously for 3–4 minutes until leaves are wilted and vibrant green (tip: massage kale briefly before cooking to tenderize it).
6. Pour in 2 tablespoons of tamari, 1 tablespoon of rice vinegar, 1 teaspoon of toasted sesame oil, and ½ teaspoon of crushed red pepper flakes, stirring to coat evenly.
7. Reduce heat to low and simmer for 2 minutes, allowing flavors to meld (tip: finish with a squeeze of fresh lime for brightness).
8. Remove from heat and transfer to serving plates immediately.Velvety chickpeas mingle with tender kale in a savory-sweet glaze, creating a texture that’s both hearty and light. Serve it over quinoa for a protein-packed bowl, or stuff it into warm tortillas with avocado for a fun twist—either way, it’s a flavor fiesta that’ll have you skipping the takeout line.
Baked Chicken with Lemon and Rosemary
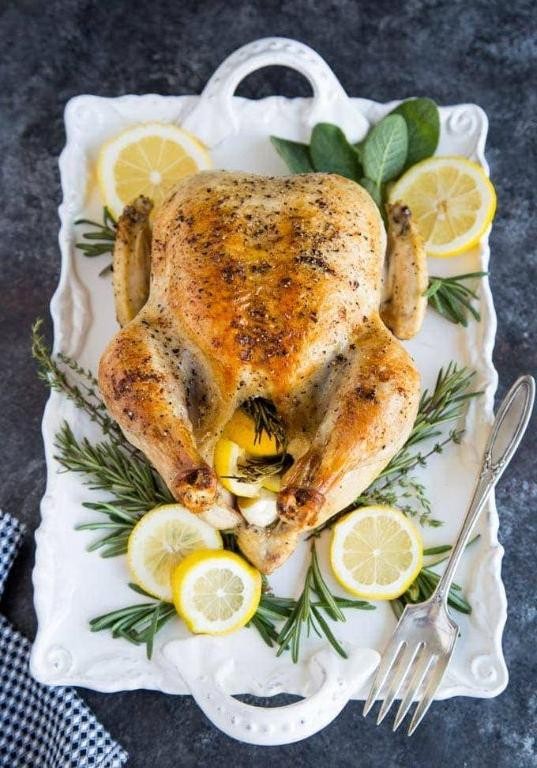
Tired of chicken dinners that taste like they were cooked by someone who thinks ‘seasoning’ means salt and existential dread? This baked chicken with lemon and rosemary is here to save your taste buds from their sad, beige existence with flavors so vibrant they’ll practically dance on your tongue.Servings3
servingsPrep time15
minutesCooking time40
minutesIngredients
- 4 bone-in, skin-on chicken thighs (approximately 2 pounds)
- 3 tablespoons extra-virgin olive oil
- 2 tablespoons freshly squeezed lemon juice
- 4 garlic cloves, thinly sliced
- 2 fresh rosemary sprigs, needles stripped
- 1 teaspoon kosher salt
- ½ teaspoon freshly cracked black pepper
- 1 lemon, sliced into ¼-inch rounds
- ¼ cup dry white wine
Instructions
- Preheat your oven to 425°F and position a rack in the center.
- Pat the chicken thighs completely dry with paper towels to ensure crispy skin.
- In a small bowl, whisk together the olive oil, lemon juice, sliced garlic, rosemary needles, kosher salt, and black pepper.
- Rub this marinade thoroughly over all surfaces of the chicken thighs, including beneath the skin.
- Arrange the chicken thighs skin-side up in a single layer in a 9×13-inch baking dish.
- Tuck the lemon slices around and underneath the chicken pieces.
- Pour the white wine into the bottom of the baking dish, avoiding the chicken skin.
- Roast for 35-40 minutes until the skin is golden brown and crispy, and the internal temperature reaches 165°F when tested with an instant-read thermometer.
- Remove from oven and let rest for 5 minutes to allow juices to redistribute.
- Transfer chicken to serving plates and spoon the pan juices over the top.
Zesty lemon cuts through the rich chicken fat while rosemary provides earthy notes that linger beautifully. The skin shatters with each bite, revealing impossibly moist meat beneath. Serve this over creamy polenta to soak up every drop of those glorious pan juices, or shred it for the most sophisticated chicken salad of your life.
Vegetable and Tofu Stir-Fry
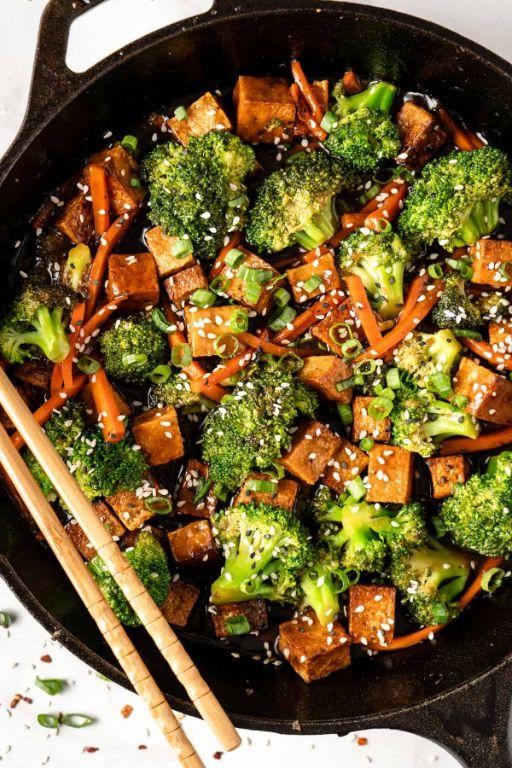
Never has a vegetable medley danced so deliciously across your taste buds! This vegetable and tofu stir-fry is the culinary equivalent of a standing ovation—packed with vibrant colors, satisfying textures, and flavors that will make your kitchen the hottest ticket in town. Get ready to wok and roll!
Servings3
servingsPrep time15
minutesCooking time15
minutesIngredients
- 1 block (14 ounces) extra-firm tofu, pressed and cubed
- 2 tablespoons toasted sesame oil
- 1 tablespoon cold-pressed avocado oil
- 3 cloves garlic, minced
- 1 tablespoon freshly grated ginger
- 1 large red bell pepper, julienned
- 1 cup broccolini florets
- 1 medium carrot, cut into thin batons
- 1/2 cup snap peas, trimmed
- 3 tablespoons tamari
- 1 tablespoon rice vinegar
- 1 teaspoon sambal oelek
- 2 teaspoons cornstarch
- 2 tablespoons filtered water
- 2 scallions, thinly sliced on the bias
- 1 tablespoon toasted sesame seeds
Instructions
- Heat a large carbon steel wok over high heat for 2 minutes until a drop of water sizzles and evaporates immediately.
- Add 1 tablespoon cold-pressed avocado oil and swirl to coat the wok surface completely.
- Arrange pressed tofu cubes in a single layer and sear for 3-4 minutes per side until golden brown and crisp-edged.
- Transfer tofu to a clean plate using a slotted spatula.
- Pour 2 tablespoons toasted sesame oil into the hot wok.
- Add 3 cloves minced garlic and 1 tablespoon freshly grated ginger, stir-frying for exactly 30 seconds until fragrant but not browned.
- Introduce 1 julienned red bell pepper, 1 cup broccolini florets, and 1 carrot cut into thin batons, tossing continuously for 2 minutes.
- Add 1/2 cup trimmed snap peas and continue stir-frying for 1 additional minute.
- Whisk together 3 tablespoons tamari, 1 tablespoon rice vinegar, and 1 teaspoon sambal oelek in a small bowl.
- Create a slurry by combining 2 teaspoons cornstarch with 2 tablespoons filtered water until smooth.
- Return seared tofu to the wok with the vegetables.
- Pour the tamari mixture over the ingredients, tossing to coat evenly.
- Drizzle the cornstarch slurry into the center of the wok while stirring constantly.
- Cook for 1-2 minutes until the sauce thickens and glazes the vegetables and tofu.
- Remove from heat and garnish with 2 thinly sliced scallions and 1 tablespoon toasted sesame seeds.
What emerges is a symphony of textures—crisp-tender vegetables playing against the satisfying chew of perfectly seared tofu, all wrapped in a glossy, umami-rich sauce that clings to every bite. Serve this vibrant masterpiece over jasmine rice for the ultimate weeknight win, or get fancy by stuffing it into lettuce cups for a low-carb crunch fest that’ll have everyone asking for an encore!
One-Pot Brown Rice and Bean Casserole

Gosh, have you ever dreamed of a meal that basically cooks itself while you kick back? This magical one-pot wonder is about to become your new best friend—it’s hearty, fuss-free, and packed with so much flavor, your taste buds might just throw a party.Servings5
servingsPrep time15
minutesCooking time55
minutesIngredients
- 1 cup long-grain brown rice, rinsed
- 2 tablespoons extra-virgin olive oil
- 1 large yellow onion, finely diced
- 3 cloves garlic, minced
- 1 (15-ounce) can black beans, drained and rinsed
- 1 (15-ounce) can fire-roasted diced tomatoes, with juices
- 2 cups vegetable broth
- 1 teaspoon smoked paprika
- 1/2 teaspoon ground cumin
- 1/4 teaspoon crushed red pepper flakes
- 1/2 cup sharp cheddar cheese, freshly grated
- 2 tablespoons fresh cilantro, chopped
- Kosher salt, to taste
- Freshly ground black pepper, to taste
Instructions
- Heat the extra-virgin olive oil in a large, oven-safe Dutch oven over medium heat until shimmering.
- Add the finely diced yellow onion and sauté, stirring occasionally, until translucent and lightly golden, about 5–7 minutes.
- Stir in the minced garlic and cook until fragrant, about 30 seconds, being careful not to let it brown.
- Tip: Toasting the rice briefly before adding liquid enhances its nutty flavor and prevents clumping.
- Add the rinsed long-grain brown rice to the pot and stir continuously for 1 minute to lightly toast.
- Pour in the vegetable broth, scraping the bottom of the pot to lift any browned bits.
- Stir in the drained and rinsed black beans, fire-roasted diced tomatoes with juices, smoked paprika, ground cumin, and crushed red pepper flakes.
- Season with kosher salt and freshly ground black pepper, then bring the mixture to a boil.
- Reduce the heat to low, cover the pot, and simmer for 45 minutes, or until the rice is tender and has absorbed most of the liquid.
- Tip: Resist the urge to peek while simmering—keeping the lid on ensures even cooking and perfect texture.
- Preheat your oven’s broiler to high (500°F) while the rice finishes cooking.
- Remove the lid and sprinkle the freshly grated sharp cheddar cheese evenly over the top.
- Transfer the Dutch oven to the oven and broil for 2–3 minutes, or until the cheese is bubbly and lightly browned.
- Tip: For extra crunch, broil until the cheese edges are golden—watch closely to avoid burning.
- Remove from the oven and let the casserole rest for 5 minutes to allow the flavors to meld.
- Garnish with the chopped fresh cilantro just before serving.
Just imagine diving into a bowl where the brown rice is perfectly chewy, the beans add creamy contrast, and the smoked paprika gives it a subtle, smoky kick. Serve it topped with a dollop of cool Greek yogurt or alongside crisp tortilla chips for scooping—it’s a cozy, customizable feast that’s as fun to eat as it is easy to make.
Spinach and Feta Stuffed Chicken Breasts
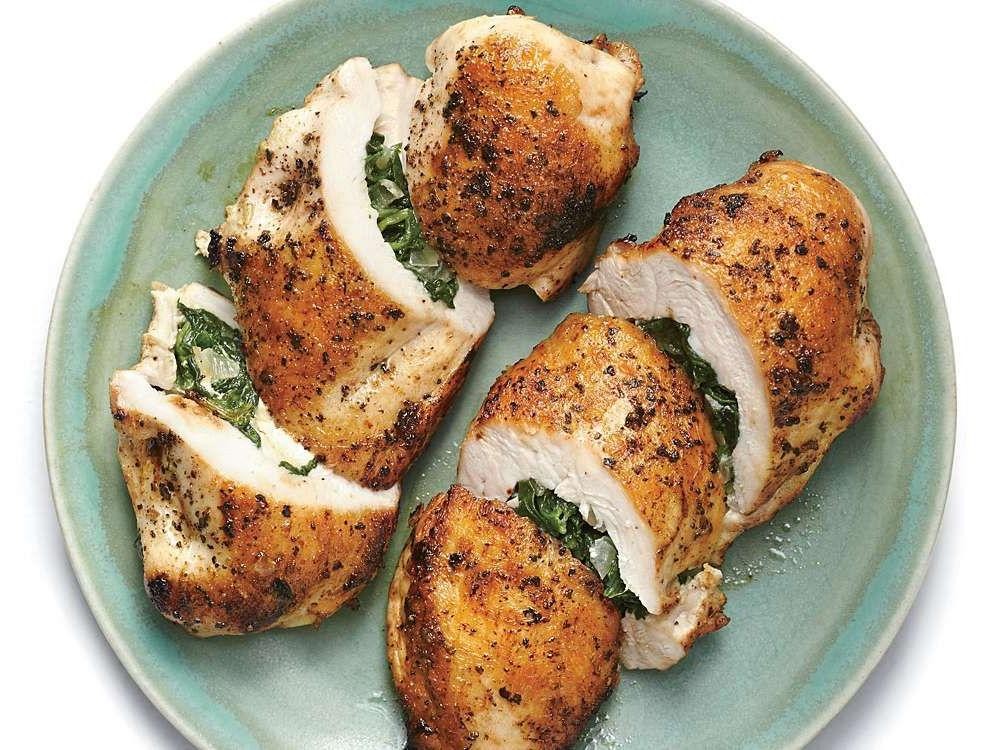
Prepare to elevate your weeknight dinner from “meh” to magnificent with these spinach and feta stuffed chicken breasts. This dish cleverly hides a vibrant, cheesy surprise inside, turning the humble chicken breast into a culinary magic trick that will have everyone at the table asking for your secrets.
Servings5
portionsPrep time15
minutesCooking time35
minutesIngredients
- 4 boneless, skinless chicken breasts (approx. 6 oz each)
- 1 tablespoon extra-virgin olive oil
- 5 oz fresh spinach leaves, thoroughly washed
- 4 oz high-quality feta cheese, crumbled
- 2 cloves garlic, minced
- 1/4 cup heavy cream
- 1/4 teaspoon freshly grated nutmeg
- 1/2 teaspoon kosher salt
- 1/4 teaspoon freshly cracked black pepper
- 1 tablespoon unsalted butter
Instructions
- Pat the chicken breasts completely dry with paper towels to ensure proper searing.
- Using a sharp paring knife, carefully create a deep horizontal pocket in each chicken breast, being careful not to cut through the sides.
- Season the interior of each pocket evenly with half of the kosher salt and black pepper.
- Heat the extra-virgin olive oil in a large oven-safe skillet over medium-high heat until it shimmers.
- Sauté the minced garlic for 45 seconds until fragrant but not browned.
- Add the fresh spinach leaves and cook for 2-3 minutes, stirring constantly, until fully wilted and any liquid has evaporated.
- Transfer the spinach mixture to a medium bowl and allow it to cool for 5 minutes.
- Combine the cooled spinach with crumbled feta cheese, heavy cream, and freshly grated nutmeg, mixing until fully incorporated.
- Divide the spinach-feta mixture into four equal portions and carefully stuff each chicken breast pocket, pressing gently to compact.
- Secure the openings of each chicken breast with 2-3 toothpicks placed at 1-inch intervals.
- Season the exterior of the chicken breasts with the remaining kosher salt and black pepper.
- In the same skillet, melt the unsalted butter over medium-high heat until foaming subsides.
- Sear the chicken breasts for 4-5 minutes per side until a deep golden-brown crust forms.
- Transfer the skillet to a preheated 375°F oven and bake for 18-20 minutes until the internal temperature reaches 165°F when measured with an instant-read thermometer.
- Remove the skillet from the oven and let the chicken rest for 5 minutes before removing toothpicks and slicing.
Delight in the perfect contrast of the crispy, golden exterior giving way to the creamy, savory filling. The feta provides a tangy punch that cuts through the richness, while the spinach adds earthy depth. Serve these beauties sliced diagonally to showcase the stunning spiral, perhaps alongside lemon-herb orzo or roasted asparagus for a complete meal that looks as impressive as it tastes.
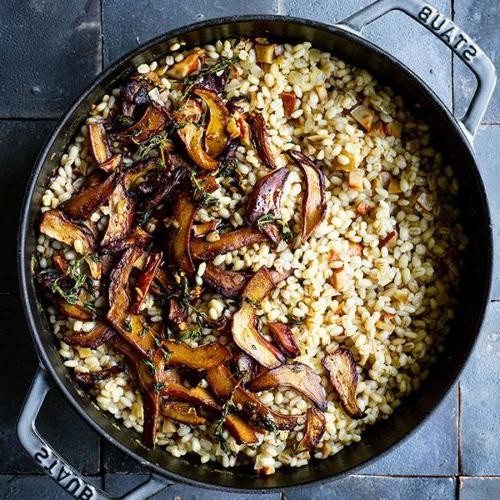
Mushroom and Barley Risotto
Aren’t you tired of risotto that demands your undivided attention like a needy houseplant? This mushroom and barley version is the low-maintenance, high-reward comfort food you’ve been dreaming of—creamy, earthy, and packed with enough umami to make your taste buds do a happy dance.Servings4
servingsPrep time15
minutesCooking time50
minutesIngredients
- 1 cup pearl barley, rinsed
- 4 cups rich mushroom stock, kept at a simmer
- 2 tablespoons clarified butter
- 1 large shallot, finely minced
- 3 cloves garlic, thinly sliced
- 12 ounces mixed wild mushrooms (such as cremini, shiitake, and oyster), cleaned and sliced
- 1/2 cup dry white wine
- 1/2 cup freshly grated Parmigiano-Reggiano
- 2 tablespoons unsalted butter, chilled and cubed
- 2 tablespoons fresh flat-leaf parsley, finely chopped
- Kosher salt and freshly cracked black pepper
Instructions
- Heat clarified butter in a heavy-bottomed Dutch oven over medium heat until shimmering.
- Sauté minced shallot for 3–4 minutes until translucent and fragrant.
- Add sliced garlic and cook for 1 minute until aromatic but not browned.
- Stir in rinsed pearl barley, toasting for 2 minutes until lightly golden and nutty-smelling.
- Deglaze with dry white wine, scraping up any browned bits from the pot bottom.
- Simmer until wine is nearly fully absorbed, about 2 minutes.
- Add 1 cup of simmering mushroom stock, stirring continuously until liquid is absorbed.
- Repeat adding stock in 1/2-cup increments, stirring constantly until each addition is absorbed before adding the next.
- Continue this process for 35–40 minutes until barley is tender but retains a slight chew.
- While barley cooks, heat a separate skillet over high heat with 1 tablespoon olive oil.
- Sear sliced wild mushrooms in a single layer for 4–5 minutes until deeply browned and crispy-edged.
- Season mushrooms generously with kosher salt and black pepper halfway through cooking.
- Fold seared mushrooms into the cooked barley risotto off the heat.
- Stir in grated Parmigiano-Reggiano until melted and creamy.
- Finish by vigorously stirring in chilled butter cubes until emulsified into a glossy sauce.
- Fold in chopped parsley and adjust seasoning with salt and pepper if needed.
Get ready for a textural masterpiece—the barley offers a delightful chew against the silky, cheese-enriched sauce, while those seared mushrooms provide earthy depth and crispy contrast. Serve it topped with extra Parmigiano and a drizzle of truffle oil for a restaurant-worthy weeknight upgrade that’ll have you forgetting traditional risotto ever existed.
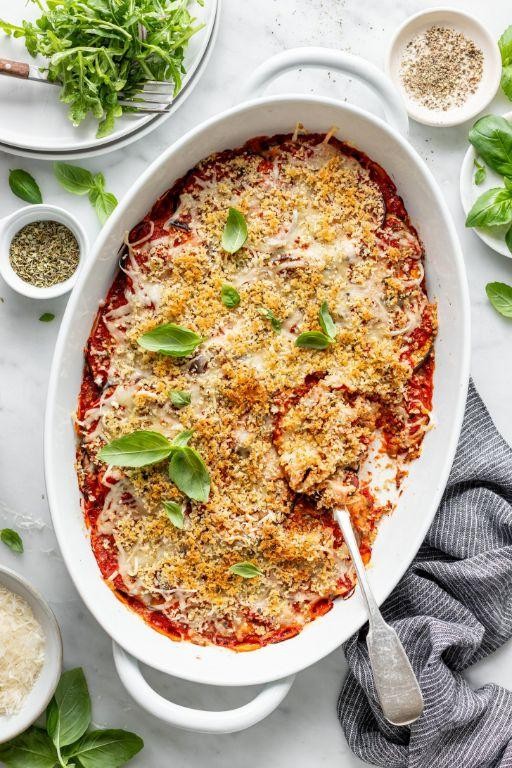
Eggplant Parmesan Casserole
Kick that sad desk lunch to the curb, because we’re diving fork-first into a cheesy, saucy, soul-warming hug of a dish that’ll make your taste buds do a happy dance. This isn’t your nonna’s labor-of-love project; it’s a streamlined, weeknight-friendly marvel that delivers all the cozy comfort with a fraction of the fuss.Servings6
servingsPrep time25
minutesCooking time60
minutesIngredients
- 2 large globe eggplants (about 2 lbs total), sliced into 1/2-inch rounds
- 1/4 cup extra-virgin olive oil
- 1 tsp fine sea salt, divided
- 1/2 tsp freshly cracked black pepper
- 24 oz high-quality marinara sauce
- 8 oz fresh mozzarella cheese, torn into rough chunks
- 1/2 cup freshly grated Parmigiano-Reggiano cheese
- 1/4 cup panko breadcrumbs
- 1 tbsp unsalted butter, melted
- 1/4 cup loosely packed fresh basil leaves, chiffonaded
Instructions
- Preheat your oven to 425°F and arrange the oven racks in the upper and lower thirds.
- Arrange the eggplant rounds in a single layer on two parchment-lined baking sheets.
- Brush both sides of each eggplant round generously with the extra-virgin olive oil.
- Season the eggplant evenly on both sides with 3/4 teaspoon of the fine sea salt and all of the freshly cracked black pepper.
- Roast the eggplant for 20-25 minutes, swapping the baking sheets between racks halfway through, until the slices are golden brown and tender.
- Reduce the oven temperature to 375°F and lightly grease a 9×13-inch baking dish.
- Spread 1/2 cup of the marinara sauce in a thin, even layer across the bottom of the prepared baking dish.
- Arrange half of the roasted eggplant slices in a single, slightly overlapping layer over the sauce.
- Top this eggplant layer with half of the remaining marinara sauce, spreading it evenly with the back of a spoon.
- Scatter half of the torn fresh mozzarella and half of the grated Parmigiano-Reggiano over the sauce.
- Repeat the layering process with the remaining roasted eggplant, marinara sauce, and cheeses.
- In a small bowl, combine the panko breadcrumbs, melted unsalted butter, and the remaining 1/4 teaspoon of fine sea salt, mixing with a fork until the crumbs are evenly moistened.
- Sprinkle the buttered panko mixture evenly over the top cheese layer.
- Place the casserole dish on a baking sheet to catch any potential drips and bake at 375°F for 30-35 minutes, until the top is deeply golden and the sauce is bubbling vigorously around the edges.
- Let the casserole rest on a wire cooling rack for 15 minutes to allow the layers to set properly for cleaner slicing.
- Just before serving, garnish the top evenly with the chiffonaded fresh basil leaves.
Let this glorious, bubbling dish rest—it’s the secret to achieving those picture-perfect slices instead of a cheesy landslide. The final texture is a sublime contrast: a crisp, golden panko crust gives way to molten, stretchy cheese and tender, almost silky eggplant, all embraced by a robust, herby tomato sauce. Serve it over a bed of creamy polenta for ultimate comfort, or slice it thick and tuck it into a crusty loaf of bread for the world’s most epic vegetarian sandwich.
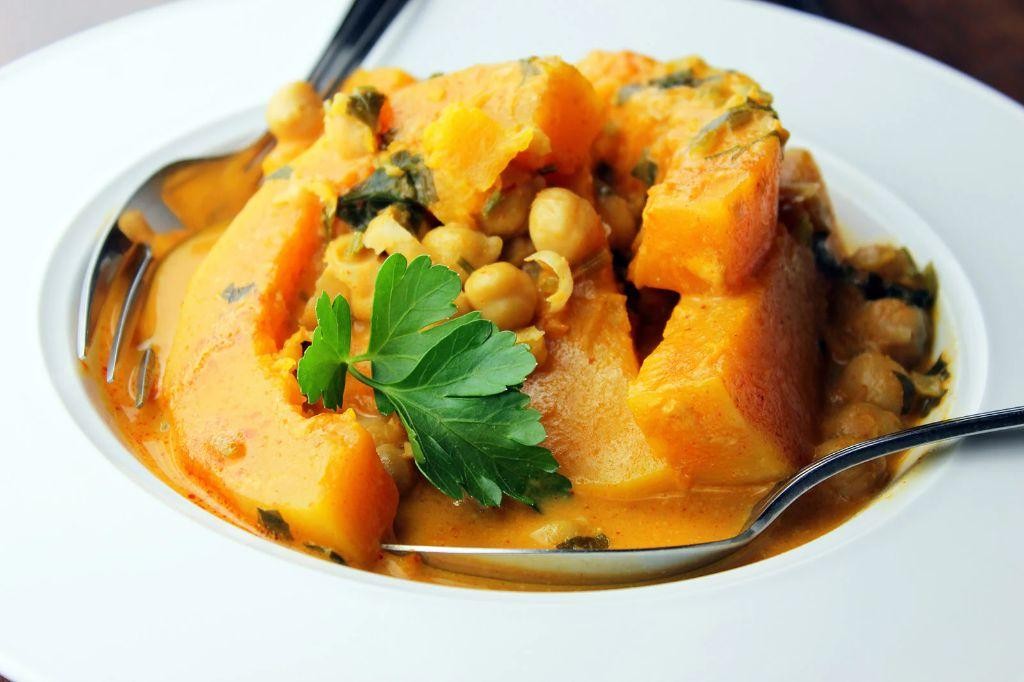
Butternut Squash and Quinoa Curry
Dare we say it’s time to ditch those boring weeknight dinners? This butternut squash and quinoa curry is about to become your new culinary crush—a vibrant, soul-warming bowl of cozy that’ll make your taste buds do a happy dance while pretending you’re actually adulting.Servings5
servingsPrep time20
minutesCooking time35
minutesIngredients
– 2 tablespoons virgin coconut oil
– 1 large yellow onion, finely diced
– 3 garlic cloves, minced
– 1 tablespoon freshly grated ginger
– 2 tablespoons red curry paste
– 1 medium butternut squash, peeled and cubed into 1-inch pieces
– 1 cup quinoa, rinsed thoroughly
– 1 (13.5-ounce) can full-fat coconut milk
– 2 cups vegetable broth
– 1 tablespoon fresh lime juice
– 1/4 cup chopped cilantro
– 1/4 cup toasted pepitasInstructions
1. Heat virgin coconut oil in a large Dutch oven over medium heat until shimmering.
2. Add finely diced yellow onion and sauté for 5-7 minutes until translucent and fragrant.
3. Stir in minced garlic and freshly grated ginger, cooking for 60 seconds until aromatic.
4. Incorporate red curry paste, toasting for 2 minutes while stirring constantly to deepen flavors.
5. Add cubed butternut squash, tossing to coat evenly with the spice mixture.
6. Pour in rinsed quinoa, ensuring grains are distributed throughout the squash.
7. Add full-fat coconut milk and vegetable broth, bringing mixture to a gentle boil.
8. Reduce heat to low, cover, and simmer for 20 minutes until quinoa has absorbed liquid and squash is fork-tender.
9. Remove from heat and let rest, covered, for 5 minutes to allow flavors to meld.
10. Drizzle with fresh lime juice and fluff gently with a fork.
11. Garnish with chopped cilantro and toasted pepitas before serving.Expect a delightful textural symphony where creamy squash melts into fluffy quinoa, all wrapped in a coconut curry that’s just spicy enough to keep things interesting. Serve it in shallow bowls with extra pepitas for crunch, or be extra and stuff it into warm pita pockets for a curry-spiked lunch upgrade that’ll make your coworkers genuinely jealous.
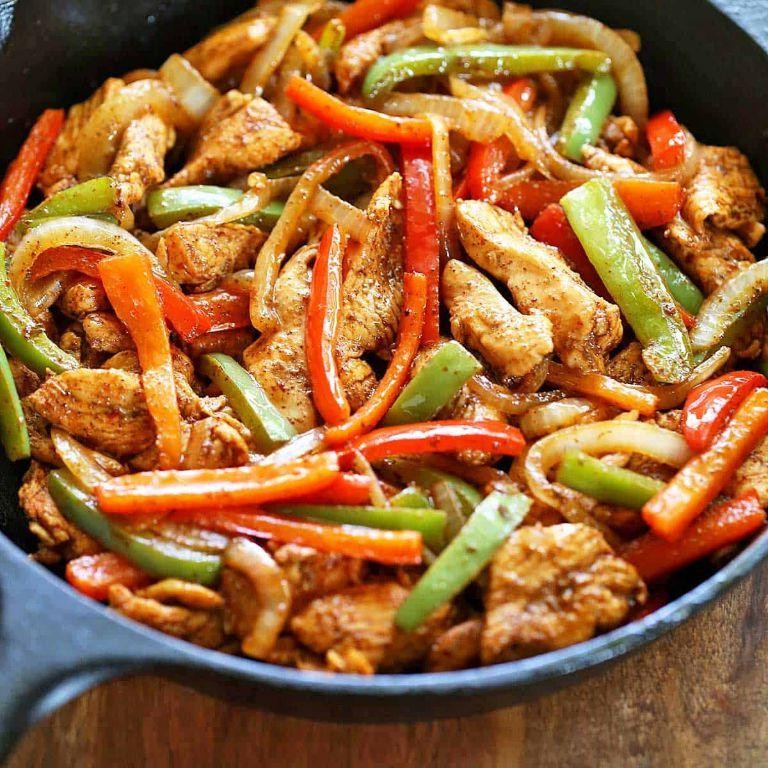
Healthy Chicken Fajitas
Oh, the humble fajita—forever trapped between Taco Tuesday and your New Year’s resolutions. But fear not, flavor-seekers! These healthy chicken fajitas are here to rescue your taste buds from blandness without derailing your wellness goals, proving that eating well doesn’t mean sacrificing fun.Servings8
servingsPrep time20
minutesCooking time20
minutesIngredients
– 1.5 lbs boneless, skinless chicken breasts, sliced into ½-inch strips
– 3 large bell peppers (red, yellow, orange), julienned
– 1 large yellow onion, thinly sliced
– 3 tbsp avocado oil, divided
– 2 tbsp fresh lime juice
– 2 tsp chili powder
– 1.5 tsp ground cumin
– 1 tsp smoked paprika
– ¾ tsp garlic powder
– ½ tsp dried oregano
– ¼ tsp cayenne pepper
– 8 whole-grain tortillas
– ½ cup fresh cilantro leaves, roughly chopped
– 1 ripe avocado, slicedInstructions
1. In a medium bowl, whisk together 2 tablespoons avocado oil, lime juice, chili powder, cumin, smoked paprika, garlic powder, oregano, and cayenne pepper until fully emulsified.
2. Add chicken strips to the marinade, tossing thoroughly to coat each piece, then refrigerate for exactly 30 minutes—this brief marination maximizes flavor penetration without toughening the protein.
3. Heat remaining 1 tablespoon avocado oil in a large cast-iron skillet over medium-high heat until shimmering but not smoking, about 2 minutes.
4. Add marinated chicken in a single layer, cooking undisturbed for 4 minutes to develop a golden-brown sear.
5. Flip chicken strips using tongs and cook for another 3-4 minutes until internal temperature reaches 165°F on an instant-read thermometer.
6. Transfer chicken to a clean plate, tent loosely with foil to retain moisture.
7. Add bell peppers and onion to the same skillet, sautéing for 6-8 minutes while stirring frequently until vegetables are tender-crisp with lightly charred edges.
8. Return chicken to skillet, tossing with vegetables for 1 minute to reheat and combine flavors.
9. Warm tortillas in a dry skillet over medium heat for 30 seconds per side until pliable and lightly toasted.
10. Arrange chicken-vegetable mixture down the center of each tortilla, topping with cilantro and avocado slices.Perfectly balanced between smoky spice and bright freshness, these fajitas deliver satisfying crunch from the peppers against the juicy chicken’s tender bite. For a next-level presentation, serve them deconstructed in the sizzling skillet with warm tortillas stacked alongside—letting guests build their own masterpieces while enjoying the dramatic aroma.
Broccoli and Cheddar Stuffed Potatoes

Naturally, we’ve all faced that moment when a plain baked potato just won’t cut it—enter these broccoli and cheddar stuffed potatoes, your ticket from sad spud to glorious, cheesy comfort food that basically hugs you from the inside out. Think fluffy potato clouds mingling with vibrant broccoli and that irresistible cheddar pull, all baked to golden perfection. It’s the kind of dish that makes you wonder why you ever settled for less.Servings5
portionsPrep time20
minutesCooking time78
minutesIngredients
– 4 large russet potatoes, scrubbed and patted dry
– 2 cups fresh broccoli florets, finely chopped
– 1 ½ cups sharp white cheddar cheese, freshly grated
– ½ cup heavy cream, warmed to 110°F
– ¼ cup unsalted European-style butter, softened
– 1 teaspoon Diamond Crystal kosher salt
– ½ teaspoon freshly cracked black pepper
– ¼ teaspoon smoked paprika
– 2 tablespoons extra-virgin olive oilInstructions
1. Preheat your oven to 400°F and line a baking sheet with parchment paper.
2. Rub each russet potato thoroughly with extra-virgin olive oil and place them directly on the oven rack.
3. Bake the potatoes for 55–60 minutes, until the skins are crisp and a paring knife inserts easily into the center.
4. Transfer the baked potatoes to a wire rack and let them cool for 10 minutes, or until just cool enough to handle.
5. Slice each potato in half lengthwise and carefully scoop the flesh into a medium bowl, leaving a ¼-inch border intact to maintain structure.
6. Steam the finely chopped broccoli florets over boiling water for 4–5 minutes, until bright green and tender-crisp.
7. Add the steamed broccoli, freshly grated sharp white cheddar cheese, warmed heavy cream, softened unsalted European-style butter, Diamond Crystal kosher salt, freshly cracked black pepper, and smoked paprika to the potato flesh.
8. Gently fold the mixture with a spatula until just combined, being careful not to overmix to avoid a gummy texture.
9. Divide the filling evenly among the potato shells, mounding it slightly in the center.
10. Return the stuffed potatoes to the baking sheet and bake at 375°F for 15–18 minutes, until the tops are golden and the cheese is bubbly.
11. Let the potatoes rest for 3–4 minutes before serving to allow the filling to set.Outrageously creamy and satisfying, these potatoes boast a fluffy interior with pops of tender broccoli and that signature cheddar sharpness. For a next-level twist, top them with crispy fried shallots or a drizzle of truffle oil right before serving—because why should Tuesday dinner feel any less fancy?
Black Bean and Vegetable Chili
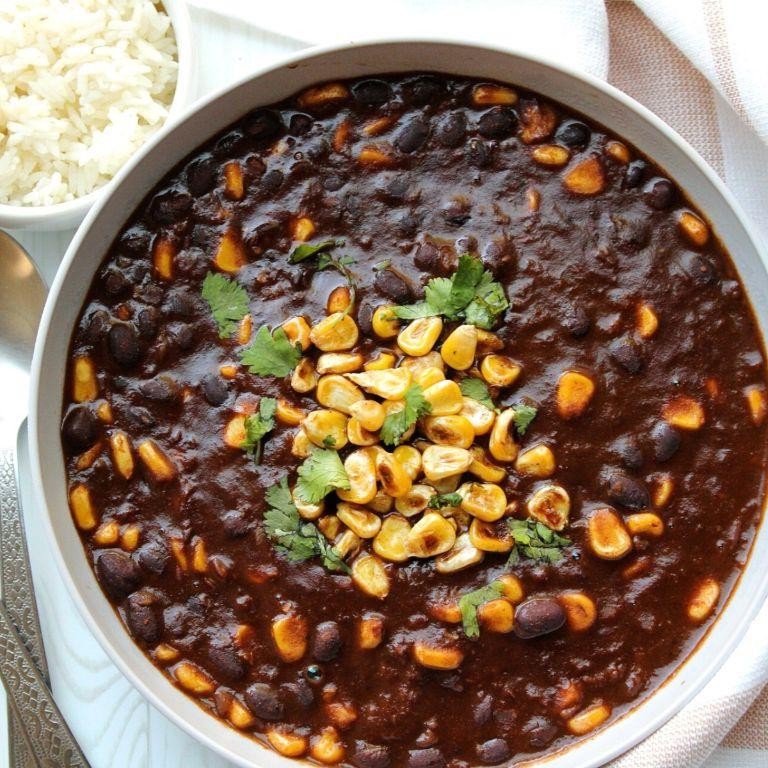
Mmm, nothing says “I’m an adult who has my life together” quite like pretending a giant pot of beans and veggies counts as gourmet cooking—welcome to the culinary equivalent of wearing sweatpants to a fancy party, but somehow pulling it off with panache. This black bean and vegetable chili is the cozy, one-pot wonder that’ll have you feeling like a kitchen wizard without the stress of, you know, actually following complicated rules. It’s hearty, forgiving, and packed with enough flavor to make even your pickiest friend forget they’re eating something vaguely healthy.Servings2
servingsPrep time20
minutesCooking time40
minutesIngredients
– 2 tablespoons extra-virgin olive oil
– 1 large yellow onion, finely diced
– 3 cloves garlic, minced
– 1 red bell pepper, seeded and diced into ½-inch pieces
– 1 jalapeño pepper, seeded and minced
– 2 tablespoons chili powder
– 1 teaspoon ground cumin
– 1 teaspoon smoked paprika
– 1 (28-ounce) can crushed tomatoes
– 3 cups cooked black beans, rinsed
– 1 cup vegetable broth
– 1 teaspoon fine sea salt
– ½ teaspoon freshly ground black pepper
– ¼ cup fresh cilantro, choppedInstructions
1. Heat the extra-virgin olive oil in a large Dutch oven over medium heat until it shimmers.
2. Add the finely diced yellow onion and sauté for 5–7 minutes, until translucent and fragrant.
3. Stir in the minced garlic and cook for 1 minute, until aromatic but not browned.
4. Incorporate the diced red bell pepper and minced jalapeño, cooking for 4–5 minutes until slightly softened.
5. Sprinkle in the chili powder, ground cumin, and smoked paprika, toasting the spices for 1 minute to deepen their flavor.
6. Pour in the crushed tomatoes, using a wooden spoon to scrape any browned bits from the bottom of the pot.
7. Add the rinsed black beans and vegetable broth, stirring to combine all ingredients evenly.
8. Season with fine sea salt and freshly ground black pepper, then bring the mixture to a gentle boil.
9. Reduce the heat to low, cover the pot, and simmer for 25–30 minutes, until the vegetables are tender and the chili has thickened slightly.
10. Stir in the chopped fresh cilantro just before serving to preserve its bright, herbaceous notes.Oh, the glory of this chili—its velvety texture hugs each spoonful, while the smoky paprika and subtle heat from the jalapeño create a dance of flavors that’s bold without being overwhelming. Serve it over a bed of fluffy quinoa for a protein-packed twist, or crown it with a dollop of tangy Greek yogurt and a squeeze of lime to cut through the richness. Honestly, it’s the kind of dish that makes leftovers something to genuinely look forward to.
Conclusion
Cooking nourishing meals during pregnancy has never been easier with these 25 delicious dinner recipes. We hope this collection inspires you to create healthy, satisfying meals that support you and your growing baby. Try out your favorites, leave a comment sharing which recipes you loved most, and don’t forget to pin this article on Pinterest to save for later!


